Element EACF05000W User manual

CHEST FREEZER
INSTRUCTION MANUAL
Model No.: EACF05000W
EACF07000W
EACF09000W
EACF14100W

Main Technical Parameters
Model
14cf chest freezer
Door color
WHITE
Effective volume (fridge/freezer/variable
temperature chamber temperature)
(cu.ft.)
14.1
Climate type
T
Rated voltage/frequency (V/Hz)
115V/60Hz
Rated current (A)
1.49
Power consumption (kw.h /24h)
0.786
Total power input of defrost (W)
80
Fridge lamp (W)
Cooling capacity (Kg/24h)
/
Refrigerant(R600a)
100g
Deodorizing method
Energy consumption level
DOE
Noise level(dB)
44
Anti-shock category
I
Dimensions
(depth * width * height) (inches)
28.74×53.74×32.87
Weight(Kg)
54
Compressor type
UKX65YTL
Ⅰ.General description of chest freezers

Ⅱ.Product parts lists and explosive views
14cf chest freezer
NO.
NAME
R3
PART CODE
QUANTITY
1
Door
890214374
GE1814.20.1
1
2
Gasket
890254358
GC1908.20-1
1
3
Hinge set
890210768
GC1811.1.2
2
4
Compressor room cover
890039294
G1008.1-1
1
5
Compressor Traverse
890056456
G1111.1.3
1
6
Fixed caster
890037860
G1002.1.3
2
7
Wheel
890037858
G1002.1.2
2
8
Hole cover
890037430
G1001.1.1.3-6
1
9
Pipe cover
890165810
G1001.1.1.3-5(A4)
1
10
indicate light
890045110
G1001.4.1-3/LG
1
11
indicate light
890045110
G1001.4.1-3/LG
1
12
Thermostat cover
890226945
GC1311.4.1-2(MA1)
1
13
Thermostat
890141511
G1009.4-1/DU
1
14
Thermostat box
890251393
GC1311-TA01(001ae)
1
15
Thermostat wire
890141511
G1009.4-1/DU
1
16
Thermostat knob
890096024
GC1311.4.1-3
1
17
Filter
890053805
Q/MLKT-239
1
18
Connecting pipe
890051066
G1001.1-5(A1)
1
19
Connecting pipe
890053904
Q/MLKT-240
1
20
Compressor
890249172
UKX65YTL_SF
1
21
Plug
890205938
Q/MLKT-138B/H2.CE4B.T4AC
1
22
Basket
890039257
G1008.5-2
1
23
ICE SCRAPER
890166000
BCD-185E.5-7(A1)
1

I. Cooling system
1.Schematic diagram

2. Cooling control rules
1) The compressor is controlled by the thermostat to be switched on/off.
2) The chest freezer internal temperature is detected by the temperature induced tube, based on which
the compressor is controlled to be switched on/off, thus maintaining the temperature within the normal
operating temperature range.
Chart a
14.69PSI
°F
Forcefully
disconnected
-9.4
-25.6
-0.4
-14.8
(WPF32)
Atmospheric pressure
Unit
ON
OFF
ON
OFF
ON
OFF
Warm
Cold
normal
Chart b
14.69PSI
°F
Forcefully
disconnected
-5.8
-22
3.2
-11.2
(WPF30)
Atmospheric pressure
Unit
ON
OFF
ON
OFF
ON
OFF
Warm
Cold
normal
Chart c
14.69PSI
°F
Forcefully
disconnected
-14.8
-25.6
-4
-14.8
(WPF32)
Atmospheric pressure
Unit
ON
OFF
ON
OFF
ON
OFF
Warm
Cold
normal
Chart d
14.69PSI
°F
Forcefully
disconnected
-2.2
-18.4
-6.8
-7.6
(WPF28)
Atmospheric pressure
Unit
ON
OFF
ON
OFF
ON
OFF
Warm
Cold
normal
Chart e
14.69PSI
°F
Fast-freeze
Below -29.2
-5.8
-22
3.2
-11.2
(WPF30)
Atmospheric pressure
Unit
ON
OFF
ON
OFF
ON
OFF
Warm
Cold
normal
Chart f
14.69PSI
°F
-9.4
-25.6
-2.2
-16.6
(WPF32)
Atmospheric pressure
Unit
ON
OFF
ON
OFF
ON
OFF
Warm
Cold
normal

II. Control System
1.Schematic diagram
2.Components control rules
1) Compressor
⚫Make sure to wait for at least 5 minutes before you energize again the compressor that gets switched off.
⚫The compressor will get switched on when the fridge temperature rises to the turn-on temperature (TON).
⚫When the fridge temperature reaches the turn-off temperature (Toff), the compressor will get switched off.
III. Product operation instructions
1. Temperature setting modes
“OFF”:Forced Shutdown Point
1—5:Frozen Interval (from -12 ℃ to -26 ℃)
2. Operation specifications
1) Knob adjust angle:0°~300°。
2) The larger the temperature mode digit, the lower the cooling temperature.
3) The knob set resolution should not be less than 0.2℃.
4) The knob adjust angle is linear to the setting value.
5) OPERATING YOUR APPLIANCE
Temperature control panels

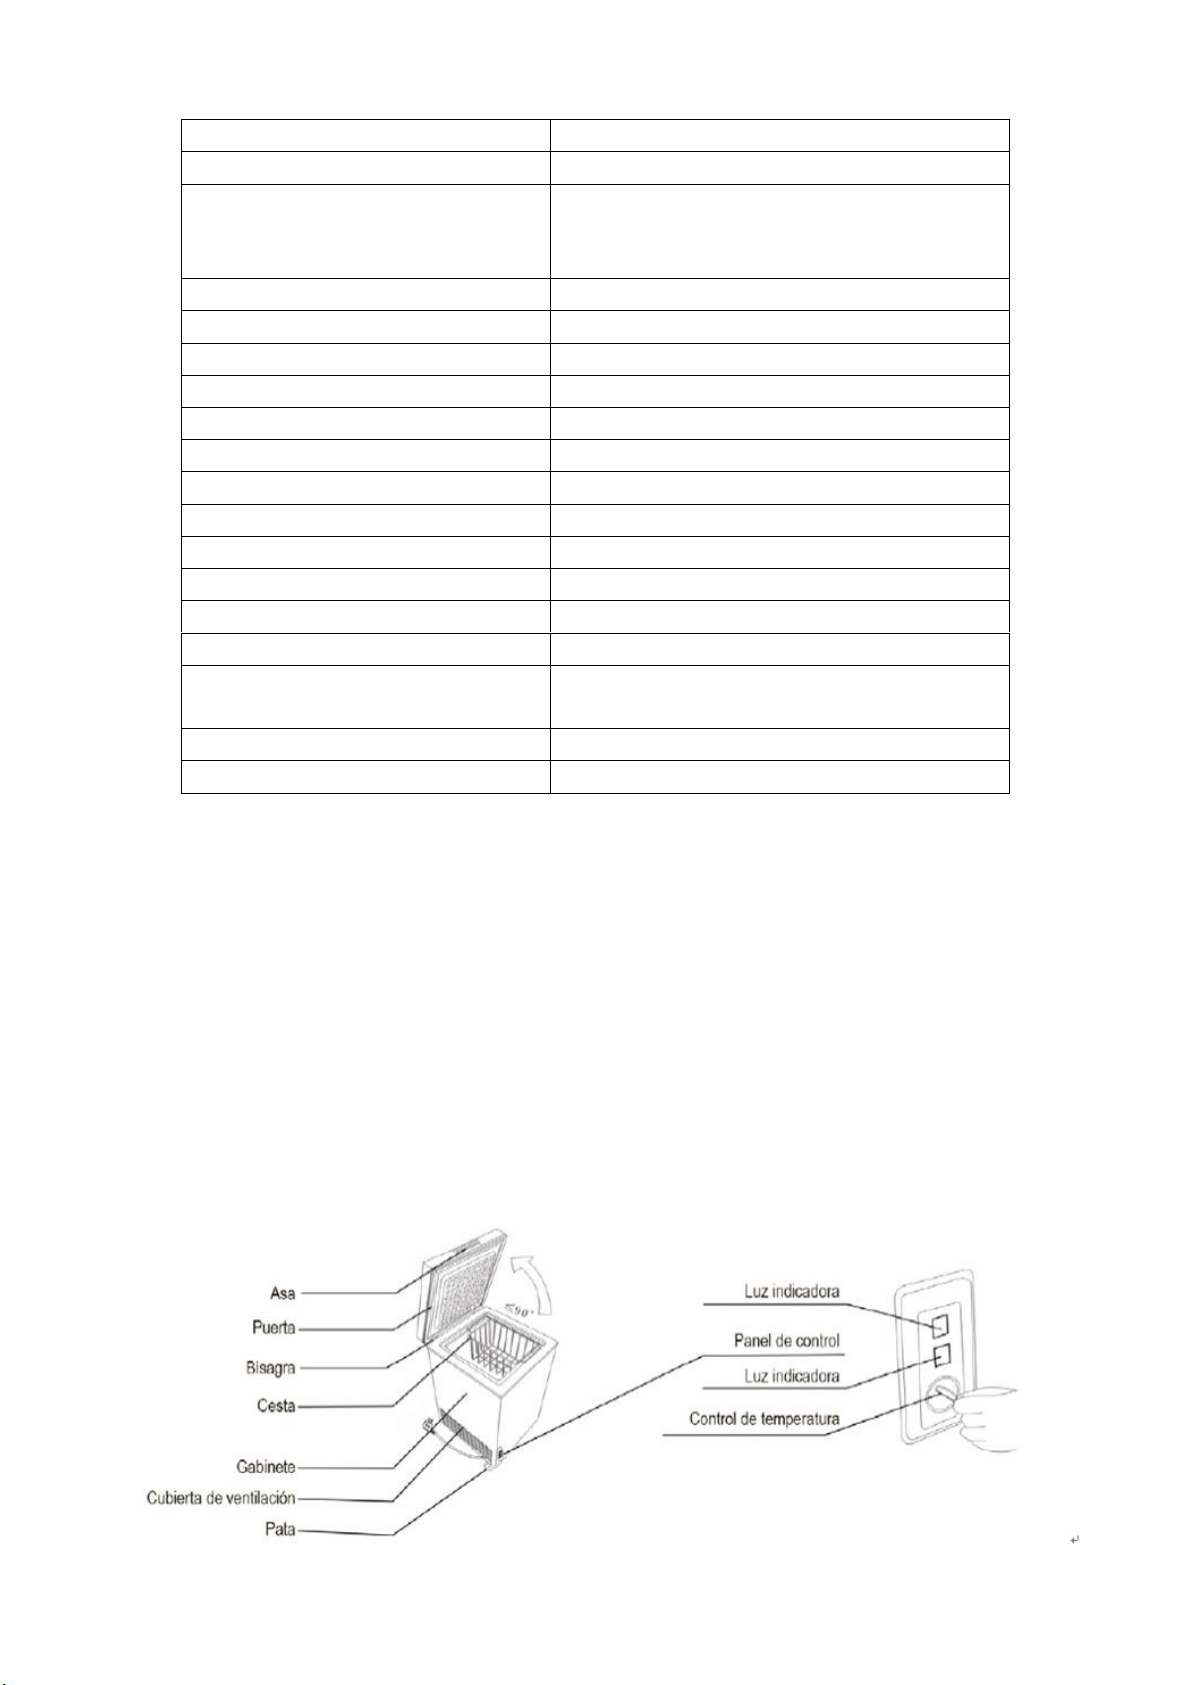
3. Setting the temperature control
•Your freezer hasone control for regulating the temperature. The temperature control is located on the bottom
of the freezer compartment.
•The temperature control in the freezer will control the actual cooling cycle . The achieved temperatures can
vary according to the conditions of use of the appliance, such as: place of the appliance, ambient temperature,
and frequency of lid opening, extent of filling with food of the freezer. The position of the thermostat knob
will change according to these factors. Normally, for an ambient temperature of approx. 25℃, the thermostat
should be adjusted to the mild position.
•The first time you turn the unit on, adjust the temperature control knob to “4 ON THE RIGHT SIDE” in the
freezer compartment and run for at least 4 hours before placing foods inside. This will ensure the freezer
cabinet is thoroughly chilled before food is placed. Then return selector to “MIDDLE” or “RECOMMENDED”
position in the freezer compartment.
•Adjust the temperature control to the setting that best suits your needs.
•If you at any time want to distribute a larger amount of cold air to the freezer, for example a large amount of
food has been added to the freezer, simply move the controller to the “4 ON THE RIGHT” position until the
desired temperature has been attained then return the controller to the “MIDDLE” or “RECOMMENDED”
position.
NOTE:
•IF THE UNIT IS UNPLUGGED, HAS LOST POWER, OR IS TURNED OFF, YOU MUST WAIT 3 TO 5 MINUTES BEFORE
RESTARTING THE UNIT. IF YOU ATTEMPT TO RESTART BEFORE THIS TIME DELAY, THE REFRIGERATOR-FREEZER
WILL NOT START.
•NOTE:
•WE DO NOT RECOMMEND THE INSTALLATION OF THE FREEZER WHERE THE TEMPERATURE WILL DROP
BELOW 50ºF (13ºC) OR RISE ABOVE 110ºF (43ºC). THE COMPRESSOR WILL NOT BE ABLE TO MAINTAIN
PROPER TEMPERATURES INSIDE THE FREEZER.
•FOR INSTALLATIONS WHERE THE TEMPERATURES WILL DROP BELOW 50º SET THE FREEZER TEMPERATURE
CONTROL TO THE “COLDEST” SETTING. THIS WILL IMPROVE THE OPERATIONS OF THE FREEZER UNDER
THESE CONDITIONS.
4、DEFROSTING
Defrost twice a year or when a frost layer of around 7 mm (1/4”) has formed.
Alternatively you may switch off the freezer at the socket outlet and pull out the mains plug.
Extract the water conduit and put in a water container.
6 hours before the defrosting, please set the thermostat knob at “MAX” position to make sure the food
is at the lowest temperature when you get it out. All food should be wrapped in several layers of
newspaper and stored in a cool place (e.g. fridge or larder).
Remove the freezer basket. Leave the lid open. Containers of warm water may be placed carefully in the
freezer to speed up the defrosting.
Never use hairdryers, electrical heaters or other such electrical appliances for defrosting. When
defrosting has finished flow out defrost water which collects at the bottom of the freezer as the below
diagram and dry the interior thoroughly. Switch on the Fast Freeze and leave it on for about three
hours.
1. There is a water conduit at the bottom of the freezer, when defrosting, extract the rubber cover,
defrosted water will drip into the hole and flow out. (NOTES: PLEASE KEEP THE RUBBER COVER
WELL DURING THE DEFROSTING AND PUT IT BACK AFTER DEFROSTING IS DONE )
2. Extract the water conduit by 20-25mm until the water hole can be seen.

3. Twist the water conduit until the arrow points downward.
After defrosting is done, make sure there is no more water coming out before out the water conduit in
place and make the arrow point upward.
5.Device operation rules
5.1 Compressor
5.1.1 Compressor will not be started again until five minutes after it is shut down.
IV. Repair guide
Steps to change the door:
Open the door, remove the upper and lower hinge covers on the left and right sides.
Close the door, use a screwdriver or other tool to screw off the lower screws of the hinge, then remove
the upper screws of the hinge, and replace the door with a new one.
Retighten the hinge screws, , and install the upper and lower hinge covers.

1. Replacing the thermostat, thermostat box, and indicator light, etc.
Screw off the ventilating hood screws, remove the upper screws of the thermostat box cover, then
remove the lower screws of the thermostat box cover, and unplug the lamp wire terminal.
Press the buckle on the left side of the thermostat box using the thumb to remove the thermostat box,
use the tool to push out the temperature control knob, remove the thermostat fixing nut, and replace
the indicator light, thermostat, and thermostat box, etc.
Install the temperature control knob, fix the thermostat box, and fix the thermostat cover.
Note: Make sure the thermostat box and the buckle on the underside of the box cover are fixed into
position.
Fix the upper and lower screws of the cover, connect the wiring terminal; make sure to fix the buckle on

the upper side of the hood into the hole on the cabinet shell, and finally fix the four screws of the hood.
2. Changing the door gasket
Tear off the door gasket corner from one side, remove the door gasket in the desired direction, and
replace it with a new one, paying attention that the side with hole should be placed at the lower side;
finally, squeeze the gasket with hand to ensure that all are installed in place.
V. Common faults analysis
1. Troubleshooting
⚫ If the compressor does not work but the light is working normally, please check whether the power cord
(or the compressor connecting wire) is well connected.
⚫ If the refrigerator circuit is normal, please check the resistance of the thermostat.
2. Running check
⚫ Close the door after it runs for 30 minutes, if the freezer compartment temperature drops significantly, it
indicates the refrigerator system is working properly. After running a period of time, the freezer thermostat
will automatically set temperature within the startup range.
⚫ The marks on the temperature control knob indicate the temperature level, rather than the exact
temperature. “Off” stands for “ Power Off” and “5’ stands for the minimum temperature
Other manuals for EACF05000W
2
This manual suits for next models
3
Table of contents
Other Element Freezer manuals

Element
Element EUF14CEBW User manual

Element
Element ECF50MD1BW User manual

Element
Element ERBM19CBS User manual

Element
Element EACF05000W User manual

Element
Element EACF05000W User manual

Element
Element ENR18TFGBW User manual

Element
Element EUF17CEBW User manual

Element
Element EAUF14000W User manual

Element
Element EUF17CDBW User manual