manuals.online logo
Brands
  1. Home
  2. •
  3. Brands
  4. •
  5. Element
  6. •
  7. LCD TV
  8. •
  9. Element E4SFT5517 User manual

Element E4SFT5517 User manual

INSTRUCTION MANUAL
Pleaseread all theinstructionscarefullybeforeusingthisTV,
andkeepthemanualforfuturereference.
LCD TV
E4SFT5517
Please referto theactual product
1
CONTENTS
ImportantSafetyInstructions2
Additional SafetyInformation 3
Preparations 4
What'sIncluded 4
FrontView5
RearView6
WallMounting 6
RemoteControl7
Connecting External Devices 8
TVSETUP 9
Turning On/OffYourTV9
InitialSetup 9
Source 11
ChannelSelection 11
V
Current ChannelInformation
olumeAdjustment and Mute Setup11
Picture 12
Sound 14
Function 15
Time 17
Option 18
Lock 19
Channel20
NetworkSetting
INTERNET25
22
ParentalControl29
Troubleshooting 31
FCC Notes 34
OTT APPService35
2
IMPORTANTSAFETYINSTRUCTIONS
Readthese instructions Allthe safety
and operating instructionsshouldbe read
before this product isoperated.
Keeptheseinstructions The safety
and operating instructionsshouldbe
retained forfuture reference.
Heedallwarnings Allwarningson
the applianceand inthe operating
instructionsshould beadhered to.
Follow allinstructions All operating
and use instructionsshouldbe followed.
Donotuse this apparatusnear water
The applianceshouldnot beusednear
waterormoisture forexample, inawet
basementornearaswimming pool,and
the like.
•Cleanonlywithdrycloth.
Do not block anyventilation openings.
Installinaccordancewith the
manufacturer’sinstructions.
Donot installnearanyheat sourcessuch
asradiators,heatregisters,stoves,or
otherapparatus(including that
produce heat.
Do not defeat the safetypurposeof
thepolarized orgrounding-typeplug. A
polarizedplughastwobladeswithone
widerthantheother.Agrounding-type
plughastwo bladesanda third grounding
prong. Thewideblade orthe third
prong areprovided foryoursafety.If the
provided plugdoesnot into youroutlet,
consultanelectrician forreplacement of
the obsolete outlet.
•Protectthe powercordfrom being walked
onorpinchedparticularly atplugs,
conveniencereceptacles,and thepoint
where theyexit from theapparatus.
•Onlyuseattachments/accessories
bythe manufacturer.
•Use only withthe cart, stand,tripod,
bracket,ortablespecified bythe
manufacturer,orsoldwith the apparatus.
Whenacartis used,usecaution when
moving the cart/apparatuscombination to
avoid injuryfrom tip-over.
•Unplugthis apparatusduringlightning
stormsorwhen unusedforlongperiods
of time.
•Referall servicing toqualifiedservice
personnel.Servicingisrequired when
the apparatushasbeendamaged inany
way,suchasthe power-supply cordor
plugis damaged,liquidhasbeenspilled
orobjectshavefallen intotheapparatus,
the apparatushasbeen exposedtorain
ormoisture, doesnot operate normally,or
hasbeen dropped.
•Pleasekeeptheunitinawell-ventilated
environment.
WARNING: Toreduce the riskof orelectric
shock,donotexposethisapparatustorain
ormoisture.The apparatusshouldnotbe
exposed todrippingorsplashing. Objects
with liquids,suchasvasesshouldnot be
placed on apparatus.
WARNING: The batteriesshallnot be exposed
to excessiveheat such assunshine, orthe
like.
WARNING: Themainplugisusedas
disconnectdevice, the disconnectdeviceshall
remainreadilyoperable.
WARNING: Toreducethe risk of electric
shock,do not removecover(orback)asthere
areno user-serviceablepartsinside.Refer
servicing to personnel.
Thislightningflashwitharrowhead
symbolwithinanequilateraltriangle
isintended to alert the userto
thepresenceofnon-insulated “dangerousvoltage”
withinthe product’s enclosure thatmaybe of
sufficient magnitudeto constitute ariskof electric
shock.
Theexclamation point withinan
equilateraltriangleisintendedto
alertthe user to the presenceof
importantoperatingandmaintenance instructionsin
theliteratureaccompanyingtheappliance.
ThisequipmentisaClassIIordouble
insulatedelectricalappliance. It
hasbeen designed insuchaway
thatitdoesnotrequire asafety connection to
electrical earth.
RISQUEDECHOCELECTRIQUENE
PASOUVRIR
3
ADDITIONALSAFETYINFORMATION
Toensurereliableand safeoperation ofthisequipment,pleasereadcarefullyall the
instructionsinthisuser guide,especiallythesafety information below.
ElectricalSafety
TheTVsetshouldonlybeconnectedtoamainpowersupplywithvoltage that
matches the labelatthe rear of the product.
Topreventoverload,do notshare the samepower supplysocketwithtoo manyother
electroniccomponents.
Donotplaceanyconnecting wireswhere they maybe stepped on or trippedover.
Do notplaceheavyitemson them,whichmaydamage the leads.
Holdthe mainplug,notthe wires,when removing fromasocket.
During athunderstorm,orwhen notusing the televisionfor extended period oftime,
turn off thepowerswitchon the backofthe television.
Do not allow water or moisture toenterthe TVorpower adapter.Do NOTuseinwet,
moistareas,suchasbathrooms,steamykitchensornearswimming pools.
Pull theplugoutimmediately,and seekprofessionalhelpifthe mainplugor cable
isdamaged,liquidisspiltontothe set,ifaccidentallyexposed towater ormoisture,
ifanythingaccidentallypenetratesthe ventilationslots orifthe setdoesnotwork
normally.
Do notremovethe safetycovers. There areno user serviceablepartsinside.Trying
toservicethe unityourselfisdangerousand mayinvalidatethe product swarranty.
Toavoidbatteryleakage,removeexhausted batteriesfromthe remotecontrol,or
when notusing forlong period.
Do notmixoldand newbatteries.
PhysicalSafety
Do notblock ventilation slotsinthebackcover.You mayplacethe TVinacabinet,
Donottap orshakethe TVscreen,oryoumaydamagethe internalcircuits.Take
good care ofthe remotecontrol.
Do not installnear anyheatsourcessuchas radiators, heatregisters, stovesor other
Do notdefeatthesafetypurposeof the polarized orgrounding-type plug.Apolarized
plug hastwo bladeswithonewiderthantheother.Agroundingtypeplughastwo
bladesandathird groundingprong, the wide blade,or the third prong is provided for
replacementofthe obsoleteoutlet.
Protectthe power cordfrombeing walked on orpinchedparticularlyatplugs.
Unplug the apparatusduring lightning stormsor when unused forlong periods.
apparatushasbeendamaged inanyway,suchaspower-supplycordor plug is
damaged,liquidhasbeen spilled,or objectshavefallen intothe apparatus,hasbeen
exposed torainormoisture,doesnotoperatenormally,or hasbeen dropped.
Pleasealwaysconnect yourtelevisiontoapoweroutletwithprotectivegroud
connection.
4
What isIncluded?
PREPARATIONS
TV Set RemoteControlwithBatteries
UserManual
Mini YPbPrcable Mini Audiocable
QuickStart Guide
INSTRUCTION MANUAL
Pleasereadall theinstructionscarefullybeforeusingthisTV,
andkeepthemanualforfuturereference.
Digital LEDTV
Pleaserefertothe actualproduct
Input
0
789
456
1 2 3
Q.MENU
Menu
ExitBack
VOL CH
TTS
INFO
MT
VUDU
S/Audio
CC
List HOME
5
PREPARATIONS
FrontView
SOURCE
Press toselectamongdifferentinputsignalsources.
MENU
Displaythe OSD(onscreen display)menu.
CH
Press toselectachannel.
VOL+/-
+/-
Press toadjustthe volume.
LED
The LEDlightindicateswhen theTVis activated.
IR
Infrared Receiver.
POWER•
Switchthe TVbetween On/Standbymode.
LED
IR
6
PREPARATIONS
RearView
YournewTVisheavy,please consultwithprofessional wall
mountinstallertoperformthisinstallation.
Wall Mounting
HeadphoneOutput
HDMIInput
Antenna VHF/UHF)
Optical Output USBInput
AudioInput
YPBPR AV
AUDIO L/R
YPBPR/AVIN
LAN(RJ45)
7
PREPARATIONS
RemoteControl
Input
HOME
0
789
456
123
Q.MENU Menu
ExitBack
VOL CH
TTS
INFO
MTS/Audio
CC
LHOME
ist
3
11
9
13
16
23
24
18
15
6
12
7
4
5
12
10
17
22
19
14
25
8
20
21
1. POWER: Turn the TVon and off.
2. Input: This button isused toswitchamong
differentsources,Selectasourceandpress
ENTERbuttontoconfirm.
3. DigitalButtons(0-9,-): Directlyselectchannel
withdigitalbuttons.
4.Switchtothe previousprogram.:
5. : Ifnetwork connects,pressthiskey
toview YouTube directly.
YouTube
6. List: Press ittoshow channellistand favorite
list on screen.
7. HOME: Press ittogo toApp homepage.
8.
NETFLIX:
If networkconnects, pressthiskey
toviewNETFLIX directly.
9.:Press thiskeytogo toquickmenu.Q.MENU
10. Menu: Displaythemainmenu or exitthe
currentmenu.
11. ENTER: Validationkey.
12. Arrow buttons : Usetoselect
on-screen menu itemsand change men uvalues.
13. Back: Return.
14. Exit: Exitthe menu.
15.
Colorbuttons:
It'sused asit's showed
inthe Program Edit menu.
16. MUTE: Press thisbutton tocutoffthesound of
the TVsettemporarily,pressagaintoresume.
17. TTS(Text-To-Speech) Pree this button to
adjustTTSon oroff.
18. : Pressthesebuttonstoadjustthe
volume.
VOL-+/
19.:CH /Pressthesebuttonstochange
channelupward or downward.
20. DigitalMediaPlayercontrolbutton:
Include play/pause,stop,
previous,next,backward,forward is
used inUSBmode.
Pleaserefer torelevnatinstructionsin
the section ofmultimed player.
21. INFO: Displaytheprograminformation.
MTS/Audio: InUSBmode,press this
button toswitchaudiotrack when movie
isplaying.InTVmode,press thisbutton
toswitchMTSor AudioLanguage.
22.
23. VUDU:Press thisbutton toselectVUDU application.
24. Pandora: Press thisbutton toselectpandora
application.
25. CC: Press thisbutton toadjustCC mode.
8
Connecting ExternalDevices
9
TurningOn/OffYourTV
•Connectthepowercordtothepowersocket afteryouhavecompleted allthe
physicalconnections.At thisstage,theTVwillenterStandbyMode andtheblue
LED indicator willilluminate.
•InStandbyMode,pressthe buttonontheremotecontrolor press POWER on
the mainunittoturnthe TV on.
The POWER button onthe mainunitoron the remotecontrolcan only
switchtheTVintostandby. TocompletelyturnofftheTV,pleasedisconnect
the powercord fromthe power socket.
Initial Setup
•Connectthepowercordtothepowersocketafteryou havecompletedallthe
physicalconnections.Atthisstage,theTVwillenterStandbyMode andthered
LED indicator willilluminate.
•InStandbyMode,press the button ontheremotecontrolor press POWER on
the mainunittoturnthe TV on. TheredLED indicator willturnblue.
•The firsttimeyou turntheTVon,itwillgointotheSetupWizard.Press
buttonstoselect your desired modeandpress ENTER
OSD language
ConfigMenulanguage.
ENTER
Select
English
French
Espa ol
Country
Selectthecountry.
US
Canada
Mexico
Select
ENTER BACK
Return
INITIALSETUP
10
CUSTOMIZING TVSETTINGS
Initial Setup
HomeorStore
Select whereyouwillusethe TV.
Store
Home
ENTER
Select
BACK
Return
6
TimeZone
Select thetimezone.
Eastern
Central
Pacific
ENTER
Select
BACK
Return
7
DST
Select Daylightsavingtime.
On
Off
Return
ENTER
Select
BACK
89
Return
ENTER
Select
BACK
YES
Skip
NetworkConfiguration
Doyou wanttosetNetwork?
10
Return
ENTER
Select
BACK
WIFI
LAN
Network
Select networkscantype.
5
Select
Clock
Select toset theclock.
Manual
Auto
ENTER
11
BABCK
Return
ENTER
Select
Yes
Ship
AutoSearch
Doyou wanttoscanthe channels
BACK
11
Source
ChannelSelection
InputSource
TV HDMI2 HDMI3AV Component HDMI1
Input Setup
Press Input keyon theremotecontrol toenter"INPUT SOURCE" menu. Thereare
theseoptions foryoutoselect: "TV","AV","Component", "HDMI1", “HDMI2",
“HDMI3",
Use / keytoselectainput sourceandpress ENTER keytoconfirm.
Channels Selection
Therearefourwaystoselectchannel:
1)Usingnumber keys, and ENTER keysontheremotecontrol
toselectchanneldirectly.
Toselect channel 90, press
Whenyouusethenumberbuttons,you can directlyselect channelsthat wereeither
erasedornotmemorized.
2)UsingCH keyon theremotecontrol oronyour TVtoselect channel.
WhenyoupresstheCH key,theTVchangeschannelsinsequence. Youwill see
all thechannelsthat theTVhas memorized.
Youwill not seechannelsthatwereeither erasedornot memorized.
InputSource
USB
USB
“USB".
12
3)Press key toreturn toprevious channel, press it againtoreturn to
current channel.
Toquickly switchbetween twochannels that arefar apart, tune toone channel, then use
the number keys toselect the second channel. Then usethe button toquickly
alternatebetween them.
.nogninrutVTretfadegnahcneebsahlennahconfidetavitcatonsi
4)Select channels from "Channels List"or"FavoriteList".
Press List key tochoosefrom "Channel List"menu.
Volume
Adjustmentand Mute Setup
Volume adjustment
PressVOL+/-key on the remotecontrol or the TVtodisplay "Volume" menu,
adjust the volume ofTVbetween 0to100 by using VOL+/-key:
Toincreasethe volume, pressVOL+ key;
Todecreasethe volume, press VOL- key;
Mute
Press Mute”and the sound cuts off. The MUTEicon will appear inthe lower-right
corner of the screen.
To resume sound, press the Mute”button again,or simply press the VOL+ key.
Current Channel Information
Press INFO”key on the remotecontrol toview current channel information, the
indications of channel information are listed inthe following table.
Press EXIT”key on the remotecontrol toexit this OSD.
01/ 012005 08:
Movingpicture480i 4:3480i 08:30 09:30
40
14.1 ATSC-1
13
Picture
Usersettings forPICTURE
(Contrast, Brightness, Color, Sharpness,Tint)
Yourset hasseveral settings whichallowyou tocontrol picture
quality.
2.Press
Backlight
2.Press
ColorTemperature
3.Press
2.Press “
2.Press
3.Press
PictureMode
Your
y
rTint.
1.Press
2.Press .
3.Press
4.Youcanalsopressthe P.Mode
14
Standard: Selectsthenormalsoundmode.
Music:Provides clear andlivesoundfor music.
Movie:Provides liveand fullsoundfor movies.
Sports:Emphasizesbass over other sounds.
User: Selectsyour custom soundsettings.
Balance
If the volumes of the left speaker and the right speakerare not the same, you can adjust
the "Balance" tosuit your personalpreference.
1.Press key toselect "Balance" option.
2.Press /key todecreaseor increasethe value of the item.
AVL
Eachbroadcasting station has its ownsignalconditions, and it isinconvenient toadjust the
volume every time the channelis changed. “AVL”automaticallyadjusts the volume of the
desired channel bylowering the sound output when the modulation signal is high or by
raising the sound output whenthe modulation signal islow.
1.Press key toselect “AVL”option press ENTER/ key toenter submenu.
2.Press key toselect “On”or “Off”.
SurroundSound
This is used toturnon surround sound togainbetter sound effect.
1.Press key toselect "Surround Sound”option, press ENTER/ key toenter submenu.
2.Press key toselect “Surround”or “Off”.
Video Description
1.Press key toselect "Video Description”option, press ENTER/ key toenter submenu.
2.Press key toselect “On”or “Off”.
1.Press MENU key todisplay the mainmenu on the
screen.
2.Press key toselect "Sound" option.
3.Press or ENTER keytoenter"Sound" submenu.
4.You canalsopress the S.Mode key on the remote
control toselect one ofthe sound.
SoundMode
You canselect the type of the special sound effect
tobe used when watching agiven broadcast.
Your TVhas fivesound settings (“Standard”, “Music”,“Movie”,
“Sports”,“User”)that are preset at the factory.
1.Press key toselect "Sound Mode"option.
3.Press key toselect one sound mode.
2.Press “ ” or"ENTER" keytoentersubmenu.
15
DigitalAudioOutput
This is used toset digital audiooutput.
1.Press key toselect "DigitalAudioOutput”option.
PressENTER/ key toenter submenu.
2.Press key toselect Auto”or PCM”.
AudioLanguages
You can set the primary and secondarylanguage for audio.
DolbyAudioProcess
This is used toset Dolby AudioProcess.
1.Press key toselect "DolbyAudioProcess”option.
2.PressENTER/ key toenter DolbyAudioProcess”
submenu.
HDMIARC
Turn on or turnoff the HDMIARC function.
1.Press MENU key todisplay the mainmenu
on the screen.
2.Press key toselect Function”option.
3.PressENTER/ key toenter Function”submenu.
NoiseReduction
Press key toselect the NoiseReduction mode.
PressENTER/ key toenter submenu.
Press key toselect the
mode: off/low/middle/high/Auto.
MPEGNoiseReduction
Press key toselect MPEG NoiseReduction”option.
PressENTER/ key toenter submenu.
The picture willbe betterwhen it is in high”mode.
Aspect Ratio
Press key toselect Aspect Ratio”option. Press ENTER/ key toenter submenu.
Select the aspect ratiosettings:4:3/16:9/Movie/Subtitle/Native/Panorama.
VuduDeactivate
HDMI EDID
16
LinkSetup
1. Presskey toselect “Link Setup”option.
2. PressENTER or key toenter “Link Setup”submenu.
EnableLink: Press / toturn on/off the link setup.
AutoPower On: When this option is “On”and the
TVisinstandby mode.Toturn on the DVD can also
turn the TVat the same time.
AutoStandby: When this Option is “On”and the TV
is on, toturn offTVcan alsoturn the DVD into
standby mode.
NetflixDeactivate
HDMIEDID
1. Press key toselect “Netflix Deactivate" option.
2. PressENTER or key toconfirm.
3. Press"Yes"toconfirm again, the Netflixwill be activated.
NetflixESN
Display the Netflix Esninformation.
NetflixVersion
Display the Netflix version.
TTS
You can set TTSinformation inthe TTSmenu.
1. Press “/"key toselect “VuduDeactivate"option.
2. Press “ ” or"ENTER"keytoconfirm.
VuduDeactivate
1.Press “
ThisfunctionisonlyusedinHDMI mode.
/"keytoselect “HDMIEDID" option.
2.Press “ ” or"ENTER"keytoconfirm.
3.Press/ keytoselect “4K”or “2K”.
17
1. PressMENUkey todisplay the mainmenu on the screen.
2. Press key toselect "Time"option.
3. PressENTER/ key toenter "Time" submenu.
Off Time
In"OffTime”item, press button or ENTER button
toenter the submenu, set the day &time toturnoff
the TVset.
OnTime
In"OnTime”item, press button or ENTER button
toenter the submenu, set the time toturn on the TV
set, when the TVset is inthe standby mode.You
can alsochoosewhichdaytocontrolyou TVset inaweek.
SleepTimer
1. Press key toselect "Sleep Timer" option,press or ENTER button
toenter the submenu.
2. Press key repeatedly until the desired time appears (Off, 10mins, 20mins, 30mins,
60mins, 90mins, 120mins, 180mins, 240mins).
Notes: The sleep timer you haveset will be cancelled when the TVturnsoff or if apower
failure occurs.
Notes: When the time is less than 60 seconds, remind information will be displayed on
the screen. Pressany key button tocanceltimerfunction.
AutoSleep
Press key toselect whether toopen the NosignalPoweroff features. If this function is
opened, the TVwill power off inten minutes when there isno signal.
AutoSync
You canmodify the time of your TVset inManual mode. InAutomode, the “clock”is
decided by the DTVsignal.
Clock
WhenAutoSync ison,the clock is got from DTVstreams; Set the clock when AutoSync
is off.
Time Zone
You canchooseit tomodify your time zone inthe TVset.
1. Press key toselect "Time Zone" option,press or ENTER button
toenter the submenu.
2. Press key toselect time zone.
02:04
18
Option
1.Press MENU key todisplaythe mainmenu on thescreen.
2.Press / key toselect"Option" option.
3.Press key toenter “Option" submenu.
OSDLanguage
OSDLanguage1.Press / key toselect “"option.
2.Press ENTER or key toselectaproperlanguage forOSD
OSDTime
Setthe preferred amountoftime
on the screen.
ClosedCaption
1.Press / key toselect “Closed Caption" option.
2.Press ENTER key to open CC submenu.
Reset
1.Press “/ " key toselect"Reset"option.
2.Press “"or"ENTER"key toconfirm.
3.Press "Yes" toconfirm again,TV will turnoffautomaticlyand change allsetting tofactory
setting.
Networkconfiguration
Please referto"Networksetting"behind.
SoftwareUpdate(USB)
When the TV need tobe updated,please copy the newsoftwaretoaUSB storage and
insetthe USB storage toTV,then operating by following steps.
1.Press “/ " key toselect"SoftwareUpdate(USB)"option.
2.Press “ ” or"ENTER"key toconfirm.
ViewEnd-UserLicense
1.Press “/ " key toselect"ViewEnd-UserLicense" option.
2.Press “ ” or"ENTER"key toconfirm.
Internet UpdateCheck
1.Press “/ " key toselect"InternetUpdateCheck" option.
2.Press “ ” or"ENTER"key toconfirm.
NetworkUpdateInformation
1.Press “/ " key toselect"NetworkUpdateInformation" option.
2.Press “ ” or"ENTER"key toconfirm.
UserMode
1.Press “/ " key toselect"UserMode" option.
2.Press “
3.Switch touse mode "Home"or"Store".
”or"ENTER"key toconfirm.
3.Press "Yes" toconfirmagain,the TV will updatebyUSB,Please wait afew minutes
and don'tturnoffthe power,itwillturnoffautomaticlywhenupdating isfinish.
OSDLanguage
OSDTime
ClosedCaption
Reset
NetworkConfiguration
SoftwareUpadate USB
InternetUpdateCheck
ViewEnd-User License
NetworkUpdateInformation
User Mode
19
CanadaFrench
CanadaFrench1.Press / keytoselect " "option.
2.Press ENTER or key toopenCanadaFrenchmenu.
RRTSetting
RRTSetting1.Press / keytoselect " "option.
2.Press ENTER or key toopenRRTSettingmenu.
RRTReset
BlockUnratedTV
RRTReset1.Press / keytoselect " "option.
2.Press ENTER or key toopenRRTReset menu.
BlockUnratedTV1.Press / keytoselect " "option.
2.Press ENTER or key toopenBlockUnratedTV menu.
Lock System
Set theLockfunctiononoroff.
LockSystem1.Press / keytoselect" "option.
3.Press / keytoselect"On"or"Off".
SetPassword
Password1.Press / keytoselect"Set"option.
2.Enteryour4-digit passwordtoenter enter"Set
Password"submenu. Chooseany4-digitsforyour
newpasswordand enterthem.Assoonasthe 4
digitsareentered,thecursorskippedto “Confirm
Password”item,re-enterthesame4digits, and
yournewpasswordhasbeenmemorized.
Whentheprogramsislocked,you canalsopressthemenu
key, Infokeyandsoon.Thenyoucan press / keytocall
backthe input-passwordwindow.
USATV
USATV1.Press / keytoselect""option.
2.Press ENTER or .unemVTASUnepootyek
USAMPAA
USAMPAA1.Press / keytoselect" "option.
2.Press ENTER or keytoopenUSAMPAAmenu.
Lock
Please EnterPassword
LockSystem
SetPassword
USATV
USAMPAA
CanadaEnglish
CanadaFrench
RRT Setting
RRT Reset
BlockUnrated TV
2.Press “ ” or"ENTER" keytoconfirm.
CanadaEnglish
Canada English1.Press / keytoselect" " option.
2.Press ENTER or keytoopen Canada Englishmenu.
The"Lock" featureautomaticallylocks out programming that is
forchildren.TheusermustfirstenteraPasswordbeforeany
besetuporchanged.
1.Press / keytoselect"Lock"option.
2.PressENTERor keytoenter"Lock"submenu, "EnterPassword"menu
will appear,enteryour4-digit passwordtoenter"Lock"submenu(thedefault
passwordis0000,andtheuniversal passwordis1980).

Other Element LCD TV manuals

Element WE55UN4108 User manual

Element

Element WE55UN4108 User manual

Element 26LE30Q User manual

Element

Element 26LE30Q User manual

Element ELDHW421 User manual

Element

Element ELDHW421 User manual

Element ELDFT421 User manual

Element

Element ELDFT421 User manual

Element ELEFT502 User manual

Element

Element ELEFT502 User manual

Element 42LE45Q User manual

Element

Element 42LE45Q User manual

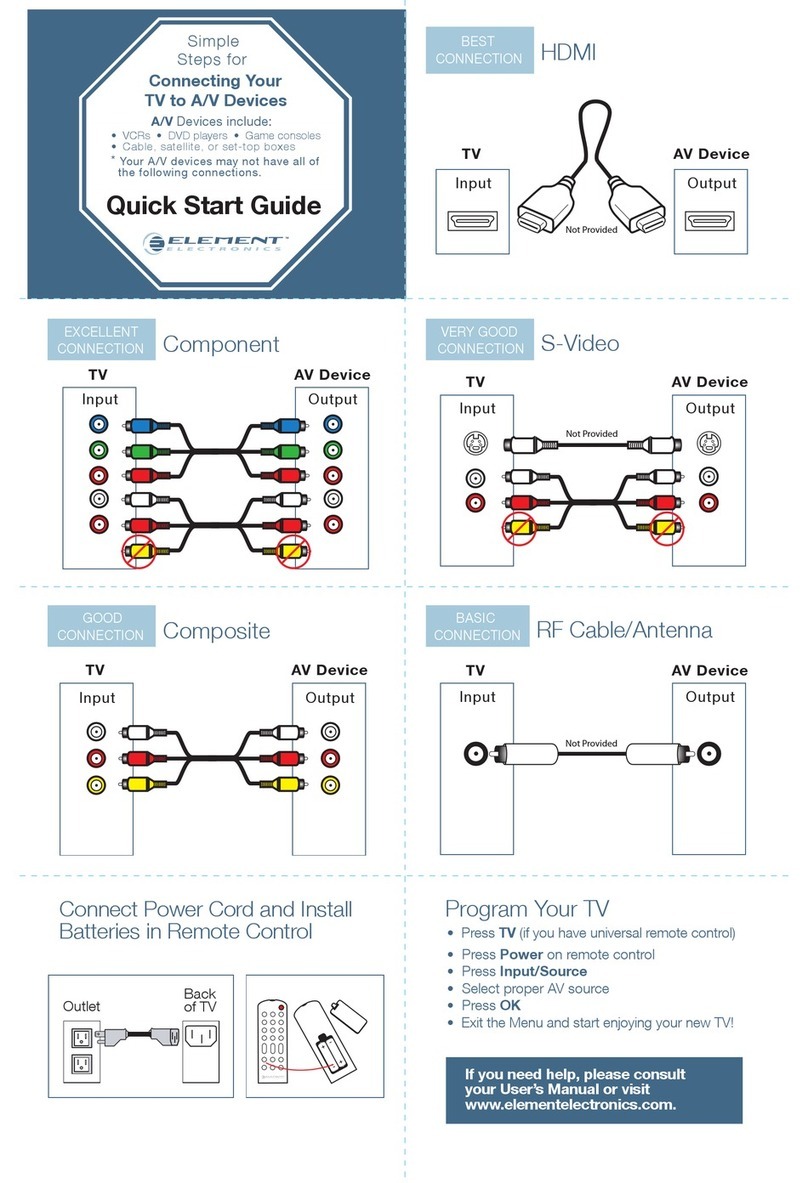
Element Connecting Your LCD TV to A/V Devices User manual

Element

Element Connecting Your LCD TV to A/V Devices User manual

Element ELCP0191 User manual

Element

Element ELCP0191 User manual

Element ELDFW374 User manual

Element

Element ELDFW374 User manual

Element E2T4019 User manual

Element

Element E2T4019 User manual

Element ELCHW321 User manual

Element

Element ELCHW321 User manual

Element ELCFW328 User manual

Element

Element ELCFW328 User manual

Element ELDFW464 User manual

Element

Element ELDFW464 User manual

Element ELDFW407 User manual

Element

Element ELDFW407 User manual

Element ELCHS371 User manual

Element

Element ELCHS371 User manual

Element ELGFT471 User manual

Element

Element ELGFT471 User manual

Element ELDFW462 User manual

Element

Element ELDFW462 User manual

Element FLX-3710 User manual

Element

Element FLX-3710 User manual

Element ELCFW328 User manual

Element

Element ELCFW328 User manual

Element ELCP0321 User manual

Element

Element ELCP0321 User manual

Element ELCFT194 User manual

Element

Element ELCFT194 User manual

Element ELCHS192 User manual

Element

Element ELCHS192 User manual

Element ELDFT321 User manual

Element

Element ELDFT321 User manual

Element FLX-2610 User manual

Element

Element FLX-2610 User manual

Popular LCD TV manuals by other brands

Samsung LA32E420 E-manual

Samsung

Samsung LA32E420 E-manual

Zenith Z32LC2D Specifications

Zenith

Zenith Z32LC2D Specifications

Palsonic TFTV930 owner's manual

Palsonic

Palsonic TFTV930 owner's manual

F&U FL2D5505UH manual

F&U

F&U FL2D5505UH manual

Sony BRAVIA KDL-V32XBR1 Quick setup guide

Sony

Sony BRAVIA KDL-V32XBR1 Quick setup guide

Hitachi UT42X902 - 42" LCD Flat Panel Display Specifications

Hitachi

Hitachi UT42X902 - 42" LCD Flat Panel Display Specifications

Panasonic TC-32DS600C owner's manual

Panasonic

Panasonic TC-32DS600C owner's manual

Seiki SC151FS Features & benefits

Seiki

Seiki SC151FS Features & benefits

Philips 26PFL3404H/12 quick start

Philips

Philips 26PFL3404H/12 quick start

August DA900C user manual

August

August DA900C user manual

Beko 15LB250MID operating instructions

Beko

Beko 15LB250MID operating instructions

Pyle P32LCD operating manual

Pyle

Pyle P32LCD operating manual

Philips 46PFL3505D Specifications

Philips

Philips 46PFL3505D Specifications

Toshiba 40G300U owner's manual

Toshiba

Toshiba 40G300U owner's manual

VISIO E32-C1 user manual

VISIO

VISIO E32-C1 user manual

Philips 22PDL49X6H user manual

Philips

Philips 22PDL49X6H user manual

Sanyo LCD-26XZ11 Service manual

Sanyo

Sanyo LCD-26XZ11 Service manual

Philips 26PF5520D - annexe 1 Specifications

Philips

Philips 26PF5520D - annexe 1 Specifications

manuals.online logo
manuals.online logoBrands
  • About & Mission
  • Contact us
  • Privacy Policy
  • Terms and Conditions

Copyright 2025 Manuals.Online. All Rights Reserved.