Elenco Electronics FO-30K User guide

FIBER OPTICS KIT
MODEL FO-30K
Assembly and Instruction Manual
Copyright © 2005, 1994 byElenco®Electronics,Inc. All rights reserved. Revised 2005 REV-P 753259
No partof this book shall be reproduced byanymeans; electronic,photocopying, or otherwise without written permission from the publisher.
Elenco®Electronics, Inc.

INTRODUCTION
The FO-30 kit, an optical voice link, will introduce you to the wonderful world of fiber optics. By building this kit,
you will learn how fiber optics works and how it could be applied to the field of communication.
GENERAL OVERVIEW
-1-
Fiber optics is a medium linking two electronic
circuits. As shown in the block diagram below, this
FO-30 kit consists of three basic elements; they are
transmitter, fiber optic cable and receiver.
The Transmitter converts an electrical signal into a
light signal. The source, either a light-emitting-diode
(LED) or laser diode, does the actual conversion.
The drive circuit changes the electrical signal fed to
the transmitter into a form required by the source.1
Fiber-optic cable is the medium for carrying the
light. The cable includes the fiber and its protective
covering.2
The Receiver accepts the light and converts it back
into an electrical signal. The two basic parts of the
receiver are the detector, which converts it back into
an electrical signal, and the output circuit, which
amplifies and, if necessary, reshapes the electrical
signal.3
The other parts which are not included in the
diagram consists of connectors which are used to
connect the fibers to the source and detector.
TRANSMITTER RECEIVERFIBER OPTIC CABLE
DRIVER SOURCE
DETECTOR
OUTPUT
CIRCUIT
IDENTIFYING RESISTOR VALUES
Use the following information as a guide in properly identifying the
value of resistors.
IDENTIFYING CAPACITOR VALUES
Capacitors will be identified bytheir capacitance value in pF
(picofarads), nF (nanofarads), or µF(microfarads). Most capacitors
will have their actual value printed on them. Some capacitors may
havetheir value printed in the following manner.
FortheNo.01234589
Multiply By 1 10 100 1k 10k100k .01 0.1
Multiplier
1 2 Multiplier Tolerance
BANDS
Second Digit
First Digit
Multiplier
Tolerance
103K
100V Maximum
Working Voltage
The value is 10 x 1,000 = 10,000pF or
.01µF100V
The letter M indicates a tolerance of +20%
The letter K indicates a tolerance of +10%
The letter J indicates a tolerance of +5%
Note: The letter “R” may be used at times
to signify a decimal point; as in 3R3 = 3.3
1, 2, 3 The above paragraphs are reproduced by permission TECHNICIAN’S GUIDE TO FIBER OPTICS 2E (PAGE 2)
By Donald J Sterling, Jr. - DELMAR PUBLISHERS, INC., Albany, New York, Copyright 1993

Qty. Description Part #
1 PC Board 519015A
2 Switch 541103
1Microphone 568000
1 Battery Holder 590096
1 Polishing Paper 600000
2 Screw 2-56 x 1/4” 641230
2 Nut 2-56 644201
Qty. Description Part #
1Lug 661106
1IC Socket 8-Pin 664008
2Test Pins 665008
1 Manual 753259
3’ Fiber Optic Cable 810020
1 Solder 9ST4
TRANSMITTER SECTION
PARTS LIST
If you are a student, and any parts are missing or damaged, please see instructor or bookstore.
If you purchased this fiber optics kit from a distributor, catalog, etc., please contact Elenco®Electronics
(address/phone/e-mail is at the back of this manual) for additional assistance, if needed. DO NOT contact your
place of purchase as they will not be able to help you.
RESISTORS
Qty. Symbol Value Color Code Part #
1 R8 220Ω5% 1/4W red-red-brown-gold 132200
1 R7 1kΩ5% 1/4W brown-black-red-gold 141000
2 R1, R3 2.2kΩ5% 1/4W red-red-red-gold 142200
3 R2, R4, R5 10kΩ5% 1/4W brown-black-orange-gold 151000
1 R6 100kΩ5% 1/4W brown-black-yellow-gold 161000
CAPACITORS
Qty. Symbol Value Description Part #
1C3 100pF (101) Discap 221017
1 C2 .01µF(103) Discap 241031
1 C4 .022µF(223) Mylar 242217
1 C1 1µF Electrolytic 261047
SEMICONDUCTORS
Qty. Symbol Value Description Part #
1Q1 2N3904 Transistor NPN 323904
1 U1 LM741 Integrated Circuit 331741
1 D1 LED Red 350002
1D2 LED Transmitter Clear 350005
MISCELLANEOUS
-2-
PARTS IDENTIFICATION
Resistor Capacitors
Electrolytic
Discap
Transistor
Red
Integrated Circuit IC Socket Switch
Lug
LEDs
Microphone
Mylar
Transmitter
Battery Holder Test Pin

-3-
SCHEMATIC DIAGRAM
TRANSMITTER
There are 5 main components in the transmitter
(see Figure 1A). They are:
a) Power supply (9V battery)
b) Microphone (MIC)
c) Op-amp LM741, (the driver)
d) NPN transistor 2N3904, and
e) Transmitter LED
The microphone picks up your voice signal and
converts it into a voltage signal. The strength of this
voltage signal depends upon the pitch and loudness
of your voice. This signal is then ac-coupled through
C1 and R2 to the input pin 2 of the LM741 op-amp
for amplification.
The gain of the op-amp LM741 depends on the ratio
of R6 to R2, which is equal to 100k/10k = 10.
Hence, the voice signal coming from the
microphone will be amplified 10 times by this op-
amp, and the amplified signal will appear at the
output of the op-amp.
At 0 Hz (DC) the impedance of C1 is infinite. The
amplifier then acts as a voltage follower. A voltage
follower is an op-amp in which the output voltage is
equal to the input voltage. In our case, the output
voltage at pin 6 is equal to the input voltage at pin 3
and pin 2 which is about 4.5V. This 4.5V at the input
pins is due to the effect of resistors R4 and R5
which act as a voltage divider. This constant DC
voltage helps keep the NPN transistor (2N3904) on
all the time.
The function of the NPN transistor (2N3904) is
similar to that of a valve, it controls the flow of the
current through the LED. The flow of this current will
depend on the base voltage of the transistor. This
base voltage in turn depends on the loudness and
pitch of your voice. Thus, the light intensity of this
LED will vary as you speak into the microphone.
This encoded light signal will then be transmitted to
the receiver through a fiber optic cable.
The LED (D1) acts as an ON/OFF indicator. It will
also indicate the state of the battery. If the LED
becomes dim, the battery is weak and should be
replaced. C2 filters out any noise that comes
through the voltage divider. C3 helps in stabilizing
the op-amp. It will also reduce any high frequency
noise generated in the transmitter. When S2 is
closed (toward the LED D2), C4 is placed into the
circuit and the op-amp will oscillate at about 1kHz.
As a result, you will hear a shrill noise from the
speaker in the receiver.
Figure 1A

-4-
Introduction
The most important factor in assembling your FO-30K Fiber Optics Kit is good soldering techniques. Using the
proper soldering iron is of prime importance. A small pencil type soldering iron of 25 - 40 watts is
recommended. The tip of the iron must be kept clean at all times and well tinned.
Safety Procedures
• Wear eye protection when soldering.
•
Locate soldering iron in an area where you do not have to go around it or reach over it.
•Do not hold solder in your mouth. Solder contains lead and is a toxic substance. Wash your hands
thoroughly after handling solder.
• Be sure that there is adequate ventilation present.
Assemble Components
In all of the following assembly steps, the components must be installed on the top side of the PC board unless
otherwise indicated. The top legend shows where each component goes. The leads pass through the
corresponding holes in the board and are soldered on the foil side.
Use only rosin core solder of 63/37 alloy.
DO NOT USE ACID CORE SOLDER!
CONSTRUCTION
Solder Soldering Iron
Foil
Solder
Soldering Iron
Foil
Component Lead
Soldering Iron
Circuit Board
Foil
Rosin
Soldering iron positioned
incorrectly.
Solder
Gap
Component Lead
Solder
Soldering Iron
Drag
Foil
1. Solder all components from
the copper foil side only.
Push the soldering iron tip
against both the lead and
the circuit board foil.
2. Apply a small amount of
solder to the iron tip. This
allows the heat to leave the
iron and onto the foil.
Immediately apply solder to
the opposite side of the
connection, away from the
iron. Allow the heated
component and the circuit
foil to melt the solder.
1. Insufficient heat -the
solder will not flow onto the
lead as shown.
3. Allow the solder to flow
around the connection.
Then, remove the solder
and the iron and let the
connection cool. The
solder should have flowed
smoothly and not lump
around the wire lead.
4.
Here is what a good solder
connection looks like.
2. Insufficient solder -let the
solder flow over the
connection until it is
covered. Use just enough
solder to cover the
connection.
3. Excessive solder -could
make connections that you
did not intend to between
adjacent foil areas or
terminals.
4. Solder bridges -occur
when solder runs between
circuit paths and creates a
short circuit. This is usually
caused by using too much
solder. To correct this,
simply drag your soldering
iron across the solder
bridge as shown.
What Good Soldering Looks Like
Agood solder connection should be bright, shiny,
smooth, and uniformly flowed over all surfaces.
Types of Poor Soldering Connections

Figure D
Electrolytics haveapolarity
marking indicating the (–)
lead. The PC board is
marked to show the lead
position.
Figure E
You have received one of four different
types of microphones. If you have type A or
B, mount it with the leads in the correct
holes on the PC board. If you have type C
or D, then bend the leads as shown.
ASSEMBLY INSTRUCTIONS FOR TRANSMITTER
-5-
Figure A
Mount the lug as shown.
Figure B
Bend the leads as shown. Mount the
LED transmitter with the flat side in the
direction shown below.
Figure C
Mount the LED with the flat side in the
same direction as marked on the top
legend.
Figure F
Mount the transistor
in the correct direction
as marked on the top
legend.
Figure G
Insert the IC socket
into the PC board
with the notch in the
direction shown on
the top legend.
Solder the IC socket
into place.Insert
the IC into the
socket with the
notch in the same
direction as the
notch on the socket.
A
B
C
D
Mount flush
with PC board
Flat
Lug
PC Board
Flat
Flat (–) (+)
Polarity
Mark
IC
IC
Socket
PC Board
Notch
Notch
Marking
Lug (see Figure A)
D2 - LED Transmitter Clear
(see Figure B)
S2 - Switch
R7 - 1kΩ5% 1/4W Resistor
(brown-black-red-gold)
8-Pin IC Socket
U1 - 741CN
(see Figure G)
D1 - LED Red (see Figure C)
S1 - Switch
R2 - 10kΩ5% 1/4W Resistor
(brown-black-orange-gold)
C1 - 1µFElectrolytic Capacitor
(see Figure D)
Q1 - 2N3904 NPN Transistor
(see Figure F)
C4 - .022µF(223) Capacitor
R5 - 10kΩ5% 1/4W Resistor
(brown-black-orange-gold)
C3 - 100pF (101) Capacitor
R6 - 100kΩ5% 1/4W Resistor
(brown-black-yellow-gold)
R8 - 220Ω5% 1/4W Resistor
(red-red-brown-gold)
R4 - 10kΩ5% 1/4W Resistor
(brown-black-orange-gold)
C2 - .01µF(103) Capacitor
MIC - Microphone
(see Figure E)
R1 - 2.2kΩ5% 1/4W Resistor
R3 - 2.2kΩ5% 1/4W Resistor
(red-red-red-gold)

TESTING PROCEDURE
QUIZ 1
Answers: 1. transmitter, fiber optic cable, receiver; 2. electrical, light; 3. light;
4. light, electrical; 5. voice, electrical; 6. IO; 7. 4.5; 8. current; 9. battery; 10. noise
-6-
1. Connect a 9 volt battery to the battery holder.
2. Switch S2 to the 1kHz position (toward LED D2)
and S1 on (toward LED D1). Observe that LED
D1 and D2 are on.
3. If you have a voltmeter, measure the DC voltage
on pins 2, 3, and 6 of the IC. All of these voltages
should be 1/2 the battery voltage.
4. If you have an oscilloscope, connect it to test
point TP. Switch S2 in the 1kHz position (toward
LED D2) to place C4 in the circuit. You should
see a 6V peak-to-peak square wave of about
1kHz on the scope.
5. Switch S2 to the mic position (toward the
battery), speak into the microphone and observe
your voice waveform on the scope.
If you experience any problems, see the
Troubleshooting Guide on page 20.
1. The FO-30 Kit consists of three basic elements
that are found in every fiber optic link. They are
_____________, _____________, and
_____________.
2. The function of the transmitter is to convert an
_____________ signal into a _____________
signal.
3. The function of the fiber optic cable is to transmit
a_____________ signal from the transmitter to
the receiver.
4. The receiver accepts a _____________ signal
and converts it backto an _____________
signal.
5. The microphone picks up a _____________
signal and converts it to an _____________
signal.
6. The gain of the LM-741 is equal to
_____________.
7. The DC output to the op-amp is _____________
volts.
8. The NPN transistor (3904) controls the
_____________ through the LED.
9. The LED (D1) indicated the state of the
_____________.
10. C2 filters out any _____________ that comes
through the voltage divider.
Screws and Nuts
Mount the two screws in the position as shown in the
pictorial diagram. Place the nuts on the screws and
tighten them from the back side of the PC board.
9V Battery Holder
Solder the 9V battery holder to pad
J1 and J2 in the correct position as
shown in the pictorial diagram.
To point marked
TP on PC board
GND & TP - Test Point
To point marked
GND on PC board

FIBER OPTICS
FIBER OPTICS AND ITS ADVANTAGES
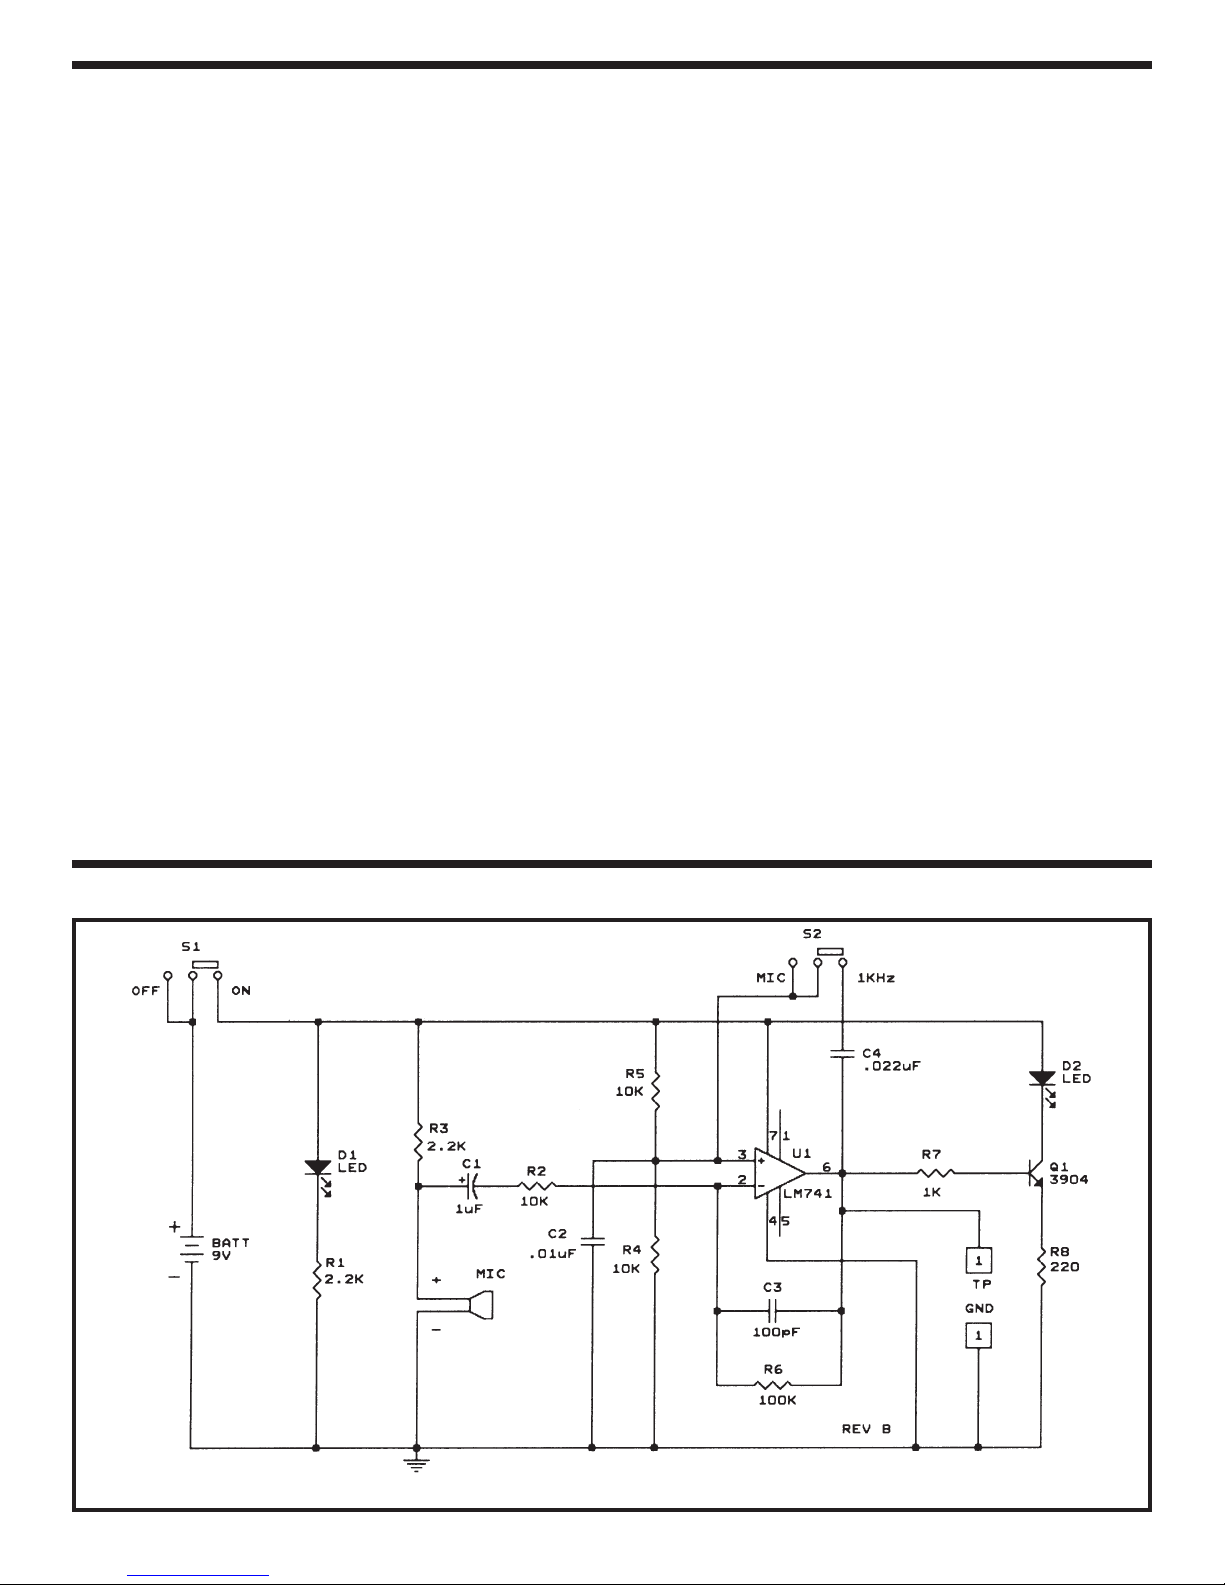
SECTION A
-7-
The obvious questions concerning fiber optics are
these: Why go through all the trouble of converting
the signal to light and back? Why not just use wire?
The answers lie in the following advantages of fiber
optics.
a) Wide bandwidth
b) Low loss
c) Electromagnetic immunity
d) Light weight
e) Small size
f ) Safety
g) Security
Of all the above mentioned advantages, wide
bandwidth, low loss and electromagnetic immunity
are probably the most important features.
Bandwidth is an effective indication of the rate at
which information can be sent. Potential
information-carrying capacity increases with the
bandwidth of the transmission medium. From the
earliest days of radio,useful transmission
frequencies have pushed upward five orders of
magnitude,from about 100kHz (100 x 103Hz) to
about 10GHz (10 x 109Hz). Optical fibers have a
potential useful range to about 1THz (1 x 10¹² Hz).
The information-carrying possibilities of fiber optics
haveonly begun to be exploited, whereas the same
potentials of copper cable are pushing their limits.
Togive perspective to the incredible capacity that
fibers are moving toward, a 10GHz (10 x 109)signal
has ability to transmit any of the following per
second.
a) 1,000 books
b) 130,000 voice channels
Loss indicates how far the information can be sent.
As a signal travels along a transmission path, be it
copper or fiber, the signal loses strength. The loss
of strength is called attenuation. In a copper cable,
attenuation increases with frequency. The higher
the frequency of the information signal, the greater
the loss. In an optical fiber, attenuation is flat. Loss
is the same at any signaling frequency up until a
very high frequency. The combination of high
bandwidth and low loss has made the telephone
industry probably the heaviest user of fiber optics.
Unlike copper cables, optical fibers do not radiate or
pick-up electromagnetic radiation. Any copper
conductor acts like an antenna, either transmitting
or receiving energy. One piece of electronic
equipment can emit electromagnetic interference
(EMI) that disrupts other equipment. Among
reported problems resulting from EMI are the
following:
• An electronic cash register interfered with
aeronautical transmissions at 113MHz.
•Coin-operated video games interfered with police
radio transmissions in the 42MHz band.
•Some personal computers tested bythe Federal
Communications Commission (FCC) in 1979
emitted enough radiation to disrupt television
reception several hundred feet away.
Since fibers do not radiate or receive
electromagnetic energy,they make an ideal
transmission medium when EMI is a concern.
Furthermore, signals do not become distorted by
EMI in fiber. As a result, fiber offers very high
standards in error-free transmission.4
4The above paragraphs are reproduced by permission TECHNICIAN’S GUIDE TO FIBER OPTICS 2E (PAGES 24-29)
By Donald J Sterling, Jr.-DELMAR PUBLISHERS,INC., Albany, New York, Copyright 1993

PRINCIPLES OF LIGHT
WAVELENGTH
SECTION B
Plastic Optical Cable
Core
Cladding
Jacket
-8-
FIBER MATERIAL
There are many materials that can be used to transmit light. The two most
popular optical fibers are glass, which has the best optical characteristics,
and plastic. Plastic is less expensive and does not break easily. This kit
uses a plastic optical cable similar to the one shown.
Light occupies only a small portion of the
electromagnetic spectrum shown in Figure 2A.
The equation λ=c/f is used to convert frequency
to wavelength, where λ=wavelength, c = speed of
light, and F = Frequency of the light wave.
Note that in Figure 2A, the visible range of light is
approximately 380 x 10-9 meters (violet) to 750 x 10-
9meters (red). When using plastic as the fiber optic
cable medium, the best results occur around 660 x
10-9 (orange-red).
Light also can be thought of as little bundles of
energy being rapidly transmitted. These discrete
groups of energy are called photons, and the
amount of energy present in each photon is
dependent on the frequency at which they are
transmitted. Higher frequencies produce more
energy than lower frequencies of light. The equation
for the amount of energy in each photon is E = hƒ.
Where E = energy in joules,his Planck’sconstant
(6.63 x 10⁻³⁴ joules-seconds), and ƒis the frequency
in hertz.
It is important to remember that light can be
explained on a wave or a photon energy packet
when investigating the properties of fiber optics.
0
10
10 2
10 3
10 4
10 5
10 6
10 7
10 8
10 9
10 10
10 11
10 12
10 13
10 14
10 15
10 16
10 17
10 18
10 19
10 20
10 21
10 22
Sonic
Sound
AM Radio
Shortwave Radio
Television & FM Radio
Radar
Infrared Light
Ultraviolet Ray
X-Ray
Gamma Ray
Cosmic Ray
Frequency
(Hz)
Visible Light
Wavelength
(nm)
Ultraviolet
Violet
Blue
Green
Orange
Red
Infrared
400
455
490
550
620
750
800
Figure 2A

REFRACTION
-9-
Figure 2B
Refraction
Red
Orange
Yellow
Green
Blue
Violet
Refraction
White Light
The speed of light can be defined as the velocity of
electromagnetic energy in a vacuum such as space.
The speed of light will vary as it travels from one
material to another, which, because of wave motion,
results in light changing its direction. This change of
direction of light is called refraction. In addition,
different wavelengths of light travel at different
speeds in the same material.
The best example of refraction if the prism of
Figure 2B.
White light entering the prism contains
all colors. The prism refracts the light and changes
speed as it enters the prism. Because each color or
frequency changes speed differently, each is
refracted differently. Red light deviates the least and
travels the fastest, while violet light deviates the
most and travels the slowest. The white light then
emerges from the prism divided into the colors of
the rainbow.5
REFRACTIVE INDEX
One of the important measures that you often come
across in light is refractiveindex. The refractive
index can be defined as the ratio of the speed of
light in a vacuum to the speed of light in a material.
n=c(vacuum) / c(material)
where: nis the refractive index
cis the speed of light
Since the speed of light in a vacuum is always faster
that the speed of light in anymaterial, the refractive
index is always greater than one. The amount that
aray of light is refracted depends on the refractive
index of the two materials.
5The above paragraphs are reproduced by permission TECHNICIAN’S GUIDE TO FIBER OPTICS 2E (PAGES 36, 37)
By Donald J Sterling, Jr.-DELMAR PUBLISHERS,INC., Albany, New York, Copyright 1993

REFLECTION
Before trying to explain reflection, we must first define some important terms shown in Figure 2C.
-10-
Figure 2C
θ1
θ2
n1
n2
Reflected Ray
Refracted Ray
Angle of Refraction
Angle of Incidence
Incident Ray
Normal
Interface
n1is less than n2
• The normal is an imaginary line perpendicular to
the interface of the twomaterials.
• The angle of incidence ( θ1) is the angle between
the incident ray and the normal.
• The angle of refraction ( θ2) is the angle between
the refracted ray and the normal.
Light passing from a lower refractive index to a
higher one is bent toward the normal, as shown in
Figure 2C. Light going from a higher index to a
lower will refract away from the normal, as shown in
Figure 2D-1. As the angle of incidence increases,
the angle of refraction approaches 90Oto the
normal. The angle of incidence that yields an angle
of refraction of 90Oto the normal is the critical angle
as shown in Figure 2D-2. If the angle of incidence
increases past the critical angle, the light is totally
reflected backto the first material so that it does not
enter the second material as shown in Figure 2D-3.
The angles of incidence and reflection are equal.6
6The above paragraphs are reproduced by permission TECHNICIAN’S GUIDE TO FIBER OPTICS 2E (PAGE 39)
By Donald J Sterling, Jr.-DELMAR PUBLISHERS,INC., Albany, New York, Copyright 1993

SNELL’S LAW
-11-
Figure 2D
Figure 2D-1 Figure 2D-2 Figure 2D-3
θ2
n1
n2
Critical Angle
Light is bent away from normal
Light does not enter
second material
Angle of
Refraction
Angle of Incidence
n1
n2
n1
n2
θ1
Angle of
reflection
Angle of
incidence
=
When the angle of reflection is
more than the critical angle, light
is reflected.
n1is greater than n2
7The above paragraphs are reproduced by permission TECHNICIAN’S GUIDE TO FIBER OPTICS 2E (PAGE 40)
By Donald J Sterling, Jr.-DELMAR PUBLISHERS,INC., Albany, New York, Copyright 1993
Snell’s Law states the relationship between the
incident and refracted rays.
n1sin θ1= n2sin θ2
where: n1and n2are refractiveindexes
θ1and θ2are angle of incidence and angle of
refraction respectively.
The law shows that the angles depend on the
refracted indices on the two materials. Knowing any
three of the values, of course, allows us to calculate
the fourth through simple rearrangement of the
equation.
The critical angle of incidence θc, where θ2=
90O,is
θc=arcsin (n2/n1)
At an angle greater than θc, the light is reflected.
Because reflected light means that n1and n2are
equal (since they are in the same material), θ1and
θ2are also equal. The angle of incidence and
reflection are equal. These simple principles of
refraction and reflection formthe basis of light
propagation through an optical fiber.7

OPTICAL FIBER CONSTRUCTION
-12-
8The above paragraphs are reproduced by permission TECHNICIAN’S GUIDE TO FIBER OPTICS 2E (PAGES 40, 44)
By Donald J Sterling, Jr.-DELMAR PUBLISHERS,INC., Albany, New York, Copyright 1993
The optical fiber has two concentric layers called the
core and the cladding. The inner core is the light-
carrying part. The surrounding cladding provides
the difference in the refractive index that allows total
internal reflection of light through the core. The fiber
usually has an additional coating around the
cladding. The coating, which is usually one or more
layers of polymer, protects the core and cladding
from shock that might affect their optical or physical
properties. Figure 2E shows the cross-section of an
optical cable
.8
Core
Cladding
Jacket
Figure 2E

HOW LIGHT TRAVELS THROUGH AN OPTICAL CABLE
SECTION C
-13-
Figure 2F
Light is propagated by
total internal reflection
n1
n2
Cladding
Core
Angle of RefractionAngle of Incidence =
81O
81O
9The above paragraphs are reproduced by permission TECHNICIAN’S GUIDE TO FIBER OPTICS 2E (PAGES 40, 44, and 45)
By Donald J Sterling, Jr.-DELMAR PUBLISHERS,INC., Albany, New York, Copyright 1993
To best understand how light propagates through an
optical fiber, let us look at an example. Assume that
the core has a refractive index (n1)of 1.48 and the
cladding has a refractive index (n2)of 1.46 (these
values are typical for optical fibers). By applying
Snell’s Law, we can calculate the critical angle:
θc=arcsin (n2/n1)
θc=arcsin (1.46/1.48) = 80.6Oor approximately
81O
Figure 2F shows that as light rays are injected into
the fiber, they strike the core-to-cladding interface at
an angle greater than that of the critical angle
(80.6O). As a result, the light will reflect back to the
core. Since the angles of incidence and reflection
are equal, the reflected light will again be reflected.
The light will continue zig-zagging down the length
of the fiber. Any light that strikes the interface at
less than the critical angle will be absorbed by the
cladding. This total internal reflection forms the
basis of light propagation through a simple optical
fiber.9

AN IMPORTANT UNIT IN FIBER OPTICS (THE DECIBEL)
-14-
10 The “DECIBEL” Section is reproduced by permission TECHNICIAN’S GUIDE TO FIBER OPTICS 2E
By Donald J Sterling, Jr.-DELMAR PUBLISHERS,INC., Albany, New York, Copyright 1993
The decibel is an important unit that you will use
continually in fiber optics as well as in electronics. It
is used to express gain or loss in a system or
component. A transistor, for example, can amplify a
signal, making it stronger by increasing its voltage,
current or power. This is called gain. Similarly, loss
is a decrease in voltage, current, or power. The
basic equations for the decibel are:
dB = 20 log10 (V1/V2)
dB = 20 log10 (I1/I2)
dB = 10 log10 (P1/P2)
Where V is voltage, I is current, and P is power. The
decibel then is the ratio of two voltages, currents, or
powers. Notice that voltage and current are 20
times the logarithmic ratio, and power is 10 times
the ratio.
The basic use of the decibel is to compare the
power entering the system, circuit, or component to
the power leaving it. In fiber optics, we deal mostly
with loss and optical power. The source emits
optical power. As light travels through the fiber to
the receiver, it loses power. This power loss is
expressed in decibels. For example,if the source
emits 1,000 microwatts (µW) of power and the
detector receives 20µW, the loss through the
system is about 17dB.
Loss = 10 log10 (Pr/Ptr)
=10 log10 (20/1,000)
=-16.989 dB
Where Ptris the power transmitted from the source
and Prispower received by the receiver. A 10dB
loss represents a loss of 90% of the power; only
10% remains. A useful figure to remember is 3dB,
which represents a loss of one half of the power.
Fiber optic links easily tolerate losses of 30dB,
meaning that 99.9% of the power from the source is
lost before it reaches the detector. If the source
emits 1,000µWof power, only 1µWreaches the
detector. In fiber optics, it is common to omit the
negative sign.10

Both ends of the optical cable are terminated in the
same way. Please follow the steps below.
1) Use a razor blade (a very sharp knife will do) to
cut the cable at a right angle to the length of the
cable. Make the cut as close to 90Oas possible.
2) Place the polishing paper on a work bench or
other flat surface, and apply a few drops of water
or oil to it. Hold the cable at a right angle to the
polishing paper and polish the end that was just
cut. The cable should not flex while polishing.
To avoid flexing, clamp the cable between the
two PC boards with only a small length of the
cable extending beyond the edge of the PC
board.
3) Repeat steps 1 and 2 for the other end.
4) Mount the two ends of the cable to the two
connectors on the transmitter and receiver PC
board as shown in the figure.
ASSEMBLY INSTRUCTIONS
HOW TO TERMINATE AN OPTICAL FIBER
-15-
Answers: (1) wide bandwidth, lowloss, electromagnetic immunity (2) rate (3) attenuation (4) glass, plastic
(5) radiation (6) loss, gain (7) light, light (8) reflect (9) cladding, core (10) reflection
QUIZ 2
1. The three most important features of fiber optics
are _________, _________ and __________.
2. Bandwidth is an indication of the _________ at
which information can be sent.
3. The loss of signal strength is called ________.
4. The two most popular optical fibers are
________ and _________.
5. Unlike copper cables, optical fibers do not
radiate or pickup _________.
6. The Decibel is a unit used to express
_________ or _________ in a system or
component.
7. Refractiveindex is the ratio of the speed of
_________ in vacuum to the speed of
_________ in any material.
8. If the angle of incidence is greater than the
critical angle, light will completely _______ back.
9. The optical fiber has two concentric layers called
the _________ and __________.
10. The total internal _________ forms the basis of
light propagation through a simple optical fiber.

PARTS IDENTIFICATION
-16-
PARTS LIST
If you are a student, and any parts are missing or damaged, please see instructor or bookstore.
If you purchased this fiber optics kit from a distributor, catalog, etc., please contact Elenco®Electronics
(address/phone/e-mail is at the back of this manual) for additional assistance, if needed. DO NOT contact your
place of purchase as they will not be able to help you.
RESISTORS
Qty. Symbol Value Color Code Part #
1 R3 10Ω5% 1/4W brown-black-black-gold 121000
1 R2 2.2kΩ5% 1/4W red-red-red-gold 142200
1 R1 200ΩPot 191322
CAPACITORS
Qty. Symbol Value Description Part #
3 C1, C3, C5 .047µF(473) Mylar 244717
1 C6 10µF Electrolytic 271045
1 C2 47µF Electrolytic 274744
1 C4 220µF Electrolytic 282244
SEMICONDUCTORS
Qty. Symbol Value Description Part #
1Q1 LPT80A Phototransistor 32T80A
1 U1 LM-386 Audio Op-amp Integrated Circuit 330386
1 D1 LED Red 350002
MISCELLANEOUS
Qty. Description Part #
1 PC Board 519015B
1Switch 541103
1Battery Holder 590096
1Speaker 590102
2 Screws 2-56 x 1/4” 641230
Qty. Description Part #
2 Nuts 2-56 644201
1Lug 661106
1IC Socket 8-pin 664008
6” Wire 22ga. Black 814120
6” Wire 22ga. Red 814220
RECEIVER SECTION
Resistor Capacitors
Electrolytic
Mylar
Transistor
Red
Integrated Circuit IC Socket
SwitchLED
Phototransistor
Potentiometer
Battery
Holder
Lug
Speaker

RECEIVER
Figure 3A
-17-
There are 4 main components in the receiver (refer
to Figure 3). They are:
a) Power Supply (9V battery)
b) Phototransistor LPT80A (the detector)
c) Audio op-amp LM-386
d) Speaker
The phototransistor Q1 (LPT80A) used in a
common-collector configuration has high current
gain. This transistor acts as a valve which controls
the flow of current to the potentiometer R1. The flow
of current is directly proportional to the intensity of
light striking the base. The more intense the light,
the more current will flow through transistor Q1. The
current will then be coupled to the audio amplifier
(LM386) through capacitor C1 for amplification.
The gain of the audio amplifier (LM386) is internally
set to 20. Hence, the voltage signal that is coupled
through C1 to input pin 2 will be amplified 20 times,
and will appear on the output of the op-amp (pin 5).
The above amplified voltage will then be coupled
through C4 to the speaker. The speaker then
converts this voltage into sound.
The LED (D1) acts as an ON/OFF indicator. It will
also indicate the state of the battery. If this LED
becomes dim, the battery is weak and should be
replaced. C2 filters out any noise at the power
supply (9V battery).

Lug (see Figure D)
Q1 - Phototransistor
(see Figure F)
C3 - .047
µ
FMylar Cap. (473)
R1 - 200ΩPot (see Figure E)
R3 - 10Ω5% 1/4W Resistor
(brown-black-black-gold)
S1 - Switch
C2 - 47µFElectrolytic Capacitor
(see Figure B)
C6 - 10µFElectrolytic Capacitor
(see Figure B)
D1 - LED (see Figure A)
C1 - .047
µ
FMylar Cap. (473)
R2 - 2.2kΩ5% 1/4W Resistor
(red-red-red-gold)
8-Pin IC Socket
U1 - LM386N Integrated Circuit
(see Figure C)
6” Black Wire - Strip 1/8” of
insulation off of both ends of the
wire.
6” Red Wire - Strip 1/8” of
insulation off of both ends of the
wire.
C4 - 220µFElectrolytic Capacitor
(see Figure B)
C5 - .047µFMylar Cap. (473) Figure F
Insert the phototransistor into the PC
board in the direction shown.
Figure C
Insert the IC socket into
the PC board with the
notch in the direction
shown on the top
legend. Solder the IC
socket into place. Insert
the IC into the socket
with the notch in the
same direction as the
notch on the socket.
Figure A
Mount the LED with the
flat side in the same
direction as marked on
the top legend.
Figure B
Electrolytics have a
polarity marking
indicating the (–) lead.
The PC board is
marked to showthe
lead position.
Figure D
Mount the lug as
shown. Make sure
that the phototran-
sistor lens lines up
with the lug hole.
Figure E
ASSEMBLY INSTRUCTIONS FOR RECEIVER
-18-
Mount flush
with PC board
(–) (+)
Polarity
Mark PC Board
Notch
Marking
Flat
Notch IC
Socket
IC
Speaker and 2 Wires
Solder the wires to the correct
position as shown.
– +
9V Battery Holder
Solder the 9V battery holder to
pad J1 and J2 in the correct
position as shown.
Screws and Nuts
Mount the two screws in the
position as shown. Place the nuts
on the screws and tighten them
from the back side of the PC
board.

-19-
INSERT THE CABLE
TESTING PROCEDURE
Answers: (1) power supply, phototransistor, audio op-amp, speaker (2) light, electrical (3) intensity
(4) 20 (5) C4 (6) electrical, sound (7) On-Off (8) noise (9) volume (10) audio
Slide the cable through the lug
and butt the cable up against the
phototransistor.
1. Plug a fresh 9 volt battery into the battery holder.
2. Turn S1 on (toward the pot), observe that LED
D1 is on.
3. If you have a voltmeter, measure the DC voltage
at pin 5, it should be about 4V.
4. Connect one end of the fiber to the source
connector to the transmitter, and the other end to
the detector connector of the receiver. Make sure
switch S2 of the transmitter is in the off position
(toward the battery). Now, speak into the
microphone. You should hear your voice from the
speaker of the receiver. Now, place C4 into the
circuit by sliding switch S2 toward the infrared
LED. You should hear a shrill noise from the
speaker.
1. The receiver consists of 4 main components.
Theyare _________, _________, _________
and ________.
2. The phototransistor Q1 converts a __________
signal into an __________ signal.
3. The flow of the current through Q1 is directly
proportional to the ________ of light that strikes
its base.
4. The gain of the audio amplifier (LM386) is
internally set to _________.
5. The amplifier signal is coupled to the speaker
through __________.
6. The speaker converts an _________ signal into
a_________ signal.
7. The LED D1 acts as an _________ indicator.
8. C2 filters out any __________ at the power
supply.
9. The pot R1 is a __________ control device.
10. The LM386 chip is an __________ amplifier.
QUIZ 3
Table of contents