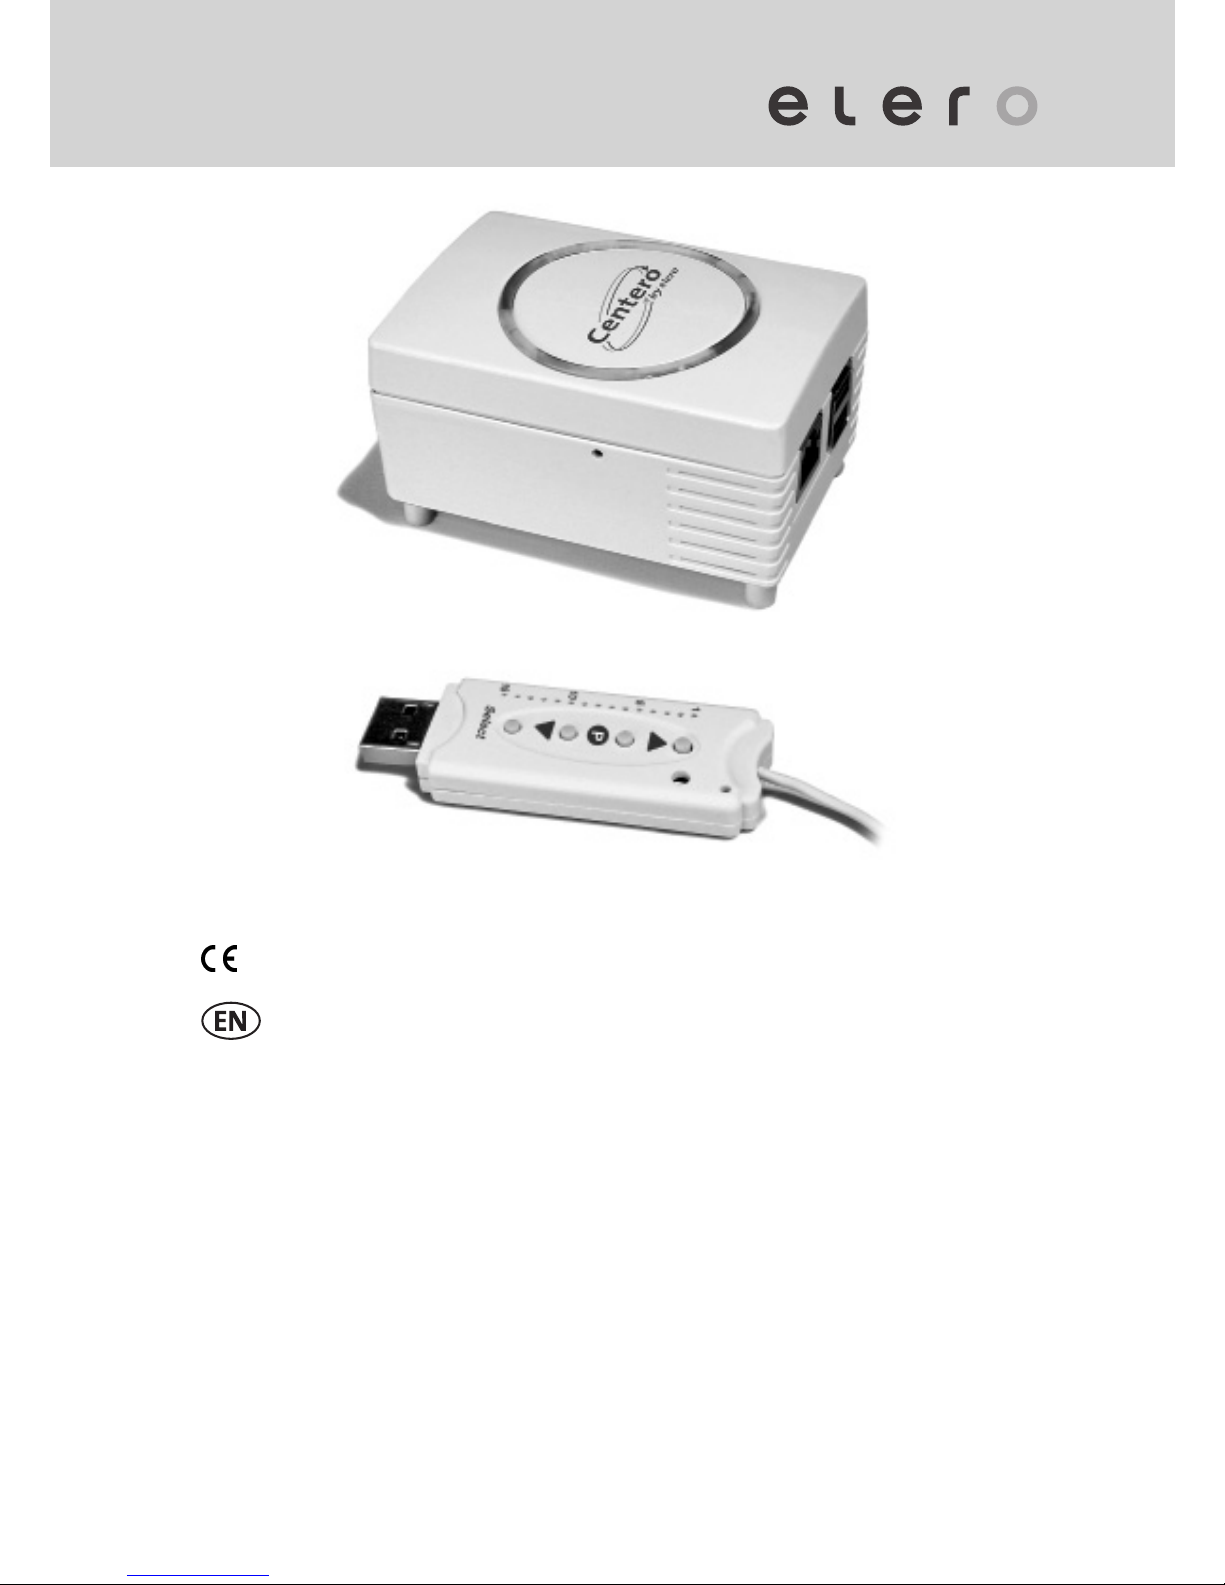
elero Centero User manual
2011569_EN_0913
0682
Operating instructions (translation)
Keep the operating instructions in a safe place!
Centero

2 | EN Ⓒelero GmbH
Translation from the original German version.
All other documents in different languages are translations
of the original version.
All rights reserved in the event of registration of patents,
working models or design patents.

3 | EN Ⓒelero GmbH
Table of Contents
1 General 5
1.1 Notes on the Operating Instructions 5
1.2 Standards and Directives 6
1.3 Intended use 6
1.4 Warranty and liability 7
2 Safety 8
2.1 General safety instructions 8
2.2 Requirements for the personnel 8
2.3 Safety instructions for operation 8
3 Product Description 8
3.1 General 8
3.2 Scope of supply 9
3.3 Bidirectional radio system 9
3.4 Principle of function 9
3.4.1 Connections on the Centero Server 10
3.4.2 Status indicator of the Centero Server 10
3.4.3 Power supply of the Centero Server 11
3.4.4 Centero Transmitter Stick 11
3.4.5 Status indicator of the Centero Transmitter Stick 12
3.5 Connections 13
3.6 Teaching-in the Centero Transmitter Stick
into one or multiple receivers 13
3.6.1 Programming intermediate positions in the
receiver 15
3.6.2 Deleting a transmitter channel in the receiver 17
3.6.3 Connecting the Centero Transmitter Stick to the
Centero Server 17

4 | EN Ⓒelero GmbH
3.7 App Centero 18
3.7.1 Initial login on the Centero Server 18
3.7.2 Range of functions of the app Centero 18
3.7.3 Working with the app Centero 18
3.8 Menu structure of the app Centero 19
3.8.1 Rooms menu 19
3.8.2 Devices menu 20
3.8.3 Scenes menu 23
3.8.4 Settings menu 26
4 Specifications 29
5 Cleaning and maintaining the device 30
6 EC Declaration of Conformity 30
7 Troubleshooting 31
8 Repair 32
9 Address 33
10 Disposal 33
11 Legal Notes 34
5 | EN Ⓒelero GmbH
1 General
1.1 Notes on the Operating Instructions
Please read these Operating Instructions carefully prior to
the first commissioning and observe the safety instructions!
All activities on and with this device may only be perfor-
med as they are explained in these Operating Instructions.
Please store this document for the Centero System for later
use. If you pass the device on to someone else, please
hand them these Operating Instructions as well.
Warning symbols and signal words used in these Instruc-
tions.
Warning symbols and signal words used
Warning!
Warning of danger by electric shock!
Caution!
Observe instructions to prevent injuries and
material damages!
Important:
Observe instructions!
Important:
Further information on the use of this device!
The manufacturer reserves the right to make changes to the
Specifications stated in these Operating Instructions at any
time. These may, in individual cases, be different from the
respective device version, however the functional informa-
tion will not undergo significant changes or become invalid.
The current version of the Specifications may be requested
from the manufacturer at any time. No claims may be as-

6 | EN Ⓒelero GmbH
serted against the manufacturer as a result of the preceding
sentence. Deviations from text or picture statements are
possible and depend on the technical development, fea-
tures, and accessories of the device. Deviating information
on special versions will be explained by the manufacturer
in the sales documentation. Other information shall remain
unaffected by these provisions.
1.2 Standards and Directives
During the design process, the basic health and safety re-
quirements of the applicable laws, Standards and Directives
were complied with. All safety information in these Opera-
ting Instructions refer to the laws and regulations currently
applicable in Germany. All instructions in the Operating
Instructions shall be observed without limitation and at
any time. Beside the safety instructions contained in these
Operating Instructions, the provisions for accident preventi-
on, environmental protection and occupational safety, which
are applicable for the operating site, must be observed.
Provisions and Standards for the safety rating can be found
in the EC Declaration of Conformity which also confirms the
safety herein.
1.3 Intended use
The device is intended to be used in a domestic distribu-
tion environment (to control electrically driven shutters,
sunblinds, sunshades, roller blinds, electrical lighting and
heating equipment). The Centero domestic automation
solution by elero connects the control of these applications
via devices with the Apple iOS operating system, such as
iPhone, iPad or iPad mini. The solution requires an existent
system (home network with WLAN and internet connection).
Well-engineered, the bidirectional ProLine 2 radio system
by elero ensures a smooth operation. Using this solution,
you can control and use your shutters, sunblinds, sunsha-
des, lighting equipment, and similar radio-controlled devices
at home and on the go.

7 | EN Ⓒelero GmbH
Further fields of application have to be arranged with the
manufacturer, elero GmbH Antriebstechnik (see Chapter 8,
Address).
The operator will be solely responsible for damages resul-
ting from improper use of the device. The manufacturer
cannot be held liable for personal or material damages
caused by misuse or procedural errors, and by improper
operation and commissioning.
A use which deviates from the intended use stated by the
manufacturer, elero GmbH Antriebstechnik, is deemed as
foreseeable misuse.
1.4 Warranty and liability
Principally, the General Terms and Conditions of the ma-
nufacturer, elero GmbH Antriebstechnik (see Chapter 8,
Address for address), apply. Liability claims for personal or
material damages are excluded when they can be attributed
to one or more of the following causes:
• Customer has opened the device (seal is broken)
• Unintended use of the device
• Improper installation, commissioning, or operation of the
device
• Structural modifications to the device without the written
consent of the manufacturer
• Operation of the device with improperly installed con-
nections, defective safety devices or improperly installed
safeguards
• Non-observance of the safety provisions and instructions
of these Operating Instructions
• Operation of the device outside the limits specified in the
Specifications.

8 | EN Ⓒelero GmbH
2 Safety
This device is not intended to be used by people (including
children) with limited physical, sensory or mental aptitude
or lack of experience and/or knowledge unless they are
supervised by a person responsible for their safety or have
received instruction from this person as to how the device
is used.
• Never allow children to use electrical devices unless
they are supervised.
2.1 General safety instructions
The Operating Instructions contain all safety instructions
which must be observed in order to prevent dangers inhe-
rent to handling the device in connection with the drives
and components to be controlled. A safe use of the device
can only be ensured when all given safety instructions are
observed.
2.2 Requirements for the personnel
• Each person who is tasked to work with the device must
have read the complete Operating Instructions and have
understood the dangers resulting from the use of device
before performing any activities.
2.3 Safety instructions for operation
• You have to check the casing and the lines for damages
prior to the commissioning and regularly afterwards as
well. Never commission a damaged device.
3 Product Description
3.1 General
Using the Centero Server and the Centero Transmitter Stick
in combination with device based on Apple iOS and with the
elero app “Centero” installed, you can configure and opera-
te all taught-in bidirectional receivers.

9 | EN Ⓒelero GmbH
3.2 Scope of supply
The purchased product includes the following:
• Centero Server
• Centero Transmitter Stick
• Socket adapter
• Adapter for small devices to use the mains cable
• Mains cable with Euro plug for small devices
• Network cable to connect the Centero Server to a home
network
• USB extension cable
• Multilingual Operating Instructions on the Mini CD
• Short operating instructions
3.3 Bidirectional radio system
The term bidirectional radio system means the transmission
of radio signals to radio receivers and the response option
for the radio receivers to the transmitter. The radio signal
can be sent directly to the target receiver. If this is not pos-
sible, the radio signal will be routed via other bidirectional
participants until it reaches the target receiver. The target
receiver executes the command and then sends a confirma-
tion back to the transmitter. The prerequisite for a bidirectio-
nal radio system is hence the radio transmitting capability
as well as the radio reception capability of all participating
components.
3.4 Principle of function
The Centero Server remains powered on at all times and is
integrated into the home network.
When the app Centero is executed, it automatically con-
nects to the Centero Server. Using the app Centero and the
Centero Server, you can operate all taught-in receivers.

10 | EN Ⓒelero GmbH
3.4.1 Connections on the Centero Server
Side view
left: Network connection
RJ-45 port to connect to a
suitable router
right: 2 USB ports
to connect the
Centero Transmitter Stick
Bottom view:
2 connecting contacts for
power supply
Latch (locking) for the
adapters used
3.4.2 Status indicator of the Centero Server
The status indicator on the upper side of the casing signals
different operating statuses.
top green lit: power supply
right green flashing: depending on CPU load
left green lit: after boot-up process
red lit: during check for updates
red flashing: during update process
11 | EN Ⓒelero GmbH
3.4.3 Power supply of the Centero Server
WARNING!
Danger of injury due to electric current.
Only change the wiring of the Centero Server when it is
dead resp. disconnected from the live socket.
• There are concealable connecting contacts with a latch
on the bottom side of the Centero Server; these are
used to connect to the different adapters (country-speci-
fic or with mains cable for small devices).
To establish power supply, select one of the supplied
plug adapters and connect it.
• Push the plug adapter onto the connecting contacts on
the rear side of the Centero Server. If required, push
down on the latch and remove the plug adapter.
• Some time after establishing the power supply, the left
status indicator will signal ready state by a permanent
green light.
3.4.4 Centero Transmitter Stick
The Centero Transmitter Stick ensures the bidirectional
radio communication with the receivers.
It is plugged into one of the USB ports on the Centero
Server.
Product features of the Centero Transmitter Stick
• 15-channel handheld radio transmitter for bidirectional
communication between transmitter and receiver(s)
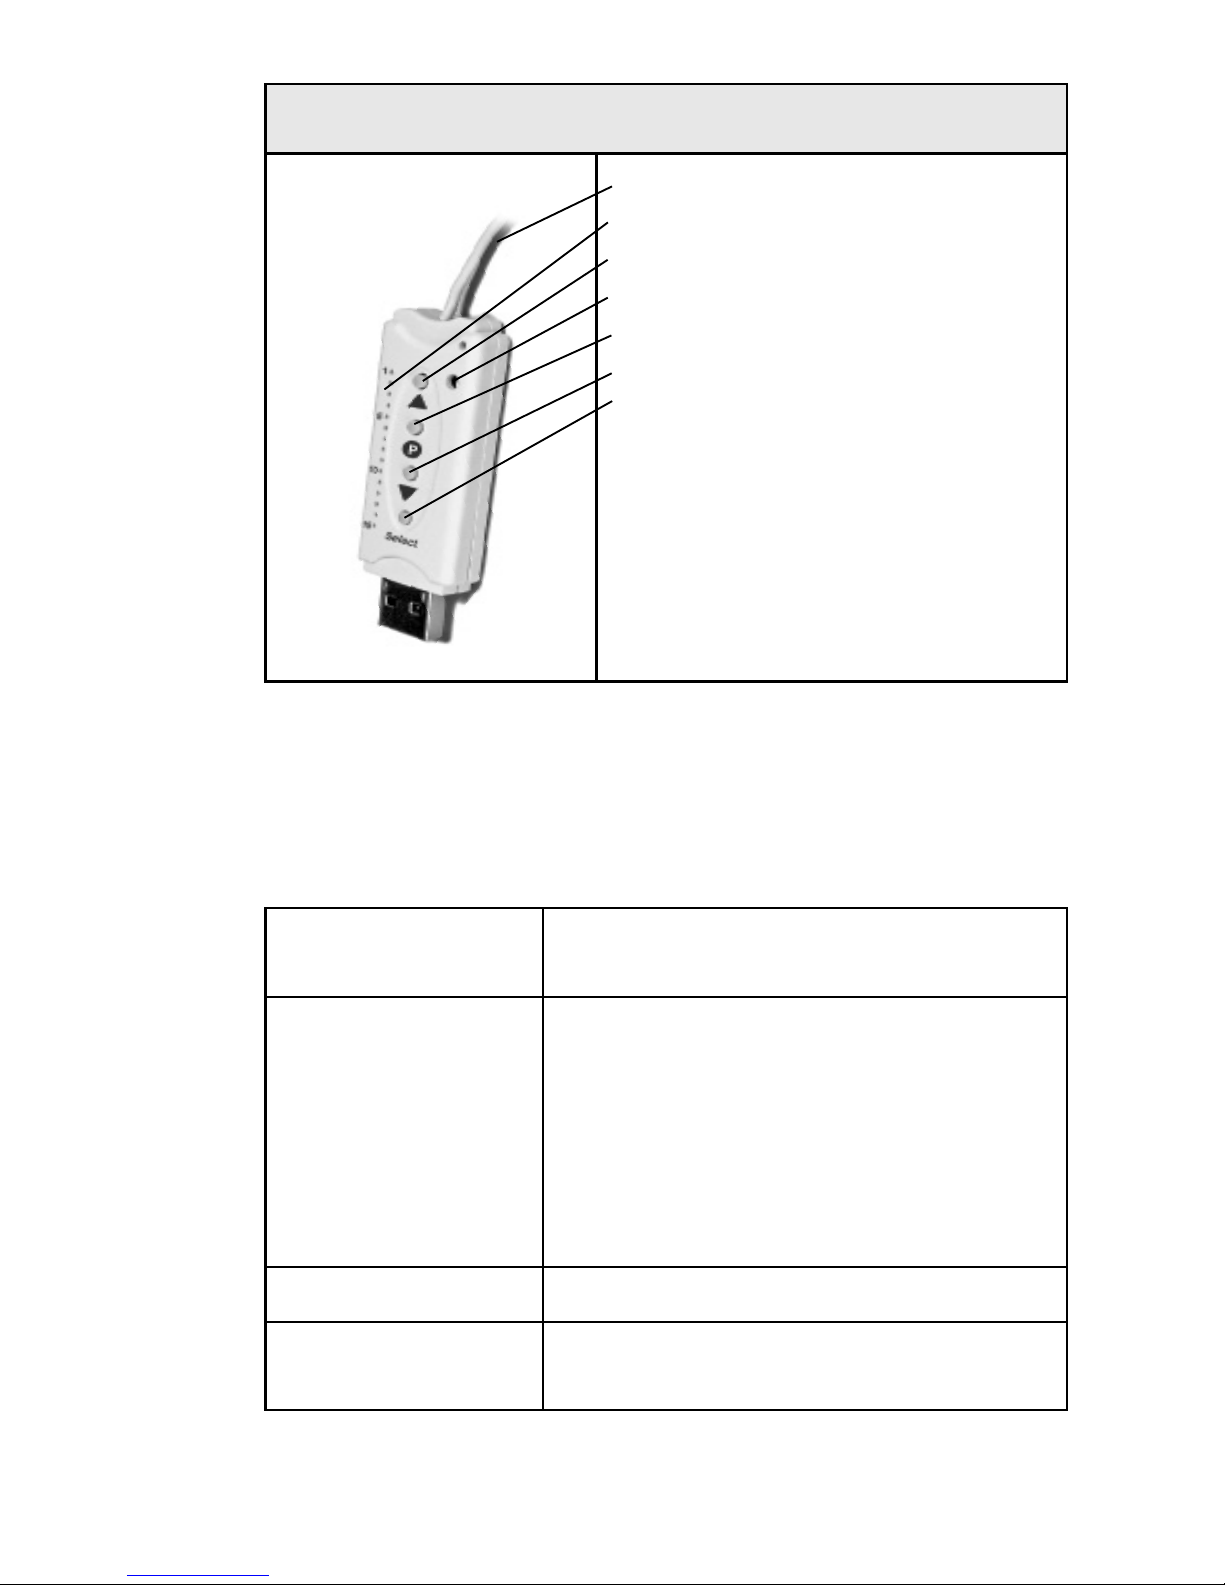
12 | EN Ⓒelero GmbH
Centero Transmitter Stick
1. Antenna
2. Channel indicator
3. UP button
4. Status indicator
5. STOP/Pbutton
6. DOWN button
7. Select button
3.4.5 Status indicator of the Centero Transmitter Stick
A radio signal is signalled on the Centero Transmitter Stick
by the status indicator light: The different colours have the
following meaning:
orange flashing Channel (transmitter) not taught-in
into any receiver
orange
flashing rapidly
Channel in bidirectional teaching
mode Operation of receivers already
taught-in not possible (except for
STOP button to cancel teaching
mode).
In group teach-in mode every 2 se-
conds (even without button pressing)
orange then green Receiver has received the signal
orange then
red flashing
One of the receivers did not receive
the signal

13 | EN Ⓒelero GmbH
3.5 Connections
To be able to use the Centero Server as central control, the
Centero Server must be connected to an unoccupied LAN
connection of a router.
Requirements:
Apple iOS device (e.g. iPhone, iPad, iPad mini) with elero
app Centero, home network with WLAN router.
For a mobile use of the app Centero outside your home
network, a one-time registration of the Centero Server with
our service partner (cf. Chapter 3.8.4, Remote Control) is
required to set up a defined communication.
3.6 Teaching-in the Centero Transmitter Stick
into one or multiple receivers
Requirements:
• To use the receiver control of the app Centero, at least
one receiver must be taught-in into the Centero Trans-
mitter Stick.

14 | EN Ⓒelero GmbH
Important:
The Centero Transmitter Stick has no battery. To teach-
in the Centero Transmitter Stick into a receiver you must
connect the stick to a USB port using the supplied USB
extension cable. You can connected the stick to the Centero
Server, a USB port on your PC, or a USB charger.
Select one of 15 channels by pressing the Select button.
Press the button until the desired channel is lit in the chan-
nel indicator.
1. When you have already electrically installed receivers,
you have to switch off the fuse and switch it on again
after a few seconds. The receiver will now be ready for
teach-in for approx. 5 minutes.
2. Press the STOP/P button on the Centero Transmitter
Stick for approx. 1 second. The shutters will now move
up and down for 2 minutes independently to show that
the receiver is in teach-in mode.
3. Press the UP button immediately after the upward mo-
vement starts (maximum delay: 1 second). The status
indicator is lit briefly. The shutters will then stop - start
up again - stop - and will finally move into the DOWN
direction.
4. Press the DOWN button immediately after the downward
movement starts (maximum delay: 1 second). The status
indicator is lit briefly. The shutters stop.
Important:
If the shutters do not stop, you will have repeat the teach-in
procedure.
The receiver is now taught-in on the selected channel of the
Centero Transmitter Stick.

15 | EN Ⓒelero GmbH
The Centero Server receives the information about the
devices taught-in into the Centero Transmitter Stick immedi-
ately after plugging the stick into the Centero Server.
This must be considered especially if the Centero Server
was used as power source for the Centero Transmitter Stick
during the teach-in procedure.
In this case you must remove the Centero Transmitter
Stick for a short period of time upon completion the
teach-in procedure and then plug it in again in order to
ensure that the Centero Server gets all receivers cur-
rently taught-in.
The radio receiver can now be operated via the Centero
Transmitter Stick plugged into the Centero Server.
3.6.1 Programming intermediate positions in the
receiver
Requirements:
The transmitter resp. channel is taught-in. The end positions
of the drive are set. The shutters are in the top end position.
1. Press the DOWN button to move the shutters just before
the desired position.
2. During this movement (while the DOWN button is
pressed) press the STOP/P button in addition.
The shutters stop. The status indicator is lit briefly.
The intermediate position is now programmed.
Programming ventilation / turning positions
Requirements:
The transmitter resp. channel is taught-in. The end posi-
tions of the drive are set. The shutters are in the bottom end
position.

16 | EN Ⓒelero GmbH
1. Move the shutters in the UP direction by pressing the UP
button until the ventilation louvres open up resp. until the
shutter blades start to turn. Hold the UP button during
the movement.
2. Press the STOP/P button in addition. The shutters stop.
The status indicator is lit briefly.
The ventilation / turning position is now programmed.
Moving to intermediate positions
Requirements:
The transmitter resp. channel is taught-in.
1. Press the the DOWN button two times. The status indi-
cator is lit briefly.
2. The shutters will move to the registered intermediate
position. For sunblinds, the shutter blades will be turned
automatically after they have arrived at the intermediate
position. When no intermediate position has been regis-
tered, the shutters will move to the bottom end position.
Moving to ventilation / turning positions
Requirements:
The transmitter resp. channel is taught-in.
1. Press the the UP button two times. The status indicator
is lit briefly.
2. The shutters will move to the registered ventilation /
turning position. When no ventilation / turning position
has been registered, the shutters will move to the top
end position.

17 | EN Ⓒelero GmbH
Deleting an intermediate position
1. Press the STOP/P button and the DOWN button.
2. Hold these buttons for approx. 3 seconds. The status
indicator is lit briefly.
Deleting a ventilation / turning position
1. Press the STOP/P button and the UP button.
2. Hold these buttons for approx. 3 seconds. The status
indicator is lit briefly.
3.6.2 Deleting a transmitter channel in the receiver
Deleting a single channel
1. Select the channel to be deleted.
2. Press and hold the UP, STOP/P, and DOWN buttons for
at least 6 seconds.
3. The status indicator is lit briefly.
The channel in the transmitter is now deleted.
The Centero Transmitter Stick is not designed to delete all
transmitters in the receiver. This feature has to be realised
with a separate handheld transmitter.
3.6.3 Connecting the Centero Transmitter Stick to the
Centero Server
Plug the taught-in Centero Transmitter Stick into one of
the two USB ports of the Centero Server (directly or by
means of the supplied USB extension cable).
The information about taught-in transmitters will be trans-
ferred to the Centero Server. Further actions can then be
performed via the app.

18 | EN Ⓒelero GmbH
3.7 App Centero
The "Centero" app can be found in the App Store (iTunes
Store) by typing in the keywords "elero" or "Centero" and
can then be downloaded and installed.
3.7.1 Initial login on the Centero Server
When a device is new, the Centero Server must be
searched and found first, then you can perform the regist-
ration. The corresponding is "+ tap: Search Centero
Server.“ When the search has been successful, select
the Centero Server found and trigger the actual login proce-
dure by pressing the login button. Login with the user name
"Admin" and the default password "Admin"; you will then
have to change and confirm your login password. These
data will be used for further logins.
The application will now attempt to perform a fully automatic
configuration.
After the app has started, the home screen to enter the
login data is displayed.
If the automatic configuration fails, you can switch to ma-
nual configuration mode. In this mode, you can specify
data on IP address, network port ("12345"), user name and
password for the user name in the respective fields.
3.7.2 Range of functions of the app Centero
The Centero app lets you operate the 15 channels of the
Centero Transmitter Stick. The app also features room and
scene creation, different switching times, etc.
3.7.3 Working with the app Centero
The features of the Centero Server with the Centero Trans-
mitter Stick will only be available after the user has autho-
rised themselves by entering user name and password.

19 | EN Ⓒelero GmbH
3.8 Menu structure of the app Centero
The user interface contains four main menus to manage
and control the registered receivers (taught-in into the Cen-
tero Transmitter Stick).
Rooms
Devices
delete
create
create
configure
delete
operate
Scenes
create
time-controlled scene
delete
settings
manage users
remote control
configuration
about
astro function
timer
astro function
3.8.1 Rooms menu
In the "Rooms" menu you can combine local receivers
which belong together in physical rooms. This logic allo-
cation is achieved by creating rooms (e.g. study, kitchen,
bedroom, living room, etc.).

20 | EN Ⓒelero GmbH
a) Creating rooms
To create a new room, tap the Edit button in the top right
corner of the "Rooms" main menu, then tap the "+" icon.
You can assign an unequivocal name using the keyboard.
In addition, you can assign one of the icons provided.
To return to the Rooms main menu, simply tap the Rooms
icon in the top left section of the menu bar.
b) Deleting rooms
To delete a room, simply swipe across the room you want to
delete or tap the Edit button (top right section of the menu
bar) and then tap the red minus icon (left of the displayed
icon). Finally tap the red Delete button on the far right in
the respective room's line (list item) to delete the correspon-
ding room (from the list of displayed rooms).
3.8.2 Devices menu
Receivers already taught-in into the Centero Transmitter
Stick will be displayed in the "Devices" menu automatically
after the stick has been plugged into the Centero Server.
You will always be informed about the steps to take and the
related status notifications by the intuitive guidance with
corresponding dialogues.
This menu also features an option to delete taught-in de-
vices (if you lose the Centero Transmitter Stick). The usual
procedure for deleting resp. removing a taught-in receiver
from the system is already explained in Chapter 3.6.2 "De-
leting a transmitter channel in the receiver."
Table of contents


