Elevated Access Sinoboom GTJZ1412 User manual

021 500 486 www.elevatedaccess.co.nz
GTJZ1412
& GTJZ1414
Maintenance Manual

Key Points
Before maintaining the machine, it is necessary to
read, understand and observe those safety rules,
operation instructions and maintenance instructions.
Only the trained and authorized personnel are allowed
to maintain the machine. It is necessary to always
keep this Manual along with the machine as a part of
it. Please contact with Hunan SINOBOOM Heavy
Industry Co., Ltd.
Table of Contents
Importance.......................................................2
Safety Rules ....................................................2
Product Performance Parameters....................4
Operating Procedures......................................8
Regular Maintenance Procedures ...................8
Procedure A...........................................13
A-1 Inspect All Manuals...............13
A-2 Inspect All Labels..................13
A-3 Inspect Damaged, Loose or
Lost Parts.......................................13
A-4 Inspect Hydraulic Oil Level ..14
A-5 Inspect Hydraulic Oil Leakage14
A-6 Functional Tests .....................14
A-7 Carry out Maintenance after 30
Days...............................................14
A-8 Inspect Battery.......................15
Procedure B...........................................16
B-1 Inspect Electric Wires ............16
B-2 Inspect Rim and Tire (Including
Mounting Nuts).............................16
B-3 Test Key Switch .....................17
B-4 Test Emergency Stop Buttons 17
B-5 Test Horn................................17
B-6 Test Braking Device ..............17
B-7 Testing Traveling Speed
(Platform in Lifted State)..............18
B-8 Testing Traveling Speed
(Platform in Fully Retracted State)18
B-9 Test Full Lifting and Full
Lowering Time..............................18
B-10 Inspect Hydraulic Oil...........19
B-11 Check the hydraulic tank
ventilation system .........................19
Procedure C...........................................20
C-1 Replace Air Filter of Hydraulic
Oil Tank ........................................20
C-2 Inspect Platform Weighing
System (Optional) .........................20
Procedure D...........................................20
D-1 Inspect Scissor Arm Installation
Bearing..........................................20
D-2 Inspect Base Frame Slider .....20
D-3 Replace Return Oil Filter of
Hydraulic Oil Tank........................20
Procedure E...........................................21
E-1 Inspect and Replace Hydraulic
Oil..................................................21
Maintenance Procedures ...............................22
Platform Components ...........................23
1-1 How to Remove Electric
Control Box from Platform...........23
1-2 How to Remove Platform.......23
1-3 How to Remove Extension
Platform.........................................23
Scissor Arm Part....................................24
2-1 How to Remove Scissor Arm .24
2-2 How to Remove Lifting
Cylinder.........................................24
Base Frame Components ......................25
3-1 How to dismantle the brake....25
3-2 How to dismantle the driving
motor .............................................25
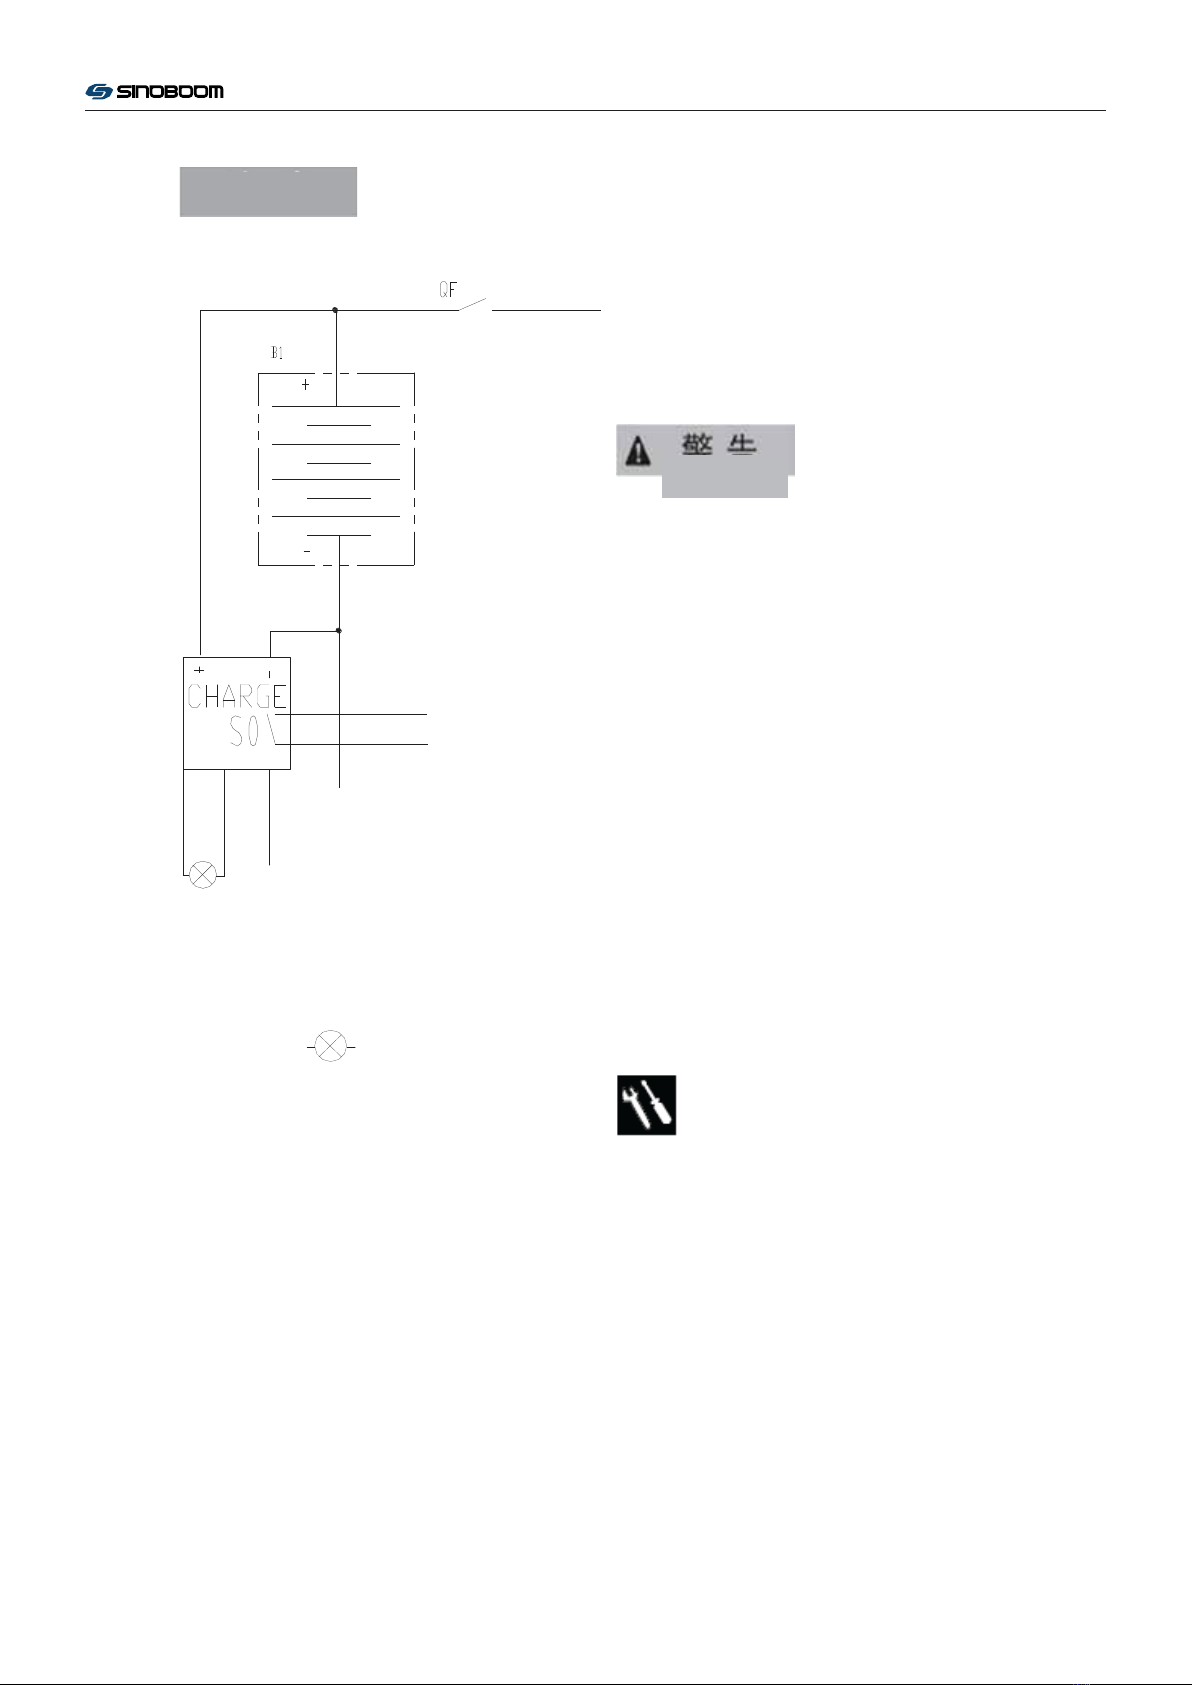
3-3 How to Remove Storage Battery26
3-4 How to Remove Hydraulic
Valve Block...................................26
3-5 How to dismantle the hydraulic
power unit .....................................26
3-6 How to Remove Hydraulic Oil
Tank...............................................26
3-7 How to Remove Steering Oil
Cylinder of Front Wheel ...............27
3-8 How to dismantle the front
wheel bracket ................................27
Hydraulic System..................................27
4-1 Detection of Function Pump...27
4-2 How to Remove Hydraulic
Pump .............................................28
GTJZ1412 & GTJZ1414 Maintenance Manual

4-3 Control valve block on the
platform.........................................29
4-4 Symbols of Hydraulic System 33
4-5 Hydraulic Schematic Diagram34
Electrical System...................................35
5-1 Use and Maintenance of
Lead-Acid Storage Battery ...........35
5-2 Trouble Diagnosis (Deltatech
System)..........................................40
5-3 Fundamental Troubleshooting 43
5-4 Electrical Symbols..................46
5-5 Electrical Schematic Diagram
(Deltatech system) ........................47
1
GTJZ1412 & GTJZ1414 Maintenance Manual

Importance
Before maintaining GTJZ1412 it is necessary to read,
understand and observe corresponding safety rules
and operation instructions.
This Manual provides detailed maintenance
information for the owner and the operator, and
specifies inspection, maintenance and troubleshooting
methods and procedures for the competent
professional maintenance personnel.
The execution of maintenance procedures requires
basic knowledge on machinery, hydraulic and
electrical aspects. Some maintenance procedures need
special skills, tools, lifting equipment and appropriate
work place. Therefore, it is strongly recommended to
maintain and repair at the designated service center of
the SINOBOOM.
Hunan SINOBOOM Heavy Industry Co., Ltd. will
provide accurate information and quality services.
However, the products will be improved continuously
and technical specification of product may be
modified without advance notice. We suggest the
users to update latest product maintenance
specifications regularly.
We will appreciate if the customers could inform us
the deficiencies of the products and propose
improvement measures. We will consider all
suggestions carefully and use them as the reference
for the preparation of maintenance specification and
other specifications. Please contact us by E-mail or
fax.
Safety Rules
Hazard
Failure to observe the instructions in this Manual and
corresponding operation manual would cause death or
serious injury accident.
Pay attention to the unsafe operations mentioned in
the operation manual when carrying out maintenance
procedures.
Do not operate, unless:
You have understood and observed the safe
operation rules in the operation manual
You shall have read, understood and observed
—Manufacturer’s instructions and safety rules
—User’s safety rules and workplace regulations
—All the applicable government regulations
You must use appropriate tools, lifting
equipment and work place.
Personal safety
All working staff on or around the machine must be
aware of any possible safety hazards. The personal
safety and the continuous and safe operation are the
most important.
Read the procedures carefully. The marks used in the
labels in this manual and on the machine are defined
as follows:
Safety warning mark- It is used to prompt
potential personal injuries. Observe all
safety prompts behind this mark for the
purpose of avoiding personal injuries or
death.
Red mark- It is used to prompt the urgent
hazardous cases; if not avoided, it would
lead to death or serious injuries.
Orange mark- It is used to prompt
potential hazardous cases; if not avoided,
it would lead to death or serious injuries.
Orange mark with safety warning- It is
used to prompt potential hazardous case;
if not avoided, it might lead to mild or
moderate personal injury.
Orange mark without safety warning- It is
used to prompt potential hazardous case;
if not avoided, it might lead to property
losses.
Green mark- It is used to prompt
operation or maintenance information.
It is necessary to wear protective goggles,
and work clothes.
With potential hazards such as movable
parts, components which could rotate
Hazard
Warning
Caution
Caution
Attention
2
GTJZ1412 & GTJZ1414 Maintenance Manual

freely or have not been fixed, lifting or moving weight.
Be sure to wear work boots.
Safety in Work Place
Keep sparks, flame and lit cigarette end
away from flammable and explosive
materials such as storage battery and
engine fuel. Equip qualified fire
extinguisher nearby.
Maintain all tools and work place
properly for future use. Ensure the
working environment to be clean and
prevent the sundries or fragment dropping
into the machine components, resulting in damages.
Ensure good ventilation and illumination
conditions in the work place and working
area.
Ensure any forklift, traveling crane or
other lifting/supporting equipment to
have sufficient bearing and lifting
capacity. Ensure to use steel wire rope or
belt with sufficient bearing capacity and in good
condition.
Do not use disposable fasteners (such as
split pins and self-locking nuts)
repeatedly. The components might
become invalid if they are used again.
Dispose the used hydraulic oil and other
fluid appropriately. Use appropriate
container. Protect the environment from
being polluted.
3
GTJZ1412 & GTJZ1414 Maintenance Manual

Product Performance Parameters
Parameter Items Unit GTJZ1412
Outline dimension
Length m 2.76
Width
m 1.25
Height
m 2.60
Ground clearance mm 100
Ground clearance (Pithole
protective device stretches)
mm 22
Total weight kg 3364
Design dimension
Maximum platform height
m13.8
Maximum working height
m15.8
Maximum horizontal
extension
m0.9
Maximum bearing capacity kg 227
Extended platform bearing capacity kg 120
Allowable quantity of people
working on the platform
Person 2 (indoor)/1 (outdoor)
Wheel base m2.22
Wheel span m1.25
Turning radius
Internal wheel m0
External wheel m2.56
Maximum allowable yawing force
(indoor/outdoor)
N400/200
Control voltage (DC) V24
Platform dimensions
Length m 2.64
Height m 0.81
Tire size
Diameter mm 380
Height mm 125
Oil volume
Hydraulic oil tank L 14
Hydraulic system
L42 (Oil tank)
Pressure of hydraulic system bar 240
System voltage (DC) V 24
Maximum noise for normal
working
dB 72
Traveling speed
4
GTJZ1412 & GTJZ1414 Maintenance Manual

Off-running status km/h 0~3.2
Lifting status km/h 0~0.8
Gradeability % 25
Lifting/lowering time s 83s~92s /55s~65s (No load)
Maximum allowable wind speed
(indoor/outdoor)
m/s 0/12.5 (Gale Level 6)
Maximum allowed inclined
angle
Front and rear 3°/Left and right 1.5°
5
GTJZ1412 & GTJZ1414 Maintenance Manual

Description of Hydraulic System
Normal temperature region (0℃to 40℃):
L-HM46;
Cold region (-25℃to 25℃): L-HV32;
Hot region
(>40℃): L-HM68;
Extremely cold region
(<-30℃): Special scheme to be determined;
Different hydraulic oil may be filled in
according to the requirements of the customer
upon delivery.
Hydraulic pump
Type Gear pump
Flow rate (at 3000r/min) 12L/min
Maximum driving pressure 248bar
Traveling motor
Type Orbit motor
Displacement 375cc/r
Functional valves
Pressure of function main safety valve 248bar
Pressure of lifting overflow valve 210bar
Pressure of steering overflow valve 120bar
Pressure of travelling overflow valve 248bar
Opening pressure of travelling brake 28 bar
Oil return filter
Oil return filter of hydraulic oil tank SP-06×10
Bypass pressure of oil return filter 2.5bar
6
GTJZ1412 & GTJZ1414 Maintenance Manual

Installation Instructions for Hydraulic Hoses and
Fittings
When removing or installing the hydraulic hoses and
fittings with O-ring, it is necessary to operate as per
the torque specified in the following table.
Hose fittings
Thread Torque Nm
G1/8A 20±1
G1/4A 35±2
G3/8A 50±3
G1/2A 75±5
G3/4A 120±8
G1A 180±10
G1 1/4A 240±15
7/16-20 21±2
Hoses
Thread Torque Nm
M12×1.5 19±1
M14×1.5 26±2
M16×1.5 40±3
M18×1.5 50±4
M22×1.5 70±5
M26×1.5 90±6
M30×2 120±8
M36×2 150±12
Tightening Procedures
1. Replace the O-ring. It is necessary to replace the
O-ring if the seal has been damaged. The O-ring
shall not be reused if the pipe fitting or the hose
has between tightened.
2. Lubricate the O-ring before installation.
3. Ensure to place and fix the O-ring properly.
4. Align the hose nut to the pipe fitting, and tighten
the nut.
5. Tighten the nut or the pipe fitting as per the
torque specified in the above table.
6. Perform all machine functions and inspect hoses,
hose fittings and relevant components to confirm
that no leakage occurs.
7
GTJZ1412 & GTJZ1414 Maintenance Manual

Operating Procedures
Energy
4 sets of 6V lead-acid cell in series for driving of a
24V DC motor. The gear pump is connected to the
output shaft of the motor with the spline to provide
power for the system.
Hydraulic System
All functions of the machine are driven by a hydraulic
system which is divided into two parts: one for the
travelling and steering functions and the other for the
lifting function of the platform.
When the motor is working, the hydraulic pump sends
the pressure oil to the function valve block which is
equipped with a directional valve and a flow
regulating valve for performing different actions and
adjusting the speed. In order to protect relevant
components and avoid overload of system pressure, a
relief valve is installed on the valve block.
Electrical System
4 separate 6V batteries are used in the system to drive
the hydraulic pump and drive a controller that controls
the lift function of the lift arm. The storage batteries
are re-charged with external power supply.
Machine Control
The functions of the machine are controlled with one
controller in this system. This controller is installed in
the ground control box. The controller exchanges data
through a high-speed data bus.
Safety Measures
A series of angle sensors and limit switches provides
signals to the controllers. The level sensor measures
the angle of vehicle body on axis X and axis Y; when
the angle on axis X exceeds 1.5° or the angle on axis
Y exceeds 3°, the alarm will be triggered, and the
machine could not lift, travel or turn.
Travel switch shall be used to confirm if the pit
protective mechanism is opened enough. If the
platform is lifted off ground by 2.5m, the pit
protective plate is not stretched, and the sensor has not
detected the signals, the platform will stop rising.
Regular Maintenance Procedures
Compliance
The maintenance and inspection should be
completed by trained and competent personnel.
The regular maintenance inspection consists of
daily, quarterly, semiannual, annual and biennial
maintenance. The maintenance and inspection
personnel must inspect and maintain according
to the maintenance and inspection reports, and
fill in maintenance and inspection reports in
details.
Warning: Failure to carry out
maintenance procedures
specified herein timely and
regularly may lead to death, serious injury or machine
damages.
The damaged or troubled machine must be
labeled and moved away timely.
The damaged or troubled machine must be
repaired before operation.
All records shall be stored for at least three
years.
The machine which has not been maintained by
over three months must be subjected to quarterly
inspection.
Unless otherwise specified, the maintenance
procedures shall be carried out according to the
following precautions:
Park the vehicle on level firm ground
Engage the platform in loaded state
Turn the key switch to the position “OFF” and
take down the key
Turn the red emergency stop buttons on
platform controller and ground controller to the
position “OFF”
Disconnect all DC power supplies on the
machine
Lock the tires
Warning
8
GTJZ1412 & GTJZ1414 Maintenance Manual

Description
This section provides detailed operation procedures
for the regular maintenance and inspection.
Symbol Definition
Safety warning mark- It is used to prompt
potential personal injuries. Observe all safety
prompts behind this mark for the purpose of
avoiding personal injuries or death.
Red mark- It is used to prompt the urgent
hazardous cases; if not avoided, it would lead to
death or serious injuries.
Orange mark- It is used to prompt potential
hazardous cases; if not avoided, it would lead to
death or serious injuries.
Orange mark with safety warning- It is used to
prompt potential hazardous case; if not avoided,
it might lead to mild or moderate personal injury.
Orange mark without safety warning- It is used
to prompt potential hazardous case; if not
avoided, it might lead to property losses.
Green mark- It is used to prompt operation or
maintenance information.
Maintenance Symbol Definition
The following symbols are
used in this manual for
helping the reader understand
the intent of this specification. If one or several
symbols are marked in front of the maintenance
procedure, it is defined as follows:
Indicate the tools for carrying out this
operation
Indicate new parts for carrying out this
operation
Indicate that hydraulic motor must be
stopped before carrying out this operation
Indicate that hydraulic motor must be
started before carrying out this operation
Indicate that this operation must be carried
out by the supplier
Maintenance Schedule
There are five types of repair & inspection to be
carried out according to the schedule: Every day,
every quarter, every six months, every year and every
two years. With consideration to the repeated
procedures, the “Regular Repair Procedure Section”
and the “Repair & Inspection Report” shall be
classified into five sections- A, B, C, D and E. The
necessary procedure combination for regular
inspection shall be determined according to the
following table.
Inspection Interval Inspection Procedures
Every day or every 8 hours A
Every quarter or every 250 hours A+B
Every half a year or every 500 hours A+B+C
Every year or every 1,000 hours A+B+C+D
Every two years or every 2,000 hours A+B+C+D+E
Repair & Inspection Report
The repair & inspection report shall include the
inspection table of each regular inspection.
Duplicate the repair & inspection report for each
inspection. Store the completed tables by over three
years.
Attention
Hazard
Warning
Caution
Caution
Attention
9
GTJZ1412 & GTJZ1414 Maintenance Manual

Pre-delivery Inspection:
It is quite necessary to carry out the preparation before
delivery.
Carry out this procedure each time before delivery for
the convenience of finding before putting the machine
into service whether there are any obvious errors.
Damaged or troubled machine shall not be used. It is
necessary to label and move away the machine if
finding damaged or abnormal machine.
The machine repair must be completed by the
competent repair personnel strictly according to the
repair manual.
Daily maintenance must be completed by the
competent operator according to the provisions of this
Manual.
Description:
Use the operation manual for this machine.
The preparation before delivery includes inspection
before delivery, maintenance procedures and
functional inspections.
Record the inspection results. If any inspection result
is N, it is necessary to stop the machine, repair the
machine and then re-inspect the machine, and mark R.
Notes:
Y—Yes, the machine is in good condition.
N—No, the machine has trouble.
R—Repaired, the machine has been repaired.
Record Form of Preparation before Delivery
Items Y N R
Inspection before
Delivery
Maintenance Procedures
Functional Inspections
Model
Serial No.
Date
User
Signature of Inspector
Position of Inspector
Organization of Inspector
Attention
10
GTJZ1412 & GTJZ1414 Maintenance Manual

Maintenance Record Form:
Model
Serial No.
Date
User
Signature of Inspector
Position of Inspector
Organization of Inspector
Description:
Record the following results after inspection on each
step.
Time Interval Inspection Procedures
Every day or every 8 hours A
Every quarter or every 250 hours A+B
Every half a year or every 500 hours A+B+C
Every year or every 1,000 hours A+B+C+D
Every two years or every 2,000 hours A+B+C+D+E
Inspect according to the steps in this section to get
acquainted with the inspection procedures.
Record the inspection results. If any inspection result
is N, it is necessary to stop the machine, repair the
machine and then re-inspect the machine, and mark R.
Notes:
Y—Yes, the machine is in good condition.
N—No, the machine has trouble.
R—Repaired, the machine has been repaired.
Record Form A
Items Y N R
A-1 Inspect All Manuals
A-2 Inspect All Labels
A-3 Inspect Damaged, Loose or Lost
Parts
A-4 Inspect Hydraulic Oil Level
A-5 Inspect Hydraulic Oil Leakage
A-6 Functional Inspections
Carry out Inspections of New Vehicle after 40
Working Hours
A-7 Carry out Maintenance after 30
Days
Carry out Inspections Every 125 Hours
A-8 Inspect Battery
Record Form B
Items Y N R
B-1 Inspect Electric Wires
B-2 Inspect Rim and Tire (Including
Mounting Nuts)
B-3 Test Key Switch
B-4 Test Emergency Stop Buttons
B-5 Test Horn
B-6 Test Braking Device
B-7 Test Traveling Speed (Platform in
Lifted State)
B-8 Test Traveling Speed (Platform in
Fully Retracted State)
B-9 Test Full Lifting and Full Lowering
Time
B-10 Inspect Hydraulic Oil
B-11 Inspect Ventilation System of
Hydraulic Oil Tank
Record Form C
Items Y N R
C-1 Replace the hydraulic oil tank air
11
GTJZ1412 & GTJZ1414 Maintenance Manual

filter
C-2 Inspect Platform Weighing
System (Optional)
Record Form D
Items Y N R
D-1 Inspect Scissor Arm Installation
Bearing
D-2 Inspect Base Frame Slider
D-3 Replace Return Oil Filter of
Hydraulic Oil Tank
Record Form E
Items Y N R
E-1 Inspect and Replace Hydraulic Oil
12
GTJZ1412 & GTJZ1414 Maintenance Manual

Procedure A
A-1 Inspect All Manuals
Storing the operation manual and the maintenance
manual in appropriate place is of great importance to
the safe operation of the machine. The manuals shall
be stored in the dedicated storage box on the platform.
The illegible or damaged manuals could not provide
necessary safety and operation information for safe
operation.
1. Inspect and confirm that the document box is
placed on appropriate position of the platform.
2. Inspect and confirm that the operation manual
and the maintenance manual are stored in the
storage box on the platform properly.
3. Inspect the pages of the manuals and confirm that
they are legible and intact.
4. Return the manual into the storage box after use.
If needing to replace the
manual, please contact
with Hunan SINOBOOM
Heavy Industry Co., Ltd.
A-2 Inspect All Labels
Maintaining all safety and prompt labels properly is of
great importance to the safe operation of the machine.
The labels are used to prompt the operator the
potential risks in the operation process, and
meanwhile provide operation and maintenance
information to the user. The illegible labels could not
guide the operator properly, and might result in unsafe
operation.
1. Consult to the label section in the “GTJZ1412
Operation Manual” and determine the correct
positions of the labels according to the label list
and chart.
2. Inspect whether all labels are legible and intact;
replace the damaged and illegible labels timely.
If needing to replace the
labels, please contact with
Hunan SINOBOOM Heavy Industry Co., Ltd.
A-3 Inspect Damaged, Loose or Lost Parts
Inspecting the condition of the machine daily is of
great importance to the safe and reliable operation of
the machine. It would lead to unsafe operation if the
damaged, loose or lost parts have not been found and
repaired timely.
Observe the entire machine and check whether any
parts are damaged, installed improperly or lost,
including:
Electrical components, wirings and cables
Hydraulic power unit, oil tank, fittings, hoses,
hydraulic cylinders and valve blocks
Storage battery pack and its connection
Driving motor, brake device and fastening bolts
Tyre and fastening nut
Power unit
Limit switch and horn
Alarms and indicator lamps (if provided)
Nuts, bolts and other fasteners
Intermediate hurdles of entrance or door for
platform
Pit-hole protector
Extended zone of platform
Pivot of scissors arm and fastener
Platform joystick
Fastening bolts on the sliding block of the
platform
Attention
Attention
13
GTJZ1412 & GTJZ1414 Maintenance Manual

For any damaged, improperly installed or missing
parts, the new ones should be replaced immediately
and installed correctly. If the fasteners are found loose,
they should be tightened immediately.
A-4 Inspect Hydraulic Oil Level
Ensuring appropriate hydraulic oil is of great
importance to the normal operation of the machine.
The hydraulic components may be damaged of the
hydraulic oil level is inappropriate. By virtue of daily
inspection, the observer could learn about the oil level
changes so as to find the problems existing in the
hydraulic system.
Attention: Perform this procedure by opening the
revolving door on the right side of the chassis.
Observe the graduated lines on the side board of the
hydraulic oil tank.
Oil level of the hydraulic
oil shall be at the top
“FULL” position of the
liquid level meter.
A-5 Inspect Hydraulic Oil Leakage
Preventing hydraulic oil leakage is of great
importance to the safe operation and normal work of
the machine. It would lead to hazardous situation,
impair the machine performance and damage the
components if the leakage has not been found.
Observe whether there are overflowing, dripping or
residual marks on or around the following
components:
Hydraulic oil tank- filter, pipe fittings, oil pipe, power
unit
All hydraulic cylinders, pumps and Manual release
valve
All hydraulic valve blocks
The area around the machine
A-6 Functional Tests
Inspect Platform and Ground Controller
Testing functional switches and emergency stop
buttons of machine is of great importance to the safe
operation of the machine. If any function could not
operate normally or the emergency stop buttons could
not stop all functions, it would lead to unsafe cases.
Any function shall operate stably and reliably, and
there shall be no swaying, or strong and abnormal
noise.
Inspect Ground Controller
1. Turn the key switch to the ground controller.
2. Turn the functional switches on ground control
panel.
Result: All functions shall be performed normally
(refer to “Operation Manual” for the indication of
specific functions).
Inspect Platform Controller
1. Turn the key switch to the platform controller.
2. Try to press the function control handle of the
machine, turn the switch or the button.
Result: All functions shall be performed normally
(refer to “Operation Manual” for the indication of
specific functions).
A-7 Carry out Maintenance after 30 Days
The 30-day maintenance is a kind of one-off
maintenance after new equipment operates by about
30 days or 40 hours. After finishing this maintenance,
carry out relevant maintenance as per normal time
Fastening bolts
on the sliding
block of the
platform
Attention
Fastening bolts
on the sliding
block of the
platform
14
GTJZ1412 & GTJZ1414 Maintenance Manual

interval.
Carry out according to the following procedures:
B-1 Replace Return Oil Filter Element
B-3 Inspect Tightening Torque of Fixing Nuts for
Tires
A-8 Inspect Battery
Carry out this procedure
every 125 hours.
Good battery condition is of great importance to the
normal and safe operation of the equipment. The
equipment components may be damaged and it might
lead to hazardous situation if the electrolyte level is
inappropriate, the cable is damaged or is not
connected firmly.
Touching battery charger
conductor might lead to
death or serious injuries.
Take down all ear rings, wrist watch and other
jewelries.
The battery contains acid liquor which shall be
prevented from leakage. Do not touch it. Neutralize
the leaking acid liquor with sodium carbonate
solution.
Before carrying out this
operation, it is necessary to
charge the battery fully.
Description of battery level:
Display of electric quantity for
platform Proportion Description
90-100%
The battery
has been
fully charged
70%
70% of the
battery
capacity
50%
50% of the
battery
capacity
30%
30% of the
battery
capacity
20%
The batter
level is low
and the
battery must
be
re-charged
10%
The battery
level is very
low and the
machine
action
becomes
slow
For judging the status of
the battery more accurately,
it is necessary to charge the
battery fully and put aside by 24h.
1. Wear protective clothing and goggles properly.
2. Ensure that the connections of battery cable have
not been corroded.
3. Ensure that the battery is installed reliably and
the cable is connected tightly.
4. Open the vent caps of two sets of rack and
inspect the density of the electrolyte of individual
battery rack with liquid densimeter.
Result: It is necessary to replace the battery if the
electrolyte density of any battery pack is smaller than
1.026.
5. Inspect the electrolyte level. Supplement distilled
water from the water inlet on the top of the
battery if necessary. Do not overflow.
6. Install the cap of battery electrolyte drain outlet.
7. Inspect the line connection of battery and ensure
the connection to be correct.
8. Connect the charging plug to 220V socket.
Result: The battery could be re-charged normally, and
the charge indicator is lit up.
Attention
Warning
Attention
Attention
15
GTJZ1412 & GTJZ1414 Maintenance Manual

It is necessary to re-charge
when the battery level is
about 20%. It is prohibited
to re-charge after the battery has been used up.
S0 charger
QF power-off switch
Charge indicator
Procedure B
B-1 Inspect Electric Wires
The maintenance of electric wires is of great
important to normal and safe operation of the machine.
It might lead to unsafe operations or serious injuries if
the blown, bruised, corroded or broken wires have not
been found and replaced
timely.
Touching live conductor
might lead to death or
serious injuries. Take down all ear rings, wrist watch
and other jewelries.
1. Inspect whether there are burned, bruised,
corroded or loose wires in the following areas:
Wiring harness of storage battery
Charger harness
Wiring harness of scissor arm
Power unit harness
Ground controller junction box
Platform controller junction box
2. Inspect the flexile joints, and confirm that the
joints have not become loosened and the sensor
lines have not been damaged.
B-2 Inspect Rim and Tire (Including Mounting
Nuts)
Good maintenance of rims and tires is great
importance to the safety. The machine might tip over
if the rim or the tire has problems. The components
might be damaged if the problems have not been
found and repaired timely.
The machine is equipped with solid tires which do not
need to be inflated.
1. Inspect whether there are cuts, cracks, puncture
or abnormal wear patterns on all tires.
2. Inspect and confirm that all rims are free from
damage, buckling deformation and welding
cracks.
Attention
Warning
16
GTJZ1412 & GTJZ1414 Maintenance Manual

3. Take down the split pin, inspect and confirm that
the mounting nuts have been tightened with
correct torque.
When inspecting the
retaining nut, it is
necessary to replace the
split pin frequently.
4. Replace the split pin, and bend it to locking
position.
B-3 Test Key Switch
The flexible operation of key switch is of great
importance to the safety of the machine. Failure of
key switch might cause hazardous operation.
A key switch is on the ground control panel of the
machine and is used to control the On-Off of the
power supply and select upper/lower platform control.
When inspecting this item,
it is necessary to operate
on the ground and not to
stand on the platform.
1. Release the emergency stop buttons on upper and
lower platforms.
2. Turn the key switch to the position of lower
platform control.
Result: The power indicator lamp is lit up and the
upper platform control becomes invalid.
3. Turn the key switch to the position of upper
platform control.
Result: The power indicator lamp is lit up and the
lower platform control becomes invalid.
4. Turn the switch to the middle position (“OFF”).
Result: All actions become inoperative.
B-4 Test Emergency Stop Buttons
The function of the emergency stop buttons is of great
importance to the safe operation of the machine. If the
emergency stop buttons fail, the power unit and the
machine could be stopped under emergency. It would
put the personnel working on the ground and the
platform in danger.
The ground controller shall
precede over the platform
controller (including emergency stop buttons).
1. Release the emergency stop button of lower and
upper platforms, and turn the key switch to the
ground control position.
2. Press the emergency stop button on the ground
operation panel.
Result: All actions of the machine become
inoperative.
3. Release the emergency stop button of lower and
upper platforms, and turn the key switch to the
platform control position.
4. Press the emergency stop button on the platform
operation panel.
Result: All actions of the machine become
inoperative.
The ground and platform
emergency stop buttons
may stop all actions of the
machine even the key switch is turned to the platform
controller.
B-5 Test Horn
The horn function is of great importance to the safe
operation of the machine. If the horn button is pressed
on the platform controller, the horn will be ringed on
the base frame to warn the personnel on the ground.
the operator could not send safety warning signal to
the personnel on the ground if the horn function fails.
1. Release the emergency stop button of lower and
upper platforms, and turn the key switch to the
platform control position.
2. Press the horn button on the platform controller.
Result: The horn rings.
B-6 Test Braking Device
Proper brake is of great importance to the normal and
safe operation of the machine. The braking is required
to be stable, shock-free and noise-free.
This machine applies rear wheel braking.
The vehicle is no-loaded
and the boom is retracted
fully.
Attention
Attention
Attention
Attention
Attention
17
GTJZ1412 & GTJZ1414 Maintenance Manual

1. Turn the key switch to the platform control
position.
2. Operate the handle to make the vehicle run on
flat pavement at maximum speed, and then
release the handle rapidly.
3. Measure the braking distance of the vehicle. The
braking distance is required to be less than
0.45m.
The vehicle must be park
on the slope with
maximum gradient at
which it could get on, and shall not slide.
4. When the vehicle is fully-loaded, the boom has
been extended fully, the vehicle is running on the
flat pavement at the maximum speed, the vehicle
braking distance shall be less than 0.05m after
the handle is released rapidly.
B-7 Testing Traveling Speed (Platform in Lifted
State)
Reasonable driving speed is of great importance to the
safe operation of the machine. The driving function
shall respond to the operations of the operator rapidly
and stably, free from swinging, impact and abnormal
noise.
The machine shall be placed on flat, level and
barrier-free firm ground.
1. Draw two about 12m lines from the start point to
the end point on the ground.
2. Turn the key switch to the platform control
position.
3. Lift the platform off ground by 2.5m and open
the pit protective device.
4. Operate the control handle and drive the vehicle
from start point to end point.
Result: Run at the speed of 0.8km/h.
5. Move the high/low-speed selection switch
(tortoise symbol) once, push the control handle to
the maximum position and drive the vehicle from
start point to end point.
Result: Run at low speed (0.8km/h).
B-8 Testing Traveling Speed (Platform in Fully
Retracted State)
Reasonable driving speed is of great importance to the
safe operation of the machine. The driving function
shall respond to the operations of the operator rapidly
and stably, free from swinging, impact and abnormal
noise.
The machine shall be
placed on flat, level and
barrier-free ground.
1. Draw two about 12m lines from the start point to
the end point on the ground.
2. Turn the key switch to the platform control
position.
3. The platform is in the fully retracting state, and
the pit protective devise is also in the retracting
state.
4. Operate the control handle and drive the vehicle
from start point to end point.
Result: run at high speed (3.2km/h).
5. Move the high/low-speed selection switch
(tortoise symbol) once, push the control handle to
the maximum position and drive the vehicle from
start point to end point.
Result: Run at low speed (1.6km/h).
B-9 Test Full Lifting and Full Lowering Time
Appropriate lifting or lowering speed is of great
importance to the safe operation of the machine. The
control and response shall be able to respond to the
operations of the operator rapidly and stably.
Select a barrier-free testing area with firm and level
surface.
1. Release the emergency stop button, and turn the
key switch to the lower platform control.
2. Move the platform up/down switch to the up
Attention
Attention
18
GTJZ1412 & GTJZ1414 Maintenance Manual
This manual suits for next models
1
Table of contents
Other Elevated Access Scissor Lift manuals
Popular Scissor Lift manuals by other brands

John Bean
John Bean Spacesaver 9000 Series Installation and operation manual

Skyjack
Skyjack SJ9233 RT Operation manual

Upright
Upright MX Series Service and maintenance manual

Oshkosh Corporation
Oshkosh Corporation JLG ES1330L Operation and safety manual

Mec
Mec 1330SE Service and parts manual

Magni
Magni W 8 Use and maintenance manual

Bend-Pak
Bend-Pak P-6FB Service manual

twin busch
twin busch TW SA 42 U V2 Installation, operation and maintenance manual

Skyjack
Skyjack SJIII Series Maintenance & parts manual

TECHNOLIFT
TECHNOLIFT SLA-16 Installation, operation & maintenance manual

Genie
Genie GS-2669 RT Operator's manual

GMG
GMG 1330-ED Service manual