Elite Fitness Trimline 2000 User manual
RECORD SERIAL NUMBER
Elite Fitness Trimline 2000
ASSEMBLY MANUAL

2
CONTENTS
Important Safety Instrucons 3
Assembly Instrucons 5
Moving and Storage Instrucons 10
User Instrucons 11
Care and Maintenance 16
Maintenance Log 18
Warranty Descripon 19
Warm-Up Exercises 20
Training Stages 21
Parts List 22
Exploded Drawing 23
Thank you for purchasing the Elite Fitness Trimline 2000 Treadmill.
For over 20 years, Elite Fitness™ has been New Zealand’s largest supplier of tness equipment. Our
aim and vision is to provide you Elite™ branded products, tested to the highest standard for quality
and biomechanics at the best possible price.
Please read through this manual to familiarise yourself with the operaon of your new Elite Fitness
Trimline 2000 Treadmill. Doing so will help to insure that you get the most out of your machine,
enjoying safe and eecve workouts ahead.
Even though we go to great eort to ensure the quality of each product we produce, occasional
errors and or omissions do occur. In any event should you nd this product to have either a
defecve or a missing part, please contact us for a replacement.
SERVICE & WARRANTY
For service and warranty assistance please visit:
www.elitetness.co.nz/service
Online forms are available for Service, Warranty and Parts requests.
(09) 258 9067
Elite Fitness HQ
28 Morrin Road,
St. Johns
Auckland, New Zealand
info@elitetness.co.nz
0800 243 834
www.elitetness.co.nz

3ELITE FITNESS TRIMLINE 2000 TREADMILL ASSEMBLY MANUAL
The following denion applied to the word “WARNING” when used in this manual:
Used to call aenon to POTENTIAL hazards that could result in
personal injury.
READ ALL INSTRUCTIONS BEFORE USING THE MACHINE
This product has been designed for home use only. Product liability and warranty condions will
not be applicable to products being subjected to professional use or products being used in a
commercial environment. e.g Gym Centre.
This exercise machine is built for opmum safety. However, certain precauons apply whenever
you operate a piece of exercise equipment. Be sure read the enre manual before you assemble or
operate your machine. In parcular, note the following safety precauons.
— Read all instrucons in this manual before using this equipment.
— Use the machine only for its intended use as described in this manual.
— Inspect and ghten all the loose parts before this equipment is used.
— Keeps hands away from moving parts.
— Keep children and pets away from the machine at all me. DO NOT leave children unaended
in the same room with the machine.
— Before using the machine to exercise, always do stretching exercises to properly warm up.
— Inspect the machine before each use; make sure all of the connecons are ghtly secured.
— Only one person at a me should use the machine.
— If the user experiences dizziness, nausea, chest pain, or any other abnormal symptoms, STOP
the workout at once. CONSULT A PHYSICIAN IMMEDIATELY.
— Posion the machine on a clear, levelled surface. DO NOT use the machine near water or
outdoors.
— Always wear appropriate workout clothing when exercising. DO NOT wear robes or other
clothing that could become caught in the machine. Sporng shoes are recommended when
using the machine.
— Do not place any sharp object around the machine.
— Disabled persons should not use the machine without a qualied person or physician in
aendance.
— Never operate the machine if the machine is not funconing properly.
— Only carry out training work on the equipment when it is in perfect working order. Only use
original spare parts in the event of a repair.
— Do not use strong solvents for cleaning, and only use the tools supplied, or suitable ones of
your own, for any repairs that may be required. Please dispose of the packaging and any parts
that have to be replaced subsequently (all parts for the unit) at suitable collecng points or
containers with a view to saving the environment.
— Not for therapeuc use.
IMPORTANT SAFETY INSTRUCTIONS

4
WARNING: Before beginning any exercise programme, consult your physician. This is especially
important for persons with pre-exisng health problems. The seller assumes no responsibility for
personal injury or property damage sustained by or through the use of this product.
SERVICE HINTS: The high quality standard of this product only will be kept if you, on a regular
basis, check all screw connecons and moving parts on proper ng. Damaged parts need to be
changed immediately. During the me of repair the product must not be used by anybody.
IMPORTANT HINTS:
A) This product has been tested in accordance with the requirements of EN 957-1/A1, EN 957-5,
standard, Class HA (HOME USE). The maximum load is limited to 100KG.
B) Parents should be aware of the risk factor of young children playing on tness equipment
unaended. Make sure that children are instructed properly in the use of the product and in
the controlled execuon of the dierent exercises. Misuse of the product could result in
serious injury.
PRODUCT SPECIFICATIONS
User Weight Capacity:
Dimensions:
Shipping Weight:
Net Weight: 42kg
Power Requirements: 220V 50-60Hz
48kg
152 x 70 x 142 cm
100kg

5ELITE FITNESS TRIMLINE 2000 TREADMILL ASSEMBLY MANUAL
NOTE:
1. Above described parts are all the parts you need to assemble this treadmill. Before you start to
assemble, please check the hardware packing to make sure they are included.
2. Please nd tools in the hardware pack to help you assemble this treadmill easier.
HARDWARE LIST
Descripon Q’ty
M8 Bolt 4
Silicone Oil 1
Allen Wrench 1
Safety Key 1
Safety Key
M8 Bolt Silicone Oil
Allen Wrench

6
ASSEMBLY INSTRUCTIONS
STEP 1
— Li the upright posts
Installation Tools
5# L Key (46) 1 PC
Open End Wrench (80) 1 PC

7ELITE FITNESS TRIMLINE 2000 TREADMILL ASSEMBLY MANUAL
STEP 2
— Use the supplied bolt(51) to x the upright post ghtly.
ASSEMBLY INSTRUCTIONS

8
STEP 3
— Use the supplied bolt (51) to x the console
ASSEMBLY INSTRUCTIONS

9ELITE FITNESS TRIMLINE 2000 TREADMILL ASSEMBLY MANUAL
ASSEMBLY INSTRUCTIONS
CONGRATULATIONS
Assembly of your Elite Fitness Trimline 2000 Treadmill is now complete! Be sure to fully inspect
your machine before using it for the rst me.
Failure to visually check and test and tech the assembly before use can cause damage to the
Elite Fitness Trimline 2000 Treadmill and serious injury to users and bystanders and can also
compromise the eecveness of your exercise program.
10
MOVING AND STORAGE INSTRUCTIONS
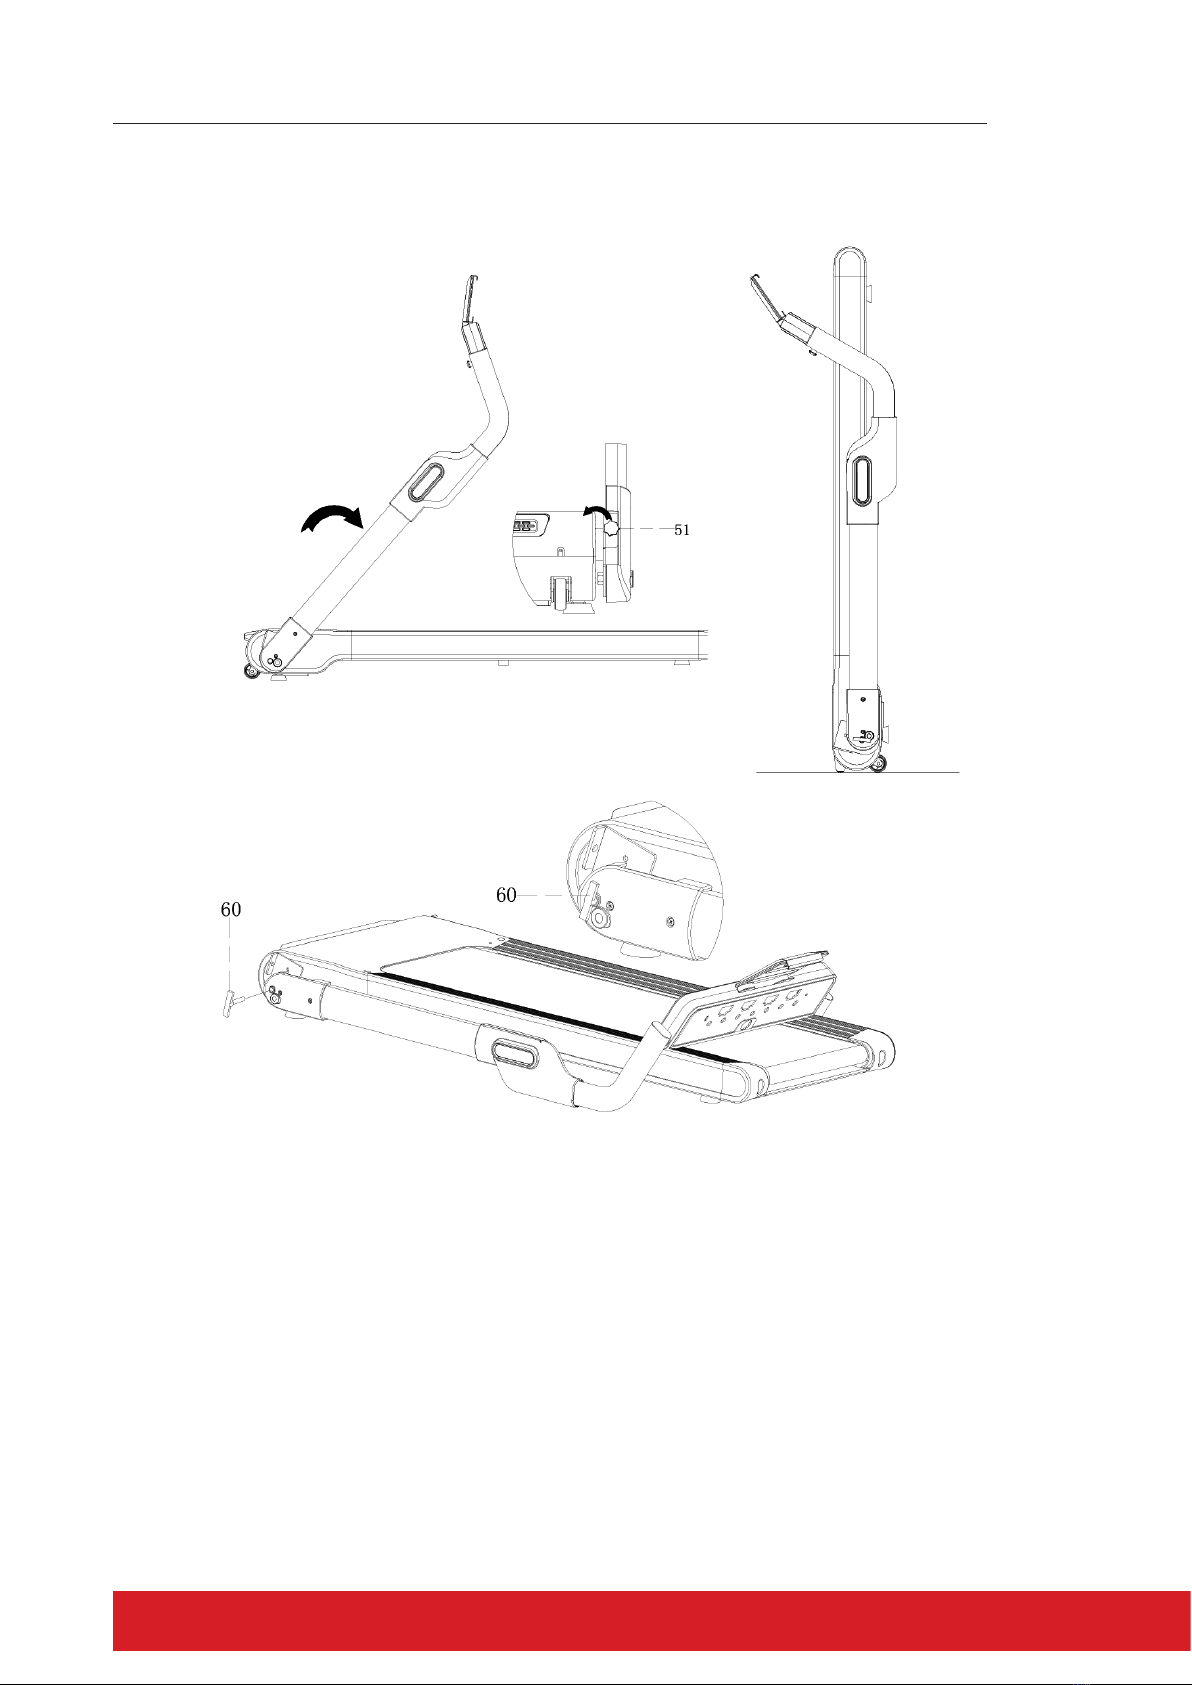
FOLDING
— Release the Bolt (No 51) from both upright
post.
— Lock the Bolt (No 60) on the upright post.

11ELITE FITNESS TRIMLINE 2000 TREADMILL ASSEMBLY MANUAL
USER INSTRUCTIONS
Start Quick Start or Program Start
Stop To stop the treadmill while exercising and reset the computer
Program Displays Program selecon
Mode To select Programs and conrm values
Time Displays Time remaining or total Time
Calories Displays remaining Calorie burn or total Calories burned
Distance Displays remaining Distance or total Distance (km)
Distance Displays remaining Distance or total Distance (km)
Speed Displays the running Speed (1-16km/h)
Incline / Adjusts the incline while in use
Speed+/– Adjusts the speed while in use. Adjusts program values.
START
/STOP
SPEED
MODEPROG
SPEED
START
/STOP
PROG
SPEED SPEED
SPEEDTIME DISTANCE
CALORIES
US B
MODE

12
Start/Stop
Normal startup aer 3 seconds countdown with the lowest speed 1.0. Press Stop to stop gradually.
Program
12 pre-set programs, 3 users (U1 - U3), 3 mode, body fat (F1-F5)
Mode
Press Mode to select me, distance or calories as countdown mode. Press + / - to alter gure and
Start to begin workout.
Speed ”+”
Speed – buon, at the running state, press it will decrease 0.1KM/H every me, press it for a long
me, it will decrease the speed constantly.
Safety Key
The safety key funcon acts as an emergency stop device. In an emergency situaon, remove
safety key, alarm will sound and the running belt will stop immediately. A “---------” error sign will
appear in the window display.
Hear Rate Indicator
The safety key funcon acts as an emergency stop device. In an emergency situaon, remove
Lightly hold the hand sensors on the handlebars. Heart rate will display within 5 seconds. Ensure
that your hands are clean to avoid any interference of heart rate signal. Note: Incline and Heart
Rate share the same window on the LCD screen. TheHeartRatereadingsareindicaveonlyand
canbeinaccurateduetoindividualconducvitythroughthecontactsensors.For this reason the
heart rate sensors are not a medically cered device.
If you require more accurate heart rate readings for medical or training purposes, please contact
an Elite Fitness Sales Representave for further informaon and advice.
USER INSTRUCTIONS

13ELITE FITNESS TRIMLINE 2000 TREADMILL ASSEMBLY MANUAL
Exercise Program
The 16 programs are divided into 16 exercise secons in an equal me division.
Time
Program
P1
P2
P3
P4
P5
P6
P7
P8
P9
P10
P11
P12
P13
P14
P15
P16
SPEED
INCLINE
SPEED
INCLINE
SPEED
INCLINE
SPEED
INCLINE
SPEED
INCLINE
SPEED
INCLINE
SPEED
INCLINE
SPEED
INCLINE
SPEED
INCLINE
SPEED
INCLINE
SPEED
INCLINE
SPEED
INCLINE
SPEED
INCLINE
SPEED
INCLINE
SPEED
INCLINE
SPEED
INCLINE
2
0
2
0
2
0
2
0
2
0
2
0
2
0
2
0
2
0
2
0
2
0
2
0
2
0
2
0
2
0
2
0
5
0
2
1
4
1
6
1
4
2
4
1
7
1
2
1
4
1
5
1
5
2
6
1
12
8
8
8
12
3
12
4
5
1
7
2
9
2
6
2
6
4
5
3
7
1
6
2
8
2
6
2
6
2
8
1
4
10
10
12
10
4
4
5
5
1
2
2
9
3
6
3
12
6
5
4
9
2
6
4
10
3
7
4
7
2
10
3
12
13
12
13
8
5
12
6
10
1
2
3
4
4
12
4
12
4
6
4
9
2
6
2
2
4
8
6
9
3
8
3
4
4
4
4
12
6
4
2
10
1
7
3
4
5
12
5
12
2
6
3
4
3
8
1
4
5
9
6
9
3
6
5
12
8
8
8
12
8
12
4
5
2
7
2
8
4
12
6
3
1
8
3
4
3
9
2
8
6
10
6
6
3
4
5
4
10
10
12
10
7
4
5
5
2
12
2
8
5
12
7
3
0
8
1
12
4
10
4
10
7
11
4
9
4
6
7
12
13
12
13
8
8
12
6
5
2
4
3
10
4
6
6
3
1
6
2
12
4
11
2
2
8
10
4
6
4
8
7
4
4
4
4
12
8
4
2
3
2
4
3
10
2
6
6
3
1
6
1
4
3
12
1
4
9
9
4
9
4
12
5
12
8
8
8
12
7
12
4
3
3
12
2
12
1
3
5
12
2
8
2
4
3
9
2
10
8
8
2
6
5
8
5
4
10
10
12
10
7
4
5
2
3
4
2
4
2
3
4
12
2
8
1
8
2
5
4
2
6
6
2
10
5
6
3
12
13
12
13
8
6
12
6
5
3
4
3
4
3
3
3
12
2
6
2
8
2
5
2
4
4
7
2
6
5
8
3
4
4
4
4
12
5
4
2
5
2
12
2
8
2
5
2
6
2
9
1
4
1
5
1
10
2
5
1
10
4
12
1
12
8
8
8
12
4
12
4
3
2
4
2
4
1
5
1
4
3
6
2
4
1
3
2
4
1
4
1
7
4
12
1
4
10
10
12
10
3
4
5
2
0
2
0
2
0
2
0
2
0
2
0
2
0
2
0
2
0
2
0
2
0
2
0
2
0
2
0
2
0
2
0
Time Set / 16 = Average Time for each exercise section
1 2 3 4 5 6 7 8 9 10 11 12 13 14 15 16
USER INSTRUCTIONS

14
Program
- Speed Display - during the seng state the window will show P1 - P12 for programme selecon.
During use the Speed range will be shown - 0.8 - 12km/h.
- Countdown Time Training Mode: in standby mode, press “MODE” buon, the me window
display will ash, Default display is 30:00 minutes, press SPEED+,- buon to adjust the seng
value. The seng range is: 5-99 minutes. Press “START” buon to start the treadmill, the treadmill
will commence at 0.8 KM/H. Once the countdown mer reaches 00:00, the treadmill will
automacally stop.
- Countdown Distance Training Mode: in standby mode, press “MODE” buon, the distance
window display will ash, Default display is 5.0KM, press SPEED+,- buon to adjust the seng
value. The seng range is: 0.5-99.0 KM. Press “START” buon to start the treadmill, the treadmill
will commence at 0.8 KM/H. Press SPEED +,- to adjust the speed. Once the countdown distance
window reaches 0.0 the treadmill will automacally stop.
- Countdown Calories Training Mode: in standby mode, press “MODE” buon 3 mes , the Calorie
window display will ash, Default display is 100 calories, press SPEED+,- buon to adjust the
seng value. The seng range is: 20-990 calories. Press “START” buon to start the treadmill,
the treadmill will commence at 0.8 KM/H. Once the countdown calorie window reaches 0, the
treadmill will automacally stop.
There are 12 Preset programmes to choose from. To select a program, P1-P12 press the program
key separately to choose the desired workout. The Time window will ash.
During the seng state the me window will ash, the default display 30:00 minutes. Use the
SPEED +,- buon to adjust the me seng. Press “START” buon to start the treadmill. When the
countdown mer is 00:00 the treadmill with stop automacally. Press SPEED +,- buon to change
the program data during use.
Countdown Function Parameter Data
InialCountdownSeng SengRange RecfyRange
Time (MINS) 30:00 5:00 - 99:00 1:00
Calories (KC) 50 20 - 990 10
Distance (KM) 1.0 1.0 - 99.0 1.0
CycleOrder:Manual Time Distance Calories
Body Fat Tester
1. Press PROG connually unl you nd Body Fat Test (F1).
2. Press MODE and + / - To set your personal details. F1 Sex (1=Male, 2=Female); F2 Age, F3 Height,
F4 Weight.
3. Grasp the hand sensors when F5 is displayed. Wait for a few seconds and it will show your body
quality index. The body quality index is to test the relaon between height and weight, not the
body scale. Thedataisonlyforreference,itcannotbeuseasmedicaldata.
FAT <19 Under Weight FAT= (25-29) Overweight
FAT= (20-25) Normal Weight FAT >30 Obese
USER INSTRUCTIONS

15ELITE FITNESS TRIMLINE 2000 TREADMILL ASSEMBLY MANUAL
Other
• The system will beep and enter into Manual mode once the countdown ends.
• The parameter funcon is in a Cycle mode. e.g.: The range of me is in between 5:00 – 99:00
When it is set in 99:00, it can directly revert to 5:00 by connuously pressing “+” buons.
• You may only choose one type of countdown secon (me, calorie, distance) for every cycle.
• Speed recfy range is 0.1km/h.
Troubleshooting
Problem Reason ProblemSolving
--------- Safety Key removed 1. Replace Safety Key.
2. Computer defecve. Call an authorized service technician
to renew the safety key on/o switch or magnet inductor.
E01 Communicaon failure
for controller and
computer
1. Data cable or integrated circuit is loose or in improper
order. Try to reconnect or reorder.
2. Call an authorized service technician:
• Defecve data cable
• Defecve controller
• Defecve transformer
E02 Speed control sensor or
motor fault
1. Check if the power voltage is 50% lower than the
standard voltage. Please make sure the power and voltage is
complying with standard.
2. Check if the motor wire is well connects. Reconnect the
wire and restart. Call an authorized service technician if this
problem persists.
3. Check if the controller has a smoky smell, the IGBT could
be in short circuit. Contact an authorized service technician
for maintenance.
E04 Incline sensor or motor
fault
1. Check if the incline motor signal cables and AC wires are
rmly connected.
2. Call an authorized service technician:
• Damage to incline motor or AC motor signal cables
• Defecve motor controller
E05 Overcurrent protecon 1. Overload current will stop the device from operang.
Simply restart the machine to solve this problem.
2. Jammed or defecve components will cause an overload
in current. Apply lubricant to the specic area and restart
the device.
3. Check if there is a smoky smell or sound that is caused by
the motor or controller. Call an authorized service technician
for maintenance.
No
Display
Machine breakdown
or power supply is
disconnected
1. Check if the overcurrent protecon switch is on or o.
2. Check the power switch, overcurrent protecon, display
cables, transformer and motor are connected and in
good condion.
3. Call an authorized service technician for maintenance
USER INSTRUCTIONS

16
Before cleaning or carrying out any maintenance on your treadmill, ensure the power is turned o
and the power cord removed from the plug socket.
At least once a year, the motor cover on your treadmill should be removed and any dust or debris
vacuumed up to maintain the smooth operaon of the motor and drive system. Contact the Elite
Fitness Service Department for further informaon on servicing your treadmill.
CLEANING
General cleaning the unit will greatly prolong the treadmills working life.
Keep the treadmill clean by dusng regularly. Be sure to clean the exposed parts of the deck
surface on both side of the walking belt and also the side rails. Make sure the soles of your shoes
are clean , This reduces the build up of foreign material underneath the running belt. The top of
the belt can be cleaned with a wet, soapy cloth. Be careful to keep liquid away from the electrical
components and underneath the running belt.
This treadmill’s running belt and deck are equipped with a pre-lubricated, low maintenance deck
system. The belt/ deck fricon may play a major role in the funcon and life of your treadmill, thus
requiring periodic lubricaon. We recommend a periodic inspecon of the deck.
We recommend lubricaon of the deck according to the following metable
— Light user (less than 3 hours/ week) annually
— Medium user (3-5 hours/ week) every six months
— Heavy user (more than 5 hours/ week) every three months
Treadmill lubricating oil can be purchased from your nearest Elite Fitness store or our Service
Department.
— In order to maintain and prolong the working life of your treadmill, we suggest you power o
the treadmill for 10 minutes aer every 2 hours of running use.
— A loose running belt may slip when you are running and may require a small adjustment; if the
running belt is over ghtened it can aect the performance of the motor and add extra wear
to the rollers. For ideal tension, the running belt can be lied 50-75mm from the central part
of the running deck.
CARE AND MAINTENANCE
17ELITE FITNESS TRIMLINE 2000 TREADMILL ASSEMBLY MANUAL
CARE AND MAINTENANCE
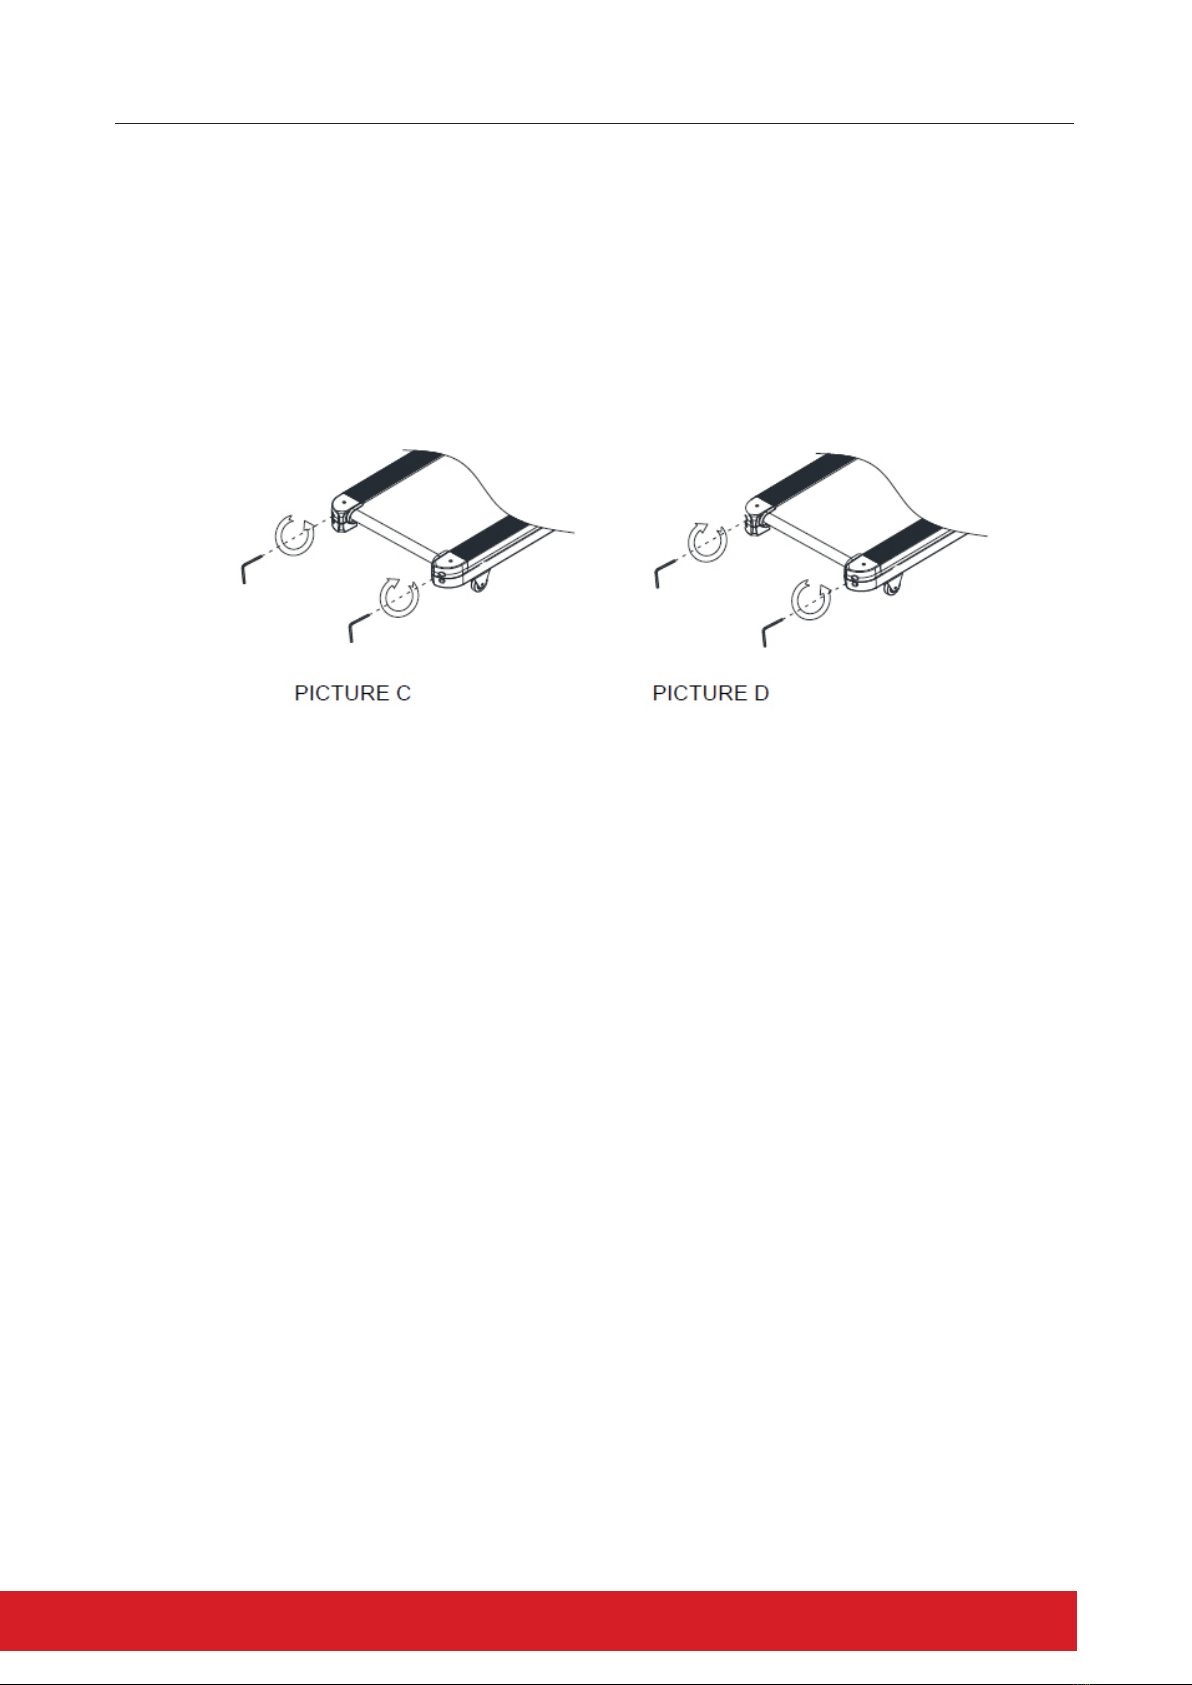
BELT ADJUSTMENT
— Place treadmill on a level surface.
— Run the treadmill at 6-8km/h.
— If the belt has dried to the right . With the right adjusng bolt clockwise rotaon 1/2 turn,
then with the le adjusng bolt anclockwise 1/2 turn AS PICTURE C
— If the belt has dried to the le. With the le adjusng bolt clockwise rotaon 1/2 turn, then
with the right adjusng bolt anclockwise 1/2 turn AS PICTURE D

18
Prolong the life of your treadmill by performing periodic maintenance checks. Not only does this
ensure your machine is in full working order, but it will save you service costs in the long run.
Every me you perform maintenance, record the date and if you can, the distance and hours
operated.
DAT E HOURS DISTANCE
BELT MAINTENANCE DECK SERVICE
COMMENTS
Tension Lubricated Alignment Cleaned
01/06 15 16.5km √√√√Greased frame pivot bolts
eg:
MAINTENANCE LOG

19ELITE FITNESS TRIMLINE 2000 TREADMILL ASSEMBLY MANUAL
WARRANTY RANGE
Damage in correct maintenance and normal operaons (not facous factors). Warranty card to
the original purchaser, shall not be transferred.
WARRANTY TIME
HOME USE
— 10 Year Frame
— 5 Years Motor
— 1 Year Parts and Labour
The following conditions are not under warranty range:
A) As a result of abuse, neglect, accident, or unauthorized modicaon;
B) The damage due to incorrect adjustment of the running belt and motor belt;
The Treadmill should not be:
A) Plugged into a mul-board plug device. The treadmill requires a dedicated power circuit and
should be plugged directly into the wall socket.
B) Used with an extension cord any longer than 1.5m.
C) Lubricated only with manufacturers approved silicone oil, do NOT use: WD40, CRC or any other
lubricant. Consult Elite Fitness Service Department for advice or supply of the correct product.
REPAIR AND MAINTENANCE SERVICE
Please contact our Elite Fitness Service Department at EliteService@elitetness.co.nz or visit
www.elitetness.co.nz for any service related issues or advice on preventave maintenance
servicing procedures.
LIMITED WARRANTY
20
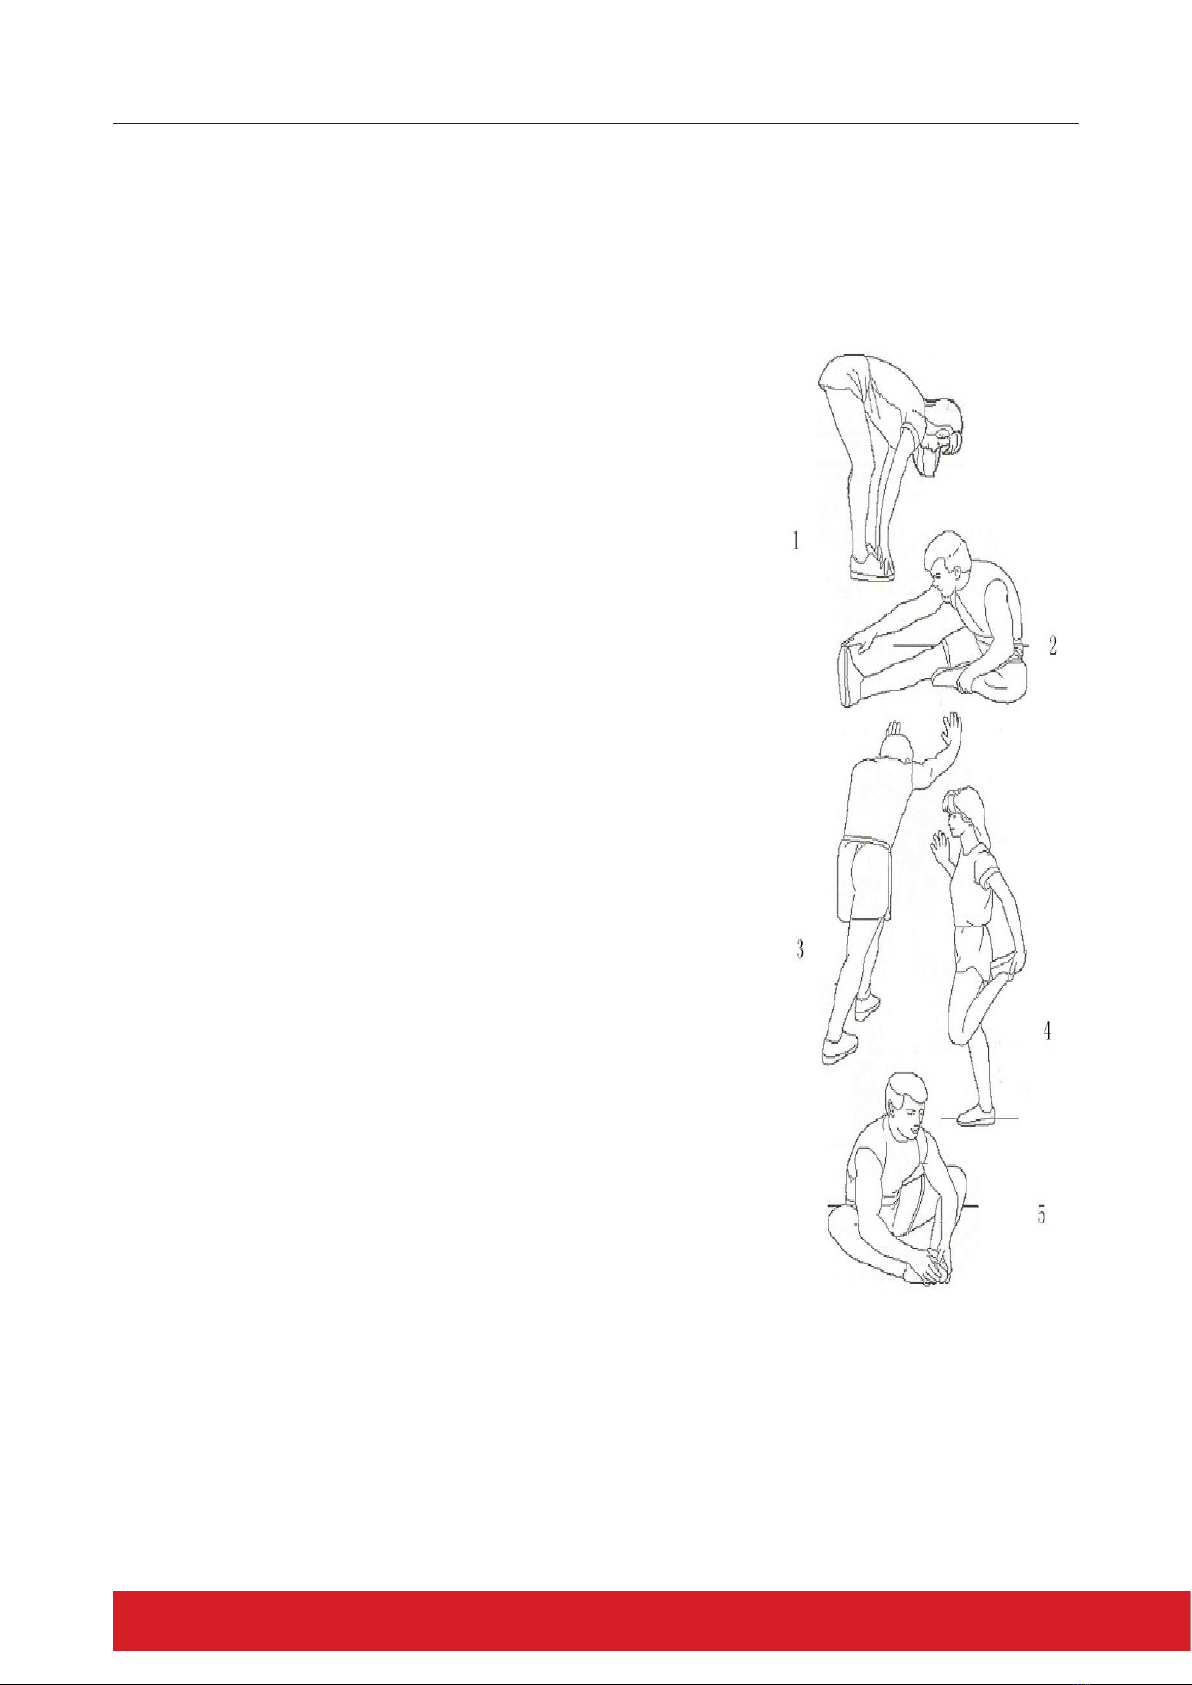
Warm up exercise is important in preparing the muscles for acvity whilst minimising the risk of
injury. You may choose to warm up with a light/brisk walking pace for 5-10 minutes before stopping
and performing some simple stretches. (As shown in the pictures below)
—HamstringStretch(Standing)
Keep your knees slightly bent and slowly lean forward, back and shoulders relaxed, reaching
towards your toes. You should feel the tension and slight
discomfort in your hamstring muscles. Hold for 15-20 seconds.
Repeat 2-3 mes.
—HamstringsStretches(Seated)
Sing on the oor preferably on a mat, put one leg straight,
the other inward and close to the inside of the straight leg.
Lean forward from the hips, reaching towards your toes. Hold
for 10-15 seconds, and relax. Repeat 3 mes for each leg (See
picture 2).
—CrusandFeetTendonStretches
Standing with two hands on the wall or tree, one leg behind.
Keeping your legs straight and the heel on the ground, lean
forward towards the wall or tree. Hold for 10-15 seconds, and
relax. Repeat 3 mes for each leg (See picture 3).
—QuadricepsStretches
Keeping your balance with your le hand holding onto a wall
or staonery xture, grasp your right foot with your right hand
and stretch your right heel toward your buocks slowly, unl
you feel the stretch in the front of your thigh. Hold for 10-15
seconds, and relax. Repeat 3 mes for each leg (See picture 4).
—Sartorius(InnerMusclesoftheThigh)MuscleStretches
Sing down with the soles of your feet or shoes together and
your knees posioned outward. Pull your feet towards your
groin unl you can feel the stretch. Hold for 10-15 seconds, and
relax. Repeat 3 mes (See picture 5).
WARM-UP EXERCISE
Table of contents
Other Elite Fitness Treadmill manuals


