Eloma EB 30 User manual

Operation Manual
Backmaster T
EB 30, EB 30 XL


1
Dear Customer,
You have chosen an Eloma baking oven.
Thank you for your confidence
These operation manual apply to Eloma’s Backmaster T EB 30, Backmaster T EB 30 XL electrical appliances.
Please read the installation and operating instructions in full before starting up the appliance and make sure to
pay particular attention to the safety information.
Attention!
The named standards are valid for Germany in all other countries follow the local standards and valid instructions.
Damages based on installation not complying with the directives given hereunder are not covered by warranty terms.
Check for any transport damage.
Should there any signs of transport damage, inform your dealer / freight forwarder immediately.
For information and tips please contact:
Eloma GmbH Innovative cooking and baking technology
82216 Maisach / Germany Otto-Hahn-Str. 10. Tel.: +49 (0) 8141 395-0 Fax: +49 (0) 8141 395-130
For our baking forum and user tips, visit our website at www.eloma.com.
User hotline:
Service
You can reach us practically around the clock, 7 days a week, 365 days a year:
Your service hotline:
For information on liability for material defects and warranty conditions, please consult our
general terms and conditions of business (T&C).
Eloma GmbH D-82216 Maisach
Appliance model:.............................
Appliance Nr.:..................................
Dealer: Installer:
Date:………………… Installed on:……………….

2
Operating Instructions
Backmaster T
EB 30, EB 30 XL
Table of contents:
1. Safety information ................................................. 4
2. Operating panel and description of functions ........ 7
2.1 Backmaster T EB 30 and EB 30 XL panel ............ 7
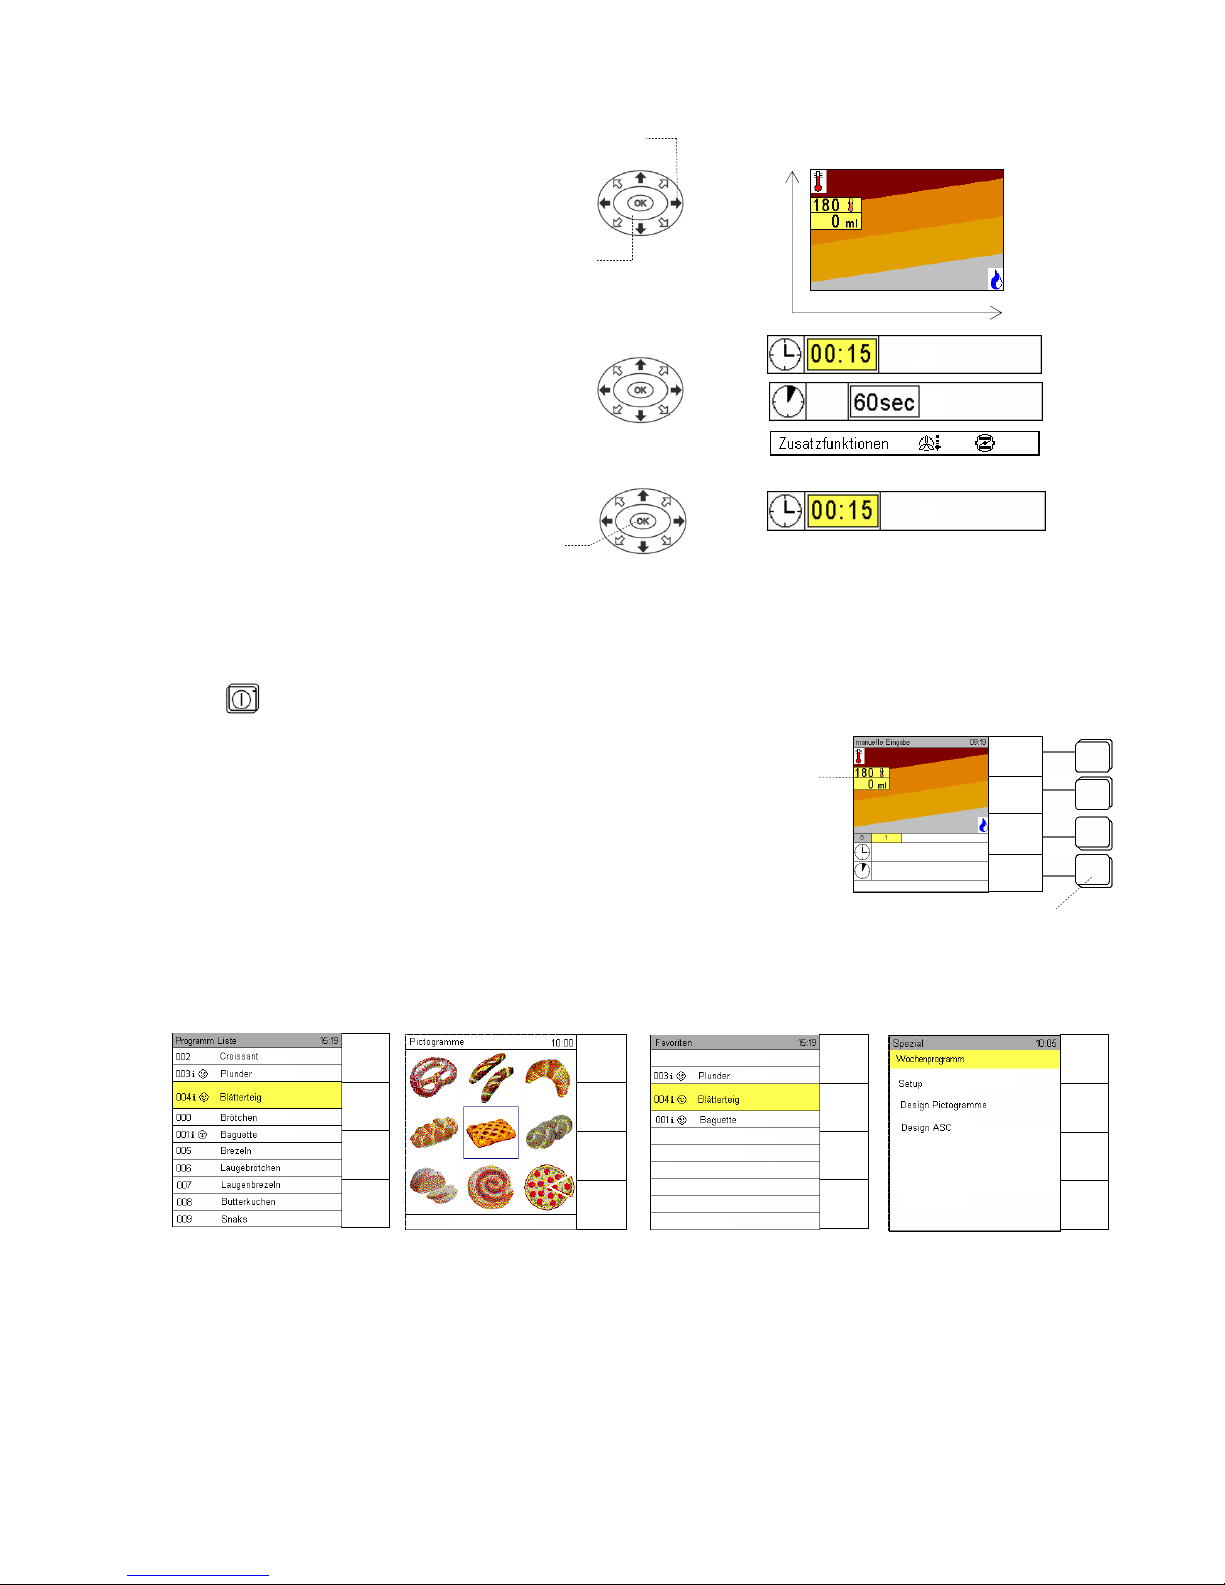
2.2 Operating the Backmaster T using Scout.............. 8
2.3 Screen layout for manual operation ...................... 8
3. Starting the Backmaster T up................................ 9
3.1 Manual input ......................................................... 10
3.2 Manual operation with one step ............................ 11
3.3 Entering several baking steps ............................... 12
3.4 Operating states for several baking steps ............. 13
3.5 Display of actual values ........................................ 14
3.6 Selecting additional functions................................ 15
3.7 Delayed start for manual input .............................. 15
4. Saving programs ................................................... 16
4.1 Saving programs ................................................... 16
4.2 Deleting a program................................................ 19
4.3 Copying a program................................................ 19
4.4 Selecting and starting a program from the
program list ........................................................... 20
4.5 Selecting and starting a program from the
pictogram level...................................................... 21
4.6 Assigning pictograms to saved baking programs .. 21
4.7 ASC mode............................................................. 22
4.8 Assigning saved baking programs to the
ASC level .............................................................. 22
4.9 Program sequence in ASC mode.......................... 23
4.10 Selecting and starting a program from the
pictogram level...................................................... 23
5. Combi baking ........................................................ 24
6. Pre-heating ........................................................... 25
7. Special programs .................................................. 26
7.1 Cleaning................................................................ 26
7.1.1Manual cleaning .................................................... 26
7.2 HACCP ................................................................. 27
7.2.1Interface for connecting cable ............................... 27
7.2.2Selecting and printing baking logs......................... 28
7.3 Weekly program.................................................... 29
7.4 Setup .................................................................... 29
7.4.1 Date/Time............................................................. 29
7.4.2 Start screen.......................................................... 30
7.4.3 Language ............................................................. 30
7.4.4 Unit parameters.................................................... 30
8. Errors .................................................................... 31
8.1 Displaying errors ................................................... 31
8.2 Error messages..................................................... 32
8.3 Troubleshooting .................................................... 33
9. End of operation.................................................... 33
10. Cleaning and maintenance ................................... 34
11. ProConnect Backmaster communication ......... 35
11.1 Starting up ProConnect Backmaster
communication...................................................... 35
11.2 Function for networking a baking control
system (option) ..................................................... 35
12. EC Declaration of Conformity................................ 37
Version 1.
Item no. (/504459 /201

3
Pictograms/symbols used
Danger! Warning! Caution
Indicates a situation presenting an
immediate danger, which, if
Indicates a potentially dangerous
situation, which, if
Indicates a potentially dangerous
situation, which, if
if not avoided, will result in
serious injury or death.
not avoided, could result in
serious injury.
not avoided, could result in minor or
moderate injury.
Caustic substances
Caution: Risk of burns
Caution: Hot steam
Caution: Hot liquid
Warning: Dangerous electrical voltage
Do not dispose the Backmaster domestic waste

4
1. Safety information
- Installing the appliance incorrectly, making incorrect settings on it or modifying
it can lead to damage, injury or even death.
- Read the installation and operating instructions for the baking oven through carefully
before starting it up.
Use for intended purpose
- The appliance shall only be used for its intended purpose, namely the professional preparation of food.
- The Eloma baking ovens are designed for use in commercial environments.
Method of operation
- The Backmaster T enables you to prepare baked goods using the best possible baking environment.
This means the ability to adjust temperature and humidity levels exactly as required for each type of
baked good.
- At the same time, the required baking method can be selected using the scout feature
on the operating panel.
-The Climatic® cursor moves during this process. This moveable Climatic® cursor indicates the exact
temperature in degrees and the exact humidity level between 10 and 1000 ml or in seconds.
- The baking chamber temperature can be set to between 30°C and 250°C, and the humidity level to
between 10 and 1000 ml, or in seconds depending on the setting made in the Service menu.
Operation
- Keep this manual in a place where it can be accessed by all users of the appliance at any time.
- Insert the water tank only with the lid.
The baking oven must only be operated
- By trained staff
- For its intended purpose as outlined in the operating instructions, and whilst in perfect working order.
- To prevent the risk of accidents or damage to the appliance, it is essential that operating staff are given
training and health and safety briefings on a regular basis.
- If the machine is set up outside, it must be ensured that it is adequately protected from rain, thunder
storms and lightening. It must be set up on a solid foundation to ensure stability.
It must also be ensured that the machine is only accessible for qualified personnel.
The appliance must not be operated
- By children or persons with impaired physical, sensory or mental abilities, or by persons who do not
have the requisite experience and/or knowledge, unless they are being supervised by a person who is
responsible for their safety or are receiving instructions in how to use the appliance from this person.
- At an ambient temperature of < +4°C
- In toxic atmospheres or atmospheres where there is a risk of explosion
- With food containing highly flammable ingredients (e.g. alcohol)
Door lock, emergency release lever
- The Backmaster T is fitted with an automatic door lock.
- If the Backmaster is being used, the door is closed by giving it a gentle push.
-When the program ends the door opens automatically, depending on the setting
made in the Service menu.
- The door can be opened by means of the "Open door" sensor button either during or after operation.
-When the door opens automatically at the end of the baking time, there is a risk of personnel
sustaining burns.
-Should a malfunction or power failure occur, or should the appliance be disconnected from
the mains, the door can easily be opened by mechanical means.
- The emergency release lever can be found underneath the door, near to the handle.
- Push the emergency release lever down and the door will open.
See close-up photo:
Emergency release lever
Door Handle

5
- Only authorised customer service personnel may open the side wall and carry out
repairs and maintenance work.
Risk of injury
Installation
- Please refer to the installation instructions for precise information on how to install the appliance.
- Only authorised customer service personnel may install appliances, put them into operation and
perform maintenance work on them.
Risk of burns!
- Care must be taken when opening the baking chamber door, as hot air and steam could escape.
Risk of burns!
- The functional surfaces of the appliance become hot during operation.
- When the door opens automatically at the end of the baking time, there is a risk of personnel
sustaining burns.
Appliance defects
- If the glass part of the door is damaged, the appliance must not be started up.
Contact customer service.
- If malfunctions occur, disconnect the appliance from the mains and close the water shut-off valve.
Contact customer service.
Before turning on
-Lock the air baffle in place. Never reach behind the air baffle during operation and never attempt
to stop fans manually.
- Lock the rack in place correctly.
- Take care not to bend the tracks when doing this, as this will stop grids, trays and containers from
being held securely in place.
Condensation hood (option)
- An optional condensation hood is available for Eloma baking ovens.
- The condensation hood is controlled fully automatically via the baking oven.
- During the baking process, steam is condensed as it passes over air-cooled plate condensers.
Cleaning
- Do not spray water into the hot baking chamber.
- Under no circumstances must water jets, steam cleaners or high-pressure cleaners be used on
the exterior of the appliance.
- Only use Eloma Multi-Clean special cleaning agents.
-Eloma GmbH accepts no liability for damage caused by using non-Eloma cleaning agents or rinse
agents; use of such agents will also invalidate any warranty claims.
-Please observe the instructions for use provided with the cleaning agent and rinse agent.
- Wear appropriate protective gear when carrying out manual cleaning work (gloves, protective goggles).
- Do not breathe in spray mist.
- Make sure that the air baffle and racks are used and locked in place in accordance with regulations.
Notes on maintenance
- Insert the water tank only with the lid.
- Empty and clean the tank every day. If the appliance is going to be out of operation for a
prolonged period, allow the tank to dry out.
- To keep the appliance in perfect working order, an authorised service partner should carry out
maintenance work on it at least once a year.
- We recommend that you agree a maintenance contract for this purpose.
- If the appliance is not going to be used for a prolonged period, turn it off, disconnect it from the
mains and close the water tap.

6
Before turning on
- Before closing the oven door make sure that the pans and grids inside are securely in place to avoid
damages to the door glass.
-When opening and closing the door take care to leave enough space for yourself and other
people to avoid possible injuries.
-Lock the air baffle in place. Never reach behind the air baffle during operation and never attempt
to stop fans manually.
- Lock the rack or mobile tray rack in place correctly.
Loading/unloading
Risk of burns
- Depending on the selected baking temperature, the food containers, grids, rack trolley and inside of the
door in particular may reach high temperatures. It is recommended that you wear protective gloves.
- The temperature of the glass part of the door and the casing may reach more than 60°C at some
points during operation.
- Maximum permissible loading weight:
EB 30 10 kg (max. 10 kg per tray)
EB 30 XL 15 kg (max. 15 kg per tray)
Fixing the rack in place (tabletop appliances)
- Hanging in place: Push the rack up and hang it in place.
- Take care not to bend the tracks when doing this, as this will stop grids, trays and containers from
being held securely in place.
Appliance with water tank option
If your appliance is not connected to a water supply, it can be filled with water manually.
- The Backmaster is equipped with a water tank that has a capacity of around 2 litres.
- This water tank is located on the right-hand side of the top section, next to the oven's control panel.
- In order to fill the water tank, it must be removed from the oven.
- Press the cover on the operating panel firmly to open it up.
- Take hold of the water tank by the handle, lift it up slightly and then pull it towards you.
- Place the tank on a level surface.
- Open the lid and fill the tank with water up to the appropriate mark.
-Now close the water tank by pushing the lid down until it clicks into place and re-insert the tank
next to the control panel, pushing it in as far as it will go.
-Close the cover on the operating panel.
- The Backmaster is now ready to use again.
- If the water level in the tank has fallen below 250 ml, the icon lights up in the info line to warn
of this lack of water.
Only use softened water
- The water poured into the tank must have a chloride and sulphate content of below 50 mg/l.
- If possible, only fill the tank with as much water as will be needed for one day (maximum 2.1 litres).
- Ensure that no dirt has penetrated the water tank.
Insert the water tank only with closed cover.
Water tank
Press here

7
2. Operating panel and description of functions
2.1 Backmaster T EB 30 and EB 30 XL panel
To achieve a high degree of evenness in baking, the direction in which the fan rotates changes during
operation. The length the rotation direction is dynamically adapted to the baking time, which means, that
during short baking times, the rotation direction is changed at shorter intervals than with longer ones.
The oven space light is controlled by the program and depends on the door’s position.
If the door is opened, to put in or take something out of the oven, the light switches off.
See also device settings in the service menu.
Climatic monitor for baking ON/OFF key Backmaster Scout
Operation system Sensor key Direction arrows Open door button
Info Zeile Taste Start/Stop Bestätigungstaste OK
Info line Start/Stop key OK to confirm Water tank option

8
2.2 Operating the Backmaster T using Scout
Press the Scout direction arrows to
move the Climatic cursor around the
Climatic screen.
The selected field appears on a yellow
background.
Press the Scout direction arrows briefly to
make changes step by step, or hold them
down to make changes rapidly.
Confirm your settings by
pressing OK.
The setting, in this case the time, is
adopted.
2.3 Screen layout for manual operation
Press to switch the appliance on; the start screen appears.
The moveable Climatic cursor indicates the exact
temperature in degrees and the humidity level.
Using sensor buttons to select menus
Press the sensor buttons to call up the different menus.
OK
Climatic screen
Scout
Climatic cursor
Sensor buttons
Direction arrows
Humidification
Temperature
Program
list
Picto-
grams
Favourites
Special
program
Manual
input
Picto
grams
Favourites
Pre-eating
ON
Manual
input
Picto
grams
Favourites
Pre-heating
ON
Manual
input
Autoclean
HACCP
Manual
input
Program
list
Favourites
Pre-heating
ON
Special programs

9
3. Starting the Backmaster T up
Prior to start: open water tap
If the appliance is connected to the mains, the Eloma standby screen appears.
Press the ON/OFF button; the start screen appears and the appliance is ready to
use.
The LED lights up.
"Manual input" appears in the operating mode display.
Press the Special program sensor button and select Setup to open the Service input menu.
Select the start screen and press OK to confirm.
Four display menus can be selected as the start screen (Manual input/Favourites/Program
list/Pictograms).
The default Climatic cursor settings that appear after the appliance has been switched on using are
temperature = 180°C and humidity = 0 ml.
Initially, only icons are displayed in the "Time" and "Rest period" lines.
Program
list
Picto-
grams
Favourites
Special
program
Eloma Standby screen Start screen

10
3.1 Manual input
The temperature and humidity level are set via the Climatic cursor.
Input range: temp. 30°C – 250°C and humidity level 10 1000 ml or in seconds, depending on the setting
made in the Service menu.
Default baking settings are temp. 180°C and humidity level 0 ml.
Enter the baking program manually.
Use Scout to enter the desired temperature and humidity level, 10 1000 ml, in 10 ml increments.
If a humidity level of "0" is entered in the first baking step and confirmed with OK, 00:00 appears in the
time display and the baking time of between 00:00 and 23:59 hours is entered using the direction arrows.
If a humidity level of ">0" is entered in the first baking step and confirmed with OK,00:00 appears in the
time display and the rest period of between 0 180 seconds can be entered using the direction arrows.
You can also enter 0 sec. as the rest period.
For the baking step, the time must always be entered, otherwise it will not be possible to input any other
settings.
The time can be set to between 00:00 and 23:59 or switched to continuous operation.
Time at a setting of 00:00 press or at 23:59 press = continuous operation
The appliance always has to be pre-heated. This is selected via the Pre-heating sensor button.
For a description of the pre-heating function, refer also to Section 7.
For information on entering several baking steps, see Section 3.3. Up to 20 baking steps are possible per
baking program.
Save the baking programs as described in Section 4.
Start the appliance by pressing ; the appliance will switch to Pre-heating mode, assuming that this
mode has been activated.
When pre-heating is complete, a signal sounds. The temperature is maintained.
Press the "Open door" sensor button to open the door.
Now insert food into the appliance quickly so that the drop in temperature resulting from holding the door
open can be kept to a minimum.
Close the door the baking process will now start.
The door can be opened at any time during the baking process by pressing the "Open door" sensor
button, allowing more food to be placed in the baking chamber, if required. The baking program is
interrupted. Once the food has been inserted, leave the door slightly ajar and the program will continue to
run from the point at which it was interrupted.
Additional baking
You can subject food to additional baking both before and after the end of the specified baking process.
The additional baking function is only ever available in the last baking step of a baking program; the baking
chamber temperature remains unchanged.
If the baking time is to be extended by 1, 2, 3 or 4 minutes, depending on the setting parameters, before
the end of the baking program, press the Additional baking sensor button as many times as required.
If the baking time is to be extended by 1, 2, 3 or 4 minutes after the end of the baking program, you must
perform the following steps:
Switch the audible signal/buzzer off by pressing the arrow keys.
Press the Additional baking button as many times as required and leave the door slightly ajar.
Then press the button.
The appliance continues to bake for the period of time you have set.
Pressing the Additional baking sensor button a fifth time deactivates the function.
When the baking program has finished, a signal sounds and the door opens automatically, depending on
the settings made in the Service menu.
Settings can be made in the Service menu to determine whether or not a signal should sound at the end of the
baking program and what time delay will apply before the door is opened. Default setting = 5 sec.

11
3.2 Manual operation with one step
Use Scout to enter the desired temperature and humidity level via the Climatic cursor and confirm your
settings with OK.
Enter the baking time and confirm with OK.
Enter the rest period and confirm with OK.
Use the additional functions to select whether the exhaust air flap should be open or closed.
The "Pre-heating ON" sensor button is activated.
Start the Backmaster T by pressing ; the appliance begins to pre-heat and the LED lights up.
Once the nominal temperature is reached, a signal sounds and "Pre-heating end" appears in the info line.
The signal continues to sound at regular intervals until the door is opened.
The nominal temperature is maintained for a maximum of 1 hour.
Insert food into the appliance and ajar the door. The baking program starts at the first baking step.
When the program ends a signal sounds.
The door opens automatically (depending on the setting made in the Service menu).
The baking program can be started again by pressing .
A display indicating how the program is progressing appears on the screen.
Bars indicating the progress of the program appear in the display fields.
During humidification, the bar extends to the right and when the rest period is running down, the bar
decreases in length from right to left.
Additional manual humidification can always be executed by pressing the "Shot of steam" sensor button.
When the program is complete, a signal sounds.
Time
remaining
Nominal
time
Manual input Humidification Rest period Baking
Menu
back
Save
Next
Step
Pre-heating
ON

12
3.3 Entering several baking steps
Enter the first step as described in Section 3.1.
If several baking steps are to be entered, select the Next step sensor button.
Enter the first step as described in Section 4.
The maximum number of baking steps is 20.
Step 1 Step 2 Step 3 Step 4
Step 5 etc. Pre-heating Start first step
You can check which baking step was performed immediately prior to this point by pressing the "Back to
menu" sensor button briefly.
Pressing the "Back to menu" sensor button for longer will take the user back to the start screen.
Caution! This will cause all previously entered data to be cleared automatically.
Start the appliance by pressing ; the appliance will switch to Pre-heating mode, assuming that this
mode has been activated.
When pre-heating is complete, a signal sounds and Pre-heating end appears in the info line.
The temperature is maintained.
Press the "Open door" sensor button to open the door.
Insert food into the appliance and ajar the door. The program starts at the first baking step automatically.
The door can be opened at any time during the baking process by pressing the "Open door" sensor
button, allowing more food to be placed in the baking chamber, if required. The baking program is
interrupted. Once the food has been inserted, ajar the door and the program will continue to run from the
point at which it was interrupted.
When the baking program has finished, a signal sounds and the door opens automatically, depending on
the settings made in the Service menu.
Settings can be made in the Service menu to determine whether or not a signal should sound at the end of the
baking program and what time delay will apply before the door is opened. Default setting = 3 sec.
Additional baking
Refer to the "Additional baking" description contained in Section 3.1.
Menu
back
Save
Next
Step
Pre-heating
ON
Menu
back
Save
Next
Step
Pre-heating
ON
Menu
back
Save
Next
Step
Pre-heating
ON
Menu
back
Save
Next
Step
Pre-heating
ON
Dampf-
stoss
Change
Step
Next
Step
Add on
baking
Menu
back
Save
Next
Step
Pre-heating
ON

13
3.4 Operating states for several baking steps
Example: Bread rolls
1st step input: temperature 145°C, 400 ml humidity, pause of 60 sec, flap closed
2nd step input: temperature 155°C, 300 ml humidity, pause of 30 sec, flap closed
3rd step input: temperature 165°C, 100 ml humidity, pause of 10 sec, flap closed
4th step input: temperature 175°C, baking time of 13 min, flap closed
5th step input: temperature 180°C, baking time of 6 min, flap closed
Pre-heating operating state Step 1 operating state Step 2 operating state
Step 3 operating state Step 4 operating state Step 5 operating state
If the Shot of steam sensor button is pressed, water will be evaporated in the baking chamber.
Manual
Steam
Change
Step
Next
Step
Manual
Steam
Change
Step
Next
Step
Add on
baking
Manual
Steam
Change
Step
Next
Step
Add on
baking
Manual
Steam
Change
Step
Next
Step
Add on
baking
Manual
Steam
Change
Step
Next
Step
Add on
baking

14
3.5 Display of actual values
During operation, the actual temperature values for the active baking step can be displayed for 5 seconds by
pressing one of the direction arrows.
After 5 seconds, the nominal values will be displayed again automatically.
Next step
Press the "Next step" function button whilst a baking program is running to view the settings for the next
baking step.
Change step
Press the "Change step" function button whilst a baking program is running to view and modify the settings
for a baking step.
Press the "Save changes" function button to activate the changes for the program being executed.
Terminating a program
Press to terminate the active program; entered data is retained in the memory.
Program end
The appliance switches off. The STOP LED lights up and a signal sounds. The signal can be stopped
immediately by pressing an arrow key or opening the door.
If required, press the "Additional baking" sensor button. Leave the door slightly ajar and the additional baking
procedure will start automatically.
When the program ends, press to switch the display to the "Manual input" screen.
Display during signal time Display following start/stop
Memory
When a program is terminated or completed, the entered data is retained in the memory so that the same
baking process or program can be started again straightaway.
Manual
Steam
Change
Step
Next
Step
Add on
baking
A
ctual
values Nominal
display
Manual
Steam
Change
Step
Next
Step
Add on
baking
Manual
Steam
Change
Step
Next
Step
Add on
baking
Menu
back
Save
Pre-heating
ON
Menu
back
Save
Preheat
ON
Add on
baking

15
3.6 Selecting additional functions
You can select other functions using the Additional functions line.
Manual input Additional functions Additional function activated Manual input
Press OK to select or deselect a function. ““ appears when a function is selected.
Press the "Back to menu" sensor button briefly to return to the "Manual input" screen.
The additional functions are shown in the info line.
Fan pulsing
½ Half load can be selected if you are not using all the trays.
If the program is saved with ½, this is indicated by the "½" icon, which appears in the program list.
In addition, a continuous query “half load" at program start can be set in the service menu.
The default setting for the exhaust air flap is closed.
Program start can be pre-programmed.
3.7 Delayed start for manual input
Once the start time has been entered using Backmaster Scout, press the button and the appliance will go
into standby.
Press the button to cancel the delayed start.
The "Manual input" screen is automatically displayed again and the preset program can be started using .
Menu
back
Save
Next
Step
Pre-heating
ON
Menu
back
Save
Next
Step
Pre-
heating
ON
Info line
Menu
back
Save
Next
Step
Pre-heating
ON
Menu
back
Help Help
Menu
back
Save
Next
Step
Pre-heating
ON
Manual input Delayed start Time input Display of standby
t t
Menu
back
Save
Next
Step
Pre-heating
ON
Menu
back
Save
Next
Step
Pre-heating
ON

16
4. Saving programs
Program number
Input field number
Input field name
<< Left cursor
>> Right cursor
x Delete characters to the left
x Delete characters
Suggested name field
Info line
Program name
Confirmation of program name/no.
Favourite icon
Letters/numbers field
Pictogram design
4.1 Saving programs
Make the settings you require for a baking program and press the Save sensor button.
The program number is preset, but it can be changed.
For new baking programs, the next available program number is suggested.
To enter the program name, use the direction arrows to select the required letters/numbers and confirm
with OK.
The program name must not exceed 22 characters.
The program can be marked as a favourite by moving the cursor to the icon and pressing OK.
If the program name is confirmed with ENTER, Scout jumps to "Pictogram design". Select "" or deselect
the function using OK.
If the program name is confirmed with ENTER, additional information relating to the baking program can
be stored in "Program info".
Press the Save sensor button to save the program.
Press the START button to start the program.
Press the "Back to menu" sensor button to return to the "Program list" input screen.
Press the "Manual input" sensor button to return to the "Manual input" input screen.
Menu
back
Save
A -> a
a -> A
Help
Program number Program name
Menu
back
Save
Next step
Pre-heating
ON
Menu
back
Save
A -> a
a -> A
Help

17
Selecting and editing program names from the suggested name field
Use Scout to enter the first letter of the program.
Confirm with OK.
Use Backmaster Scout to select the suggested name field.
Two suggestions are provided in the form of existing program names starting with the same letter as that
displayed at the cursor position.
Press Backmaster Scout to scroll through other program names in the highlighted name line, if any are
available.
If the suggested name is confirmed with OK, the program name can be edited or adopted as it is by
pressing Enter.
Save the program as described in Section 5.1.
Changing program numbers
Select the required program and confirm with OK.
Press the Save sensor button.
Move the Scout cursor to the "Number" input field and confirm with OK.
The "Number" input field is highlighted in yellow and the program number can now be changed.
If the program number in the input field turns red, it means that this number has already been assigned
but can be overwritten. This will delete the old program.
Press the Save sensor button to return to the input screen.
Menu
back
Save
A -> a
a -> A
Help
Menu
back
Save
A -> a
a -> A
Help
Menu
back
Save
Next
Step
Pre-heating
ON
Menu
back
Save
A -> a
a -> A
Help
Menu
back
Save
A -> a
a -> A
Help
Menu
back
Save
Next
Step
Pre heating
ON
Manual
input
Picto
grams
Favourites
P
h
Pre heating
ON

18
Selecting a program as a favourite
Mark the programs you use frequently as favourites.
They can then be filtered out of the program list to make them easier to find.
The program can be marked as a favourite by moving Scout to the icon and pressing OK.
Pictogram design
If the program name is confirmed with ENTER, Scout jumps to "Pictogram design". Select "" or deselect the
function using OK.
Press the Save sensor button to open the "Pictogram design" input screen.
Press the "Picto selection" sensor button to open the available saved pictograms.
Use Scout to select a pictogram for the baking program that has been entered and confirm with OK.
Press the Save sensor button to save the entered baking program under that particular pictogram.
Press the Back to menu and Manual input sensor buttons to access the "Manual input" screen.
Program info
If the program name is confirmed with Enter, Scout can be used to select the "Program info" line.
If the "Program info" line is opened with OK, you can enter your own specific data for the program.
If the program is saved with this information, this is indicated by the "i" icon, which appears in the program list.
If "ENTER" is selected with OK at the "Program info" level, you will return to the "Save program" input screen.
Favourite icon
Menu
back
Save
A -> a
a -> A
Help
Menu
back
Save
A -> a
a -> A
Help
Menu
back
Save
Picto
selection
Delete
program
Menu
back
Save
Picto
selection
Delete
program
Menu
back
Save
A -> a
a -> A
Help
Menu
back
Save
A -> a
a -> A
Help
Other manuals for EB 30
1
This manual suits for next models
1
Table of contents
Other Eloma Oven manuals
Popular Oven manuals by other brands

Electrolux
Electrolux EOB975 Operation and installation manual

Hisense
Hisense BSA66226AX Instructions for use

Zanussi
Zanussi ZSF 30 K OPERATING AND INSTALLATION Manual

inventum
inventum IMC6144RK instruction manual

TECNOEKA
TECNOEKA KF 981 EV Use and instruction manual use and instruction manual

Maytag
Maytag MEW5524AS0 installation instructions

Tricity Bendix
Tricity Bendix 2556A operating instructions

Fri-Jado
Fri-Jado TDR 7 AC user manual

Cuisinart
Cuisinart TOA-95 INSTRUCTION AND RECIPE BOOKLET

Nectre Fireplaces
Nectre Fireplaces Big Bakers installation instructions

Zanussi
Zanussi ZYB 590 XL user manual

Monogram
Monogram ZKS90DPSNSS owner's manual