ELR Engeineering CHARYBDIS User manual

Coal fired steam locomotive
CHARYBDIS
Owners Manual

Contents
Locomotive running tools
Controls
Running in
Preparing to run your locomotive
Running your locomotive
Once you have finished your running session
Maintenance / troubleshooting
Precautionary instructions
The Charybdis locomotive operates just like its full-sized counterpart by using coal to
produce steam under pressure. Therefore, parts of the locomotive will become very hot.
Provided the locomotive is operated with adequate care and attention, no problems
should arise. The model is intended for outdoor use and should only be used in well-
ventilated areas.
The model is unsuitable for children unless they are carefully supervised at all times:
Charybdis is not a toy.
Whilst the locomotive is in steam, an exhaust will be emitted through the chimney that
includes hot steam, ash and sparks. Therefore, any operator or bystander must not lean
over the locomotive while it is running.

Controls
1. Gauge glass
2. Gauge glass blow-down
3. Pressure gauge
4. Lubricator
5. Blower
6. Water bypass control
1
2
3
4
6
5

Locomotive running tools
The following tools are supplied with your new locomotive:
Battery blower
Firing shovel and pricker
Flu brush
Water top-up bottle
Bottle of steam oil
Bag of coal
Preparing your locomotive
Your locomotive must be fully prepared before every running session in accordance with
the operational guidelines below.
Firstly, fill the boiler with water using the top-up bottle. Distilled water is preferred if
available. Place the end of the flexible pipe from the bottle into the water valve connector
located on the right hand side of the floor of the cab (9). Fill until the water reading is
slightly over the top of the gauge glass (3).
Next, fill up the large saddle tank with water. To do this, remove the saddle tank cap
located in the middle of the tank.
N.B. If distilled water is not available: clean soft tap water, filtered rainwater or filtered
water from a dehumidifier may also be used.
Next, unscrew the top of the lubricator (7) and also unscrew the drain of the lubricator,
which is located beneath the cab floor on the right hand side. Allow any water to drain
then, as oil starts to appear, retighten the lubricator drain screw (finger tighten only). Top
up the lubricator with steam oil until full and then screw the top on again (finger tight).
The next task is to use a light motion oil to lubricate the valve gear. Make sure to include
all moving parts even those between the frames. For instance, the water pump ram,
located just above the front axle, together with its joint to the eccentric arm are both easy
to miss, yet require routine lubrication. Also, there are parts of the eccentric located on
the rear axle that will benefit from frequent lubrication.
Your locomotive is now ready to be steamed.
Running your locomotive
When you are ready to light your locomotive, place the battery blower into the chimney
and turn it on. Then prepare a shovel of paraffin-soaked charcoal and shovel this into the
firebox and light the fire. Soon after, shovel three or four more loads onto the fire and
shut the firebox door. After a couple of minutes or so put another three or four loads into
the firebox, as to create a nice even spread and again shut the door. It is important to keep
the firebox door shut as much as possible as most heat is lost here. Keep an eye on your

fire and if it looks to be fading, add some more charcoal. You will soon have steam
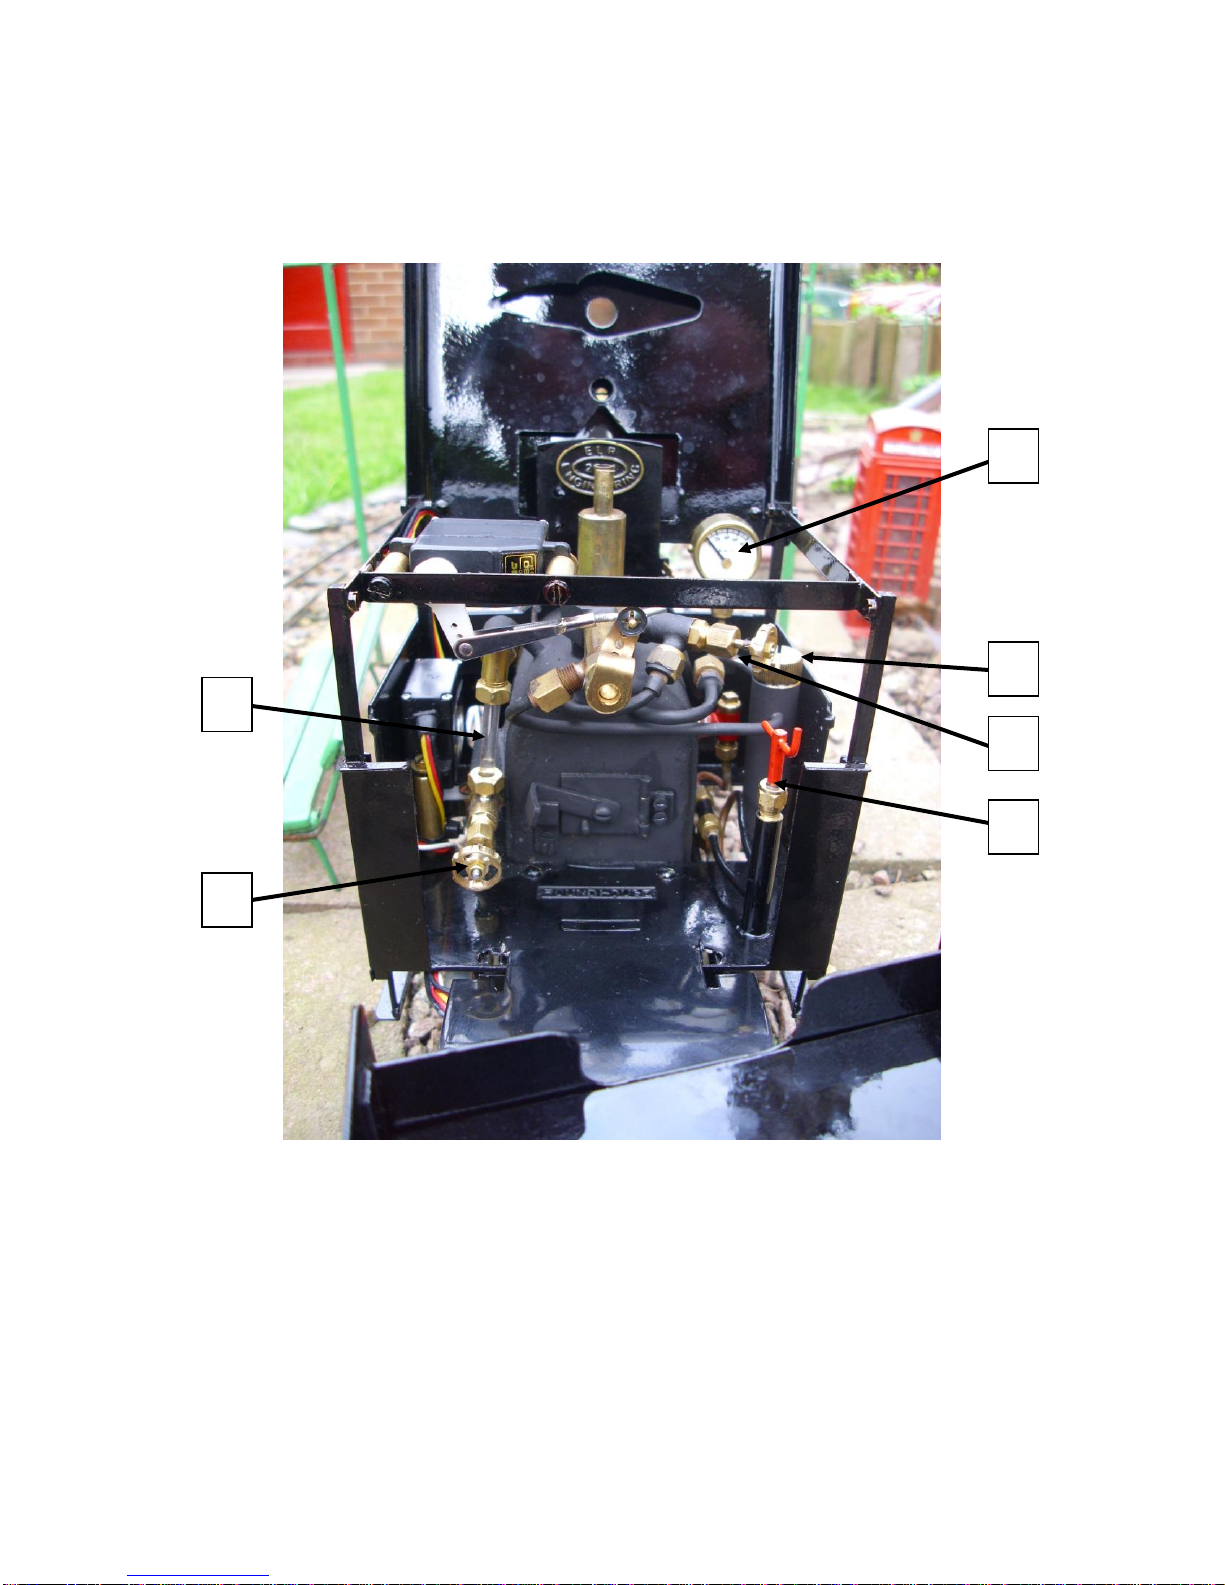
pressure. Once the pressure gauge (5) reaches over 30psi (pounds per square inch), you
can then open the locomotive’s own steam blower (6) and remove the battery blower
from the chimney at the same time.
Charybdis will now be able to draw its fire harder and therefore generate more heat from
the charcoal. You will be able to see the fire increase in intensity and hear the increased
draw from the locomotive’s steam blower: if you cant, open the blower a little more.
At this stage, you can add some steam coal: a little at first and again, shut the firebox
door between each shovelful. This allows the coal to start to burn (too much at once
could put the fire out). You should soon be able to see the fire building up nicely. When
the locomotive has reached its full working pressure, you will be able to move it under its
own steam.
Move the reverser (2) into forward gear (push it forward) and then open the regulator (8).
Some priming is expected (identified by water escaping from the chimney). This is
normal and will soon clear. Following priming, the locomotive is ready to start running.
When running the locomotive, it is important to keep a draft to draw the fire. Without one
the fire will go out. When the loco is stationary, it should become automatic to open the
blower valve: doing this will create the draft of steam required to draw the fire. Shortly
before you open the regulator to move the locomotive, you may shut the blower valve.
Once the locomotive is moving, its own exhaust creates the necessary draft to draw the
fire.
By this stage, you will need to add more coal to your fire, with the aim of producing a
nice, deep orange glow. Remember to shut the door in between shovelfuls in an attempt
to keep in as much heat as possible.
The water bypass valve (1) can now be closed. This pumps water from the saddle tank
into the boiler while the loco is running and therefore maintains a steady level of water in
the gauge glass (3). Setting the water bypass value so it pumps water at the optimum rate
is something that is learnt as you run your locomotive. If the gauge glass fills completely,
you will be able to hear the loco prime, as the boiler is full of water. At this point you
open the water bypass valve. This stops water being pumped into the boiler for the
moment. Only begin to close it again when the gauge glass indicates that the water level
has dropped to a more sensible level. Keeping plenty of water in boiler is very important
and this is why the top-up bottle is included. If the water level drops too low, i.e. it falls
out the bottom of the gauge glass, attach the top-up bottle to the water top-up valve in the
cab (9) and add water to the boiler using the bottle.
Operators should aspire to run their locomotive efficiently, eventually achieving between
10 –15 minutes running time between firings, while remembering to keep the saddle tank
topped up with water.
N.B If you intend running your locomotive for extended periods, the lubricator will
require oil after about an hour (please note, it will be hot! ). You will also need to keep
the water pump ram and its cam (between the locomotive frames) well oiled.

Once you have finished your running session
Once you have finished running your locomotive, it needs to be ‘disposed of’ responsibly
–just like the real thing!
Firstly, on front of the smoke-box, completely unscrew the centre dart, thus removing the
smoke-box door. You will probably be able to see an accumulation of ash built up inside
the smoke-box (the amount depends upon the length of your run). Next, brush out as
much of the ash as possible using a small paintbrush. A gentle blow down the chimney
will remove the remainder.
Removing the smoke-box ash will reveal the boiler tubes. Using the flu brush provided,
clean out all six tubes that you will see down the boiler. These can get blocked with bits
of coal and ash, limiting the boiler’s steaming capability. Don’t worry if it is difficult to
push the brush through, keep trying: we find dipping the end of the brush in paraffin
helpful.
Next, drop the remnants of your fire. Charybdis’s ash pan makes this easy. Behind the
ash pan (located under the firebox) is a movable hook and eye system. Just push the hook
to one side out of the eye (which is attached to the ash pan), the whole ash pan and grate
will hinge down and allow complete and easy removal of the remaining fire and ash.
Beware: this may still be hot. Once the fire has been removed, hinge the grate and ash
pan back to its original position and reinsert the pin.
Reattach the smoke-box door using the screw dart you removed earlier. Tighten until
finger tight.
You can now clean your locomotive, removing unwanted ash and dirt. We have found
that a soft paintbrush can be very effective for removing fresh ash that has covered some
of the bodywork.
Maintenance / troubleshooting
To keep your locomotive running well, you must keep all moving parts well oiled. It is
worth being aware that a well-oiled valve gear can very easily attract ash onto itself. This
ash is abrasive and its presence can increase wear on the valve gear. To keep this wear at
a minimum, we suggest using an old toothbrush to remove ash out of the valve gear.
As is the case for many new locomotives, the seals at certain joints may take time to ‘bed
in’. This can soon be overcome by a gentle tightening of the seal.
If the axle pump is failing to pump enough water into the boiler, there are usually two
reasons for this. The most likely of which is that small particles of dirt have blocked the
pump. This dirt can be removed by opening the bypass valve in order to allow the water
system to unblock itself after a moment of running. The second reason for a lack of water
is that water may be leaking out of the gland and avoiding the pump. Check the gland
over the ram is finger tight. If you are still having trouble, you can disconnect the rubber
tube underneath the loco. This pipe runs between the centre driving wheels and supplies
water to the pump. Put the end of your water top-up bottle onto the pipe and pump water
around the system, this pushes out any dirt. Once done reconnect the rubber tube and test
the locomotive.
Table of contents
Other ELR Engeineering Toy manuals
Popular Toy manuals by other brands

Vollmer
Vollmer 43860 Mounting instruction

Eduard
Eduard He 219 Uhu self adhesive quick start guide

GREAT PLANES
GREAT PLANES AT-6 Texan instruction manual

Fisher-Price
Fisher-Price B9762 instruction sheet

Hasbro
Hasbro Video Now Color Deluxe Carry Case 73987 instruction manual

LeapFrog
LeapFrog Shapes & Sharing Picnic Basket Parent guide & instructions