Eltax Voyager BT10 User manual

Voyager BT10
Instruction manual
Mode d’emploi
Danish Sound Since 1959
Merci d’avoir acheté un produit Eltax. An de proter au mieux de votre produit,
nous vous recommandons de lire attentivement ce mode d’emploi avant toute utilisation.
Veuillez conserver l’emballage et ce mode d’emploi pour un éventuel usage ultérieur.
Thank you for purchasing an Eltax product. To fully exert the function of this product,
we suggest you to read the instruction manual carefully before using it.
Please keep this instruction manual for further reference.
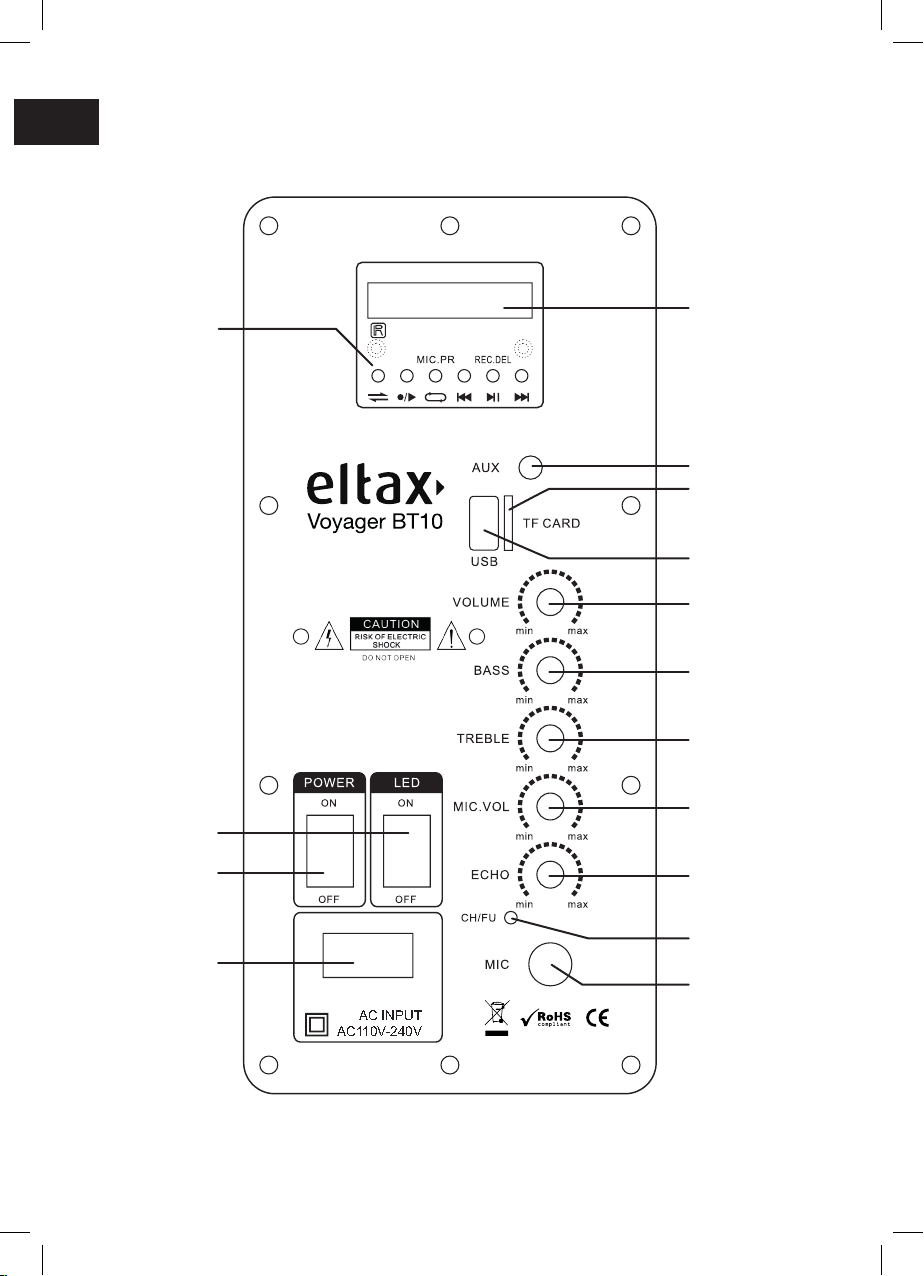
AC INPUT
AC110V-240V
UK
AC input
Power adaptor input
Display screen
Control panel(1)
LED Power
Power switch
USB input
TF card input
(microSD card)
AUX input
Volume
Master volume
Bass
To adjust bass level
Treble
To adjust treble level
Mic Volume
Microphone volume
Echo
To adjust micro
echo depth
Mic
Wired microphone input
Battery charge indicator(2)
UK
(1) CONTROL PANEL
MODE : Select and switch between Bluetooth, AUX, USB, TF (microSD) and FM inputs.
/RECORD : Short-press to start playback recording / Long-press to start recording
REPEAT / MIC. PR : Short-press to repeeat mode / Long-press to microphone priority
PREVIOUS SONG / PREVIOUS RADIO STATION
PLAY/PAUSE : Short-press to Play/Stop/ FM Auto scan / Long-press to delete record les (effective when playing record
les)
NEXT SONG / NEXT RADIO STATION
(2) BATTERY CHARGE INDICATOR :
Charge : red light / Full : green light
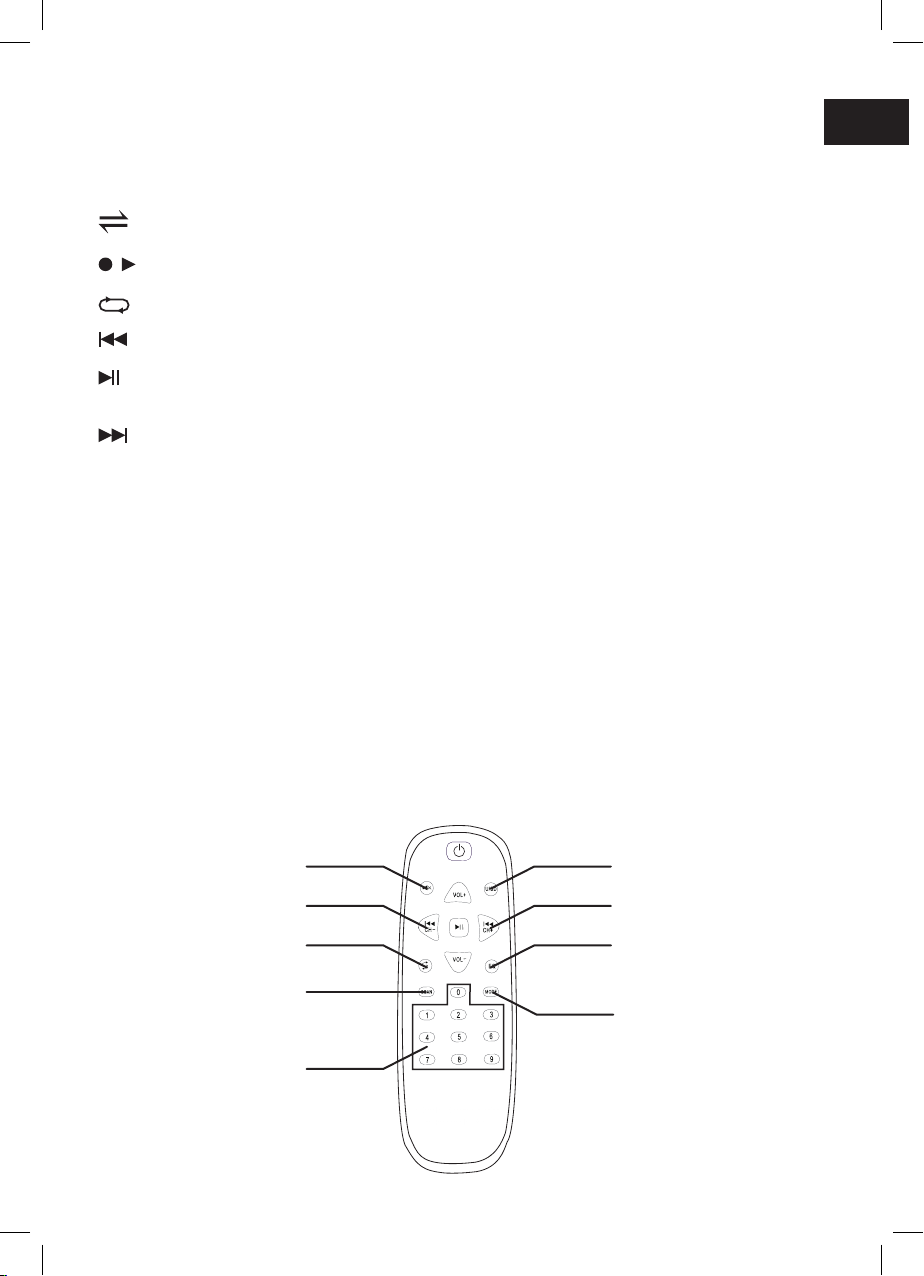
U/SD
Select USB or TF (microSD) mode
CH+
To change to next radio station
EQ
Equalizer : to change DSP
sound effect
Mode
Change BT/FM/AUX input
Mute
CH-
To change to previous radio station
Repeat
Scan
To scan the local radio station and
save it automatically (rst saved
radio will be on memory 1, etc)
Use the numbers to choose
saved radio station number or
track selection (USB/TF)
Remote control
BATTERY
• Please charge the battery before using the Voyager BT outdoor (charging time : 8-10 hours). More charging time can damage
the battery and signicantly reduce its lifetime.
• When the battery is out of charge after being used for a short time, please charge the built-in battery.
• If you don’t use the Voyager BT for a long time, please charge the battery every six months, to avoid the invalidity of the
battery.
MP3
• If you want to use the MP3 function, please format your USB disk as FAT-32 format on your computer rst.
• Please note that the Voyager BT will play the les according to the sequence on the USB disk. If you want to play a specic
sequence, you need to arrange the sequence as you want on the USB disk rst.
Mic
Wired microphone input
Battery charge indicator(2)
UK
• Correctly install the battery.
• Turn the power switch to «ON». If the indicator LED does not ash or always lights, please check the battery. Battery voltage
may be insufcient, or the polarity is installed oppositely.
• Before using wireless microphone, please extend the rod antenna and make it vertically upward to ensure better reception.
• Adjust the microphone volume on the Voyager BT according to the sound volume when singing.
• Keep away the receiving antenna from metal surface, wall or other obstacles, as it can signicantely reduce the signal.
• The effective using distance of wireless microphone is within 30 meters. When the battery is low, or if there are too many
interferences, the using distance will be shortened accordingly.
• To enjoy the best singing effect, the distance between mouth and microphone shall be 5-15cm, and the best angle is 45
degrees.
• When the battery is low, the indicator LED will light. Please change the battery in time in order not to affect the singing effect.
• Please keep away the microphone from the speaker to avoid Larsen effect.
• If you have purchased more than two sets of Voyager BT with wireless microphones and intend to use them together, please
select the varieties in different standard frequencies. If the frequency is identical, two Voyager BT can not be used until they
are separated from each other for 100 meters, so as to avoid mutual interference and other troubles.
NB : frequencies are indicated in the battery slot.
Wireless microphone
Troubleshooting
10" woofer
Piezo tweeter
Power : 250W
Sensitivity : 95dB/W/m
Frequency response : 50-20 kHz
Battery : 7.4V/2000mAh Li battery
Battery life : 10 hours*
Dimensions (WxHxD) : 265 x 445 x 280 mm
Weight : 4,3 kg All specications are subject to change without notice.
* Battery life will vary with use.
FAULT PHENOMENON ANALYSIS SOLUTION
Failing to power on • The power switch is not opened.
• The built-in battery is totally discharged.
• Open power switch.
• Use power adaptor to charge the battery.
No sound
• Failing to input sound source.
• Main volume is switched to minimum.
• USB disk playing has no sound.
• Poor contact or damage of external signal line.
• Change signal source.
• Properly adjust the volume knob.
• Inspect USB disk or audio switch.
• Readjust or change signal line.
External microphone has no sound
• External microphone is not fully inserted in the jack.
• The external microphone switch is not opened.
• The volume knob of microphone is off.
• Totally insert the microphone to the jack.
• Open the switch of wireless microphone.
• Properly adjust the volume knob of microphone.
Problems with wireless microphone
• The switch of wireless microphone is not opened.
• The battery is not inserted in the microphone.
• The sound of the wireless microphone is in distorsion.
• Open the switch of wireless microphone.
• Insert battery in the wireless microphone.
• Change the battery of wireless microphone.
Specications
Panneau de
commandes(1)
Bouton Marche/arrêt
des LED en façade
Interrupteur On/Off

FR
AC INPUT
AC110V-240V
Entrée AC
Adaptateur secteur
Écran
Panneau de
commandes(1)
Bouton Marche/arrêt
des LED en façade
Interrupteur On/Off
Entrée USB
Entrée carte TF
(microSD)
Entrées AUX
Volume
Volume général
Bass
Réglage du volume
des basses
Treble
Réglage du volume
des aigus
Mic Volume
Réglage du volume
microphone
Echo
Réglage de la
profondeur de l’écho
du microphone
Mic
Entrée microphone laire
Indicateur de charge(2)

U/SD
Choisir le mode USB ou TF (microSD)
CH+
Station de radio suivante
EQ
Egaliseur : pour sélectionner
les effets DSP
Mode
Choisir la source BT/FM/AUX
Coupure du son
CH-
Station de radio précédente
Répétition
Scan
Recherche les radios locales et les
sauvegarde automatiquement (la
première radio trouvée sera sauver-
gardée sur la mémoire 1, etc)
Utiliser les chiffres pour
sélectionner le numéro de station
de radio sauvegardée ou pour
sélectionner une piste (USB/TF)
Télécommande
FR
(1) PANNEAU DE COMMANDES
MODE : Sélectionner et changer le mode source : Bluetooth, AUX, USB, TF (microSD) ou FM.
/RECORD : Appui court pour enregistrer le playback / Appui long pour enregistrer
REPEAT / MIC. PR : Appui court pour activer le mode Répétition / Appui long pour mettre le micro en mode prioritaire
MORCEAU PRÉCÉDENT / STATION DE RADIO PRÉCÉDENTE
LECTURE/PAUSE : Appui court pour Lecture/Stop/Scan FM auto / Appui long pour effacer les chiers enregistrés (actif
lors de la lecture des chiers enregistrés)
MORCEAU SUIVANT / STATION DE RADIO SUIVANTE
(2) INDICATEUR DE CHARGE :
Charge : LED rouge / Full : LED verte
BATTERIE
• Veuillez charger la batterie avant d’utiliser le Voyager BT en extérieur (temps de recharge : 8-10 heures). Un temps de
recharge prolongé au delà peut endommager la batterie et réduire sa durée de vie de façon signicative.
• Si la batterie est déchargée après une courte période d’utilisation, veuillez la recharger.
• Si vous n’utilisez pas le Voyager BT pendant une longue période, il est recommandé de charger la batterie tous les 6 mois
environ, an d’éviter tout dommage.
MP3
• Si vous souhaitez utiliser la fonction MP3, veuillez formater votre clé USB au format FAT-32.
• Notez que le Voyager BT jouera les chiers selon l’ordre des chiers de la clé USB. Si vous souhaitez jouer une séquence
précise, vous devez d’abord organiser les chiers dans l’ordre désiré sur la clé USB.
FR
• Installer correctement les piles.
• Mettre le bouton power sur «ON». Si l’indicateur LED ne clignote pas ou reste allumé, vérier les piles. La tension des piles n’est
pas sufsante, ou les polarités ne sont pas respectées.
• Avant d’utiliser le microphone sans l, déplier l’antenne et la positionner verticalement an d’assurer une meilleure réception.
• Ajuster le volume du microphone sur le Voyager BT en fonction du volume sonore de la musique.
• Tenir l’antenne éloignée de toute surface métallique, mur ou obstacle, pour éviter toute perte du signal.
• La distance maximale d’utilisation du microphone sans l est de 30 mètres. Lorsque la tension des piles est faible, ou s’il y a trop
d’interférences, la distance d’utilisation sera réduite en conséquence.
• An de proter du meilleur effet de chant, la distance entre la bouche et le microphone doit être de 5 à 15cm, dans un angle de
45°.
• Lorsque la tension des piles est faible, l’indicateur LED s’allume. Changer les piles rapidement an de ne pas affecter le chant.
• Tenir le microphone éloigné de l’enceinte pour éviter tout effet Larsen.
• Si vous avez plusieurs Voyager BT équipés de microphones sans l et que vous souhaitez les utiliser ensemble, veuillez
sélectionner plusieurs fréquences différentes. Si les fréquences sont identiques, deux Voyager BT ne peuvent être utilisés qu’en
étant séparés l’un de l’autre d’une distance de 100 mètres an d’éviter toute interférence ou d’autres dommages.
NB : les fréquences sont indiquées dans le logement des piles.
Microphone sans-l
Dépannage
Haut-parleur 10"
Tweeter piezo
Puissance : 250W
Sensibilité : 95dB/W/m
Réponse en fréquence : 50-20 kHz
Batterie : 7.4V/2000mAh Li battery
Autonomie : 10 heures*
Dimensions (LxHxP) : 265 x 445 x 280 mm
Poids : 4,3 kg Les caractéristiques peuvent être modiées sans préavis.
*L’autonomie varie en fonction de l’utilisation.
ERREUR ANALYSE SOLUTION
Impossible d’allumer • L’interrupteur est éteint.
• La batterie est déchargée.
• Mettre l’interrupteur sur On.
• Charger la batterie.
Pas de son
• Signal d’entrée non reconnu.
• Le volume général est au minimum.
• La clé USB ne contient pas de son.
• Rendu sonore de la source faible ou détérioré.
• Changer l’entrée sur le menu Mode.
• Ajuster le bouton de volume général.
• Vérier la clé USB.
• Rebrancher ou changer la source.
Pas de son dans le micro externe
• Le micro externe n’est pas bien branché.
• L’interrupteur du micro externe est éteint.
• Le bouton volume du micro est éteint.
• Rebrancher le câble du micro.
• Mettre l’interrupteur sur On.
• Ajuster le bouton volume du micro.
Problèmes avec le micro sans l
• L’interrupteur du micro est éteint.
• Il n’y a pas de piles.
• Le son du micro sans l est distordu.
• Mettre l’interrupteur sur On.
• Mettre des piles.
• Changer les piles du micro sans l.
Caractéristiques

www.eltax.com
Update : 2018/08/06
Table of contents
Languages:
Other Eltax Portable Speakers manuals


