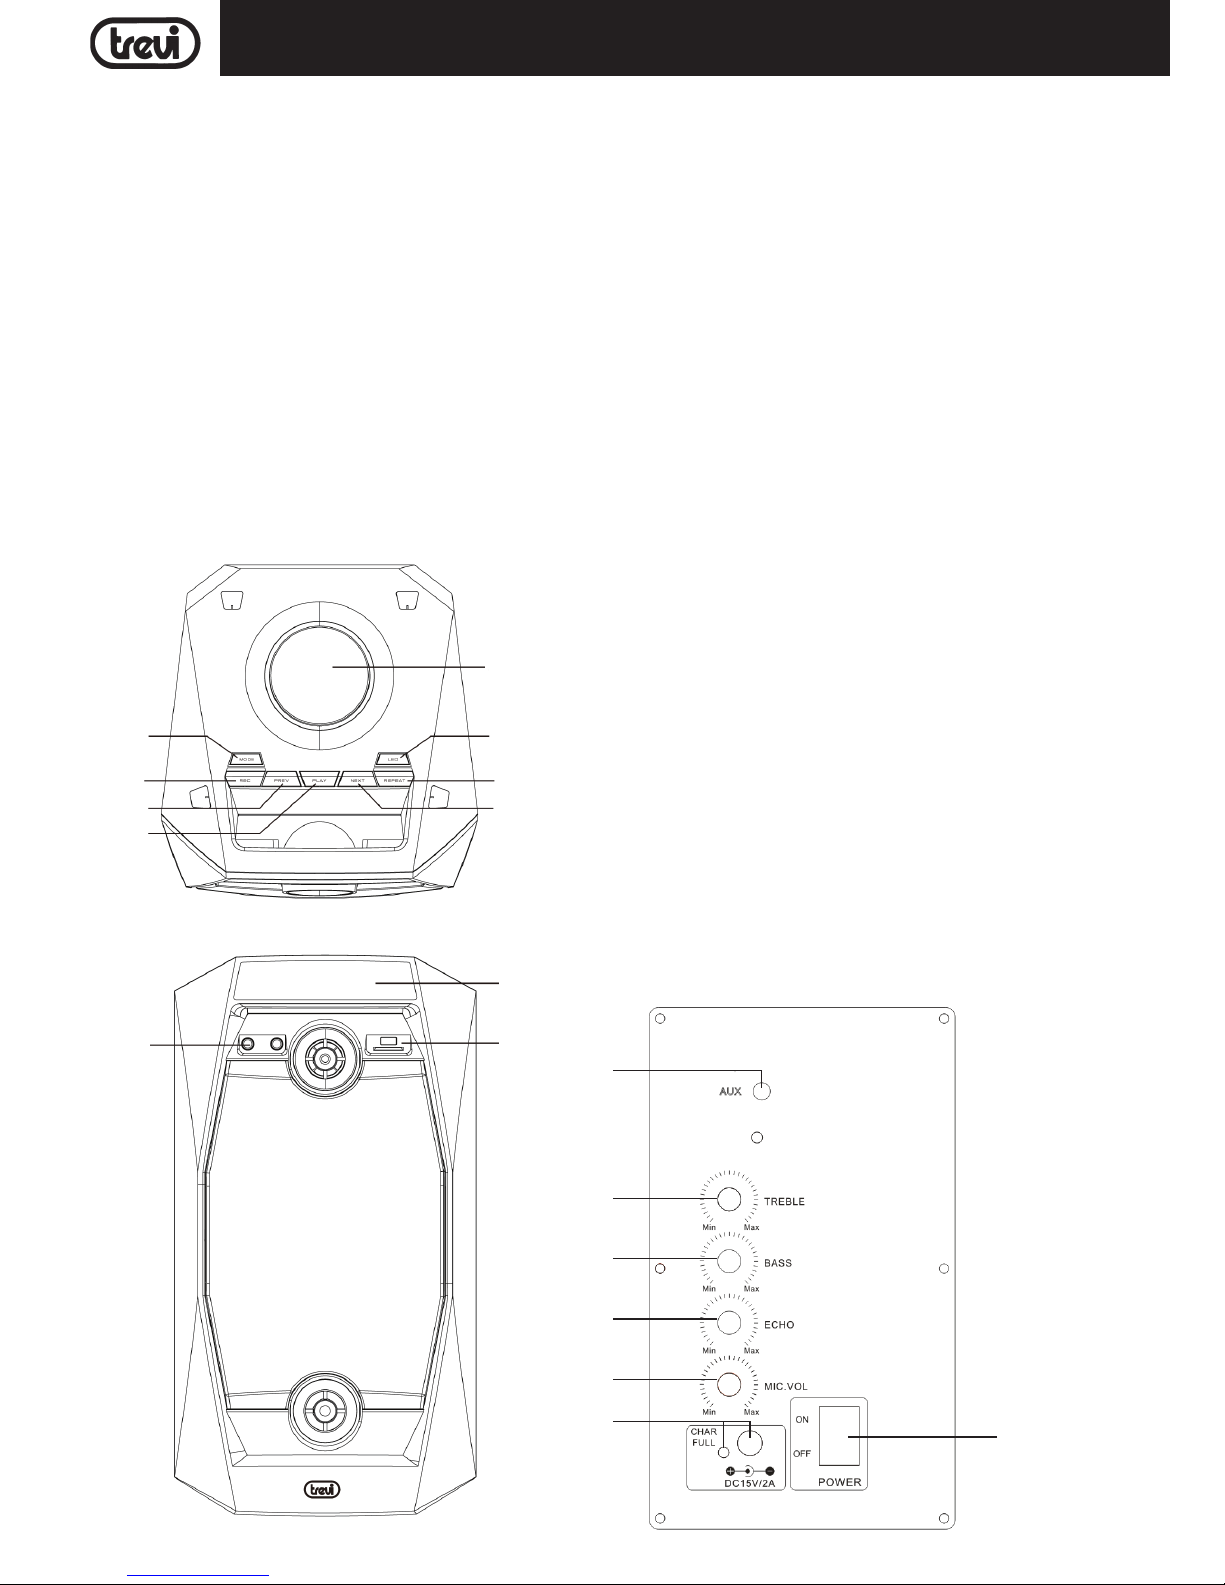
Trevi XF 800 User manual

ALTOPARLANTE AMPLIFICATO CON KARAOKE, BLUETOOTH
Manuale d'uso e collegamento
PORTABLE SPEAKER WITH KARAOKE, BLUETOOTH FUNCTION
Connection and Operation Manual
HAUT-PARLEUR AVEC KARAOKE, BLUETOOTH FONCTION
Mode d'emploi et branchement
BEWEGLICHER LAUTSPRECHER MIT KARAOKE, BLUETOOTH-FUNKTION
Gebrauchs- und Anschlusshandbuch
ALTAVOZ CON KARAOKE, FUNCIÓN BLUETOOTH
Manual para el uso y la conexión
AUX-IN
USB
RECORDER
XF 800
Guida d’uso
User guide
DISCO
LIGHT
BT
BLUETOOTH
Per informazioni integrative ed aggiornamenti su questo prodotto visita www.trevi.it
For additional information and updates of this product see www.trevi.it
2
INGRESSI
MIC
MP3
PLAYER
RADIO
FM

2
XF 800
NOTE D'USO
Questo apparecchio è uno strumento elettronico di alta precisione, evitate quindi di utilizzarlo nei seguenti casi:
• Vicinoafortifontidicalorecomecaloriferiestufe.
• Inluoghimoltoumidicomestanzedabagno,piscine,ecc.
• Inluoghimoltopolverosi.
• Inluoghisoggettiafortivibrazioni.
• Posizionatel'apparecchioinmodocheaisuoilaticisiasempreabbastanzaspazioperlaliberacircolazionediaria(almeno5cm).
• Nonostruiteleferitoiediventilazione.
• Sedeiliquidipenetranoall'internodell'apparecchioscollegateimmediatamentelaspinadallapresaeportatel'apparecchioalpiùvicinocentro
assistenza autorizzato TREVI.
• Controllatesempreprimadiaccenderel'apparecchiocheicavidialimentazioneedicollegamentosianoinstallaticorrettamente.
CURA E MANUTENZIONE
Per la pulizia si consiglia l’ uso di un panno morbido, leggermente inumidito. Evitate solventi o sostanze abrasive.
IMPORTANTE
Questo dispositivo e' progettato per uso domestico non professionale. La buona costruzione di questo apparecchio ne garantisce per lungo tempo il
perfettofunzionamento.Setuttaviadovessepresentarsiqualcheinconveniente,saràopportunoconsultareilpiùvicinoCentroAssistenzaautorizzatoTREVI.
TREVI persegue una politica di continua ricerca e sviluppo. Pertanto i prodotti possono presentare caratteristiche diverse da quelle descritte.
ITALIANO
DESCRIZIONE CONNETTORI/COMANDI
Comandi e prese sul dispositivo
1. Controllo Volume
2. Attivazione/disattivazione illuminazione Led
3.TastoREPEAT(ripetizionesingolobrano,tutto)
4. Tasto NEXT, selezione traccia successiva
5.TastoPLAY,riproduzioneepausa
6. Tasto PREV, selezione traccia precedente
7. Tasto REC, registrazione
8. Tasto MODE, selezione della funzione
9. Display
10. Ingresso USB/ SD Card
11. Ingressi MICROFONI
12. Ingresso AUX-In
13. Regolazione toni alti
14. Regolazione toni bassi
15.RegolazioneECHO
16. Regolazione Volume Microfono
17. Presa ricarica batteria
Indicatore Led stato di ricarica
18. Interruttore principale ON / OFF, accensione/spegnimento
1
2
3
4
5
6
7
8
11
9
10
12
13
14
15
16
17 18

3
XF 800ITALIANO
TRASPORTO
Periltrasportodell'apparecchiopoteteutilizzarel'appositamanigliadoveèmontatoilDisplay(9).
ALIMENTAZIONE
Questaunitàfunzionaconbatteriaricaricabilealpiombo12V,4,5AhealimentatoreDC15V,2A(indotazione).
Quando la batteria e' in fase di esaurimento o l'apparecchio non si accende, inserire il cavo dell'alimentatore in dotazione nella presa di ricarica batteria
(17)suldispositivoelaspinadell'alimentatoreinunapresadicorrenteeaccenderel'apparecchiopereffettuarelaricarica.
StatidellaspiaLeddiricarica(17):
- Spia LED ROSSA lampeggiante: con il dispositivo in uso indica che la batteria e' in fase di ricarica.
- Spia LED ROSSA fissa: operazione di ricarica terminata, la batteria e' carica.
Attenzione:
- La batteria viene ricaricata solamente se l'interruttore principale ON/OFF(18) e su ON.
- Non collegare l'apparecchio a prese con tensione diversa da quella indicata.
- Non utilizzare alimentatori differenti da quello in dotazione o con tensione e corrente diversa da quella indicata.
FUNZIONI DI BASE
ACCENSIONE/SPEGNIMENTO
Premerel'interruttoreprincipaleON/OFF(18)eportarloinposizioneONperaccenderel'apparecchio.
Premerel'interruttoreprincipaleON/OFF(18)eportarloinposizioneOFFperspegnerel'apparecchio.
STAND-BY
E'possibileportarel'apparecchioinmodalitàStand-byutilizzandoiltasto (19)deltelecomando.Premerlonuovamenteperriaccenderel'apparecchio
Attenzione:
- La funzione Stand-by è attivabile solamente se l'interruttore ON/OFF(18) è in posizione ON.
- Vi ricordiamo che lasciando l'apparecchio in funzione Stand-by la batteria si scarica più velocemente che utilizzando l'interruttore ON/OFF(18).
- Non e' possibile effettuare la ricarica della batteria se l'apparecchio e' in standby.
SELEZIONE DELLA FUNZIONE
Percambiarelamodalitàdifunzionamento,premerepiu'volteiltastoMODE(8)sull'unitàopremereiltasto(25)sultelecomandoperselezionare
RADIO(suldisplaycomparelafrequenza),BLUETOOTH(suldisplaycompareBLUE),USB(solosesullapresaUSB(10)viècollegataunamemoria,
suldisplaycompareUSBperqualchesecondo),SD(solosesullapresaSD(10)viècollegataunamemoria,suldisplaycompareSDperqualche
secondo),AUX(suldisplaycompareU).
REGOLAZIONE DEL VOLUME
1. RuotarelamanopoladelvolumeVOL.(1)peraumentareodiminuireilvolumegeneralediriproduzione,oppureutilizzareitasti(23)e(29)sul
telecomando.
2. RuotarelamanopolaMICVOL(16)perregolareilvolumedelsegnalesugliingressiMICROFONI(11).Laregolazioneagiscesuidueingressi
contemporaneamente
19 24
20 25
21 26
27
22
23
28
29
30
Telecomando
19. Tasto , accensione/spegnimento
20.TastoREPEAT(ripetizionesingolobrano,ripetizionedituttiibrani)
21. Tasti numerici 0-9
22. Tasto (Play/Pausa)
23. Volume -
24. Tasto MUTE
25.TastoMODE(selezionedellafunzione)
26.TastoRECORD(registrazione)
27.TastoSOUND(preequalizzazioni)
28. Tasto 9, selezione traccia precedente
29. Volume +
30. Tasto :, selezione traccia successiva
21
Installazione batterie:
Rimuovere il coperchio nella parte posteriore del Telecomando, inserire 2 batterie formato “AAA”
facendo attenzione alla polarità indicata e richiudere il coperchio.

4
XF 800
PRE EQUALIZZATORE
Questaunitàhadellepre-equalizzazioneaudiointegrate.PremerepiùvolteiltastoSOUND(27)sultelecomandoperselezionareun'impostazioneche
meglio si adatta alla riproduzione sonora in corso. Le pre-equalizzazioni sono attive e selezionabili solamente nelle funzioni USB e SD.
REGOLAZIONE TONI ALTI E BASSI
RuotarelamanopolaTREBLE(13)perregolareitonialti.
RuotarelamanopolaBASS(14)perregolareitonibassi.
EFFETTO ECHO
RuotarelamanopolaECHO(15)peraumentareodiminuirel'effettoecosugliingressiMICROFONI(11).
Nota: l'effetto eco agisce unicamente sugli ingressi microfonici.
EFFETTI DISCO-LIGHT
PerattivareglieffettiDisco-LightpremereiltastoIlluminazioneLed(2),ildisplaymostra"ON".
Perdisattivarel'effettoDisco-Light,premerenuovamenteiltastoIlluminazioneLed(2),ildisplaymostra"OFF".
VOCE GUIDA
Perattivarelavoceguida(solamenteinlinguaInglese),tenerepremutoperqualchesecondoiltastoPLAY(5)sull'unita'.
Perdisattivarelavoceguida,tenerepremutoperqualchesecondoiltastoPLAY(5)sull'unita'.
FUNZIONE RADIO FM
RICERCA AUTOMATICA
1. Accenderel'apparecchioepremerepiùvolteiltastoMODE(8)sull'unità,oiltastoMODE(25)sultelecomandoeselezionarelafunzioneRADIO
(suldisplaycompariràl'indicazionedellafrequenza).
2.
PremereiltastoPLAY(5)sull'unitàoppureiltasto
(22)sultelecomandoperattivarelamemorizzazioneautomaticadelleemittenti(laradio
iniziaunaricercaautomaticadellestazioniradioelesalvaautomaticamenteinmemoria).Ilnumerodellestazionimemorizzatedipendedalsegnale
radionellavostrazona.DurantelaricercapremereiltastoPLAY(5)sultelecomandoperarrestarelamemorizzazione.
3. UtilizzareitastiNEXT(4)ePREV(6),oppureitasti:(30)e9(28)sultelecomandoperl'ascoltodellevarieemittentiradiosalvateinmemoria.
4. Perrichiamareilnumerodiunastazionememorizzatautilizzareitastinumerici(21)sultelecomando.
Per esempio per richiamare la stazione numero 12 premere prima 1 e poi 2.
RICHIAMO DIRETTO DELLA FREQUENZA
1. Utilizareitastinumerici(21)sultelecomandopersintonizzarsidirettamentesullafrequenzadesiderata(traquellememorizzate).
Per esempio per ascoltare le frequenza 93.1MHz digitare 9 3 1.
Nota:
-
La ricezione in FM dipende molto dal luogo dove è posto l’apparecchio.
- La vicinanza di apparecchi TV, lampade al neon o altri elettrodomestici può provocare disturbi nella ricezione di programmi radio, in questo
caso allontanate l'apparecchio.
FUNZIONAMENTO BLUETOOTH
1. Accenderel'apparecchioepremereiltastoMODE(8)sull'unità,oiltastoMODE(25)sultelecomandoeselezionarelafunzionebluetooth,suldisplay
compariràlascritta"BLUE".
2. Nella modalità Bluetooth, il simbolo suldisplay(9)cominceràalampeggiare,ilsistemaentraautomaticamenteinricerca.
3. Attivare la funzionalità Bluetooth sul dispositivo esterno da accoppiare.
4. Avviarelaricercadeidispositivi.Altermineselezionareildispositivo"TREVIXF800".
5. Inserirelapassword"0000"serichiesta.
6. Premere il tasto
PLAY(5)sull'unitàoppureiltasto
(22)sultelecomando
peravviarelariproduzioneeutilizzareitastiNEXT(4)ePREV(6),
oppure i tasti :(30)e9(28)sultelecomandoperlaselezionedeibrani.
RIPRODUZIONE SU INGRESSO USB/SD
1. Accendere l'apparecchio.
2. InserireunamemoriaUSBounaschedaSDnell'ingressoUSB/SD(10).Lariproduzionevieneavviataautomaticamente.
3. Per mettere in pausa la riproduzione, premere il tasto
PLAY(5)sull'unitàoppureiltasto
(22)deltelecomando
, sul display comparirà l'icona
PAUS.
4. Per riprendere la riproduzione, premere nuovamente il tasto
PLAY(5)sull'unitàoppureiltasto
(22)deltelecomando
.
5. PremereiltastoNEXT(4)oiltasto:(30)sultelecomando,durantel’ascoltoperpassareallatracciasuccessiva.PremereiltastoPREV(6)o
9(28)sultelecomandoperpassareaibraniprecedenti.
6. Utilizzandolatastieranumerica(21)sultelecomandopotetedigitaredirettamenteilnumerodelbranomusicalechevoleteriprodurre.
7. PremereunavoltailtastoREPEAT(20)daltelecomando,suldisplay(9)compariràlascritta"ONE",perriprodurrecontinuamentelastessatraccia;
premerlounasecondavolta,suldisplay(9)compariràlascritta"ALL",perriprodurrecontinuamentetuttibranicontenutinellaUSB/SD.
Nota:
- Il lettore potrebbe non supportare alcuni dispositivi USB, questo è dovuto all'incompatibilità di alcuni processori.
- Per evitare interferenze dannose, collegare sempre le periferiche USB direttamente all'unità, non utilizzare cavi di prolunga.
- Dal computer formattare le memorie USB/SD in FAT (16 o 32).
ITALIANO

5
XF 800
AUX-IN
1. Accendere l'apparecchio.
2. Collegareunaqualsiasiunitàprovvistadiuscitaaudio,tramiteappositocavoJackda3,5mm(nonincluso),all'ingressoAUXIN(12).
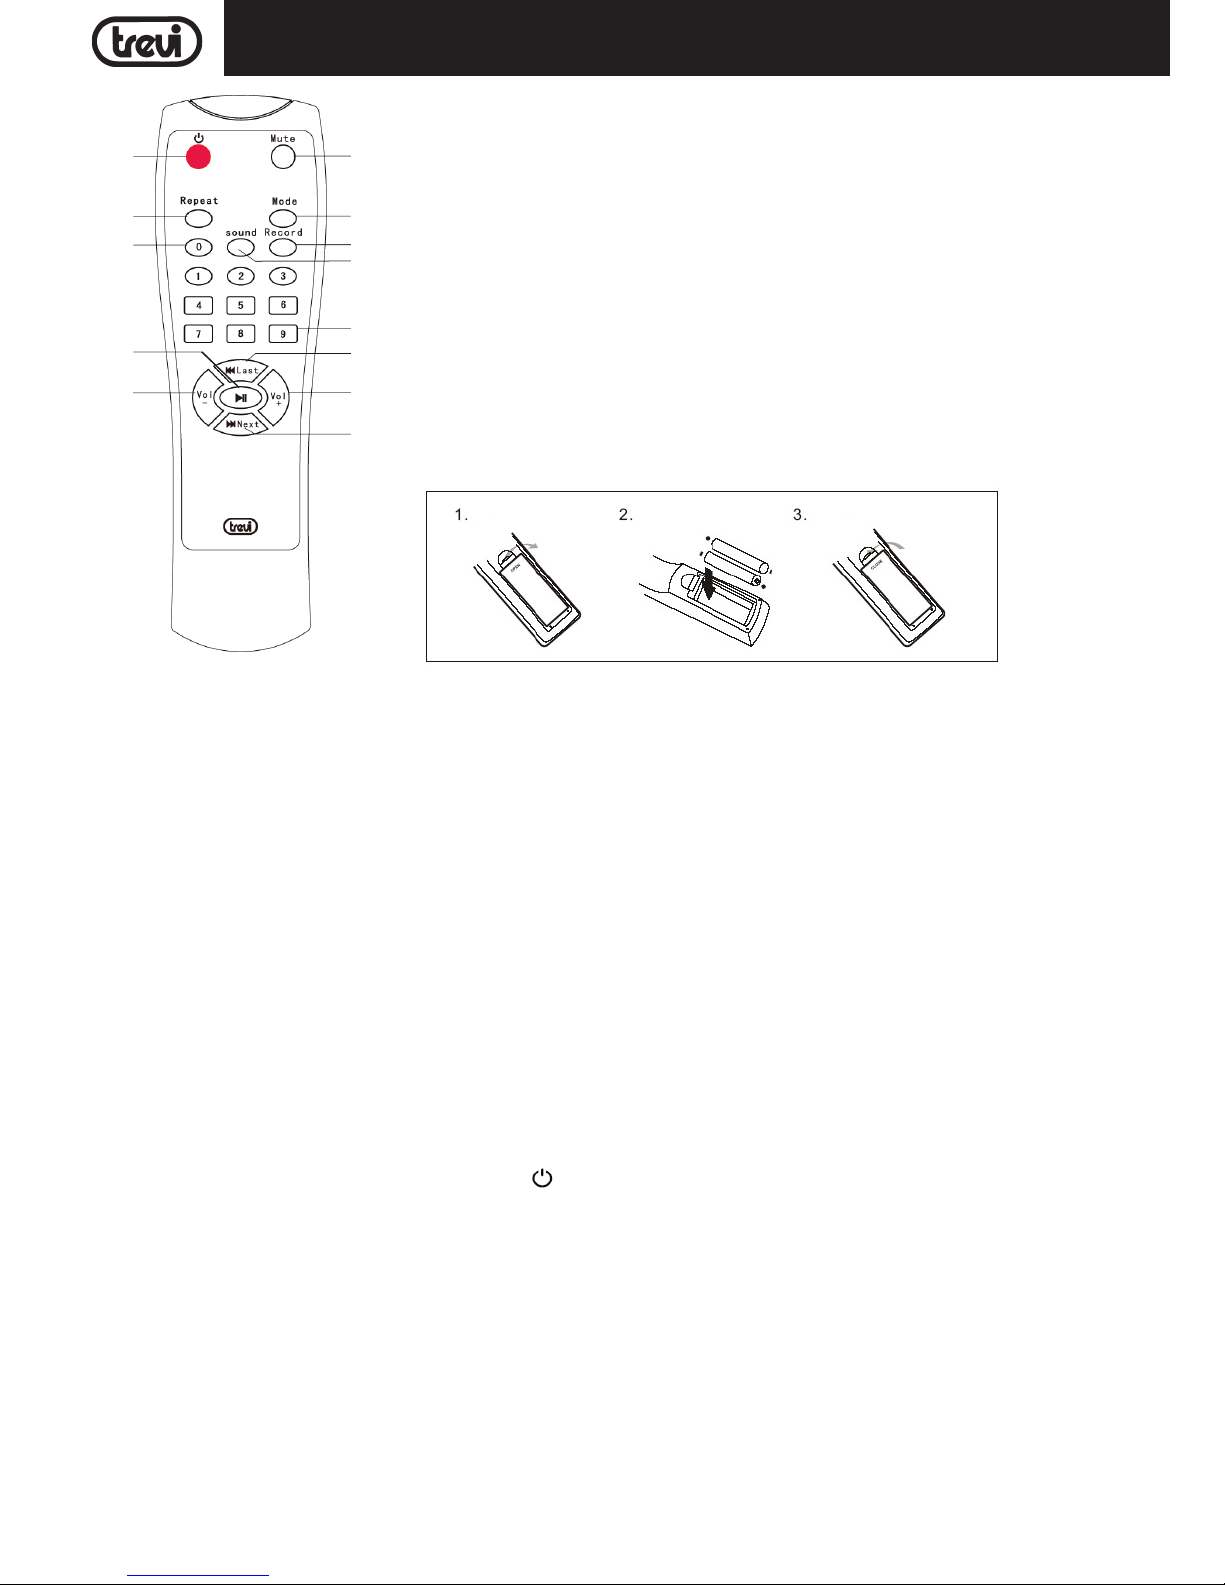
3. PremereiltastoMODE(8)sull'unità,oiltastoMODE(25)sultelecomando,eselezionarelamodalità"AUX",suldisplaycompariràlascritta"U".
4. Regolare il dispositivo esterno dai propri comandi.
UTILIZZO DEL MICROFONO
1. CollegareilmicrofonoindotazioneadunodegliingressiMICROFONI(11).
2. Accendere il microfono agendo sull'interruttore presente sul manico del microfono stesso portandolo in posizione ON.
3. Regolareilvolumediingressodelmicrofono(16)el'effettoeco(15)comedesideratotramitegliappositicomandi.
Nota:
- E' possibile utilizzare due microfoni contemporaneamente (secondo microfono non in dotazione).
- E' possibile collegare al secondo ingresso microfonico anche uno strumento musicale come una chitarra.
REGISTRAZIONE
REGISTRAZIONE MUSICALE
Questoapparecchioe'ingradodiregistraresullamemoriaUSBdeibranimusicalidallafunzioneRadioodallafunzioneAUX-In(NONèpossibile
registraredallefunzioniBluetoothoSD).All'internodellamemoriaUSBl'apparecchiocreeràautomaticamenteunacartellachiamata"Record"dove
memorizzerà tutti i file di registrazione.
1. Accendere l'apparecchio.
2. InserireunamemoriaUSBnell'ingressoUSB/SD(10).
3. SelezionarelafunzioneRadioolafunzioneAUX-IntramiteiltastoMODE(8)sull'unità,oiltastoMODE(25)sultelecomando.
4. PremereiltastoREC(7)sull'unitàoiltastoRECORD(26)sultelecomandoperavviarelaregistrazione,suldisplay(9)compariràlascritta"REC"e
si avvierà l'indicazione del tempo.
5. PremerenuovamenteiltastoREC(7)sull'unità,oiltastoRECORD(26)sultelecomando,perarrestarelaregistrazione.L'apparecchiosiporterà
automaticamente nella funzione USB per riprodurre immediatamente il brano registrato.
Nota:
- E' possibile registrare solamente l'audio dalle funzioni Radio o AUX-In. Anche inserendo e utilizzando il microfono in dotazione, l'apparecchio
registrerà solamente il segnale audio trasmesso da queste sorgenti, non registrerà la parte vocale fatta con il microfono.
- Quando si attiva la funzione "Registrazione" tutti i comandi dell'apparecchio vengono inibiti compreso la regolazione del volume, questi riprenderanno
la loro normale funzione quando la registrazione verrà arrestata.
- La funzione di registrazione potrebbe non supportare alcuni dispositivi USB, questo è dovuto all'incompatibilità di alcuni processori.
REGISTRAZIONE VOCALE
Questo apparecchio e' in grado di registrare sulla memoria USB la parte vocale quando si utilizza il microfono in dotazione. All'interno della memoria
USBl'apparecchiocreeràautomaticamenteunacartellachiamata"Record"dovememorizzeràtuttiifilediregistrazione.
1. Accendere l'apparecchio.
2. InserireunamemoriaUSBnell'ingressoUSB/SD(10).
3. SelezionarelafunzioneUSBoSDtramiteiltastoMODE(8)sull'unità,oiltastoMODE(25)sultelecomando.
4. PremereiltastoREC(7)sull'unitàoiltastoRECORD(26)sultelecomandoperavviarelaregistrazione,suldisplay(9)compariràlascritta"REC"e
si avvierà l'indicazione del tempo.
5. PremerenuovamenteiltastoREC(7)sull'unità,oiltastoRECORD(26)sultelecomando,perarrestarelaregistrazione.L'apparecchioriprodurrà,
automaticamente, il brano registrato.
Nota:
- E' possibile registrare solamente la voce.
- La funzione di registrazione potrebbe non supportare alcuni dispositivi USB, questo è dovuto all'incompatibilità di alcuni processori.
INFORMATIVA SULLA RIMOZIONE E LO SMALTIMENTO DELLE BATTERIE
Attenzione: Questa operazione è riservata esclusivamente al personale tecnico specializzato!
PROCEDURA PER LA RIMOZIONE DELLA BATTERIA DALL’ALTOPARLANTE AMPLIFICATO
Operare esclusivamente in assenza di collegamento dell’apparecchio alla rete elettrica!
1. Rimuovereleviticheserranoilpannellodell'alloggiamentobatteria;
2. Rimuovereilpannellometallico;
3. Individuarelabatteria;
4. Rimuovere le viti che serrano i sostegni della batteria, rimuovere i sostegni, scollegare la batteria e rimuoverla.
Qualunque sia il tipo di batteria esaurita, essa non deve essere gettata tra i rifiuti domestici,nel fuoco o nell’acqua. Ogni tipo di batteria esaurita deve
essere riciclata oppure smaltita presso gli appositi centri raccolta dedicati.
CARATTERISTICHE TECNICHE
Alimentazione: .....................................DC15V,2A-batteriainternaalpiombo12V4.5Aricaricabile
Consumo: ................................................................................................... 30W
Potenza massima in uscita: .............................................................................................Max50W
Dimensioni: ................................................................................ 270x260x500mm
Peso: ................................................................................................. 5,5Kg
ITALIANO

6
XF 800
ENGLISH
NOTES ON USE
Thisisaprecisionelectronicappliance;avoidusingitinthefollowingcases:
• Nearstrongheatsources,suchascentralheatingplantsorstoves.
• Inveryhumidplacessuchasbathrooms,swimmingpools,etc.
• Inverydustyplaces.
• Inplacessubjecttostrongvibrations.
• Positiontheapplianceinsuchawaythatthereisalwaysenoughroomforfreeaircirculation(atleast5cm).
• Donotblocktheairinlets.
• Ifanyliquidenterstheappliance,unplugitimmediatelyfromthesocketandtakeittothenearestTREVIauthorisedservicecentre.
• Beforeswitchingontheappliance,alwayscheckthatthepowercableandtheconnectioncableareproperlyinstalled.
CARE AND MAINTENANCE
Use a slightly damp soft cloth for cleaning. Do not use solvents and abrasive substances.
IMPORTANT
Thisdeviceisdesignedforhomeuse(notprofessionaluse).Thisappliancehasbeencarefullybuilttoensurelong-lastingperfectperformance.
However, should any inconvenience occur, please contact your local authorised TREVI Service Centre.
TREVI follows a policy of ongoing research and development. Therefore products may have different features from those described.
LOCATION OF CONTROL
Description controls
1. Main Volume Control
2. Led ON/OFF
3. REPEAT
4. NEXT
5.PLAY
6. PREV
7. REC
8. MODE
9. Display
10. USB/ SD Card Input
11. MIC Input
12. AUX-In
13. TREBLE
14. BASS
15.ECHO
16. MIC VOL
17. Charging Input Jack
Charging indicate Light
18. Power Switch
1
2
3
4
5
6
7
8
11
9
10
12
13
14
15
16
17 18

7
XF 800ENGLISH
TRANSPORTATION
Tocarrythedevicecanusethehandlewhichismountedthedisplay(9).
POWER
Thisunitworkswithrechargeablelead-acid12V,4,5AhandDCpowersupply15V,2A(included).
Whenthebatteryand'beingphasedoutorthedevicedoesnotturnon,plugthepowercordsuppliedinthebatterychargingsocket(17)onthedevice
and plug the adapter into a power outlet to recharge .
LampstatusLEDcharging(17):
- RED LED flashing light: indicating that the battery is' being charged.
- LED light RED fixed: charging process completed, the battery and 'charge.
Caution:
- The battery is charged only when the main switch ON/OFF (18) is ON position.
- Do not connect the appliance to sockets with a voltage other than that indicated.
- Do not use power supplies other than the one supplied with voltage or current, and other than that indicated.
BASIC FUNCTIONS
POWER ON/OFF
PressthemainswitchON/OFF(18)topositionONtoturnthepower.
PressthemainswitchON/OFF(18)topositionOFFtoswitchoff.
STAND-BY
Youcanswitchthesystemtostandbymodeusingthebutton (19)ontheremote.Pressitagaintoturnitbackon
Caution:
- The stand-by function is activated only if the ON/OFF switch(18) is ON.
- We remember leaving the unit in stand-by function the battery discharges faster than using the ON/OFF(18).
MODE SETTING FUNCTION
Tochangethemodefunction,pressmore'timestheMODEkey(8)ontheunitorpressthebutton(25)ontheremotecontroltoselectRADIO(di-
splaycomaprefrequency),BLUETOOTH(thedisplayBLUE),USB(onlyiftheUSBsocket(10)isconnectedtoamemory,thedisplayshowsfora
fewsecondsUSB),SD(SDonlyiftheoutlet(10)isconnectedtoamemory,thedisplayshowsSDforafewseconds),AUX(thedisplayshowsU).
ADJUSTING THE VOLUME
1.TurnthevolumeVOL.(1)toincreaseordecreasetheoverallvolumeofplayback,orusethebuttons(23)and(29)ontheremotecontrol.
2.TurntheMICVOL(16)toadjustthevolumelevelsignalinputsMICROPHONE(11).Theadjustmentactsonthetwoinputssimultaneously
PRE-EQUALIZER
Thisunithasthepre-equalizationaudio.PresstheSOUNDbutton(27)ontheremotecontroltoselectasettingthatbestsuitsthesoundreproduction
in progress. The pre-equalization are active and can be selected only in the USB and SD function.
19 24
20 25
21 26
27
22
23
28
29
30
Remote control
19. Power ON/OFF
20.REPEATKey(singlerepeat,repeatall)
21. 0-9 Keys
22.Play/pause(allthesoundwilloffwhenpause)
23. Volume -
24. MUTE
25.MODEKey(ShiftAUX/USB/SDmode)
26. RECORD Key
27.Soundmodekey(severalsoundmodescirculated)
28. Previous song
29. Volume +
30. Next song
21
Installing the Batteries
Removethebatterycoverfromthe RemoteControlandput2xAAAsizebatteriesinsidethe compartment.
The diagram inside the Battery Compartment shows the correct way to install the batteries.

8
XF 800
ENGLISH
SETTING TONE TREBLE AND BASS
TurntheknobTREEBLE(13)toadjustthetreble.
TurntheknobBASS(14)toadjustthebass.
ECHO EFFECT
TurntheknobECHO(15)toincreaseordecreasetheechoeffectontheinputsMIC.
Note: the echo only works on microphone inputs.
DISCO-LIGHT EFFECTS
ToactivatetheeffectsDiscoLight-longpresstheLEDON/OFF(2).Thedisplayshow"ON".
TocanceltheeffectDisco-Light,presstheLEDON/OFF(2)untilthedisplayshows"OFF".
VOICE GUIDE
Toactivatethevoiceguide(onlyinEnglish),pressandholdforafewsecondsthePLAYbutton(5).
Toturnoffthevoiceguide,pressandholdforafewsecondsthePLAYbutton(5).
FUNCTION RADIO FM
AUTOMEMORY
1. TurnontheunitandpressrepeatedlytheMODEkey(8)onunit,ortheMODE(25)onremotecontrolandselectRADIOfunction(thedisplaywill
showthefrequency).
2. PressthePLAYbutton(5)ontheunitorthekey(22)onremotecontroltoactivatetheautomemory(theradiostartsanautomaticsearch
radiostationsandsavesthemautomatically).Thestation'snumberstoreddependsontheradiosignalinyourarea.Duringthesearch,press
PLAYbutton(5)ontheremotecontroltostoprecording.
3. UsetheNEXT(4)andPREV(6),orthekeys:(30)and9(28)ontheremotecontroltolistentothevariousradiostationssavedinmemory.
4. Tocallthenumberofapresetstationusingthenumberkeys(21)ontheremotecontrol.
For example, to call up the station number 12, first press 1 and then 2.
DIRECTRECALLOFFREQUENCY
1. Usethekeypad(9)totunethedesiredfrequency.
For example, to listen to 93.1MHz frequency type 9 3 1.
Note:
- The FM reception depends on the place where you place the unit.
- The proximity of TV sets, fluorescent lamps or other appliances may cause interference in the reception of radio programs, in this case, move this unit.
BLUETOOTH OPERATION
1. TurnonthemachineandpresstheMODE(8)onunit,ortheMODE(25)onremotecontroltoselecttheBluetoothfunction,thedisplayshows
"BLUE".
2. In the Bluetooth mode, the symbol on display will start flashing, the system automatically enters search mode.
3. Activate the Bluetooth feature on the external device to be coupled.
4. Initiateasearchfordevices.Afterselectthe"TREVIXF800".
5. Enterthepassword"0000"ifrequired.
6. PressthePLAYbutton(5)ontheunitorthekey(22)onremotecontrol,tostartplayingandthebuttonsNEXT(4)andPREV(6),orthekeys
:(30)and9(28)fortheselectionofsongs.
PLAYONINPUTUSB/SD
1. Turn on the unit.
2. InsertaUSBmemoryoranSDcardintotheUSB/SD(10)slot.Playbackstartsautomatically.
3. Topauseplayback,pressthePLAYbutton(5)ontheunitorthekey(22)oftheremotecontrol,thedisplaywillshowtheiconPaus.
4. Toresumeplayback,pressthePLAYbutton(5)ontheunitorthekey(22)oftheremotecontrol.
5. PresstheNEXT(4)orkey:(30)ontheremotecontrolwhilelisteningtoswitchtothenexttrack.PressthePREV(6)or9(28)ontheremoteto
go to the previous tracks.
6. Usingthenumerickeypad(21)ontheremotecontrolyoucandirectlyenterthenumberofthesongyouwanttoplay.
7. PressonceREPEATbutton(20)ontheremote,thedisplay(9)willshow"ONE",tocontinuallyplaythesametrack;pressitasecondtime,the
display(9)willshow"ALL"tocontinuouslyplayallsongsintheUSB/SD.
Note:
- The player may not support some USB devices, this is due to the incompatibility of some processors.
- To avoid harmful interference, always connect USB devices directly to the unit, do not use extension cords.
- From the computer to format the USB memory/SD FAT (16 or 32).
AUX-IN
1. Turn on the unit.
2. Connectanyunitequippedwithaudiooutput,throughacable3.5mmjack(notincluded)totheAUXIN(12).
3. PresstheMODEbutton(8)ontheunit,ortheMODE(25)ontheremotecontrol,andselectthe"AUX",thedisplaywillshow"U".
4. Use the external device from their commands.
USING THE MICROPHONE
1. ConnectthesuppliedmicrophoneintothejackMIC(11).

9
XF 800
2. Turn on the microphone using the switch on the handle of the microphone to the ON position.
3. Adjustthevolumeofthemicrophoneinput(16)andtheechoeffect(15)asdesiredusingtheappropriatecommands.
Note:
- You can use two microphones simultaneously (second microphone not included).
INPUT GUITAR
This device can amplify a guitar or other preamp music instrument.
1.ConnectthecableoftheguitarbyinsertingitintotheMIC(11)input.
2.Adjustthevolumeofthemicrophoneinput(16)asdesiredusingtheappropriatecommand.
RECORDING
MUSIC RECORDING
Thisunitand'capableofrecordingonUSBmemorythemusicfromtheradiofeatureorAUX-Infunction(itisNOTpossibletorecordfromtheBluetooth
orSDfunctions).Thedevicewillautomaticallycreateafoldercalled"Record"insidetheUSBmemoryanditwillstorealllogfiles.
1. Turn on the unit.
2. InsertaUSBmemoryintotheUSB/SD(10).
3. SelectthefunctionAUX-InorRadiofunctionbyMODEbutton(8)ontheunit,ortheMODE(25)ontheremotecontrol.
4. PressRECbutton(7)ontheunitortheRECORDbutton(26)ontheremotecontroltostartrecording,thedisplay(9)willshow"REC"andtime
signature will start.
5. PressRECbutton(7)ontheunit,ortheRECORDbutton(26)ontheremotecontroltostoprecording.ThedevicewillautomaticallygointoUSB
functiontoimmediatelyplaybacktherecordedfile.Afterplayingtheunitwillreportontheinitialfunction(RadioorAUX-In).
Note:
- You can record only the audio functions from Radio or AUX-In. Even inserting and using the supplied microphone, the unit will record only the audio
signal transmitted from these sources, it will not record the vocals done with the microphone.
- When you turn on the "Registration" all the controls of the unit are inhibited including volume adjustment, they will take their normal function when
the recording will stop.
VOICE RECORDING
This unit and 'capable of recording the vocals on the USB memory when using the supplied microphone. The device will automatically create a folder
called"Record"insidetheUSBmemoryanditwillstorealllogfiles.
1. Turn on the unit.
2. InsertaUSBmemoryintotheUSB/SD(10).
3. SelecttheUSBorSDfunctonbyMODEbutton(8)ontheunit,ortheMODEbutton(25)ontheremotecontrol.
4. PressRECbutton(7)ontheunitortheRECORDbutton(26)ontheremotecontroltostartrecording,thedisplay(9)willshow"REC"andthetime
signature will start.
5. PressRECbutton(7)ontheunit,ortheRECORDbutton(26)ontheremotecontroltostoprecording.Theunitwillplay,automatically,therecorded
file.
Note:
- You can record only the voice.
INFORMATION NOTE ON THE REMOVAL AND DISPOSAL OF BATTERIES
Warning: Only high-qualied personnel should perform this operation!
BATTERY REMOVAL
The appliance should not be plugged to the mains socket when performing this operation!
1. Remove the screws that secure the structure of the trolley and take it apart.
2.Removethescrewsthatsecuretherearpanelspeakeramplifiedandremovethepanel;
3.Locatethebattery;
4. Remove the screws that secure the supports of the battery, remove the supports, disconnect the battery and remove it.
Used batteries should not be disposed of with household waste or thrown into fire or water. Used batteries should be recycled or disposed of in
separate waste collection centres.
SPECIFICATIONS
Power Supply: ....................................DC15V,2A-internalleadacidrechargeablebattery12V4.5A
Consumption: .................................................................................................... 30W
Maximum output power: .............................................................................................Max50W
Sound Bar Dimensions: ................................................................................ 270x260x500mm
Weight: ..................................................................................................5,5kg
ENGLISH

10
XF 800
NOTES D’EMPLOI
Cetappareilestuninstrumentélectroniquedehauteprécision;évitezdoncdel’utiliserdanslescassuivants:
• Prèsdegrossessourcesdechaleurcommedesradiateursetdespoêles.
• Dansdesendroitstrèshumidescommelessallesdebains,lespiscines,etc.
• Dansdesendroitstrèspoussiéreux.
• Dansdesendroitsexposésàdefortesvibrations.
• Placezl’appareildesortequ’ilyaittoujoursassezd’espacesursescôtéspourlaissercirculerlibrementl’air(aumoins5cm).
• Nebouchezpaslesfentesd’aération.
• Sidesliquidespénètrentàl’intérieurdel’appareil,débranchez-leimmédiatementetportez-leaucentred’assistanceagrééTREVIleplusproche.
• Contrôleztoujours,avantd’allumerl’appareil,quelescâblesd’alimentationetlescâblesdebranchementsontcorrectementinstallés.
MANIEMENT ET ENTRETIEN
Pour le nettoyage, il est conseillé d’utiliser un chiffon doux légèrement humide. Évitez l’emploi de solvants ou de substances abrasives.
IMPORTANT
Cetappareilestconçupourunusagedomestique(usagenonprofessionnel).Labonnefabricationdecetappareilgarantitunfonctionnementparfait
pour une longue période. Si toutefois quelques inconvénients devaient se présenter, adressez-vous au Centre d’Assistance agréé TREVI le plus proche.
TREVI observe une politique de recherche et de développement continus. C’est pourquoi ses produits peuvent présenter des caractéristiques différentes
par rapport à celles qui sont décrites.
DESCRIPTION DES CONNECTEURS ET DES COMMANDES
FRANCAIS
Commandes et prises sur le périphérique
1.Contrôleduvolume
2. Activer/désactiver l'éclairage LED
3.KeyRIPEAT(répéterunepiste,tout)
4. NEXT, la sélection de la piste suivante
5.touchePLAY,lalectureetlapause
6. PREV, la sélection de piste précédente
7. REC, l'enregistrement
8. Bouton MODE, sélectionnez la fonction
9. Affichage
10. Entrée USB/SD Card
11. Entrées MICROPHONES
12. AUX-In
13. Réglage des aigus
14. Réglage de la basse
15.RéglezECHO
16. Réglage du volume du microphone
17. Batterie prise de charge
Indicateur LED pour l'état de charge
18. Interrupteur principal ON/OFF
1
2
3
4
5
6
7
8
11
9
10
12
13
14
15
16
17 18

11
XF 800FRANCAIS
TRANSPORT
Pourtransporterl'appareilpeututiliserlapoignéequiestmontél'affichage(9).
ALIMENTATION
Cetappareilfonctionneavecunebatterieauplombrechargeable12V4,5AhetalimentationDC15V,2A.
Lorsquelabatterieet«progressivementsuppriméeoul'appareilnesemetpassur,branchezlecordond'alimentationfournidanslabatterieprise(17)
sur le dispositif de chargement et branchez l'adaptateur dans une prise de courant pour recharger .
ÉtatdelalampeLEDdecharge(17):
-LEDrougeclignote:avecinterrupteurprincipalON/OFF(18)surON,indiquantquelabatterieest«encoursdecharge.
- RED LED fixe: le processus de chargement terminé, la batterie et «charge.
Attention:
- La batterie est chargée seulement lorsque l'interrupteur principal ON/OFF (18) et ON.
- Ne pas raccorder l'appareil aux prises avec une tension autre que celle indiquée.
- Ne pas utiliser des alimentations autres que celui fourni avec tension ou de courant, et autre que celle indiquée.
FONCTIONS DE BASE
POWER ON/OFF
Appuyezsurl'interrupteurprincipalON/OFF(18)enpositionONpourallumerl'appareil.
Appuyezsurl'interrupteurprincipalON/OFF(18)enpositionOFFpouréteindre.
STAND-BY
E 'peut placer l'appareil en mode veille en utilisant la touche (19)surlatélécommande.Appuyezdenouveaupourrallumer
Attention:
- La fonction de stand-by est activé seulement si l'interrupteur ON/OFF(18) est sur ON.
- S'il vous plaît noter que sortant de l'unité de la fonction stand-by la batterie se vide plus vite que l'aide de la touche ON/OFF(18).
FONCTION MODE SETTING
Pourchangerlemodedefonctionnement,appuyezplusfoislatoucheMODE(8)surl'appareilouappuyezsurlatouche(25)surlatélécommande
poursélectionnerRADIO(affichagefréquencedecomapre),BLUETOOTH(l'écranbleu),USB(seulementsilapriseUSB(10)estreliéàunemémoire,
l'affichageindiquepourquelquessecondes,USB),SD(écart-typeseulementsilasortie(10)estreliéàunemémoire,l'afficheurindiqueSDpendant
quelquessecondes),AUX(l'écranafficheU).
AJUSTEMENT DU VOLUME
1. TournerlevolumeVOL(1)pouraugmenteroudiminuerlevolumeglobaldelareproduction,ouutilisezlestouches(23)et(29)surlatélécom-
mande.
2. TournezleMICVOL(16)pourréglerlevolumedesentréesdesignauxMICROPHONES(11).Leréglageagitsurlesdeuxentréessimultanément
PRE-EGALISATION
Cetteunitéal'égalisationaudiopré-intégrée.AppuyezsurleboutonSOUND(27)surlatélécommandepoursélectionnerunréglagequiconvientle
19 24
20 25
21 26
27
22
23
28
29
30
Télécommande
19. Touche , On/Off
20.ToucheREPEAT(Répétezseulechanson,répétertouslesmorceaux)
21. Touches numériques 0-9
22. bouton(Lecture/Pause)
23. Volume -
24. MUTE
25.MODE(sélectiondefonction)
26.RECORD(enregistrement)
27.ToucheSOUND(EQpré)
28. Touche 9, la sélection de piste précédente
29. Volume +
30. Touche :, sélectionner la piste suivante
21
Installation des batteries:
Ôter le couvercle au dos de la télécommande, introduire 2 batteries en format « AAA » ayant soin de
respecter la polarité indiquée, et remettre le couvercle.

12
XF 800
FRANCAIS
mieuxàlareproductionsonoreencours.Lepré-égalisationsontactifsetpeutêtrechoisiquedansleportUSBetSD.
REGLAGE TONALITE AIGUS ET DES GRAVES
TournezleboutonTREBLE(13)pourréglerlesaigus.
TournezleboutonBASS(14)pourréglerlesbasses.
ECHO EFFET
TournezleboutonECHO(15)pouraugmenteroudiminuerl'effetd'échosurlaentréesdemicrophone(11).
Remarque: l'écho agit uniquement sur les entrées micro.
DISCO-LIGHT EFFETS
PouractiverleseffetsDiscoLight-presseéclairageLED(2),l'affichageindique"ON".
Pourdésactiverl'effetDisco-Light,appuyezsurleboutond'éclairagenouveauLed(2),l'écranaffiche"OFF".
VOIX
Pouractiverleguidagevocal(enanglaisseulement),appuyezetmaintenezpendantquelquessecondessurleboutonPLAY(5).
PourdésactiverlavoixguideappuyezetmaintenezpendantquelquessecondessurleboutonPLAY(5).
FONCTION RADIO FM
AUTO
1. AllumezlamachineetappuyezplusieursfoissurlatoucheMODE(8)surl'appareil,oulemode(25)surlatélécommandeetsélectionnezlaradio
(l'écranaffichelafréquence).
2. AppuyezsurleboutonPLAY(5)surl'appareilousurlatouche(22)surlatélécommandepouractiverleréglageautomatique(laradiocom-
menceunerechercheautomatiquedesstationsderadioetlesenregistreautomatiquementdanslamémoire).Lenombredestationsmémorisées
dépenddusignalradiodansvotrerégion.Pendantlarecherche,appuyezsurleboutonPLAY(5)surlatélécommandepourarrêterl'enregistrement.
3. UtilisezleNEXT(4)etPREV(6),ousurlestouches:(30)et9(28)surlatélécommandepourécouterlesdifférentesstationsderadioenregistrées
dans la mémoire.
4. Pourappelerlenumérod'unestationprérégléeenutilisantlestouchesnumériques(21)surlatélécommande.
Par exemple, pour appeler le numéro de la station 12, appuyez d'abord sur 1 puis 2.
RAPPEL DIRECT DE FRÉQUENCE
1. Utiliserleslepavénumérique(21)surlatélécommandepourréglerlafréquencesouhaitée(deceuxquisontsauvés).
Par exemple, pour écouter le type de fréquence 93.1MHz 3 9 1.
Remarque:
- La réception FM dépend de l'endroit où vous placez l'appareil.
- La proximité de téléviseurs, les lampes fluorescentes ou d'autres appareils peut provoquer des interférences dans la réception des programmes
de radio, dans ce cas, déplacez cette unité.
BLUETOOTH FONCTIONNEMENT
1. MettezlamachineetappuyezsurlatoucheMODE(8)surl'appareil,oulemode(25)surlatélécommandeetsélectionnezlafonctionBluetooth,
l'écranaffiche"BLUE".
2. En mode Bluetooth, le symbole surl'écran(9)semetàclignoter,lesystèmepasseautomatiquementenrecherche.
3. ActivezlafonctionBluetoothsurl'appareilexternepourêtrecouplé.
4. Lancezunerecherchedesappareils.Aprèssélectionnezl'option"TREVIXF800".
5. Entrezlemotdepasse"0000"sinécessaire.
6. AppuyezsurleboutonPLAY(5)surl'appareiloulatasto(22)surlatélécommandepourdémarrerlalectureetl'utilisationdel'NEXT(4)et
PREV(6),oulestouches:(30)et9(28)surlatélécommandepoursélectionnerlespistes.
JOUER EN ENTRÉE USB/SD
1. Allumez l'appareil.
2. InsérezunemémoireUSBouunecarteSDdansleportUSB/SD(10).Lalecturedémarreautomatiquement.
3. Pourinterromprelalecture,appuyezsurleboutonPLAY(5)surl'appareilousurlatouche(22)delatélécommande,l'écranaffichel'icône
PAUS.
4. Pourreprendrelalecture,appuyezsurleboutonPLAY(5)surl'appareilousurlatouche(22)delatélécommande.
5. AppuyezsurlatoucheNEXT(4)oulatouche:(30)surlatélécommandetoutenécoutantdepasseràlapistesuivante.AppuyezsurPREV(6)ou
9(28)surlatélécommandepourpasserauxpistesprécédentes.
6. Àl'aidedupavénumérique(21)surlatélécommande,vouspouvezentrerdirectementlenumérodelachansonquevousvoulezjouer.
7. AppuyezsurleboutonunefoisREPEAT(20)surlatélécommande,l'affichage(9)indique"ONE",àjouercontinuellementlamêmepiste;appuyez
unesecondefois,l'affichage(9)indique"ALL"pourjouerenpermanencetouslesmorceauxdelacléUSB/SD.
Remarque:
- Le joueur peut ne pas supporter certains périphériques USB, cela est dû à l'incompatibilité de certains processeurs.
- Pour éviter les interférences nuisibles, toujours connecter des périphériques USB directement à l'appareil, ne pas utiliser de rallonges.
- De l'ordinateur pour formater la mémoire USB/SD FAT (16 ou 32).
AUX-IN
1. Allumez l'appareil.
2. Branchezuneunitééquipéd'unesortieaudio,viauncâblejack3,5mmspéciale(noninclus)àlapriseAUXIN(12).

13
XF 800
3. AppuyezsurleboutonMODE(8)surl'appareil,oulemode(25)surlatélécommande,etsélectionnez"AUX",l'écranaffiche"U".
4. Réglez l'appareil externe de leurs commandes.
UTILISATION DU MICROPHONE
1. ConnectezlemicrophonefournidanslapriseMIC(11).
2. Allumez le microphone en utilisant l'interrupteur sur la poignée du microphone sur la position ON.
3. Réglezlevolumedel'entréemicrophone(16)etl'effetd'écho(15)quedésiréenutilisantlescommandesappropriées.
Remarque: vous pouvez utiliser deux microphones simultanément (second microphone non inclus).
ENTRÉE GUITARE
Ce dispositif peut amplifier un préampli guitare ou un autre instrument de musique.
1. Branchezlecâbledelaguitareenl'insérantdanslaentréeMIC(11).
2. Réglez le volume d'entrée GUITAR désiré en utilisant la commande appropriée.
ENREGISTREMENT
ENREGISTREMENT MUSICAL
Cetteunitéet«capabled'enregistrersurlamémoireUSBdelamusiqueàpartirdelafonctionoudelafonctionradio-AUX-In(ilestimpossibled'en-
registrerdesfonctionsBluetoothouSD).LedispositifdestockageUSBl'appareilvaautomatiquementcréerundossierappelé"Record"quipermet
destockertouslesfichiersjournaux.
1. Allumez l'appareil.
2. InsérezunemémoireUSBdansleportUSB/SD(10).
3. SélectionnezlafonctionoulafonctionRadio,AUX-InvialeboutonMODE(8)surl'appareil,oulemode(25)surlatélécommande.
4. AppuyezsurlatoucheREC(7)surleboutond'enregistrement(26)surlatélécommandepourdémarrerl'enregistrementsurl'écran(9)montrera
"REC"unitéouvacommenceretlasignaturedetemps.
5. AppuyezsurlatoucheREC(7)surleboutond'enregistrement(26)surlatélécommandepourarrêterl'enregistrementunité,ou.Ledispositifse
metautomatiquementenfonctionUSBpourlireimmédiatementlemorceauenregistré.Aprèsavoirjouél'unitéferarapportsurlafonctioninitiale
(RadioouAUX-In).
Remarque:
- E 'peut enregistrer uniquement les fonctions audio de Radio ou AUX-In. Même insertion et l'utilisation du microphone fourni, l'appareil enregistrera
seulement le signal audio transmis à partir de ces sources, il ne sera pas enregistrer les voix réalisés avec le microphone.
- Lorsque vous mettez sur le "Inscription" tous les contrôles de l'appareil sont inhibées y compris le réglage du volume, ils prendront leur fonction
normale lorsque l'enregistrement arrêtera.
ENREGISTREMENT VOCAL
Cette unité et «capable d'enregistrer les voix sur la mémoire USB en utilisant le microphone fourni. Le dispositif de stockage USB l'appareil va auto-
matiquementcréerundossierappelé"Record"quipermetdestockertouslesfichiersjournaux.
1. Allumez l'appareil.
2. InsérezunemémoireUSBdansleportUSB/SD(10).
3. SélectionnezleportUSBouSDvialeboutonMODE(8)surl'appareil,oulemode(25)surlatélécommande.
4. AppuyezsurlatoucheREC(7)surleboutond'enregistrement(26)surlatélécommandepourdémarrerl'enregistrementsurl'écran(9)montrera
"REC"unitéouvacommenceretlasignaturedetemps.
5. AppuyezsurlatoucheREC(7)surleboutond'enregistrement(26)surlatélécommandepourarrêterl'enregistrementunité,ou.L'unitévajouer,
automatiquement, le morceau enregistré.
Remarque:
- E 'peut enregistrer uniquement la voix.
NOTE D'INFORMATION SUR LE RETRAIT ET ÉLIMINATION DES BATTERIES
Attention: Seul le personnel de haute qualié doit effectuer cette opération!
RETRAIT DE LA BATERIE
L'appareil ne doit pas être branché à la prise de courant lors de l'exécution de cette opération!
1. Retirer les vis qui fixent la structure du chariot et de le démonter.
2.Retirerlesvisquifixentlehaut-parleuramplifiépanneauarrièreetretirezlepanneau;
3.Repérezlapile;
4. Retirer les vis qui fixent les supports de la batterie, retirer les supports, débrancher la batterie et retirez-le.
Lespilesusagéesnedoiventpasêtrejetésaveclesdéchetsménagersoujetésdanslefeuoul'eau.Lesbatteriesusagéesdoiventêtrerecyclésou
éliminés dans les centres de collecte de déchets séparés.
CARACTÉRISTIQUES
Alimentation: .........................DC15V,2A-rechargeablebatterieauplomb12V4.5A
Consommation: .................................................................................................... 30W
Puissance de sortie maximale: .............................................................................................Max50W
Sound Bar Dimensions: ................................................................................ 270x260x500mm
Poids: ..................................................................................................5,5kg
FRANCAIS

14
XF 800
DEUTSCH
GEBRAUCHSHINWEISE
Dieses Gerät ist ein elektronisches Instrument höchster Präzision. Die Inbetriebnahme des Geräts sollte daher in den folgenden Fällen vermieden werden:
• InderNähevonWärmequellenwieHeizkörpernundÖfen.
• InsehrfeuchtenRäumenwieBadezimmern,Schwimmbädernusw.
• InsehrstaubigenRäumen.
• AnOrten,diestarkenSchwingungenausgesetztsind.
• DasGerätsolltesoaufgestelltwerden,dassandenSeitenjeweilsgenügendRaumverbleibt,umeinefreieLuftzirkulationzuermöglichen(min-
destens5cm).
• DieVentilationsöffnungendürfennichtabgedecktwerden.
• SolltenFlüssigkeiteninsInneredesGerätseindringen,denSteckervonderSteckdoseunmittelbarabziehenundsichandienächstgelegene
autorisierte TREVI-Kundendienststelle wenden.
• VordemEinschaltendesGerätsistsicherzustellen,dassNetzkabelundAnschlusskabelkorrektinstalliertsind.
PFLEGE UND WARTUNG
FürdieReinigungwirddieVerwendungeinesleichtangefeuchteten,weichenTuchsempfohlen.DerEinsatzvonLösungsmittelnoderscheuernden
Substanzen sollte vermieden werden.
WICHTIG
DiesesGerätistfürdenHeimgebrauch(nichtprofessionellenGebrauch).DerfachgemäßeBaudiesesGerätsgewährleistetlangfristigeineneinwandfreien
Betrieb. Sollten dennoch Betriebsstörungen auftreten, wenden Sie sich bitte an nächstgelegene autorisierte TREVI-Kundendienststelle.
Die Firma TREVI verfolgt eine Politik ständiger Forschung und Weiterentwicklung. Die Produkte können daher andere als die beschriebenen Eigen-
schaften aufweisen.
BESCHREIBUNG DER ANSCHLÜSSE/BEDIENELEMENTE
Beschreibung Kontrollen
1. Hauptlautstärkeregler
2. LED ON / OFF
3. Wiederholen
4. NÄCHSTE
5.PLAY
6. PREV
7. REC
8. MODE
9. Anzeige
10. USB / SD Karteneingabe
11. MIC-Eingang
12. AUX-In
13. TREBLE
14. BASS
15.ECHO
16. MIC VOL
17. Ladeeingangsbuchse
Lade angegeben Licht
18. Power Switch
1
2
3
4
5
6
7
8
11
9
10
12
13
14
15
16
17 18

15
XF 800DEUTSCH
TRANSPORT
UmdasGerätdurchführenkönnenSiedenGriff,diedieAnzeige(9)montiertist,zuverwenden.
LEISTUNG
DiesesGerätarbeitetmitwiederaufladbarenBlei-Säure-12V,4,5AhundDC-Netzteil15V,2A(imLieferumfangenthalten).
WenndieBatterieund"HerausoderPhaseddasGerätschaltetsichnichtein,steckenSiedasimBatterieladebuchse(17)aufdemGerätmitgelieferte
Netzkabel und stecken Sie den Adapter in eine Steckdose zum Aufladen.
LampenstatusLED-Lade(17):
-LEDrotblinkendesLicht:HauptschalterON/OFF(18)aufON,wasdaraufhinweist,dassdieBatterie"wirdgeladen.
-LED-LichtREDfixiert:Ladevorgangabgeschlossenist,dieBatterieund"Ladung.
Achtung:
- Der Akku wird nur geladen, wenn der Hauptschalter ON/OFF (18) und ON.
- Das Gerät nicht an Steckdosen mit einer anderen als der angegebenen Spannung angeschlossen werden.
- Verwenden Sie keine anderen Netzteile als die mit Spannung oder Strom zugeführt wird, und andere als angegeben.
GRUNDFUNKTIONEN
POWER ON/OFF
DrückenSiedenHauptschalterON/OFF(18)indiePositionON,umdasGeräteinzuschalten.
DrückenSiedenHauptschalterON/OFF(18)aufPositionOFF,um.
STEHEN ZU
Sie können das System in den Standby-Modus mit der Taste (19)aufderFernbedienungwechseln.DrückenSieerneut,umeswiedereinzuschalten
Achtung:
-DieStand-by-Funktionwirdnuraktiviert,wennderEIN/AUS-Schalter(18)EINist.
-Wirerinnernuns,verlassenSiedasGerätimStand-by-FunktionDerAkkuentlädtsichschnelleralsmitderON/OFF(18).
MODUS EINSTELLUNG FUNKTION
UmdasGerätändernSiedenModus-Funktion,drückenSiemehr'maldieMODE-Taste(8)oderdrückenSiedieTaste(25)aufderFernbedienungauf
RADIO(AnzeigecomapreFrequenzen)auszuwählen,Bluetooth(dieAnzeigeblau),USB(nurwennDerUSB-Anschluss(10)istmiteinemSpeicher
verbundenist,zeigtdieAnzeigefüreinigeSekunden,USB),SD(SDnur,wennderAusgang(10)istmiteinemSpeicherverbundenist,zeigtdasDisplay
SDfüreinpaarSekunden),AUX(dasDisplayzeigtU).
LAUTSTÄRKE
1. DrehenSiedieLautstärkeVOL(1)zuerhöhenoderverringerndieGesamtlautstärkederWiedergabe,oderverwendenSiedieTasten(23)und(29)
auf der Fernbedienung.
2. DrehenSiedenMICVOL(16),umdieLautstärkeSignaleingängeMikrofon(11)einzustellen.DieEinstellungwirktaufdiebeidenEingängegleichzeitig
VOR-EQUALIZER
DiesesGerätverfügtüberdieVorentzerrungAudio.DrückenSiedieSOUND-Taste(27)aufderFernbedienung,umeineEinstellung,dieambestendie
Klangwiedergabe in Bearbeitung auswählen. Vorentzerrung aktiv sind und nur in der USB und SD-Funktion gewählt werden.
19 24
20 25
21 26
27
22
23
28
29
30
Fernbedienung
19. Power ON / OFF
20.Wiederholungstaste(EinzelRepeat,Alleswiederholen)
21. Tasten 0-9
22. ,PLAY/PAUSE(allderTonausWennpausiert)
23. Volume -
24. MUTE
25.MODE-Taste(Shift-AUX/USB/SD-Modus)
26 RECORD Key
27.Sound-Modus-Taste(verschiedeneSound-Modiumgewälzt)
28. 9 Vorheriges Lied
29. Volume +
30. : Nächstes Lied
21
Einsetzen der Batterien:
DenDeckelimhinterenBereichderFernbedienung entfernen, die beiden AAA-BatterienunterBeachtung
derrichtigenPolaritäteinlegenunddenDeckelwiederschließen.

16
XF 800
DEUTSCH
EINSTELLUNG TONE HöHEN UND BäSSE
DrehenSiedenKnopfTREEBLE(13),umdieHöheneinzustellen.
DrehenSiedenReglerBASS(14),umdieBässeeinzustellen.
ECHO EFFECT
DrehenSiedenKnopfECHO(15)zuerhöhenoderverringerndieEcho-EffektaufdieEingängeMIC.
Hinweis: das Echo funktioniert nur auf Mikrofoneingänge.
DISCO-LICHTEFFEKTE
UmdieEffekteDisco-Licht-langedrückenSiedieLEDON/OFFaktivieren(2).AufdemDisplayerscheint"ON".
UmdenEffektDisco-Light,drückenSiedieLEDON/OFF(2),bisdieAnzeige"OFF"abzubrechen.
VOICE GUIDE
UmdieSprachführung(nurinenglischerSprache)zuaktivieren,drückenundhaltenSiefüreinigeSekundendiePLAY-Taste(5).
SoschaltenSiedieSprachführung,drückenundhaltenSiefüreinigeSekundendiePLAY-Taste(5).
FUNCTION RADIO FM
AUTOMEMORY
1. SchaltenSiedasGeräteinunddrückenSiedieTasteMODE(8)amGerätoderdieMODE(25)aufderFernbedienung,undwählenSieRADIO-Funktion
(imDisplaywirddieFrequenzangezeigt).
2. DrückenSiediePLAY-Taste(5)aufdemGerätoderderkey(22)aufderFernbedienung,umdieautomatischeSpeicheraktivieren(dasRadio
starteteinenautomatischenSendersuchlaufundspeichertsieautomatisch).GespeichertderStationAnzahlistabhängigvondemFunksignalin
IhrerNähe.WährendderSuche,drückenSiediePLAY-Taste(5)aufderFernbedienung,umdieAufnahmezustoppen.
3. VerwendenSiedieNEXT(4)undPREV(6)oderdieTasten:(30)und9(28)aufderFernbedienung,umaufdieverschiedenenRadiosenderim
Speicher abgelegt zu hören.
4. UmdieNummereinesgespeichertenSendersmitdenZifferntasten(21)aufderFernbedienungaufrufen.
BeispielsweiserufenSiedieStationsnummer12drückenSiezuerst1unddann2.
DIRECT RECALL FREQUENZ
1. VerwendenSiedieTastatur(9),umdiegewünschteSenderfrequenz.
Zum Beispiel, um zu 93.1MHz Frequenztyp 9 3 1 zu hören.
Hinweis:
- Der UKW-Empfang ist abhängig von der Stelle, wo Sie das Gerät zu platzieren.
- Die Nähe von Fernsehgeräten, Leuchtstofflampen oder anderen Geräten kann es zu Störungen bei der Aufnahme von Radioprogrammen verursachen,
in diesem Fall, müssen Sie das Gerät.
BLUETOOTH-BETRIEB
1. SchaltenSiedasGerätunddrückenSiedieMODE(8)amGerätoderdieMODE(25)aufderFernbedienung,umdieBluetooth-Funktionzuwählen,
zeigtdasDisplay"BLUE".
2. Wählen Sie im Bluetooth-Modus wird das Symbol auf dem Display blinkt, geht das System automatisch den Suchmodus.
3. Aktivieren Sie die Bluetooth-Funktion auf dem externen Gerät gekoppelt werden.
4. InitiierenSieeineSuchenachGeräten.NachwählenSiedie"TREVIXF800".
5. DasPasswort"0000"eingeben,fallserforderlich.
6. DrückenSiediePLAY-Taste(5)aufdemGerätoderderkey(22)aufderFernbedienung,umanfangenzuspielenunddieTastenNEXT(4)und
PREV(6)oderdieTasten:(30)und9(28)fürdieAuswahlderLieder.
SPIELEN SIE AUF INPUT USB/SD
1. Schalten Sie das Gerät ein.
2. SetzenSieeinenUSB-SpeicherodereineSD-KarteindenUSB/SD(10)Steckplatz.DieWiedergabestartetautomatisch.
3. UmdieWiedergabeanzuhalten,drückenSiediePLAY-Taste(5)aufdemGerätoderderTaste(22)aufderFernbedienung,wirdimDisplay
das Symbol Paus zeigen.
4. UmdieWiedergabefortzusetzen,drückenSiediePLAY-Taste(5)aufdemGerätoderderTaste(22)aufderFernbedienung.
5. DrückenSiedieNEXT(4)oderdieTaste:(30)aufderFernbedienungwährendderWiedergabezumnächstenTitelzuwechseln.DrückenSie
dieTastePREV(6)oder9(28)aufderFernbedienung,umzudenvorherigenTrackszugehen.
6. MitdemnumerischenTastenfeld(21)aufderFernbedienungkönnenSiedirektdieNummerdesSongs,dieSiespielenmöchten.
7. DrückenSieeinmaldieTasteREPEAT(20)aufderFernbedienung,dasDisplay(9)erscheint"ONE",umdiegleicheStreckekontinuierlichzu
spielen;drückenSieeinzweitesMal,dasDisplay(9)erscheint"ALL"fortwährendspielenalleTitelaufdemUSB/SD.
Hinweis:
- Der Spieler kann keine Unterstützung für einige USB-Geräte, ist dies aufgrund der Unvereinbarkeit von einigen Prozessoren.
- Zur Vermeidung funktechnischer Störungen, immer eine Verbindung USB-Geräte direkt an das Gerät, verwenden Sie keine Verlängerungskabel.
- Vom Computer auf den USB-Speicher/SD FAT (16 oder 32) zu formatieren.
AUX-IN
1. Schalten Sie das Gerät ein.
2. SchließenSiejedeEinheitmitAudio-Ausgangausgestattet,übereinKabel3,5mmKlinke(nichtenthalten)andieAUXIN(12).
3. DrückenSiedieMODE-Taste(8)aufdemGerätoderdieMODE(25)aufderFernbedienung,undwählenSiedie"AUX",wirddieAnzeige"U"zu

17
XF 800
zeigen.
4. Verwenden Sie das externe Gerät aus ihren Befehlen.
MIKROFON
1. SchließenSiedasmitgelieferteMikrofonandieBuchseMIC(11).
2. Schalten Sie das Mikrofon mit dem Schalter am Griff des Mikrofons in die Position ON.
3. StellenSiedieLautstärkedesMikrofon-Eingang(16)unddemEcho-Effekt(15)nachWunschunterVerwendungderentsprechendenBefehle.
Hinweis:
- Sie können zwei Mikrofone gleichzeitig zu verwenden (zweites Mikrofon nicht im Lieferumfang enthalten).
INPUT GUITAR
Dieses Gerät kann eine Gitarre oder andere Vorverstärker Musikinstrument zu verstärken.
1. SchließenSiedasKabelvonderGitarre,indemsieinder(11)EingangMIC.
2. StellenSiedieLautstärkedesMikrofon-Eingang(16),nachWunschmitdenentsprechendenBefehl.
AUFNAHME
MUSIKAUFNAHME
DieseEinheitund"inderLage,dieAufnahmeaufUSB-SpeicherdieMusikausdemRadio-FeatureoderAUX-In-Funktion(esistnichtmöglich,aus
demBluetooth-oderSD-Funktionenaufzuzeichnen).DasGerätwirdautomatischeinOrdnermitdemNamen"Record"inderUSB-Speicherundes
wird alle Protokolldateien zu speichern.
1. Schalten Sie das Gerät ein.
2. SetzenSieeinenUSB-SpeicherindenUSB/SD(10).
3. WählenSiedieFunktionAUX-InoderRadiofunktiondurchMODE-Taste(8)aufdemGerätoderdieMODE(25)aufderFernbedienung.
4. DrückenSiedieREC-Taste(7)aufdemGerätoderderRECORD-Taste(26)aufderFernbedienung,umdieAufnahmezustarten,aufdemDisplay
(9)erscheint"REC"unddieTaktartwirdgestartet.
5. DrückenSiedieREC-Taste(7)aufdemGerätoderdieRECORD-Taste(26)aufderFernbedienung,umdieAufnahmezustoppen.DasGerätwird
automatisch in den USB-Funktion zu gehen, um sofort die Wiedergabe der aufgenommenen Datei. Nach dem Abspielen der Einheit wird auf dem
Anfangsfunktion(RadiooderAUX-In)zumelden.
Hinweis:
- Sie können nur die Audiofunktionen von Radio oder AUX-In aufzunehmen. Auch das Einfügen und die Verwendung des mitgelieferten Mikrofons
wird das Gerät nur die von diesen Quellen übertragenen Audiosignal aufzuzeichnen, wird es nicht erfassen die Vocals mit dem Mikrofon erfolgen.
- Wenn Sie auf den "Registrieren" schalten alle Bedienelemente des Geräts werden gesperrt inklusive Lautstärkeregelung, werden sie ihre normale
Funktion zu nehmen, wenn die Aufnahme stoppt.
TONAUFNAHME
DieseEinheitund"derLagedieAufnahmedenGesangaufdemUSB-SpeicherbeiVerwendungdesmitgeliefertenMikrofons.DasGerätwirdautomatisch
einOrdnermitdemNamen"Record"inderUSB-SpeicherundeswirdalleProtokolldateienzuspeichern.
1. Schalten Sie das Gerät ein.
2. SetzenSieeinenUSB-SpeicherindenUSB/SD(10).
3. WählenSiedenUSB-oderSD-functondurchMODE-Taste(8)aufdemGerätoderderMODE-Taste(25)aufderFernbedienung.
4. DrückenSiedieREC-Taste(7)aufdemGerätoderderRECORD-Taste(26)aufderFernbedienung,umdieAufnahmezustarten,aufdemDisplay
(9)erscheint"REC"undderTaktartwirdgestartet.
5. DrückenSiedieREC-Taste(7)aufdemGerätoderdieRECORD-Taste(26)aufderFernbedienung,umdieAufnahmezustoppen.DasGerätermöglicht
die Wiedergabe automatisch, die aufgenommene Datei.
Hinweis:
- Sie können nur die Stimme aufnehmen.
Informationen Hinweis auf die Entfernung und Entsorgung von Batterien
Achtung: Nur qualitativ qualiziertes Personal darf diese Operation durchzuführen!
BATTERIE AUSBAUEN
Das Gerät darf nicht an die Netzsteckdose angeschlossen werden um diesen Vorgang auszuführen!
1. Entfernen Sie die Schrauben, die die Struktur der Laufkatze sichern und zu zerlegen.
2.EntfernenSiedieSchrauben,diedieRückwand-LautsprecherverstärktzusichernundentfernenSiedieAbdeckung;
3.SuchenSiedieBatterie;
4.EntfernenSiedieSchrauben,mitdenendieTrägerderBatteriezusichern,entfernenSiedieStützen,dieBatterieabklemmenundausbauen.
VerbrauchteBatteriengehörennichtindenHausmüllentsorgtwerdenoderinFeueroderWassergeworfen.GebrauchteBatterienmüssenrecycelt
oder in separaten Sammelstellen entsorgt werden.
TECHNISCHE DATEN
Stromversorgung: ...................................DC15V,2A-internenBlei-Säure-Akku12V4.5A
Verbrauch: .................................................................................................... 30W
Maximale .............................................................................................Max50W
Soundbar ............................................................................... 270x260x500mm
Gewicht: ..................................................................................................5,5kg
DEUTSCH

18
XF 800
ESPANOL
NOTAS PARA EL USO
Esteaparatoesuninstrumentoelectrónicodealtaprecisión;porlotantodebeevitarutilizarloenlossiguientescasos:
• Cercadefuertesfuentesdecalorcomocaloríferosyestufas.
• Enlugaresmuyhúmedoscomocuartosdebaño,piscinas,etc.
• Enlugaresmuypolvorientos.
• Enlugaressujetosafuertesvibraciones.
• Posicioneelaparatodemaneraqueelespaciocircundanteseaamplioparalalibrecirculacióndelaire(porlomenos5cm).
• Noobstruyalasranurasdeventilación.
• Sipenetranlíquidosdentrodelaparato,desconecteinmediatamenteelenchufedelatomadecorrienteylleveelaparatoalcentrodeasistencia
autorizado TREVI más cercano.
• Siemprecompruebequeloscablesdealimentaciónydeconexiónesténinstaladoscorrectamenteantesdeencenderelaparato.
CUIDADOYMANTENIMIENTO
Paraefectuarlalimpiezaseaconsejautilizarunpañosuave,ligeramentehumedecido.Evitesolventesosustanciasabrasivas.
IMPORTANTE
Estedispositivoestádiseñadoparausodoméstico(usonoprofesional).Labuenaconstruccióndelaparatogarantizasuperfectofuncionamiento
durantemuchotiempo.Sisepresentasealgúninconveniente,seráoportunoconsultaralCentrodeAsistenciaautorizadoTREVImáscercano.
TREVIcultivaunapolíticadeinvestigaciónydesarrollocontinuos.Porconsiguiente,losproductospuedenpresentarcaracterísticasdistintasalasdescritas.
DESCRIPCIÓN DE LOS CONECTORES/MANDOS Descriptión controles
1. Control de volumen
2. Activar/desactivar la iluminación LED
3.RIPEATKey(repeticiónpistaindividual,todo)
4. NEXT, la próxima selección de pista
5.botónPLAY,lareproducciónylapausa
6. botón PREV, la selección de pista anterior
7. REC, la grabación
8. Botón MODE, seleccione la función
9. Pantalla
10.EntradaUSB/TarjetaSD
11. Entradas MICRÓFONOS
12. AUX-In
13.Ajustedeagudos
14.Ajustedegraves
15.AjusteECHO
16.Ajustedelvolumendelmicrófono
17.Bateríatomadecarga
LED indicador de estado de carga
18. Interruptor principal ON/OFF, ON/OFF
1
2
3
4
5
6
7
8
11
9
10
12
13
14
15
16
17 18

19
XF 800
ELLEHNIKA
ESPANOL
TRANSPORTE
Paratransportareldispositivopuedeutilizarelmangoquesemontalapantalla(9).
ALIMENTACION
Estaunidadfuncionaconbateríadeplomorecargable12V,4,5AhyfuentedealimentaciónDC15V,2A(incluida).
Cuandolabateríaestáeliminandooeldispositivonoseenciende,conecteelcableadaptadorsuministradoenelenchufedecargadelabatería(17)
en el dispositivo y conecte el adaptador a una toma de corriente para recargar.
ElestadodelalámparaLEDdecarga(17):
-REDLEDparpadeanteluz:conelinterruptorprincipaldeencendido/apagado(18)enON,loqueindicaquelabateríaestá'estácargando.
-LEDROJOluzfija:procesodecargacompleta,labateríayel'cargo.
Precaución:
- La batería se carga sólo cuando el interruptor principal ON/OFF(18) y ON.
- No conecte a las tomas eléctricas con un voltaje distinto del indicado.
- No utilice fuentes de alimentación que no sean el suministrado con voltaje o corriente, y otra a la indicada.
FUNCIONES BÁSICAS
ON/OFF
Presioneelinterruptorprincipaldeencendido/apagado(18)enlaposiciónONparaencenderlaunidad.
Presioneelinterruptorprincipaldeencendido/apagado(18)enlaposiciónOFFparaapagar.
STAND-BY
Y'sepuedecolocarlaunidadenmododeesperaconelbotón (19)enelcontrolremoto.Púlselodenuevoparavolveraencenderla
Precaución:
- La función de stand-by se activa sólo si el interruptor ON/OFF(18) está en ON.
- Tenga en cuenta que dejar la unidad en función de stand-by la batería se agota más rápido que con la tecla ON/OFF(18).
SELECCIÓN DE LA FUNCIÓN
Paracambiarelmododeoperación,presionemás"veceslateclaMODE(8)enlaunidadopulseelbotón(25)enelcontrolremotoparaseleccionar
RADIO(visualizacióndelafrecuenciacomapre),Bluetooth(lapantallaazul),USB(sólosielconectorUSB(10)estáconectadoaunamemoria,la
pantallamuestraduranteunospocossegundosUSB),SD(sóloentomarSD(10)estáconectadoaunamemoria,lapantallamuestraSDdurante
unospocossegundos),AUX(lapantallamuestraU).
AJUSTE DEL VOLUMEN
1. GireelbotónVOLvolumen(1)paraaumentarodisminuirelvolumenglobaldelareproducción,outilizarlosbotones(23)y(29)enelcontrol
remoto.
2. GireelMICVOL(16)paraajustarelvolumendelmicrófonoentradasdeseñal(11).Elajusteactúasobrelasdosentradassimultáneamente
PRE ECUALIZADOR
Estaunidadcuentaconlaecualizacióndeaudiopre-integrada.PulseelbotónSOUND(27)enelcontrolremotoparaseleccionarunajustequemejor
se adapte a la reproducción de sonido en curso. El pre-ecualización están activos y sólo se puede seleccionar en el USB y SD.
19 24
20 25
21 26
27
22
23
28
29
30
Mando a distancia
19. Key , On / Off
20.BotónREPEAT(repeticióndeunapista,repetirtodaslaspistas)
21. Teclas 0-9
22. Tecla (Reproducir/Pausa)
23. Volumen -
24. MUTE
25.MODE(seleccióndefunción)
26.RECORD(grabación)
27.BotónSOUND(EQpre)
28. Clave 9, la selección de pista anterior
29. Volumen +
30. Clave :, seleccione la siguiente pista
21
Instalación de las pilas:
Retirelatapadelaparteposteriordelcontrolremoto,inserte2x"AAA",asegurándosedequela
polaridad y cerrar la tapa.

20
XF 800
ESPANOL
AJUSTEDETONOAGUDOSYBASS
GireelmandoTREBLE(13)paraajustarlosagudos.
GireelmandoBASS(14)paraajustarlosgraves.
ECHO EFECTO
GirelaperilladeECHO(15)paraaumentarodisminuirlaMICRÓFONOentradasdeeco(11).
Nota: el eco sólo actúa en las entradas de micrófono.
EFECTO DISCO-LIGHT
ParaactivarlosefectosDiscoLight-prensadeiluminaciónLED(2),lapantallamuestra"ON".
ParadesactivarelefectoDisco-Luz,pulseelbotóndeiluminaciónLeddenuevo(2),lapantallamuestra"OFF".
GUÍA DE VOZ
Paraactivarlaguíadevoz(sóloenInglés),mantengapulsadoduranteunossegundoselbotónPLAY(5).
Paradesactivarlavozguía,mantengapulsadoduranteunossegundoselbotónPLAY(5).
LA FUNCTIÓN DE RADIO FM
AUTO
1. EnciendalaunidadypulserepetidamentelateclaMODE(8)enlaunidad,oelmodo(25)enelcontrolremotoyseleccionelaradio(lapantalla
mostrarálafrecuencia).
2. PulseelbotónPLAY(5)enlaunidadolatecla(22)enelcontrolremotoparaactivarlasintonizaciónautomática(laradiocomienzauna
búsquedaautomáticadeemisorasderadioylosguardaautomáticamenteenlamemoria).Elnúmerodeemisorasalmacenadasdependedela
señalderadioensuárea.Durantelabúsqueda,pulseelbotónPLAY(5)enelcontrolremotoparadetenerlagrabación.
3. UtiliceelNEXT(4)yPREV(6),olasteclas:(30)y9(28)enelcontrolremotoparaescucharlasdiversasestacionesderadioguardadasenla
memoria.
4. Parallamaralnúmerodeunaemisoraprogramadaconlosbotonesnuméricos(21)enelcontrolremoto.
Porejemplo,parallamaralnúmerodelaestación12primeropresione1yluego2.
RECUERDAN DIRECTO DE FRECUENCIA
1. Utilicelasteclasnuméricaslimpias(21)enelcontrolremotoparasintonizardirectamentelafrecuenciadeseada(delossalvados).
Porejemplo,paraescuchareltipodefrecuencia93.1MHz391.
Nota:
- La recepción de FM depende del lugar donde se coloca la unidad.
- La proximidad de televisores, lámparas fluorescentes u otros aparatos puede causar interferencias en la recepción de programas de radio, en
este caso, mueva esta unidad.
OPERACIÓN DE BLUETOOTH
1. ConectelaalimentaciónypulseelbotónMODE(8)enlaunidad,oelmodo(25)enelcontrolremotoyseleccionelafunciónBluetooth,lapantalla
mostrará"AZUL".
2. EnelmodoBluetooth,elsímbolo enlapantalla(9)comenzaráaparpadear,elsistemaentraautomáticamenteenlabúsqueda.
3. Active la función Bluetooth en el dispositivo externo a acoplar.
4. Inicieunabúsquedadedispositivos.Despuésdeseleccionarel"TREVIXF800".
5. Introduzcalacontraseña"0000"siesnecesario.
6. PulseelbotónPLAY(5)enlaunidadoeltasto(22)delmandoadistanciaparainiciarlareproducciónyelusodelaNEXT(4)yPREV(6),o
las teclas :(30)y9(28)enelcontrolremotoparaseleccionarpistas.
JUGAR EN ENTRADA USB/SD
1. Encienda la unidad.
2. InserteunamemoriaUSBounatarjetaSDenlaUSB/SD(10).Lareproducciónseiniciaautomáticamente.
3. Parapausarlareproducción,pulseelbotónPLAY(5)enlaunidadolatecla(22)delmandoadistancia,lapantallamostraráeliconoPaus.
4. Parareanudarlareproducción,pulseelbotónPLAY(5)enlaunidadolatecla(22)delmandoadistancia.
5. PulseNEXT(4)olatecla:(30)enelcontrolremotomientrasseescuchaparacambiaralasiguientepista.PulseelPREV(6)o9(28)enel
control remoto para ir a las pistas anteriores.
6. Medianteeltecladonumérico(21)delmandoadistanciapuedeintroducirdirectamenteelnúmerodelacanciónquedeseareproducir.
7. Pulseunavezelbotón(20)enelcontrolremotoREPEAT,lapantalla(9)mostrará"UNO",parajugarcontinuamentelamismapista;presioneuna
segundavez,lapantalla(9)mostrará"ALL"parareproducircontinuamentetodaslascancionesenelUSB/SD.
Nota:
- El jugador no puede apoyar algunos dispositivos USB, esto se debe a la incompatibilidad de algunos procesadores.
- Para evitar interferencias perjudiciales, siempre conecte los dispositivos USB directamente a la unidad, no utilice cables de extensión.
- Desde el ordenador para formatear la memoria USB / SD FAT (16 ó 32).
AUX-IN
1. Encienda la unidad.
2. Conectecualquierunidadequipadaconsalidadeaudioatravésdeunconectorde3,5mmcableespecial(noincluido)alatomaAUXIN(12).
3. PulselateclaMODE(8)enlaunidad,oelmodo(25)enelcontrolremotoyseleccionelaopción"AUX",lapantallamostrará"U".
Table of contents
Languages:
Other Trevi Portable Speakers manuals

Trevi
Trevi XF 3400 PRO User manual

Trevi
Trevi XR 8A70 User manual

Trevi
Trevi XF 4100 PRO User manual

Trevi
Trevi XF 3200 PRO User manual

Trevi
Trevi XF 470 KB User manual

Trevi
Trevi XF 600 KB User manual

Trevi
Trevi XR 8A01 User manual

Trevi
Trevi XF 1700KB User manual

Trevi
Trevi SL 3841 User manual

Trevi
Trevi XF 1750KB User manual

Trevi
Trevi XF 440 KB User manual

Trevi
Trevi XF 1550 KB User manual

Trevi
Trevi XF 1250 KB User manual

Trevi
Trevi XF 1800KB User manual

Trevi
Trevi XF 3500 PRO User manual

Trevi
Trevi XF 1200 KB User manual

Trevi
Trevi XFest XF 1560 KB User manual

Trevi
Trevi XF 1560 KB User manual

Trevi
Trevi XF 300 POP User manual

Trevi
Trevi XF 300 User manual