Elvie Stride EB01-02 User manual

Instructions
for Use
Thank you for choosing Elvie.
We’re pumped you’re here.
It’s our mission to create products that improve
women’s lives, so we hope Elvie Stride makes
a dierence to yours.

1
Contents
1. Parts
2. Intended use
3. Safety
4. Getting ready
5. Using Elvie Stride
6. Troubleshooting
7. Warranty
8. Product specifications
1.1 Product description
1.2 Controls
4.1 Charging
4.2 Taking Elvie Stride apart
4.3 Cleaning
4.4 Breast Shield sizing
4.5 Assembling Elvie Stride
4.6 Single-side pumping
5.1 Turning on Elvie Stride
5.2 Aligning your nipple
5.3 Finding the right in-bra fit
5.4 Starting your session
5.5 Modes and intensity settings
5.6 Automatic functions
5.7 Ending your session
5.8 Storing your milk
5.9 How to store Elvie Stride
Additional help and support
The Pump with Elvie app can be downloaded from the
Apple App Store (for iPhone) or Google Play Store (for Android).
If you need any help with your Elvie Stride, please get in touch
with our Customer Care team. Visit elvie.com for their details.
For Customer Care contact details and to see these instructions
in other languages, visit elvie.com/languages.
Para ponerte en contacto con atención al cliente,
visita elvie.com/languages.
English
Español
1
34
3
5
5
10
19
25
26
27
Languages

2 3
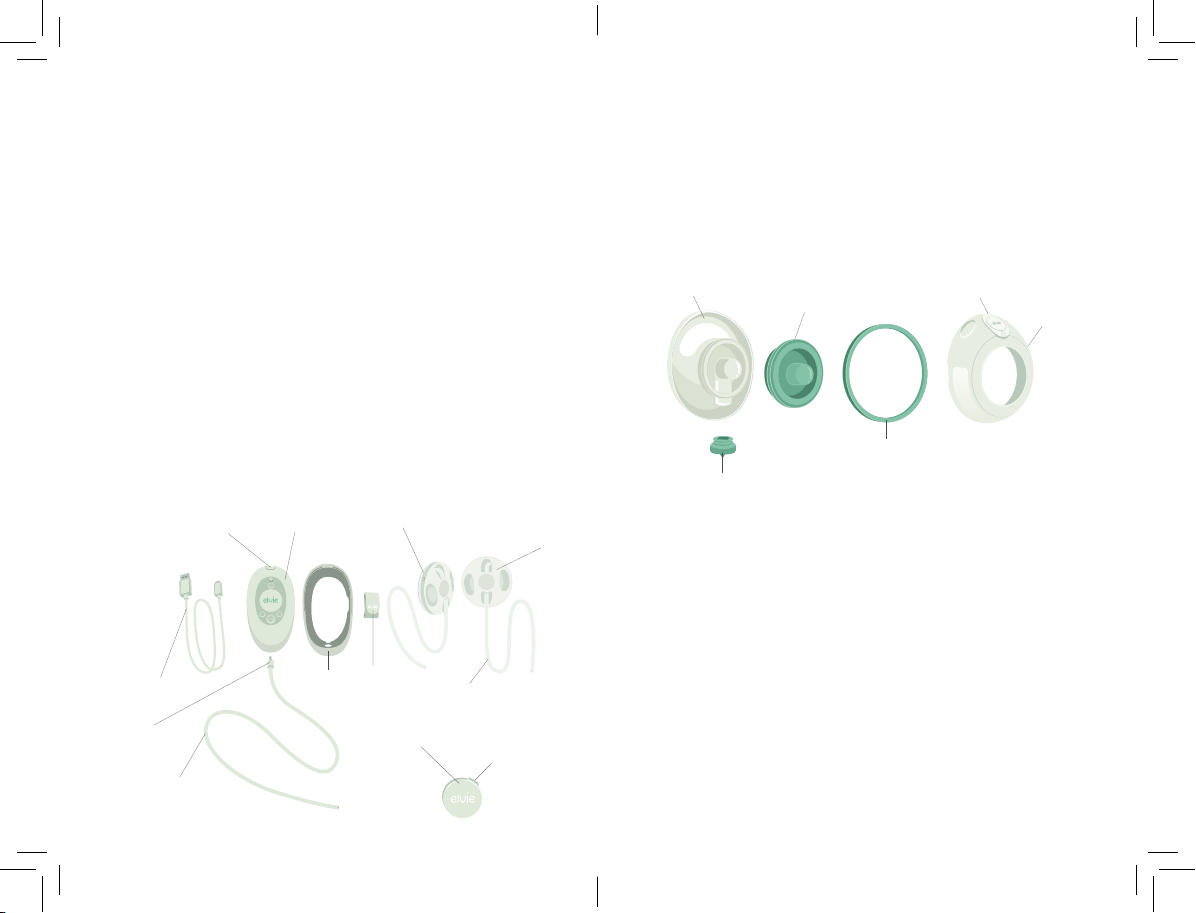
1. Parts
1.1 Product description
Elvie Stride is comprised of the parts and accessories
listed below. They can also be seen below and on page 4:
1 Hub
2 Cup Fronts
2 Cup Seals
2 Breast Shields (24 mm)
2 Caps
1 Tube Splitter
2 Short Tubes (for the Cups)
1 Long Tube (for the Hub)
1 Clip
1 Cover
2 Valves
2 Diaphragms
1 Charging Cable
Stopper
Cup Front
Cup Seal
Diaphragm
Breast Shield
Valve
Getting started
1. Charge the Elvie Stride Hub
Plug in the Hub for five minutes to wake it up before
first use. Please note, Elvie Stride does not turn on while
it is charging. For more details, please read the Charging
section of this booklet.
2. Download the Pump with Elvie app
Download the Pump with Elvie app on your smart phone
to make use of your pump’s smart features:
• Track sessions
• Control Elvie Stride remotely
• Personalize your pump preference settings
The Pump with Elvie app can be downloaded from
the Apple App Store (for iPhone) or Google Play Store
(for Android).
For the most up-to-date information on what devices
the app can be used with please visit elvie.com.
3. Learn how to set up your Elvie Stride
Read the Getting ready section of this booklet. It will take
you through cleaning, charging and finding your best fit.
4. Find out more
Find out what to expect from your first pumping session
by reading the Using Elvie Stride section of this booklet.
It will show you how to express with your Elvie Stride.
5. Get in touch
If you have any further questions, contact our Customer
Care team at elvie.com.

4 5
2. Intended use
Indications for use
This powered breast pump is for use by lactating women
to express and collect milk from their breast. The device is
intended for a single user.
Operating life
The expected operating life of the replaceable, washable
components is six months. It is recommended that you
replace the washable components after long-term storage
or before pumping for your next child.
Contraindications
There are no known contraindications for use with
this product.
3. Safety
Warnings
Read all instructions before using. Elvie Stride is not
provided sterile. It must be cleaned and sanitized before
first use (see the Cleaning section).
It is recommended that you consult with a licensed
healthcare professional before using Elvie Stride if you
have an active implanted device that would be aected
by a magnetic field (e.g. pacemaker, implantable
cardioverter defibrillator).
When using electrical products, especially when children
are present, basic safety precautions should always be
maintained, including the following:
Intensity Lights
Power
Intensity Settings
Mode
Mode Light
Play/Pause
1.2 Controls
Charging Port Hub
Tube Splitter
ClipCover
Long Tube (for the Hub)
Short Tube
(for the Cups)
Charging Cable
Hub Connector
Cap Seal
Tube Splitter
Stopper
Cap

6 7
• Never operate an Elvie Stride if it has been damaged,
is not working properly, or has been dropped into
water. If damage is found, immediately discontinue use.
In case of damage or wear, please replace parts
• If the package appears damaged or tampered
with before use, do not use and contact our
Customer Care team
• Do not submerge the Cap in water. It may be dicult to
dry and may risk liquid being sucked into the Hub
• Regularly check that there is no residue or
condensation in the Tubes. The Tubes must be
completely dry before assembly; residue or
condensation can be drawn into the Elvie Stride Hub,
which could cause product failure. If there is milk in the
Tubes discontinue use, check the Diaphragm for damage
and contact Customer Care. If mold develops in the
Tubes, discontinue use and replace
• Always inspect all parts before use for damage, liquid
and cleanliness. Elvie Stride must not be used if the
Diaphragm is damaged. A damaged Diaphragm risks
liquid being sucked into the Hub, which could
cause permanent damage resulting in no suction.
Keep sharp objects away from the Diaphragm
• Do not immerse the Hub, Tubes, Tube Splitter
or Cap in water or other liquids. Wipe with a
clean, damp cloth
• Do not drop or insert any foreign object into any
openings on the Hub and always close the
Charging Cap after charging
• Only use Elvie manufactured parts with Elvie Stride,
including the Charging Cable; do not substitute. Use of
accessories or cables other than those specified could
result in irreversible damage to your Hub
• Elvie Stride is best paired with a charging adapter of
maximum output 5 V / 2.1 A or 10 W. See our website
FAQ for more information about charging Elvie Stride
• During normal use, areas of the Hub may warm up
• It is not necessary to have trained medical professionals
present during use/operation of this product
• The Breast Shield is the part that should be
applied to the body
• Do not store wet or damp parts, as mold may develop
• Do not use flammable materials while using
Elvie Stride or connecting Elvie Stride to a charger
• Elvie Stride should not be used while lying down,
engaging in strenuous activities or performing
activities with risk of harm such as operating
heavy machinery. Do not pump while driving
• Do not pump until after giving birth, as breast
pumping can induce labor
• Using a breast pump should not cause pain. Do not
try to express with an intensity setting that is too high or
uncomfortable. If excessive discomfort or pain is
felt during pumping, stop pumping, break the seal
around your nipple and discontinue the session
• This product contains small parts, Tubes and a cable
that may present a hazard. Keep out of reach of children
• Inspect for damage, clean and sanitize washable
components that come into contact with your
breast and breast milk prior to first use
• Clean all parts that come into contact with your
breast and breast milk, and inspect for damage
after every use
• This is a single-user product. Use by more than one
person may present a health risk and voids the warranty

8 9
Precautions
• Always ensure all parts are completely dry before
assembling. Any liquid left on the Diaphragm risks
being sucked into the Hub, which could cause
product failure
• Do not use harsh chemicals to clean the Breast
Shield, Cup Front, Cup Seal, Valve or Diaphragm
• Do not place the Hub in the fridge or freezer
• Do not expose Elvie Stride or its components
to direct sunlight
• Wash your hands thoroughly with soap and water
before touching Elvie Stride, its components or your
breasts. Avoid touching the inside of the Cup Fronts
and Breast Shields
• Only use drinking-quality tap water or bottled water
for cleaning components that come into contact
with milk
• Contact your healthcare professional if you express
minimal or no milk, or if expression is painful
• For further assistance with correct Breast Shield sizing
and comfort, please see a lactation consultant or
breastfeeding specialist
• Elvie Stride will not work when connected to the
charger; always disconnect Elvie Stride from the
charger and close the Charging Port
• If stored at minimum or maximum storage
temperature (see Product specifications), when
removing from storage, please allow 24 hours
for the pump to reach normal operating
temperature before use
• Do not attempt to reset the Hub during use
• Take extra care when using Elvie Stride in the
vicinity of children
Please visit elvie.com for troubleshooting advice, including alerts,
warnings and how to factory reset Elvie Stride.
Please keep a copy of these instructions for future reference.
• Only use Elvie Stride for its intended use as
described in this manual
• Do not use Elvie Stride while sleeping or overly drowsy
• Always break the seal around your nipple before
removing Elvie Stride from your breast
• Do not wear Elvie Stride when not pumping
• Elvie Stride and its components are not heat resistant.
Keep away from heat sources
• Elvie Stride uses Bluetooth technology. Please follow
airline rules for the use of portable electronic devices
when flying. Furthermore, high altitudes, including
while in a pressurized aircraft cabin, will aect the
performance of Elvie Stride
• Portable and mobile frequency communications
equipment can aect the Hub
• Please note that the Pump with Elvie app is
not required to use Elvie Stride. In the case of
disconnection from the app all pump controls are still
accessible via the device

10 11
4. Getting ready
Battery low
Battery charging
Fully charged
Charge immediately after finishing your pumping session
if low battery is indicated.
Tip: Press the Mode button when the Hub is off;
the Intensity Lights will show how much battery is left.
Tip: Close the Charging Port before use to ensure the
Hub is as discreet as possible.
To get the most from your pump, it’s really important to set
it up properly. This guide will show you how to assemble
your pump and how to customize it to fit your body.
4.2 Taking Elvie Stride apart
1. Remove the Cap. The Hub, Tubes and Cap must be
placed on a dry surface and kept away from water
2. Using the Finger Grips, pull the Cup Front away from
the Breast Shield
3. Pull the Valve out of the Breast Shield. Then remove
the Diaphragm
Finger Grip
4.1 Charging
Plug in the Hub for five minutes to wake it up before first
use. The Hub will not turn on while it is charging. It takes
approximately two hours to fully charge the Hub,
although this can vary depending on your charging set up.
A full charge lasts approximately five 30 minute sessions.
Only use the Charging Cable provided in the box.
12 13
4.3 Cleaning
Before first use
Elvie Stride is not provided sterile. It must be cleaned and
sanitized before first use. Always disassemble the
components before cleaning or sanitizing. For additional
cleaning guidelines see the Center for Disease Control
website – https://www.cdc.gov/healthywater/hygiene/
healthychildcare/infantfeeding/breastpump.html
1. Before first use, remove the Cup Seal by peeling it out
of the groove on the side. During normal cleaning this
Cup Seal can stay in place
2. To replace, stretch the Cup Seal over the outer rim of
the Cup Front. Make sure it goes on with the ridges
facing outwards. Press along the groove, checking
that it is snugly in place all the way around
Non-washable components
The Hub, Cap, Tubes, Tube Splitter, Cover and Clip are
non-washable components and should be kept dry.
They must not be microwaved. They can be wiped clean
with a damp cloth, but should not be submerged in water.
If the tubes are moldy, discard and replace immediately.
Washable components
Cleaning washable components that come into contact
with milk, as soon as possible after pumping, prevents the
buildup of dry milk residue. Residue can cause the growth
of bacteria that may be harmful to you and your baby.
Breast Shield Stopper
Cup Front
Diaphragm
Valve
Cup Seal
Cleaning (before first use and after every use)
1. Rinse in cold, clear water. Do not place the parts
directly in the kitchen sink for rinsing and washing.
Use a dedicated wash basin and brush for infant feeding
2. Wash in warm water using mild dish washing soap
3. Rinse with cold, clear water for 10 to 15 seconds
Place on the top shelf of the dishwasher
OR
Charging Port Hub
Tube Splitter
ClipCover
Long Tube (for the Hub)
Short Tube
(for the Cups)
Charging Cable
Hub Connector
Cap Seal
Tube Splitter
Stopper
Cap
14 15
Sanitizing (before first use
and subsequently once daily)
1. Sanitize parts in boiling water for five minutes
Suitable for microwave, steam or cold water sanitization.
We do not recommend microwave or steam sanitizing for
more than five minutes.*
*Always refer to the manufacturer’s instructions
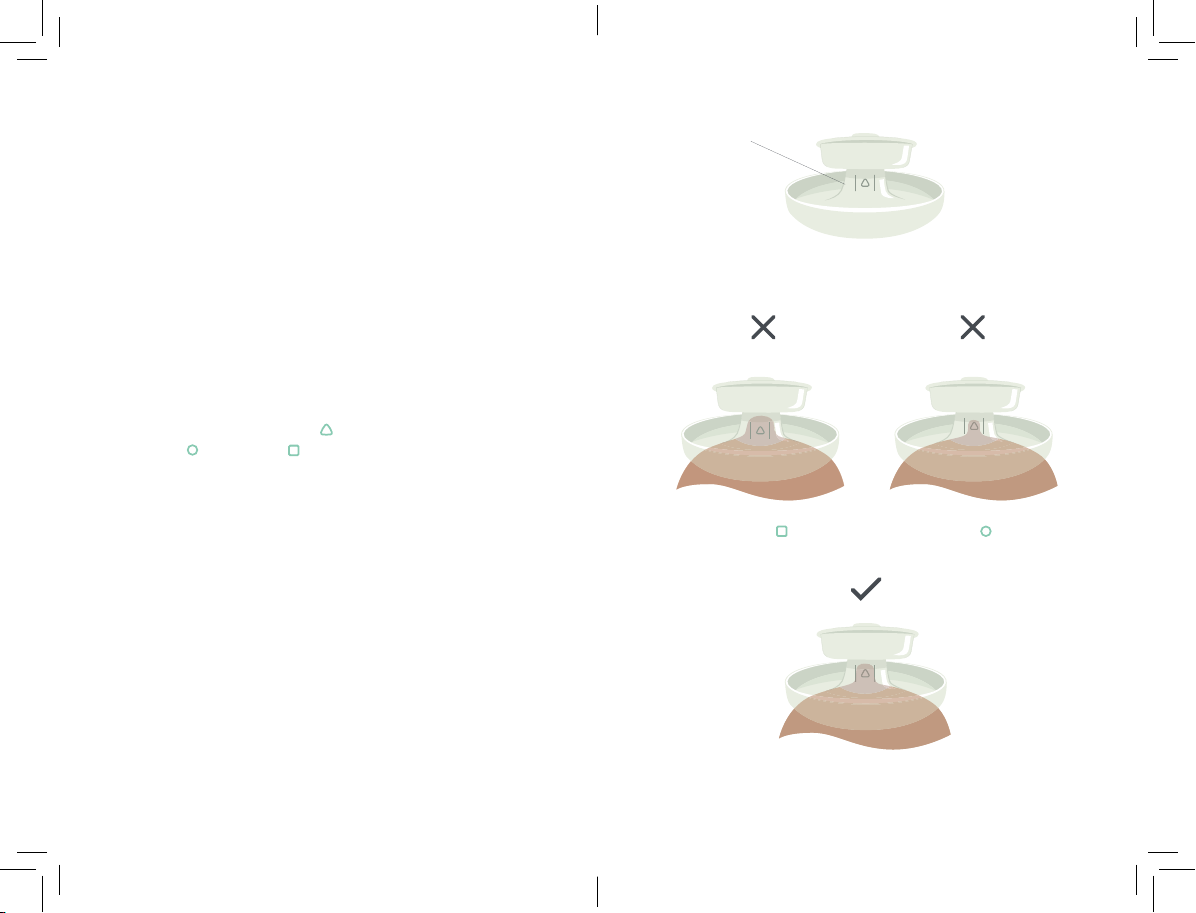
4.4 Breast Shield sizing
Elvie Stride comes with two (24 mm) Breast Shields.
If needed (21 mm ) or (28 mm) Breast Shields are
available to purchase separately.
The Breast Shield creates a seal between your nipple and the
pump, and it is therefore important it fits well.
To check your size:
1. Put the Breast Shield on with the sizing symbol
facing upwards, and place your nipple in the
center of the fit lines
2. The fit lines should align with the outside of your nipple
3. To comfortably pump on both sides, repeat this process
for both nipples to ensure you have the correct Breast
Shield size for each nipple
Drying
Place parts on a clean surface and air dry completely
before assembly.
Breast Shield too small Breast Shield too bigBreast Shield correct fit
Elvie Stride Breast Shield
Too small – buy (28 mm) Too big – buy (21 mm)
Breast Shield correct fit
Nipple Tunnel
OR

16 17
4.5 Assembling Elvie Stride
Wash hands thoroughly before you begin. Once the parts
have been cleaned and sanitized, make sure they are dry
and not moldy before putting them together. Pay extra
attention to the Diaphragm and ensure it is completely dry.
1. Attach the Cover and Clip. Slide the Hub into the
Cover, ensuring the hole for the Hub Connector is
aligned with the hole on the Cover. Push the short
end of the Clip through the slot, and pull through
3. Push the Valve and Diaphragm
onto the Breast Shield
4. Use your fingers to work the Diaphragm rim over
the Breast Shield lip. Take a moment to check the
Diaphragm is sitting flush and is on securely
Diaphragm rimBreast Shield lip
5. Push the Breast Shield and the Cup Front together
using the markings as a guide. Ensure that there is a
good seal all the way around. Check that there are
no gaps and that the Cup Seal is fully covered by the
frosted lip of the Breast Shield
Tip: Take the Cup Front off and check that the Dia-
phragm is on correctly if:
• You can’t get the Cup to push together fully
• You can see the Cup Seal above the frosted lip
6. Check that the Diaphragm is completely dry because
moisture can be sucked into the Hub. This will aect
performance. Push the Cap into the Cup Front
Frosted lip
2. Push the Hub Connector firmly into the Hub,
ensuring that it is fully inserted
18 19
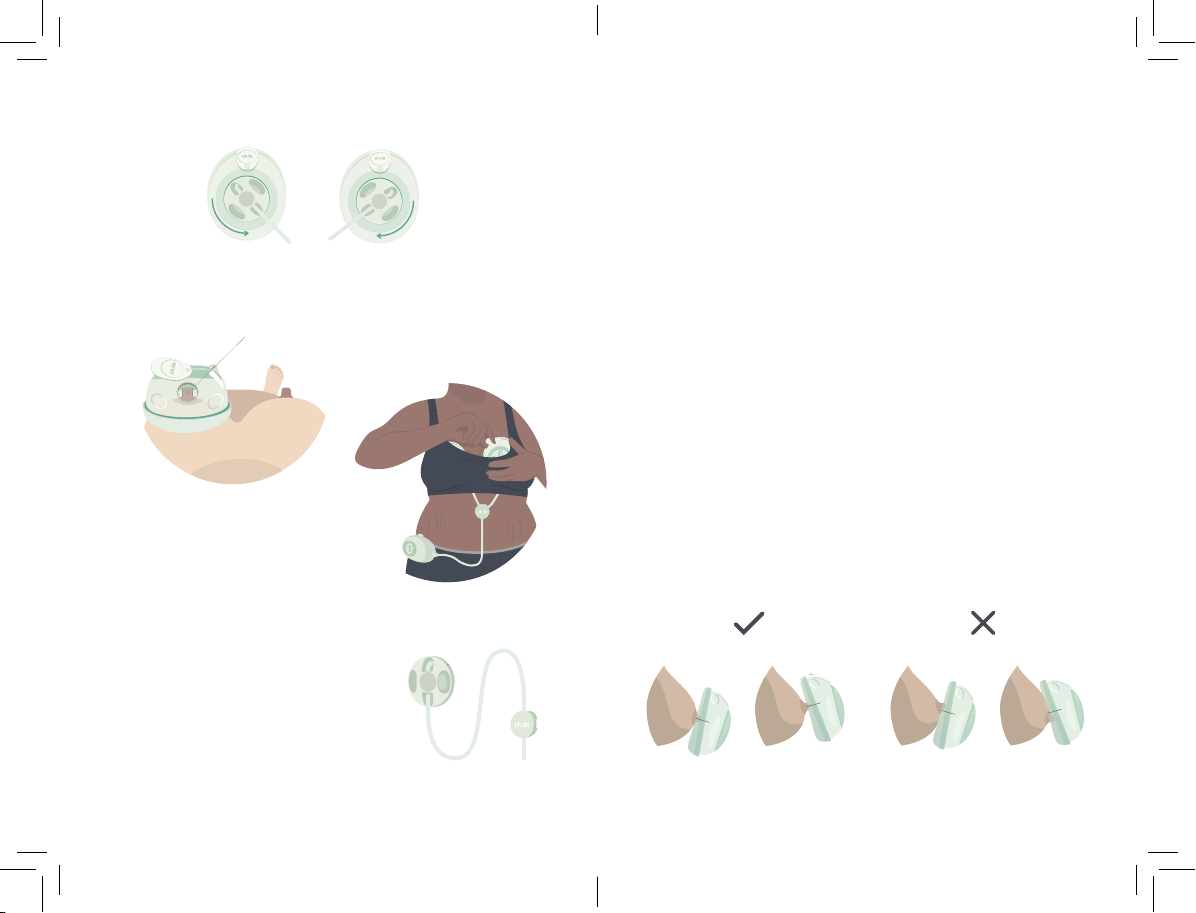
7. Rotate the Cap when it’s in place for the most discreet fit
8. Check your nipple alignment through the open
Pour Hole. Close the Pour Hole using the Stopper
9. Attach the Hub to your
clothing using the clip
To pump on one side, you only
need one Short Tube that connects
to one Cup. Remove the unused
Short Tube from the Tube Splitter.
Seal the opening with the Tube
Splitter Stopper to ensure consistent
suction on the one Cup in use.
Tip: Make sure the Tubes are not kinked or pinched flat
5. Using Elvie Stride
5.1 Turning on Elvie Stride
Once fully assembled, press Power to turn the Hub on.
The Intensity Lights will begin to flash and will show
the intensity setting that Stimulation mode will start on.
You can adjust the intensity setting before you start
your session.
5.2 Aligning your nipple
We’re all dierent. No two nipples point in the same
direction. Correct nipple alignment in the Breast Shield
is the key to comfortable and ecient pumping.
Align the Breast Shield with the direction of your
nipples when you are putting it on.
To avoid discomfort, your nipple must be positioned
correctly in the Nipple Tunnel before pumping.
1. Use the markings on the Breast Shield to help align
your nipple when putting the Cup on
To help you to get the best performance from your pump,
this section will guide you through a pumping session.
Breast Shield correctly aligned Breast Shield incorrectly aligned
4.6 Single-side pumping
Pour Hole
20 21
2. Bend forwards and hold your breast from underneath.
Bring the Cup to your breast, paying attention to the
direction of your nipple. You can use the markings
on the Breast Shield to help align your nipple
3. Once the Cup is on, you can check your alignment
by removing the Stopper and adjusting so that your
nipple sits in the middle of the Nipple Tunnel.
Replace the Stopper before use
5.3 Finding the right in-bra fit
Elvie Stride is designed to be worn with your standard
nursing bra. You can use it in either a sitting or standing
position. Elvie Stride needs to be firmly pressed against
your breast. There should be no gaps between the Cups
and your breasts.
Every bra has a dierent level of support, so make sure to
get the pressure and fit right before each session. This is
important because it can have an impact on milk volumes.
5.4 Starting your session
Once the Hub is turned on and the Cups are positioned in
your bra, press Play/Pause to start pumping. If you need to
pause pumping for any reason, press Play/Pause again.
5.5 Modes and intensity settings
Elvie Stride has two modes: Stimulation and Expression.
Elvie Stride will always start in Stimulation mode.
This is a faster pumping rhythm to stimulate milk let-down.
Elvie Stride will automatically switch to Expression mode
after approximately two minutes. You can also change
modes in the app or on the Hub using the Mode button.
When the Mode Light is illuminated, the pump is in
Expression mode. This is a slower, stronger pumping
rhythm for ecient milk expression.
Modes
Mode
Mode Light

22 23
Elvie Stride has ten intensity settings in Stimulation mode
and ten intensity settings in Expression mode. This means
you can adjust the pump to find a setting that feels
comfortable and works eciently in both Stimulation and
Expression modes. Once you can feel the suction on your
nipples, use and to adjust the intensity to find your
preferred setting in both modes. The Intensity Lights will
illuminate to show your chosen setting.
You can save the intensity settings that you would like your
pump to start in for both Stimulation and Expression mode
by using the Personalize feature in the Pump with Elvie
app. The app is free to download in the Apple App Store
or Google Play Store.
Intensity settings
Tip: A higher intensity setting does not always mean a higher
volume of milk. Putting your nipple under excess stress
or pumping if you are in pain can reduce milk production.
Tip: Make sure the Tubes are not kinked or pinched flat.
5.6 Automatic functions
• The Hub will automatically switch from Stimulation
mode to Expression mode after two minutes
• When the Hub is pumping, it will automatically pause
after 40 minutes. It is recommended that you leave
Elvie Stride for 60 minutes before using it again
• When the Hub is paused, it will automatically turn o
if a button has not been pressed for five minutes
• The Hub will automatically turn o if the battery
is empty
• The Hub will automatically turn o if a technical
error occurs
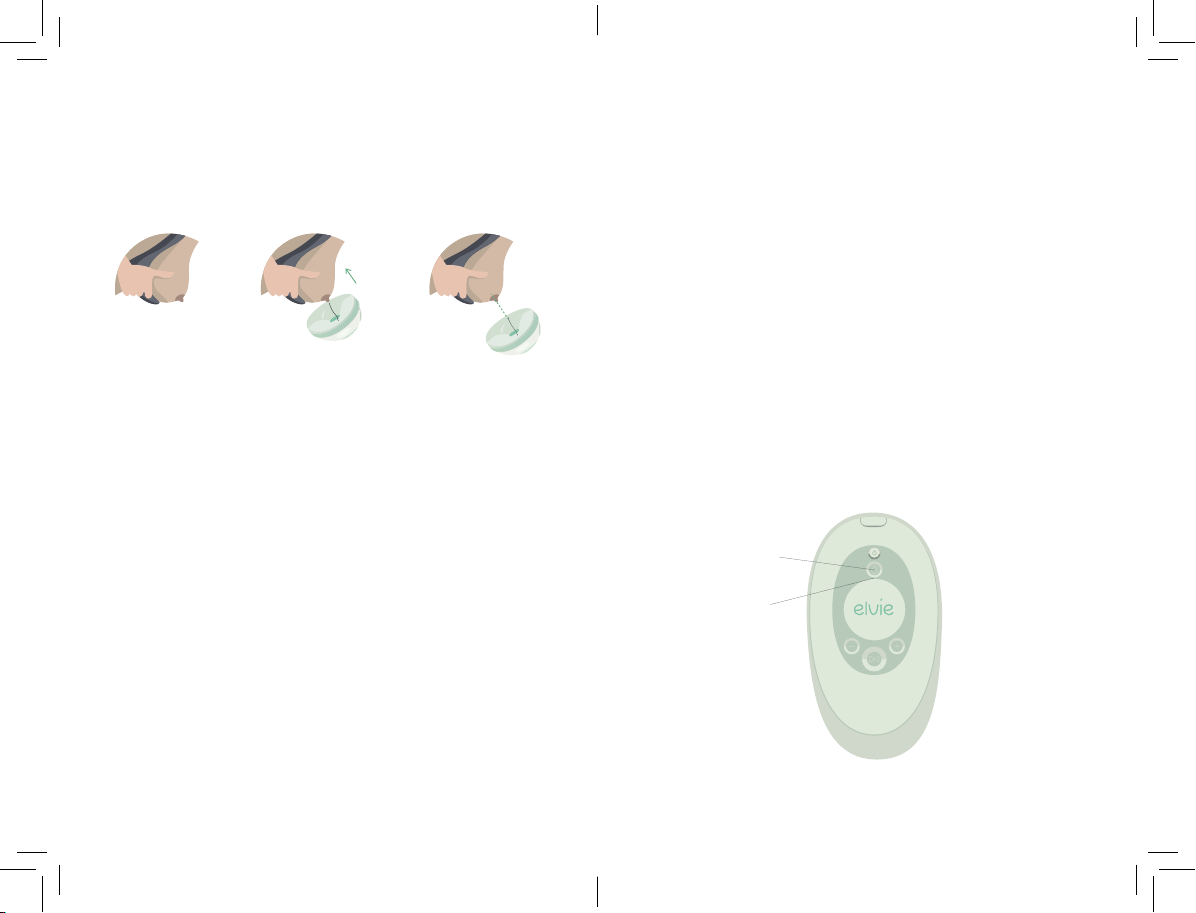
5.7 Ending your session
1. While leaning forward, press Play/Pause to stop
pumping. Turn o the pump by pressing and
holding Power
2. Unclip your bra and use your finger to break the seal
around your nipple to avoid nipple damage
3. Remove the entire Cup from your bra
4. Remove the Cap from the Cup
5. The Cup can be laid flat on a dry surface with the
Nipple Tunnel facing up before decanting if required
6. Unplug and rotate the Stopper to decant your milk
7. Pour milk out as shown below, through the side of
the Pour Hole
8. Refer to the Cleaning section of this booklet for
cleaning and sanitizing instructions
Tip: Leaning forward when you pause or stop your session
helps the milk drain from the Nipple Tunnel into the Cup.

24 25
5.9 How to store Elvie Stride
• Recharge immediately after finishing your pumping
session if the Battery Light is on
• Between sessions, please store your Elvie Stride out
of direct sunlight and ensure the washable parts are
clean and dry. Keep out of reach of children
Short-term storage
• The washable parts will require cleaning and drying
before long-term storage and should be stored away
from direct sunlight to avoid discoloration
• If stored at minimum or maximum storage temperature
(see Product specifications), please allow 24 hours for
the pump to reach normal operating temperature
before use after removing it from storage
Long-term storage
Tip: It’s important that the components are kept dry in
storage because mold may develop if moisture is present.
5.8 Storing your milk
• Do not store your milk in the Cup. Pour your milk
into a sealed container of your choice. Before storage,
label with date and time, and immediately place
in a fridge, freezer, or cooler bag with ice packs
• While you are preparing to pour your milk the Cup
can be laid flat on a dry surface with the
Nipple Tunnel pointing up
• For information on storing your breast milk, refer to
https://www.cdc.gov/breastfeeding/recommendations
/handling_breastmilk.htm
6. Troubleshooting
Alerts and warnings
• Intensity Lights flashing – Elvie Stride is paused
• Battery Light flashes red four times – battery empty
• All Intensity Lights illuminated –
maximum intensity level reached
• All lights flash then turn o – technical error
(Contact Customer Care)
Factory reset
1. Turn Elvie Stride on
2. Press and hold both simultaneously for five seconds
3. Play/Pause and Intensity Lights will flash while
Elvie Stride is resetting
4. All lights and Elvie Stride will then turn o
To perform a factory reset:
Re-attaching the Tube into the Cap
1. Insert the Short Tube
into the Cap
2. Push the Short Tube
onto the Tube Port
3. Once secure, ensure there
are no kinks or bends in tubes
Tube Port

26 27
7. Warranty
At Chiaro Technology Limited (“Chiaro”), we stand behind the Elvie Stride. The
Elvie Stride is backed by a limited manufacturer’s warranty against any defects
in materials and/or workmanship for a period of two (2) years for the Hub and
ninety (90) days for all other components. These warranty periods shall run
from the date of original purchase. Because Chiaro cannot control the quality
of products sold by unauthorized sellers, this limited warranty applies only to
original purchasers of the Elvie Stride that were purchased from Chiaro or a
Chiaro authorized seller in the United States, unless otherwise prohibited by
law. Chiaro reserves the right to reject warranty claims from purchasers for
the Elvie Stride purchased from unauthorized sellers, including unauthorized
Internet sites. The warranty is also limited to the original, end-user purchaser.
This warranty does not cover cosmetic deterioration or damage caused
by general wear and tear, physical or natural destruction, accident, misuse,
neglect, alteration to the product or other external causes.
Any warranty claims must be supported with reasonable evidence, including
proof of date of purchase, alongside these warranty conditions. Chiaro
reserves the right to a reasonable period of investigation to establish the cause
of the defect. If you wish to make a warranty claim, please contact Chiaro at
regarding where and when you purchased your Elvie Stride. If your request is
approved, we will provide further guidance relating to providing your proof of
purchase or any returns. Please note that, if applicable, you are responsible for
costs incurred in mailing your product and/or proof of purchase. Chiaro will
repair or replace a defective Elvie Stride that is covered by this warranty. In
the event that Chiaro decides to provide a replacement, any replacement
will not renew or extend the duration of this warranty. There are no
warranties which extend beyond those stated herein. Any implied warranties
that may be applicable to the Elvie Stride, including implied warranties of
merchantability or fitness for a particular purpose, are limited in duration to
the duration of this warranty. Some States do not allow limitations on how
long an implied warranty lasts, so the above limitation may not apply to you.
Under no circumstances shall Chiaro be liable for any special, incidental, or
consequential damages based upon breach of this limited warranty, breach of
contract or strict liability. Some States do not allow the exclusion or limitation
of incidental or consequential damages, so the above limitation or exclusion
may not apply to you. This warranty gives you specific legal rights, and you
may also have other rights which vary from State to State.
If you have any questions about whether a seller is authorized,
Instructions for return
Elvie Stride Limited Warranty for the United States
8. Product specifications
Technical specifications
Vacuum range
Power
Battery capacity and type
Bluetooth info
Operating temperature
Operating humidity
Ambient pressure
Use life
-35 to -300 mmHg
5 v DC, 1.5 A max
2300 mAh Li-ion rechargeable
Bluetooth V4.2 (Bluetooth Low
Energy) Range up to 10m
+5 °C to +30 °C/ +41 °F to +86 °F
15 to 90% RH
90 to 106 kPa
500 hours
We will provide you with a Return Merchandise Authorization number, which
must be displayed on the outside packaging. Please keep your proof of purchase
in the event that you need to contact Elvie Customer Care for warranty services.
On/O
Mode
Increase intensity
Decrease intensity
Do not microwave
Play/Pause
Consult instructions for use
Manufacturer
Date of manufacture
Do not dispose the device together with unsorted municipal
waste (in accordance with the local regulations)
Compliance with international requirements for protection
from electric shock. (Type BF applied parts)
Protection against entrance of solid foreign objects and
against harmful eects due to the entrance of water
Manufacturer has taken all necessary measures to ensure that
the product complies with applicable safety legislation for
distribution within the European Community
Serial Number
Lot Number
Direct Current
LOT
SN
IP22
II

28 29
Emission Tests Compliance Electromagnetic
environmental guidance
RF Emissions Group 1
CISPR 11
RF emissions Class B
CISPR 11
Harmonic emissions Not Applicable
IEC 61000-3-2
Voltage fluctuations / Not Applicable
flicker emissions
IEC 61000-3-3
Electromagnetic compatibility (EMC) Advice
This device complies with part 15 of the FCC rules. Operation is
subject to the following two conditions:
(1) This device may not cause harmful interference, and
(2) this device must accept any interference received, including
interference that may cause undesired operation.
This equipment has been tested and found to comply with the
limits for a Class B digital device, pursuant to part 15 of the FCC
Rules. These limits are designed to provide reasonable protection
against harmful interference in a residential installation. This
equipment generates, uses and can radiate radio frequency energy,
and if not installed and used in accordance with the instructions,
may cause harmful interference to radio communications.
However, there is no guarantee that interference will not occur
in a particular installation. If this equipment does cause harmful
interference to radio or television reception, which can be
determined by turning the equipment o and on, the user is
encouraged to try to correct the interference by one or more
of the following measures:
i) Reorient or relocate the receiving antenna
ii) Increase the separation between the equipment and receiver
iii) Connect the equipment into an outlet on a circuit dierent
from that to which the receiver is connected
iv) Consult the dealer or an experienced radio/TV technician
for help
FCC Radiation Exposure Statement: This equipment complies
with FCC radiation exposure limits set forth for an uncontrolled
environment. This transmitter must not be co-located or operating
in conjunction with any other antenna or transmitter.
Caution: The user is cautioned that changes or modifications not
expressly approved by the party responsible for compliance could
void the user’s authority to operate the equipment.
Guidance and manufacturer’s declaration –
electromagnetic emissions
The Elvie Stride uses RF
energy only for its internal
function. Therefore, its RF
emissions are very low
and are not likely to cause
any interference in nearby
electronic equipment.
The Elvie Stride is suitable
for use in all establishments,
including domestic
establishments and those
directly connected to the
public low voltage power
supply network that
supplies buildings used
for domestic purposes.
WARNING: This device should not be used adjacent to or stacked
with other equipment. And if adjacent or stacked use is necessary,
this device should be observed to verify normal operation in the
configuration in which it will be used.
The Elvie Stride breast pump product is suitable for use in a specific
electromagnetic environment outlined below. The user of this
product should assure that it is used in such an environment.

30 31
Guidance and manufacturer’s declaration –
electromagnetic immunity
The Elvie Stride breast pump product is suitable for use in a specific
electromagnetic environment outlined below. The user of this product
should assure that it is used in such an environment. The Elvie Stride
breast pump was tested for immunity to electromagnetic disturbances
and passed using the following criteria:
1) No noticeable change in the operation of the breast
pump signifying maximum vacuum pressure is exceeded
or cycle speeds are degraded.
2) During charging, the pump did not turn on and start operating.
Immunity test IEC 60601 test level Compliance level Electromagnetic
environment guidance
Electrostatic
discharge
(ESD) IEC
61000-4-2
+/- 2kV, +/-
4kV, +/- 6kV,
+/- 8kV contact
discharge
+/- 2kV, +/- 4kV,
+/- 6kV, +/- 8kV,
+/- 15 kV air
discharge
+/- 2kV, +/-
4kV, +/- 6kV,
+/- 8kV contact
discharge
+/- 2kV, +/- 4kV,
+/- 6kV, +/- 8kV,
+/- 15 kV
air discharge
Floors should be
wood, concrete
or ceramic tile.
If floors are
covered with
synthetic
material, the
relative
humidity should
be at least 30%.
Power
frequency
(50/60 Hz)
magnetic
field IEC
61000-4-8
30 A/m, 50
or 60 Hz
30 A/m, 50
or 60 Hz
It may be
necessary to position
the breast pump
further from sources
of power frequency
magnetic fields
or to install
magnetic shielding.
The power frequency
magnetic field
should be
measured in the
intended installation
location to assure that
it is suciently low.
Guidance and manufacturer’s declaration –
electromagnetic immunity
Immunity test IEC 60601 test level Compliance level
Radiated
RF
IEC
61000-4-3
10 V/m
(minimum)
80 MHz –
2,7 GHz
80 % AM
at 1 kHz
10V/m
(minimum)
Electromagnetic environment guidance: Portable and mobile RF
communications equipment should be used no closer to any part
of the breast pump, including cables, than the recommended separation
distance calculated from the equation applicable to the frequency
of the transmitter. Recommend separation distance:
d = 1,2√P
d = 1,2√P 80 MHz - 800 MHz
d = 2,3√P 800 MHz - 2.7 GHz
Where P is the maximum output power rating of the transmitter in watts
(W) according to the transmitter manufacturer and d is the recommended
separation distance in metres (m). Field strengths from fixed RF
transmitters, as determined by an electromagnetic site survey, a should
be less than the compliance level in each frequency range. Interference
may occur in the vicinity of equipment marked with the following symbol.
Note 1: At 80 MHz and 800 MHz, the higher frequency range applies.
Note 2: These guidelines may not apply in all situations. Electromagnetic
propagation is aected
A. Field strengths from fixed transmitters, such as base stations for radio
(cellular/cordless) telephones and land mobile radios, amateur radio,
AM and FM radio broadcast and TV broadcast cannot be predicted
theoretically with accuracy. To assess the electromagnetic environment
due to fixed RF transmitters, an electromagnetic site survey should be
considered. If the measured field strength in the location in which the
breast pump is used exceeds the applicable RF compliance level above,
the breast pump should be observed to verify normal operation.
If abnormal performance is observed, additional measures may be
necessary, such as re-orienting or relocating the breast pump.
B. Over the frequency range 150 kHz to 80 MHz, field strengths
should be less than 10 V/m.

32 33
Portable RF communications equipment (including peripherals such
as antenna cables and external antennas) should be used no closer
than 30 cm (12 inches) to any part of Elvie Stride including cables
specified by the manufacturer. Otherwise, degradation of the
performance of this equipment could result
Band
(MHz) Service Modulation
Max
Power
(W)
Distance
(m)
Immunity
Test Level
(V/m)
380-
390 TETRA 400 Pulse 1.8 0.3 27
430-
470
GMRS 560,
FRS 460 FM 20.3 28
704-
787 LTE Band 13, 17 Pulse 0.2 0.3 9
800-
900
GSM 800/900;
TETRA 800; iDEN
820; CDMA 850;
LTE Band 5
Pulse 20.3 28
1700 -
1990
GSM 1800; CDMA
1900; GSM 1900;
DECT; LTE Band
1,3,4,25; UMTS
Pulse 2 0.3 28
2400 -
2570
Bluetooth, WLAN,
802.11 b/g/n, RFID
2450. LTE Band 7
Pulse 2 0.3 28
5100 -
5800 WLAN 802.11 a/n Pulse 0.2 0.3 9
Disposal
Elvie Stride contains a Li-ion rechargeable battery. Please
dispose of the Hub at a designated collection point for the
recycling of waste electrical and electronic equipment.
The appropriate disposal of Elvie Stride will help conserve
natural resources and ensure that it is recycled in a manner
that protects human health and the environment.
For more information about where you can drop o your
waste for recycling, please contact your local authority or
where you purchased your product.
Transport, storage and disposal
Transport
While traveling, use the Charging Cable provided and pair
with the appropriate USB power source for your current
location. Please check with the airline prior to travel for
advice on carrying and using Elvie Stride while flying.
Temperature: -20 °C to +60 °C / -4 °F to +140 °F
Relative humidity: 15 to 90%
Storage
Temperature: -20 °C to +60 °C / -4 °F to +140 °F
Relative humidity: 15 to 90%
Ambient pressure: 90 to 106 kPa

34 35
Instrucciones
de uso
Gracias por elegir Elvie.
Nos emociona que nos hayas elegido.
Nuestra misión es crear productos que mejoren
la vida de las mujeres, así que esperamos que
Elvie Stride sea una influencia positiva en la tuya.
Más ayuda y soporte
La aplicación de Elvie Pump se puede descargar en la App Store
de Apple (para iPhone) o en la Play Store de Google (para Android).
Si necesitas ayuda con tu Elvie Stride, ponte en contacto con
nuestro equipo de atención al cliente.
Visita elvie.com para más detalles.
Contenido
1. Piezas
2. Uso previsto
3. Seguridad
4. Preparación
5. Uso de Elvie Stride
6. Resolución de problemas
7. Garantía
8. Especificaciones del producto
1.1 Descripción del producto
1.2 Controles
4.1 Carga
4.2 Desarmar Elvie Stride
4.3 Limpieza
4.4 Tamaño del embudo
4.5 Armar Elvie Stride
4.6 Bombeo desde un solo lado
5.1 Encendido de Elvie Stride
5.2 Alineación del pezón
5.3 Encontrar el ajuste adecuado en el bra
5.4 Inicio de la sesión
5.5 Modos y ajustes de intensidad
5.6 Funciones automáticas
5.7 Fin de la sesión
5.8 Almacenamiento de la leche
5.9 Cómo almacenar Elvie Stride
37
39
39
53
59
60
61
44

36 37
Primeros pasos
1. Cargar la base de control de Elvie Stride
Enchufa la base de control durante cinco minutos antes
del primer uso. Ten en cuenta que Elvie Stride no se
enciende mientras se está cargando. Para más detalles,
consulta la sección Carga de este manual.
2. Descarga la app de Elvie Pump en tu celular
Descarga la app Pump with Elvie en tu celular para utilizar
las funciones inteligentes del extractor:
• Monitorear de las sesiones de bombeo
• Controlar Elvie Stride a distancia
• Personalizar los ajustes del extractor
La app Pump with Elvie puede descargarse en la
App Store de Apple (para iPhone) o en la Google Play
Store (para Android).
Para obtener la información más actualizada sobre los
dispositivos compatibles con la app, visita elvie.com.
3. Descubre cómo puedes configurar tu Elvie Stride
Lee la sección Primeros pasos de este manual. Te guiará
a través de la limpieza, la carga y te ayudará a encontrar
el mejor ajuste.
4. Descubrir más
Descubre cómo será tu primera sesión de bombeo
leyendo la sección Usar Elvie Stride de este manual.
Te mostrará cómo bombear leche con tu Elvie Stride.
5. Contacta con nosotros
Si tienes más preguntas para el equipo de atención
al cliente, visita elvie.com
1. Piezas
1.1 Descripción del producto
Elvie Stride se compone de las piezas y los accessorios listados
a continuación, que puedes ver en las ilustraciones siguientes:
1 base de control
2 piezas frontales de la copa
2 juntas de la copa
2 embudos (24 mm)
2 juntas de la tapa
1 separador de mangueras
2 mangueras cortas
(para las copas)
1 manguera larga
(para la base de control)
1 clip
1 funda
2 válvulas
2 diafragmas
1 cable cargador
Tapón
Pieza frontal de la copa
Junta de la copa
Diafragma
Embudo
Válvula
This manual suits for next models
1
Table of contents
Languages:
Other Elvie Breast Pump manuals


Popular Breast Pump manuals by other brands


Medela
Medela Swing Instructions for use

Medela
Medela Symphony Instructions for use

Tommee Tippee
Tommee Tippee Made for Me Silicone breast pump manual

Medela
Medela Symphony Instructions for use

Lansinoh
Lansinoh Breast Pump Instructions for use

Dr. Brown's
Dr. Brown's Electric Breast Pump Instruction booklet