NUK jolie User manual

Operating Instructions
Kullanım Kılavuzu
Art. No. 10.749.078
JOLIE
Manual Breast Pump
Manüel Göğüs Pompası
Mipu JOLIE Cluster 2.book Seite 1 Montag, 22. Juli 2013 12:44 12

Mipu JOLIE Cluster 2.book Seite 2 Montag, 22. Juli 2013 12:44 12

English . . . . . . . . . . . . . . . . . . . . . . . . . . . . . . . . . . . . 3
Please note inner coverpage
Türkçe . . . . . . . . . . . . . . . . . . . . . . . . . . . . . . . . . . . . 14
Lütfen kullanım kılavuzunu okuyunuz
Suomi . . . . . . . . . . . . . . . . . . . . . . . . . . . . . . . . . . . . 23
Huomaa kannen kääntöpuoli
Svenska . . . . . . . . . . . . . . . . . . . . . . . . . . . . . . . . . . 33
Läs även utviksuppslaget
Norsk . . . . . . . . . . . . . . . . . . . . . . . . . . . . . . . . . . . . 42
Se utbrettssiden
Română. . . . . . . . . . . . . . . . . . . . . . . . . . . . . . . . . . 52
Vărugăm sărețineți pagina cu privire de ansamblu
Srpski . . . . . . . . . . . . . . . . . . . . . . . . . . . . . . . . . . . . .62
Molimo obratite paznju na unutrsanje stranice
. . . . . . . . . . . . . . . . . . . . . . . . . . . . . . . . . . . 81
Mipu JOLIE Cluster 2.book Seite 1 Montag, 22. Juli 2013 12:44 12

B
A
CD
Mipu JOLIE Cluster 2.book Seite 1 Montag, 22. Juli 2013 12:44 12

E
I
K
H
FG
L
MN
Mipu JOLIE Cluster 2.book Seite 2 Montag, 22. Juli 2013 12:44 12

6
5
7
3
2
9
1
10
11
4
8
13
12
O
LOT-Nr.
Mipu JOLIE Cluster 2.book Seite 1 Montag, 22. Juli 2013 12:44 12

3
English Contents
1. Important Information Before Using for the First Time . . . . . . . . 4
2. Pump Description . . . . . . . . . . . . . . . . . . . . . . . . . . . . . . . . . . . . . . . 4
2.1 Intended use. . . . . . . . . . . . . . . . . . . . . . . . . . . . . . . . . . . . . . . . . . . . . . . . . . . . 4
2.2 Description of function . . . . . . . . . . . . . . . . . . . . . . . . . . . . . . . . . . . . . . . . . . . 4
2.3 Contraindications. . . . . . . . . . . . . . . . . . . . . . . . . . . . . . . . . . . . . . . . . . . . . . . . 4
2.4 Side effects . . . . . . . . . . . . . . . . . . . . . . . . . . . . . . . . . . . . . . . . . . . . . . . . . . . . . 4
3. Safety Information . . . . . . . . . . . . . . . . . . . . . . . . . . . . . . . . . . . . . . 5
3.1 General information . . . . . . . . . . . . . . . . . . . . . . . . . . . . . . . . . . . . . . . . . . . . . 5
3.2 Hygiene. . . . . . . . . . . . . . . . . . . . . . . . . . . . . . . . . . . . . . . . . . . . . . . . . . . . . . . . 5
3.3 NUK Breast Milk Container . . . . . . . . . . . . . . . . . . . . . . . . . . . . . . . . . . . . . . . . 5
4. Key to Parts (Figure O) . . . . . . . . . . . . . . . . . . . . . . . . . . . . . . . . . . . 6
5. Taking the Pump Apart (Figures A to F) . . . . . . . . . . . . . . . . . . . . . 6
6. Cleaning and Sterilising . . . . . . . . . . . . . . . . . . . . . . . . . . . . . . . . . . 6
6.1 Cleaning . . . . . . . . . . . . . . . . . . . . . . . . . . . . . . . . . . . . . . . . . . . . . . . . . . . . . . . 6
6.2 Sterilising . . . . . . . . . . . . . . . . . . . . . . . . . . . . . . . . . . . . . . . . . . . . . . . . . . . . . . 7
7. Reassembling the Pump (Figures G to N) . . . . . . . . . . . . . . . . . . . . 7
8. Using the Breast Pump . . . . . . . . . . . . . . . . . . . . . . . . . . . . . . . . . . . 7
9. Tips for Successful Expressing . . . . . . . . . . . . . . . . . . . . . . . . . . . . . 8
9.1 Frequency of expressing . . . . . . . . . . . . . . . . . . . . . . . . . . . . . . . . . . . . . . . . . . 8
9.2 Method. . . . . . . . . . . . . . . . . . . . . . . . . . . . . . . . . . . . . . . . . . . . . . . . . . . . . . . . 8
9.3 Quantity of milk. . . . . . . . . . . . . . . . . . . . . . . . . . . . . . . . . . . . . . . . . . . . . . . . . 8
9.4 Let-down reflex . . . . . . . . . . . . . . . . . . . . . . . . . . . . . . . . . . . . . . . . . . . . . . . . . 8
10. Hygiene Tips . . . . . . . . . . . . . . . . . . . . . . . . . . . . . . . . . . . . . . . . . . . 9
11. Storing Milk. . . . . . . . . . . . . . . . . . . . . . . . . . . . . . . . . . . . . . . . . . . . 9
11.1 NUK Breast Milk Container . . . . . . . . . . . . . . . . . . . . . . . . . . . . . . . . . . . . . . . . 9
11.2 Important information for handling breast milk. . . . . . . . . . . . . . . . . . . . . . . 9
12. Help with Problems . . . . . . . . . . . . . . . . . . . . . . . . . . . . . . . . . . . . 11
13. Technical Data . . . . . . . . . . . . . . . . . . . . . . . . . . . . . . . . . . . . . . . . . 11
14. Disposal . . . . . . . . . . . . . . . . . . . . . . . . . . . . . . . . . . . . . . . . . . . . . . 11
15. Warranty . . . . . . . . . . . . . . . . . . . . . . . . . . . . . . . . . . . . . . . . . . . . . 12
Mipu JOLIE Cluster 2.book Seite 3 Montag, 22. Juli 2013 12:44 12

4
Dear Mother,
Breast milk is the best food for a baby
during the first six months of its life. To
enable you and your baby to enjoy every
moment of breastfeeding, NUK has
developed a range of practical and
comfortable breastfeeding aids for the
systematic support of breastfeeding.
The NUK JOLIE Breast Pump is designed to
help you and your baby whenever natural
breastfeeding is not possible.
Before using your NUK JOLIE Breast Pump
for the first time, please allow a few
minutes of your time to carefully read
these instructions for use.
1. Important Information Before Using for the
First Time
Before using the NUK JOLIE Breast Pump for the first time, clean and sterilise all
parts (see “6. Cleaning and Sterilising”).
2. Pump Description
2.1 Intended use
The NUK JOLIE Breast Pump is an aid to
expressing and collecting breast milk:
–in the workplace or when baby is
away, at home or when travelling
–to maintain milk production during a
break in breastfeeding
–to relieve engorgement
–to increase milk production
Once expressed, breast milk can be
collected, stored, frozen, warmed and fed
to your baby using the NUK Breast Milk
Container.
2.2 Description of function
The NUK JOLIE Breast Pump is a manual
suction pump and offers the following
benefits:
• simple to use and needs no power
supply
• breast pump comes apart for easy
cleaning
• silicone cushion for gentle massaging
effect and softer feel
• imitates your baby’s natural suckling
action
• collects expressed breast milk
• supplied with stand for safe,
convenient storage
2.3 Contraindications
If you suffer from certain breast ailments
(inflammation, open wounds), please
consult your doctor, midwife or
breastfeeding counsellor before using the
NUK JOLIE Breast Pump.
2.4 Side effects
If at any time you experience an
unexpected reaction, please consult your
midwife, health visitor, doctor or
pharmacist.
Mipu JOLIE Cluster 2.book Seite 4 Montag, 22. Juli 2013 12:44 12

5
3. Safety Information
Breastfeeding is best for your baby.
For your own safety please observe the
following:
3.1 General information
• Before using the pump, please read
these instructions for use carefully.
These instructions are part of the unit
and must be kept to hand at all times.
• Use the NUK JOLIE Breast Pump and
accessories for their intended purpose
only (see “2.1 Intended use”)
• To avoid the risk of choking, keep
small parts that may be swallowed out
of the reach of children.
• We recommend removing any fatty or
oily creams from your breast before
using the pump, as these may damage
the surface of the breast shield.
• To guarantee that the pump will
function correctly, only use orginal
NUK accessories.
• If accessories from other
manufacturers are used, the pump
may not function properly.
• Please note that any claim under
warranty or liability will be void if
accessories are used which are not
recommended in these operating
instructions, or if any parts other than
original spare parts are used for
repairs. This also applies to repairs
carried out by unqualified persons.
• In the event of any malfunction, the
pump may only be repaired by the
manufacturer, otherwise your
warranty will be invalid.
• If the breast milk is for a premature
baby, it is essential to follow your
doctor's instructions.
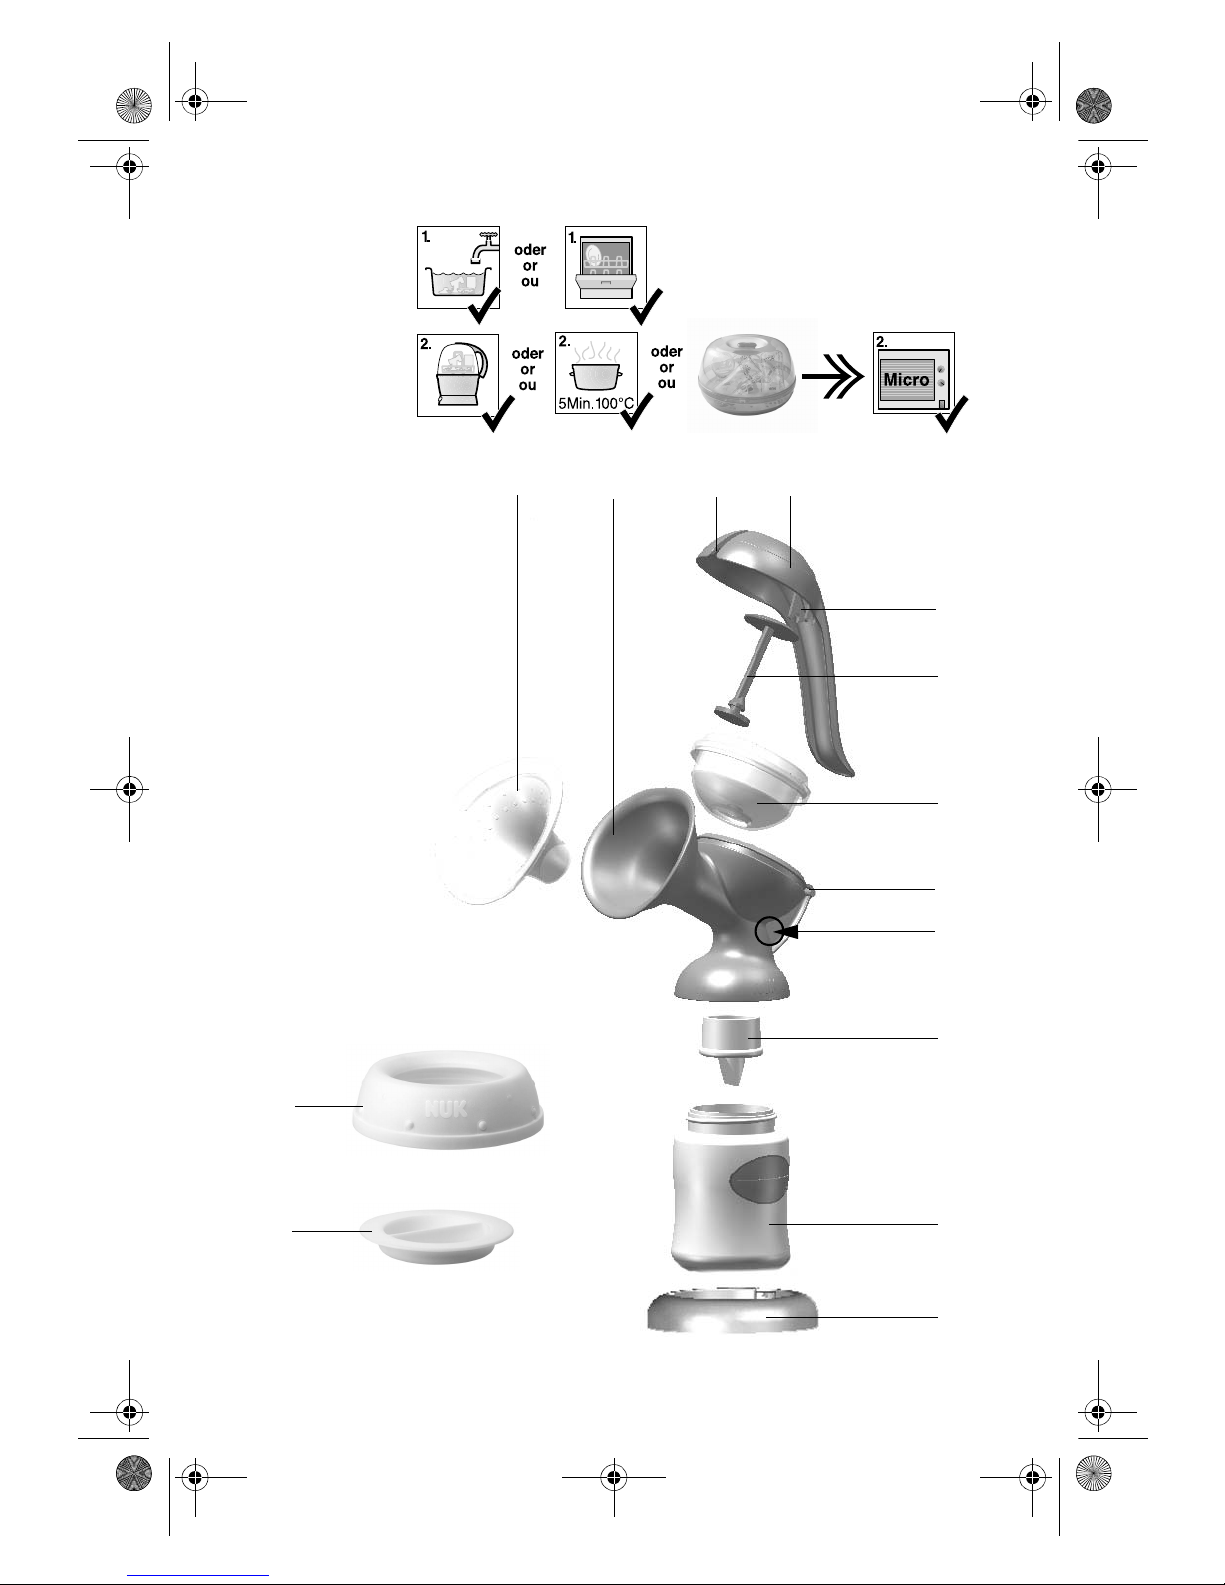
3.2 Hygiene
• To ensure the healthy development of
your child, when handling breast milk,
hygiene is of the utmost importance.
• Remove all body jewellery (e.g.
piercings) before using the breast
pump.
• To prevent infection or bacterial
contamination (microbial growth) and
to prevent damage to the pump,
please read and pay attention to
“6. Cleaning and Sterilising” on
page 6.
•Only a breast pump which has
been thoroughly cleaned will
achieve full suction strength.
3.3 NUK Breast Milk
Container
• For hygiene reasons, if the breast milk
container is damaged on the inside
(e.g. scratched), it should be replaced .
• Any individual parts not currently in
use must be stored out of the reach of
children (choking hazard).
• Tea or juices may discolour the breast
milk container and accessories.
• Only administer food and drink in the
quantity and consistency recom-
mended by the manufacturer in
question.
• Do not microwave closed breast milk
containers filled with feed (risk of
explosion/material damage). Heating
in this way could cause the contents of
the breast milk container to explode.
Uneven heating carries a risk of
scalding.
Mipu JOLIE Cluster 2.book Seite 5 Montag, 22. Juli 2013 12:44 12

6
• NUK Breast Milk Containers and teats
are only compatible with the
associated NUK FIRST CHOICE system.
• The NUK Breast Milk Container is in
compliance with EN 14350.
4. Key to Parts (Figure O)
1Silicone cushion
2Breast shield
3Slot for pump rod
4Pump lever
5Handle fixture
6Pump rod
7Pump diaphragm
8Catch for handle
9Lip valve
10 NUK Breast Milk Container
11 Stand for NUK Breast Milk Container
12 Sealing disc
13 Screw ring
5. Taking the Pump Apart (Figures Ato F)
1. Take the silicone cushion 1out of the
breast shield 2(Fig. A).
2. Holding the end of the handle, pull
the pump lever 4up slightly, until the
handle fixture 5slips out of the catch
for the handle 8(Fig. B).
3. Remove the pump lever 4from the
pump rod 6(Fig. B).
4. Take the pump diaphragm 7and
pump rod 6out of the breast shield 2
(Fig. C).
5. Ease the pump rod 6out of the pump
diaphragm 7(Fig. D).
6. Unscrew the NUK Breast Milk
Container 10 from the breast shield 2
(Fig. E).
7. Pull the lip valve 9out of the breast
shield 2(Fig. F).
8. Finally, clean the individual parts as
described in “6. Cleaning and
Sterilising”.
6. Cleaning and Sterilising
Hygiene is of the utmost priority
when handling breast milk and
all parts that come into contact
with it. The pump should
therefore only be used in a
clean and sterile condition.
Warning! Clean, sterilise and quickly dry
all parts thoroughly before using for the
first time and immediately after each use.
6.1 Cleaning
Warning! Do not use cleaning utensils
(such as brushes or scourers) to clean the lip
valve 9. These can cause damage.
1. Clean all parts with warm water and a
little washing up liquid (or NUK
Rinsing Agent).
2. Rinse off all parts in running water.
3. Next, sterilise all parts (see
“6.2 Sterilising”).
Mipu JOLIE Cluster 2.book Seite 6 Montag, 22. Juli 2013 12:44 12

7
• All parts can also be cleaned in the
dishwasher.
Note: When cleaning parts in the
dishwasher, food residues may cause
discolouration of the materials.
6.2 Sterilising
Before sterilising, clean as described in “6.1
Cleaning”.
• Use a NUK Steam Steriliser. Follow the
operating instructions associated with
the device. Alternatively,
• boil the parts for 5 minutes in a pan of
vigorously boiling water. Ensure there
is sufficient water in the pan to avoid
damage.
• Only the NUK Microwave Steam
Steriliser should be used for sterilising
in a microwave. Follow the
manufacturer's instructions when
using any sterilisers or chemical
solutions in order to prevent damage
to the product.
Important! Before using again, allow
sterilised parts to cool and dry completely
before reassembling the pump.
7. Reassembling the Pump (Figures Gto N)
1. Insert the pump rod 6in the pump
diaphragm 7. The lower end of the
pump rod 6must fit in the hole of the
pump diaphragm 7. (Fig. G).
2. Position the pump diaphragm 7in the
breast shield 2and press firmly in
place (Fig. H).
3. Insert the head of the pump rod 6in
the pump lever 4(Fig. I).
4. Engage the handle fixture 5in the
catch for the handle 8(Fig. K).
5. Insert the lip valve 9in the breast
shield 2(Fig. L).
6. Screw the NUK Breast Milk Container
10 under the breast shield 2(Fig. M).
7. Position the silicone cushion 1in the
front of the breast shield 2and pull
the edge of the cushion over the
breast shield (Fig. N).
8. Using the Breast Pump
Warning! As hygiene is so important,
please wash your hands before expressing
your milk, and read the information in
“10. Hygiene Tips” on page 9.
1. Place the funnel of the breast shield
over your breast.
–Make sure that your nipple is in the
centre of the silicone cushion 1. This
prevents the nipple becoming sore.
–Gently press the breast shield 2
against the breast so that the silicone
cushion 1fits closely and no air is
sucked in from the side.
–As far as possible, hold the pump
vertically.
2. Press the pump handle 4then release
again slowly.
Note: The further you press the pump
lever 4, the greater the suction. To
reduce the suction, do not press the
pump lever 4as far.
Please pay attention to the
information in “9. Tips for Successful
Expressing”.
Mipu JOLIE Cluster 2.book Seite 7 Montag, 22. Juli 2013 12:44 12

8
3. After expressing, place the breast
pump in the stand 11. The pump must
not be allowed to topple over as milk
might escape.
4. Unscrew the breast shield 2from the
NUK Breast Milk Container 10.
5. Firmly seal the NUK Breast Milk
Container 10 using the supplied screw
ring 13 and sealing disc 12.
6. Using a freezer pen, write the date
and time the milk was expressed on a
label.
7. Stick the label on the NUK Breast Milk
Container 10.
9. Tips for Successful Expressing
Correct expressing takes practice. You will
first need to get used to your new pump.
9.1 Frequency of expressing
How often you need to express depends on
the reason for expressing. If you will be
apart from your child and/or want to
sustain milk production, the natural
breastfeeding rhythm should be
maintained. You should therefore express 6
to 8 times daily, including once during the
night. In all other cases you should express
entirely according to your personal wishes
and requirements.
9.2 Method
Milk should be expressed from each breast
in turn.
The amount of time needed to express milk
will vary considerably from one person to
another.
9.3 Quantity of milk
Don't be surprised if it takes a little while
for the milk to start to flow properly at
first. This is not unusual. In fact it is quite
normal because milk production adapts
itself to daily requirements.
This means that the quantity of milk
produced may vary considerably.
• Always make sure that you have plenty
to drink.
9.4 Let-down reflex
During natural breastfeeding, placing the
baby on the breast stimulates the let-down
reflex and milk begins to flow. You can also
stimulate the let-down reflex as follows:
• Find yourself a quiet place to sit,
where you can relax fully when using
the breast pump.
• Adopt a comfortable and relaxed
sitting position.
• Place a warm compress (e.g. NUK Cool
& Warm Gel Breast Compress) on your
breast for a few minutes, to relax the
tissue, and massage your breast.
• Ensure you have eye contact with your
baby. If this is not possible, look at a
photo of your baby.
• The let-down reflex triggers milk flow
in both breasts simultaneously. You
can use the NUK Breast Milk
Collection Shell to collect breast milk
leaking from the breast you are not
currently expressing.
Mipu JOLIE Cluster 2.book Seite 8 Montag, 22. Juli 2013 12:44 12

9
10. Hygiene Tips
Hygiene is especially important when using
the breast pump. This applies to all the
individual pump parts as well as to your
own personal hygiene. We recommend
washing your nipples in clean water daily.
Preferably, soap should not be used, as it
may irritate the nipples.
11. Storing Milk
11.1 NUK Breast Milk
Container
If the breast milk is not used immediately,
you must seal the filled breast milk
container firmly and store it in the
refrigerator or freeze it.
Warning! Do not place the entire NUK
JOLIE Breast Pump in the refrigerator, just
the breast milk container 10 with screw
ring 13 and sealing disc 12.
Breast milk may be chilled, frozen and
defrosted in the breast milk container. The
container may also be used for warming
and feeding. It is important that you follow
the instructions about handling breast milk
which is provided below.
Note: When freezing breast milk, do not
fill the container with more than 150 ml (5
fl oz), as breast milk expands as it freezes
and the container could burst.
11.2 Important information for handling breast milk
•Warning! If transporting chilled
breast milk make sure that it stays
chilled at all times, otherwise the milk
could go off and be harmful to your
baby. Use a cooler bag with ice packs,
for example.
Breast milk Storage location Storage periods
Freshly
expressed
At room temperature Max. 6-8 hours
Refrigerator (not in door) 72 hours at 4 °C
Refrigerator freezer compartment 2 weeks
Upright/chest freezer 6 months at –18 °C
Defrosted,
unopened
Refrigerator (not in door) 24 hours at 4 °C
Defrosted,
opened
Refrigerator (not in door) 12 hours at 4 °C
Defrosting milk Gradually in refrigerator Approx. 24 hours at
4°C
At room temperature followed by immediate
feeding
If time is short, defrost container with breast milk in
lukewarm water (max. 37°C), then feed
immediately.
Mipu JOLIE Cluster 2.book Seite 9 Montag, 22. Juli 2013 12:44 12

10
•Warning! Breast milk must not be
thawed in a microwave as this will
destroy valuable nutrients as well as
causing possible damage to the
container, with a possible risk of
explosion. Uneven heating may result
in scalding!
• To attain the correct feed temperature
of approx. 37 °C, place the container
of thawed breast milk in a NUK Baby
Food Warmer.
Note: The container must be open to
prevent pressure build-up as the milk
warms up.
• Shake the milk gently before feeding
so that milk and milk fat are properly
mixed again.
• Defrosted, warmed or unused milk
must be disposed of and not refrozen.
• If you express breast milk more than
once within a period of 24 hours, the
freshly expressed milk may be added
to the previously cooled breast milk.
However freshly expressed milk must
be cooled down before being added
to milk that is already cool. The
temperatures must be the same
(cold on cold).
• Consult your health visitor, midwife,
doctor or pharmacist for detailed
information about long-term storage.
• You can find more information about
breastfeeding on our NUK website
(www.nuk.com).
Mipu JOLIE Cluster 2.book Seite 10 Montag, 22. Juli 2013 12:44 12

11
12. Help with Problems
13. Technical Data
14. Disposal
If at some stage the appliance is no longer
fit for use, the parts can be disposed of
along with normal household waste.
Problem Reason Remedy
Pump has no
suction or too
little suction
The pump rod 6is not seated
properly in the pump
diaphragm 7
Make sure that the pump rod 6is fully
inserted in the hole in the pump
diaphragm 7(see “7.Reassembling the
Pump (Figures G to N)“ on page7).
Pump diaphragm 7missing,
fitted incorrectly or damaged
Insert pump diaphragm 7correctly (see
“7.Reassembling the Pump (Figures G
to N)“ on page7). If anything is
damaged, please contact the NUK
Service Center (see “Contact addresses“
on page83).
Lip valve 9is incorrectly
positioned
Position lip valve 9correctly
(see “7.Reassembling the Pump (Figures
G to N)“ on page7).
Lip valve 9missing, fitted
incorrectly or damaged
Check that the lip valve 9is correctly
positioned. If anything is damaged,
please contact the NUK Service Center
(see “Contact addresses“ on page83).
Breast milk container 10 is full
and lip valve 9is touching the
expressed milk
Change the breast milk container 10.
No vacuum is produced Make sure that the breast shield 2forms
a complete seal around the breast.
Make sure that the silicone cushion 1is
inserted correctly and is pulled over the
edges of the breast shield.
Pump is being held at an
angle
Hold the pump as upright as possible.
Medical product according to directive 93/42/EEC Class I
Temperature range
- Operation
- Storage
+6 °C to +40 °C
0°Cto+40°C
Mipu JOLIE Cluster 2.book Seite 11 Montag, 22. Juli 2013 12:44 12

12
15. Warranty
Subject to careful treatment of your
appliance and observance of these
operating instructions, the manufacturer
offers a 24 month warranty from the date
you purchase the product.
Appliances sent to us postage paid will be
repaired free of charge in the event of
faulty materials or workmanship. Any
further claims are in accordance with your
statutory rights.
No compensation will be given for damage
caused by improper use of the device.
Within the first 24 months after the date of
purchase we will rectify any recognised
faults without any charge for incidental
costs incurred.
Under all circumstances, the device must be
returned accompanied by this completed
warranty certificate or, failing this, the
purchase receipt or other proof of the
purchase date must be supplied.
If no proof of purchase date is provided,
you will be invoiced for the costs incurred
without further inquiry, and the item will
be returned to you once payment has been
received.
Please complete the warranty form
immediately after purchase and keep this,
or the till receipt, as proof of purchase in a
safe place. Lost warranty certificates will
not be replaced.
Please keep the address, Art. No. and LOT
No. in case of complaints. The LOT No. can
be found on the breast shield (see Fig. O)
Model: Dealer’s stamp:
Date of purchase:
Purchaser:
Mipu JOLIE Cluster 2.book Seite 12 Montag, 22. Juli 2013 12:44 12

13
İçindekiler
1. İlk kez kullanımdan önce önemli bilgiler . . . . . . . . . . . . . . . . . . . 14
2. Cihazın tanımı. . . . . . . . . . . . . . . . . . . . . . . . . . . . . . . . . . . . . . . . . 14
2.1 Kullanım Amacı. . . . . . . . . . . . . . . . . . . . . . . . . . . . . . . . . . . . . . . . . . . . . . . . 14
2.2 İşlev tanımı. . . . . . . . . . . . . . . . . . . . . . . . . . . . . . . . . . . . . . . . . . . . . . . . . . . . 14
2.3 Kontrendikasyonlar . . . . . . . . . . . . . . . . . . . . . . . . . . . . . . . . . . . . . . . . . . . . . 14
2.4 Yan etkiler . . . . . . . . . . . . . . . . . . . . . . . . . . . . . . . . . . . . . . . . . . . . . . . . . . . . 15
3. Güvenlik uyarıları. . . . . . . . . . . . . . . . . . . . . . . . . . . . . . . . . . . . . . 15
3.1 Genel bilgiler . . . . . . . . . . . . . . . . . . . . . . . . . . . . . . . . . . . . . . . . . . . . . . . . . . 15
3.2 Hijyen . . . . . . . . . . . . . . . . . . . . . . . . . . . . . . . . . . . . . . . . . . . . . . . . . . . . . . . . 15
3.3 NUK Anne Sütü Şişesi. . . . . . . . . . . . . . . . . . . . . . . . . . . . . . . . . . . . . . . . . . . . 15
4. Parçaların ve fonksiyon elemanlarının tanımı(Şekil O) . . . . . . . 16
5. Göğüs Pompası’nın parçalarına ayrılması(Şekil A - F) . . . . . . . . 16
6. Temizlik ve dezenfeksiyon . . . . . . . . . . . . . . . . . . . . . . . . . . . . . . . 17
6.1 Temizleme . . . . . . . . . . . . . . . . . . . . . . . . . . . . . . . . . . . . . . . . . . . . . . . . . . . . 17
6.2 Dezenfekte edilmesi . . . . . . . . . . . . . . . . . . . . . . . . . . . . . . . . . . . . . . . . . . . . 17
7. Parçaların birleştirilmesi (Şekil G - N) . . . . . . . . . . . . . . . . . . . . . . 17
8. Kullanım . . . . . . . . . . . . . . . . . . . . . . . . . . . . . . . . . . . . . . . . . . . . . 18
9. Doğru sağmak için öneriler . . . . . . . . . . . . . . . . . . . . . . . . . . . . . . 18
9.1 Sağma sıklığı. . . . . . . . . . . . . . . . . . . . . . . . . . . . . . . . . . . . . . . . . . . . . . . . . . . 18
9.2 Uygulama . . . . . . . . . . . . . . . . . . . . . . . . . . . . . . . . . . . . . . . . . . . . . . . . . . . . . 19
9.3 Süt miktarı. . . . . . . . . . . . . . . . . . . . . . . . . . . . . . . . . . . . . . . . . . . . . . . . . . . . 19
9.4 Süt verme refleksi . . . . . . . . . . . . . . . . . . . . . . . . . . . . . . . . . . . . . . . . . . . . . . 19
10. Hijyene ilişkin öneriler . . . . . . . . . . . . . . . . . . . . . . . . . . . . . . . . . . 19
11. Sütün saklanması. . . . . . . . . . . . . . . . . . . . . . . . . . . . . . . . . . . . . . 19
11.1 NUK anne sütü şişesi . . . . . . . . . . . . . . . . . . . . . . . . . . . . . . . . . . . . . . . . . . . . 19
11.2 Anne sütünün kullanılmasına ilişkin önemli öneriler . . . . . . . . . . . . . . . . . . 20
12. Sorunlarda yardım . . . . . . . . . . . . . . . . . . . . . . . . . . . . . . . . . . . . . 21
13. Teknik veriler. . . . . . . . . . . . . . . . . . . . . . . . . . . . . . . . . . . . . . . . . . 21
14. İmha . . . . . . . . . . . . . . . . . . . . . . . . . . . . . . . . . . . . . . . . . . . . . . . . . 21
15. Garanti. . . . . . . . . . . . . . . . . . . . . . . . . . . . . . . . . . . . . . . . . . . . . . . 22
Mipu JOLIE Cluster 2.book Seite 13 Montag, 22. Juli 2013 12:44 12

14
Sevgili Anne,
Anne sütü, bir bebeğin ilk altıayda
alabileceği en iyi besindir. Bebeğiniz ile
birlikte mükemmel bir emzirme dönemi
yaşayabilmeniz için NUK emzirme
programıile kullanışlıve konforlu
emzirmeye yardımcıürünler sunarak sizi
desteklemektedir.
NUK JOLIE manüel göğüs pompası, doğal
emzirme geçici veya sürekli olarak
mümkün olmadığında size ve bebeğinize
yardımcıolmasıiçin düşünülmüştür.
NUK JOLIE manüel göğüs pompasınıilk
kez kullanmadan önce lütfen birkaç
dakika zaman ayırın ve bu kullanım
kılavuzunu dikkatle okuyun.
Size ve bebeğinize en iyi dileklerimizi
sunarız.
1. İlk kez kullanımdan önce önemli bilgiler
NUK JOLIE manüel göğüs pompasınıilk kez kullanmadan önce bütün
parçalarıtemizleyin ve dezenfekte edin (bakın “6. Temizlik ve
dezenfeksiyon”).
2. Cihazın tanımı
2.1 Kullanım Amacı
NUK JOLIE manüel göğüs pompası, anne
sütünün sağılmasınıve toplanmasını
sağlayan bir cihazdır:
–İşyerinde veya bebek yanınızda
olmadığında, evdeyken veya
yoldayken
–Emzirmeye ara verildiğinde süt
üretiminin devam ettirilmesini
sağlamak için
–Süt birikmesini azaltmak için
–Süt üretimini arttırmak için.
Sağılan anne sütü doğrudan NUK Anne
Sütü Şişesi’nde toplanabilir, saklanabilir,
dondurulabilir, ısıtılabilir ve bu şişeden
bebek beslenebilir.
2.2 İşlev tanımı
NUK JOLIE manüel göğüs pompası,
manüel emme pompasıprensibine göre
çalışmaktadır ve aşağıda belirtilen
avantajlarısağlamaktadır:
•Akım beslemesi olmadan manüel
kullanım için kullanımıkolay cihaz;
•Göğüs pompasının temizliği,
parçalarına ayrılabildiği için kolaydır;
• Ek bir masaj etkisi sağlayan ve göğsü
rahatsız etmeyecek bir kullanım için
silikon yastıklar;
• Pompa etkinleştirilerek, bebeğin
emme işleminin taklit edilmesi;
•Sağılan anne sütünün biberonda
toplanması;
•Ayaklarısayesinde bir yere sağlam bir
şekilde oturtulması.
2.3 Kontrendikasyonlar
Bazıgöğüs hastalıklarında (enfeksiyon,
açık yaralar) NUK JOLIE manüel göğüs
pompası,sadece tedavi eden doktor veya
emzirme danışmanıile görüştükten sonra
kullanılmalıdır.
Mipu JOLIE Cluster 2.book Seite 14 Montag, 22. Juli 2013 12:44 12

15
2.4 Yan etkiler
Beklenmedik durumlar meydana geldi-
ğinde, lütfen ebenize, emzirme danışma-
nınıza, doktorunuza veya eczacınıza
başvurun.
3. Güvenlik uyarıları
Bebeğe anne sütü emzirmek bebek için en
yararlıgıdadır.
Kendi güvenliğiniz için lütfen aşağıda
belirtilen uyarılarıdikkate alınız:
3.1 Genel bilgiler
•Cihazıkullanmadan önce lütfen bu
kullanım kılavuzunu okuyun. Kullanım
kılavuzu cihazın bir parçasıdır ve her
zaman hazır bulundurulmalıdır.
• NUK JOLIE Manüel Göğüs Pompası’nıve
aksesuarını, sadece beyan edilen
kullanım amacı(bakın “2.1 Kullanım
Amacı”) için kullanın.
• Küçük parçalarıçocukların
erişemeyeceği yerde saklayınız: Yutma
tehlikesi.
• Sütün sağılmasından önce yağlı
merhemleri temizlemenizi öneririz,
çünkü bunlar göğüs adaptörünün
yüzeyine zarar verebilir.
• Pompanın kusursuz bir şekilde
çalıştığından emin olmak için sadece
NUK orijinal aksesuarlarıkullanınız.
• Yabancıaksesuarların kullanılması,
ürünün düzgün çalışmamasına neden
olabilir.
• Bu kullanım kılavuzunda tavsiye
edilmemişaksesuar parçaları
kullanıldığında ve onarımlarda sadece
orijinal yedek parçalar kul-
lanılmadığında, her türlü garanti ve
sorumluluğumuzun geçerliliğini kay-
bettiğini lütfen dikkate alın. Bu husus,
onarım çalışmalarıkalifiye olmayan bir
personel tarafından yapıldığında da
geçerlidir.
• Muhtemel çalışma arızalarında cihaz
sadece üretici tarafından onarılabilir.
Aksi takdirde, her türlü garanti
geçerliliğini kaybeder.
• Anne sütü, erken doğan bir bebek için
sağıldığıtakdirde, mutlak şekilde
doktorunuzun talimatlarına uyun.
3.2 Hijyen
• Çocuğunuzun sağlıklıbir şekilde
gelişebilmesi için anne sütü
kullanımında hijyen çok önemlidir.
•Göğüste taşınan veya takılan süs ve
ziynet eşyaları(örn. piercing veya
hızma), süt pompasıkullanılmadan
önce çıkarılmalıdır.
• Bir enfeksiyonu, bakteri oluşumunu ve
cihazın zarar görmesini engellemek
için, lütfen 17. sayfadaki “6. Temizlik
ve dezenfeksiyon” altında verilen
uyarılarıdikkate alın.
• Sadece iyice temizlenmişGöğüs
Pompasıtam emme gücüne ulaşır.
3.3 NUK Anne Sütü Şişesi
• Anne sütü şişesinin içi hasarlı(örneğin
çizilme nedeniyle) ise, hijyenik
nedenlerden dolayıdeğiştirilmelidir.
• Kullanılmayan bütün parçalar,
çocukların ulaşamayacaklarıyerde
saklanmalıdır (yutma tehlikesi).
Mipu JOLIE Cluster 2.book Seite 15 Montag, 22. Juli 2013 12:44 12

16
• Anne sütü şişesinin ve aksesuarın
rengi, çay veya meyve sularınedeniyle
değişebilir.
• Besin maddeleri ve içecekler, sadece
üretici tarafından önerilen miktarlarda
ve tutarlılıkta verilmelidir.
• Besin maddesi ile doldurulmuşve
kapatılmışanne sütü şişeleri,
mikrodalga fırına koyulmamalıdır
(patlama tehlikesi/ malzemenin zarar
görmesi). Anne sütü şişesinin
içindekiler, ısınma nedeniyle patlama
şeklinde taşabilir. Dengesiz ısınma
nedeniyle haşlanma tehlikesi
bulunmaktadır.
• NUK anne sütü şişeleri ve emzikleri,
sadece ilgili NUK FIRST CHOICE sistemi
ile uyumludur.
• NUK anne sütü şişesi EN 14350
standardına uygundur.
4. Parçaların ve fonksiyon elemanlarının tanımı
(Şekil O)
1Silikon yastık
2Göğüs adaptörü
3Pompa çubuğu deliği
4Pompa kolu
5Kol-Sabitleme
6Pompa çubuğu
7Pompa membranı
8Tutamak askısı
9Dudak valfi
10 NUK Anne Sütü Şişesi
11 NUK Anne Sütü Şişesi için ayak
12 Kapama plakası
13 Dişli halka
5. Göğüs Pompası’nın parçalarına ayrılması
(Şekil A- F)
1. Göğüs adaptöründeki 1silikon
yastıkları2çıkarın (Şek. A).
2. Pompa kolunu 4tutamak ucundan
biraz yukarıkaldırın, böylece tutamak
kilidi 5tutamak askısından 8çıkmış
olur (Şek. B).
3. Pompa kolunu 4pompa çubuğundan 6
çekin (Şek. B).
4. Pompa membranını7pompa çubuğu 6
ile birlikte göğüs adaptöründen 2
çıkarın (Şek. C).
5. Pompa çubuğunu 6pompa
membranından 7çıkarın (Şek. D).
6. NUK anne sütü şişesini 10 göğüs
adaptöründen 2çıkarın (Şek. E).
7. Göğüs adaptöründeki 9dudak
valfını2çıkarın (Şek. F).
8. Bu işlemlerden sonra her bir parçayı,
“6. Temizlik ve dezenfeksiyon”
bölümünde anlatılan şekilde
temizleyin.
Mipu JOLIE Cluster 2.book Seite 16 Montag, 22. Juli 2013 12:44 12
Other manuals for jolie
4
Table of contents
Languages:
Other NUK Breast Pump manuals

NUK
NUK BP7 Series User manual

NUK
NUK e-Motion User manual

NUK
NUK e-Motion User manual

NUK
NUK Simply Natural Freemie User manual

NUK
NUK Sensitive 10.749.048 User manual

NUK
NUK First Choice+ User manual

NUK
NUK Expressive User manual

NUK
NUK Simply Natural Freemie User manual

NUK
NUK jolie User manual

NUK
NUK jolie User manual