elysia RamperPro Instruction Manual

Tips, Tricks and Frequently Asked Questions
Published on Elysia Visuals (http://www.elysiavisuals.com)
Tips, Tricks and Frequently Asked Questions
Don't point the light sensor directly to the sun
Don't point the light sensor directly to the sun! Otherwise you risk that the sensor gets too much
light; more that it can handle. The light sensor measures how fast its getting darker or lighter during
your shoot. It is therefore good enough to point the sensor to the direction of your subject, but not
straight to the sun.
Check your connections before you start
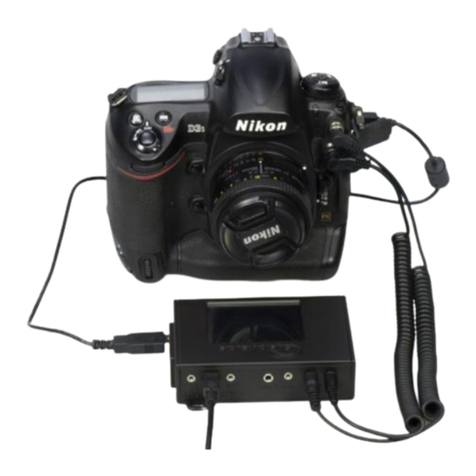
The RamperPro needs a lot of cables; especially when you are using two camera's. One of the most
important cables is the PC Sync cable. This cable is used to measure the exact exposure during Bulb.
A missing PC Sync cable, a badly connected one or even a broken cable will stop your sequence
because the RamperPro cannot work properly in bulb without a proper cable. You really don't want
your timelapse sequence to stop when the RamperPro switches to Bulb when something is wrong
with any cable. The trick is to test all connections before you start.
The easy way to test all cables is to set the start exposure value higher than the "start bulb mode"
value in the settings of the RamperPro. That way you force the device to use Bulb from the start. You
can then start an advanced sequence as a test. The RamperPro will give an error when any of the
required cables is not connected. You can even "tie" two camera's if you want to check if all cables
to the second camera are connected properly.
Don't forget to set the start exposure speed back to the desired value if you really want to start
ramping.
Take an extra SD card with you
The RamperPro depends on the software that is on the SD card. This means that if, for any reason,
the SD card gets corrupted you cannot use the unit. We therefore recommend to always bring a
second SD card.
A word about ISO values
Nikon cameras also support some L or H ISO values. The value of these ISO values cannot be used
with the RamperPro. The reason for this is that these values are not accurate. L1.0 on a D700 should
be ISO 100. But it is actually ISO 160. This means that the RamperPro cannot make accurate
calculations when you shift the ISO over these L of H ISO values. This is the reason why the
RamperPro will give an error if you want to use ISO 100 on a D700 for example.
How to switch to bulb and manual on Canon cameras
The RamperPro cannot switch automatically between normal shutter speeds and bulb on
many Canon cameras. This is due to the fact that bulb is a different setting and not a “special”
shutter speed as it is on all supported Nikon models. This means that you need to switch between
manual and bulb mode manually on Canon cameras. The RamperPro will indicate this with a popup.
Change the setting of your camera and press the touch screen afterwards.
© Elysia Productions. All rights reserved | Telephone +31 6 3473 9959 | email: [email protected] All shown prices are in
Euro's, including VAT and excluding shipping costs
About us - Contact us Page 1 of 4

Tips, Tricks and Frequently Asked Questions
Published on Elysia Visuals (http://www.elysiavisuals.com)
This is really not as bad as it seems. Suppose that you are ramping over a large number of stops
with the following parameters. Start shutter speed is 1/250th of a second and speed is 2 seconds and
you switch to bulb mode at 0.5 seconds. This will result in one switch from normal shutter speeds to
bulb speed when the exposure has reached a value of 0.5 seconds; you only have to switch mode
manually once with these settings when you use a Canon camera. All supported Nikon cameras are
fully controlled by the RamperPro; no manual intervention is needed. Some Nikon camera’s feature a
mode dial, but you will be notified by the RamperPro to set it to manual before you can start an
exposure ramping sequence.
Camera locks when connected to the USB port
Canon cameras seem to freeze when you connect them to the RamperPro via a USB
cable. You cannot change any settings on the camera and it will display “busy” on the display. The
RamperPro is actively forcing these cameras to accept external activities like changing from manual
to bulb on the 1DX for example. Canon cameras are only forced to do this when a timelapse
sequence is running. That is why you cannot change settings on your camera when the RamperPro is
in idle mode. We recommend disconnecting the USB cable when you want to configure your Canon
camera for a shoot. Wait until the RamperPro mentions that the USB connection is lost before you
reconnect your camera. This way you are sure that the RamperPro discovers your camera correctly
after you have reconfigured it. Settings like ISO and shutter speed are set by the RamperPro; so
there is no need to set them by hand upfront.
I don't see the correct images played back on the touch screen
This can happen on (Nikon) cameras with two memory cards. Please set the second card to overflow
and not to backup.
No image playback available on Nikon cameras
Nikon cameras don’t support playback on their own LCD screen when a USB cable is connected. This
means that you cannot check the individual images when they are taken by the camera. This is not a
limitation of the RamperPro. This is just how Nikon has implemented their cameras. It would
theoretically be possible to show the images on the touch screen of the RamperPro. We have chosen
not to do this in the current version of the firmware since that would mean that the images need to
be downloaded to the RamperPro via the USB cable, scaled and then displayed and all this within the
interval between two images.
Histogram mode uses jpeg images. Can the RamperPro handle RAW files
Yes, the RamperPro works when your camera is set to RAW. We use jpeg images for the histogram
analysis because it would take too much time to analyze RAW files. You can set your camera to RAW
+ jpeg during a shoot. The jpeg images are used for the histogram analysis, you can use the RAW
files to render the resulting timelapse movie.
© Elysia Productions. All rights reserved | Telephone +31 6 3473 9959 | email: [email protected] All shown prices are in
Euro's, including VAT and excluding shipping costs
About us - Contact us Page 2 of 4

Tips, Tricks and Frequently Asked Questions
Published on Elysia Visuals (http://www.elysiavisuals.com)
Does it take long to analyze the images?
Your interval needs to be long enough during histogram mode. The reason for this is that it takes
some time before an image is ready for analysis. Let's say that we have a shutterspeed of 2 seconds
and that it takes 3 seconds before the image is written to the memory card. In this case it takes 5
seconds after the start of the shot before the RamperPro can download and analyze the image.
Downloading and analyzing a 36MP jpeg from a D800 (in basic quality) only takes 2.5 seconds. This
means that in this example it takes at least 7.5 seconds from the beginning of the shot until the
analysis data is available. The bulk of this time is due to the nature of how digital camera's work.
This long interval can be limiting is some cases. We recommend to disable histogram mode if you
need a shorter interval. Just make sure to set the proper end exposure in this case. You could
determine this end exposure by doing a test shoot if you are able to do this. You can then determine
the proper end ISO and shutter speed that you need to set when you are not using histogram mode.
Set the correct aperture on Canon cameras
Popular Canon camera’s like the 5Dmkii and 5Dmkiii feature a dial that you need to physically turn
to choose manual or bulb mode. It can happen that the selected aperture differs between manual
and bulb mode. Please make sure that you set the same aperture in both the manual and bulb mode
of your camera before you start. Failure to do so will result in different exposures when you switch
from normal shutter speeds to bulb mode.
Properly setup your Canon dSLR
Make sure to set ‘External Speedlite control’ to “Enable”. You also need to make sure that the ISO
and shutterspeed steps are in 1/3 stop increments (and not in 1 stop increments). These are the
default values of your camera, so you are fine if you have never changed them on your camera.
How does the intervalometer work
The intervalometer of the RamperPro determines when its time to take the next image. There are a
few things that might be interesting to know about this. The intervalometer always starts counting
again as soon as the interval has expired. This means that the interval will start counting as soon as
a picture is taken. Let's say that we have set an interval of 8 seconds and a shutter speed of 5
seconds. A result of these setting is that the next image is taken 3 seconds after the exposure is
finished of the previous image.
It can happen that you have a situation where the shutter speed is larger than the interval. The
RamperPro will not stop when this is happening. In fact, the exposure ramper will still give good
results because all calculations will take this into account. The only effect will be that the interval will
be longer than expected because it will now become at least as long as the shutter speed that is
used. The error detecting system of the RamperPro will try, where possible, to warn upfront that
there is a possible collision between the interval and the shutter speed.
Which shutter speeds are calculated by the RamperPro
There is a shift in the shutter speeds that are used by the RamperPro. That is by design. This is
because, by default, the RamperPro will always make negative XMP corrections. So, suppose you
want a start shutter speed of 1/100. You will get 1/80 and a correction of -0.3 at the beginning of
your shoot.
The camera is not taking any pictures
© Elysia Productions. All rights reserved | Telephone +31 6 3473 9959 | email: [email protected] All shown prices are in
Euro's, including VAT and excluding shipping costs
About us - Contact us Page 3 of 4

Tips, Tricks and Frequently Asked Questions
Published on Elysia Visuals (http://www.elysiavisuals.com)
Check if you camera is not in auto focus mode because that could result on lost images if the camera
cannot focus properly. Is there a memory card in your camera? We recommend to set the camera to
manual focus and then focus manually on your subject. The preview mode of the RamperPro needs
two cables. You need to connect both the supplied trigger cable and the USB cable. This is done by
design to make sure that both cables are connected properly before you start your shoot. Note that
the current version of the preview mode doesn't work in Bulb mode. Set your camera to manual to
use the preview mode. Alwasy disable live view when you use the RamperPro. The camera will not
be triggererd properly when live view is enabled and your camera battery will be drained too during
long ramping shoots.
Source URL: http://www.elysiavisuals.com/content/tips-and-tricks-0
© Elysia Productions. All rights reserved | Telephone +31 6 3473 9959 | email: [email protected] All shown prices are in
Euro's, including VAT and excluding shipping costs
About us - Contact us Page 4 of 4
Other manuals for RamperPro
3
Table of contents
Other elysia Controllers manuals

