EmberGlo AR60 Operating instructions

Installation, Service Instructions & Parts
Quality Designed for Proven Performance Printed in USA
8471 11
AVOID ERROR IN PARTS SELECTION. When ordering use
complete EMBERGLO Part Number and Description. Furnish
Model Number, Bill of Material Number and Serial Number (if
available) from the specifi cation plate found on the product.
IMPORTANT: Availability of parts as well as specifi cations are
subject to change without notice. Please consult factory for
item availability.
SAFETY INFORMATION TERMS: The following terms are used to identify hazards, safety precaution of
special notations and have standard meanings throughout this manual. They are printed in all capital letters
using a bold type face as shown below, and preceded by the exclamation mark symbol. When you see the
safety alert symbol and one of the safety information terms as shown below, be aware of the hazard potential.
DANGER: Identifi es the most serious hazards which will result in severe personal injury or
death.
WARNING: Signifi es a hazard that could result in personal injury or death.
CAUTION: Identifi es unsafe practices which would result in minor personal injury or product and
property damage.
CAUTION: This steamer to be used with
distilled water only (demineralized). Without treated
water, deposits can build up in steam generators causing
reduced steam volume and eventual stoppage of steam
production. Clogged or limed steam generators caused
by use of non-distilled water will not be covered under the
terms of the warranty.
AR Series -Self Contained Water Reservoir and Pump - Stain-
less steel construction, Top injecting, portable, removable water
drawer, manual pump or timer, 6′ - 3 wire cord.
Special Note: The AR Series requires distilled or demineral-
ized water. Clogged or limed generators caused by use of
non-treated water will not be covered under the terms of the
warranty.
Specifi cations:
• 120 volts 60HZ AC 1500 watts, max 13 amp
• 240 volts 60HZ AC 1500 watts, max 6.3 amp
(240V model is Export Only and not UL listed)
• Manual water pump operation
• Closed generator
• Drawer style steamer
C
O
M
P
A
N
Y
R
E
G
I
S
T
E
R
E
D
EmberGlo
A Div of Midco® International Inc.
4140 West Victoria Street
Chicago, Illinois 60646
toll free 866.705.0514
tel 773.604.8700
fax 773.604.4070
web www.emberglo.com
e-mail [email protected]
Warranty Form must be fi lled in and returned to EmberGlo to
validate warranty. See warranty page for return instructions.
This manual contains suffi cient information for installation of the
EmberGlo Steamer in normal locations.
In the United States, installation must conform with local codes.
PURCHASER: Retain these instructions for future use.
Post in a prominent location near the steamer.
CAUTION: Cooking equipment should be used in
an environment protected by an automatic fi re suppression
system. Consult the National Fire Protection Association NFPA
Code 96 or the latest edition of Standards for Installation of
Equipment for Removal of Smoke and Grease-Laden Vapors
From Commercial Cooking Equipment.
WARNING: Improper installation, adjustment,
alteration, service or maintenance can cause property
damage, injury or death. Read the installation, operating
and maintenance instructions thoroughly before install-
ing or servicing this equipment.
Warranty
See the back of this manual for warranty.
This warranty does not apply to damages resulting from
accident, misuse, abuse or alteration.
No equipment may be returned without written authorization
from EmberGlo (or Midco) . Returned goods must be shipped
prepaid to the factory.
U
L
®
718
AR60
Front Open
Self Contained Water Supply
Counter Top Steamer
Two irds Size Pan
120V and 240V Models
(240V Model for Export ONLY)
AR60 Manual Operation with Water Pan 120V 5400400
AR60 Manual Operation with Water Pan 240V 5400406
Models Description Volts BOMs
2EmberGlo A Division of Midco International Inc 8471 11
Maintenance
Daily as Required
Operation
Installation 1. Position steamer on level surface and plug power cord into 3-hole 120 volt AC grounded
receptacle. If an adapter is used, it must be grounded properly.
2. Pull out water pan and fi ll with distilled (NOT HOT OR BOILING) water to 1/4″ from the top of
the water pan baffl es; then close drawer. Unit is now ready for operation.
3. No Hood Installation Required: According to the Uniform Mechanical Codes per the
International Conference of Building Offi cials Code EmberGlo Steamers do not require a
separate hood for vapor produced during operation. Also, there are no requirements in NSF
Standard 4 (2006e) for steamers to have ventilation.
__________________________________________
1. Move toggle switch to ON position. The pilot indicating light remains on at all times.
Allow 15-20 minutes to reach operating temperature.
2. Open food drawer, place food in pan; close drawer and operate lever as required per cooking
guide.
3. At end of time cycle, open drawer and remove food.
4. Keep drawer closed when not in use.
5. To shut off unit move toggle switch to OFF position.
Caution: Operate lever to the left and return to vertical position. Rapid repeated op-
eration will over steam the unit. The amount of steaming necessary is determined by the type
and amount of food to be heated. For more than one shot, wait 15 seconds between shots. A
“shot” is one operation of the lever.
__________________________________________
The food pan is removed by lifting up. Clean the inside thoroughly and wipe the outside to remove
any material which might have accumulated.
- To remove the food drawer, pull the drawer out until it stops, release stop located at rear
underside of drawer to unlock, and pull out the frame. Wipe the drawer and frame clean and
return by inserting the drawer slide into the slide of the frame, then push the food pan to the
rear until the lock engages automatically.
__________________________________________
DANGER: READ AND UNDERSTAND THIS BULLETIN THOROUGHLY BEFORE
STARTING ANY TROUBLE SHOOTING. AN INADVERTENT SERVICE ERROR COULD RESULT
IN SEVERE PERSONAL INJURY OR DEATH. ONLY A TRAINED EXPERIENCED SERVICE
TECHNICIAN SHOULD ATTEMPT ANY REPAIR PROCEDURE.
Qualifi ed serviced agencies are available at most locations - Refer to EmberGlo listing of
AUTHORIZED SERVICE AGENCIES included in Standard Equipment Catalog.
AR60 - Installation and Service
Service
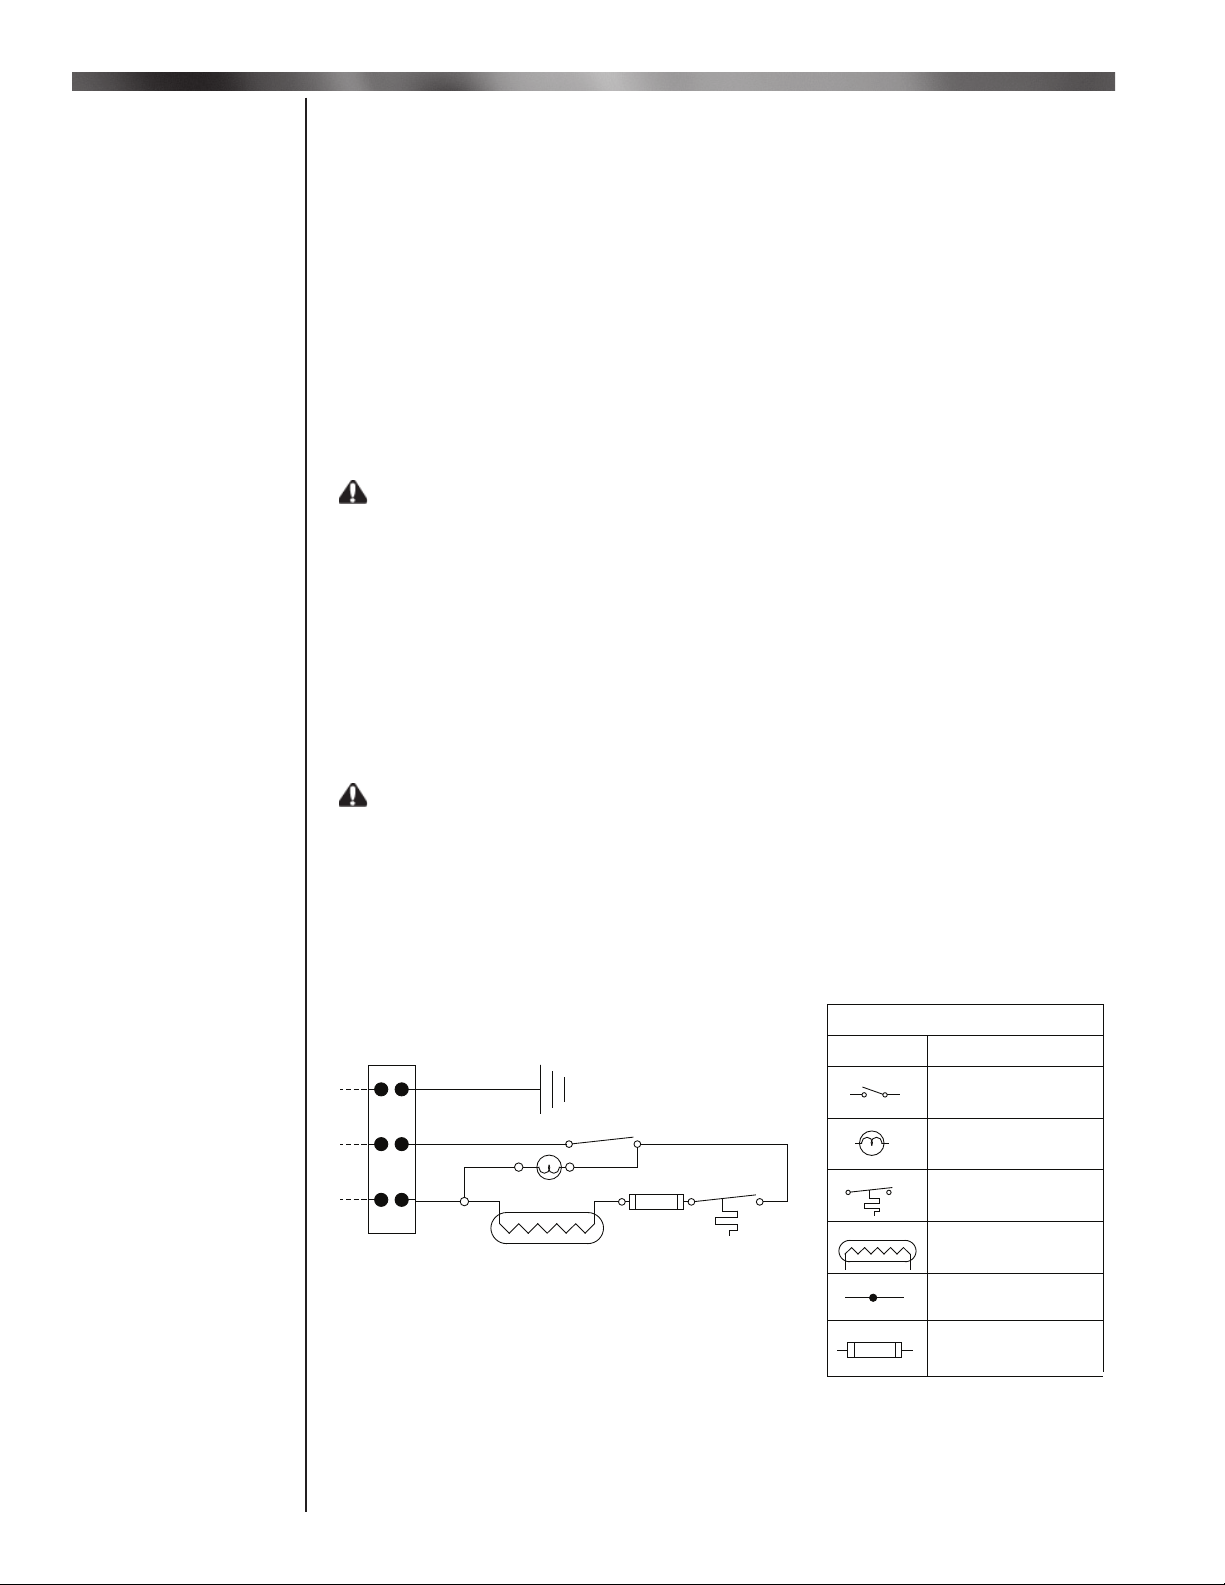
Figure 1. Wiring for AR60 Steamer
Service to be performed by qualified personnel only
L2
L1 Blk
G
Gnd
Blk
Wht
LEGEND
Symbol Description
Toggle Switch
Pilot Light
Thermostat
Generator
Over Heat
Protection Fuse
5646 10
Terminal Strip
E
Plug for 240 VAC to be Supplied by Installer
Material: (Outdoor/ Indoor Polyperm)
AR60 Wiring for
120/240 VAC Steamer

EmberGlo A Division of Midco International Inc
8471 11 3
AR60 - Service
Service
Continued
Note: Before attempting service, unplug power cord. For service or examination, all “working parts”
of the steamer are exposed by removing fi rst the cabinet top, then the back. The wiring diagram and
spare clean out gasket is located on inside of back.
Electric Switch/Thermostat
The on-off switch should audibly “click” when operated manually. To determine if electrically opera-
tive, a continuity check should be made.
- The thermostat is adjusted at the factory default setting. It is not recommended to re-adjust the
setting. If found defective it is recommended to replace.
Pump System
Operate pump lever and observe length of pump shaft travel. It should travel approximately 7/8″. If
travel is less, check for broken or disengaged pins, links, crank.
- Disconnect brass fi tting at water riser tube and bend tube up slightly so discharging water will
clear front of unit. Operate pump lever; water should shoot out about 15 feet. If water does
not shoot out, remove and inspect inlet tube assembly for leaks. Any air entering tube will break
the suction on the water. Check installation and alignment of dip tube spring as detailed under
next section. If water still doesn’t not shoot out, pump should be replaced.
- A strainer is located in the inlet tube at pump fi tting. Loosen fi tting and remove pump inlet tube.
Dump strainer out of tube and wash under running water, then replace.
Dip Tube and Spring
If the dip tube does not enter the water pan properly it must be replaced. When replacing, the open
end or point of hook must be at the bottom and the eye must be in a vertical plane, like a coin
standing on edge.
Steam Generator
1. To Clean. Remove cabinet top and generator insulation. This will expose a square plate on the
generator, which is removable for cleaning water passages.
- Check the three exposed holes when the clean-out cover is removed. If any of these holes
are clogged, clean them out by hand-twisting a 7/64″ drill for the center hole and a 3/16″
drill for the two side holes.
- After thoroughly cleaning the three holes, plug in power supply and operate lever to steam
unit. THE UNIT MUST BE HOT. Operate several times to blow out any accumulation.
- Replace the clean out cover, using new gasket. With the unit hot, operate lever. The unit
should steam properly. If it does not, and the pump is operative as detailed under PUMP
SYSTEM, the entire generator assembly is probably limed and must be disassembled and
cleaned or replaced.
- To clean generator assembly, separate casting from plate and clean lime from cavity
in casting.
Caution: Do not damage plate by scratching or polishing the fi nish.
2. Information on use of the overheat label (8451-98)
Caution: To prevent accidental shock, disconnect electrical plug from receptacle
before attempting service.
- An overheat label is located on the clean-out cover of the steam generator. The triangle in
the center of the label, as shown below, is normally gold color. This triangle turns black at 450° F,
indicating that the generator has overheated at least once. The operating temperature of the
generator should be between 350° and
400° F. If it is not, the thermostat should be
replaced.
Note: the overheat label will not return
to its original gold color once it has turned
black. It should be scraped off and replaced
so that the thermostat can be monitored at
all times. In addition, in the event that the
thermostat has to be replaced, it is important
to replace the label immediately afterwards
so that someone at a later inspection will not
suspect a faulty thermostat.
450
232
CF
CelsiDot
Overheat Label
Figure 2. Steam Generator Overheat Label Placement
4EmberGlo A Division of Midco International Inc 8471 11
3. To Remove.
- Disconnect the water riser tube.
- Disconnect electric wiring at the two terminals.
- Remove 16 hex nuts. Note: Remove food drawer and hold screws up to prevent turning.
- Lift off generator.
4. To Replace.
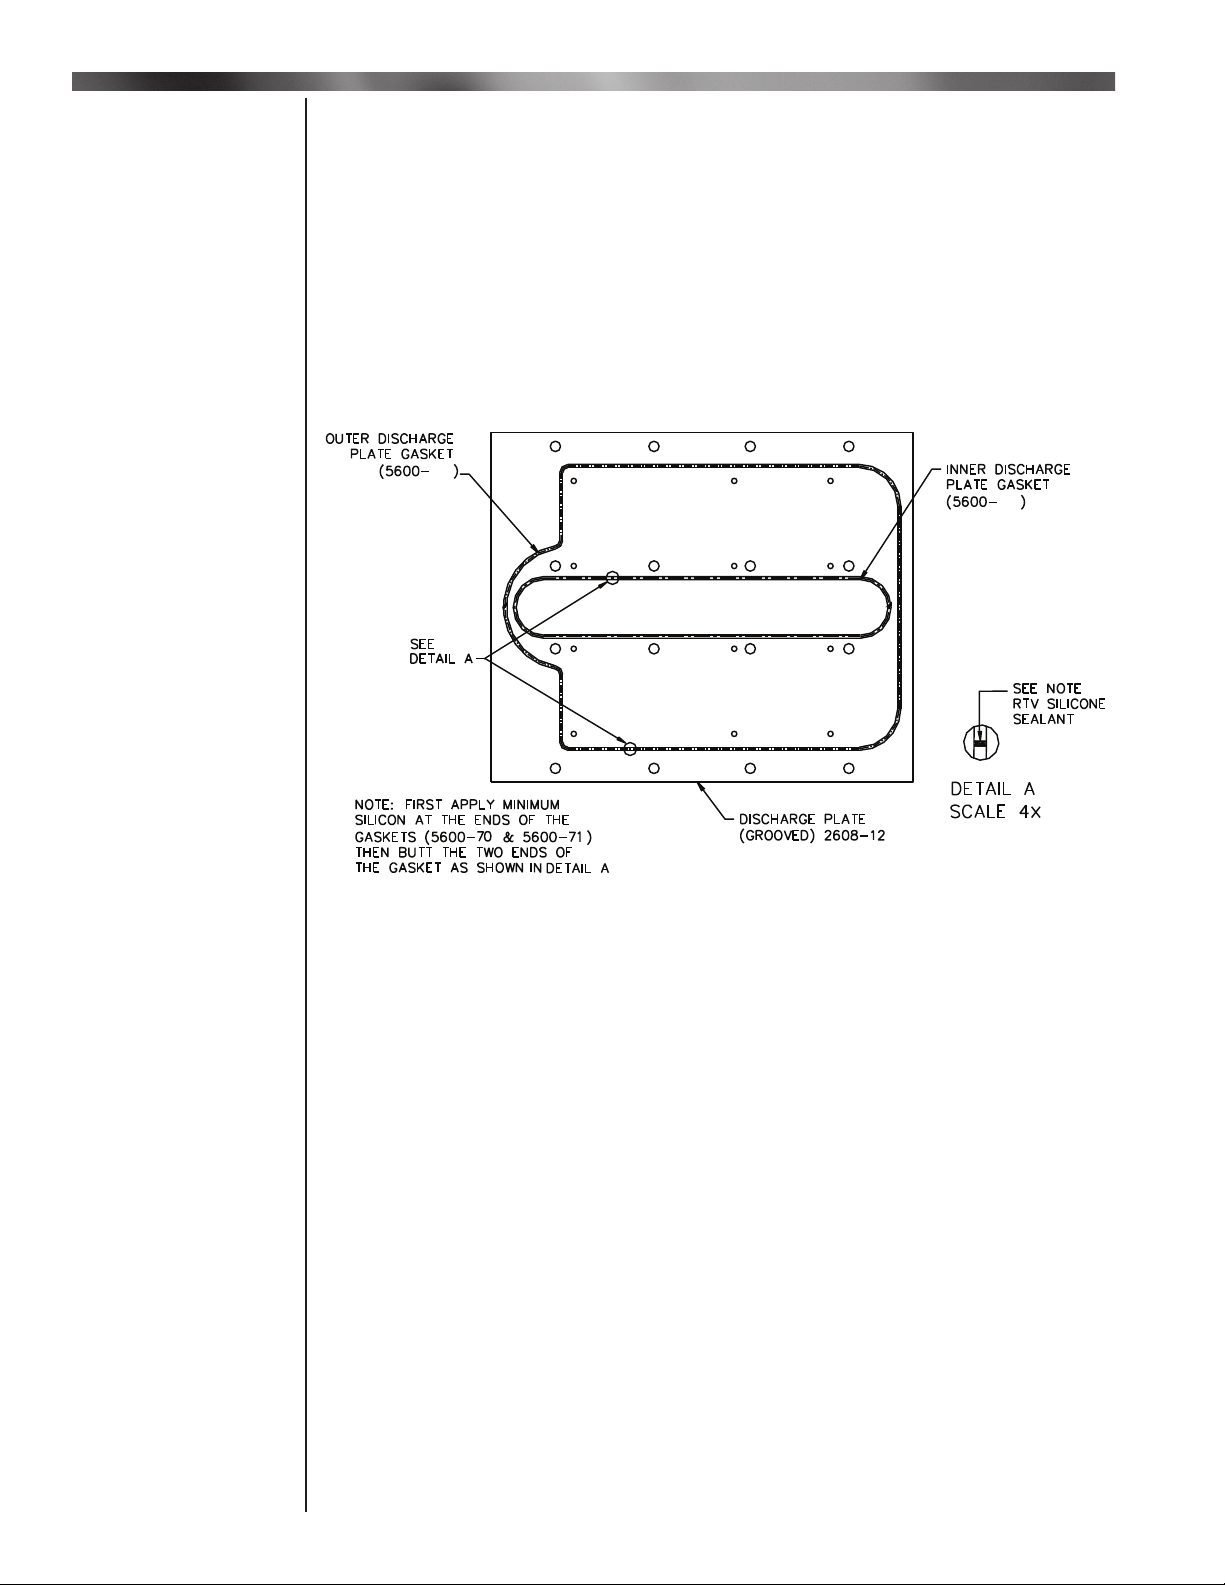
- Install the gaskets in the discharge plate grooves as shown in Figure 3.
- Place discharge plate & gasket assembly on the steamer (gasket facing up towards
generator) so that steam holes line up with the twelve round holes in steam chamber.
- Place the generator (#5655-90) on the above assembly so that mounting holes line up with
the sixteen round holes in the discharge plate. Tape the carriage bolts in place from inside
steam chamber and then tighten the nuts with lock washers. Remove all the tape.
__________________________________________
1. Unit will not heat up; light out.
a. No power.
b. Plug out.
c. Loose internal connection.
d. Defective switch.
2. Unit will not heat up; light on.
a. Defective thermostat.
b. Loose heating element connection.
c. Defective generator unit.
d. Defective thermal fuse or open
3. Unit heats up light will not light.
a. Defective light in switch.
b. Loose connection.
4. Unit heats up; does not steam.
a. No water in pan.
b. Defective pump.
c. Cam, pins or linkage broken or disengaged.
d. Leak in inlet tube.
e. Dip tube spring assembly misaligned.
f. Clogged steam generator.
Note: If electrical trouble is other than loose connections, it is recommended that parts be replaced
rather than repaired.
Trouble
Chart
Service
Continued
AR60 - Service and Trouble Shooting
LG
70
71
Figure 3. Generator Casting
EmberGlo A Division of Midco International Inc
8471 11 5
These suggestions are made only to help the operator get started. Since each location will
have diff erent portions and diff erent requirements, each operator must determine his own
operation habits. Please remember that the steamer conserves its steam in the drawer and
therefore does not often need repeated shots. The main exception is when frozen product
must be defrosted.
If a product is at room temperature or refrigerated, start with 2 shots. This ensures that the
food pan is full of steam.
If a product is frozen, start with 3 shots because condensation on the cold product eliminates
the steam quickly.
Cooking
Instructions
Heating and Cooking Guide
Breads Refrigerated Frozen
Bread 1 to 2 shots of steam 2 min
Bagels 1 to 2 min 3 to 4 min
Croissant 15 seconds
Muffi n 1-2 shots of steam
Pastries 1 to 2 min 3 to 4 min
Tamales 5 min 10 min
Tortillas 1 shot of steam 10 seconds
Eggs
Soft Boiled 6 min
Poached 3 min
Scrambled (dz) 5 min
Meat
Bratwurst 8 min 16 min
Breakfast sausage 8 min 14 min
Chicken breast (lg) 15 min 25 to 30 min
Chicken breast (precooked) 5 min 15 min
Deli meats 2 to 3 min
Hamburger (precooked) 4 min 4 min
Hot dogs 4 min 8 min
Italian sausage 4 min 8 min
Ribs (precooked) 10 min 18 min
Noodles and Rice
Macaroni (2 qt. cooked, 1 pt. water, 2 oz. oil) 5 min
Egg Noodles (2 qt. cooked, 1 pt. water, 2 oz. oil) 6 to 7 min
Rice (precooked) 5 min 8 to 10 min
Spaghetti (2 qt. cooked, 1 pt. water) 5 min
Vegetables Refrigerated Frozen
Artichokes 25 to 30 min 50 min
Asparagus 10 min 14 min
Brussels 15 min 18 min
Broccoli 10 min 12 min
Carrots sliced 4 min 8 min
Carrots whole baby (2 lb) 15 to 20 min
Caulifl ower 12 min 16 min
Corn on the cob 3 min 5 min
Fennel 10 min
Green beans 4 min 8 min
Pea pods 6 min 9 min
Peas 5 min 8 min
Potatoes 8 whole (3 oz each) 20 min
Potatoes mashed (2 qt) 8 min
Squash, Acorn 4 (8 oz each) 12 to 20 min
Squash, Zucchini -sliced frozen (1b) 10 Min
Seafood
Large clams 4 min 8 min
King crab 8 min 12 min
Snow crab 6 min 10 min
Fish fi lets 6 min 8 to10 min
Lobster 8 oz Tails 8 min 14 to16 min
Scallops 5 min 8 to10 min
Shrimp 4 min 6 min

6EmberGlo A Division of Midco International Inc 8471 11
DETAIL A
DETAIL B
A
B
1
3
4
25
29
28
24
25
26
27
23
22
21
6
20
19
8
18 17 16 15
9
10
13
12
11
14
7
AR60 Exploded View

7
Item Part # Description Qty Item Part # Description Qty
EmberGlo A Division of Midco International Inc
8471 11
AR60 Parts List
1 5600-73 General Gasket Kit 1
2 2641-00 Kit: Discharge Plate &
Generator – 120V 1
3 5601-90 Clean Out Cover 1
4 5602-20 Clean Out Gasket 1
5 5661-64 Spring Anchor Bracket 1
6 5676-50 AR60 Cabinet Top 1
7 5677-00 AR60 Cabinet Back 1
8 8423-43 On/Off Toggle Switch 1
9 8445-00 Ball Knob 1
10 8450-25 Leg Cushion 4
11 5615-02 Pump Handle 1
12 5648-01 Pilot Light Assembly 1
13 5600-30 Water Pan 1
14 5660-81 AR60 Right Cabinet Side 1
15 5686-00 Water Pan Baffl e 2
16 8445-01 Water Pan Knob 1
17 5678-00 Food Door 1
18 1435-01 Food Drawer Handle Assembly 1
19 5687-00 Door Liner/Gusset Assembly 1
20 5686-50 Food Drawer AR60 1
21 5683-50 Food Pan AR60 (2/3 Size) - 4″ 1
22 5682-50 Food Pan Grid 1
23 5660-80 AR60 Left Cabinet Side 1
24 5693-10R AR Dip Tube Assembly 1
25 5661-01 AR Pump Replacement Kit
(Includes: Bracket, Dip Tube
And Riser Tube Assemblies) 1
26 5659-65 Crank Replacement Kit 1
27 2625-30 Food Steamer Pump Spring 1
28 1412-41 Thermostat / Thermal Fuse Kit 1
29 5693-01 AR60 Riser Tube 1
Not Shown
2618-00M Power Cord (120V) 1
5600-67 Pump Shoulder Bolt Kit 1
5627-20 Clean Out Gasket Kit 1
5655-06 Generator 240V 1
5663-25 Pump Link 1
5663-50 Pump, Link, and Cam Assembly 1
8450-19 Nyliner 1
8451-44 Strainer 1
8457-46 Strain Relief 1
Steamer Accessories - Not Shown
1426-05 Handle (only) (for use with all baskets & racks)
5608-70 Three in 1 Basket Kit w/ Handle
5608-72 1/2 Size Basket w/ Handle
5608-73 Two of 1/4 Size Basket w/ Handle
5682-60 Tortilla Rack (Pita Rack)
8450-62 Steam Generator Cleaning Brush
2070610 Egg Poacher- 6 Cups
2070615 Egg Poacher- 4 Cups
Avoid error in parts selection. When ordering, use complete EmberGlo part number and description. Furnish model number,
bill of material number and date code or serial number from specifi cation plate.
IMPORTANT: Availability of parts as well as specifi cations are subject to change without notice. Please consult factory for item
availability.

8EmberGlo A Division of Midco International Inc
Warranty
Warranty
Return Instructions
Warranty
Midco® International Inc Limited Warranty Policy
Exclusions Terms, Customer Requirements and Instructions
All claims should be fi led through Warranty Central.
Call factory for information (773 604 8700)
Only Authorized Service Providers are authorized to provide Limited Warranty service on all EmberGlo®, a Division of
Midco® International Inc., food equipment as described under and Midco® International Limited Warranty Policy. A list of
providers can be found on our web site: www.emberglo.com
Provisions:
In lieu of an implied warranty, all repairs and replacement parts furnished under our Limited Warranty shall be f.o.b.
point of distribution, but the owner must pay the necessary freight, delivery and labor costs involved when required. Any
Federal, State or Local taxes are also extra. This Limited Warranty is eff ective for a period of twelve (12) months from
the date of installation, or 18 months from date of manufacture or whichever occurs first. EmberGlo® Char Broilers
and EmberGlo® Electric Food Preparation Equipment manufactured by Midco International, sold under the EmberGlo®
trademark, are guaranteed to be free from defect in material and workmanship under normal use and service for a for a
period of twelve (12) months from the date of installation, or 18 months from date of manufacture or whichever
occurs first. Midco’s obligation under this Limited Warranty Policy shall be limited to repairing or replacing, at our option,
any part of said equipment which Midco examination shall disclose to its satisfaction to be thus defective.
Exclusions:
This Limited Warranty Policy does not apply to damages resulting from accident, misuse, abuse or alteration, nor does
it apply to limed steam generators, nor does it apply to any consequential damages. Most geographical areas require
the use of distilled or demineralized water. Tap water is permissible only with ES Series Steamers. Nor does it apply to
Barbriq’s®, briquettes, or rods used in gas broilers. Midco’s obligation will be the replacement of the product or parts
removed.
Terms:
Under the terms of this Limited Warranty Policy, models considered portable (devices with cords and plug caps such
as EmberGlo Steamers) must be taken or returned to the nearest service provider, transportation prepaid, returned
transportation collect. Non-portable units with permanent wiring will be serviced on the customer’s premises. Under these
terms, Midco agrees, within the terms of this Limited Warranty period, to make all repairs at no charge by the authorized
service provider. Labor and mileage charges submitted by any other provider not authorized will be the responsibility of
the customer.
Customer Requirements:
All charges related to repairs made after the twelve (12) months from the date of installation, or 18 months from date
of manufacture, during the Limited Warranty period will be the responsibility of the customer
If a part is defective due to workmanship or materials and is removed from the product within the applicable warranty
period and returned to Midco in accordance with the following procedure described, Midco will, at its option, either repair
or replace the part.
Call the factory for Instructions on returned goods.
No equipment may be returned without written authorization from MIDCO / EMBERGLO. Returned goods must be
shipped prepaid to the factory.
WARNING: Improper installation and use of this product could result in personal or property injury.
TO VALIDATE WARRANTY:
FILL OUT THE FORM ON THE NEXT PAGE.
RETURN TO EMBERGLO
Keep for your records
Gas Broiler Electric Broiler Steamer Accessory
Model Number
Serial Number
Installation Date
Purchased from - Name:
Address
City, State, Zip
EmberGlo A Division of Midco International - 4140 West Victoria Street - Chicago, Illinois 60646
free: 866 705 0515 - tel: 773.604.8700 - fax: 773.604.4070 - web: www.emberglo.com - e-mail: [email protected] Printed in USA
8471 11
ISO
9001
C
O
M
P
A
N
Y
R
E
G
I
S
T
E
R
E
D
718
As an ISO 9001:2008 certified company, we proudly design, manufacture and assemble our products in Chicago, Illinois, USA.
Mail: EmberGlo
4140 W Victoria St
Chicago, IL 60646
Fax: 773 604 4070
Email: [email protected]

Warranty From
Warranty
Return Form
Warranty
Claims
Warranty
Midco® International Inc Limited Warranty Policy
Exclusions Terms, Customer Requirements and Instructions
All claims should be fi led through Warranty Central. Call factory for information (773 604 8700)
Fill out form and fax to 773 604 4070 or copy and mail to: EmberGlo A Division of Midco International
4140 West Victoria Street
Date of Purchase
End User Name
Company Name
Street & Apt. No.
City, State, Zip
Email Address
Web Address
Telephone
Fax
Gas Broiler Electric Broiler Steamer Accessory
Model Number
Serial Number
Installation Date
Purchased from - Name:
Address
City, State, Zip
8471 11
718

10 EmberGlo A Division of Midco International Inc
EmberGlo A Division of Midco International Inc.
Attn: Warranty Department
4140 West Victoria Street
Chicago, Illinois 60646
PLACE
STAMP
HERE
EmberGlo A Division of Midco International - 4140 West Victoria Street - Chicago, Illinois 60646
toll free: 866 705 0515 - tel: 773.604.8700 - fax: 773.604.4070 - web: www.emberglo.com - e-mail: [email protected]
Printed in USA
718
8471 11
ISO
9001
C
O
M
P
A
N
Y
R
E
G
I
S
T
E
R
E
D
Table of contents
Other EmberGlo Kitchen Appliance manuals


Popular Kitchen Appliance manuals by other brands


La Sommeliere
La Sommeliere LSBU51DB2 User instructions

Great Northern Popcorn
Great Northern Popcorn 6251 SS TWISTER STOVE TOP POPPER Assembly instructions

Speidel
Speidel 47014 operating instructions

Marta
Marta MT-FD1888 Series user manual

Conrad
Conrad 2362833 operating instructions

Aroma
Aroma ASP-610 user manual


