Ememe Tulip101 User manual

Tulip101 1
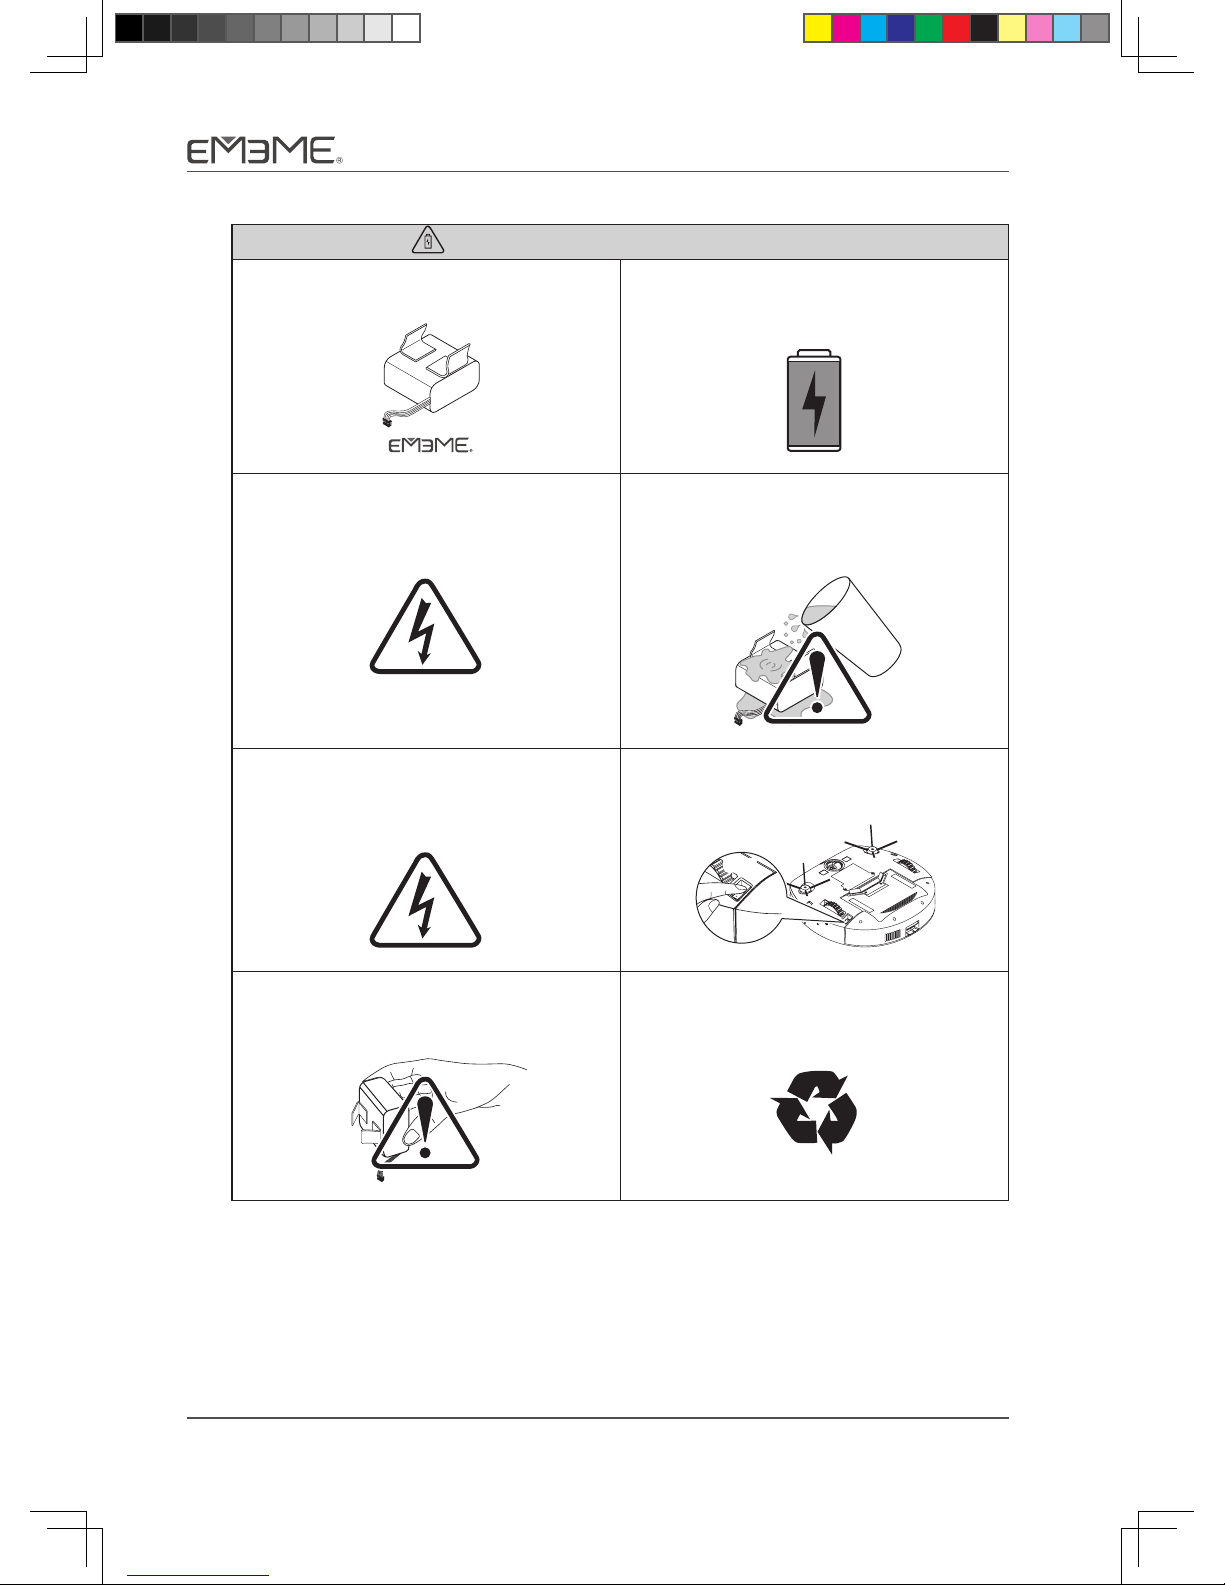
Safety Information
Be sure to read the following product safety information carefully and follow the
instructions, to avoid hazards such as fire, electric shock and personal injury, as well as
to prevent damage to the vacuum robot.
⽕ℶџ䷙
☿♑ǃ䳏䱾
䳏∴ᬙ䱰 ⠽储᧡າ ⽕ℶ∈⋫
Ҏવফڋ 5RERW⭄ᐌ᪡᧡າ
⊼ᛣџ䷙ 䳏∴Ⳍ䮰џ䷙
Avoid the following actions: Incorrect use of this product may cause serious
injury.
Do not disassemble this product, other than to
replace consumable parts, to avoid damaging
the product or risking hazards such as electric
shock.
0°C
45°C
ᢣ⾱→⁉⽪
≤┤⾱→⁉⽪
☮㏢䳶ລⴂ
ཚ䲭⾱→⁉⽪
ࠪ付࣐㇝九⁉⽪
・⟸ق䴫㐊 ⓛᓖ䀸⁉઼ࠪᓖ
䴫⊐/2*2 䴫⊐ᇩ䟿െ䮳䴫⣰
䀨䴫െ 䴫⊐≤▁☪
ᴤᨋെ⽪䆖⁉⽪ ഻䳋എ᭦LFRQ
⭘৫༃URERWк䜘⾱→⁉⽪
OFFOFF
Do not subject this product to excessive weight.
Exercise extra caution if used in the presence of
young children or pets at home; do not allow
them to step or sit on the vacuum cleaner.
0°C
45°C
ᢣ⾱→⁉⽪
≤┤⾱→⁉⽪
☮㏢䳶ລⴂ
ཚ䲭⾱→⁉⽪
ࠪ付࣐㇝九⁉⽪
・⟸ق䴫㐊 ⓛᓖ䀸⁉઼ࠪᓖ
䴫⊐/2*2 䴫⊐ᇩ䟿െ䮳䴫⣰
䀨䴫െ 䴫⊐≤▁☪
ᴤᨋെ⽪䆖⁉⽪ ഻䳋എ᭦LFRQ
⭘৫༃URERWк䜘⾱→⁉⽪
OFFOFF
This product is not waterproof! Users are
advised not to employ it in areas that
are wet, humid, or oily. Refrain from
attempting to clean the main unit with
any liquid.
0°C
45°C
ᢣ⾱→⁉⽪
≤┤⾱→⁉⽪
☮㏢䳶ລⴂ
ཚ䲭⾱→⁉⽪
ࠪ付࣐㇝九⁉⽪
・⟸ق䴫㐊 ⓛᓖ䀸⁉઼ࠪᓖ
䴫⊐/2*2 䴫⊐ᇩ䟿െ䮳䴫⣰
䀨䴫െ 䴫⊐≤▁☪
ᴤᨋെ⽪䆖⁉⽪ ഻䳋എ᭦LFRQ
⭘৫༃URERWк䜘⾱→⁉⽪
OFFOFF
This product is for indoor use only. To prevent its
infrared sensors from being affected by sunlight,
do not expose the unit to direct sunlight.
0°C
45°C
ᢣ⾱→⁉⽪
≤┤⾱→⁉⽪
☮㏢䳶ລⴂ
ཚ䲭⾱→⁉⽪
ࠪ付࣐㇝九⁉⽪
・⟸ق䴫㐊 ⓛᓖ䀸⁉઼ࠪᓖ
䴫⊐/2*2 䴫⊐ᇩ䟿െ䮳䴫⣰
䀨䴫െ 䴫⊐≤▁☪
ᴤᨋെ⽪䆖⁉⽪ ഻䳋എ᭦LFRQ
⭘৫༃URERWк䜘⾱→⁉⽪
OFFOFF
⽕ℶџ䷙
☿♑ǃ䳏䱾
䳏∴ᬙ䱰 ⠽储᧡າ ⽕ℶ∈⋫
Ҏવফڋ 5RERW⭄ᐌ᪡᧡າ
⊼ᛣџ䷙ 䳏∴Ⳍ䮰џ䷙
Precautions: Incorrect use of this product may cause injury or damage.
Before using this product, please ensure that the
filter is properly installed in the filter cartridge,
to prevent the blower fan from being damaged
by foreign objects drawn into the unit.
0°C
45°C
ᢣ⾱→⁉⽪
≤┤⾱→⁉⽪
☮㏢䳶ລⴂ
ཚ䲭⾱→⁉⽪
ࠪ付࣐㇝九⁉⽪
・⟸ق䴫㐊 ⓛᓖ䀸⁉઼ࠪᓖ
䴫⊐/2*2 䴫⊐ᇩ䟿െ䮳䴫⣰
䀨䴫െ 䴫⊐≤▁☪
ᴤᨋെ⽪䆖⁉⽪ ഻䳋എ᭦LFRQ
⭘৫༃URERWк䜘⾱→⁉⽪
OFFOFF
For best cleaning results, prevent foreign
objects from blocking the exhaust outlet.
0°C
45°C
ᢣ⾱→⁉⽪
≤┤⾱→⁉⽪
☮㏢䳶ລⴂ
ཚ䲭⾱→⁉⽪
ࠪ付࣐㇝九⁉⽪
・⟸ق䴫㐊 ⓛᓖ䀸⁉઼ࠪᓖ
䴫⊐/2*2 䴫⊐ᇩ䟿െ䮳䴫⣰
䀨䴫െ 䴫⊐≤▁☪
ᴤᨋെ⽪䆖⁉⽪ ഻䳋എ᭦LFRQ
⭘৫༃URERWк䜘⾱→⁉⽪
OFFOFF
This product will move by itself and perform
automatic cleaning. Be sure to remove or
clear away any power cords, extension cords,
slippers, and items that are fragile or could
easily be knocked over.
0°C
45°C
ᢣ⾱→⁉⽪
≤┤⾱→⁉⽪
☮㏢䳶ລⴂ
ཚ䲭⾱→⁉⽪
ࠪ付࣐㇝九⁉⽪
・⟸ق䴫㐊 ⓛᓖ䀸⁉઼ࠪᓖ
䴫⊐/2*2 䴫⊐ᇩ䟿െ䮳䴫⣰
䀨䴫െ 䴫⊐≤▁☪
ᴤᨋെ⽪䆖⁉⽪ ഻䳋എ᭦LFRQ
⭘৫༃URERWк䜘⾱→⁉⽪
OFFOFF
This product employs a rechargeable lithium
bat ter y. P lea se o per ate th e uni t in t he
temperature range of 0 – 45°C in order to
ensure that the battery remains in proper
working order.
0°C
45°C
ᢣ⾱→⁉⽪
≤┤⾱→⁉⽪
☮㏢䳶ລⴂ
ཚ䲭⾱→⁉⽪
ࠪ付࣐㇝九⁉⽪
・⟸ق䴫㐊 ⓛᓖ䀸⁉઼ࠪᓖ
䴫⊐/2*2 䴫⊐ᇩ䟿െ䮳䴫⣰
䀨䴫െ 䴫⊐≤▁☪
ᴤᨋെ⽪䆖⁉⽪ ഻䳋എ᭦LFRQ
⭘৫༃URERWк䜘⾱→⁉⽪
OFFOFF
2 Tulip101
⽕ℶџ䷙
☿♑ǃ䳏䱾
䳏∴ᬙ䱰 ⠽储᧡າ ⽕ℶ∈⋫
Ҏવফڋ 5RERW⭄ᐌ᪡᧡າ
⊼ᛣџ䷙ 䳏∴Ⳍ䮰џ䷙
Battery instructions: Usage and charging
Do not use batteries or power adapters other than
those provided by the manufacturer.
0°C
45°C
ᢣ⾱→⁉⽪
≤┤⾱→⁉⽪
☮㏢䳶ລⴂ
ཚ䲭⾱→⁉⽪
ࠪ付࣐㇝九⁉⽪
・⟸ق䴫㐊 ⓛᓖ䀸⁉઼ࠪᓖ
䴫⊐/2*2 䴫⊐ᇩ䟿െ䮳䴫⣰
䀨䴫െ 䴫⊐≤▁☪
ᴤᨋെ⽪䆖⁉⽪ ഻䳋എ᭦LFRQ
⭘৫༃URERWк䜘⾱→⁉⽪
OFFOFF
Please full charge the battery before using it for
the first time. Check whether the power adapter
specifications match those of the household
outlet.
0°C
45°C
ᢣ⾱→⁉⽪
≤┤⾱→⁉⽪
☮㏢䳶ລⴂ
ཚ䲭⾱→⁉⽪
ࠪ付࣐㇝九⁉⽪
・⟸ق䴫㐊 ⓛᓖ䀸⁉઼ࠪᓖ
䴫⊐/2*2 䴫⊐ᇩ䟿െ䮳䴫⣰
䀨䴫െ 䴫⊐≤▁☪
ᴤᨋെ⽪䆖⁉⽪ ഻䳋എ᭦LFRQ
⭘৫༃URERWк䜘⾱→⁉⽪
OFFOFF
If the power jack or the plug of the power
adapter is loose or damaged, refrain from
plugging the unit into the power outlet.
0°C
45°C
ᢣ⾱→⁉⽪
≤┤⾱→⁉⽪
☮㏢䳶ລⴂ
ཚ䲭⾱→⁉⽪
ࠪ付࣐㇝九⁉⽪
・⟸ق䴫㐊 ⓛᓖ䀸⁉઼ࠪᓖ
䴫⊐/2*2 䴫⊐ᇩ䟿െ䮳䴫⣰
䀨䴫െ 䴫⊐≤▁☪
ᴤᨋെ⽪䆖⁉⽪ ഻䳋എ᭦LFRQ
⭘৫༃URERWк䜘⾱→⁉⽪
OFFOFF
If the battery comes into contact with water,
juice, or other liquids, turn off the unit's main
power switch immediately and remove the
battery that has been exposed to moisture.
0°C
45°C
ᢣ⾱→⁉⽪
≤┤⾱→⁉⽪
☮㏢䳶ລⴂ
ཚ䲭⾱→⁉⽪
ࠪ付࣐㇝九⁉⽪
・⟸ق䴫㐊 ⓛᓖ䀸⁉઼ࠪᓖ
䴫⊐/2*2 䴫⊐ᇩ䟿െ䮳䴫⣰
䀨䴫െ 䴫⊐≤▁☪
ᴤᨋെ⽪䆖⁉⽪ ഻䳋എ᭦LFRQ
⭘৫༃URERWк䜘⾱→⁉⽪
OFFOFF
Use the adapter in a safe environment and plug
in the unit properly. To avoid the risk of electric
shock, do not expose the metallic portions of
the plug.
0°C
45°C
ᢣ⾱→⁉⽪
≤┤⾱→⁉⽪
☮㏢䳶ລⴂ
ཚ䲭⾱→⁉⽪
ࠪ付࣐㇝九⁉⽪
・⟸ق䴫㐊 ⓛᓖ䀸⁉઼ࠪᓖ
䴫⊐/2*2 䴫⊐ᇩ䟿െ䮳䴫⣰
䀨䴫െ 䴫⊐≤▁☪
ᴤᨋെ⽪䆖⁉⽪ ഻䳋എ᭦LFRQ
⭘৫༃URERWк䜘⾱→⁉⽪
OFFOFF
If the product will not be used for an extended
period of time, we recommend turning off the
main power switch before placing it in storage.
0°C
45°C
ᢣ⾱→⁉⽪
≤┤⾱→⁉⽪
☮㏢䳶ລⴂ
ཚ䲭⾱→⁉⽪
ࠪ付࣐㇝九⁉⽪
・⟸ق䴫㐊 ⓛᓖ䀸⁉઼ࠪᓖ
䴫⊐/2*2 䴫⊐ᇩ䟿െ䮳䴫⣰
䀨䴫െ 䴫⊐≤▁☪
ᴤᨋെ⽪䆖⁉⽪ ഻䳋എ᭦LFRQ
⭘৫༃URERWк䜘⾱→⁉⽪
OFFOFF
Do not disassemble the battery. Please refer
to [FAQ] and [Battery Installation] for battery
replacement information and instructions.
0°C
45°C
ᢣ⾱→⁉⽪
≤┤⾱→⁉⽪
☮㏢䳶ລⴂ
ཚ䲭⾱→⁉⽪
ࠪ付࣐㇝九⁉⽪
・⟸ق䴫㐊 ⓛᓖ䀸⁉઼ࠪᓖ
䴫⊐/2*2 䴫⊐ᇩ䟿െ䮳䴫⣰
䀨䴫െ 䴫⊐≤▁☪
ᴤᨋെ⽪䆖⁉⽪ ഻䳋എ᭦LFRQ
⭘৫༃URERWк䜘⾱→⁉⽪
OFFOFF
Please recycle used batteries properly, to
prevent pollution to the environment and
violation of the Waste Disposal Act.
0°C
45°C
ᢣ⾱→⁉⽪
≤┤⾱→⁉⽪
☮㏢䳶ລⴂ
ཚ䲭⾱→⁉⽪
ࠪ付࣐㇝九⁉⽪
・⟸ق䴫㐊 ⓛᓖ䀸⁉઼ࠪᓖ
䴫⊐/2*2 䴫⊐ᇩ䟿െ䮳䴫⣰
䀨䴫െ 䴫⊐≤▁☪
ᴤᨋെ⽪䆖⁉⽪ ഻䳋എ᭦LFRQ
⭘৫༃URERWк䜘⾱→⁉⽪
OFFOFF
If you have any questions regarding the use of this product, contact your local vendor.
∗

Tulip101 3
Package Contents
Vacuum cleaner unit
(with battery)
Charger Power adapter Cleaning brush
(installed on vacuum
cleaner dustbin)
Nano Silver HEPA filter
(consumable)
Side brush
(consumable)
(installed on vacuum
cleaner unit)
Remote control
(battery included)
High-efficiency
cleaning cloth
(consumable)
Quick Start Guide
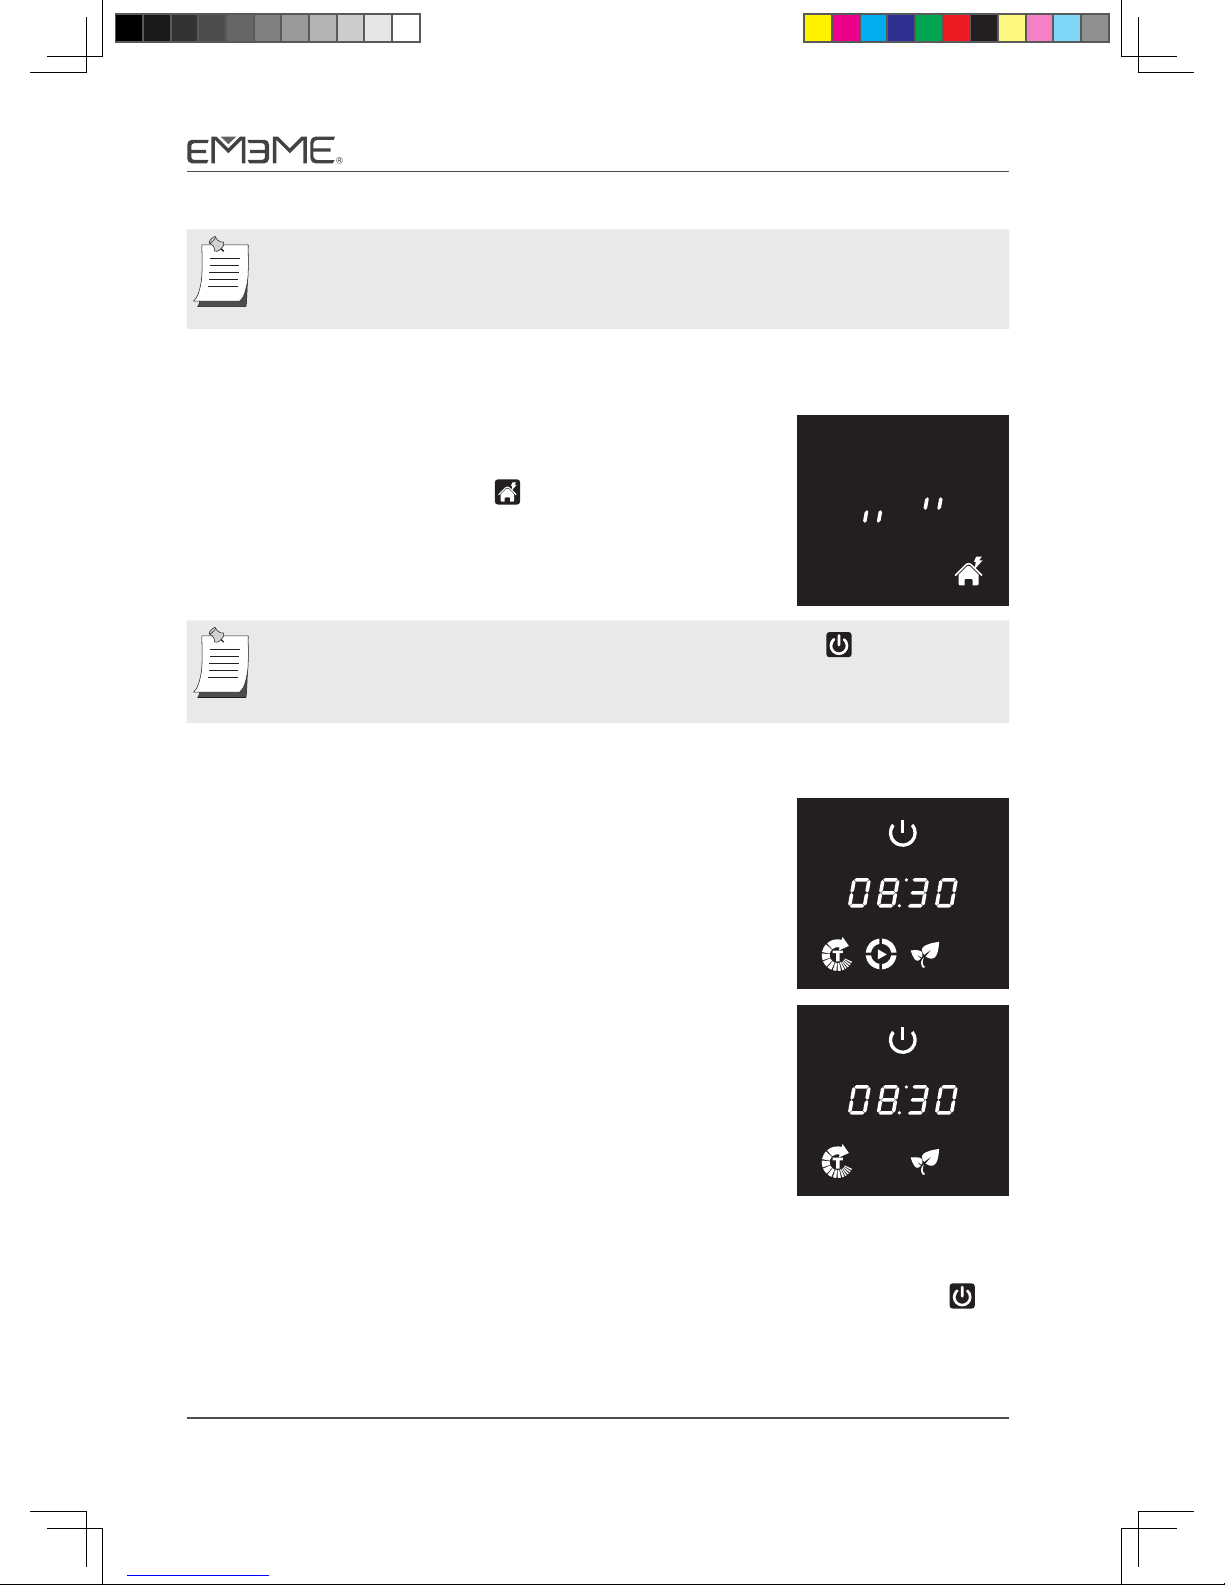
Using Tulip for the FirstTime
ONON
1 . Turn on the main power switch
2. Charging the robot: Follow the instructions outlined in the
"Installing the Charger" section to the right and install
the charger properly.Then place the robot manually on the
charging base to begin charging.
At this p oint the "Power Button " will beg in to flash.Allow
the robot to be fully charged until the indicator light on the
"Power Button " is fully illuminated.
3. Press the "Sweep Button " to start the robot's automatic
sweeping function
The default cleaning time of Tulip is 30 minutes. You can
also manually set the start time and the duration of the
sweeping function. For more information, consult the
"Setting the time and scheduled cleaning" section in the
User Manual.
Sweep mode
Tu r n o n t h e p o w e r s w i t c h a n d t h e m a c h i n e w i l l p l a y a t u n e . T h e n
p r e s s t h e " S w e e p B u t t o n " b u t t o n t o b e g i n c l e a n i n g .
If no actionsare taken after 10 seconds, the robotwill enter the
po we r-s avin g mo de. The r ob ot w ill re su me ope rati on w hen th e
"P o w e r B u t t o n " i s p r e s s e d .
Pressingthe"PowerButton " whil e th e rob ot is
sweeping will cause the unit to pause. The robot will
resume cleaning if there are no further instructions after
three seconds.
Vacuum Robot
User Manual Quick Start Guide
4 Tulip101
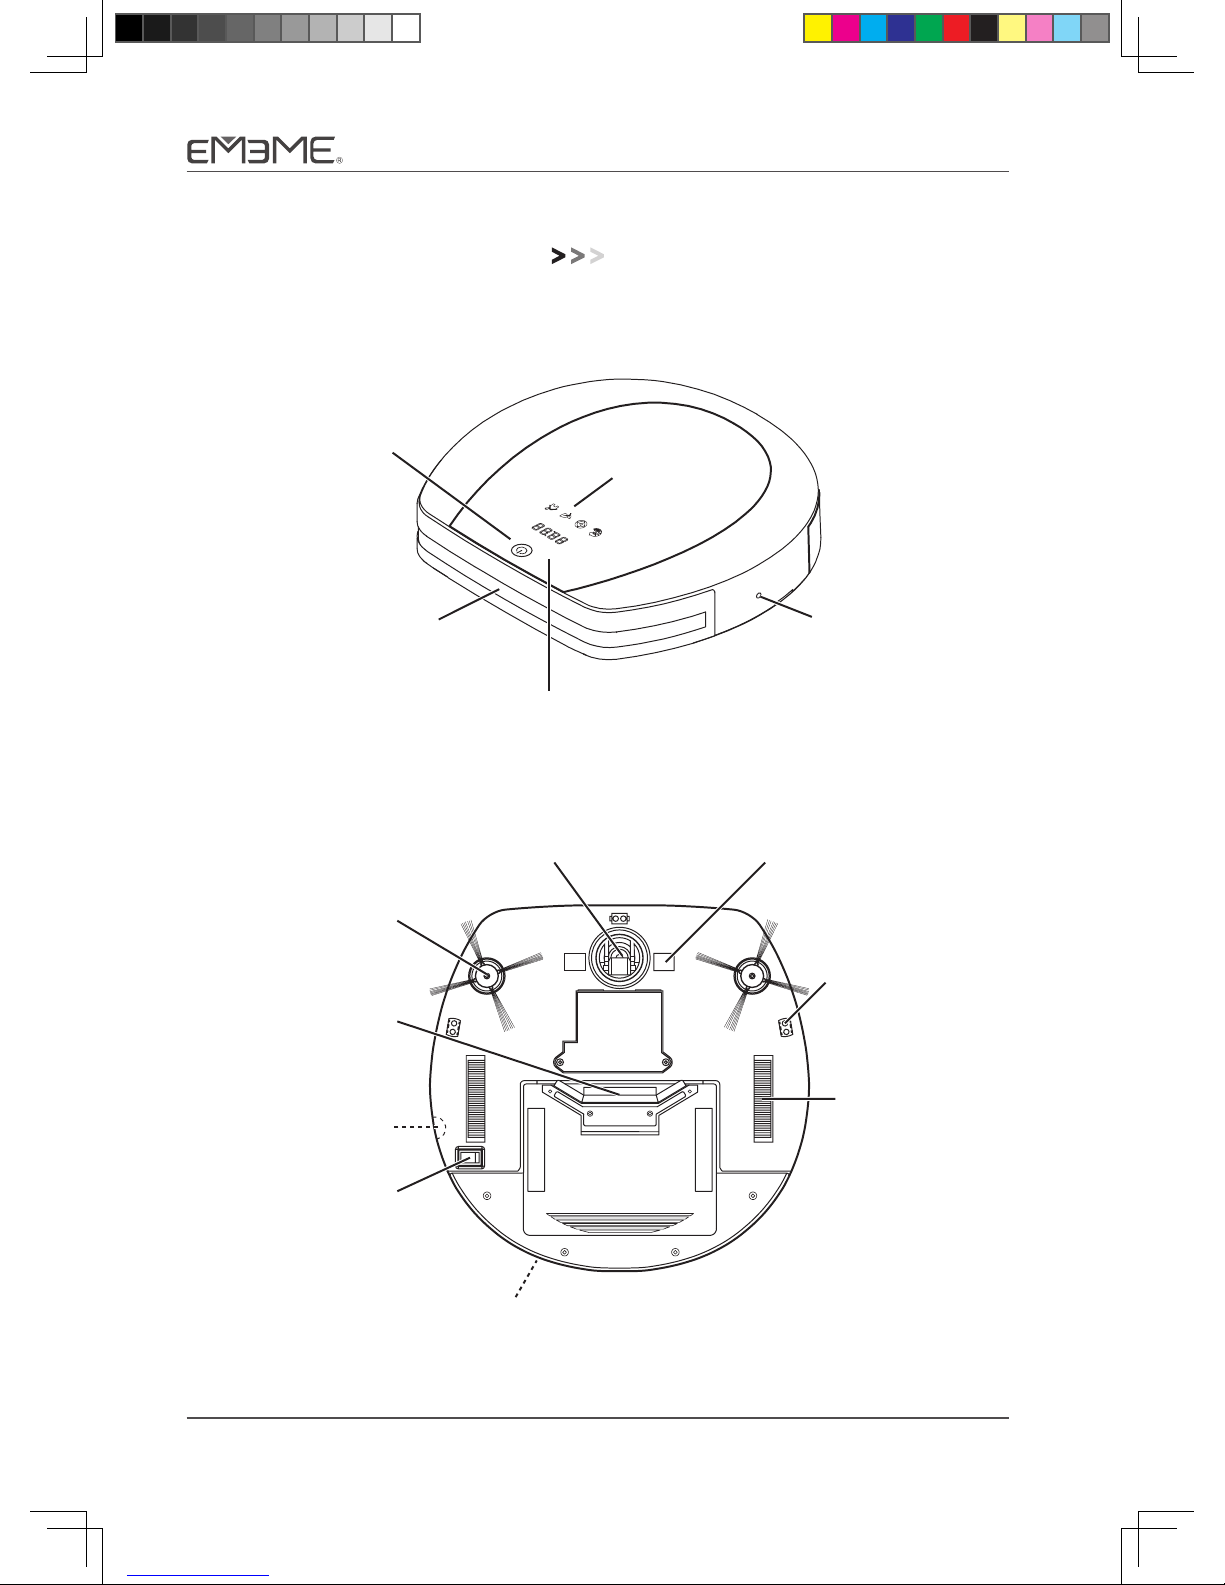
Product Overview
Vacuum cleaner unit
Power jack
Exhaust port
Side brush
Wheels
Multi-direction
wheel
Battery
bay
Suction inlet
Main power
switch
Charging
contact
Ground
sensor
Obstacle sensor
Remote sensor
Charger
sensor
Power button Display panel

Tulip101 5
Dustbin
Filter cartridge
Cleaning
brush
Filter
Dustbin collector Press switch
Filter cover
6 Tulip101
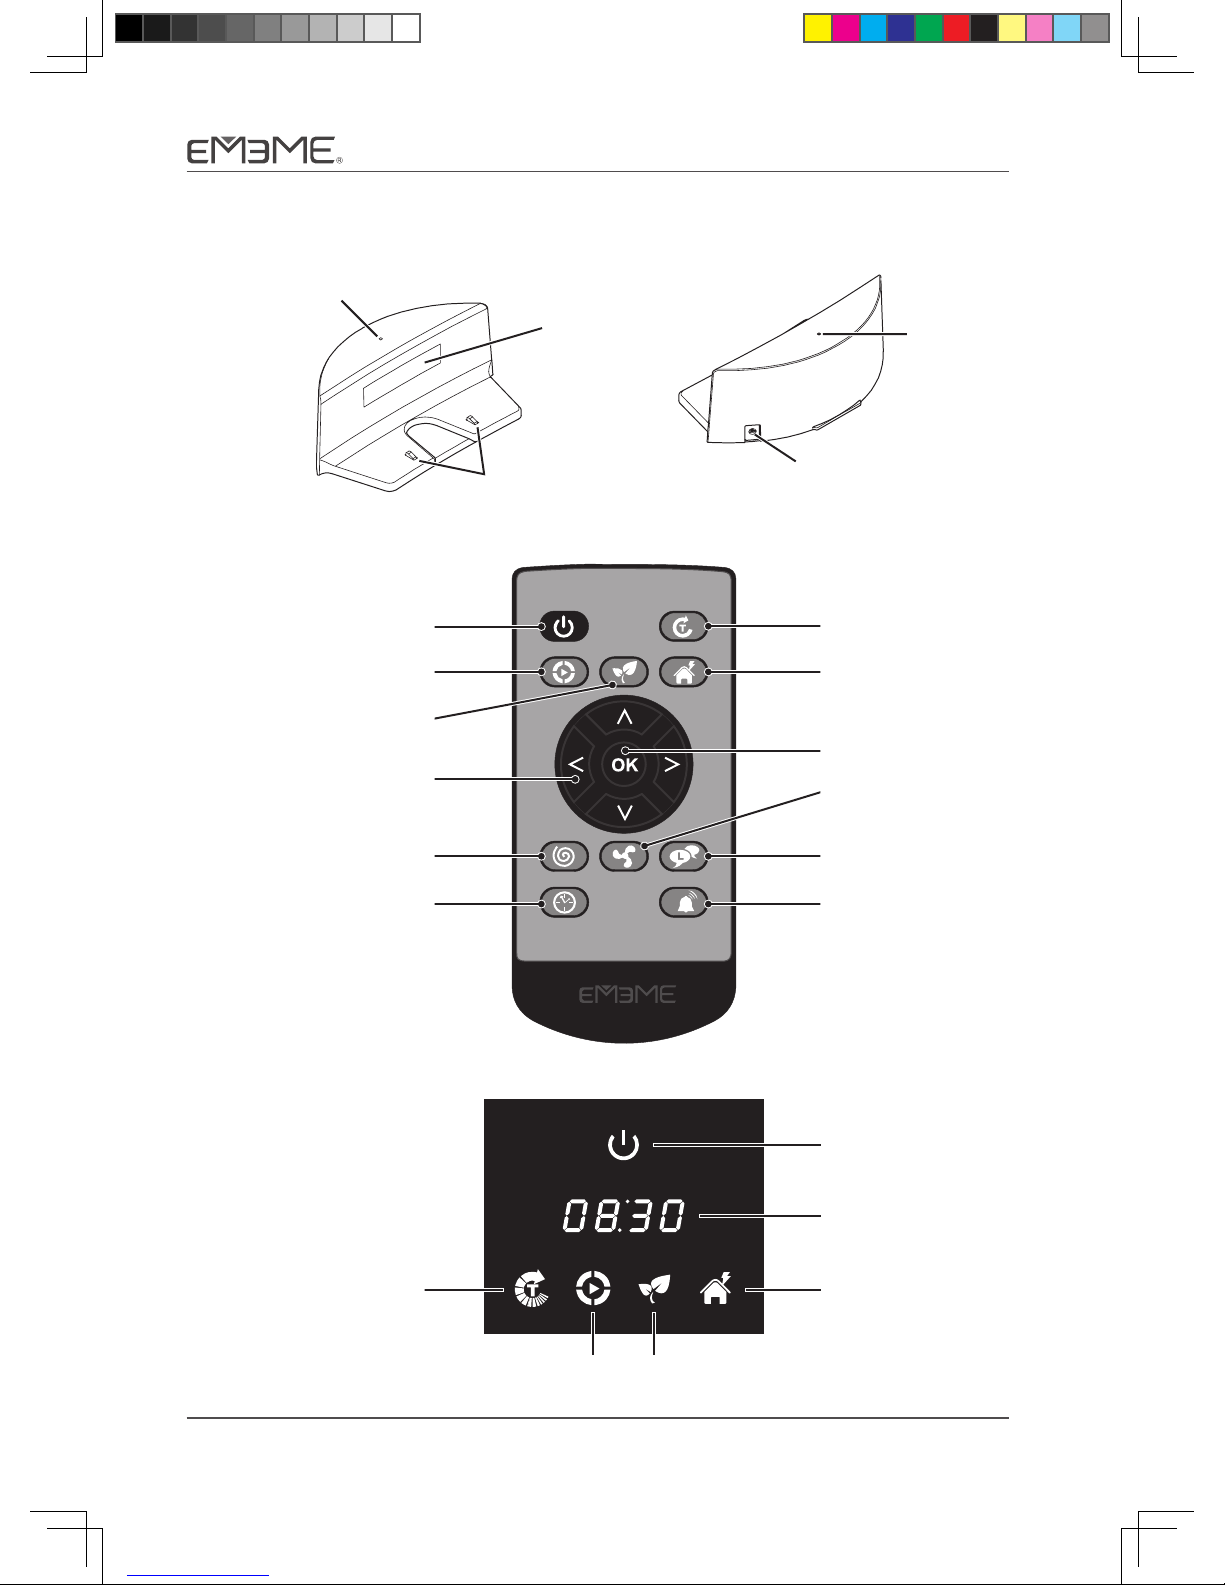
Charger
Status indicator
Charging contact
IR window
Power jack
Status
indicator
Remote control
PowerTime
Sweep Negative Ion Dock
Spiral Vacuum Language
Clock Schedule
Power button
Auto cleaning
button
Negative-ion
button
Direction/Selection
button
Spiral button
Clock settings
button
Timer button
Docking button
OK button
Vacuum button
Language settings
Scheduled
cleaning button
Panel Display
Timer button
Auto cleaning
button
Negative-ion
button
Clock/working
time
Power button
Docking button

Tulip101 7
When using Tulip101 for the first time,
please refer to the Quick Start Guide.
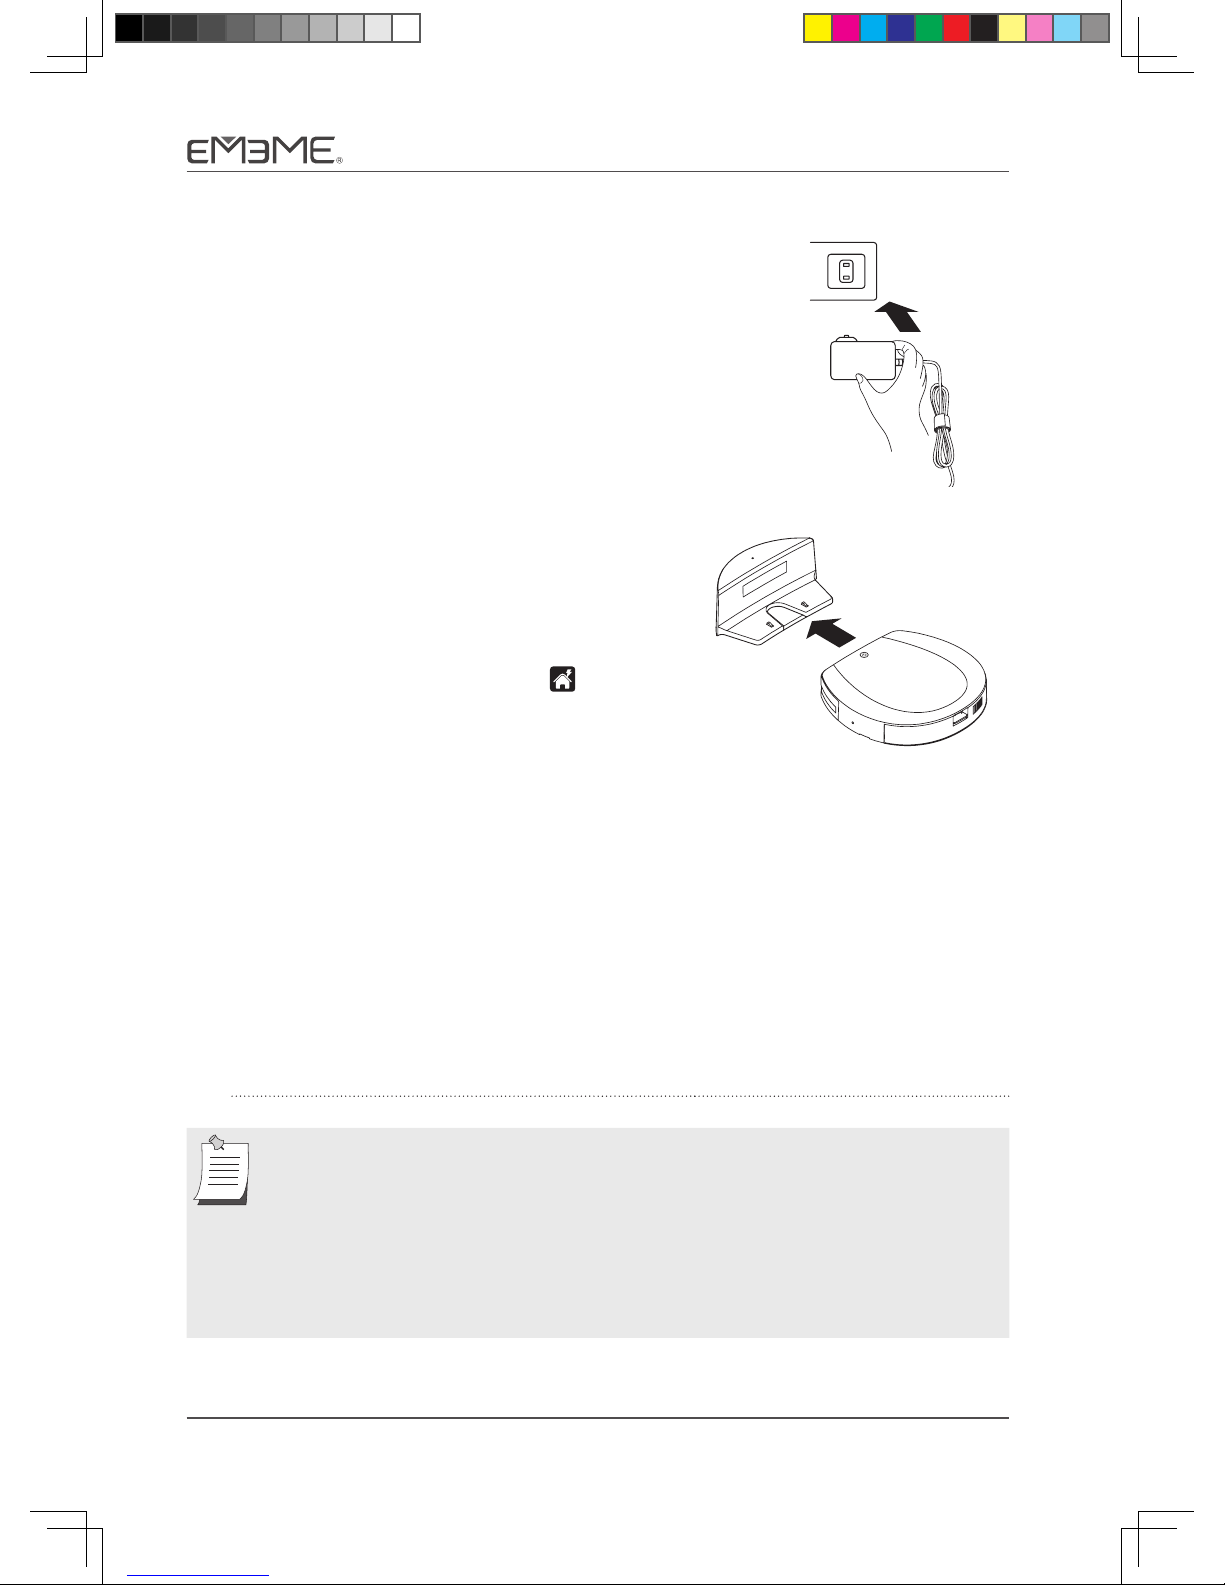
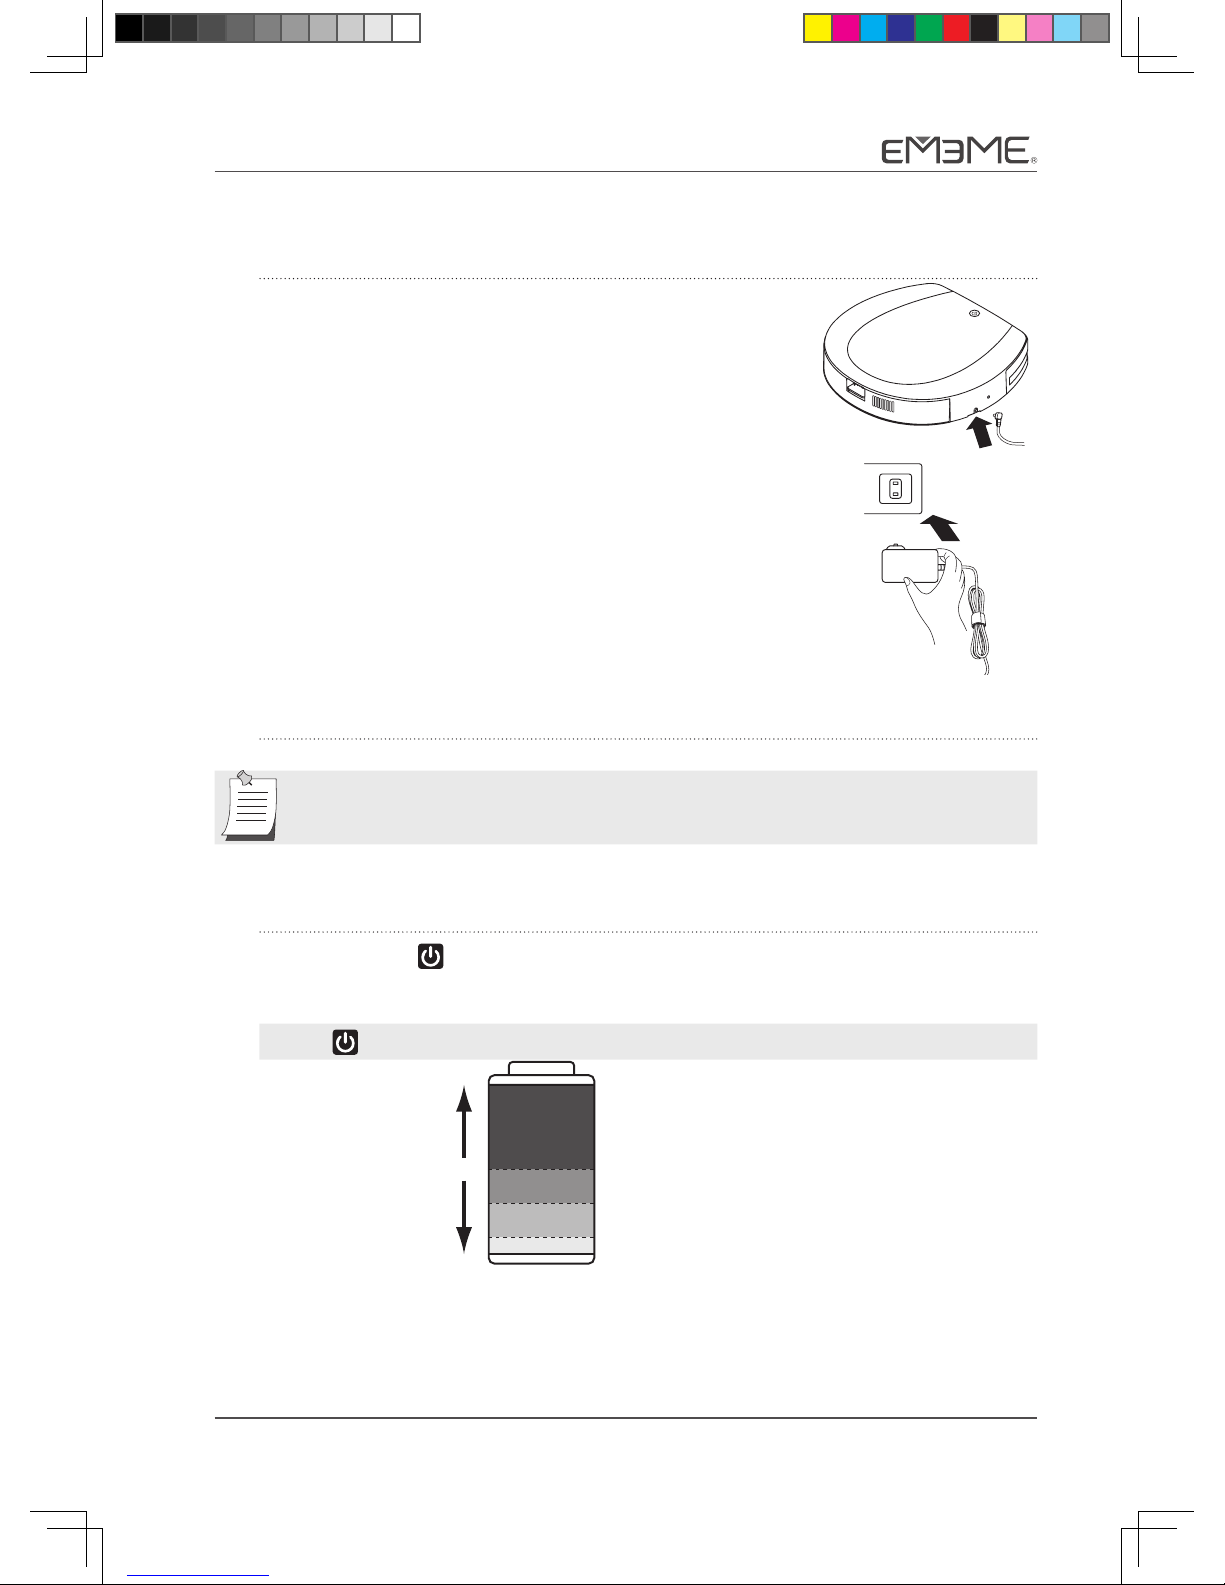
Charging the Product
Before charging, ensure that the battery is properly installed. This unit can be charged
with either the charger or the adapter:
Charging in the charger
Find the most suitable location for the charger.
1. Place the charger on a level surface parallel
to a wall. An ideal location is to the lower
right of the power outlet or immediately
below it. In addition, make sure the charger
is clear of all objects 50cm to the sides and
100cm directly in front.
50cm 50cm
100cm
50cm 50cm
100cm
2. Insert the DC end of the power adapter into
the back of the charger. Please properly
bundle up the cables to avoid tripping the
vacuum robot while it is in motion.
8 Tulip101
3. Insert the AC end of the power adapter
into the electrical outlet.
4. Manual charging: Place the vacuum robot
on the charger and ensure that the charging
contact on the underside of the unit is in
contact with the charging contact of the
charger.
Auto charging: Use the
2/Qpxfs!po0pgg
3/Txffq!Ujnf
5/Ofhbujwf!Jpot
4/Bvup
6/Epdljoh
2/Vq
3/Epxo
5/Sjhiu
4/Mfgu
6/Foufs
7/Tqsjbm
9/Tdifevmjoh
8/Dmpdl
:/Wbdvvn
21/Mbohvbhf
button on
the remote control and display panel to
return the vacuum robot to the charger
automatically (the main power switch must
first be turned on).
5. Make sure that the status indicator of the charger is functioning
correctly.
Not lit: Make sure the power adapter is properly installed and check to see if the external
power supply is working properly.
Fully lit: Normal.
Flashing: This indicates a short-circuit. Remove the power cord and any objects near the
charger and reconnect the cord.
6. When the unit begins to play the
Begin Charging music
, battery charging has
started.
• Wheninstallingthecharger,payattentiontothesurroundingsandangleas
well as the recommended clearance radius, and check to see if the power
adapter cable is properly bundled.
• Ifthevacuumrobothaslessthan30%batterypowerduringthevacuuming
process, it will automatically return to the charger to recharge itself.
• Iftheworkingtimeissettoinfinite,thevacuumrobotwillremoveitselffrom
the charger after a full recharge and continue to carry out its cleaning task.
Tulip101 9
Adapter charging
1. Plug the DC end of the power adapter into
the power jack on the right side of the
vacuum robot.
2. Insert the AC end of the power adapter
into the electrical outlet.
3. When the unit begins to play the
Begin Charging music
, battery charging has
started.
The unit will be charged even when the main power switch is set to off.
Charging status indicator
The power button
2/Qpxfs!po0pgg
3/Txffq!Ujnf
5/Ofhbujwf!Jpot
4/Bvup
6/Epdljoh
2/Vq
3/Epxo
5/Sjhiu
4/Mfgu
6/Foufs
7/Tqsjbm
9/Tdifevmjoh
8/Dmpdl
:/Wbdvvn
21/Mbohvbhf
will flash in three different frequencies depending on the amount of
battery power remaining:
2/Qpxfs!po0pgg
3/Txffq!Ujnf
5/Ofhbujwf!Jpot
4/Bvup
6/Epdljoh
2/Vq
3/Epxo
5/Sjhiu
4/Mfgu
6/Foufs
7/Tqsjbm
9/Tdifevmjoh
8/Dmpdl
:/Wbdvvn
21/Mbohvbhf
Battery level
Fully lit: Charging
complete
100%
50%
30%
10%
Battery fully charged
Slow flash:
Approx. once per
second
Normal
Fast flash: Approx.
4 times per second
Power is nearly depleted; vacuum robot will
enter return-home mode, except for when it is
in negative-ion mode
Low battery; robot entering power-saving
mode.

10 Tulip101
Operating Instructions
Main display panel operations
2/Qpxfs!po0pgg
3/Txffq!Ujnf
5/Ofhbujwf!Jpot
4/Bvup
6/Epdljoh
2/Vq
3/Epxo
5/Sjhiu
4/Mfgu
6/Foufs
7/Tqsjbm
9/Tdifevmjoh
8/Dmpdl
:/Wbdvvn
21/Mbohvbhf
Power button: Wakes up robot from power-saving mode or to enter power-saving
mode.
2/Qpxfs!po0pgg
3/Txffq!Ujnf
5/Ofhbujwf!Jpot
4/Bvup
6/Epdljoh
2/Vq
3/Epxo
5/Sjhiu
4/Mfgu
6/Foufs
7/Tqsjbm
9/Tdifevmjoh
8/Dmpdl
:/Wbdvvn
21/Mbohvbhf
Timer button: Sets robot cleaning time for 15, 30, 45, 60, 80, or 100 minutes, or
unlimited (- -).
2/Qpxfs!po0pgg
3/Txffq!Ujnf
5/Ofhbujwf!Jpot
4/Bvup
6/Epdljoh
2/Vq
3/Epxo
5/Sjhiu
4/Mfgu
6/Foufs
7/Tqsjbm
9/Tdifevmjoh
8/Dmpdl
:/Wbdvvn
21/Mbohvbhf
Auto cleaning button: Robot will automatically switch cleaning modes and direction
depending on the operating environment. Negative ions are also released during
auto cleaning.
2/Qpxfs!po0pgg
3/Txffq!Ujnf
5/Ofhbujwf!Jpot
4/Bvup
6/Epdljoh
2/Vq
3/Epxo
5/Sjhiu
4/Mfgu
6/Foufs
7/Tqsjbm
9/Tdifevmjoh
8/Dmpdl
:/Wbdvvn
21/Mbohvbhf
Negative-ion button: The machine functions as a negative-ion air purifier, and will
clean the air, suppress bacteria, and remove unpleasant or tobacco odors.
Suggested uses: (1) Place vacuum robot directly on charging base; (2) Place the robot
in upright position and plug in power supply.
Before turning on the negative-ion option, the dustbin should be cleaned first. Refer
to [Cleaning the Dustbin Assembly] for details.
2/Qpxfs!po0pgg
3/Txffq!Ujnf
5/Ofhbujwf!Jpot
4/Bvup
6/Epdljoh
2/Vq
3/Epxo
5/Sjhiu
4/Mfgu
6/Foufs
7/Tqsjbm
9/Tdifevmjoh
8/Dmpdl
:/Wbdvvn
21/Mbohvbhf
Docking button: Automatically returns to charger for recharge.
Tulip101 11
Remote control operations
2/Qpxfs!po0pgg
3/Txffq!Ujnf
5/Ofhbujwf!Jpot
4/Bvup
6/Epdljoh
2/Vq
3/Epxo
5/Sjhiu
4/Mfgu
6/Foufs
7/Tqsjbm
9/Tdifevmjoh
8/Dmpdl
:/Wbdvvn
21/Mbohvbhf
2/Qpxfs!po0pgg
3/Txffq!Ujnf
5/Ofhbujwf!Jpot
4/Bvup
6/Epdljoh
2/Vq
3/Epxo
5/Sjhiu
4/Mfgu
6/Foufs
7/Tqsjbm
9/Tdifevmjoh
8/Dmpdl
:/Wbdvvn
21/Mbohvbhf
2/Qpxfs!po0pgg
3/Txffq!Ujnf
5/Ofhbujwf!Jpot
4/Bvup
6/Epdljoh
2/Vq
3/Epxo
5/Sjhiu
4/Mfgu
6/Foufs
7/Tqsjbm
9/Tdifevmjoh
8/Dmpdl
:/Wbdvvn
21/Mbohvbhf
2/Qpxfs!po0pgg
3/Txffq!Ujnf
5/Ofhbujwf!Jpot
4/Bvup
6/Epdljoh
2/Vq
3/Epxo
5/Sjhiu
4/Mfgu
6/Foufs
7/Tqsjbm
9/Tdifevmjoh
8/Dmpdl
:/Wbdvvn
21/Mbohvbhf
2/Qpxfs!po0pgg
3/Txffq!Ujnf
5/Ofhbujwf!Jpot
4/Bvup
6/Epdljoh
2/Vq
3/Epxo
5/Sjhiu
4/Mfgu
6/Foufs
7/Tqsjbm
9/Tdifevmjoh
8/Dmpdl
:/Wbdvvn
21/Mbohvbhf
Refer to [Main Display Panel Operations] for instructions.
2/Qpxfs!po0pgg
3/Txffq!Ujnf
5/Ofhbujwf!Jpot
4/Bvup
6/Epdljoh
2/Vq
3/Epxo
5/Sjhiu
4/Mfgu
6/Foufs
7/Tqsjbm
9/Tdifevmjoh
8/Dmpdl
:/Wbdvvn
21/Mbohvbhf
Up button: Increase time (hr/min) in setup mode. In other modes, this button will
move the robot forward.
2/Qpxfs!po0pgg
3/Txffq!Ujnf
5/Ofhbujwf!Jpot
4/Bvup
6/Epdljoh
2/Vq
3/Epxo
5/Sjhiu
4/Mfgu
6/Foufs
7/Tqsjbm
9/Tdifevmjoh
8/Dmpdl
:/Wbdvvn
21/Mbohvbhf
Down button: Decrease time (hr/min) in setup mode. In other modes, this button
will move the robot backward.
2/Qpxfs!po0pgg
3/Txffq!Ujnf
5/Ofhbujwf!Jpot
4/Bvup
6/Epdljoh
2/Vq
3/Epxo
5/Sjhiu
4/Mfgu
6/Foufs
7/Tqsjbm
9/Tdifevmjoh
8/Dmpdl
:/Wbdvvn
21/Mbohvbhf
Left button: Switch to (hr) in setup mode; spin robot counter clockwise in other
modes.
2/Qpxfs!po0pgg
3/Txffq!Ujnf
5/Ofhbujwf!Jpot
4/Bvup
6/Epdljoh
2/Vq
3/Epxo
5/Sjhiu
4/Mfgu
6/Foufs
7/Tqsjbm
9/Tdifevmjoh
8/Dmpdl
:/Wbdvvn
21/Mbohvbhf
Right button: Switch to (min) in setup mode; spin robot clockwise in other modes.
2/Qpxfs!po0pgg
3/Txffq!Ujnf
5/Ofhbujwf!Jpot
4/Bvup
6/Epdljoh
2/Vq
3/Epxo
5/Sjhiu
4/Mfgu
6/Foufs
7/Tqsjbm
9/Tdifevmjoh
8/Dmpdl
:/Wbdvvn
21/Mbohvbhf
OK button: Confirm the clock time that has been set, or confirm the pre-set sweep
time or working time.
2/Qpxfs!po0pgg
3/Txffq!Ujnf
5/Ofhbujwf!Jpot
4/Bvup
6/Epdljoh
2/Vq
3/Epxo
5/Sjhiu
4/Mfgu
6/Foufs
7/Tqsjbm
9/Tdifevmjoh
8/Dmpdl
:/Wbdvvn
21/Mbohvbhf
Spiral button: The vacuum robot will sweep the area in concentric circles from the
inside out.
2/Qpxfs!po0pgg
3/Txffq!Ujnf
5/Ofhbujwf!Jpot
4/Bvup
6/Epdljoh
2/Vq
3/Epxo
5/Sjhiu
4/Mfgu
6/Foufs
7/Tqsjbm
9/Tdifevmjoh
8/Dmpdl
:/Wbdvvn
21/Mbohvbhf
Vacuum button: Start or stop the motors for the vacuum and side brushes. The user
can use the
2/Qpxfs!po0pgg
3/Txffq!Ujnf
5/Ofhbujwf!Jpot
4/Bvup
6/Epdljoh
2/Vq
3/Epxo
5/Sjhiu
4/Mfgu
6/Foufs
7/Tqsjbm
9/Tdifevmjoh
8/Dmpdl
:/Wbdvvn
21/Mbohvbhf
2/Qpxfs!po0pgg
3/Txffq!Ujnf
5/Ofhbujwf!Jpot
4/Bvup
6/Epdljoh
2/Vq
3/Epxo
5/Sjhiu
4/Mfgu
6/Foufs
7/Tqsjbm
9/Tdifevmjoh
8/Dmpdl
:/Wbdvvn
21/Mbohvbhf
2/Qpxfs!po0pgg
3/Txffq!Ujnf
5/Ofhbujwf!Jpot
4/Bvup
6/Epdljoh
2/Vq
3/Epxo
5/Sjhiu
4/Mfgu
6/Foufs
7/Tqsjbm
9/Tdifevmjoh
8/Dmpdl
:/Wbdvvn
21/Mbohvbhf
2/Qpxfs!po0pgg
3/Txffq!Ujnf
5/Ofhbujwf!Jpot
4/Bvup
6/Epdljoh
2/Vq
3/Epxo
5/Sjhiu
4/Mfgu
6/Foufs
7/Tqsjbm
9/Tdifevmjoh
8/Dmpdl
:/Wbdvvn
21/Mbohvbhf
buttons to move the robot for cleaning specific areas.
2/Qpxfs!po0pgg
3/Txffq!Ujnf
5/Ofhbujwf!Jpot
4/Bvup
6/Epdljoh
2/Vq
3/Epxo
5/Sjhiu
4/Mfgu
6/Foufs
7/Tqsjbm
9/Tdifevmjoh
8/Dmpdl
:/Wbdvvn
21/Mbohvbhf
Language settings button: Set user's preferred language. Default is Mandarin
Chinese; several other languages are available, including Cantonese, Taiwanese,
Hakka and English.
2/Qpxfs!po0pgg
3/Txffq!Ujnf
5/Ofhbujwf!Jpot
4/Bvup
6/Epdljoh
2/Vq
3/Epxo
5/Sjhiu
4/Mfgu
6/Foufs
7/Tqsjbm
9/Tdifevmjoh
8/Dmpdl
:/Wbdvvn
21/Mbohvbhf
Clock settings button: Users can use the
2/Qpxfs!po0pgg
3/Txffq!Ujnf
5/Ofhbujwf!Jpot
4/Bvup
6/Epdljoh
2/Vq
3/Epxo
5/Sjhiu
4/Mfgu
6/Foufs
7/Tqsjbm
9/Tdifevmjoh
8/Dmpdl
:/Wbdvvn
21/Mbohvbhf
2/Qpxfs!po0pgg
3/Txffq!Ujnf
5/Ofhbujwf!Jpot
4/Bvup
6/Epdljoh
2/Vq
3/Epxo
5/Sjhiu
4/Mfgu
6/Foufs
7/Tqsjbm
9/Tdifevmjoh
8/Dmpdl
:/Wbdvvn
21/Mbohvbhf
2/Qpxfs!po0pgg
3/Txffq!Ujnf
5/Ofhbujwf!Jpot
4/Bvup
6/Epdljoh
2/Vq
3/Epxo
5/Sjhiu
4/Mfgu
6/Foufs
7/Tqsjbm
9/Tdifevmjoh
8/Dmpdl
:/Wbdvvn
21/Mbohvbhf
2/Qpxfs!po0pgg
3/Txffq!Ujnf
5/Ofhbujwf!Jpot
4/Bvup
6/Epdljoh
2/Vq
3/Epxo
5/Sjhiu
4/Mfgu
6/Foufs
7/Tqsjbm
9/Tdifevmjoh
8/Dmpdl
:/Wbdvvn
21/Mbohvbhf
2/Qpxfs!po0pgg
3/Txffq!Ujnf
5/Ofhbujwf!Jpot
4/Bvup
6/Epdljoh
2/Vq
3/Epxo
5/Sjhiu
4/Mfgu
6/Foufs
7/Tqsjbm
9/Tdifevmjoh
8/Dmpdl
:/Wbdvvn
21/Mbohvbhf
buttons to set the clock.
2/Qpxfs!po0pgg
3/Txffq!Ujnf
5/Ofhbujwf!Jpot
4/Bvup
6/Epdljoh
2/Vq
3/Epxo
5/Sjhiu
4/Mfgu
6/Foufs
7/Tqsjbm
9/Tdifevmjoh
8/Dmpdl
:/Wbdvvn
21/Mbohvbhf
Scheduled cleaning button: User can use the
2/Qpxfs!po0pgg
3/Txffq!Ujnf
5/Ofhbujwf!Jpot
4/Bvup
6/Epdljoh
2/Vq
3/Epxo
5/Sjhiu
4/Mfgu
6/Foufs
7/Tqsjbm
9/Tdifevmjoh
8/Dmpdl
:/Wbdvvn
21/Mbohvbhf
2/Qpxfs!po0pgg
3/Txffq!Ujnf
5/Ofhbujwf!Jpot
4/Bvup
6/Epdljoh
2/Vq
3/Epxo
5/Sjhiu
4/Mfgu
6/Foufs
7/Tqsjbm
9/Tdifevmjoh
8/Dmpdl
:/Wbdvvn
21/Mbohvbhf
2/Qpxfs!po0pgg
3/Txffq!Ujnf
5/Ofhbujwf!Jpot
4/Bvup
6/Epdljoh
2/Vq
3/Epxo
5/Sjhiu
4/Mfgu
6/Foufs
7/Tqsjbm
9/Tdifevmjoh
8/Dmpdl
:/Wbdvvn
21/Mbohvbhf
2/Qpxfs!po0pgg
3/Txffq!Ujnf
5/Ofhbujwf!Jpot
4/Bvup
6/Epdljoh
2/Vq
3/Epxo
5/Sjhiu
4/Mfgu
6/Foufs
7/Tqsjbm
9/Tdifevmjoh
8/Dmpdl
:/Wbdvvn
21/Mbohvbhf
2/Qpxfs!po0pgg
3/Txffq!Ujnf
5/Ofhbujwf!Jpot
4/Bvup
6/Epdljoh
2/Vq
3/Epxo
5/Sjhiu
4/Mfgu
6/Foufs
7/Tqsjbm
9/Tdifevmjoh
8/Dmpdl
:/Wbdvvn
21/Mbohvbhf
buttons to schedule
the cleaning time.
Whenusingthe
2/Qpxfs!po0pgg
3/Txffq!Ujnf
5/Ofhbujwf!Jpot
4/Bvup
6/Epdljoh
2/Vq
3/Epxo
5/Sjhiu
4/Mfgu
6/Foufs
7/Tqsjbm
9/Tdifevmjoh
8/Dmpdl
:/Wbdvvn
21/Mbohvbhf
button, please take note of the surroundings as the lack
of a rear sensor may cause the robot to fall off a ledge if the button is held
down.
12 Tulip101
Setting the time and scheduled cleaning
Setting the clock
1. Press the
2/Qpxfs!po0pgg
3/Txffq!Ujnf
5/Ofhbujwf!Jpot
4/Bvup
6/Epdljoh
2/Vq
3/Epxo
5/Sjhiu
4/Mfgu
6/Foufs
7/Tqsjbm
9/Tdifevmjoh
8/Dmpdl
:/Wbdvvn
21/Mbohvbhf
button on the remote control. The digits on the display panel will
flash to indicate whether the user is currently setting the hour or the minute.
2. Press the
2/Qpxfs!po0pgg
3/Txffq!Ujnf
5/Ofhbujwf!Jpot
4/Bvup
6/Epdljoh
2/Vq
3/Epxo
5/Sjhiu
4/Mfgu
6/Foufs
7/Tqsjbm
9/Tdifevmjoh
8/Dmpdl
:/Wbdvvn
21/Mbohvbhf
button to set the hour and press the
2/Qpxfs!po0pgg
3/Txffq!Ujnf
5/Ofhbujwf!Jpot
4/Bvup
6/Epdljoh
2/Vq
3/Epxo
5/Sjhiu
4/Mfgu
6/Foufs
7/Tqsjbm
9/Tdifevmjoh
8/Dmpdl
:/Wbdvvn
21/Mbohvbhf
button to set the minute.
Press and hold the
2/Qpxfs!po0pgg
3/Txffq!Ujnf
5/Ofhbujwf!Jpot
4/Bvup
6/Epdljoh
2/Vq
3/Epxo
5/Sjhiu
4/Mfgu
6/Foufs
7/Tqsjbm
9/Tdifevmjoh
8/Dmpdl
:/Wbdvvn
21/Mbohvbhf
button to increase the number rapidly, or press the
2/Qpxfs!po0pgg
3/Txffq!Ujnf
5/Ofhbujwf!Jpot
4/Bvup
6/Epdljoh
2/Vq
3/Epxo
5/Sjhiu
4/Mfgu
6/Foufs
7/Tqsjbm
9/Tdifevmjoh
8/Dmpdl
:/Wbdvvn
21/Mbohvbhf
button to decrease it rapidly.
3. Press the
2/Qpxfs!po0pgg
3/Txffq!Ujnf
5/Ofhbujwf!Jpot
4/Bvup
6/Epdljoh
2/Vq
3/Epxo
5/Sjhiu
4/Mfgu
6/Foufs
7/Tqsjbm
9/Tdifevmjoh
8/Dmpdl
:/Wbdvvn
21/Mbohvbhf
button to complete the clock's settings
Set the scheduled cleaning time:
First set the start time of the sweep and then set the desired duration of the task.
∗
1. Press the
2/Qpxfs!po0pgg
3/Txffq!Ujnf
5/Ofhbujwf!Jpot
4/Bvup
6/Epdljoh
2/Vq
3/Epxo
5/Sjhiu
4/Mfgu
6/Foufs
7/Tqsjbm
9/Tdifevmjoh
8/Dmpdl
:/Wbdvvn
21/Mbohvbhf
button on the remote control. The digits on the display panel will
flash to indicate whether the user is currently setting the hour or the minute.
2. Set the desired point in time for the machine to begin sweeping. Refer to Step 2
in [Setting the Clock] for instructions.
3. Press the
2/Qpxfs!po0pgg
3/Txffq!Ujnf
5/Ofhbujwf!Jpot
4/Bvup
6/Epdljoh
2/Vq
3/Epxo
5/Sjhiu
4/Mfgu
6/Foufs
7/Tqsjbm
9/Tdifevmjoh
8/Dmpdl
:/Wbdvvn
21/Mbohvbhf
button to complete the setting of the pre-sweep time.
4. Then decide how long you would like the machine to clean. Use the
2/Qpxfs!po0pgg
3/Txffq!Ujnf
5/Ofhbujwf!Jpot
4/Bvup
6/Epdljoh
2/Vq
3/Epxo
5/Sjhiu
4/Mfgu
6/Foufs
7/Tqsjbm
9/Tdifevmjoh
8/Dmpdl
:/Wbdvvn
21/Mbohvbhf
or
2/Qpxfs!po0pgg
3/Txffq!Ujnf
5/Ofhbujwf!Jpot
4/Bvup
6/Epdljoh
2/Vq
3/Epxo
5/Sjhiu
4/Mfgu
6/Foufs
7/Tqsjbm
9/Tdifevmjoh
8/Dmpdl
:/Wbdvvn
21/Mbohvbhf
button to select the duration. Options are 15, 30, 45, 60, 80 and 100 minutes.
5. Press the
2/Qpxfs!po0pgg
3/Txffq!Ujnf
5/Ofhbujwf!Jpot
4/Bvup
6/Epdljoh
2/Vq
3/Epxo
5/Sjhiu
4/Mfgu
6/Foufs
7/Tqsjbm
9/Tdifevmjoh
8/Dmpdl
:/Wbdvvn
21/Mbohvbhf
button complete the setting of the duration.
To cancel scheduled cleaning:
• Pressthe
2/Qpxfs!po0pgg
3/Txffq!Ujnf
5/Ofhbujwf!Jpot
4/Bvup
6/Epdljoh
2/Vq
3/Epxo
5/Sjhiu
4/Mfgu
6/Foufs
7/Tqsjbm
9/Tdifevmjoh
8/Dmpdl
:/Wbdvvn
21/Mbohvbhf
button and time display on the panel begins to flash.
• Press
2/Qpxfs!po0pgg
3/Txffq!Ujnf
5/Ofhbujwf!Jpot
4/Bvup
6/Epdljoh
2/Vq
3/Epxo
5/Sjhiu
4/Mfgu
6/Foufs
7/Tqsjbm
9/Tdifevmjoh
8/Dmpdl
:/Wbdvvn
21/Mbohvbhf
or
2/Qpxfs!po0pgg
3/Txffq!Ujnf
5/Ofhbujwf!Jpot
4/Bvup
6/Epdljoh
2/Vq
3/Epxo
5/Sjhiu
4/Mfgu
6/Foufs
7/Tqsjbm
9/Tdifevmjoh
8/Dmpdl
:/Wbdvvn
21/Mbohvbhf
button to adjust the time to - - : - - .
• Pressthe
2/Qpxfs!po0pgg
3/Txffq!Ujnf
5/Ofhbujwf!Jpot
4/Bvup
6/Epdljoh
2/Vq
3/Epxo
5/Sjhiu
4/Mfgu
6/Foufs
7/Tqsjbm
9/Tdifevmjoh
8/Dmpdl
:/Wbdvvn
21/Mbohvbhf
button to cancel scheduled cleaning.
In the following situations, the scheduled cleaning time that has been
configured will not take effect:
• Theuserhappenstobeoperatingthevacuumrobotatthescheduledtime.
• Theunitiscurrentlybeingchargedwiththeadapter.
• Unlimitedcleaningtime.
Tulip101 13
Operation and Display Modes
Turn on the unit by pressing the main power switch. The machine will play the
power-on
music
and enter the idle mode. The vacuum robot is now ready for use.
Idle mode:
The display panel will show the working time or an error
message.
Wheninidlemode,thedisplaypanelwilldimdownafter10secondsof
inactivity. Press the power button
2/Qpxfs!po0pgg
3/Txffq!Ujnf
5/Ofhbujwf!Jpot
4/Bvup
6/Epdljoh
2/Vq
3/Epxo
5/Sjhiu
4/Mfgu
6/Foufs
7/Tqsjbm
9/Tdifevmjoh
8/Dmpdl
:/Wbdvvn
21/Mbohvbhf
to control the panel and turn on the
display.
Sweep mode:
Auto SWEEP/SPIRAL:
If only the sweep button
2/Qpxfs!po0pgg
3/Txffq!Ujnf
5/Ofhbujwf!Jpot
4/Bvup
6/Epdljoh
2/Vq
3/Epxo
5/Sjhiu
4/Mfgu
6/Foufs
7/Tqsjbm
9/Tdifevmjoh
8/Dmpdl
:/Wbdvvn
21/Mbohvbhf
is shown on the display
panel, the unit is currently in this mode.
• Whileincleaningmode,pushingthepowerbutton
2/Qpxfs!po0pgg
3/Txffq!Ujnf
5/Ofhbujwf!Jpot
4/Bvup
6/Epdljoh
2/Vq
3/Epxo
5/Sjhiu
4/Mfgu
6/Foufs
7/Tqsjbm
9/Tdifevmjoh
8/Dmpdl
:/Wbdvvn
21/Mbohvbhf
will pause the
robot for three seconds as it waits for user input. The robot will resume
cleaning if no user input is detected.
• UndertheSPIRALsweepstate,themachinewillstopimmediatelyifit
detects an obstacle.
Negative-ion mode:
If only the negative-ion button
2/Qpxfs!po0pgg
3/Txffq!Ujnf
5/Ofhbujwf!Jpot
4/Bvup
6/Epdljoh
2/Vq
3/Epxo
5/Sjhiu
4/Mfgu
6/Foufs
7/Tqsjbm
9/Tdifevmjoh
8/Dmpdl
:/Wbdvvn
21/Mbohvbhf
is shown on the
display panel, the unit is currently in this mode.
14 Tulip101
Whileinnegative-ionmode,ifthebatterylevelfallsto30%,thereturn-home
mode will not be executed; the machine will continue to operate until only
10%ofbatterypowerremains,atwhichtimeitwillenterpower-savingmode.
Return-home mode:
If only the docking button
2/Qpxfs!po0pgg
3/Txffq!Ujnf
5/Ofhbujwf!Jpot
4/Bvup
6/Epdljoh
2/Vq
3/Epxo
5/Sjhiu
4/Mfgu
6/Foufs
7/Tqsjbm
9/Tdifevmjoh
8/Dmpdl
:/Wbdvvn
21/Mbohvbhf
is shown on the
display panel, the unit is currently in this mode.
Whileinreturn-homemode,pushingthepowerbutton
2/Qpxfs!po0pgg
3/Txffq!Ujnf
5/Ofhbujwf!Jpot
4/Bvup
6/Epdljoh
2/Vq
3/Epxo
5/Sjhiu
4/Mfgu
6/Foufs
7/Tqsjbm
9/Tdifevmjoh
8/Dmpdl
:/Wbdvvn
21/Mbohvbhf
will pause the
robot for three seconds as it waits for user input. The robot will resume re-
turning to the charger if no user input is detected.
Charging mode: Please refer to [Charging the Product]
When using the charger, the docking button on
the display panel will automatically dim and be non-
functional.
When using the adapter for charging, the SWEEP and
docking button on the display panel will automatically
dim and be non-functional.
Power-saving mode: If the robot is idle for over a minute, the panel display
will turn off and the robot enters power-saving mode. Press the power button
2/Qpxfs!po0pgg
3/Txffq!Ujnf
5/Ofhbujwf!Jpot
4/Bvup
6/Epdljoh
2/Vq
3/Epxo
5/Sjhiu
4/Mfgu
6/Foufs
7/Tqsjbm
9/Tdifevmjoh
8/Dmpdl
:/Wbdvvn
21/Mbohvbhf
on
the panel to return to idle mode.
Tulip101 15
Replacing Parts & Supplies
Before replacing any supplies on or inside the
robot unit, unplug the power cord and turn off
the main power.
Required tool: Phillips screwdriver.
0°C
45°C
ᢣ⾱→⁉⽪
≤┤⾱→⁉⽪
☮㏢䳶ລⴂ
ཚ䲭⾱→⁉⽪
ࠪ付࣐㇝九⁉⽪
・⟸ق䴫㐊 ⓛᓖ䀸⁉઼ࠪᓖ
䴫⊐/2*2 䴫⊐ᇩ䟿െ䮳䴫⣰
䀨䴫െ 䴫⊐≤▁☪
ᴤᨋെ⽪䆖⁉⽪ ഻䳋എ᭦LFRQ
⭘৫༃URERWк䜘⾱→⁉⽪
OFFOFF
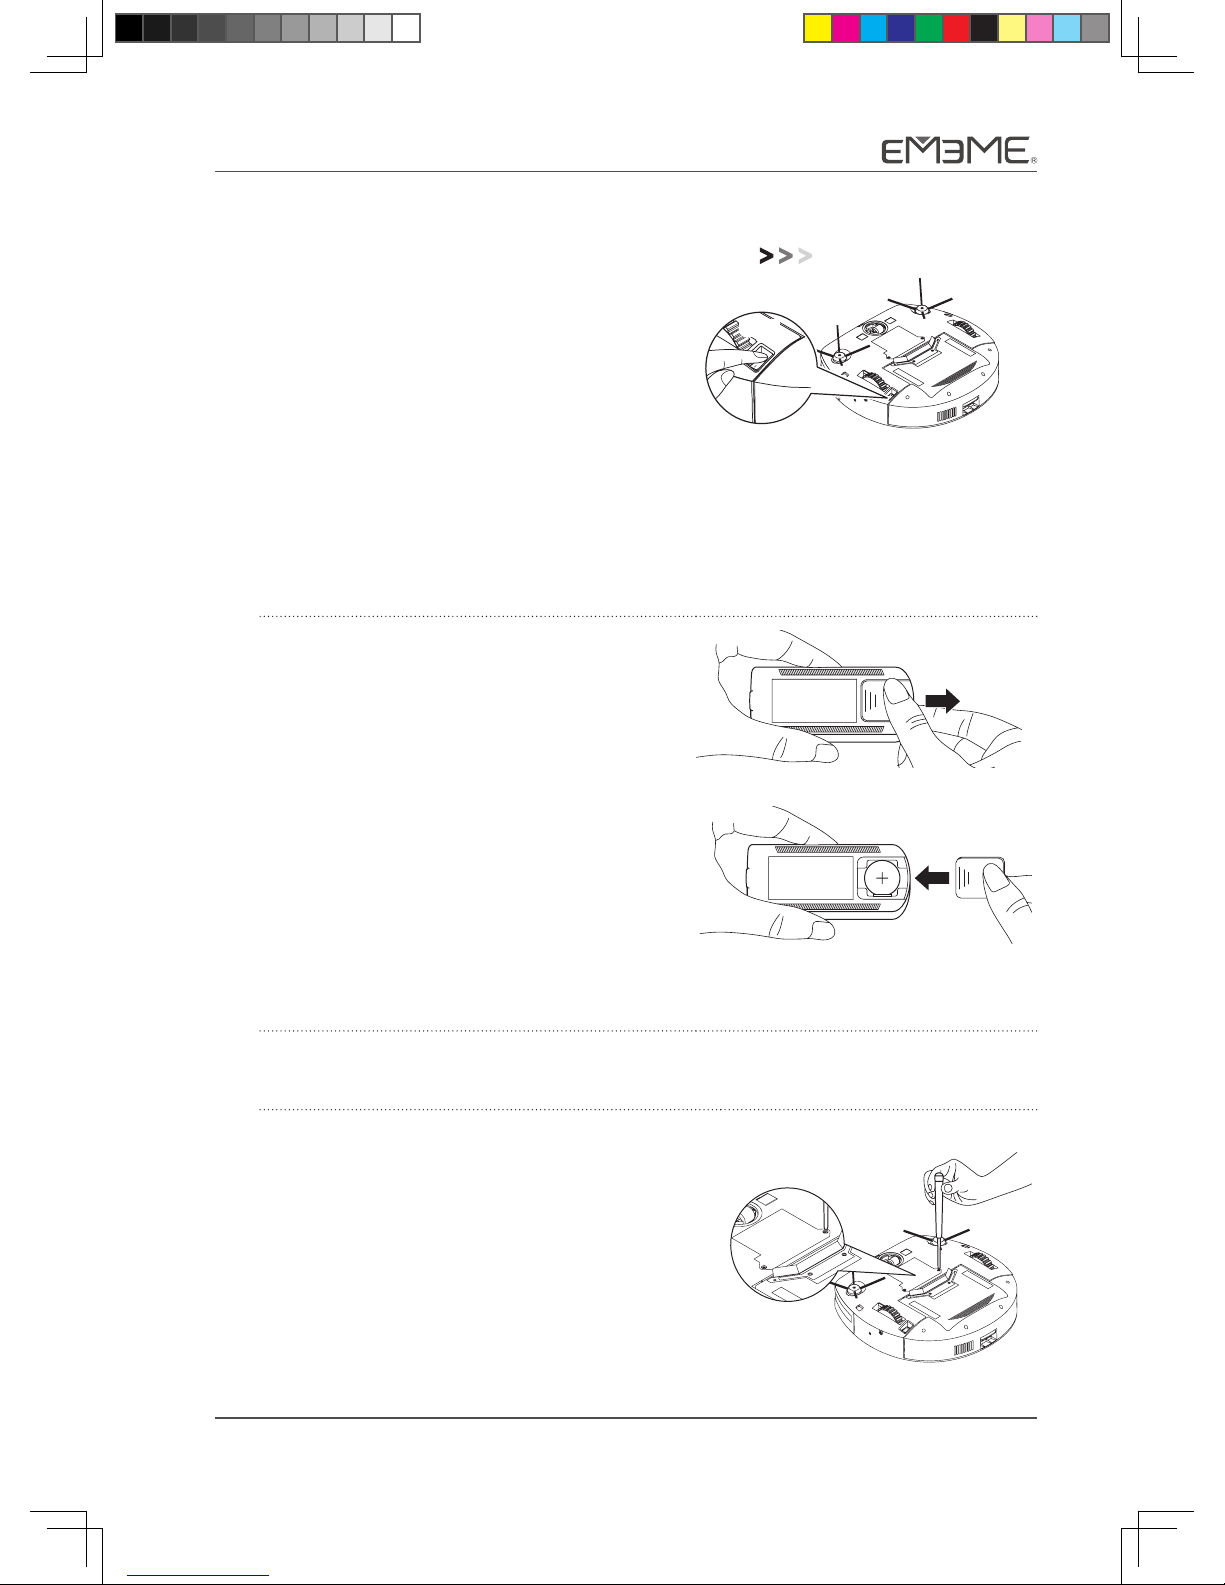
Replacing battery
Battery for the remote control
1. Pull out the battery cover along the
direction of the arrow, as shown on the
diagram to the right.
2. Remove the battery to be replaced and
insert a new CR2025 lithium button cell
or its equivalent. Ensure that the cell's
positive terminal (+) is facing up.
3. Push the battery cover back to its original
position.
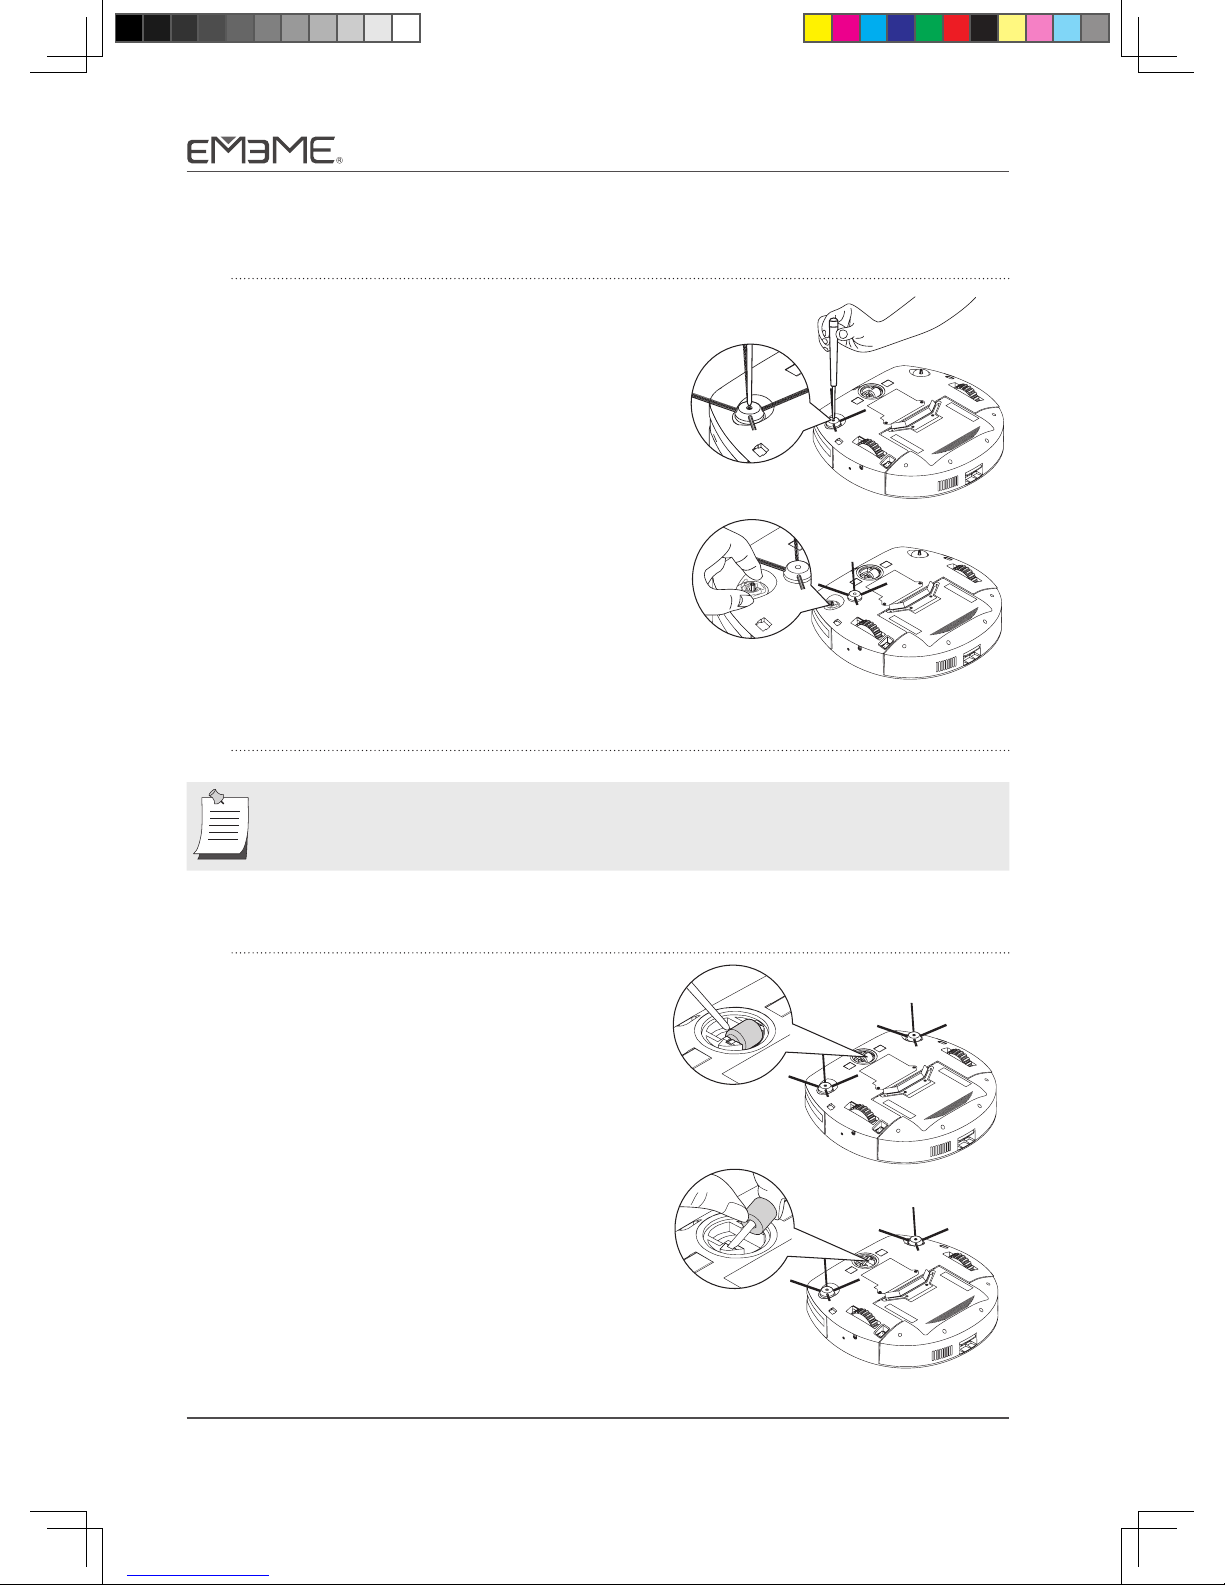
Battery for the vacuum robot
1. Use a Phillips screwdriver to loosen the
two screws on the battery cover. Open the
battery cover.
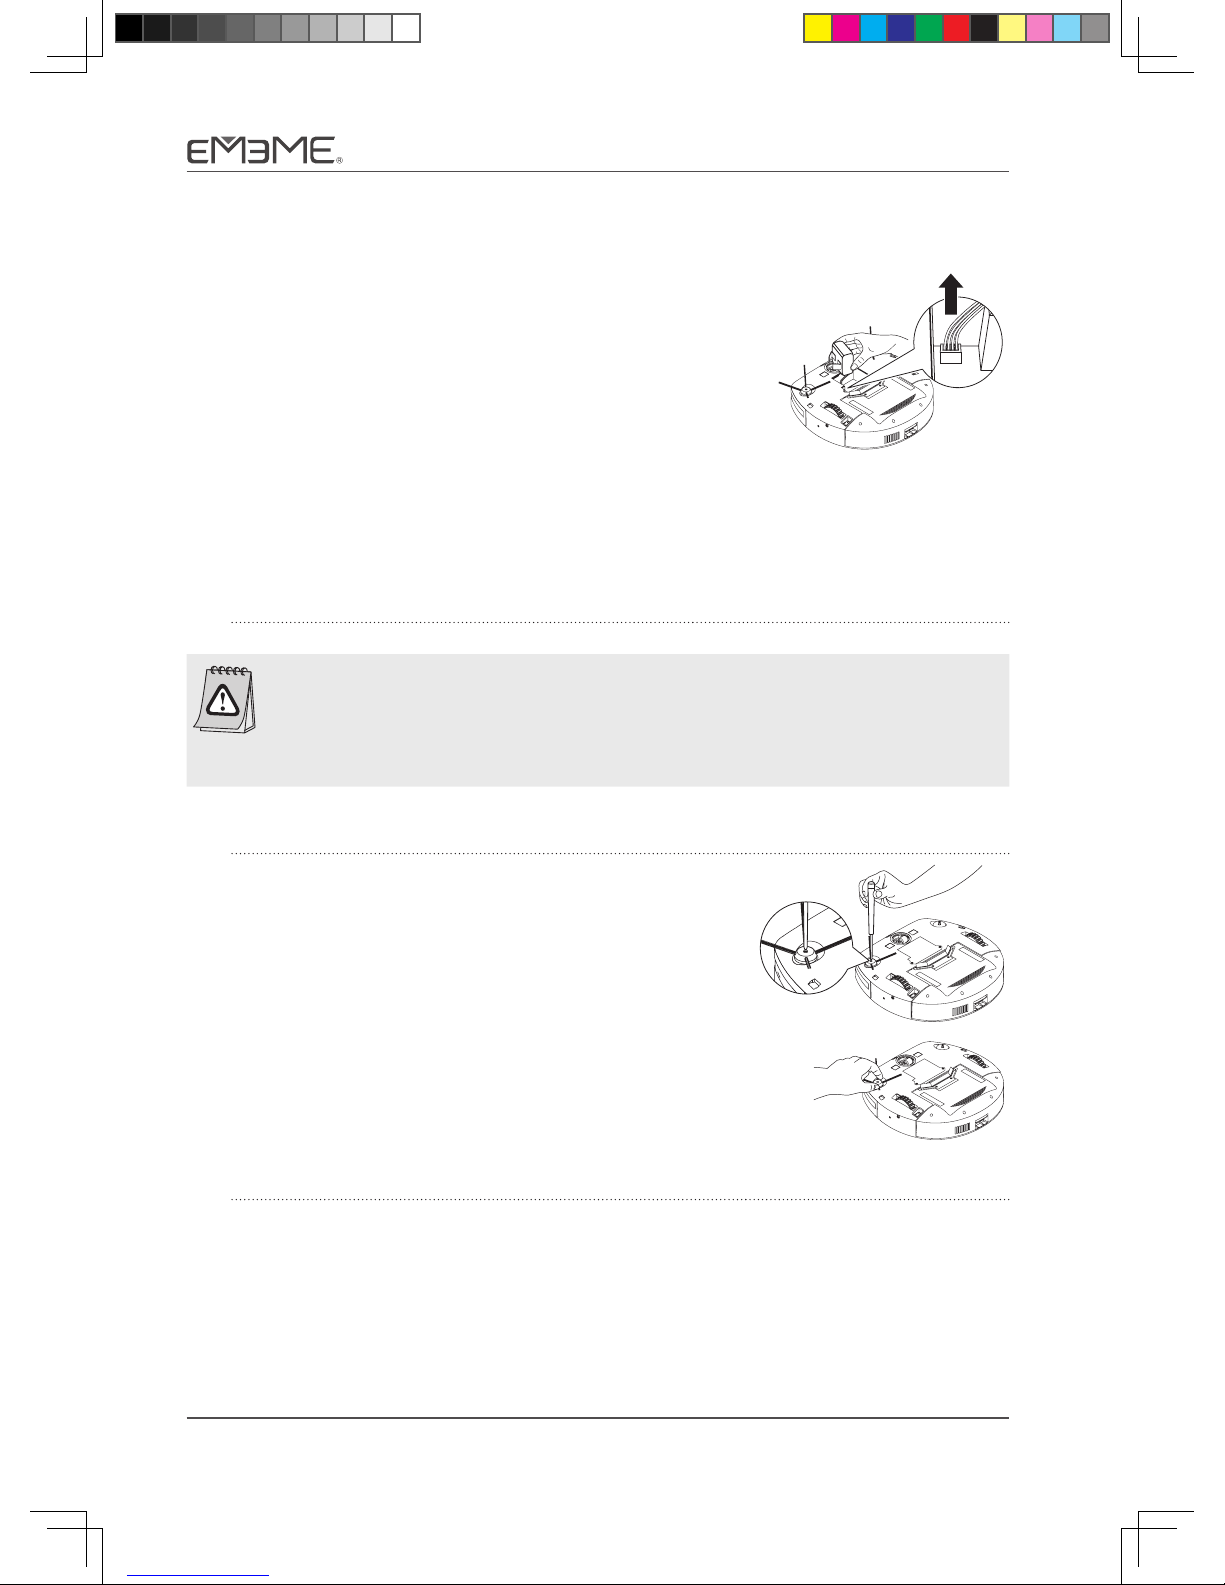
16 Tulip101
2. Gently pull the battery removal strap and
carefully remove the cable connecting the
battery to the main unit; then remove the
old battery.
3. Connect the cable of the new battery to the
connector on the main unit. Insert the new
battery while holding the battery removal
strap gently.
4. Make sure that the battery is in its correct
position, then replace the battery cover
before tightening the two previously
loosened screws.
• Beforereplacingthebattery,read[BatteryandChargingInstructions]in
[Safety Information] carefully.
• Thereplacedbatteryshouldbesafelydisposedofatadesignatedrecycling
centerinaccordancewiththeprovisionsoftheWasteDisposalAct.
Replacing the side brush
1. Loosen the screw attached to the side brush.
2. Remove old side brush and place new side brush
onto the brush holder on vacuum robot unit.
3. Tighten the screw to secure the new side brush.
Tulip101 17
• Sidebrusheswillautomaticallystopwhenmetwithexcessiveresistance.
The side brush motors will automatically restart when the resistance
disappears.
• Topreventthesidebrushfrombeingentangled,themachinewillactivate
the side brush motor to rotate the brush from time to time during its
journey back to the charger.
This phenomenon is not a defect; it is not necessary to replace the side brush.
Replace the filter
Refer to the procedure outlined in [Cleaning the Filter] for filter replacement.
Please replace the filter every three months to maintain optimum sweeping
quality.
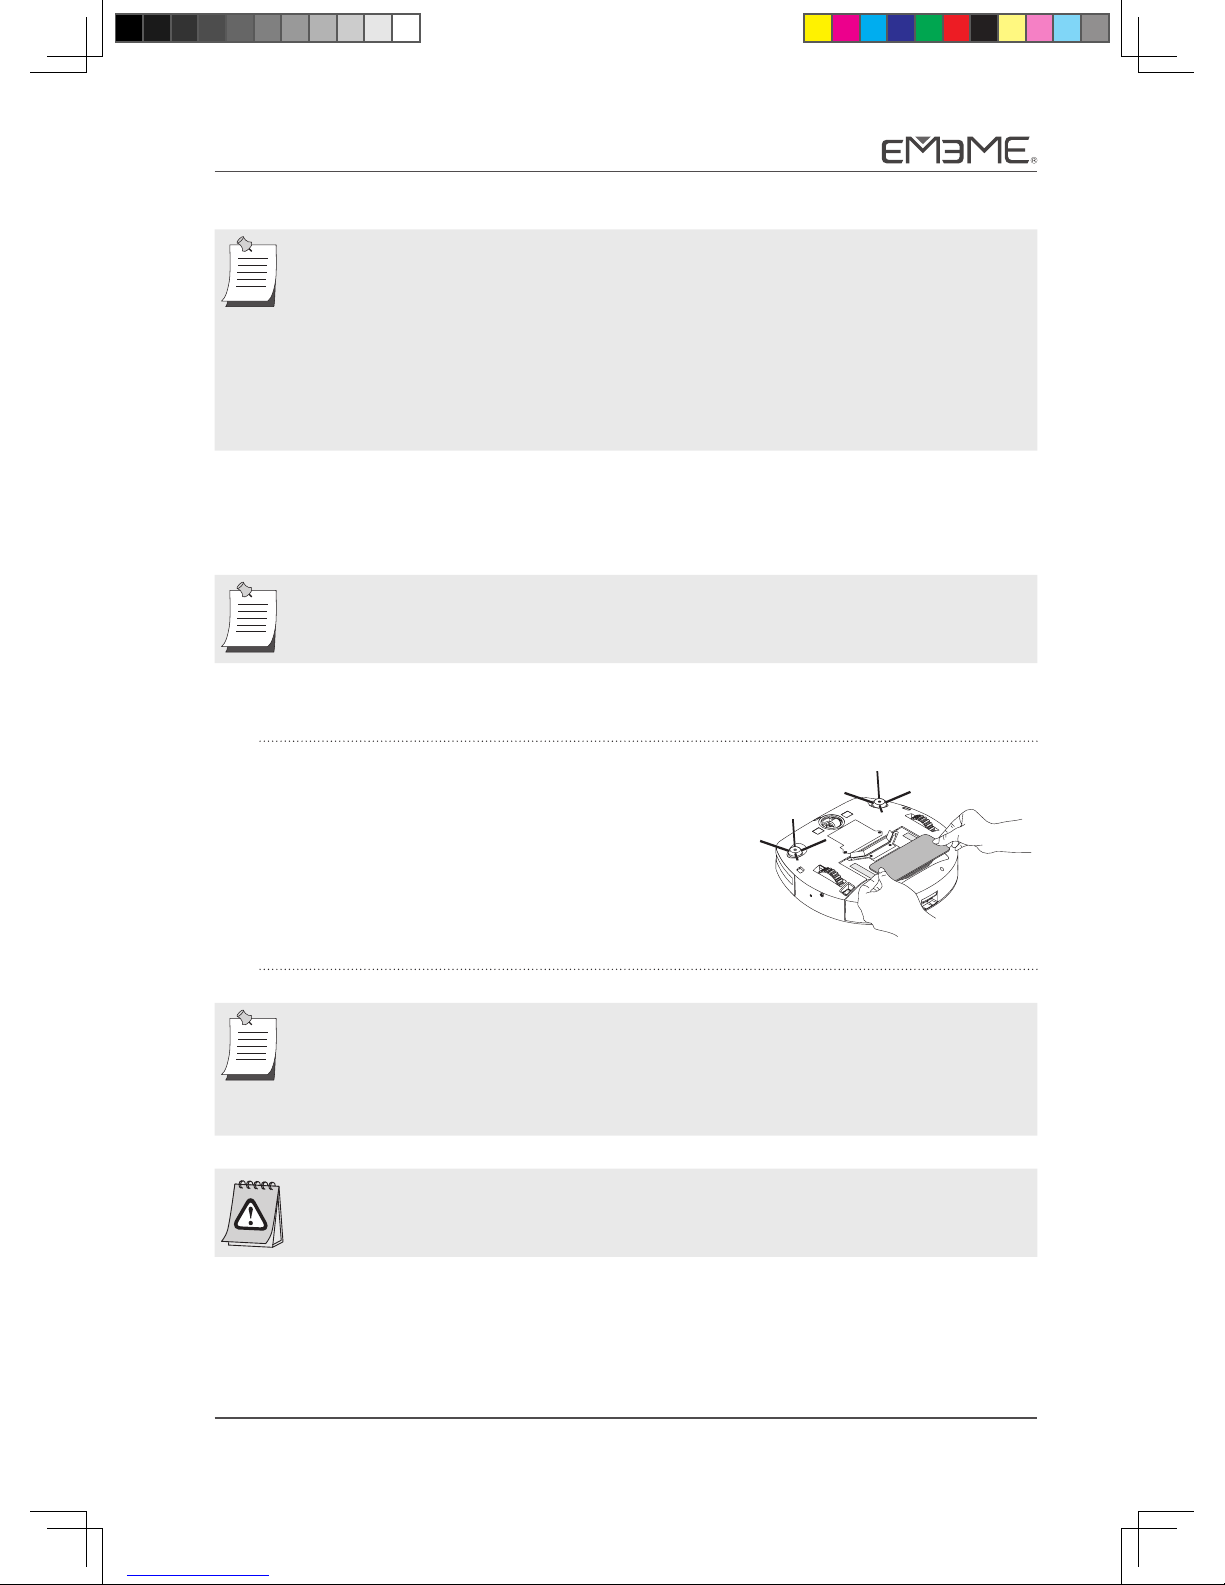
Replacing Dust Cloth
As indicated in the diagram to the right, affix the
dust cloth to the Velcro surface at the bottom of the
dustbin. Make sure that the dust cloth's adhesive
side is securely attached so that it will not fall off
during the cleaning process.
• Gentlyrinseandwashthedustclothafteruse.Dryitatanadequately
ventilated location.
• Ifthereistoomuchaccumulateddustoriftheclothbecomesmoldy,be
sure to replace it with a new one.
The dust cloth is mainly employed to improve cleaning and is not intended
for wet or damp floor.
18 Tulip101
Cleaning and Maintenance
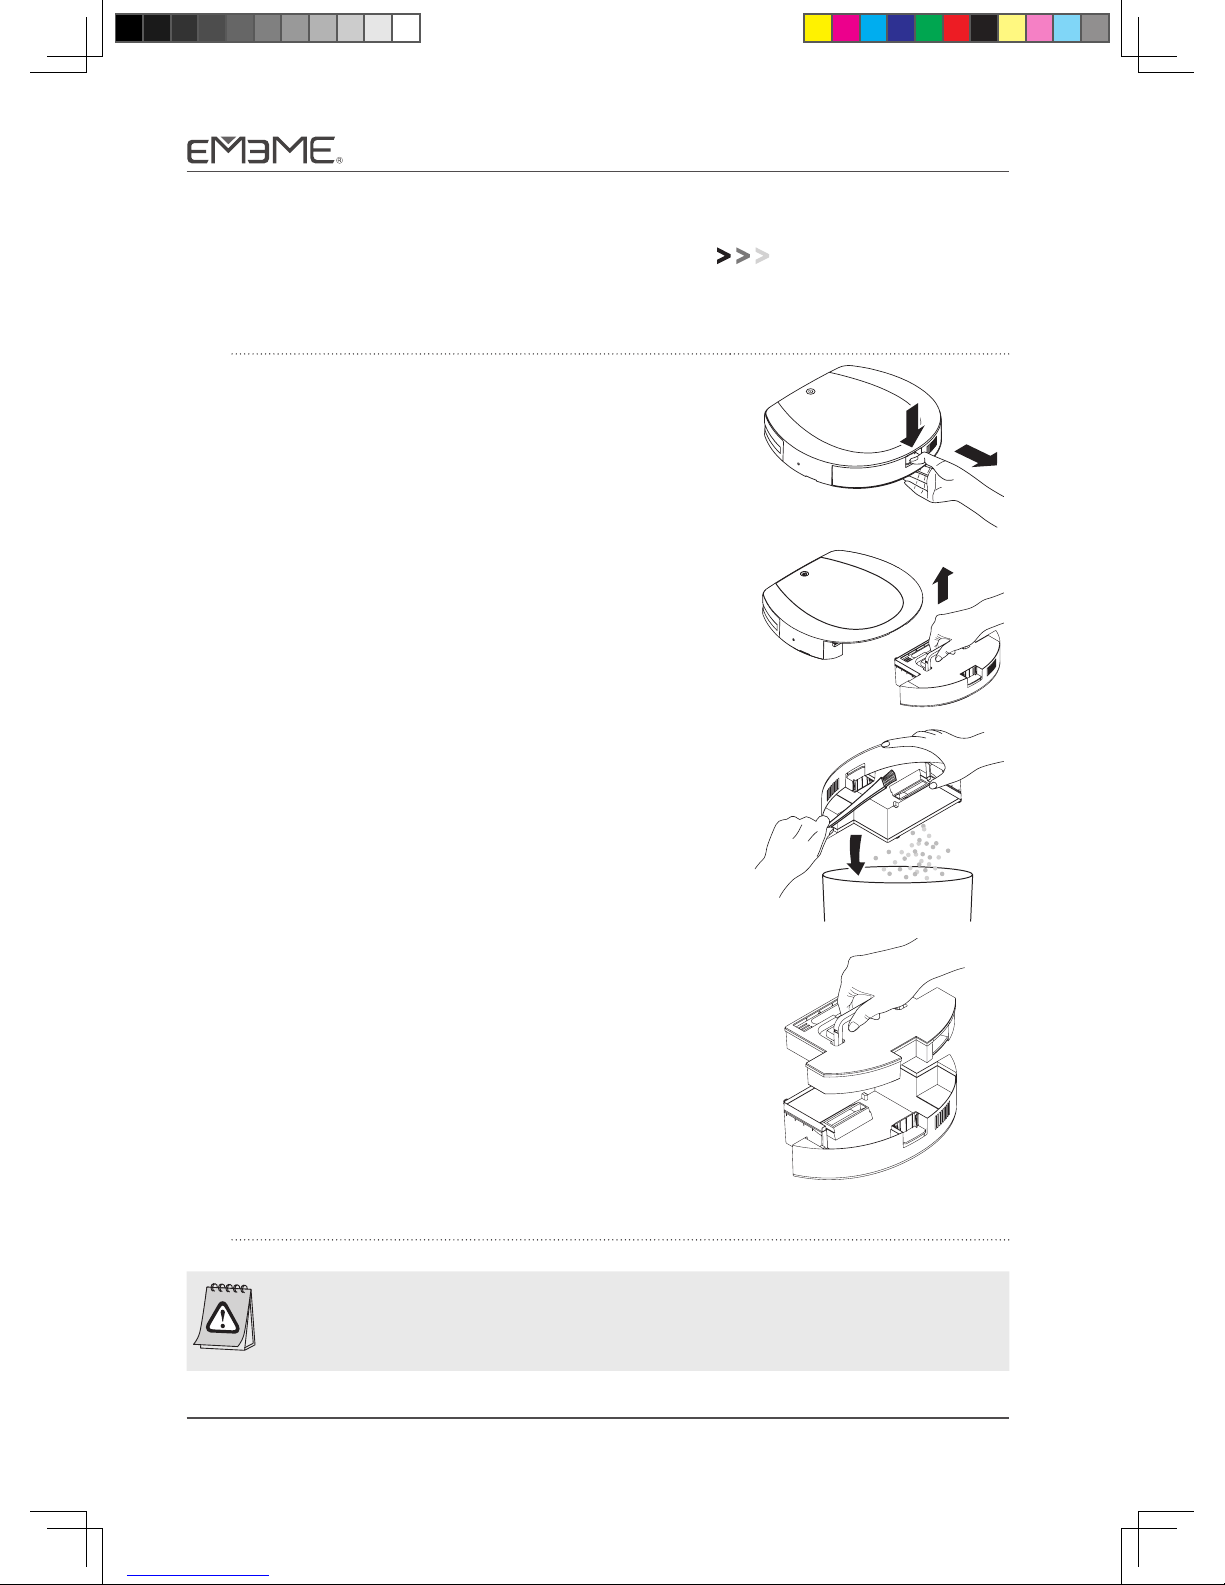
Cleaning the Dustbin Assembly
1. As shown in the diagram to the right, press the
dustbin button to release the dustbin.
ab
2. Remove the filter cartridge by lifting the black
handle (pull gently).
3. Empty any dust and debris from the dustbin
assembly into a garbage bin. A cleaning brush
can be used to remove dust and hair. Water can
also be used to clean the dustbin.
4. After cleaning, put the filter cartridge back into
the dustbin assembly.
5. Press the dustbin button and push the dustbin
back into the vacuum robot. Confirm that it has
returned to its original position.
The dustbin assembly (hollow black box) is made of plastic and may
be cleaned with water. The filter cartridge (gray box with black handle),
however, contains electronic components that can be damaged by water.

Tulip101 19
Cleaning the Filter
1. Remove the filter cartridge, and refer to Steps
1 and 2 in [Cleaning the Dustbin Assembly].
2. Turn the filter cartridge over, with its back
facing upward. To open the filter cover, gently
press the snap-fit lock, as shown in the diagram
to the right.
3. Clean the filter or replace it with a new one.
Install the filter according to the orientation
indicated by the removed corner.
4. Place the filter cover back and make sure that
the snap-fit lock is securely fastened.
5. Refer to Steps 4 and 5 in [Cleaning the Dustbin
Assembly]. Place the filter cartridge in the
dustbin assembly and put the dustbin back
into the vacuum unit.
aa
b
If the filter is too soiled to be cleaned properly, replace it with a new one.
20 Tulip101
Cleaning the Side Brush
1. Loosen the screw attached to the side
brush with a Phillips screwdriver. Remove
the side brush.
2. Clear the side brush and remove any hair
or debris attached to the axis of the side
brush.
3. Place side brush back into the brush holder on the vacuum robot unit and
tighten the screw.
If the bristles on the side brush are severely damaged, we recommend that
the brush be replaced.
CleaningMulti-directionWheel
1. Use a screwdriver to lift the wheel
assembly.
2. Remove the multi-direction wheel.
Table of contents
Other Ememe Vacuum Cleaner manuals


