sharkclean.comsharkclean.com
SAVE THESE INSTRUCTIONS
READ ALL INSTRUCTIONS BEFORE USING
THIS VACUUM:
1. This vacuum consists of a motorized
nozzle, wand, and handheld vacuum.
These components contain electrical
connections, electrical wiring, and
moving parts that potentially present
risk to the user. The floor nozzle, wand,
and handheld vacuum contain electrical
connections.
2. Before each use, carefully inspect
all parts for any damage. If a part is
damaged, discontinue use.
3. Use only identical replacement parts.
4. This vacuum contains no serviceable parts.
5. Use only as described in this manual.
DO NOT use the vacuum for any purpose
other than those described in this manual.
6. With the exception of the filters and dust
cup, DO NOT expose any parts of the
vacuum to water or other liquids.
7. Keep the appliance and its cord out
of reach of children. Do not allow the
appliance to be used by children.
DO NOT allow to be used as a toy.
Close supervision is necessary when
used near children.
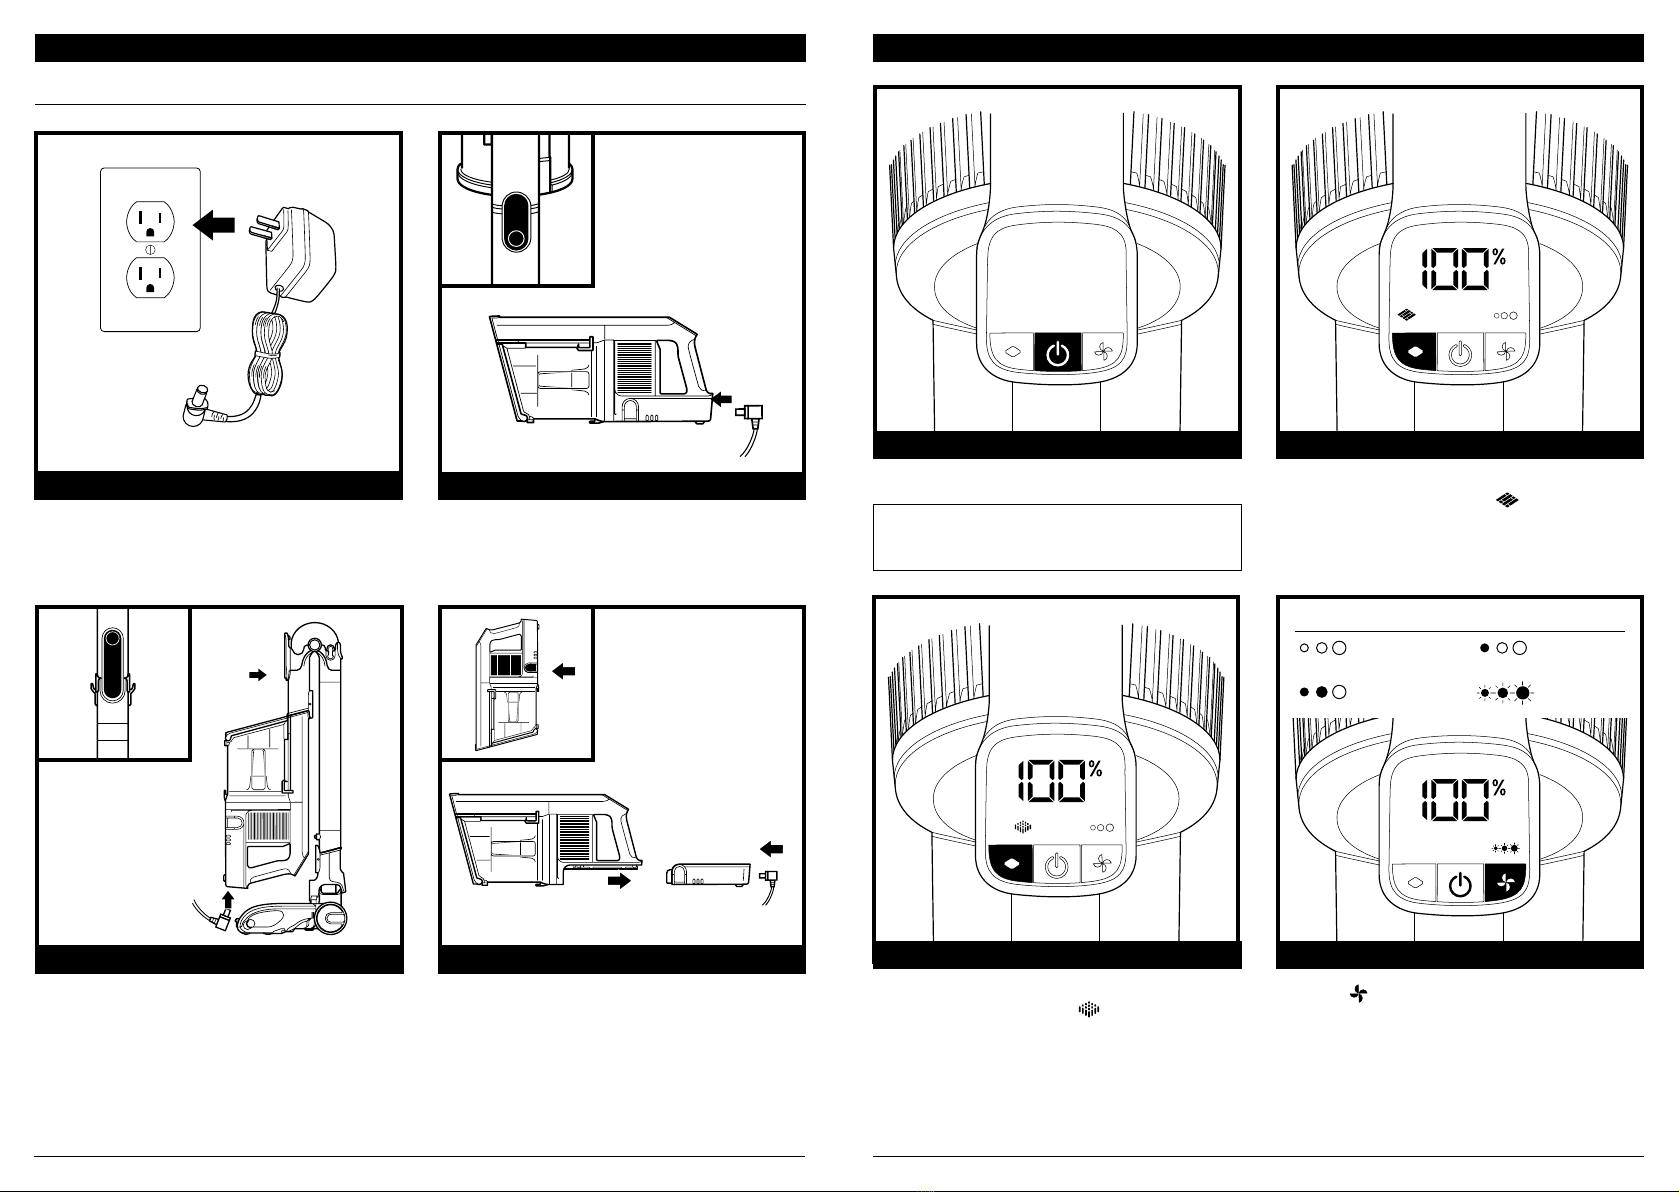
GENERAL USE
8. This appliance can be used by persons
with reduced physical, sensory or mental
capabilities or lack of experience and
knowledge if they have been given
supervision or instruction concerning
use of the appliance in a safe way
and understand the hazards involved.
Cleaning and user maintenance shall not
be made by children.
9. Always turn o the vacuum before
connecting or disconnecting any current
carrying hoses, motorized nozzles,
chargers, batteries, or other electrical or
mechanical parts.
10. DO NOT handle plug or vacuum with
wet hands.
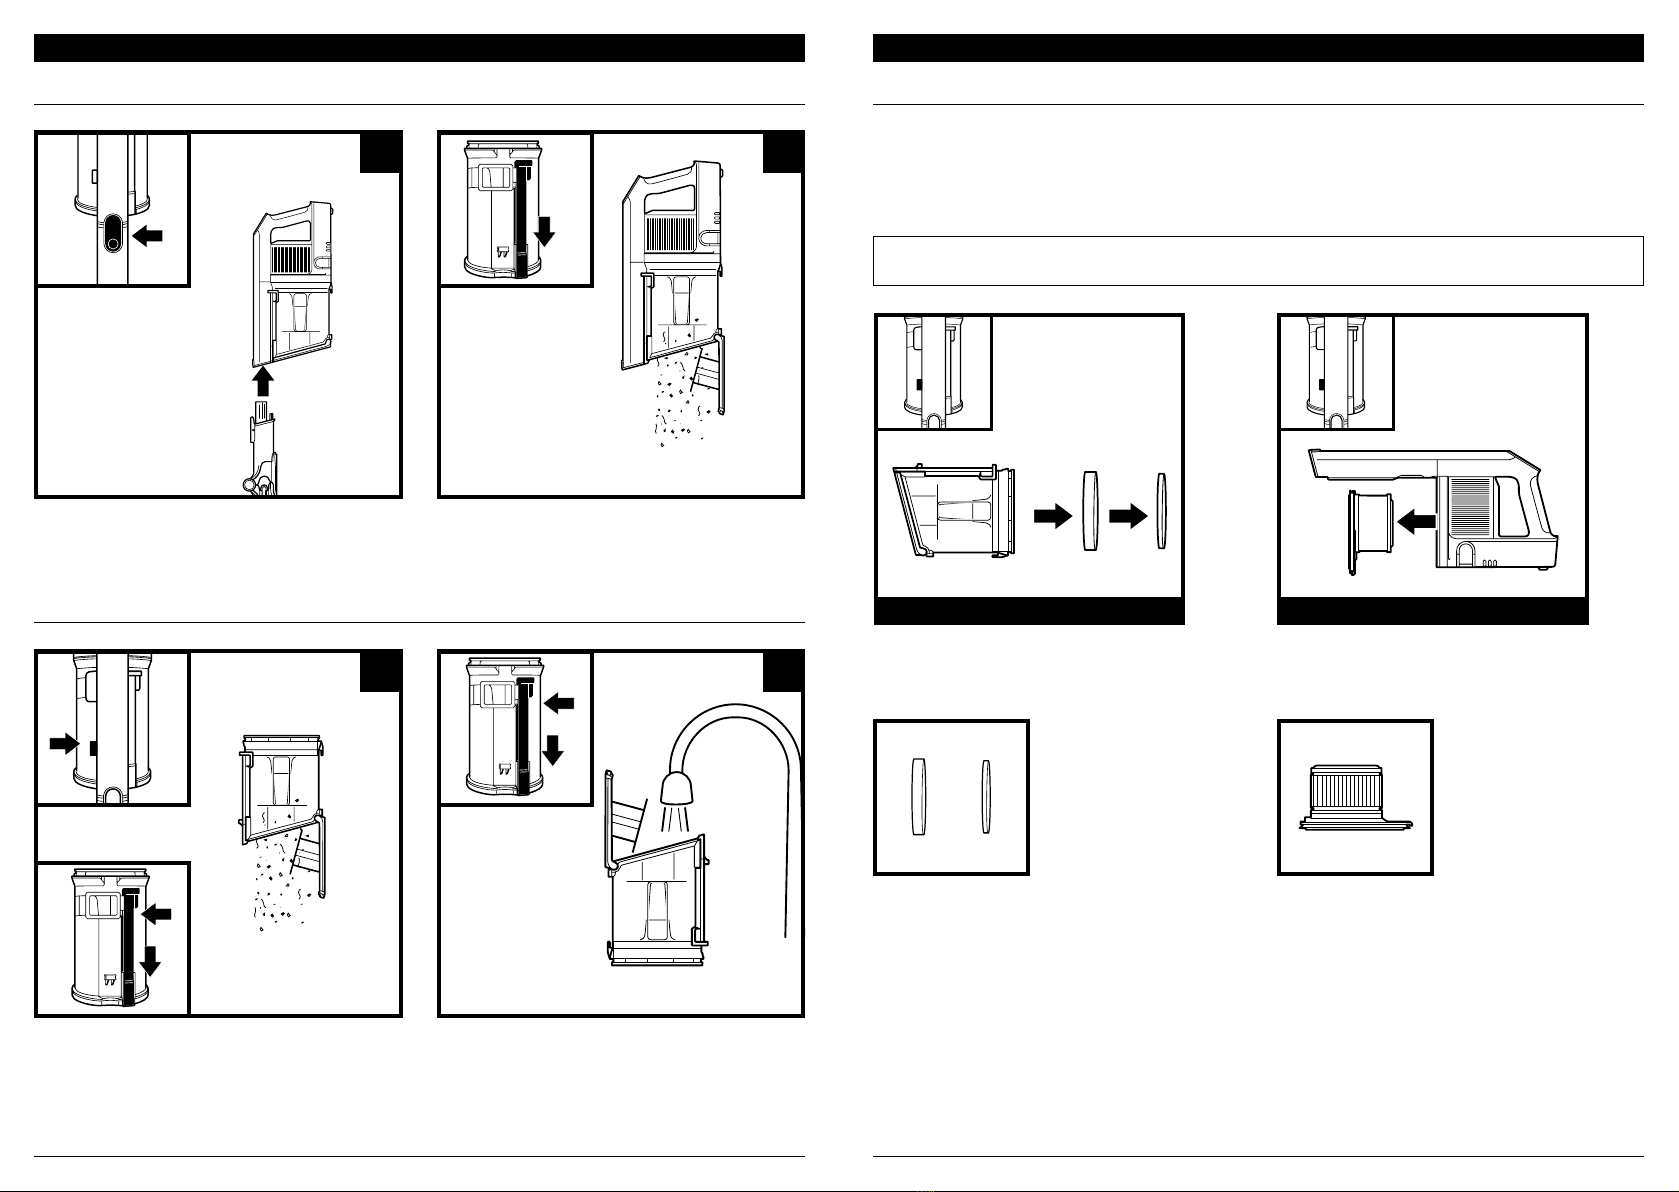
11. DO NOT use without dust cup, HEPA and
Pre-motor filter, and soft roller in place.
12. Only use Shark® branded filters and
accessories. Failure to do so will void
the warranty.
13. DO NOT put any objects into nozzle or
accessory openings. DO NOT use with
any opening blocked; keep free of
dust, lint, hair, and anything that may
reduce airflow.
14. DO NOT use if nozzle or accessory
airflow is restricted. If the air paths or
the motorized floor nozzle become
blocked, turn the vacuum o. Remove
all obstructions before you turn on the
unit again.
15. Keep nozzle and all vacuum openings
away from hair, face, fingers, uncovered
feet, or loose clothing.
16. DO NOT use if vacuum is not working
as it should, or has been dropped,
damaged, left outdoors, or dropped
into water.
17. Use extra care when cleaning on stairs.
18. DO NOT leave the vacuum unattended
while powered on.
19. When powered on, keep the vacuum
moving over the carpet surface at
all times to avoid damaging the
carpet fibers.
20. DO NOT place vacuum on unstable
surfaces such as chairs or tables.
21. DO NOT use to pick up:
a) Liquids
b) Large objects
c) Hard or sharp objects (glass, nails,
screws, or coins)
d) Large quantities of dust (including
drywall, fireplace ash, or embers).
DO NOT use as an attachment to
power tools for dust collection.
e) Smoking or burning objects (hot
coals, cigarette butts, or matches)
f) Flammable or combustible materials
(lighter fluid, gasoline, or kerosene)
g) Toxic materials (chlorine bleach,
ammonia, or drain cleaner)
WARNING
When using an electrical appliance, to reduce the risk of fire, electric shock, injury, or
property damage, basic precautions should always be followed, including the following:
IMPORTANT SAFETY INSTRUCTIONS
FOR HOUSEHOLD USE ONLY
22. DO NOT use in the following areas:
a) Poorly lit areas
b) Wet or damp surfaces
c) Outdoor areas
d) Spaces that are enclosed and may
contain explosive or toxic fumes
or vapors (lighter fluid, gasoline,
kerosene, paint, paint thinners,
mothproofing substances, or
flammable dust)
23. Turn o the vacuum before plugging in or
unplugging the charger.
24. Turn o the vacuum before any
adjustment, cleaning, maintenance or
troubleshooting.
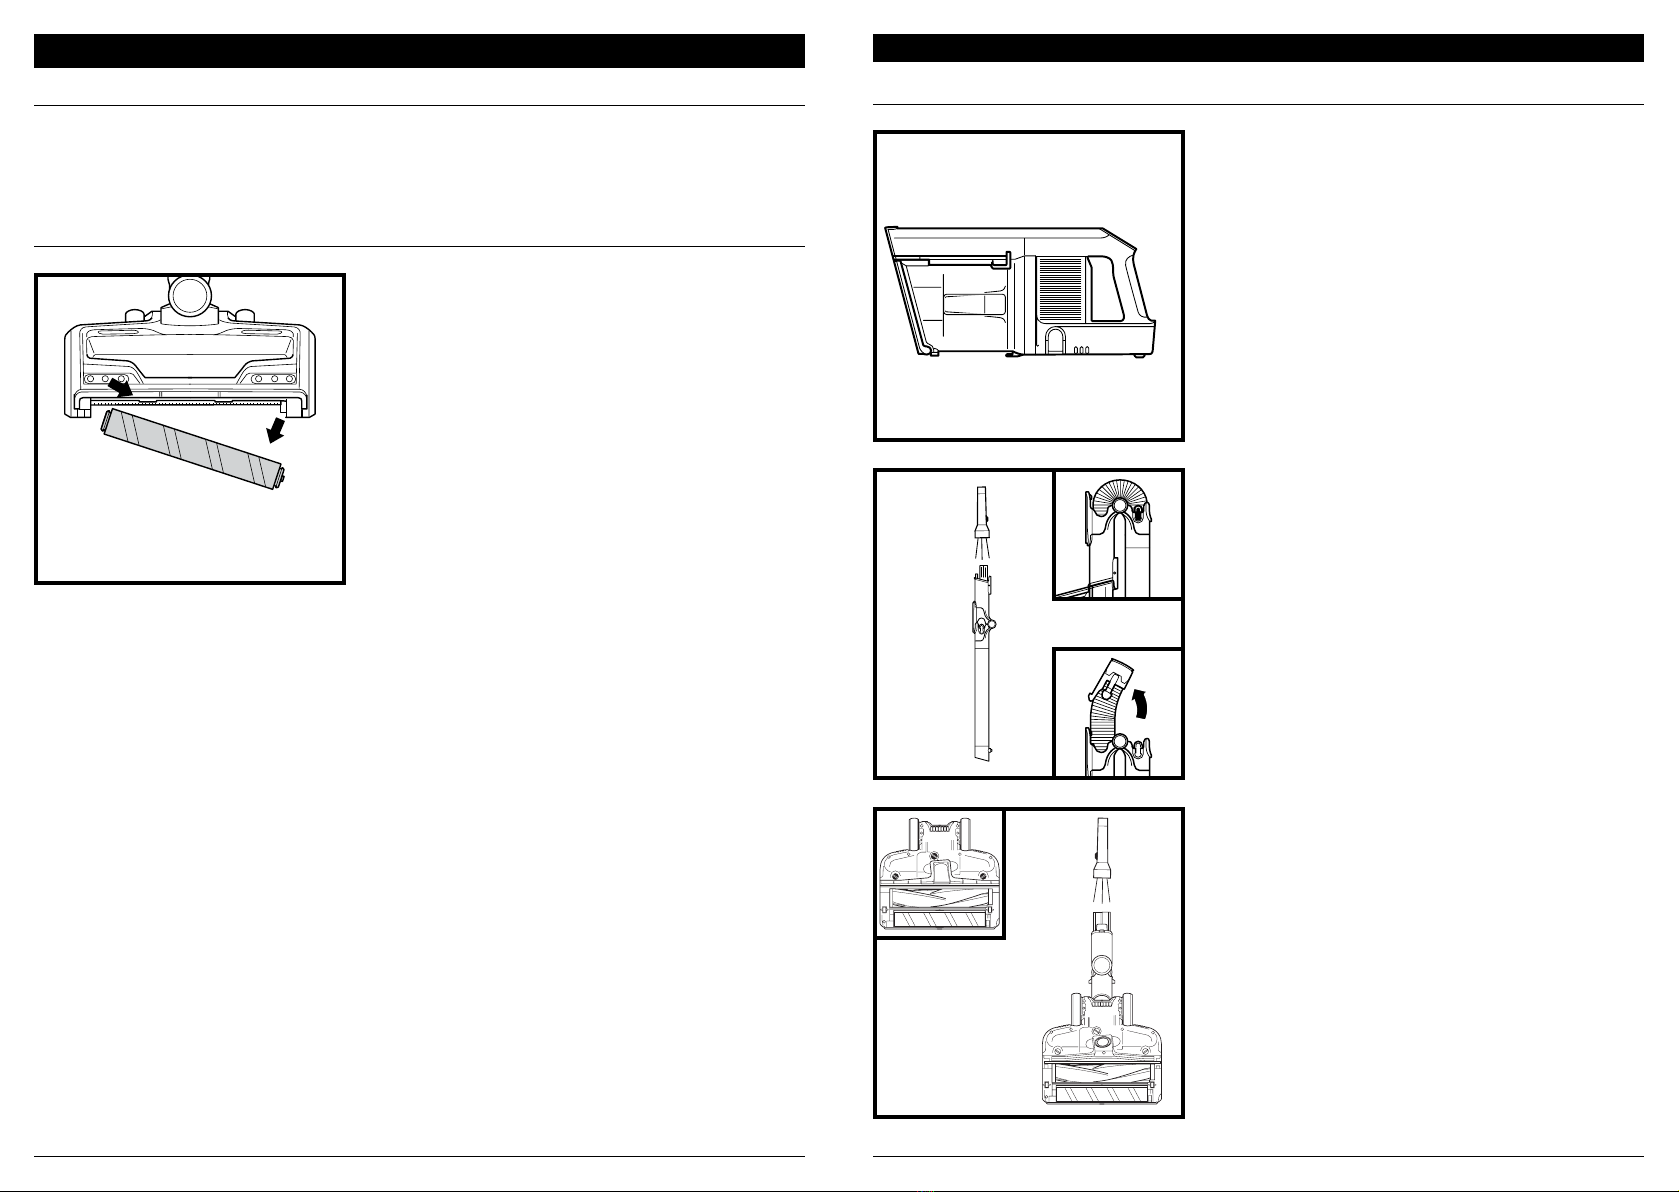
25. During cleaning or routine maintenance,
DO NOT cut anything other than hair,
fibers, or string wrapped around the
brushroll.
26. Allow all filters to air-dry completely
before replacing in the vacuum to
prevent liquid from being drawn into
electric parts.
27. DO NOT modify or attempt to repair the
vacuum or the battery yourself, except as
indicated in this manual.
DO NOT use the battery or vacuum if it
has been modified or damaged.
Damaged or modified batteries may
exhibit unpredictable behavior resulting
in fire, explosion or risk of injury.
28. Always turn o this appliance before
connecting or disconnecting motorized
nozzle or hand tool.
BATTERY PACK
29. The battery is the power source for the
vacuum. Carefully read and follow all
charging instructions.
30. To prevent unintentional starting, ensure
the vacuum is powered o before picking
up or carrying the vacuum. DO NOT carry
the appliance with your finger on the
power switch.
31. Use only Shark® charger DK024-
288080H-U or YLS0243A-T288080 for
single batteries and DK482-288080U or
YLS0483A-T2880802 for dual battery packs.
Use of an incorrect charger may result in
no charging, and/or unsafe conditions.
A charger that is suitable for one type
of battery pack may create a risk of fire
when used with another battery pack.
32. Keep the battery away from all metal
objects such as paper clips, coins, keys,
nails, or screws. Shorting the battery
terminals increases the risk of fire or burns.
33. Under abusive conditions, liquid may be
ejected from the battery. Avoid contact
with this liquid, as it may cause irritation
or burns. If contact occurs, flush with
water. If liquid contacts eyes, seek
medical help.
34. Battery should not be stored at
temperatures below 3°C (37.4°F)
or above 104°F (40°C) to maintain
long-term battery life.
35. DO NOT charge battery at temperatures
below 5°C (40°F) or above 104°C (104°F).
Charging improperly or at temperatures
outside of the specified range may damage
the battery and increase the risk of fire.
36. Store the appliance indoors. DO NOT
use or store it below 3°C (37.4°F). Ensure
the appliance is at room temperature
before operating.
37. DO NOT expose the battery to fire or
temperatures above 265°F (130°C) as it
may cause explosion.
38. Use appliances only with specifically
designated battery packs. Use of any
other battery packs may create a risk of
injury and fire.
39. Disconnect the battery pack from
the appliance before making any
adjustments, changing accessories, or
storing appliance. Such preventive safety
measures reduce the risk of starting the
appliance accidentally.
40. For IZ640H, IZ641H, IZ642H use only
with Shark battery pack XBATF725 and
for IZ662H, IZ682H, IZ683H use only with
Shark battery pack XBATR725.
41. If the charging cord plug does not fit
fully into the outlet, reverse the plug. If
it still does not fit, contact a qualified
electrician. DO NOT force into outlet or
try to modify to fit.
42. To reduce the risk of shock and
unintended operation, turn o power
and remove the Li-Ion battery before
servicing.