Emerson Network Power IRM-S04DI User manual
资料版本 V1.5 归档日期 2009-11-06 BOM 编码 31011980
IRM-S04DI Intelligent Digital Input Sensor
With Phoenix Ports User Manual
1 Overview
IRM-S02TH intelligent digital input sensor with phoenix ports (sensor for short)
is used to measure 4 routes digital input (such as infrared, smoke, door status
and water). It supports MODBUS protocol through RJ45 port in RS-485 mode
to configure and collect data. It is applicable for indoor sites which need digital
signal control such as communication rooms and IT data centers.
1.1 Product Introduction
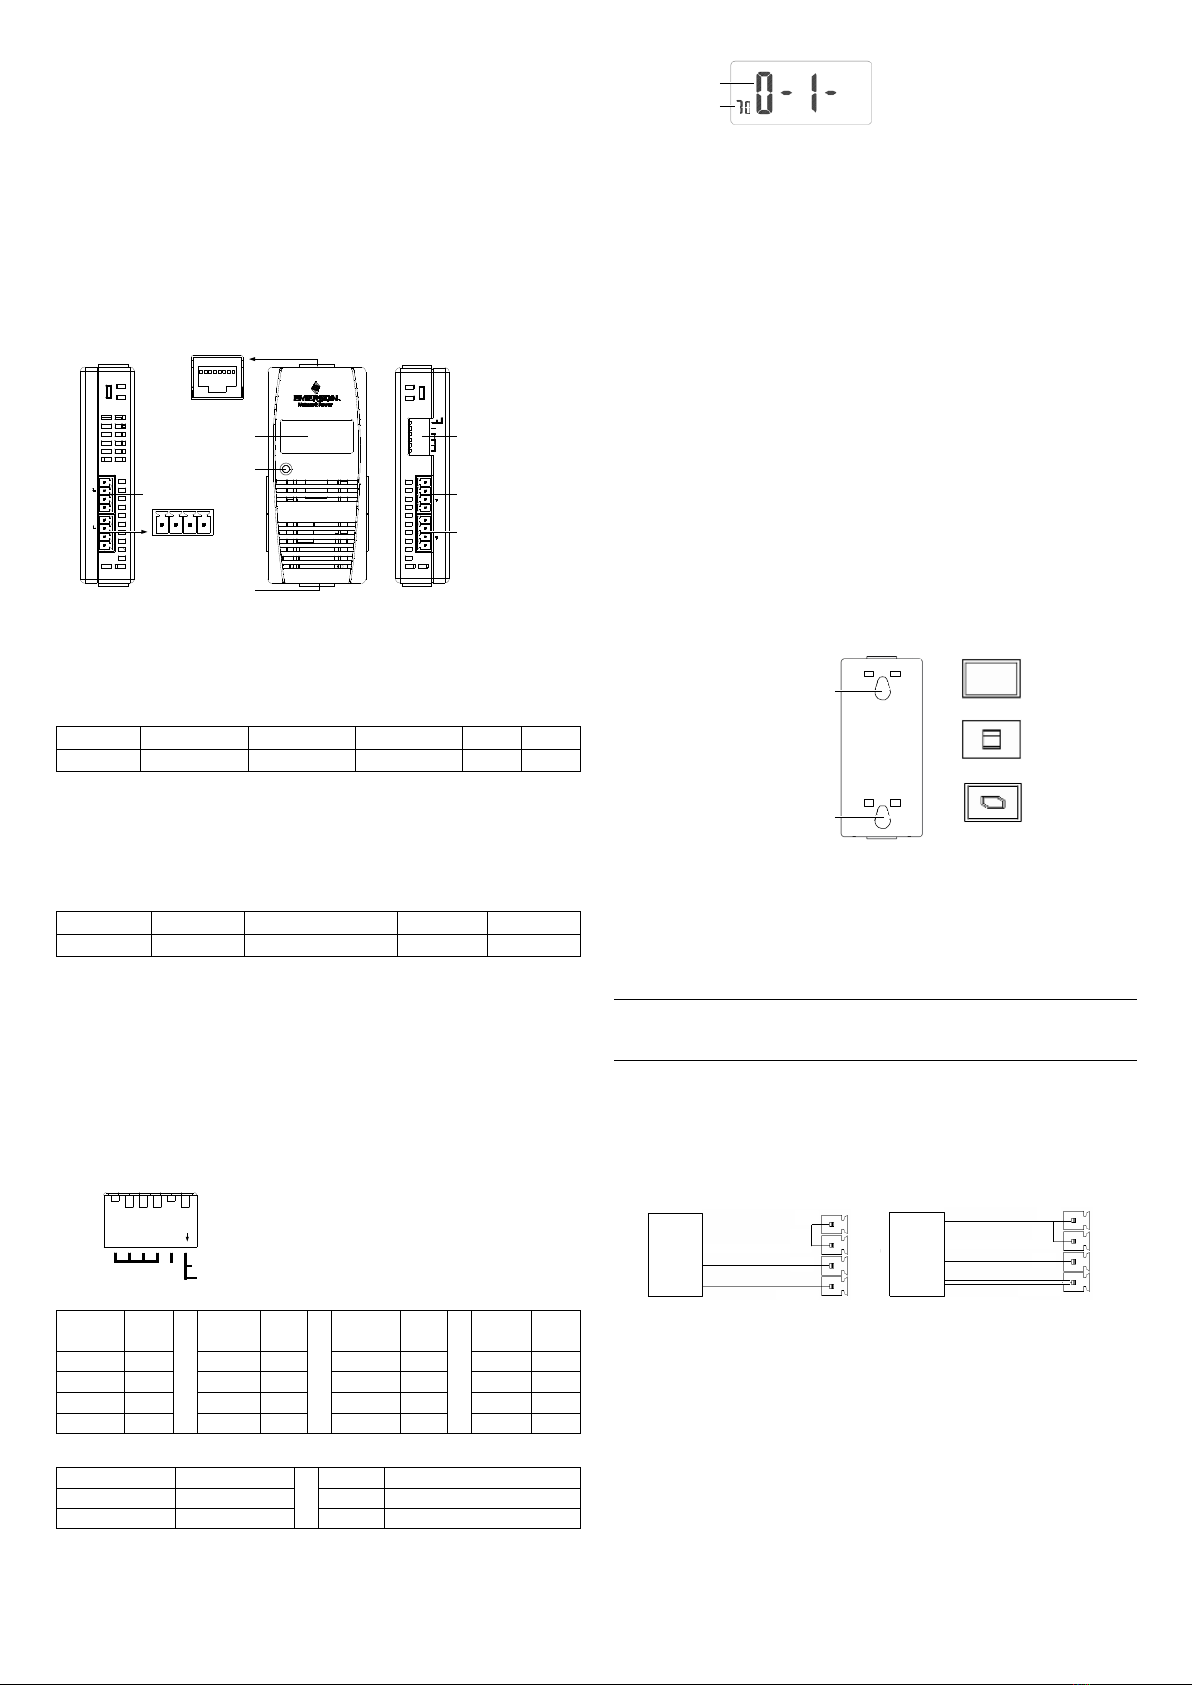
1.1.1 Appearance and Ports
The sensor’s appearance and ports are shown in the following figure.
Digital Input Sensor
IRM-S04DI
ALARM
GND GND
D1 D2
Door1/DI 1 Door2/DI 2
V+(12/24V)
+
V
OFF: Fixed
ON: User
GND GND
D3 D4
Water/DI 3 Smoke/DI 4
V+(12/24V)
V+Group Num
0
RJ45 port
12345678
RJ45 port
LCD display panel
Alarm indicator
Phoenix port 2
Phoenix port 1 Phoenix port 4
Phoenix port 3
DIP switch
1 2 3 4
Left view Front view Right view
Size (height × width × depth): 97mm × 44mm × 22mm Weight: about 100g
1.1.2 RJ45 Port
Two RJ45 ports are used in the electric connection of the sensor for power
supply, communication and equipment connection in series. The definition of
RJ45 ports is shown in the following table.
Pin
Pin1 and Pin2
Pin3 and Pin6
Pin4 and Pin5
Pin7
Pin8
Definition
+12V/24V
NC
GND
D+
D-
1.1.3 Phoenix Port
Four phoenix ports are used to connect 4 routes digital equipment. The
sensor can measure and display whether any equipment is connected and its
status. The phoenix ports also supply +12V/24V power supply, which is the
same as the input power supply of the sensor, to the connected equipment.
The pin definition of the phoenix ports is shown in the following table.
Pin
Pin1
Pin 2
Pin 3
Pin 4
Definition
GND
Equipment detection
Signal
input
+12V/24V
1.1.4 DIP Switch
The DIP switch is used to set sensor address and connected equipment type
to communicate with upper equipment through MODBUS protocol. The
sensor address is composed of group number and serial number within the
group. The DIP1 ~ DIP4 are used to set the group number; The DIP5 are
used to set the serial number within the group; The DIP6 is used to set the
type of connected equipment. For example, the sensor address of 70 is set as
shown in the following figure, among which 0111 means group number 7; 0
means serial number 0 within the group and 1 means that the type of
connected equipment is user customized equipment.
1 2 3 4 5 6
DIP ON
0 1 1 1 0 1
OFF: Fixed
ON: User
Group Num
Note: 1. DIP switch in the ON position means 1,
or it means 0;
2. The sensor address cannot be set as 00,
which is the broadcast address.
The settings of DIP1 ~ DIP4 are listed in the following table.
DIP1 ~
DIP4
Group
DIP1 ~
DIP4
Group
DIP1 ~
DIP4
Group
DIP1 ~
DIP4
Group
0 0 0 0
0
0 1 0 0
4
1 0 0 0
8
1 1 0 0
C
0 0 0 1
1
0 1 0 1
5
1 0 0 1
9
1 1 0 1
d
0 0 1 0
2
0 1 1 0
6
1 0 1 0
A
1 1 1 0
E
0 0 1 1
3
0 1 1 1
7
1 0 1 1
b
1 1 1 1
F
The settings of DIP5, DIP6 are listed in the following table.
DIP5
Num
DIP6
Connected equipment type
0
0
0
Fixed equipment
1
1
1
User customized equipment
1.1.5 LCD Display Panel
The LCD display panel (as shown in the following figure) can display sensor
address and measured data in real time. The four numbers from left to right in
the data area means the status of input digital 1, 2, 3 and 4 respectively.
Sensor address
Measured data Note: "-" means no equipment connected
"0" means no alarm
"1" means alarm exists
1.1.6 Alarm Indicator
When measured digital level is the same as configured digital level
correspondingly, the alarm indicator flashes; or the indicaor extinguishes.
1.2 Technical Specification
Operating voltage: 9Vdc ~ 28Vdc; Power consumption: 0.2W
2Installation
2.1 Environment Requirement
1. Operating environment should be free of conductive dust and
metal-corrosive & insulation-breaking gases.
2. Avoid using the sensor in watery or foggy places.
3. Keep a clearance of more than 20mm around the sensor’s airway to
ensure ventilation inside and outside of the sensor.
4. Operating temperature: -10°C ~ +50°C; Storage temperature: -30°C ~
+70°C; Humidity: 5% ~ 95%RH (non-condensing).
2.2 Unpacking Inspection
Unpack the sensor and visually inspect the sensor’s appearance. If any
damage is found, please contact the carrier immediately.
Check against the consignment list to make sure the sensor and accessories
are complete and correct.
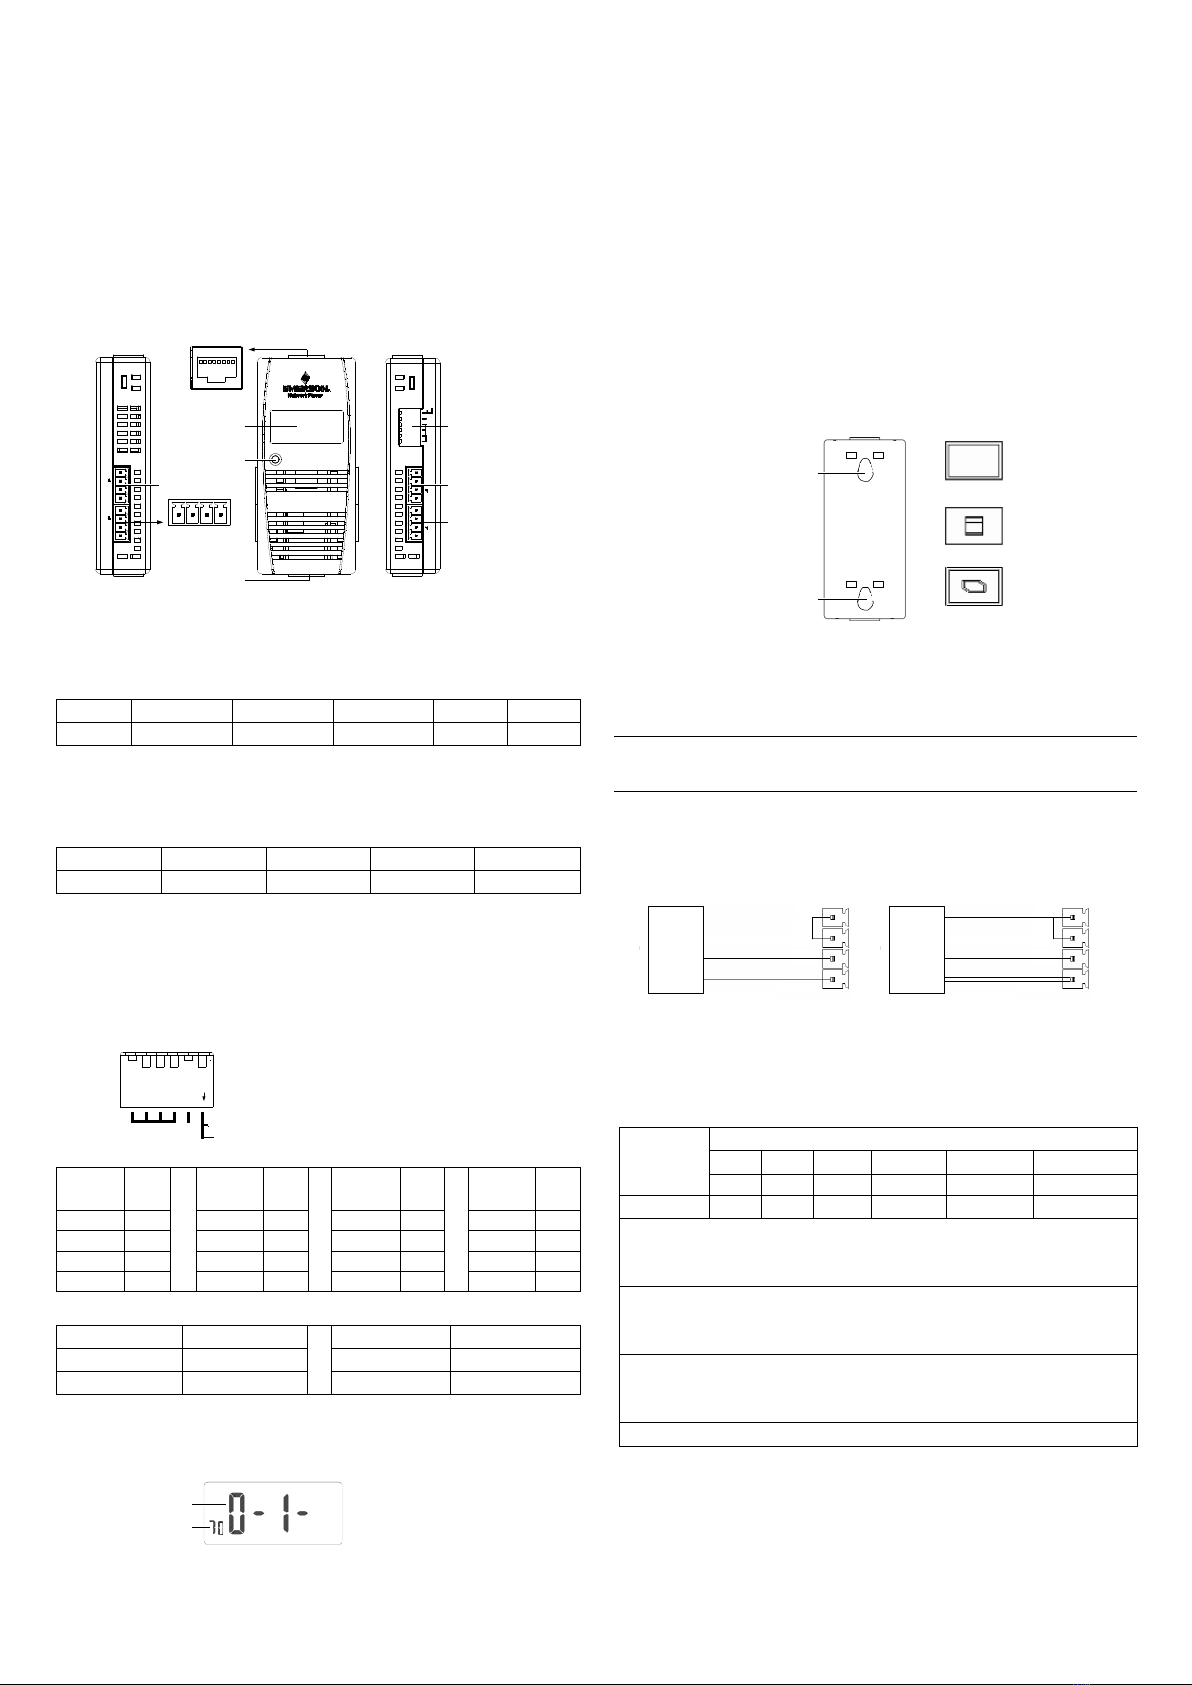
2.3 Mechanical Installation
Three modes are available for the sensor’s mechanical installation. The
installation accessories and modes are shown in the following figure.
Back installation hole Magnet pothook
L pothook
T pothook
Sensor
Back installation hole
Mode one: Insert the magnet pothook into the sensor’s back installation hole,
and the sensor can absorb on iron surface.
Mode two: Insert the L pothook into the sensor’s back installation hole, and
hang the pothook in the square hole of rack’s column with care.
Mode three: Insert the T pothook into the sensor’s back installation hole,
insert the bulge of the T pothook into the installation slot of the rack’s basic
frame, and rotate the sensor 90 degree clockwise with care.
Note
The sensor can not only be installed through the three kinds of accessories
above, but also can hang on fixed screws directly through the installation hole.
2.4 Cable Connection
1. Insert one end of the standard straight network cable into the sensor’s
RJ45 port, and insert the other end into the sensor appropriative port of upper
equipment or sensor in series.
2. Refer to 1.1.3 Phoenix Port for port definition, and connect cables as
shown in the following figure.
Equipment detect
GND
DI signal input
Phoenix port
Door
status,
water,
smoke DI signal input
Equipment detect
GND
+12V/24V
Phoenix port
Infrared DI signal input
DI signal input
3 Maintenance
1. To clean the sensor, you should cut off the power and use a piece of soft
cloth to wipe it.
2. Do not disassemble the sensor, or the inside subtle parts may be damaged.
Emerson Network Power Co., Ltd.
Address: No.1 Kefa Rd., Science & Industry Park, Nanshan District 518057,
Shenzhen China
Homepage: www.emersonnetworkpower.com.cn
E-mail: support@emersonnetwork.com.cn
Copyright © 2009 by Emerson Network Power Co., Ltd.
All rights reserved. The contents in this document are subject to change
without notice.
Version V1.5 Revision date November 6, 2009 BOM 31011980

Version V1.5 Revision date November 6, 2009 BOM 31011980
Version V1.5 Revision date November 6, 2009 BOM 31011980
IRM-S04DI Phoenix 接口智能数字量
输入传感器用户手册
1 概述
IRM-S04DI Phoenix 接口智能数字量输入传感器(简称传感器),用于测量并显
示4路数字量(如红外、烟感、门磁、水浸等),通过 RJ45 接口以 RS-485 方式
支持 MODBUS 协议,进行数据配置和采集。可应用于通信机房、IT 数据中心等
需要数字量信号测控的室内场所。
1.1 产品介绍
1.1.1 外观和接口
传感器的外观和接口如下图所示。
Digital Input Sensor
IRM-S04DI
ALARM
GND GND
D1 D2
Door1/DI 1 Door2/DI 2
V+(12/24V)
+
V
OFF: Fixed
ON: User
GND GND
D3 D4
Water/DI 3 Smoke/DI 4
V+(12/24V)
V+Group Num
0
RJ45接口
12345678
RJ45接口
LCD显示屏
告警指示灯
Phoenix接口2
Phoenix接口1 Phoenix接口4
Phoenix接口3
拨码开关
1 2 3 4
左视图 正视图 右视图
尺寸(高×宽×深):97mm×44mm×22mm 重量:约 100g
1.1.2 RJ45 接口
传感器与外部的电气连接是通过两个 RJ45 接口完成的,RJ45 接口用于供电、通
信和设备级联,其定义参见下表。
引脚
Pin1 和Pin2
Pin3 和Pin6
Pin4 和Pin5
Pin7
Pin8
定义
+12V/24V
NC
GND
D+
D-
1.1.3 Phoenix 接口
4个Phoenix 接口用于接入 4路数字量设备。传感器可实时测量显示是否有设备
接入及接入设备的状态,并对接入设备提供+12V/24V 电源,该电源电压与传感
器输入的电源电压相同。Phoenix 接口插针定义请参见下表。
插针
插针 1
插针 2
插针 3
插针 4
定义
GND
设备检测
信号输入
+12V/24V
1.1.4 拨码开关
拨码开关用于设置传感器地址和接入设备类型,通过 MODBUS 协议和上层设备
通信。传感器地址由组号和组内顺序号组成,其中 DIP1~DIP4 用于设置组号,
DIP5 用于设置组内顺序号,DIP6 用于设置接入设备类型。例如传感器地址为 70,
其设置方法如下图所示。其中 0111 代表组号 7,0代表组内顺序号 0,1代表接
入数字量设备为用户自定义设备。
1 2 3 4 5 6
DIP ON
0 1 1 1 0 1
注:1.拨码开关置于ON代表1,否则代表0;
2.传感器地址不能设为00, 00为广播地址。
OFF: Fixed
ON: User
Group Num
拨码开关 DIP1~DIP4 的设置见下表。
DIP1~
DIP4
组号
DIP1~
DIP4
组号
DIP1~
DIP4
组号
DIP1~
DIP4
组号
0 0 0 0
0
0 1 0 0
4
1 0 0 0
8
1 1 0 0
C
0 0 0 1
1
0 1 0 1
5
1 0 0 1
9
1 1 0 1
d
0 0 1 0
2
0 1 1 0
6
1 0 1 0
A
1 1 1 0
E
0 0 1 1
3
0 1 1 1
7
1 0 1 1
b
1 1 1 1
F
拨码开关 DIP5、DIP6 的设置见下表。
DIP5
顺序号
DIP6
接入设备类型
0
0
0
固定设备
1
1
1
用户自定义设备
1.1.5 LCD 显示屏
LCD 显示屏(如下图所示)可实时显示传感器地址及测量数据,数据区四位数
字从左到右依次为输入数字量 1、2、3、4的状态。
传感器地址
测量数据 注:“-”代表未接设备
“0”代表无告警
“1”代表有告警
1.1.6 告警指示灯
当测量的数字量电平和配置的对应数字量电平相同时,告警指示灯闪烁;否则,
告警指示灯灭。
1.2 技术指标
工作电压:9Vdc~28Vdc;功耗:0.2W
2 安装
2.1 环境要求
1.无导电尘埃、无腐蚀金属及破坏绝缘的气体。
2.避免在有水、有雾的场所使用。
3.传感器的通风孔周围预留大于 20mm 空间,以确保传感器内外空气流通。
4.工作温度:-10℃~+50℃;储存温度:-30℃~+70℃;
湿度:5%~95%RH(无凝露)。
2.2 开箱检验
打开传感器包装,目测传感器外观,如有损坏现象请立即通知承运商。
对照发货清单,检查传感器及附件是否齐全,正确。
2.3 机械安装
传感器共有三种安装方式,安装附件及其安装方式如下图所示。
背部安装孔
背部安装孔
磁铁挂钩
L挂钩
T挂钩
传感器
方式一:将磁铁挂钩扣入传感器的背部安装孔,传感器可吸附在铁质表面。
方式二:将 L挂钩扣入传感器的背部安装孔,轻轻将挂钩挂在机架立柱的方形
孔内。
方式三:将 T挂钩扣入传感器的背部安装孔,旋转挂钩的凸出部分插入机架主
框架型材的安装槽,轻轻将传感器顺时针旋转 90 度便安装完毕。
注意
传感器既可以通过以上三种附件安装,也可以直接通过安装孔挂在固定螺钉上。
2.4 接线
1.将标准直通网线的一端插入传感器的 RJ45 接口,网线另一端插入上层设备
的传感器专用接口或级联的传感器。
2.按照下图连线,有关接口的定义请参见 1.1.3 Phoenix
接口
。
设备检测
GND
DI信号输入
Phoenix 接口
门磁、
水浸、
烟感 DI信号输入
设备检测
GND
DI信号输入
+12V/24V
Phoenix 接口
红外
DI信号输入
3 维护
1.如需清洁,请断开电源后用软布擦拭。
2.请不要自行拆开传感器,以免损坏内部精密器件。
附录 有毒有害物质或元素标识表
部件名称
有毒有害物质或元素
铅
汞
镉
六价铬
多溴联苯
多溴联苯醚
Pb
Hg
Cd
Cr6+
PBB
PBDE
制成板
×
○
○
○
○
○
○:表示该有毒有害物质在该部件所有均质材料中的含量在 SJ/T-11363-2006 规定
的限量要求以下;×:表示该有毒有害物质至少在该部件的某一均质材料中的含量
超出 SJ/T11363-2006 规定的限量要求
艾默生网络能源有限公司一直致力于设计和制造环保的产品,我们会通过持续的研
究来减少和消除产品中的有毒有害物质。以下部件或者应用中含有有毒有害物质是
限于目前的技术水平无法实现可靠的替代或者没有成熟的解决方案:制成板含有铅
关于环保使用期限的说明:本产品的环保使用期限(已标识在产品本体),是指在
正常使用条件和遵守本产品的安全注意事项的情况下,从生产日起本产品含有的有
毒有害物质或元素不会对环境、人身和财产造成严重影响的期限
适用范围:IRM-S04DI Phoenix 接口智能数字量输入传感器
艾默生网络能源有限公司
地址:深圳市南山区科技工业园科发路一号 邮编:518057
公司网址:www.emersonnetworkpower.com.cn
客户服务热线:4008876510 E-mail:service@emersonnetwork.com.cn
资料版本:V1.5 归档时间:2009-11-06 BOM 编号:31011980
版权所有,保留一切权利。内容如有改动,恕不另行通知。

Version V1.5 Revision date November 6, 2009 BOM 31011980


