Emerson Research ES2 User manual

MICRO AUDIO SYSTEM
with
CD PLAYER,DIGITALTUNER
and
TOUCH PANELCONTROLS
ES2WoodgrainFinish
ES2BK Black Finish
ES2SSilverFinish
OWNER'SMANUAL
Visitourweb siteatwww.emersonradio.com
ES2_ib041503.p65 15/4/2003, 9:3631
1
TO PREVENT FIRE OR SHOCK HAZARD, DO NOT USE THIS PLUG WITH AN
EXTENSION CORD, RECEPTACLE OR OTHER OUTLET UNLESS THE BLADES
CAN BE FULLY INSERTED TO PREVENT BLADE EXPOSURE. TO PREVENT FIRE
OR SHOCK HAZARD, DO NOT EXPOSE THIS APPLIANCE TO RAIN OR MOISTURE.
IMPORTANTSAFETYINSTRUCTIONS
1.) Read these instructions.
2.) Keep these instructions.
3.) Heed all warnings.
4.) Follow all instructions.
5.) Do not use this apparatus near water.
6.) Clean only with dry cloth.
7.) Donotblockanyventilationopenings.Installinaccordancewiththemanufacturer’sinstructions.
8.) Donot install near any heat sources such as radiators,heat registers, stoves, or other apparatus
(including amplifiers) that produce heat.
9.) Do not defeat the safety purpose of the polarized or grounding-type plug. A polarized plug has
two blades with one wider than the other. A grounding type plug has two blades and a third
grounding prong. The wide blade or the third prong are provided for your safety. If the provided
plug does not fit into your outlet, consult an electrician for replacement of the obsolete outlet.
10.) Protect the power cord from being walked on or pinched particularly at plugs, convenience
receptacles, and the point where they exit from the apparatus.
11.) Only use attachments / accessories specified by the manufacturer.
12.) Unplug this apparatus during lightning storms or when unused for long periods of time.
13.) Refer all servicing to qualified service personnel. Servicing is required when the apparatus has
been damaged in any way, such as power-supply cord or plug is damaged, liquid has been
spilled or objects have fallen into the apparatus, the apparatus has been exposed to rain or
moisture, does not operate normally, or has been dropped.
14.) This appliance shall not be exposed to dripping or splashing water and no object filled with
liquids such as vases shall be placed on the apparatus.
15.) Do not overload wall outlet. Use only power source as indicated.
16.) Use replacement parts as specified by the manufacturer.
17.) The product may be mounted to a wall only if recommended by the manufacturer.
18.) Upon completion of any service or repairs to this product, ask the service technician to perform
safety checks.
!
CAUTION
RISK OFELECTRICSHOCK
DONOTOPEN
The lightning flashwitharrow-
head symbol,withinan equi-
lateraltriangleisintented to
alertthe usertothe presence
ofuninsulated‘dangerousvoltage’
withinthe product’s enclosure
thatmaybe ofsufficient
magnitude toconstitutearisk
ofelectricshock topersons.
The exclamation pointwithin
an equilateraltriangleisin-
tended toalertthe userto
the presenceofimportant
operating and maintenance
(servicing)instructionsin
the literatureaccompany-
ing the appliance.
WARNING:TOREDUCETHE
RISK OFELECTRICSHOCK
DONOTREMOVE COVER
(ORBACK),NOUSER
SERVICEABLEPARTSINSIDE
REFERSERVICINGTO
QUALIFIEDSERVICE
PERSONNEL.
CAUTION
ES2_ib041503.p65 15/4/2003, 9:361

2
Forfuturereference,recordthe serialnumberinthe spaceprovided.
ModelNo:ES2
SerialNumber:
BEFOREWEBEGIN
Thankyou..................
forpurchasingthisEmersonResearchaudioproduct.TheEmersonResearch
brand isyourassuranceofquality,performanceand value.
Ourengineershaveincluded manyusefuland convenientfeaturesinthis
product. Pleasebe suretoread thisOwner'sManualcompletelytomake
sureyou aregetting the maximumbenefitfromeachfeature.
Thisproductwasmanufactured using the highestqualitycomponentsand
standardsofworkmanship.It wastested byEmerson Researchinspectors
and found tobe inperfectworking orderbeforeitleft ourfactory.However,
thereisalways the chancethatsomeproblemmayoccurbecauseofrough
handling during shipmenttothe retail storeortothe finalconsumer.
If, afterreading thisManual,you experienceanyproblemswiththe operation
ofthisproduct, pleaserefertothe instructionsforobtaining serviceatthe
end ofthisManual.Emerson Researchand Emerson Researchretailersare
committed toyoursatisfaction.Onceagain,thanks forpurchasing this
Emerson Researchaudioproduct.
ES2_ib041503.p65 15/4/2003, 9:362
3
•Operatecontrolsand switchesas
described inthe manual.
•Beforeturning on the power,make
certainthatthe connecting cordsand
powercordareproperlyinstalled.
•When moving the set, be suretofirst
disconnectthe powercordand remove
cordsconnected tootherequipment.
•Avoidinstalling thisunitinplaces
exposed todirectsunlightorcloseto
heatradiating appliancessuchas
electricheaters,on top ofotherstereo
equipmentthatradiatestoo muchheat,
placeslackingventilationordustyareas,
placessubjecttoconstantvibrationand/
orhumidormoistareas.
FCC INFORMATION
Thisequipmenthasbeen tested and found tocomplywiththe limitsforaclass Bdigital
Device,pursuanttopart15 ofthe FCC Rules.Theselimitsaredesigned toprovide
reasonableprotection againstharmfulinterferenceinaresidentialinstallation.This
equipmentgenerates,uses,and can radiateradiofrequency energyand,ifnotinstalled
and used inaccordancewiththe instructions,maycauseharmfulinterferencetoradio
communications.However,thereisno guarantee thatinterferencewill notoccurina
particularinstallation.If thisequipmentdoescauseharmfulinterferencetoradioor
television reception,whichcan be determined byturning the equipmentoff and on,the
userisencouraged totrytocorrectthe interferencebyone ormoreofthe following
measures:
•Reorientorrelocatethe receiving antenna.
•Increasethe separation between the equipmentand receiver.
•Connecttheequipmentintoan outleton acircuitdifferentfromthattowhichthe receiver
isconnected.
•Consultthe dealeroran experienced radio/TVtechnician forhelp.
Thisdevicecomplieswithpart15 ofthe FCC Rules.Operation issubjecttothe following
twoconditions:
(1)Thisdevicemaynotcauseharmfulinterference,and
(2)Thisdevicemustacceptanyinterferencereceived,including interference
thatmaycauseundesired operation.
IMPORTANTNOTES
CLASS 1LASERPRODUCT
ThisproductcontainsalowpowerLaserDevice.
CAUTION
INVISIBLELASERRADIATION
WHENOPENANDINTERLOCKS
DEFEATED.
AVOIDEXPOSURETOBEAM
CLASS 1LASERPRODUCT
APPAREILÁLASERDECLASSE 1
PRODUCTOLASERDECLASE 1
ES2_ib041503.p65 15/4/2003, 9:363

4
Connecting TheAC PowerCord
Thissystemisdesigned tooperateon 120V60HzACpoweronly.Connecting this
systemtoanyotherpowersupplymaycausedamage tothe unitwhichisnotcovered
byyourwarranty.
1.Unwind the ACPowerCordcompletely.
2. Insertthe plug intoanyconvenient120V60HzACoutlet.
CAUTION!!
Thisunithasapolarized ACplug withone wide blade and one narrowblade.This
plug will onlyfitintoamatching polarizedACoutlet. Thisisasafetyfeaturetoreduce
the possibilityofelectricshock.If thisplug will notfitinyourACoutlet, you probably
havean outdated non-polarized outlet.
You shouldhaveyouroutdated outlet
changed byaqualified,licensed
electrician.Donotfilethe wide blade
on the plug,orusean adaptertomake
the plug fitintoyouroutlet. Thisdefeats
thesafetyfeatureand couldexposeyou
toelectricshock.
AC Plug
AC Outlet
PROTECT YOUR FURNITURE !!
Thismodelisequipped withnon-skidrubber'feet'topreventthe productfrommoving
when you operatethe controls.These'feet'aremade fromnon-migrating rubber
materialspeciallyformulated toavoidleaving anymarks orstainson yourfurniture.
Howevercertaintypesofoil based furniturepolishes,wood preservatives,orcleaning
sprays maycausethe rubber'feet'tosoften,and leavemarks orarubberresidue on
the furniture.Topreventanydamage toyourfurniturewestronglyrecommend that
you purchasesmall self-adhesivefeltpads,availableathardwarestoresand home
improvementcenterseverywhere,and applythesepadstothe bottomofthe rubber
'feet'beforeyou placethe producton fine wooden furniture.
ES2_ib041503.p65 15/4/2003, 9:364

5
Location OfControlsAnd Indicators
FrontPanel
1.OSTANDBY (Power).
2.HeadphonesJack.
3.CD doorOPEN/CLOSE /SNOOZE.
4.Multifunction LCDDisplay.
5.CD PLAY/PAUSE RP
6.CD STOPC
7.BReverseSKIP/Search.
8.FForwardSKIP/Search.
9.CD REPEAT/CHANNELDOWN.
10.CD RANDOM/CHANNELUP.
11.AUXInputSelect.
12.TUNER/BAND Select.
13.SLEEP
14.ALARM
15.GraphicEqualizer.
16.MUTE.
17.DisplayMODE/CD
REMAINTime
18.CD /TunerMEMORY/
CLOCKADJ.
19.VOLUMEDown/Up.
19a.CD /INTROSelect.
ES2_ib041503.p65 15/4/2003, 9:365

6
20.SUB-WOOFEROutputJack.
21.AUXInputJack.
22.LINEOUTJack.
23.AM/FMantenna terminals.
24.Speakerterminals.
25.ACPowerCord.
RearPanel
ES2_ib041503.p65 15/4/2003, 9:366
7
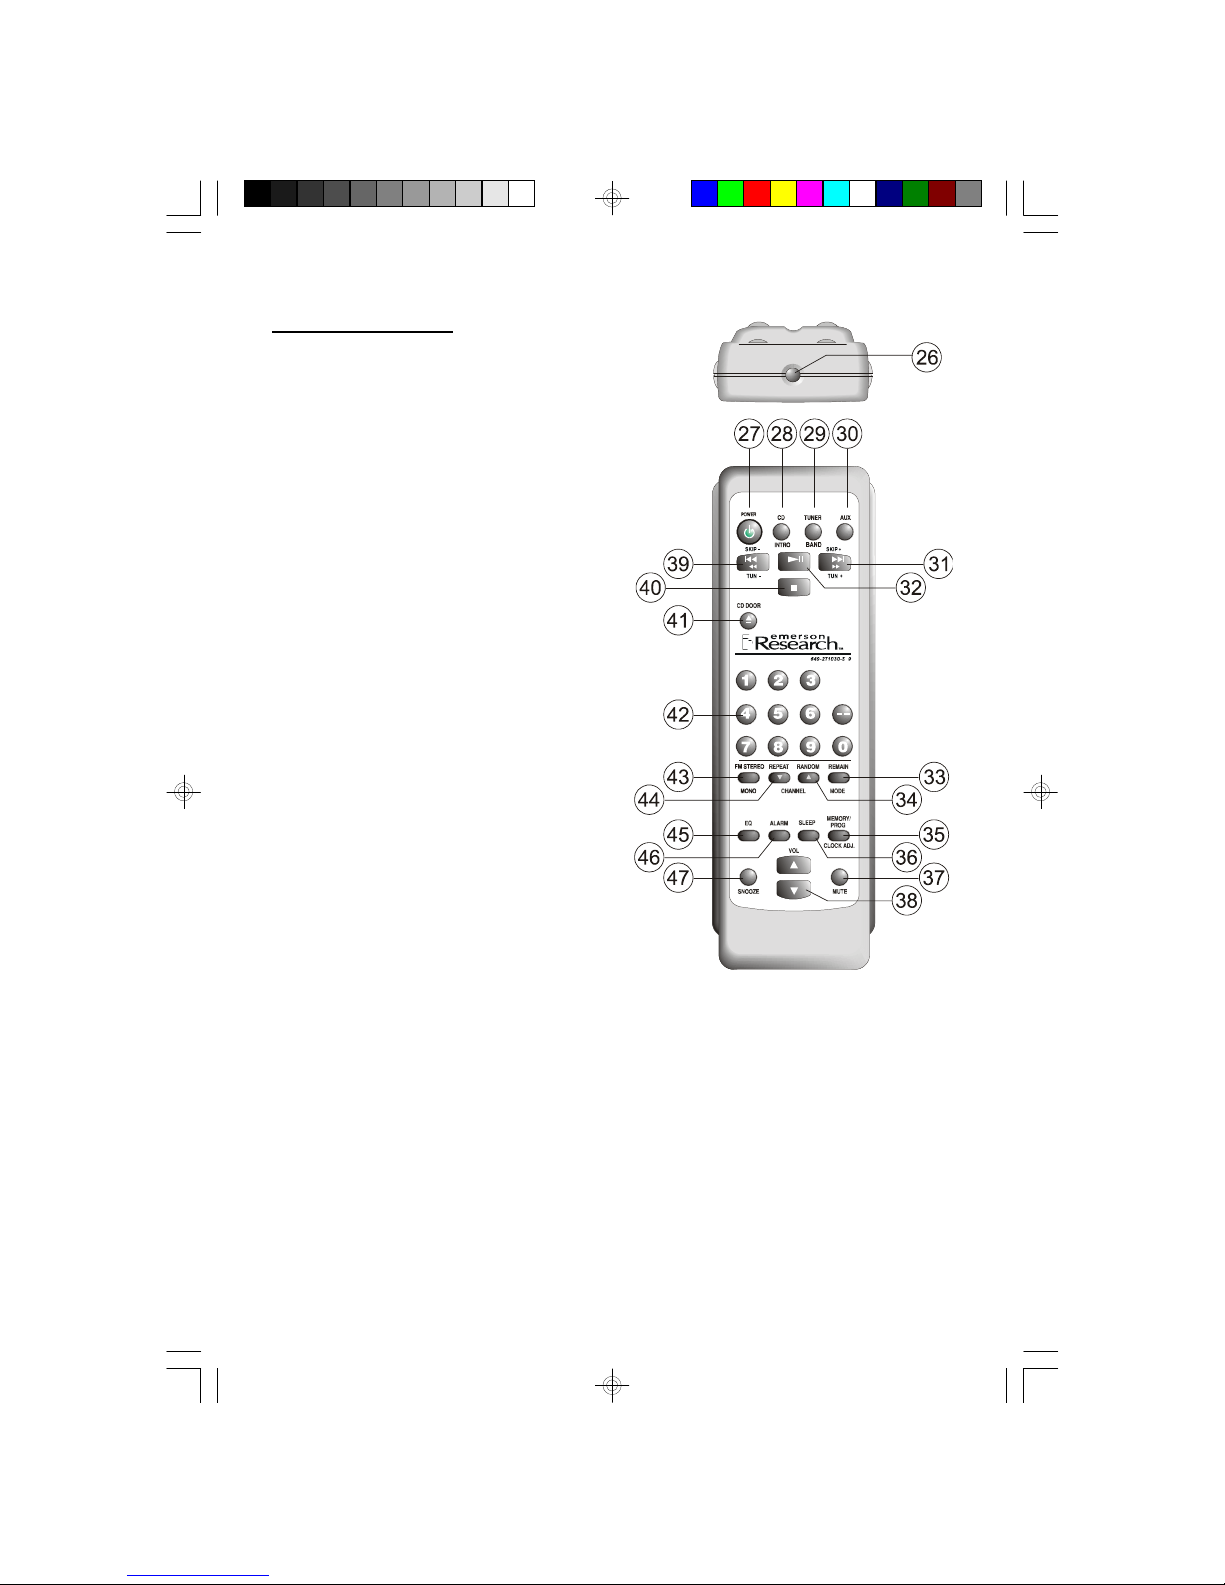
RemoteControl
26. Infrared Transmission LED.
27.OSTANDBY (Power).
28.CDSelect/INTROMode.
29.TUNER/BAND Select.
30.AUXInputSelect.
31.FForwardSKIP/Search.
32.CD PLAY/PAUSE RP
33.DisplayMODE/CD REMAINTime.
34.CD RANDOM/CHANNELUp.
35.CD /TunerMEMORY/PROG /
CLOCKADJ.
36.SLEEP.
37.MUTE.
38.VolumeUp/Down.
39.BReverseSKIP/Search.
40.CD STOPC
41.CDDOOROpen/Close.
42.Track /channelnumbers.
43.FMSTEREO/MONOSelect.
44.CD REPEAT/CHANNELDown.
45. GraphicEqualizer.
46.ALARM.
47.SNOOZE.
ES2_ib041503.p65 15/4/2003, 9:367
8
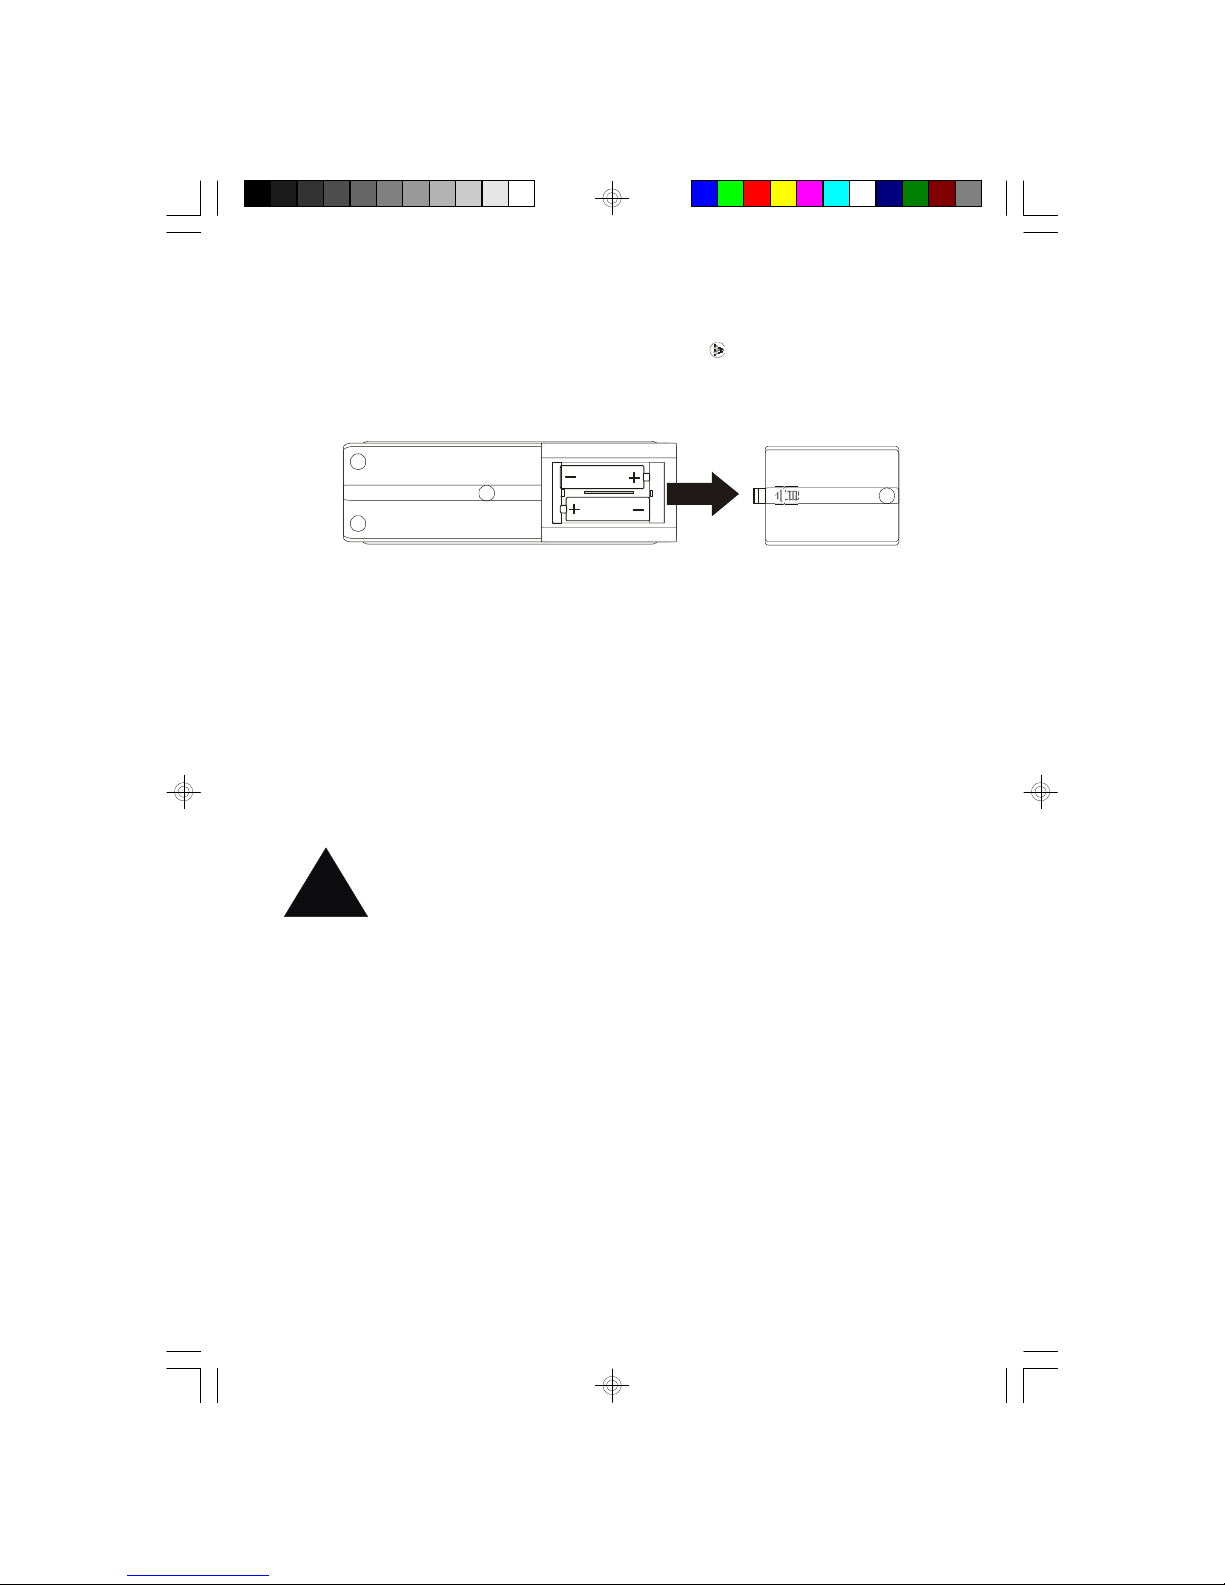
Installing TheRemoteControlBatteries
Atthe back ofthe remote,press the indented area and slide open the battery
compartment.
Insert2‘AAA’batteries(notincluded).Makesurethe polarityofthe batteriesisas
shownabove.
Oncethe batteriesareinserted,slide the batterycompartmentclosed.
If the remotestopsworking,it'smostlikelythatthe batteriesneed replacing.Always
useAlkaline batteriesforlongestlifeand bestperformance.
Disposeofoldbatteriessafely.Donotthrowthemintoafire.
If you'renotusing the remoteforafewweeks ormore,removethe batteries.
Note:
Mostfunctionscan be operated bythe remote.However,someofthe controlsare
alsopresenton the touchpanel.
!
ES2_ib041503.p65 15/4/2003, 9:368

9
Preparation ForUse
Placethe uniton astrong,levelsurfacesuchasacabinetorshelf. Makesurethe unit
iswithineasy reachofanACoutlet.
Toensureadequateventilation forthe unit, do notoperateitwhileitisplaced on a
soft surface(suchasacarpet).Makesurethatthe ventilation slotsinthe cabinetare
notobstructed.Keep itemssuchasnewspapers,tablecloths,curtains,etcawayfrom
the unit.
Donotsubjectthe unittoexcessivelyhot, cold,dampordustyconditions.Donot
operatethe unitneararadiatororheater.
The unitmustnotbe exposed todripping orsplashing.Neverplaceobjectsfilled with
liquids(suchasvases)on the unit. If liquidisaccidentallyspiltorsplashed on the
unit, disconnecttheACplug fromthe wall outletimmediatelyand consultyourdealer.
Nonaked flamesources(suchaslighted candles)shouldbe placed on ornearthe
unit.
Note:
Leave atleast3inches (7cm)totherearoftheunitforproperventilation.
Finally,position the speakerstothe left and rightofthe unit.
Connections
Connectthe speakerstothe red and black terminalson the back ofthe unitasshown
below.Toopen the terminals,slide the plasticflapsawayfromthe terminals,then
insertthe wiresintothe terminals.Returnthe plasticflapstotheiroriginalposition to
lock the wiresinplace.
ES2_ib041503.p65 15/4/2003, 9:369
10
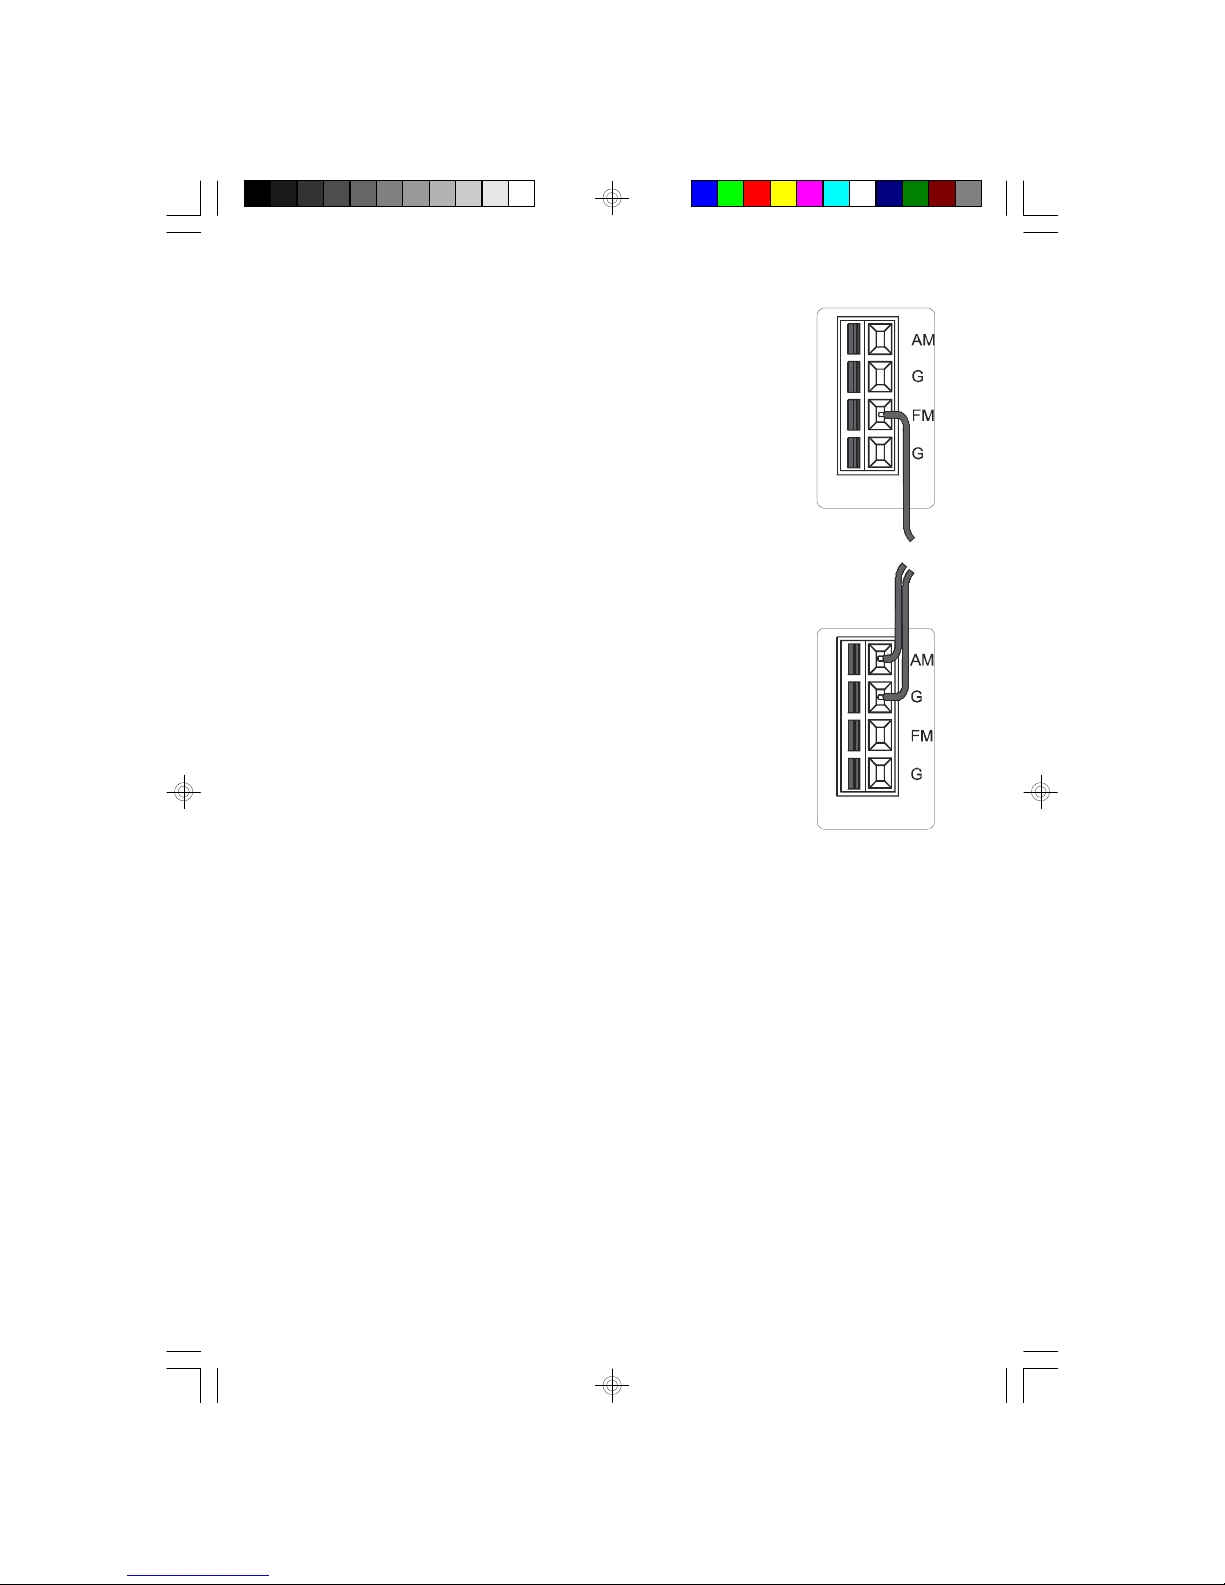
FMAntennaWire
Connectthe singleFMantenna wire(pigtail)tothe terminal
marked FM(Press terminalflap,insertwire,releasethe flap).
AMLoop Antenna
ConnecttheAMloop antenna tothe terminalsmarkedAMandG
(Press terminalflap,insertwire,releasethe flap).Position and
adjustthe loop antenna forbestreception (do thiswhen you're
tuning-intoradiostations-see page 21).
The loop antenna shouldbe atleastone footawayfromthe main
unittoavoidinterference.
Connecting ExternalAudioEquipment
•Connectyourplayback equipment*(eg.MiniDisc orcassetteplayer) tothe
AUXjacks on the back panel.
•Connectyourrecording equipment(eg.MiniDisc orcassetterecorder) tothe
LINEOUTjacks on the back panel.
•Connectyouractive(powered)sub-woofertothe SUB-WOOFERoutputjack on
the back panel.
*Otherexamplesofplayback equipmentincludeyourTV,video recorder,DVDplayer
orsatellitereceiver,oryourcomputerorgamesconsole.
Always refertothe equipmentmanufacturer'sinstructions.
ES2_ib041503.p65 15/4/2003, 9:3610

11
Operating Instructions
Plug the unitintotheACoutlet.
The STANDBY (POWER)button Owill turnred toindicatethatthe unitisinStandby
mode.
Switchthe uniton bypressing the STANDBY (POWER)button Oon the remote
controloron the unit. The STANDBY button turnstogreen.
The unitisnowreadytouse.
(Toswitchthe unitback tostandby,simplypress STANDBY (POWER)Obutton
again.)
ES2_ib041503.p65 15/4/2003, 9:3611

12
Setting TheClock
You may use thebuttonson theremoteorthetouchpanelscreenforthis
operation.
Using remoteortouchpanelscreen.
1.Press the STANDBY (POWER)button Otoswitchthe uniton.
2.Press the AUXbutton.(Notethe timesetting appearsatthe centerofthe display.)
3.Press MEMORYsothatthe hourdigitsflash,then immediatelypress Bor
Ftosetthe correcthour.
Note:Check the AM/PMindicator(tothe left ofthe hour) toensureyou makethe
correctsetting.
4.Press MEMORYagainsothatthe minutesetting flashes,then immediatelypress
BorFtosetthe correctminute.
5.Press MEMORYoncemoretofinishthe clock setting.
The displaystopsflashing and the clock beginstorun.
Note:
•If everyou find the wholetimedisplayisflashing,thismeansthatthe clock
needstobe re-set(possiblydue tothe unithaving been disconnected fromthe
ACoutlet, orapowerinterruption.)
•Clock setting can be done even ifunitisatStandbymode.
ES2_ib041503.p65 15/4/2003, 9:3612

13
GeneralInformation
Note:Mostofthe functionsareavailableon touchpanelscreen and remotecontrol.
PowerOn
Switchthe uniton bypressing the STANDBY (POWER)button O.
Selecting TheSound Source
Toselectthe sound sourceyou wishtolisten to,press:
•CD tolisten tocompactdisc (see page 15),or
•TUNERtolisten toradio(see page 21),or
•AUXtolisten toauxiliaryequipmentconnected tothe AUXjacks (see page 10).
Volume
Toadjustthe volume,useVOLUMEUorD.
Tomutethe sound temporarily,press MUTEbutton (press againtorestoresound).
Note:Atminimumvolume(orwhen MUTEispressed),you mayfind thatthe sound
isnotcompletelysilenced.Thisisperfectlynormal.
ES2_ib041503.p65 15/4/2003, 9:3613

14
Headphones
Forprivatelistening,connectapairofstereo headphones(notincluded)tothe jack
marked on the frontpanel.
When headphonesareplugged-in,the speakersareswitched off automatically.
GraphicEqualizer
The graphicequalizer(EQ)adjuststhe characterofthe sound.It providesarange of
4tonalshapes:rock,classic,pop and flat.
Press EQrepeatedlytosetthe graphicequalizeraccording toyourtasteorthe style
ofmusicbeing played.The selected setting:ROCK,CLASSIC,POP or
FLAT appearsatthe top ofthe display.
PowerOff
Press the STANDBY (POWER)button Otoshutthe power‘Off’and returntothe
Standbymode.
ES2_ib041503.p65 15/4/2003, 9:3614

15
CD Operation
All CDfunctionscan be operated bythe remote.
IMPORTANT-TheCD dooroperates electrically-don'ttrytoforce itopenor
closedbyhand.
Note-BeforeCD operation,makesureyou'veremoved the colored protective
cardboarddisc inside the door.
•Switchthe uniton and press CD.
Loading ADisc
1.Toopen the CDdoor,press DOOR/SNOOZEbutton on unitorCD DOOReon
the remotecontrol.
2.Placethe disc on the CD spindlewiththe printed labelside facing up.
3.Press OPENCLOSE /SNOOZEbutton on unitorCD DOOReon the remote
controltoclosethe CD door.
ES2_ib041503.p65 15/4/2003, 9:3615

16
Wheneveryou closethe door,the unitchecks ifanyCD isloaded.You will see the
disc spinforasecond ortwo,and then the totaltracks and playing timewill appearon
the display.
Playing ADisc
1.Load the disc and closethe CD door.
2.Press PLAY RPbutton on the touchpanelscreen orpress the RPbutton on the
remote.
Selecting Tracks
Tochange track whileadisc isplaying,press and releaseBorF.
Alternatively,you can pick atrack numberdirectlyusing buttons1to9on the remote.
If the required track numberishigherthan 9,usethe --button asfollows:
Examples-Toselecttrack 10,press --then 1and then 0.
Toselecttrack 23,press --then 2and then 3.
ES2_ib041503.p65 15/4/2003, 9:3616

17
High SpeedMusicSearch
Tosearchwithintracks whileadisc isplaying,depress and holdthe BorF
buttonsuntil you locatethe desired passage,then releasethe buttonstoresume
normalplayback.
Note:The playback volumeisautomaticallyreduced duringhighspeed musicsearch.
Pause And Stop
Topauseduring play,press RPon eithertouchpanelscreen orremote.Playtime
displaywill be flashing during pause.Press RPagaintoresumeplay.
Tostop play,press C.
RepeatPlay
You can repeatall tracks orjustone track.Toselectthe mode you require,press
REPEATuntil the top-left ofthe displayindicatesone ofthe following:
REPEAT ALL
REPEAT 1
Tocancelrepeatplay,press REPEATuntil the indicatorsREPEAT ALL and
REPEAT 1 disappearfromthe display.
RandomPlay
You can playtracks inrandomorder.
Press RANDOMbutton toselectRandommode.The RANDOMindicatorappears
inthe display.
Tocancelrandomplay,press RANDOMagain.The RANDOM indicatordisappears
fromthe display.
ES2_ib041503.p65 15/4/2003, 9:3617

18
ProgrammedPlayback
You can programthe unittoplayup to60 tracks on adisc inanydesired order.The
sametrack maybe programmed severaltimesifdesired.
Notes:
•The playermustbe stopped inordertoprogramadisc.If the disc isplaying,
press the STOPbutton beforeyou beginthe programming stepsbelow.
•Tocancelprogramming atanytime,press the STOPbutton.
1.Load the disc and closethe CD door.
2.Press MEMORYbutton on touchpanelor
remotecontrol.The MEMORYindicator
flashesinthe displayand the display
alsoshows‘P-01’.
3.Press BorFtoselectthe first
TRACKnumbertobe programmed.
(Example:Track 8)
4.Press the MEMORYbutton toenterthe
track ‘8’inprogrammemory#1.The track
numberadvancesto‘P-02’
5.Repeatsteps3and 4toenterup to60 tracks inthe programmemory.
•You can check yourprogrambypressing MEMORYrepeatedly.AsP-01,
P-02advances,check the displayed track numbers.
(Note:Afterthe finaltrack,the displayshowsFULL,and pressing MEMORY
againwill returntothe firsttrack.)
6.Finally,press RPtoplaythe programmed tracks.The MEMORYindicatorwill
stop flashing indicating thatthe CD isplaying inprogrammed mode.
MEMORY
MEMORY
MEMORY
ES2_ib041503.p65 15/4/2003, 9:3618

19
Afterthe programhasfinished playing,the CD stopsand the MEMORYindicator
startsflashing again.Thisindicatesthatthe programremainsinmemory.Press RP
button toplaythe programagain.
•Tosetthe programtorepeatcontinuously,press REPEATbutton sothat
REPEAT ALL indicatorappearsinthe display.
(Tocancelrepeat, press REPEATbuttonsothatREPEATindicatordisappears.)
Changing TheProgram
The disc mustbe stopped tomakeanyprogramchanges.
•Tochange atrack,press MEMORYrepeatedly(until the required P- numberis
displayed)then press BorFtochange the TRACK number.
•Press MEMORYtofinishchanging the track.
•Todeleteatrack,press MEMORYrepeatedly(until the required P- numberis
displayed)then press BorFtochange the TRACK numberto00.
•Press MEMORYtofinishdeleting the track.
•Toadd atrack,press MEMORYrepeatedly(until TRACK00 isshown)then use
BorFtoselectrequired TRACKnumber.And press the MEMORYbutton
toadd ittothe program.
•Toerasethe programfrommemory,press the STOPbutton oropen the CDdoor.
ES2_ib041503.p65 15/4/2003, 9:3619
This manual suits for next models
2
Table of contents
Other Emerson Research Stereo System manuals


