Sony MHC-RV60 User manual

©2003 Sony Corporation
4-246-313-11(1)
Mini Hi-Fi
Component
System
Operating Instructions
MHC-RV60
MHC-RV50

2GB
To prevent fire or shock hazard, do not
expose the unit to rain or moisture.
To prevent fire, do not cover the ventilation of the
apparatus with news papers, table-cloths, curtains, etc.
And don’t place lighted candles on the apparatus.
To prevent fire or shock hazard, do not place objects
filled with liquids, such as vases, on the apparatus.
This appliance is
classified as a CLASS 1
LASER product. This
label is located on the
rear exterior.
The following caution label is located inside the
apparatus.
Don’t throw away the battery with
general house waste, dispose of it
correctly as chemical waste.
ENERGY STAR®is a U.S.
registered mark. As an ENERGY
STAR®partner, Sony Corporation
has determined that this product
meets the ENERGY STAR®
guidelines for energy efficiency.
WARNING
Do not install the appliance in a confined space,
such as a bookcase or built-in cabinet.

3GB
How to use this manual...........................5
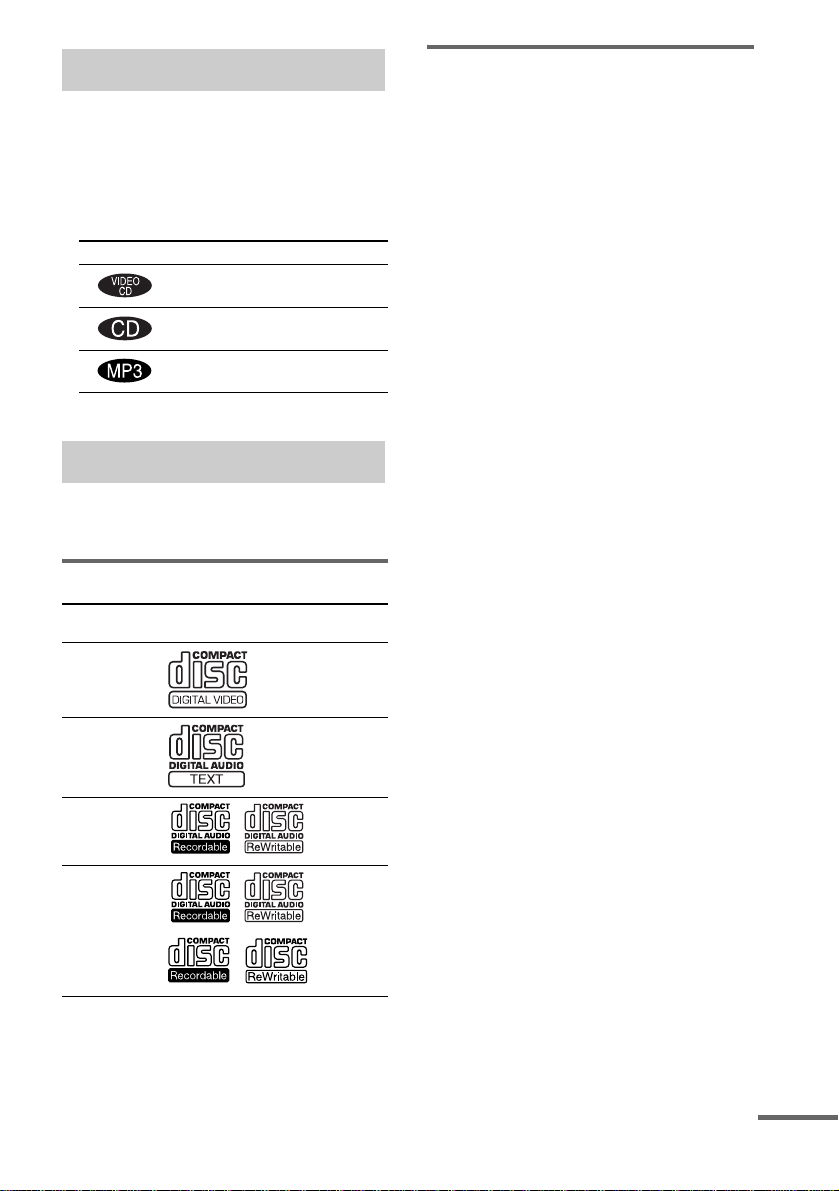
Playable discs..........................................5
Getting Started
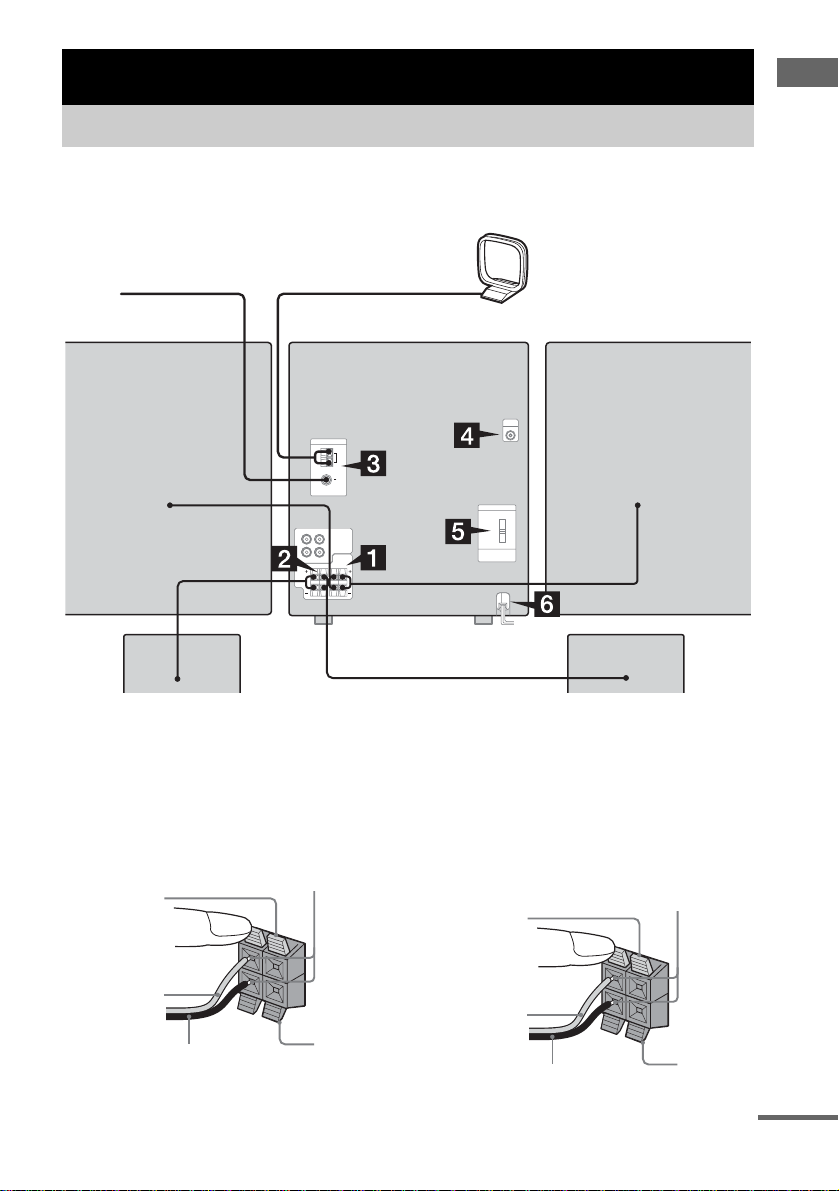
Hooking up the system............................7
Setting the clock....................................10
VIDEO CD/CD/MP3 – Play
Loading a disc.......................................11
Playing a disc........................................11
— Normal Play/Shuffle Play
Playing VIDEO CDs with PBC functions
(Ver. 2.0).........................................14
— PBC Play
Playing repeatedly.................................15
— Repeat Play
Creating your own program..................15
— Program Play
Locating a specific part of a
VIDEO CD .....................................16
— Time Search/Disc Digest
Tuner
Presetting radio stations........................18
Listening to the radio............................20
— Preset Tuning
— Manual Tuning
Tape – Play
Loading a tape.......................................21
Playing a tape........................................21
Tape – Recording
Recording your favorite CD tracks on a
tape..................................................22
— CD Synchro Recording
Recording on a tape manually...............23
— Manual Recording
Sound Adjustment
Selecting the sound system................... 24
(MHC-RV60 only)
Adjusting the sound.............................. 24
Selecting the sound effect..................... 25
Adjusting the graphic equalizer and
storing............................................. 25
Selecting the surround effect................ 26
Enhancing video game sound...............26
— Game Sync
Mixing video game sound with other
sound source................................... 26
— Game Mixing
Singing along........................................ 27
Timer
Falling asleep to music......................... 29
— Sleep Timer
Waking up to music.............................. 29
— Daily Timer
Timer recording radio programs........... 30
Display
Turning off the display......................... 31
— Power Saving Mode
Viewing information about the disc in the
display ............................................ 32
Adjusting the brightness of the
display ............................................ 33
Changing the Power illuminator........... 33
Viewing information about the disc in the
on-screen display............................ 33
Table of Contents
continued

4GB
Optional Components
Hooking up optional components.........35
Listening to audio from a connected
component ......................................36
Recording on a connected
component ......................................37
Troubleshooting
Problems and remedies .........................38
Messages...............................................41
Additional Information
Precautions............................................42
Specifications........................................43
Glossary ................................................45
List of button locations and reference
pages...............................................47

5GB
• Thismanualmainlyexplainsoperationsusing
the remote, but the same operations can also
be performed using the buttons on the unit
having the same or similar names.
• The following symbols are used in this
manual.
You can play back the following discs on this
system. Other discs cannot be played back.
List of playable discs
Discs that this system cannot
play
•CD-ROMs
• CD-Rs/CD-RWs other than those recorded in
the following formats:
– VIDEO CD format
– Music CD format
– MP3 format that conforms to ISO9660
Level 1/Level 2 or Joliet*
• A disc that has a non-standard shape (e.g.,
card, heart).
• A disc with paper or stickers on it.
• A disc that has the adhesive, cellophane tape,
or a sticker still left on it.
* Up to 30 characters can be displayed.
How to use this manual
Symbol Meaning
Functions that can be used with
VIDEO CDs
Functions that can be used with
audio CDs
Functions that can be used with
MP3
Playable discs
Format of
discs Disc logo Contents
VIDEO CDs Audio +
Video
Audio CDs Audio
CD-R/CD-RW
(audio data) Audio
CD-R/CD-RW
(MP3 files) Audio
continued

6GB
Notes on CD-R and CD-RW
• Some CD-Rs or CD-RWs cannot be played
on this system depending upon the recording
quality or physical condition of the disc, or
the characteristics of the recording device.
Furthermore, the disc will not play if it has not
been correctly finalized. For more
information, see the operating instructions for
the recording device.
• CD-R and CD-RW discs recorded in packet
write format are not supported.
• Discs recorded on CD-R/CD-RW drives may
not be played back because of scratches, dirt,
recording condition or the driver’s
characteristics.
• CD-R and CD-RW discs recorded in multi-
session mode are not supported.
• The system may be unable to play MP3
format files that do not have the extender
“.MP3”.
• Attempting to play non-MP3 format files that
have the extender “.MP3” may result in noise
or malfunction.
• With formats other than ISO9660 level 1 and
2, folder names or file names may not be
displayed correctly.
• The following discs take a longer time to start
playback.
– a disc recorded with complicated tree
structure.
– a disc to which data can be added (non-
finalized disc).
Note on playback operations
of VIDEO CDs
Some playback operations of VIDEO CDs may
beintentionallysetby softwareproducers.Since
this system plays VIDEO CDs according to the
disc contents the software producers designed,
some playback features may not be available.
Also, refer to the instructions supplied with the
VIDEO CDs.
Music discs encoded with
copyright protection
technologies
This product is designed to playback discs that
conform to the Compact Disc (CD) standard.
Recently, various music discs encoded with
copyright protection technologies are marketed
by some record companies. Please be aware that
among those discs, there are some that do not
conform to the CD standard and may not be
playable by this product.

Getting Started
7GB
Perform the following procedures 1to 7to hook up your system using the supplied cords and
accessories.
1Connect the front speakers.
Connect the right and left speaker cords to
the FRONT SPEAKER terminals as shown
below.
2Connect the surround speakers.
(MHC-RV60 only)
Connect the speaker cords to the
SURROUND SPEAKER terminals as
shown below.
Getting Started
Hooking up the system
AM loop antenna
Front speaker (right) Front speaker (left)
FM lead antenna
Surround speaker*(right) Surround speaker*(left)
*
MHC-RV60 only
R L
+
–
Black/Stripe (#)
Red/Solid
(3)
Insert only the stripped portion
Red
Black
R L
+
–
Black/Stripe (#)
Red/Solid
(3)
Insert only the stripped portion
Blue
Black
continued

8GB
3Connect the FM and AM antennas.
Set up the AM loop antenna, then connect
it.
Note
Keep the antennas away from the speaker cords.
4ConnectthevideoinputjackofyourTV
to the VIDEO OUT jack with the
supplied video cord.
When using a TV
Turn on the TV and select the video input so you can
view the pictures from this system.
5For models with a voltage selector, set
VOLTAGE SELECTOR to the local
power line voltage.
Refer to the print on your system’s
VOLTAGE SELECTOR for available
settings.
* Saudi Arabian model: 120 – 127 V
6Connect the power cord to a wall
outlet.
The demonstration appears in the display.
When you press ?/1, the system turns on
and the demonstration automatically ends.
If the plug does not fit the wall socket,
detach the supplied plug adaptor (only for
models equipped with an adaptor).
7Set the color system to PAL or NTSC
depending on the color system of your
TV while the power is off.
Notes
• You cannot set the color system in Power Saving
Mode.
• When you play back a VIDEO CD recorded in a
different color system from the one you set to the
unit, the picture image may be distorted.
Extend the FM lead antenna horizontally
AM loop
antenna
Thecolorsystem
of your TV Do this
AUTO
(factory setting) Press ?/1 while holding
down X. If your TV
automatically changes the
color system according to
the input signal, the system
is set to AUTO.
NTSC Press ?/1 while holding
down >. The system is
set to NTSC.
PAL Press ?/1 while holding
down .. The system is
set to PAL.

Getting Started
9GB
Inserting two R6 (size AA)
batteries into the remote
Note
If you do not use the remote for a long period of time,
remove the batteries to avoid possible damage from
battery leakage and corrosion.
Tip
With normal use, the batteries should last for about six
months. When the remote no longer operates the
system, replace both batteries with new ones.
Using the remote
You can use the buttons shown below to operate
a Sony TV.
Attaching the speaker pads
Attach the supplied speaker pads to the bottom
of the front and surround* speakers to stabilize
the speakers and prevent them from slipping.
Front speaker (Left (4)/Right (4))
Surround speaker (Left (4)/Right (4))*
* MHC-RV60 only
Notes
• Keep the speaker cords away from the antennas to
prevent noise.
• Do not place the surround speakers on top of a TV.
This may cause distortion of the colors in the TV
screen.
• Be sure to connect both left and right surround
speakers. Otherwise, the sound will not be heard.
To Do this
Turn the TV on or
off Press TV ?/1.
Switch the TV’s
video input Press TV/VIDEO.
Change the TV
channels Press TV CH + or –.
Adjust the volume
of the TV speaker(s) Press TV VOL + or –.
When carrying this system
Perform the following procedure to protect
the CD mechanism.
1Make sure that all discs are removed
from the system.
2Hold down CD and then press ?/1 until
“STANDBY” appears.
After “STANDBY” disappears, then
“LOCK” appears.
3Unplug the power cord.
continued

10GB
Positioning the speakers
(MHC-RV60 only)
1Place the front speakers at an angle of
45 degrees from your listening
position.
2Place the surround speakers facing
each other at about 60 to 90 cm above
your listening position.
1Press ?/1 to turn on the system.
2Press CLOCK/TIMER SET.
3Press Mor mrepeatedly to set the hour.
4Press ,.
5Press Mor mrepeatedly to set the
minute.
6Press ENTER.
The clock starts working.
To adjust the clock
1Press CLOCK/TIMER SET.
2Press Mor mto select “CLOCK SET”, then
press ENTER.
3Do the same procedures as step 3 to 6
above.
Notes
• The clock settings are canceled when you disconnect
the power cord or if a power failure occurs.
• You cannot set the clock in Power Saving Mode.
Front speaker (R)
Surround speaker (L) Surround speaker (R)
Front speaker (L)
Surround speaker
60 to 90 cm
Setting the clock

VIDEO CD/CD/MP3 – Play
11GB
1Press Z on the unit.
2Place a disc with the label side up on
the disc tray.
To insert additional discs, press DISC
SKIP/EX-CHANGE on the unit to rotate
the disc tray.
3Press Zon the unit again to close the
disc tray.
Notes
• Do notuse a disc with tape, seals or paste on it asthis
may cause malfunction.
• Do not forcibly press the disc tray closed with your
finger, as this may cause malfunction.
This system lets you play VIDEO CDs*, audio
CDs and discs with MP3 audio tracks.
Before playing a VIDEO CD, turn on your TV
and select the video input. Refer to the operating
instructions supplied with your TV if you need
help.
* You can play both VIDEO CDs without PBC
functions (Ver. 1.1) and VIDEO CDs with PBC
functions (Ver. 2.0).
Example: When a disc is loaded
1Press CD.
VIDEO CD/CD/MP3 – Play
Loading a disc
Playing a disc
— Normal Play/Shuffle Play
Track number
Disc presence indicator Playing time
Disc tray number
continued

12GB
2Press PLAY MODE repeatedly in stop
mode until the mode you want appears
in the display.
* Depending on VIDEO CDs with PBC functions
(Ver. 2.0), the disc does not change.
3Press nN.
Other operations
*1 For VIDEO CDs, there are may be some
disturbance in the video image.
*2 Only when setting the PBC function to off or when
playing VIDEO CDs without PBC functions
(Ver. 1.1).
*3 For discs with MP3 audio tracks, you cannot search
between multiple tracks.
Also, the time may not be displayed correctly for
some tracks.
Select To play
ALL DISCS*
(Normal Play) All discs in the disc tray
continuously.
1DISC
(Normal Play) The tracks on the disc you
have selected in original
order.
ALBM
(Normal Play) All MP3 audio tracks in the
album on the disc you have
selected in original order.
When playing a non-MP3
disc, Album Play performs
the same operation as
1DISCPlay.
ALL DISCS
SHUF
(Shuffle Play)
The tracks on all discs in
random order.
1DISC SHUF
(Shuffle Play) The tracks on the disc you
have selected in random
order.
ALBM SHUF
(Shuffle Play) The MP3 audio tracks in the
album on the disc you have
selected in random order.
When playing a non-MP3
disc, Album Shuffle Play
performs the same operation
as 1 DISC SHUF Play.
PGM
(Program Play) The tracks on the disc in the
order you want them to be
played (see “Creating your
own program” on page 15).
To Do this
Stop play Press x.
Pause Press X*1. Press again to resume
play.
Select a track or
scene*2 Press .or >repeatedly
during play or pause.
Select an album
of MP3 Press ALBUM – or + repeatedly
after step 2.
Find a point in a
track*3 (Lock
Search Function)
Press mor Mduring
playback. At the desired point,
press nN to stop searching
and start playback.
For VIDEO CDs only, each time
you press the button, speed
changes cyclically as follows:
1 (slower than 2) t2 (normal)
t3 (faster than 2).
Select a disc in
stop mode Press D. SKIP (or DISC 1 – 3 or
DISC SKIP/EX-CHANGE on the
unit).
Switch to CD
function from
other function
Press DISC 1 – 3 on the unit
(Automatic Source Selection).
Exchange other
discs while
playing
Press DISC SKIP/EX-CHANGE
on the unit.
Remove a disc Press Zon the unit.

VIDEO CD/CD/MP3 – Play
13GB
Notes
• You cannot change the play mode during playback.
• Some time may be needed to start playback of discs
recorded in complex configurations such as many
layers.
• When the disc is inserted, the player reads all the
tracks on that disc. If there are many albums or non-
MP3 audio tracks on the disc, it may take a long time
for play to begin or for the next MP3 audio track to
start play.
• Do not save unnecessary albums or tracks other than
MP3 ones in the disc to be used for MP3 listening.
We recommend that you do not save other types of
tracks or unnecessary albums on a disc that has MP3
audio tracks.
• An album that does not include an MP3 audio track
is skipped.
• Maximum album number: 256 (including root
album)
• Up to 512 tracks and albums of MP3 on a single disc
can be recognized on this unit.
• MP3 audio tracks are played back in the order that
they are recorded on the disc.
• Depending on the encoding/writing software,
recording device, or the recording media used at the
time an MP3 audio track is recorded, you may
encounter such problems as disabled playback,
sound interruptions, and noise.
Tip
When disc access takes a long time, set “CD POWER
ON” by CD power manage function (page 19).
To play a track by entering the
track number
You can also select the track you want using the
remote during Normal Play.
Press the number button(s).
To enter a track number over 10
1Press >10.
2Enter the corresponding digits for the same
number of “–” flashing in the display.
To enter 0, press 10/0.
Example:
To enter track number 30, press >10, then press 3 and
10/0.
Resuming playback from the
point you stopped the disc
— Resume Play
This system memorizes the point where you
stopped the VIDEO CD so you can resume from
that point.
Resume Play is not available for an audio CD
and a disc with MP3 audio tracks.
1While playing a VIDEO CD, press xto
stop playback.
“RESUME” appears on your TV screen. If
“RESUME” does not appear, Resume Play
is not available.
2Press nN.
The player starts playback from the point
you stopped the VIDEO CD in step 1.
Notes
• You cannot perform Resume Play during Disc
Digest, Shuffle Play or Program Play.
• Depending on where you stopped the VIDEO CD,
the system may resume playback from a different
point.
• Resume play is canceled when:
– you press the number buttons, PLAY MODE, x,
D. SKIP (DISC SKIP/EX-CHANGE on the unit),
./> or NEXT/PREV.
– you disconnect the power cord.
– you turn off the system.
– you open the disc tray.
– you change the function to the TUNER when “CD
POWER OFF” is selected (page 19).
Tip
To view from the beginning of the VIDEO CD, press
xin stop mode, then press nN.

14GB
You can use PBC* menus on your TV screen to
enjoy the disc’s interactive software. The menu
format and structure may differ depending on
each disc.
* PBC: Playback Control
1Press CD.
2Press nN to start playing a VIDEO
CD with PBC functions (Ver. 2.0).
The PBC menu appears on the TV screen.
3Pressthe number button(s) to enter the
item number you want.
4Continue playback according to the
instructions on the menus to enjoy
interactive playback.
Refer to the operating instructions supplied
with the disc, as the operating procedure
may differ according to the VIDEO CD.
Other operations
To cancel playback with PBC
functions (Ver. 2.0)
1In stop mode, press .or >to select a
track.
2Press nN.
The “PBC OFF” indicator lights up and
playback starts from the selected track. Still
images, such as the menu screens, will not
be shown.
To return to PBC playback, press xin stop
mode, then press nN.
Tips
• When “ ” appears on the TV screen, you have
pressed an invalid button.
• When you press NEXT during menu playback or
while playing moving pictures, the next scene on the
disc appears. Also refer to the instructions supplied
with the disc.
• You can cancel playback with PBC functions
(Ver. 2.0) by pressing any number button in stop
mode. The disc is automatically played in Normal
Play mode.
Playing VIDEO CDs with
PBC functions (Ver. 2.0)
— PBC Play
To Do this
Stop play Press x.
Go to the next
menu page or
scene
Press NEXT.
Go back to the
previous menu
page or scene
Press PREV.
Go back to the
previous menu Press RETURN O.
Select a menu See “To play a track by entering
the track number” (page 13).

VIDEO CD/CD/MP3 – Play
15GB
You can play all the tracks or a single track on a
disc repeatedly.
Press REPEAT until “REP” or “REP1”
appears.
REP: For all the tracks on the disc, or all the
tracks in the album up to five times.
REP1: For a single track only.
To cancel Repeat Play
Press REPEAT repeatedly until both “REP” and
“REP1” disappear.
Notes
• You cannot select “REP” and “ALL DISCS SHUF”
at the same time.
• When you select “REP1”, that track is repeated
endlessly until “REP1” is canceled.
• You cannot select “REP1” during playback of
VIDEO CDs with PBC functions (Ver. 2.0).
You can make a program of up to 25 steps from
all the discs in the order you want to play them.
You can synchro record the programmed tracks
onto a cassette tape (page 22).
1Press CD.
2Press PLAY MODE repeatedly in stop
mode until “PGM” appears.
3Press D. SKIP (or DISC 1 – 3 or DISC
SKIP/EX-CHANGE on the unit) to select
a disc.
4Press .or >repeatedly until the
desired track number appears.
When programming an MP3, press
ALBUM – or + to select album, then press
.or >repeatedly until the desired
track number appears.
5Press ENTER.
The track is programmed.
The program step number appears,
followed by the total playing time.
Playing repeatedly
— Repeat Play
Creating your own
program
—ProgramPlay
Selected track number
Disc tray number
Total playing time
(including selected track)
continued

16GB
6Program additional discs or tracks.
7Press nN.
Program Play starts.
Other operations
Tips
• The program you made remains after Program Play
finishes. To play the same program again, press CD,
then press nN. However, the program is cleared
when you open the disc tray.
• “– –.– –” appears when the total VIDEO CD/CD
program time exceeds 100 minutes, or when you
select a VIDEO CD/CD track whose number is 21 or
over, or when you select an MP3 audio track.
The TV screen must be ON to use these
functions.
Locating by elapsed time from
the beginning of the disc
— Time Search
1Press SPECIAL MENU in stop mode.
2Press 1 to select “1) TIME SEARCH”.
3Press the number buttons to enter the
time (in minutes) for the section you
want.
To enter 10 minutes: Press 1 and 10/0.
The selected elapsed time appears on the
TV screen.
To reenter the time: Press CLEAR and then
press the number buttons again.
4Press nN.
Playback starts from the selected time.
To program Repeat steps
Other tracks on the
same disc 4 and 5
Other tracks on
other discs 3 to 5
To Do this
Cancel Program
Play Press PLAY MODE repeatedly
in stop mode until “PGM”
disappears.
Clear a track from
the end Press CLEAR in stop mode.
Locatingaspecificpartof
a VIDEO CD
— Time Search/Disc Digest

VIDEO CD/CD/MP3 – Play
17GB
Locating the desired track
—DiscDigest
You can select the track you want by viewing
the first frame of each track. 9 different tracks
can be displayed on the TV screen at one time.
1Press SPECIAL MENU in stop mode.
2Press 2 to select “2) DISC DIGEST”.
The first frame of tracks 1 through 9 on the
current disc are displayed.
3Press the number buttons (1 – 9) to
select the track you want.
To display the next 9 tracks
Press NEXT. The first frame of tracks 10
through 18 are displayed.
When there are more tracks in the disc, “>”
appears in the upper right corner of the TV
screen.
To display previous tracks, press PREV.
Note
If you press SPECIAL MENU to active Time Search or
Disc Digest in Program or Shuffle Play mode, it
changes to Normal Play mode.

18GB
You can preset up to 20 FM stations and 10 AM
stations. You can then tune in any of those
stations simply by selecting the corresponding
preset number.
Automatic tuning preset
You can automatically tune in all of the stations
that can be received in your area and then store
the radio frequency of the desired stations.
1Press TUNER/BAND repeatedly to
select “FM” or “AM”.
2Press and hold TUNING –/+ (or –mor
M+ on the unit) until the frequency
indication starts to change, then
release it.
The frequency changes as the system scans
for a station. Scanning stops automatically
when a station is tuned in. At that time,
“TUNED” and “STEREO” (for an FM
stereo program) appear.
If “TUNED” does not appear and the
scanning does not stop
Set the frequency of the desired radio
station as described in steps 2 through 6 of
“Manual tuning preset” (page 18).
3Press TUNER MEMORY on the unit.
A preset number appears.
4Press PRESET –/+ (or .or >on
the unit) repeatedly to select the
desired preset number.
5Press ENTER.
“COMPLETE” appears.
6Repeat steps 1 through 5 to store other
stations.
Manual tuning preset
You can manually tune in and store the radio
frequency of the desired stations.
1Press TUNER/BAND repeatedly to
select “FM” or “AM”.
2Press TUNING –/+ (or –mor M+ on
the unit) repeatedly to tune in the
desired station.
3Press TUNER MEMORY on the unit.
A preset number appears.
4Press PRESET –/+ (or .or >on
the unit) repeatedly to select the
desired preset number.
5Press ENTER.
“COMPLETE” appears.
6Repeat steps 1 through 5 to store other
stations.
Tuner
Presetting radio stations Preset number

Tuner
19GB
Other operations
To improve tuner reception
When tuner reception is poor, set CD player
power off by CD power manage function.
CD power is factory set to on.
1Press CD.
2Press ?/1 to turn off the system.
3Press ?/1 while holding x.
“CD POWER OFF” appears.
To set CD power on
Repeat the procedure above and “CD POWER
ON” appears.
Notes
• When “CD POWER OFF” is selected, disc access
time is increased.
• You cannot change the setting in Power Saving
Mode.
To change the AM tuning interval
(except for Middle Eastern
model)
The AM tuning interval is factory-preset to
9 kHz(or 10 kHz forsomeareas).Tochangethe
AM tuning interval, tune in any AM station first,
then turn off the system. While holding ENTER
on the unit, press ?/1 on the unit. When you
change the interval, all the AM preset stations
are erased. To reset the interval, repeat the same
procedure.
Note
You cannot change the AM tuning interval in Power
Saving Mode.
Tips
• The preset stations are retained for about a day even
if you disconnect the power cord or if a power failure
occurs.
• To improve the reception, adjust the supplied
antennas or connect an external antenna.
To Do this
Tune in a station
with a weak signal Follow the procedure described
in “Manual tuning preset”
(page 18).
Set another station
to the existing
preset number
Start over from step 1. After
step 3, press PRESET –/+ (or
.or >on the unit)
repeatedly to select the preset
number you want to store the
other station.

20GB
You can listen to a radio station either by
selecting a preset station, or by manually tuning
in the station.
Listening to a preset station
— Preset Tuning
Preset radio stations in the tuner’s memory first
(see “Presetting radio stations” on page 18).
1Press TUNER/BAND repeatedly to
select “FM” or “AM”.
2Press PRESET –/+ (or .or >on
the unit) repeatedly to select the
desired preset station.
Listening to non-preset radio
station
— Manual Tuning
1Press TUNER/BAND repeatedly to
select “FM” or “AM”.
2Press TUNING –/+ (or –mor M+ on
the unit) repeatedly to tune in the
desired station.
Note
When TUNER is selected as the current function and
CD is pressed to select CD during “CD POWER OFF”,
it may take some time to switch the function (page 19).
Tips
• To improve broadcast reception, adjust the supplied
antennas, or connect a commercially available
external antenna.
• When an FM stereo program has static noise, press
FM MODE on the unit repeatedly until “MONO”
appears. There will be no stereo effect, but the
reception will improve.
• Press and hold TUNING –/+ (or –mor M+ on
the unit). The frequency indication changes and
scanning stops when the system tunes in a station
(Automatic Tuning).
• To record the radio programs, use manual recording
(page 23).
Listening to the radio
FrequencyPreset number
This manual suits for next models
1
Table of contents
Other Sony Stereo System manuals

Sony
Sony HCD-M70 User manual

Sony
Sony HCD-VX55 User manual

Sony
Sony FH-211W User manual

Sony
Sony SRS-X9 User manual

Sony
Sony MHC-RXD3 - 3 Ch Mini System User manual

Sony
Sony LBT-DR7AV User manual

Sony
Sony HCD-DR3 User manual

Sony
Sony CMT-G1BIP User manual

Sony
Sony HCD-VP11 User manual

Sony
Sony MEX-M70BT User manual