Emerson PD6920 User manual

OWNER’SMANUAL
PD6920
Visitourweb siteatwww.emersonradio.com
PORTABLECD,CD-R/RWPLAYER
withAM/FMSTEREORADIO
PD6920_C010703.p65 7/1/2003, 17:2216

1
TO PREVENT FIRE OR SHOCK HAZARD, DO NOT USE THIS PLUG WITH AN
EXTENSION CORD, RECEPTACLE OR OTHER OUTLET UNLESS THE BLADES
CAN BE FULLY INSERTED TO PREVENT BLADE EXPOSURE. TO PREVENT FIRE
ORSHOCKHAZARD,DONOTEXPOSETHISAPPLIANCETORAINORMOISTURE.
IMPORTANTSAFETYINSTRUCTIONS
1.) Read these instructions.
2.) Keep these instructions.
3.) Heed all warnings.
4.) Follow all instructions.
5.) Do not use this apparatus near water.
6.) Clean only with dry cloth.
7.) Do not block any ventilation openings. Install in accordance with the manufacturer’s
instructions.
8.) Do not install near any heat sources such as radiators, heat registers, stoves, or other
apparatus (including amplifiers) that produce heat.
9.) Do not defeat the safety purpose of the polarized or grounding-type plug. A polarized plug has
two blades with one wider than the other. A grounding type plug has two blades and a third
groundingprong.Thewidebladeorthethirdprongareprovidedforyoursafety. If the provided
plug does not fit into your outlet, consult an electrician for replacement of the obsolete outlet.
10.) Protect the power cord from being walked on or pinched particularly at plugs, convenience
receptacles, and the point where they exit from the apparatus.
11.) Only use attachments / accessories specified by the manufacturer.
12.) Unplug this apparatus during lightning storms or when unused for long periods of time.
13.) Refer all servicing to qualified service personnel. Servicing is required when the apparatus
has been damaged in any way, such as power-supply cord or plug is damaged, liquid has
been spilled or objects have fallen into the apparatus, the apparatus has been exposed to rain
or moisture, does not operate normally, or has been dropped.
14.) This appliance shall not be exposed to dripping or splashing water and no object filled with
liquids such as vases shall be placed on the apparatus.
15.) Do not overload wall outlet. Use only power source as indicated.
16.) Use replacement parts as specified by the manufacturer.
17.) The product may be mounted to a wall only if recommended by the manufacturer.
18.) Upon completion of any service or repairs to this product, ask the service technician to
perform safety checks.
!
CAUTION
RISK OFELECTRICSHOCK
DONOTOPEN
The lightning flashwitharrow-
head symbol,withinan equi-
lateraltriangleisintented to
alertthe usertothe presence
ofuninsulated‘dangerousvoltage’
withinthe product’s enclosure
thatmaybe ofsufficient
magnitude toconstitutearisk
ofelectricshock topersons.
The exclamation pointwithin
an equilateraltriangleisin-
tended toalertthe userto
the presenceofimportant
operating and maintenance
(servicing)instructionsin
the literatureaccompany-
ing the appliance.
WARNING:TOREDUCETHE
RISK OFELECTRICSHOCK
DONOTREMOVE COVER
(ORBACK),NOUSER
SERVICEABLEPARTSINSIDE
REFERSERVICINGTO
QUALIFIEDSERVICE
PERSONNEL.
CAUTION
PD6920_C010703.p65 7/1/2003, 17:221

2
BEFOREWEBEGIN
Thankyou forpurchasing thisEmerson audioproduct. The Emerson brand isyour
assuranceofquality,performanceand value.
Ourengineershaveincluded manyusefuland convenientfeaturesinthisproduct.
Pleasebe suretoread thisOwner’s Manualcompletelytomakesureyou are
getting the maximumbenefitfromeachfeature.
Thisproductwasmanufacturedusingthehighestqualitycomponentsandstandards
ofworkmanship.It wastested byEmerson inspectorsand found tobe inperfect
working orderbeforeitleft ourfactory.However,thereisalways the chancethat
someproblemmayoccurbecauseofrough handling during shipmenttothe retail
storeortothe finalconsumer.
If, afterreading thisManual,you experienceanyproblemswiththe operation of
thisproduct, pleaserefertothe instructionsforobtaining serviceatthe end ofthis
Manual.Emerson and Emerson retailersarecommitted toyoursatisfaction.
Onceagain,thanks forpurchasing thisEmerson audioproduct.
For future reference, record the serial number in the space provided.
Model No: PD6920
Serial No:
PD6920_C010703.p65 7/1/2003, 17:222

3
IMPORTANTNOTES
•Operatecontrolsand switchesas
described inthe manual.
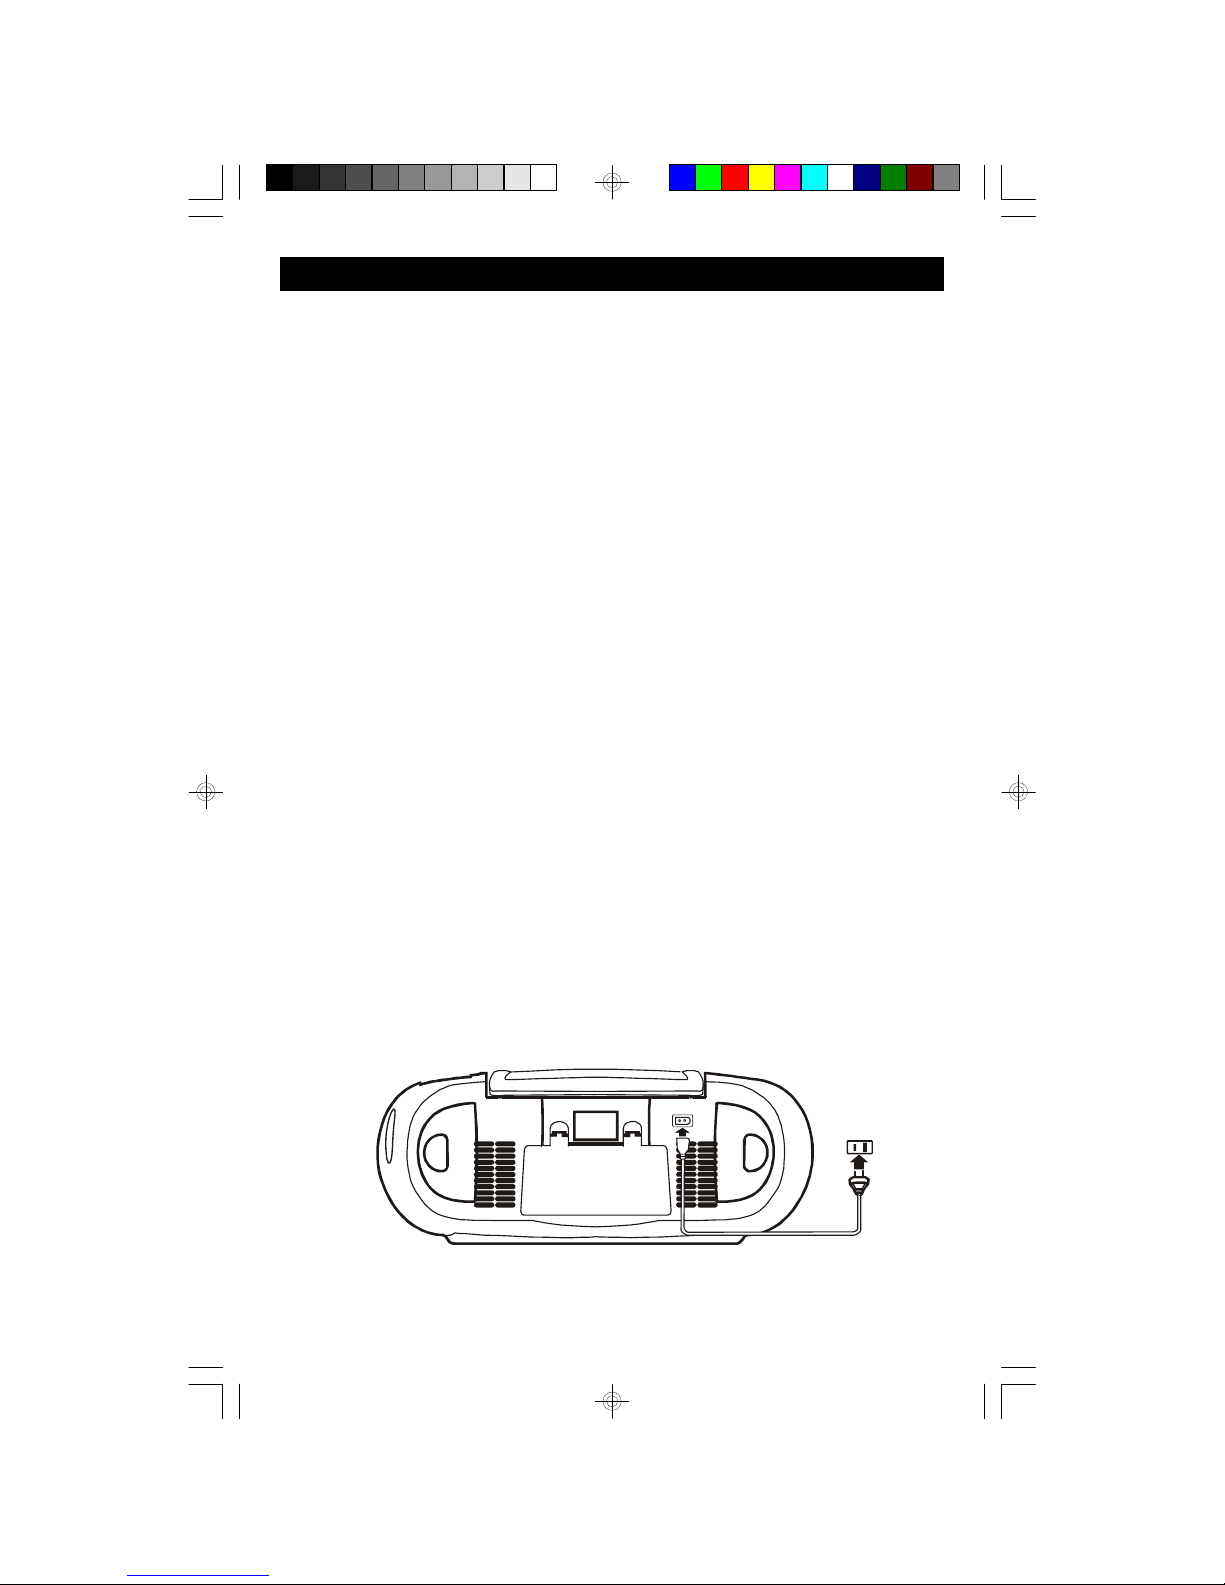
•Beforeturning ‘On’the power,make
certainthatpowercordisproperly
installed.
•StoreyourCDsinacoolarea toavoid
damage fromheat.
•When moving the set, be suretofirst
disconnectthe powercord.
•Avoidinstalling thisunitinplaces
exposed todirectsunlightorcloseto
heatradiating appliancessuchas
electricheaters,on top ofotherstereo
equipmentthatradiatestoo muchheat,
placeslackingventilationordustyareas,
placessubjecttoconstantvibrationand/
orhumidormoistareas.
•Donotattempttoclean thisunitwith
chemicalsolventsasthismightdamage
the finish.Useaclean drycloth.
CLASS 1LASERPRODUCT
CLASS 1LASERPRODUCT
APPAREILÁLASERDECLASSE 1
PRODUCTOLASERDECLASE 1
CAUTION
INVISIBLELASERRADIATION
WHENOPENAND INTERLOCKS
DEFEATED.
AVOIDEXPOSURETOBEAM
ThisproductcontainsalowpowerLaserDevice.
FCC INFORMATION
Thisequipmenthasbeen tested and found tocomplywiththe limitsforaClass Bdigital
device,pursuanttoPart15 ofthe FCC Rules.Theselimitsaredesigned toprovide
reasonableprotection againstharmfulinterferenceinaresidentialinstallation.This
equipmentgenerates,uses,and can radiateradiofrequency energyand,ifnotinstalled
and used inaccordancewiththe instructions,maycauseharmfulinterferencetoradio
communications.However,thereisno guarantee thatinterferencewill notoccurina
particularinstallation.Ifthisequipmentdoescauseharmfulinterferencetoradioortelevision
reception,whichcan be determined byturning the equipmentoff and on,the useris
encouraged totrytocorrectthe interferencebyone ormoreofthe following measures:
•Reorientorrelocatethe receiving antenna.
•Increasethe separation between the equipmentand receiver.
•Connectthe equipmentintoan outleton acircuitdifferentfromthattowhichthe receiver
isconnected.
•Consultthe dealeroran experienced radio/TVtechnician forhelp.
ThisdevicecomplieswithPart15 ofthe FCC Rules.Operation issubjecttothe following
twoconditions:
(1)Thisdevicemaynotcauseharmfulinterference,and
(2)Thisdevicemustacceptanyinterferencereceived,including interferencethat
maycauseundesired operation.
PD6920_C010703.p65 7/1/2003, 17:223

4
PREPARATIONFORUSE
UNPACKINGAND SETUP
•Carefullyremovethe unitfromthe carton and removeall packing materialsfrom
the unit.
•Carefullyremoveanysmall stripsoftape whichmayhavebeen used tokeep
the CDand Cassettedoorsclosed during shipment.
•Open the CD compartmentbyplacing you fingerundercenterofthe CD door
and lifting upward.Inside the CD compartmentyou will see awhitetransitcard
whichisused topreventthe laserpick-up frommoving during shipment. Care-
fullyremovethiscardand closethe CD compartmentdoor.
•Pleasesavethe carton and packing materialsinthe eventthatyourunitever
needstobe returned forservice.The originalcarton and packing materialsare
the onlywaytoprotectthe unitfromdamage during shipment.
POWERSOURCES
Thisunitisdesigned tooperateon 6pcs “C”batteries,notincluded,oron normal
120V60HzAChousecurrent. Operating thisunitfromanyotherpowersource
maycausedamage tothe unit, and suchdamage isnotcovered byyourwarranty.
AC Operation
Connectthe small end oftheACPowerCordtotheACsocketon the back cabinet,
then insertthe plug inanyconvenienthousehold120V60HzACoutlet.
PD6920_C010703.p65 7/1/2003, 17:224

5
NOTE:
ThisunithasapolarizedACplug withone
widebladeandonenarrowblade.Thisplug
will onlyfitintoamatching polarized AC
outlet. Thisisasafetyfeaturetoreduce
the possibilityofelectricshock.If thisplug
will notfitinyourACoutlet, you probably
havean outdated non-polarized outlet.You
shouldhaveyouroutdated outletchanged byaqualified,licensed electrician.Do
notfilethe wide blade on the plug,orusean adaptertomakethe plug fitintoyour
outlet. Thisdefeatsthe safetyfeatureand couldexposeyou toelectricshock.
BatteryOperation
1.)Removethe batterycompartmentdoor
on the back ofthe cabinetbypressing
downon the twotabsdirectlybelowthe
“ ”marks.
2.)Insert6pcs “C”sizebatteriesintothe
batterycompartmentaccording tothe
polaritydiagramengraved inside the
compartment. If the batteriesare
inserted incorrectlythe unitwill not
work.
3.)Replacethebatterycompartmentdoor.
NOTE:Inordertooperatethe uniton batterypowerthe ACcordmustbe
disconnected fromthe ACsocketon the back cabinet.
AC Plug
AC Outlet
BATTERYPRECAUTIONS
Followtheseprecautionswhen using batteriesinthisdevice:
1.Useonlythe sizeand type ofbatteriesspecified.
2.Besuretofollowthe correctpolaritywhen installing the batteriesasindicated inthe battery
compartment. Reversed batteriesmaycausedamage tothe device.
3.Donotmixdifferenttypesofbatteriestogether(e.g.Alkalineand Carbon-Zinc)oroldbatteries
withfreshones.
4. If the deviceisnottobe used foralong period oftime,removethe batteriestoprevent
damage orinjuryfrompossiblebatteryleakage.
5.Donottrytorecharge batteriesnotintendedtobe recharged;theycan overheatand rupture.
(Followbatterymanufacturer’s directions.)
PD6920_C010703.p65 7/1/2003, 17:225

6
LOCATIONOFCONTROLSAND INDICATORS
2
34
5
6
78
116
14
9
11 12 13
515
10
18
19
17
1.)PHONES Jack.
2.)CDREPEATButton.
3.)Skip/SearchREV Button.
4.)CDSTOPButton.
5.)Speakers.
6.)CDDoor.
7.)Carrying Handle.
8.)TelescopicAntenna.
9.)DialScale.
10.)CDDoorOpen/CloseTab.
11.)CDDisplay.
12.)CD PLAY/PAUSE Button.
13.)FUNCTIONSelectorSwitch.
(CD /FM/AM/OFF)
14.)Skip/SearchFWDButton.
15.)CD PROGRAMButton.
16.)VOLUMEControl.
17.)TUNINGControl.
18.)ACSocket.
19.)BatteryCompartment.
PD6920_C010703.p65 7/1/2003, 17:226

7
OPERATINGINSTRUCTIONS
LISTENINGTOTHERADIO
1.)Movethe FUNCTIONselectortoFMorAMposition.
3.)Tune toyourdesired station withthe TUNINGcontrol.
4.)Setthe VOLUMEcontroltothe desired level.
5.)When you arefinished listening movethe FUNCTIONselectorback tothe
OFF position toshutthe power‘Off’and extend the batterylife.
AntennaInformation
AM
The AMantenna isinside the cabinet. IF
AMreception isunsatisfactorytryrotating
the entireunituntil you find the position
thatprovidesthe bestreception.
FM
Varythe direction ofthe FMantenna to
find the position thatprovidesthe best
reception.
PD6920_C010703.p65 7/1/2003, 17:227

8
PLAYINGCOMPACTDISCS
NOTE:Although thisportableCD playercan read CD-Rand CD-RWdiscs,in
addition tonormalCDs,the playabilityofCD-Rand CD-RWdiscs maybe effected
bythe type ofsoftwarethatwasused tocreatethe discs,aswell asthe qualityand
condition ofthe blankmediayou areusing.100%playabilitycannotbe guaranteed.
Thisisnotan indication ofaproblemwiththe player.
NORMALPLAYBACK
1.)Movethe FUNCTIONselectortothe CD position.
2.)OpentheCDdoorbyliftingatitscenterposition.If you havenotalreadyremoved
the whitetransitcardfromthe CD player,pleaseremoveitnow.
3.)PlaceyourCDon thecenterspindlewiththe printed
labelside facing up.Closethe CDdoor.The player
will read the TableofContentsand the displaywill
showthe totalnumberoftracks on the disc.If the
disc isdamaged orup side down,displayshows
“––”
4.)Press the CD PLAY/PAUSE button tobegin
playback onTrack 1.The PLAY Indicatorappears
inthe display.
•Toskiptohigherorlowernumbered tracks during playback press the FWD
orREV button repeatedlyuntil the desired track numberappearsinthe
display.Playback will beginon the selected track.
•Tosearchrapidlyforwardorbackwardduring playback tolocateaspecific
portion ofatrack,depress and holdthe FWDorREV button.The player
will searchrapidlyforwardorbackwardaslong asthe buttonsaredepressed.
Normalspeed playback will resumewhen the buttonsarereleased.
•ToPausemomentarilyduring playback press the
PLAY/PAUSE button again.The sound stops
and the PLAY Indicatorflashes,howeverthe disc
continuestospin.TocancelPauseand resume
normalplayback press thePLAY/PAUSE button
oncemore.Normalplayback resumesand the PLAY Indicatorstopsflashing.
5.)Adjustthe VOLUMEcontrolasdesired.
PD6920_C010703.p65 7/1/2003, 17:228

9
6.)ToStop playback atanytimepress the CDSTOPbutton.The disc stopsand
the displayagainshowsthe totalnumberoftracks on the disc.Afterthe last
track hasplayed the disc stopsautomaticallyand the displayagainshowsthe
totalnumberoftracks on the disc.
7.)Open the CD door,removeyourdisc,and closethe CD dooragain.
8.)Movethe FUNCTIONselectortothe OFF position toshutthe power‘Off’.
TOSTARTPLAYBACK FROMASPECIFICTRACK
Insertyourdisc inthe player,closethe door,and waituntil the displayshowsthe
totaltracks.Presseitherthe orbuttonuntilthedesiredtrack numberappears
inthe display,then press the PLAY/PAUSE button tobeginplayback on that
track.
REPEATPLAYBACK
You can programthe playertorepeateitherasingletrack orall tracks on the disc
continuously.The Repeatfeaturecan be activated whilethe disc isplaying or
whilethe disc isstopped.
OneTrack Repeat
Press the REPEATbutton once.The REPEATIndicatorappears.Selectthe track
you wishtorepeatwiththe orbuttonsand then
press the PLAY/PAUSE button.The selected track
will be repeated continuously.
TocancelOne Track Repeatpress the STOPbutton
once.
ALL Tracks Repeat
Press the REPEATbutton twice.The REPEATALL
Indicatorappears.Press the PLAY/PAUSE button
tobeginplayback.The entiredisc will be repeated
continuously.
TocancelAll Tracks Repeatpress the STOPbutton once.
PD6920_C010703.p65 7/1/2003, 17:229

10
PROGRAMMEDPLAYBACK
You can programup to19 tracks on adisc toplayback inanydesired order.You
mayalsoprogramaspecifictrack toplayseveraltimeswithinthe sameprogram.
Note:The playercannotbe programmed whileadisc isplaying.If adisc isplaying
press the STOPbutton tostop playback beforeyou beginthe programming
stepsbelow.
1.)Movethe FUNCTIONselectortoCD,insertyourdisc inthe player,closethe
door,and waituntil the totaltrack numberappearsinthe display.
2.)Press the CD PROGRAMbutton once.The
PROGRAMIndicatorand programmemory“00”
beginflashing inthe display.
3.)Usethe /buttonstoselectthe firsttrack tobe
programmed.(Example:Track 08).
4.)Whentracknumber“08”flashesinthedisplay,press
the PROGRAMbutton onceagaintoenterthe track
“08”inprogrammemorynumber“01”.Track number
“08”disappearsand“00”flashesagaininthedisplay,
indicating thatyou maynowselectatrack tobe
entered inprogrammemorynumber“02”.
5.)Usethe orbuttonstoselectthe nexttrack tobe programmed.When the
desired track numberappearsinthe displaypress the PROGRAMbutton again
toenterthattrack inthe programmemory.
6.)RepeatStep5untilyouhaveenteredup to19tracks
inthe programmemory.When the memoryisfull,
the “––”flashesinthe LCD display
7.)Tobeginprogrammed playback press the PLAY/
PAUSE button.The LCD displaywill showthe
firstprogrammed track and playback will beginon
thattrack.The PROGRAMIndicatorflashes.
PD6920_C010703.p65 7/1/2003, 17:2210

11
Afterthe lastprogrammed track hasplayed the player
stopsbutthe programmed tracks remaininthe memory.
Toplaythe programmed tracks again,press the
PROGRAMbuttonandthenthe PLAY/PAUSE button.
Tocancelthe programmed sequencefrommemory,press the STOPbutton at
programming mode,open the CD door,ormovethe FUNCTIONselectortothe
OFF position.
ProgramRepeatPlayback
You can usethe Programand Repeatfeaturestogethertocontinuouslyrepeata
programmed sequenceoftracks.First, programthe desired tracks according to
Steps1through7inpreviouspage.WhenProgrammed
Playback beginspress the REPEATbutton twiceto
activatethe All Tracks Repeatfeature.The REPEAT
ALLIndicatorappearsinLCDdisplayand all the tracks
inyourprogrammed sequencewill be repeated
continuously.
TocancelProgrammed RepeatPlayback press the STOPbutton until boththe
PROGRAMand REPEATIndicatorsgo ‘Off’.
STEREOHEADPHONEJACK
Connectasetofstereo headphones(notincluded)witha3.5mm miniplug tothe
Phonesjack (locatedatfrontpanel)forprivatelisteningwithoutdisturbingothers.
Beforeputting on the headphonesreducethe VOLUMEcontroltoalowlevel,then
puttheheadphonesonandgraduallyincreasetheVOLUMEcontroltoacomfortable
listening level.The builtinspeakersareautomaticallydisconnected when
headphonesareconnected tothe headphone jack.
PD6920_C010703.p65 7/1/2003, 17:2211

12
COMPACTDISCCARE
•Toremoveadisc fromitsstorage case,press downon the centerofthe case
and lift the disc out, holding itcarefullybythe edges.
•Fingerprintsand dustshouldbe carefullywiped off the disc’s recorded surface
withasoft cloth.Unlikeconventionalrecords,compactdiscs haveno grooves
tocollectdustand microscopicdebris,sogentlywiping withasoft clothshould
removemostparticles.Wipe inastraightline fromthe inside tothe outside of
the disc.Small dustparticlesand lightstainswill haveabsolutelyno effecton
reproduction quality.
•Clean the disc periodicallywithasoft, lint-free,drycloth.Neverusedetergents
orabrasivecleanerstoclean the disc.If necessary,useaCD cleaning kit.
•Neverwriteon oraffixlabelstothe surfaceofcompactdiscs.
CAREOFTHECABINET
If the cabinetbecomesdustywipe itwithasoft drydustcloth.Donotuseanywax,
polishsprays,orabrasivecleanerson the cabinet.
CAUTION
Neverallowanywaterorotherliquidstogetinside the unitwhilecleaning.
CAREAND MAINTENANCE
PD6920_C010703.p65 7/1/2003, 17:2212

13
TROUBLESHOOTINGGUIDE
Shouldthisunitexhibitaproblem,check the following beforeseeking service.
SymptomPossibleCause Solution
Radio
Noiseorsound Station nottuned properlyforRetune the AMorFM
distorted on AMorFMAMorFM.broadcaststation.
broadcasts.FM:Telescopicantenna isnotExtend FMTelescopic
extended.antenna.
AM:The barantenna isnotReposition the unituntil
positioned correctly.bestreception isobtained.
AMorFM,no sound.FUNCTIONswitchisnotsettoSetFUNCTIONswitchto
AMorFM.AMorFMposition.
Volumeatminimum. IncreaseVolume.
CompactDisc Player
CD Playerwill notplay.FUNCTIONswitchisnotsettoSetFUNCTIONswitchto
CD.CD.
CD isnotinstalled orinstalled InsertCD withIabelside
incorrectly.up.
CD skipswhileplaying.Disc isdirtyorscratched.Wipe disc withclothoruse
anotherdisc.
TOFIND THELOCATIONAND PHONE
NUMBEROFYOUR NEARESTSERVICE
CENTERPERMITTEDTOPERFORM
WARRANTY...
CALL TOLL FREE:1-800-695-0098
SERVICE
FORCUSTOMERSERVICE,PLEASE WRITETO:
Emerson RadioCorp.
ConsumerAffairsDept.
1901 DiplomatDrive,
FarmersBranch,TX75234.
FORADDITIONALSET-UPOROPERATINGASSISTANCE
PLEASE CALL:
1-800-898-9020
R
PD6920_C010703.p65 7/1/2003, 17:2213

14
LIMITEDWARRANTY
Emerson RadioCorp.warrantsmanufacturingdefectsin originalmaterial,including
originalpartsand workmanship, undernormaluseand conditions, foraperiod of
ninety (90)daysfromthedateoforiginalpurchasein theU.S. With yourdated
proofofpurchase, wewill providerepairservice atno chargeforlaborand partsat
an authorizedDepotRepairFacility, orreplace theproductin ourdiscretion. For
repairorreplacement, pack yourunit in apadded box, encloseyourcheck or
money orderpayableto Emerson Radio Corp. in theamountof$9.00 (notrequired
by Californiaresidents)to covershipping and handling costs, and encloseacopy
ofyourproofofpurchase. Send yourunit to:
Emerson Radio Corp.
1901 DiplomatDrive.
FarmersBranch, TX75234.
Thiswarranty doesnotcoverdamagefromnegligence, misuse, abuse, accident,
failureto followoperating instructions, commercialuse, rental, repairsby an
unauthorized facility, orproductspurchased, used, serviced ordamaged outside
oftheUnited States.
THISWARRANTYGIVESYOU SPECIFICLEGALRIGHTS,ANDYOU MAY
ALSOHAVEOTHERRIGHTSWHICHVARYFROMSTATE TOSTATE.
AU898M
PD6920_C010703.p65 7/1/2003, 17:2214

EMERSON
PartNo.:16-2859C
301-01 PrintedinChina
EMERSONRADIOCORP.
PD6920_C010703.p65 7/1/2003, 17:2215
Table of contents
Other Emerson CD Player manuals

Emerson
Emerson Turbo HD8003 User manual

Emerson
Emerson Cd Cruiser CKD9907 User manual

Emerson
Emerson HD8116 User manual

Emerson
Emerson PD6513 User manual

Emerson
Emerson HD7097 User manual

Emerson
Emerson SR5999 User manual

Emerson
Emerson PD1710 User manual

Emerson
Emerson PD5202 User manual

Emerson
Emerson PD5098 User manual

Emerson
Emerson HD8118 User manual

Emerson
Emerson HD8000 User manual

Emerson
Emerson NC100RD User manual

Emerson
Emerson HD7090 User manual

Emerson
Emerson PD9127 User manual

Emerson
Emerson HD2850 User manual

Emerson
Emerson CKD1137 User manual

Emerson
Emerson GirlPower PD5208 User manual

Emerson
Emerson HD8150 User manual

Emerson
Emerson HD7295 User manual

Emerson
Emerson PD6870CH User manual