Emery Thompson CB-100 User manual

OPERATING MANUAL
BATCH FREEZER INSTALLATION
OPERATING, MAINTENANCE
AND CLEANING MANUAL
CB-100 Countertop
World’s Best Built Batch Freezers –100% Made in the U.S.A.
by the People Who Invented Them!

~ 1 ~
v. 1.03
TABLE OF CONTENTS
Section 1:
UNPACKAGING
FIGURE 1-1
FIGURE 1-2
FIGURE 1-3
FIGURE 1-4
FIGURE 1-5
page 2
Section 2:
OVERVIEW
CB-100 NOMENCLATURE
page 6
Section 3:
OPERATION
FIGURE 3-1
FIURE 3-1R
FIGURE 3-2
FIGURE 3-3
FIGURE 3-4
FIGURE 3-5
FIGURE 3-6
page 7
Section 4:
CLEANING AND SANITIZING
page 12
Section 5:
CARE and MAINTENANCE
PHOTO 5-1
page 14
Section 6:
PARTS DIAGRAMS
FIGURE 6-1
FIGURE 6-2
FIGURE 6-3
FIGURE 6-4
FIGURE 6-5
page 16
Section 7:
WARRANTY
page 20

~ 2 ~
v. 1.03
Section 1: UNPACKAGING
When your shipment arrives, please inspect it very carefully. Look
particularly for damage to the box covering it. If it looks crushed,
cut or punctured, have the freight driver wait until you can cut the
box off, and inspect the machine itself. Also, look for damage to
the wooden skid itself. Broken wood can signify rough treatment.
Any damage should be photographed.
The machine and skid weigh about 100 pounds total. Two people,
one on each side, should easily be able to carry it, and it will fit
through a standard 36" exterior door.
If you haven't already, remove the box from the skid by cutting
through it as close as possible to the skid, then lift it off. Look for
a small box inside which contains 4 black plastic feet, and an Allen
wrench to change out blades in the future.
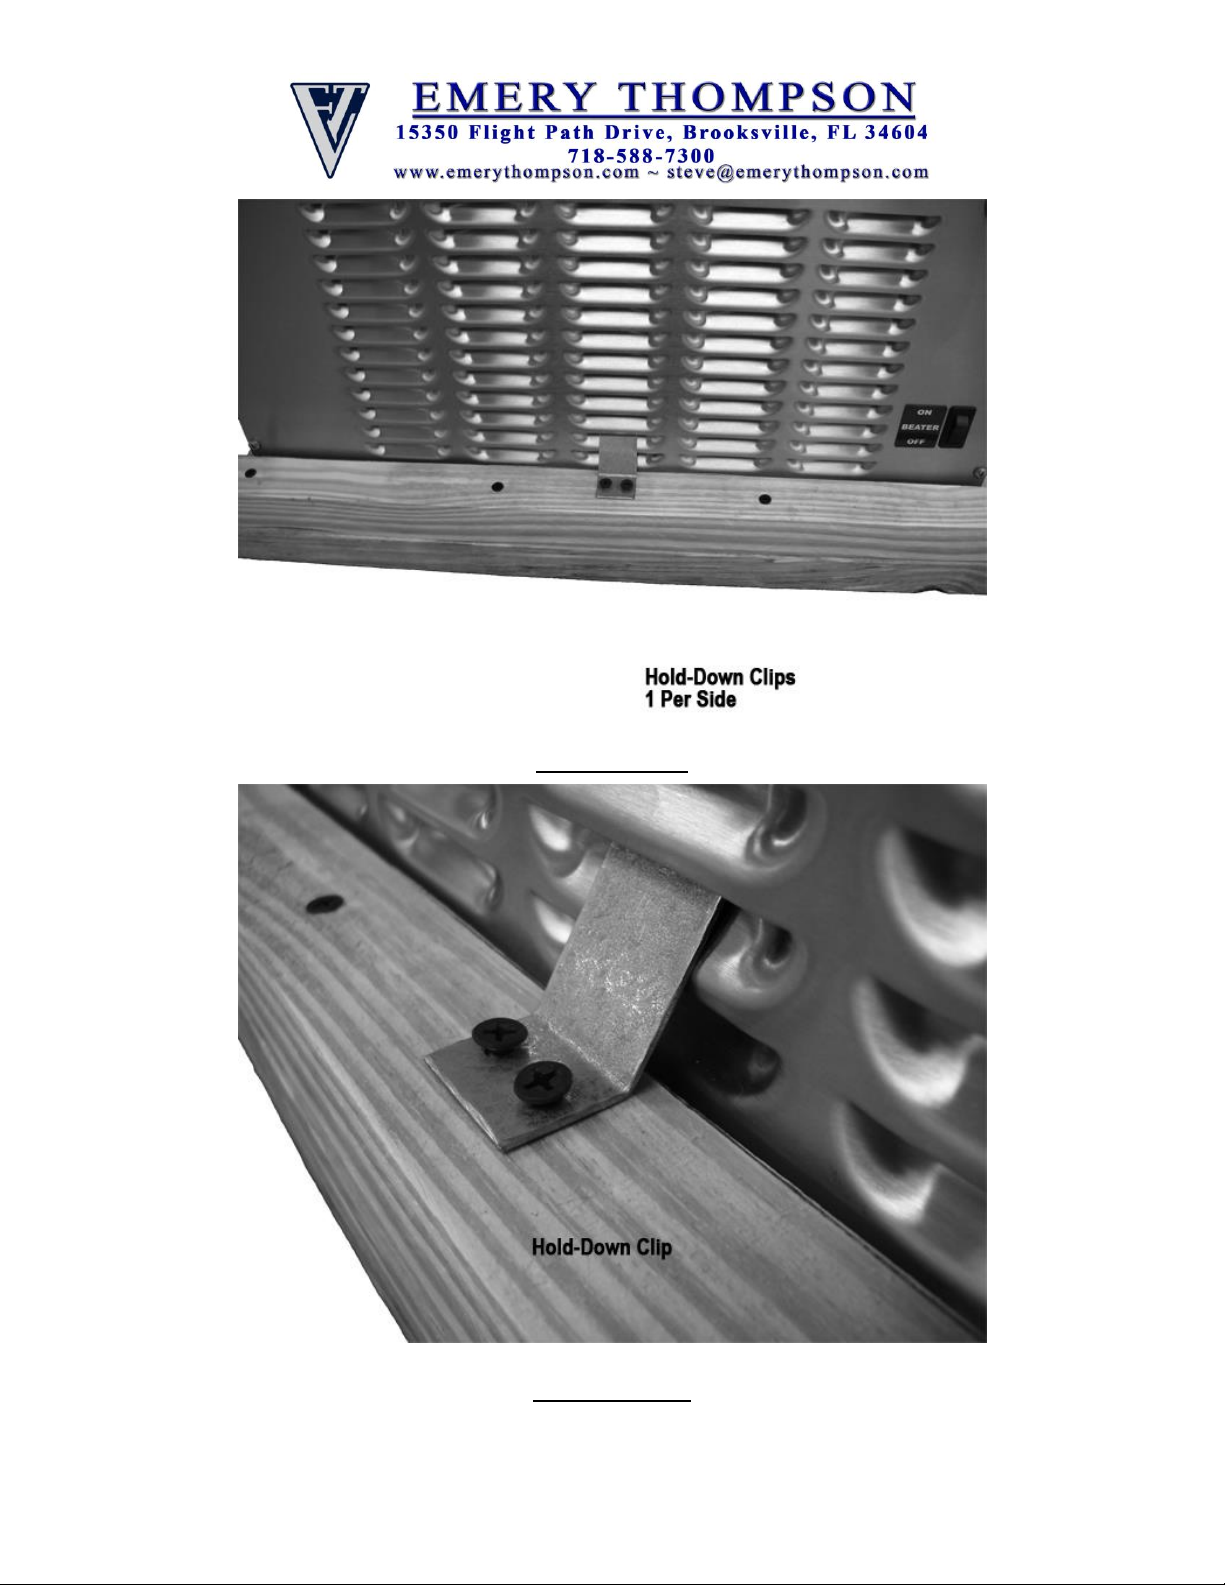
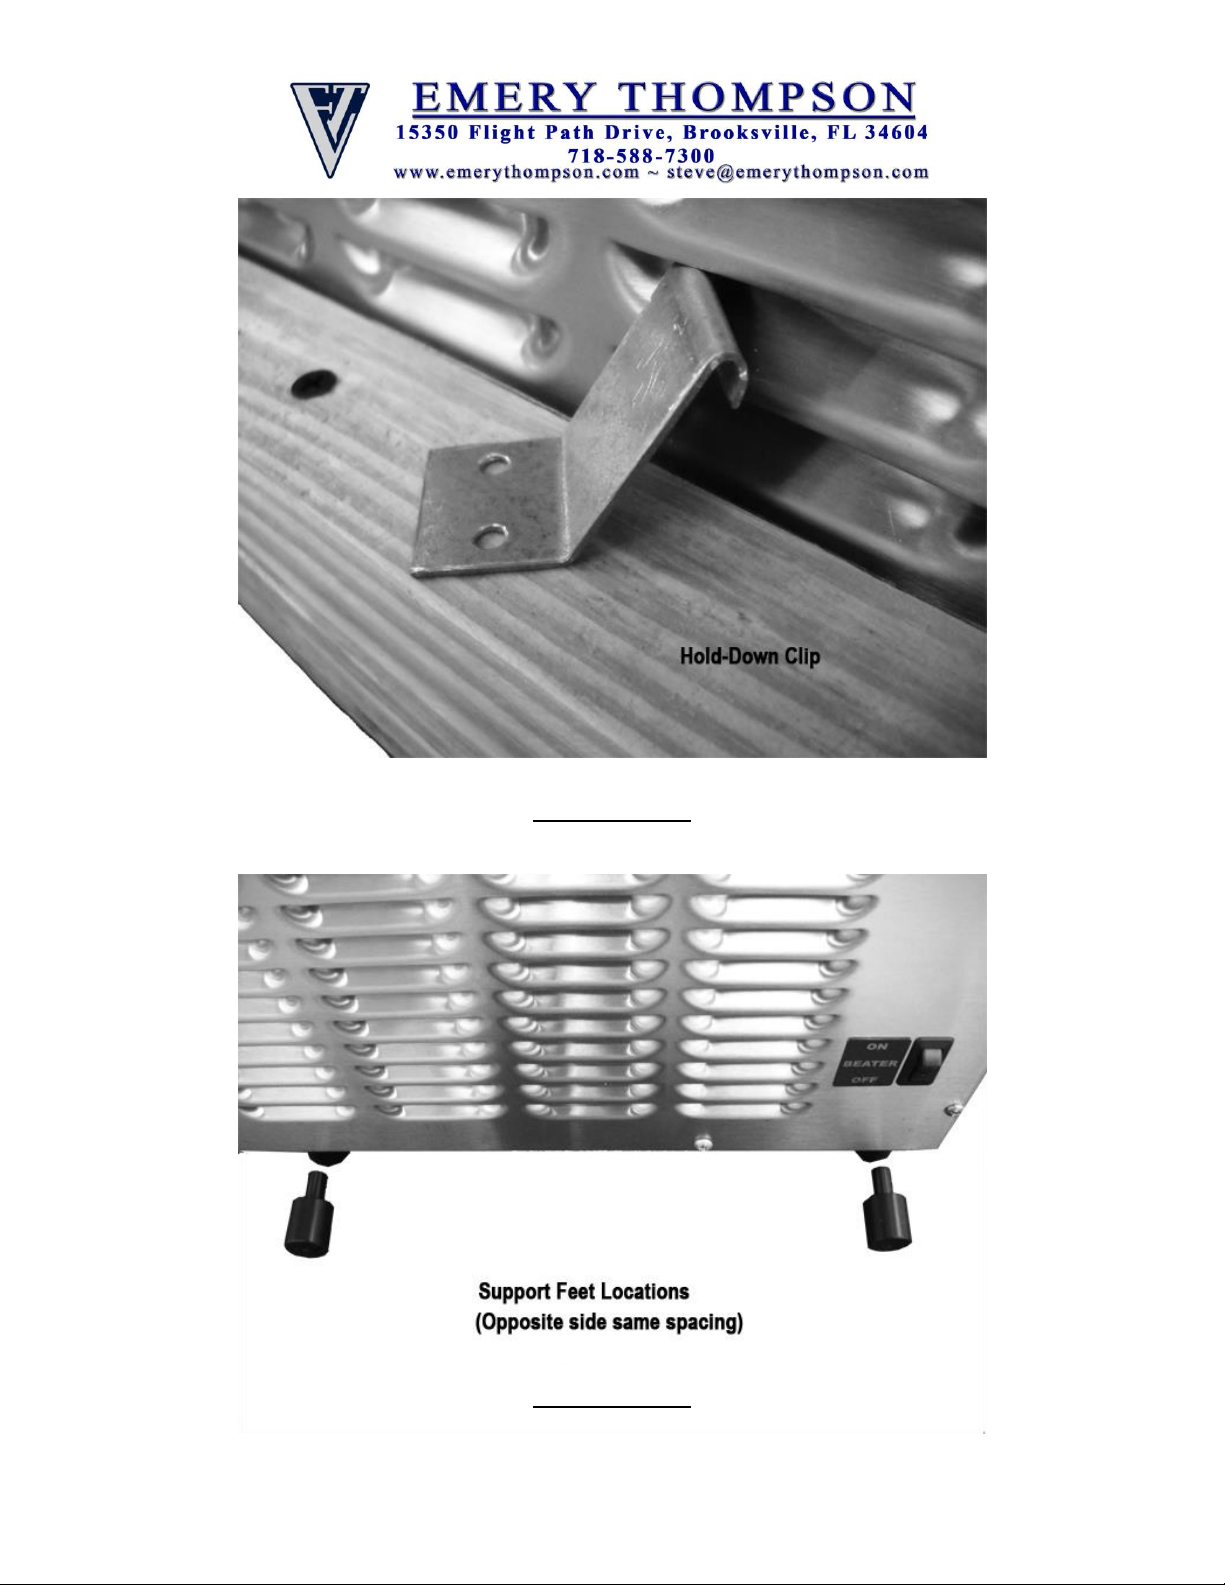
The machine is held in place by two runners along its sides, which
have a clip at their middles that hooks into the middle bottom
louver on each side of the machine. The clips are screwed down to
the runner, and these screws must be removed to free the machine
from the skid. (See Figures 1-1, 1-2, 1-3)
Once the machine is free, place it up onto the intended work
surface. To install the feet, refer to Figures 1-4 & 1-5. The feet
simply plug into the 4 holes that are molded into the machine's
base.
Remove the wire ties holding the power cord in place, and unravel
it. The machine is now ready for use.
~ 3 ~
v. 1.03
Figure 1-1
Figure 1-2
~ 4 ~
v. 1.03
Figure 1-3
Figure 1-4

~ 5 ~
v. 1.03
Figure 1-5
~ 6 ~
v. 1.03
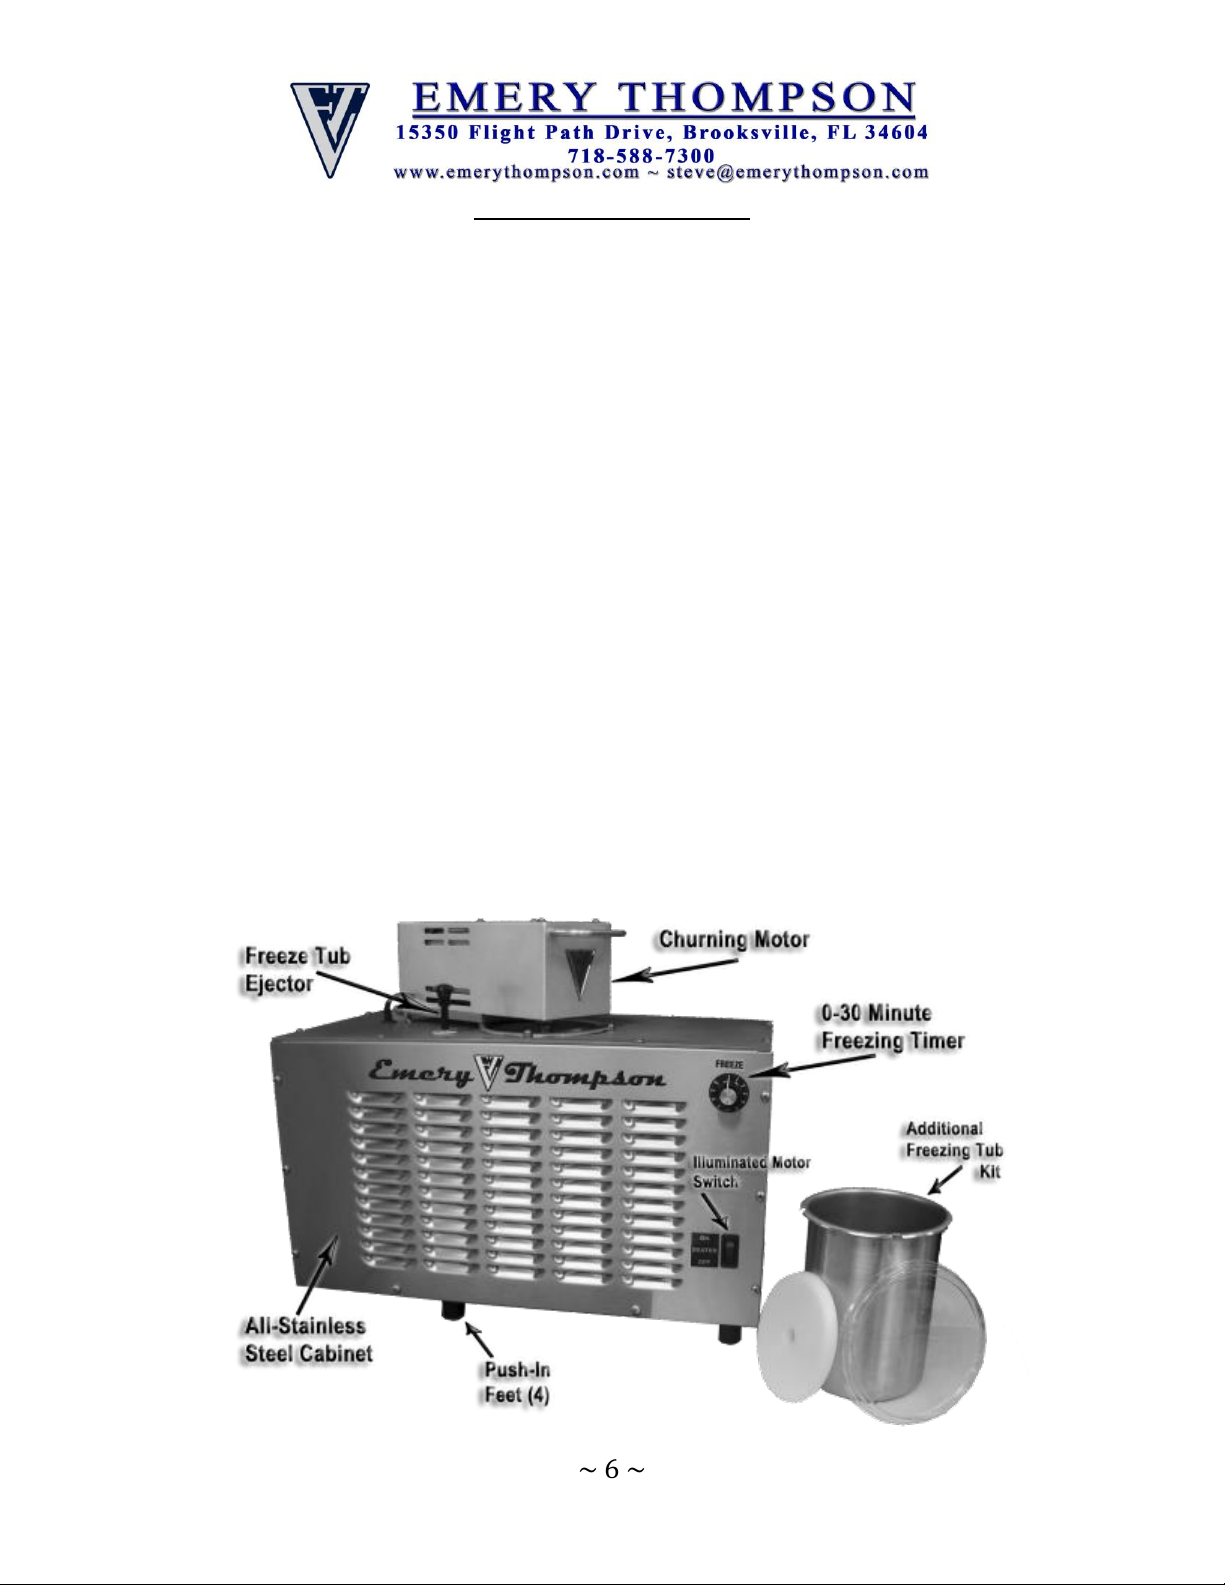
Section 2: OVERVIEW
Your new model CB100 Countertop Batch Freezer is a self-
contained air-cooled unit that is designed to sit on any countertop
and be easily moved for cleaning. It runs on standard
residential/commercial 115V service, and comes equipped with a
plug for such. The machine pulls in room air from the left end, and
distributes it out on the other 3 sides. One unique feature of the
machine is that it freezes product in what will be your serving or
hardening container. Each additional container purchased comes
with a bearing disc and a clear lid.
This machine will produce premium ice cream, Italian ices,
sorbets, and gelato in 20 minutes or less per tub. Various
inclusions can be added prior to churning, and/or after production
in the same container it was just made in.
To make it even easier to use, the CB100 has an ejection
mechanism that pushes your freezing tub up and out of the freezing
chamber, and the machine has very few parts to be cleaned and
sanitized.

~ 7 ~
v. 1.03
Section 3: OPERATION
The normal sequence of operating the CB100 is as follows:
1. Insert a clean, sanitized (See Section 4) freezing tub into the
freezing cylinder, making sure the rim of the tub engages all
4 of the round drive lugs and that the rim sits flush with the
top surface (See Figure 3-1).
2. Insert the bearing disc, with radiused edge down, into the
freezing tub. The disc should sit flat and rounded edge of
disc must match rounded profile of tub bottom. (see Figure 3-
1R).
3. Insert the dasher shaft with blade into the tub with the
hexagonal drive end facing upward. Be sure the round end of
the shaft goes into the round hole in the bearing disc, and
push it all the way down until the bottom edge of the blade
touches the surface of the disc. (See Figure 3-2).
4. Pour the mix you intend to freeze into the tub. NOTE: do not
add more than your flavorings and ONE quart of mix to the
freeze tub. You do not want overflow out of the top of the
freeze tub.
5. Lay the splash plate on top of the dasher. It will fit just inside
of the freeze tub. (See Figure 3-3).
6. Tilt the churning motor down gently until the driveshaft
touches the top of the dasher. Let the weight of the churning
motor rest atop the dasher. (See figures 3-4 and 3-5). When
you are ready to begin the cycle, simply turn on the motor
switch, and it will engage with the dasher and drop down

~ 8 ~
v. 1.03
approximately another 1/4" and stop on its rubber bumper.
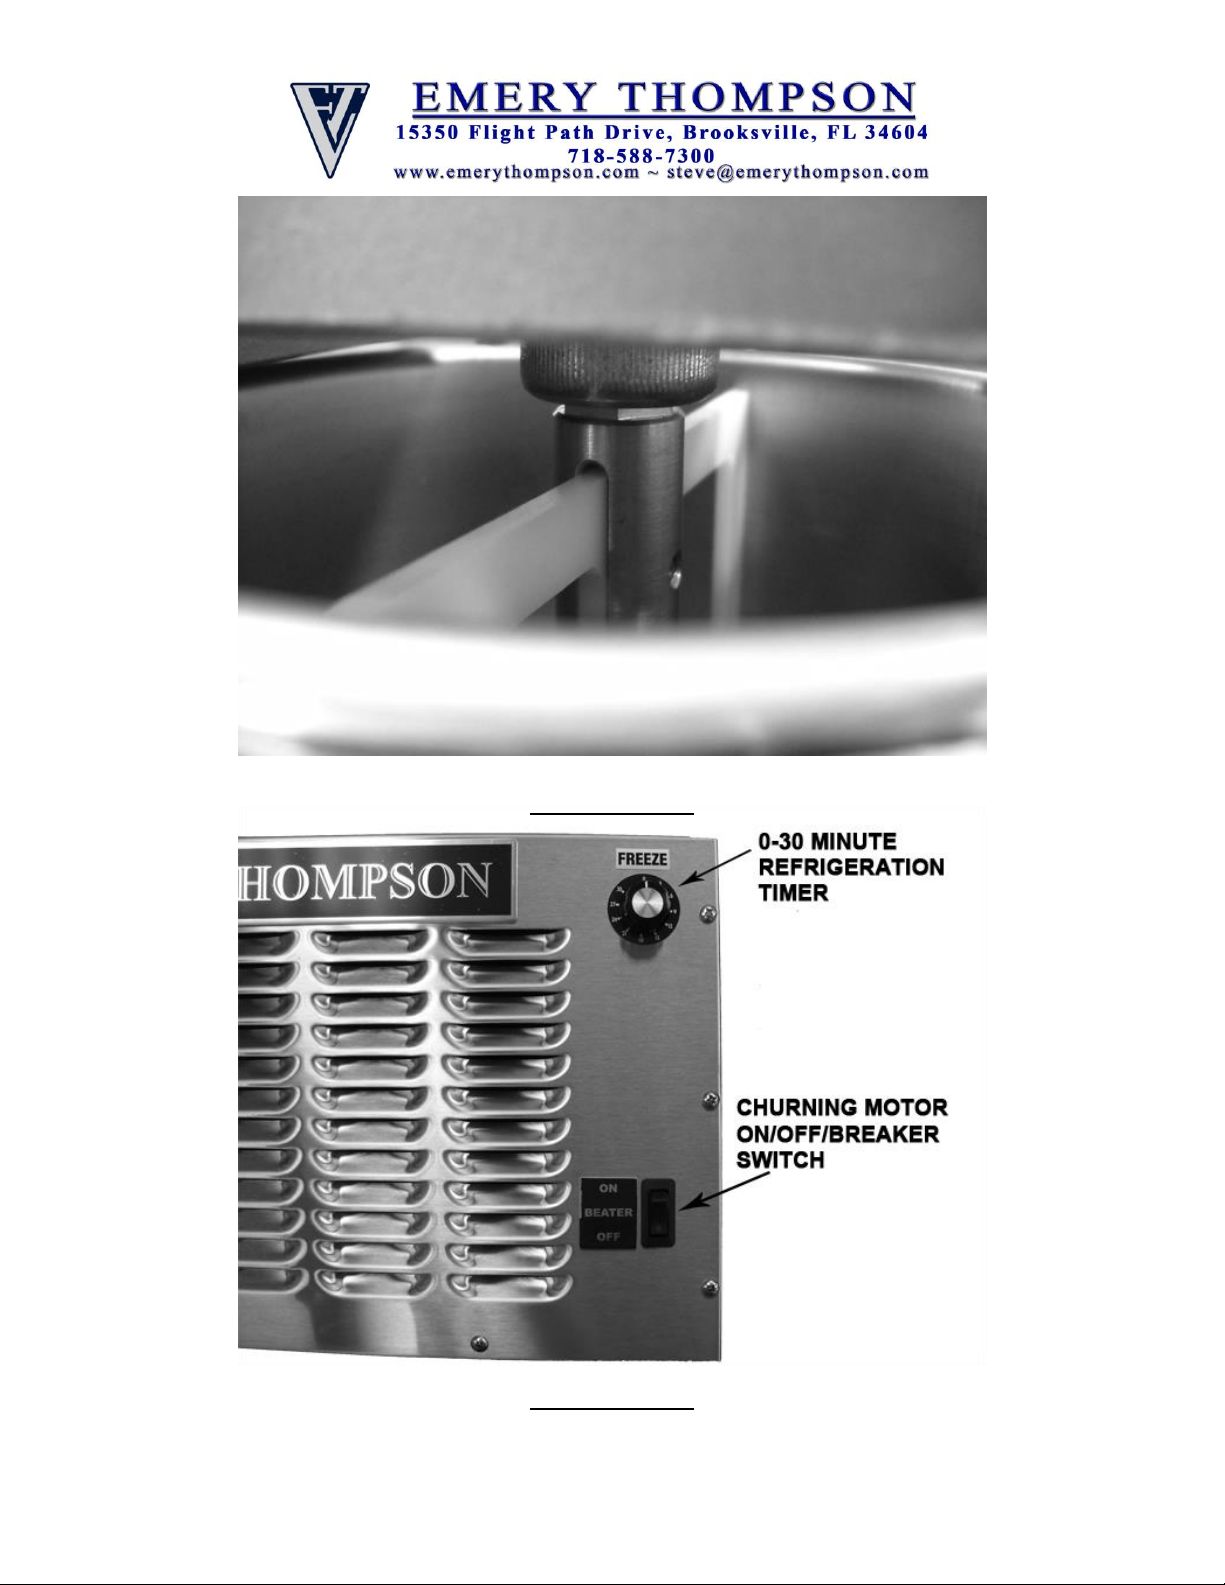
7. Once the dasher is spinning, turn the freezing timer to 20
minutes. The refrigeration will start, and continue until the
timer either times-out, or you manually twist it to the "0"
position. (See figure 3-6).
8. When the desired consistency is reached, turn the
refrigeration timer to the zero (0) position and the compressor
will stop. Now turn the rocker switch off, and the churning
motor stops. Raise the motor into its upright position. Push
down firmly on the ejection knob, making the freezing tub
rise up enough to grasp the rim and remove it from the
machine. Remove the splash disc and dasher from the freeze
tub and put a cover on the tub, then transfer to your
hardening cabinet.
Figure 3-1

~ 9 ~
v. 1.03
Figure 3-1R
Figure 3-2

~ 10 ~
v. 1.03
Figure 3-3
Figure 3-4
~ 11 ~
v. 1.03
Figure 3-5
Figure 3-6

~ 12 ~
v. 1.03
Section 4: CLEANING AND SANITIZING
It is very important to have a stringent, repeatable procedure for
cleaning and sanitizing any type of food equipment. Fortunately,
the model CB100 Batch Freezer has very few parts to clean and
sanitize. You will need to have a commercial sanitizer on hand at
all times. Emery Thompson recommends Purdy Products
"SteraSheen Green Label" sanitizer and cleaner, which was
included with your machine. It is a powder that is dissolved in
water.
On the model CB100, there are only 4 food-contact parts that must
be thoroughly cleaned and sanitized: the freezing tub, the bearing
disc, the splash plate and the dasher/blade assembly. After the last
batch of the day or shift is made, these parts should be either hand-
cleaned with detergent and warm water, or run through a
dishwasher. The sanitizing is done just prior to use, so the parts
should be washed, dried, and stored in a clean place until ready to
use the machine.
When assembling the 4 parts mentioned above for use, have a
gallon bucket of sanitizing solution ready, as well as a roll of paper
towels, and a clean work surface. Put the bearing disc into the
freezing tub, then the dasher/blade assembly into the tub.
Submerge the entire assembly into the bucket of sanitizer for at
least one minute. Then, pull the tub out, and pour the sanitizer out
of it. Consult with your local health Inspector for any additional
sanitizing methods he/she may require.
IMPORTANT: the next step is crucial! Just before you put the tub
into the machine YOU MUST DRY THE OUTSIDE of the tub!
Failure to do this important step will cause the freezing tub to lock

~ 13 ~
v. 1.03
into the freezing cylinder! Once the outside of the tub is
completely dry, it can be inserted into the freezing cylinder, and
locked onto the 4 drive pins. At this point, you are ready to add
mix/ingredients, and begin.
Keep in mind: the cleaner you work, the easier cleanup will be.
Rather than a sponge or rag, use disposable paper towels. Damp or
wet sponges and rags harbor bacteria! Wipe up spills and throw
away wrappers, paper towels, or anything that may accumulate.
After production is complete, any spilled product on the outer
casing or top of the machine should be wiped up thoroughly, and
then wiped down with some of the sanitizer that was made earlier.
Look into the freezing cylinder. If there is anything in it, including
water/condensate, it too should be wiped out thoroughly.
You simply cannot be too thorough when it comes to food and
cleanliness!

~ 14 ~
v. 1.03
Section 5: CARE and MAINTENANCE
Your model CB100 requires very little in the way of care and
maintenance. There are some functions of the machine that bear
paying attention to.
1) Airflow - your machine uses airflow from its surroundings to
extract heat from each batch of product you make. So it goes to
reason that good airflow is imperative to the efficient operation of
the unit. After about 100 batches (depending on the environment
the machine is used in) take a good look at the left side of the
machine, where air is drawn in. Look past the square perforations
in the stainless steel cabinet, and check the surface of the
condensing coil assembly. It should be clean and free of dust, lint,
etc. that may in time accumulate on its surface. A strong vacuum
cleaner with a soft brush can be used to loosen and pull out any
accumulations.
2) Blade condition - the scraping blade is made of food-grade high
density polyethylene. Eventually, the surface that touches the
freezing tub will wear down. When you notice a change in the
amount of product being left on the inside surfaces of the freezing
tub, it will be time to change the blade. You should be able to see
the gray/silver of the tub after each swipe around of the blade.
There will always be a film of product on the surface of the tub,
but if you can longer see through it to notice the color of the
stainless steel beneath it, then change the blade. A hex key is
included with the machine that fits the 3 screws that secure the new
blade into the dasher shaft. Simply remove the screws, and push
the old blade out sideways. When sliding the new blade in place,
note that there is a top and bottom. The bottom of the blade has a
very slight taper near where it rides along the bearing disc (see
photo 5-1) Be sure to insert it the correct way into the dasher
shaft. Line up the holes in the blade with the holes in the dasher

~ 15 ~
v. 1.03
shaft, and replace and tighten the 3 securing screws. Start the
screws threading into each hole before tightening any of them all
the way. Do not over tighten.
3) Bearing discs - the small centering hole in the bearing disc may
show signs of wear (oblonging) after many hundreds of batches.
To check this, insert the round end of the dasher shaft into the
bearing disc's hole. There should be some clearance, but equal all
around the hole. If questionable, replace the disc.
4) Power cord - be sure to keep the power cord routed in a safe
path to your outlet. If for some reason the cord becomes damaged
or frayed, or the plug does, have an electrician replace the entire
cord. You can purchase this part from Emery Thompson.
5) General cleanliness - aside from the normal day-to-day cleanup
of the machine, and to keep the machine looking it's best, a
stainless steel cleaner/polish can be used on all stainless surfaces to
bring back its luster. Do not use abrasive cleaners, or cleaners with
high bleach content.
Photo 5-1

~ 16 ~
v. 1.03
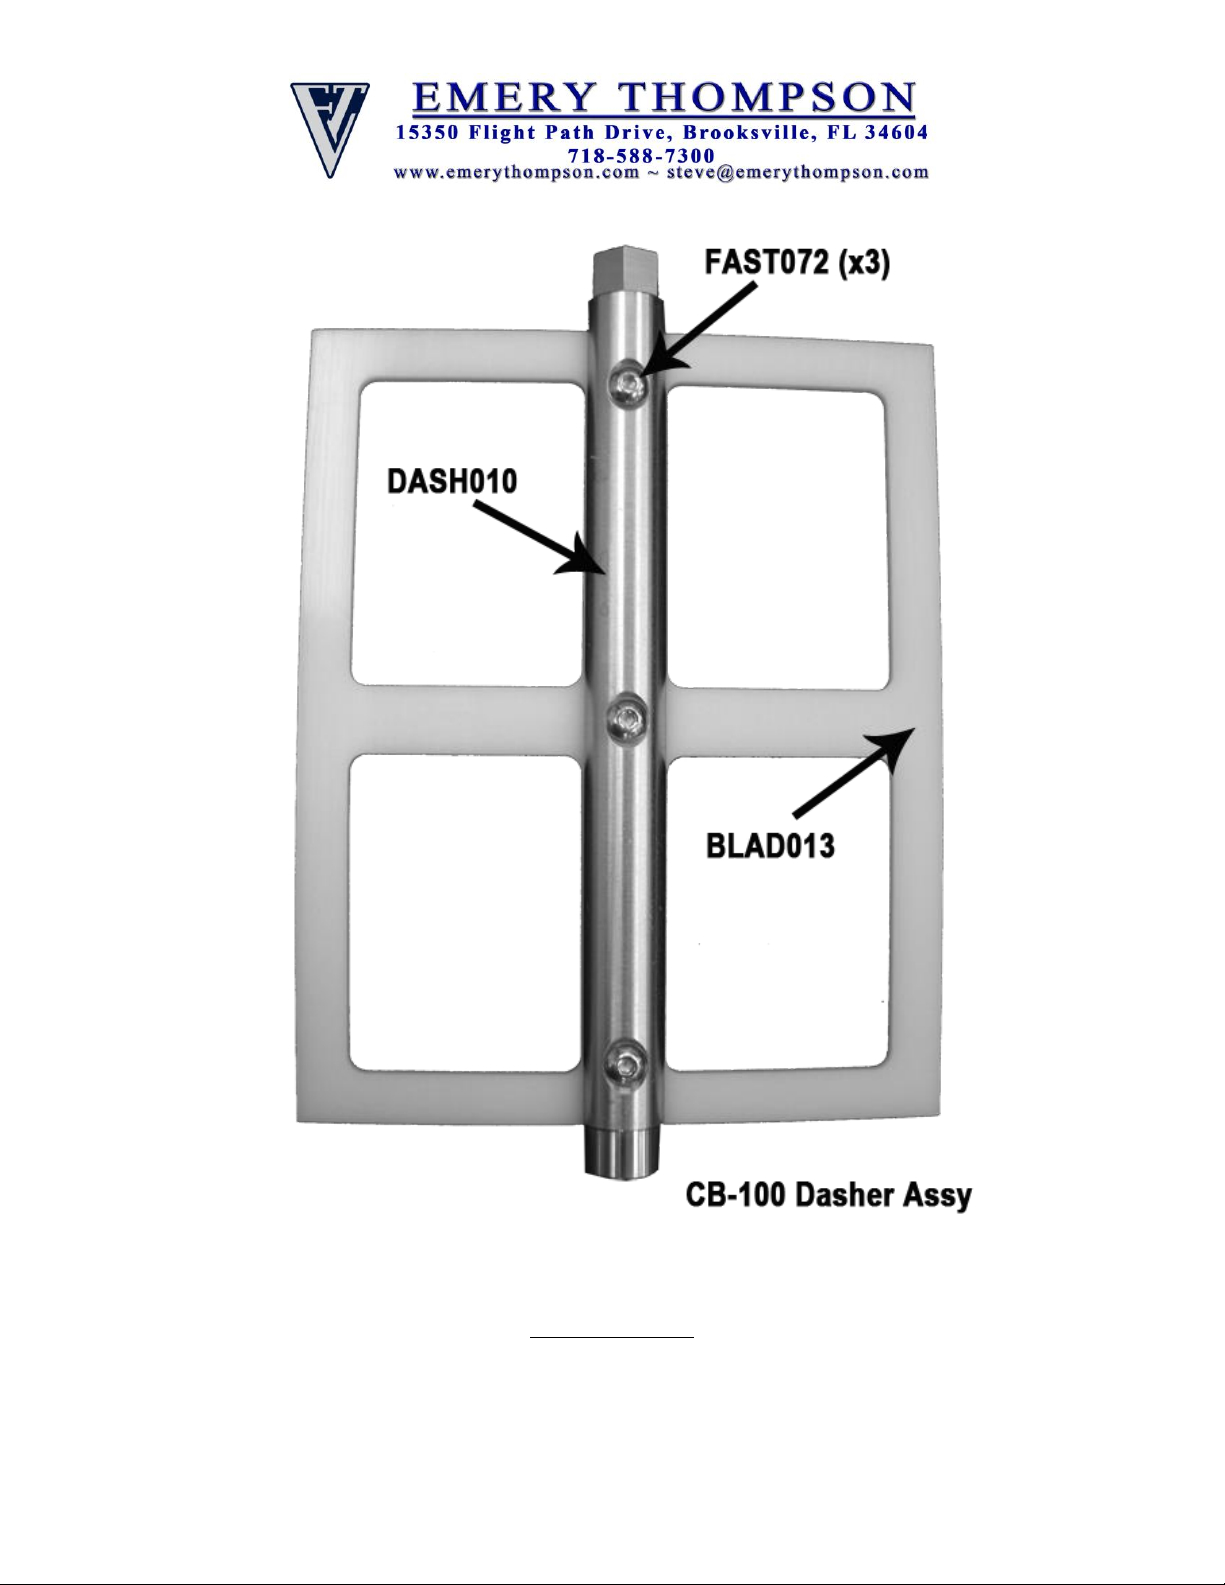
Section 6: PARTS DIAGRAMS
Figure 6-1
Figure 6-2
~ 17 ~
v. 1.03
Figure 6-3

~ 18 ~
v. 1.03
Additional Freezing Tub Kit
Figure 6-4

~ 19 ~
v. 1.03
Figure 6-5
Table of contents
Other Emery Thompson Freezer manuals


