Emfit QS Manual
HEART CONTRACTIONS, BREATHING AND BODY MOVEMENT ANALYTICS IN SLEEP
Installation &
operating instructions
V1.6 4.7.2017

3
Thank you for purchasing this EMFIT QS
sleep tracker! You have made a great choice.
In this user guide you will find useful infor-
mation about your device from taking it into
use to analyzing your sleep patterns and
longtime trends.
Content
1. Package contents . . . . . . . . . . . . . . . . . . . . . . . . . . . . . . . . . . . . . . . . . . . . . . . . . . . . . . . . . . . . . . . . . . . . . . . . . . . . . . . . . 4
2. Safety instructions . . . . . . . . . . . . . . . . . . . . . . . . . . . . . . . . . . . . . . . . . . . . . . . . . . . . . . . . . . . . . . . . . . . . . . . . . . . . . . . . 5
3. Minimum requirements . . . . . . . . . . . . . . . . . . . . . . . . . . . . . . . . . . . . . . . . . . . . . . . . . . . . . . . . . . . . . . . . . . . . . . . . . . . 6
4. Product overview . . . . . . . . . . . . . . . . . . . . . . . . . . . . . . . . . . . . . . . . . . . . . . . . . . . . . . . . . . . . . . . . . . . . . . . . . . . . . . . . . . 7
4.1. Intended use . . . . . . . . . . . . . . . . . . . . . . . . . . . . . . . . . . . . . . . . . . . . . . . . . . . . . . . . . . . . . . . . . . . . . . . . . . . . . . . 7
4.2. Liability of the manufacturer . . . . . . . . . . . . . . . . . . . . . . . . . . . . . . . . . . . . . . . . . . . . . . . . . . . . . . . . . . . . . . . 7
4.3. About these instructions for use . . . . . . . . . . . . . . . . . . . . . . . . . . . . . . . . . . . . . . . . . . . . . . . . . . . . . . . . . . . 7
4.4. Why to use EMFIT QS . . . . . . . . . . . . . . . . . . . . . . . . . . . . . . . . . . . . . . . . . . . . . . . . . . . . . . . . . . . . . . . . . . . . . . 7
5. Overview of the EMFIT QS setup . . . . . . . . . . . . . . . . . . . . . . . . . . . . . . . . . . . . . . . . . . . . . . . . . . . . . . . . . . . . . . . . . 8
6. Connect EMFIT QS to your home Wi-Fi . . . . . . . . . . . . . . . . . . . . . . . . . . . . . . . . . . . . . . . . . . . . . . . . . . . . . . . . . . . 9
6.1. Connecting EMFIT QS device to your Wi-Fi network (without WPS button)
Quick guide) . . . . . . . . . . . . . . . . . . . . . . . . . . . . . . . . . . . . . . . . . . . . . . . . . . . . . . . . . . . . . . . . . . . . . . . . . . . . . . . 10
6.2. Connecting through Wi-Fi Protected Setup (WPS) button . . . . . . . . . . . . . . . . . . . . . . . . . . . . . . . . 15
6.3. Connecting EMFIT QS device to your Wi-Fi network
(without WPS button) – Detailed guide with pictures . . . . . . . . . . . . . . . . . . . . . . . . . . . . . . . . . . . . . 16
7.3.1. My network is hidden . . . . . . . . . . . . . . . . . . . . . . . . . . . . . . . . . . . . . . . . . . . . . . . . . . . . . . . . . . . . . . 20
6.4. Checking device’s data flow to server’s database . . . . . . . . . . . . . . . . . . . . . . . . . . . . . . . . . . . . . . . . . 23
7. Register the device . . . . . . . . . . . . . . . . . . . . . . . . . . . . . . . . . . . . . . . . . . . . . . . . . . . . . . . . . . . . . . . . . . . . . . . . . . . . . . . 24
8. Set up the EMFIT QS in your bed . . . . . . . . . . . . . . . . . . . . . . . . . . . . . . . . . . . . . . . . . . . . . . . . . . . . . . . . . . . . . . . . . 26
9. Restoring EMFIT QS device to Access Point (AP) mode . . . . . . . . . . . . . . . . . . . . . . . . . . . . . . . . . . . . . . . . 27
10. Meaning of lights . . . . . . . . . . . . . . . . . . . . . . . . . . . . . . . . . . . . . . . . . . . . . . . . . . . . . . . . . . . . . . . . . . . . . . . . . . . . . . . . . 28
11. Using the device . . . . . . . . . . . . . . . . . . . . . . . . . . . . . . . . . . . . . . . . . . . . . . . . . . . . . . . . . . . . . . . . . . . . . . . . . . . . . . . . . . 31
11.1. Overview of web interface . . . . . . . . . . . . . . . . . . . . . . . . . . . . . . . . . . . . . . . . . . . . . . . . . . . . . . . . . . . . . . . . . . . . . 31
12. Analyzing the measurements . . . . . . . . . . . . . . . . . . . . . . . . . . . . . . . . . . . . . . . . . . . . . . . . . . . . . . . . . . . . . . . . . . . 32
12.1. Main display (dashboard) items . . . . . . . . . . . . . . . . . . . . . . . . . . . . . . . . . . . . . . . . . . . . . . . . . . . . . . . . . . . . . . 32
12.2. More detailed information accessible through arrow button or tabs . . . . . . . . . . . . . . . . . . . . . . . . . . 37
13. Troubleshooting . . . . . . . . . . . . . . . . . . . . . . . . . . . . . . . . . . . . . . . . . . . . . . . . . . . . . . . . . . . . . . . . . . . . . . . . . . . . . . . . . . 39
14. Cleaning . . . . . . . . . . . . . . . . . . . . . . . . . . . . . . . . . . . . . . . . . . . . . . . . . . . . . . . . . . . . . . . . . . . . . . . . . . . . . . . . . . . . . . . . . . 42
15. Technical specifications . . . . . . . . . . . . . . . . . . . . . . . . . . . . . . . . . . . . . . . . . . . . . . . . . . . . . . . . . . . . . . . . . . . . . . . . . 42
16. Warranty information . . . . . . . . . . . . . . . . . . . . . . . . . . . . . . . . . . . . . . . . . . . . . . . . . . . . . . . . . . . . . . . . . . . . . . . . . . . . 43
17. Regulatory Statements . . . . . . . . . . . . . . . . . . . . . . . . . . . . . . . . . . . . . . . . . . . . . . . . . . . . . . . . . . . . . . . . . . . . . . . . . . 44
4 5
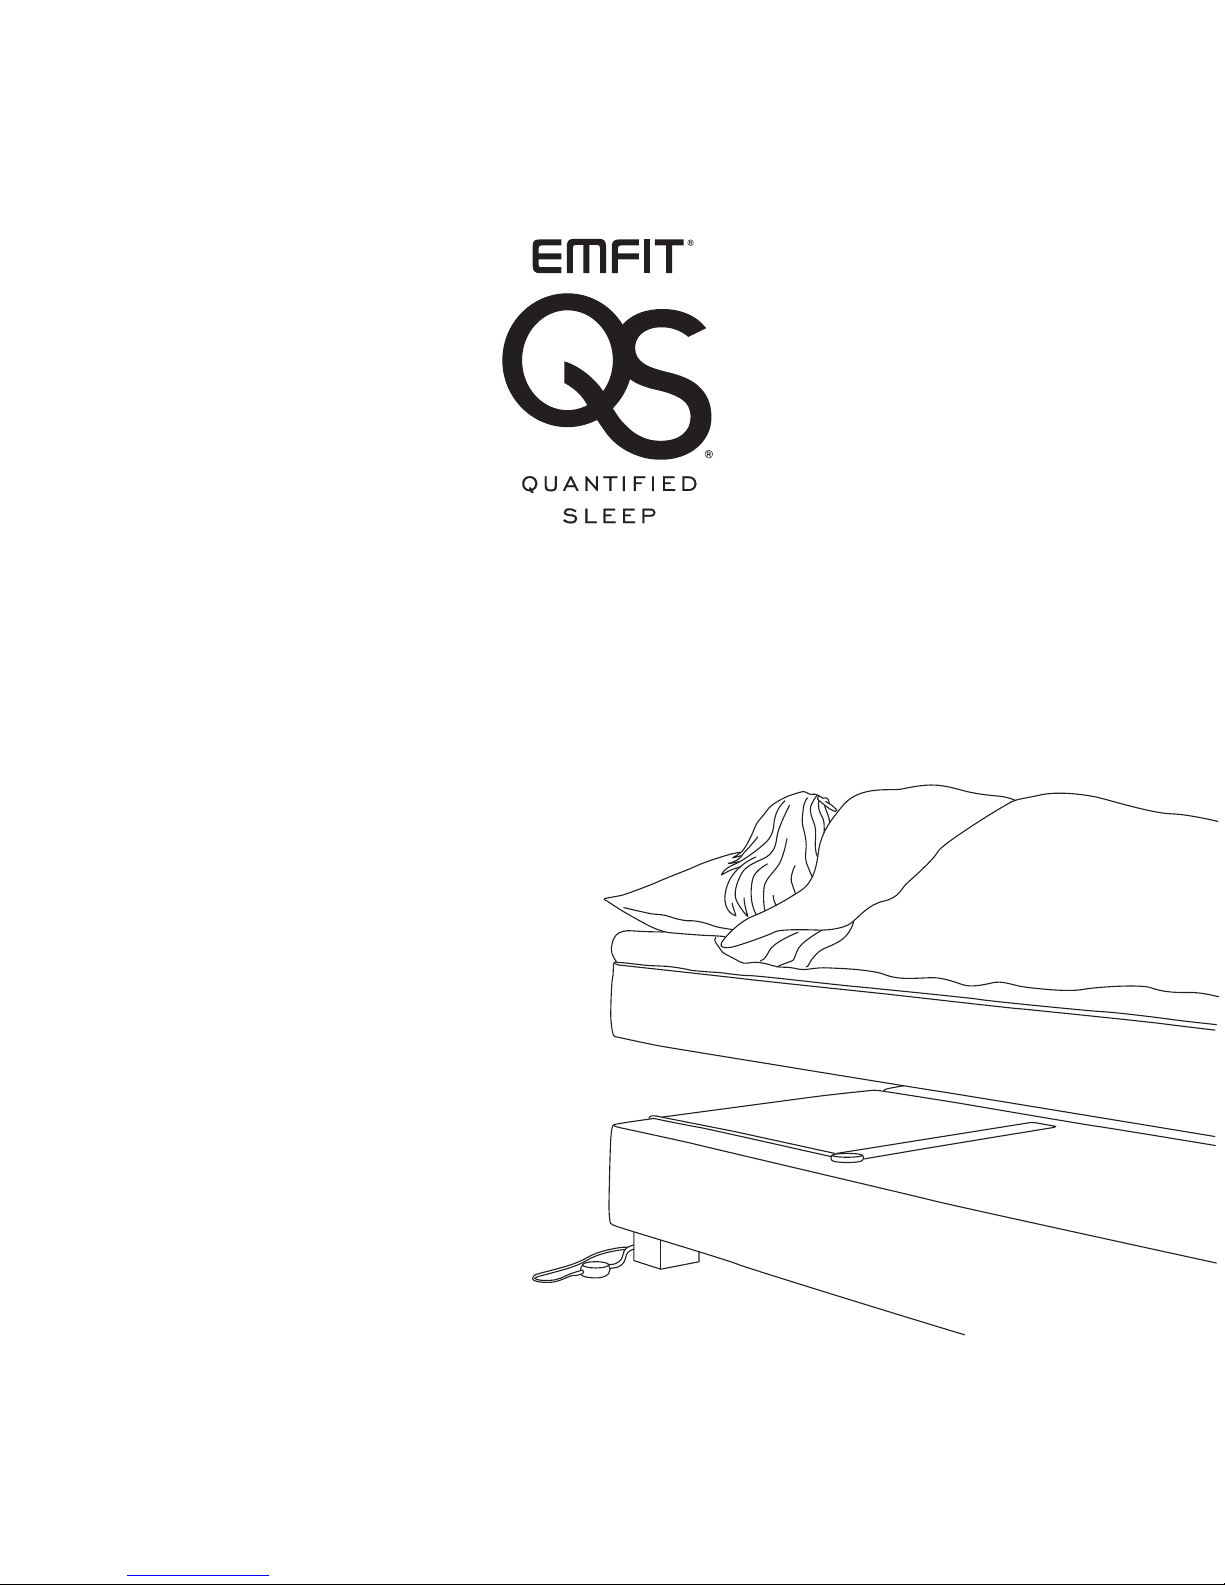
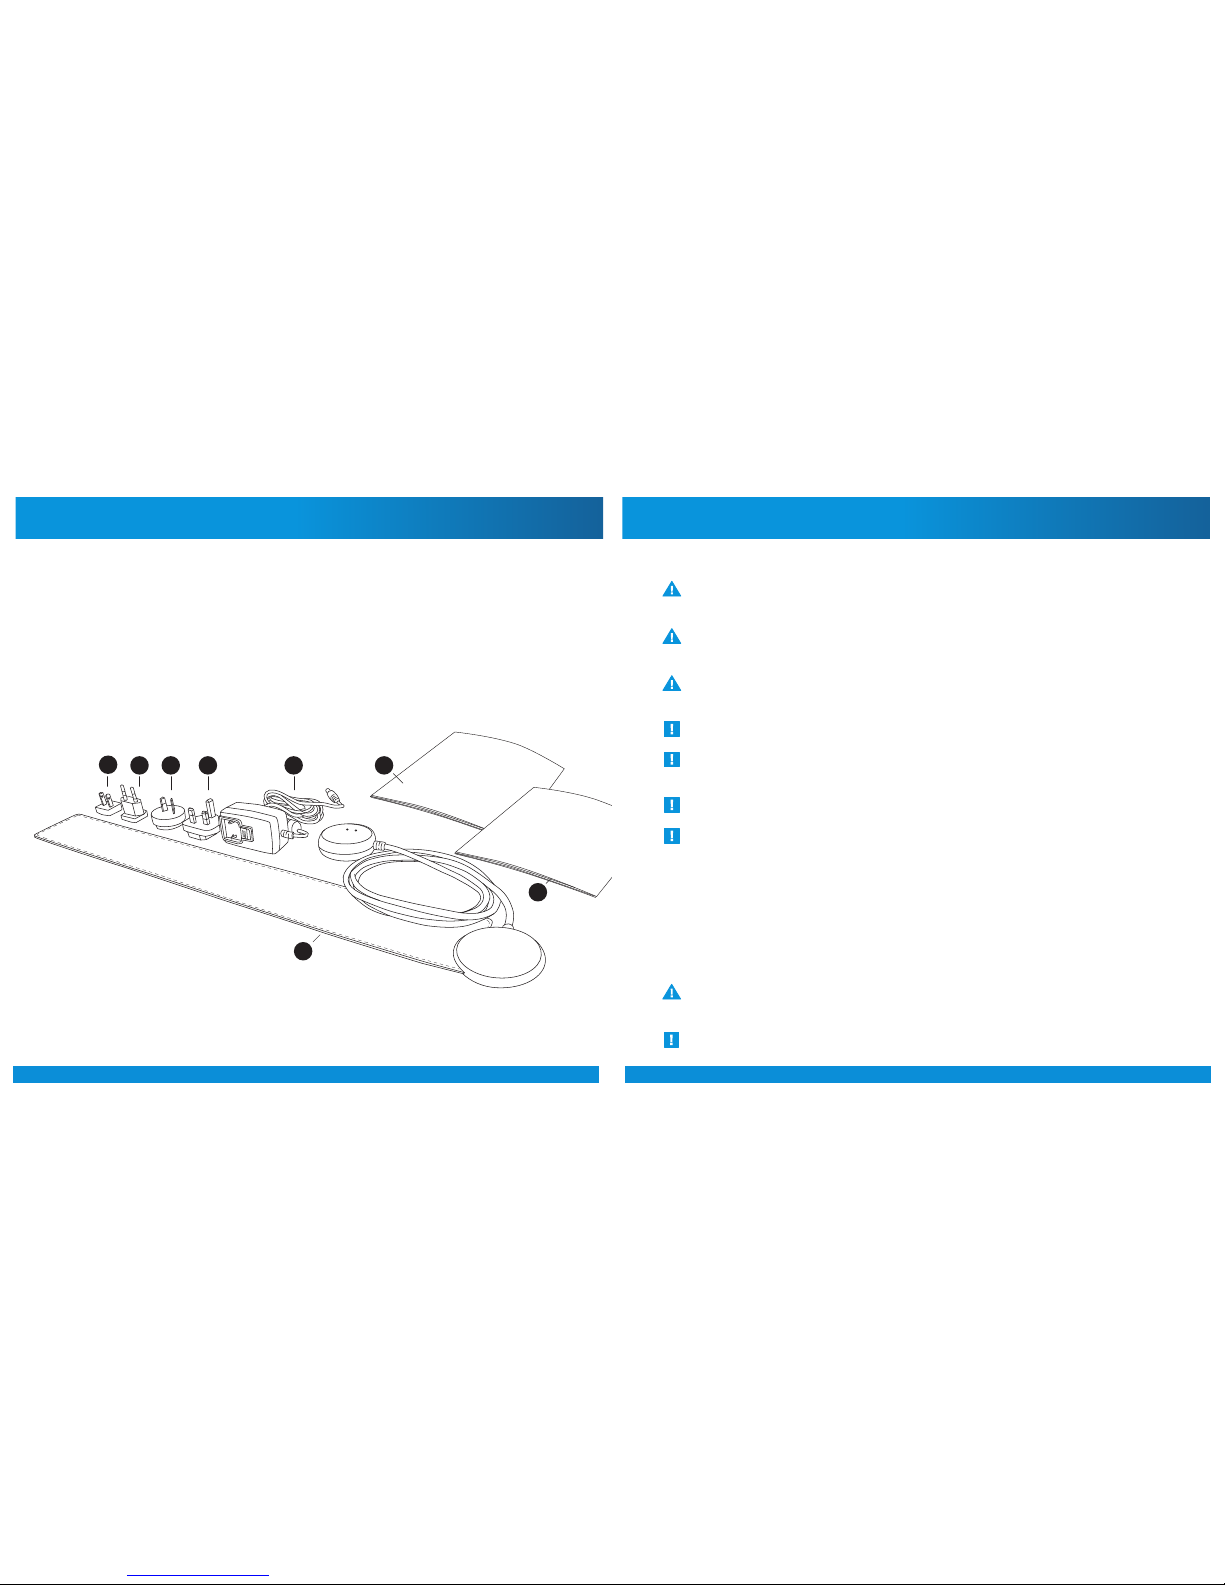
1. Electronic unit with attached bed sensor
2. Power supply
3. Plug adapter for European countries
4. Plug adapter for United Kingdom
5. Plug adapter for United States of America
6. Plug adapter for Australia
7. User guide
8. Quick guide
1.
2.3.
5. 4.6.
1. Package contents
Quick Guide
7.
8.
2. Safety instructions
If the device gets wet or starts overheating stop using immediately and disconnect power
supply from mains power.
Equipment is not suitable for use in the presence of a flammable anaesthetic mixture with air
or with oxygen or nitrous oxide.
Only use the power supply (as specified in chapter Technical specifications) supplied with
the product.
This product is designed for indoor use only.
This product IS NOT intended to be used for direct diagnosis or monitoring of disease or
other conditions, or physiological processes.
Do not use this device for any purpose other than that specified by the manufacturer.
Do not try to repair the device yourself.
If the instructions are not adhered to, the situation may lead to a death or serious personal injury (in these
instruc tions for use). ATTENTION - consult accompanying documents (i.e. these instructions for use)
SYMBOLS USED IN THESE INSTRUCTIONS FOR USE
The following instructions are designed to ensure the personal safety of the user and protect this device
or any device connected to it from damage. These instructions use symbols to draw the user’s attention to
the instructions at hand. The symbols act as safety and warning signs. The symbols and their explanations
are as follows:
Means that the section contains important information for the user (in these instructions for use).
Installation &
operating instructions

6 7
3. Minimum requirements
4.1. Intended use
The Emfit QS hardware (Product) and web applica-
tion (Service) together is a general wellness product
intended to be used for tracking the impact of free-
time activities on recovery, fatigue and sleep quality
on a healthy subject. It is not a medical device and is
not intended to be used for diagnosis or monitoring
of disease or other conditions, or investigation of a
physiological process.
The product consists of electronic unit with attached
bed sensor and a separate power supply.
4.2. Liability of the manufacturer
Emfit Ltd is liable to ensure the safety, reliability and
performance of the device, provided that:
• The device is installed, used and cleaned in
accordance with these instructions
• Any changes to the product, maintenance and
repairs are conducted by a person trained by
Emfit Ltd or its representative.
4.3. About these instructions for use
Read all warnings and reminders in these instructions
for use with care to avoid any hazardous situations
and damage.
4.4. Why to use emfit qs
• Long term measurement, all your round, every night,
whole night!
• Ease of use, nothing needs to be turned on, no need
to wear anything, no irritation on skin, etc.
• User can see long term development, and also
possible deterioration, and look reasons for this.
• System gives information about training load
(evening HRV sinks), recovery rate (ratio between
evening and morning HRV’s), and recovery status
(morning HRV). With this information, the user can
optimize the training schedule based on actual body
needs, and not on what calendar says.
• System can also prevent the user from training
when it is not beneficial; for example Resting HR
usually sinks if person is getting ill, before the person
even knows that. Long term decrease in RMSSD
may be indication of over-training syndrome.
4. Product overview
• 2,4 GHz (802.11 b/g/n) home* Wi-Fi network with access to Internet.
The 5 GHz Wi-Fi is not supported.
• Channels 1 - 11 in use (channels 12-14 are not supported)
• For Wi-Fi set up process, a computing device (for example laptop, desktop computer, smart phone)
with internet browser.
• Electrical outlet (110 - 230V AC) for the included 5V power supply
* In home Wi-Fi networks usually all outgoing ports are open. If you use professional (oce, corporate) Wi-Fi
you need to enable outgoing ports 35110 - 35121 open.
8 9
5. Quick overview of the set up 6. Connect Emfit QS to Wi-Fi
Please follow detailed instructions on the following pages for getting the device into use
QUICK OVERVIEW
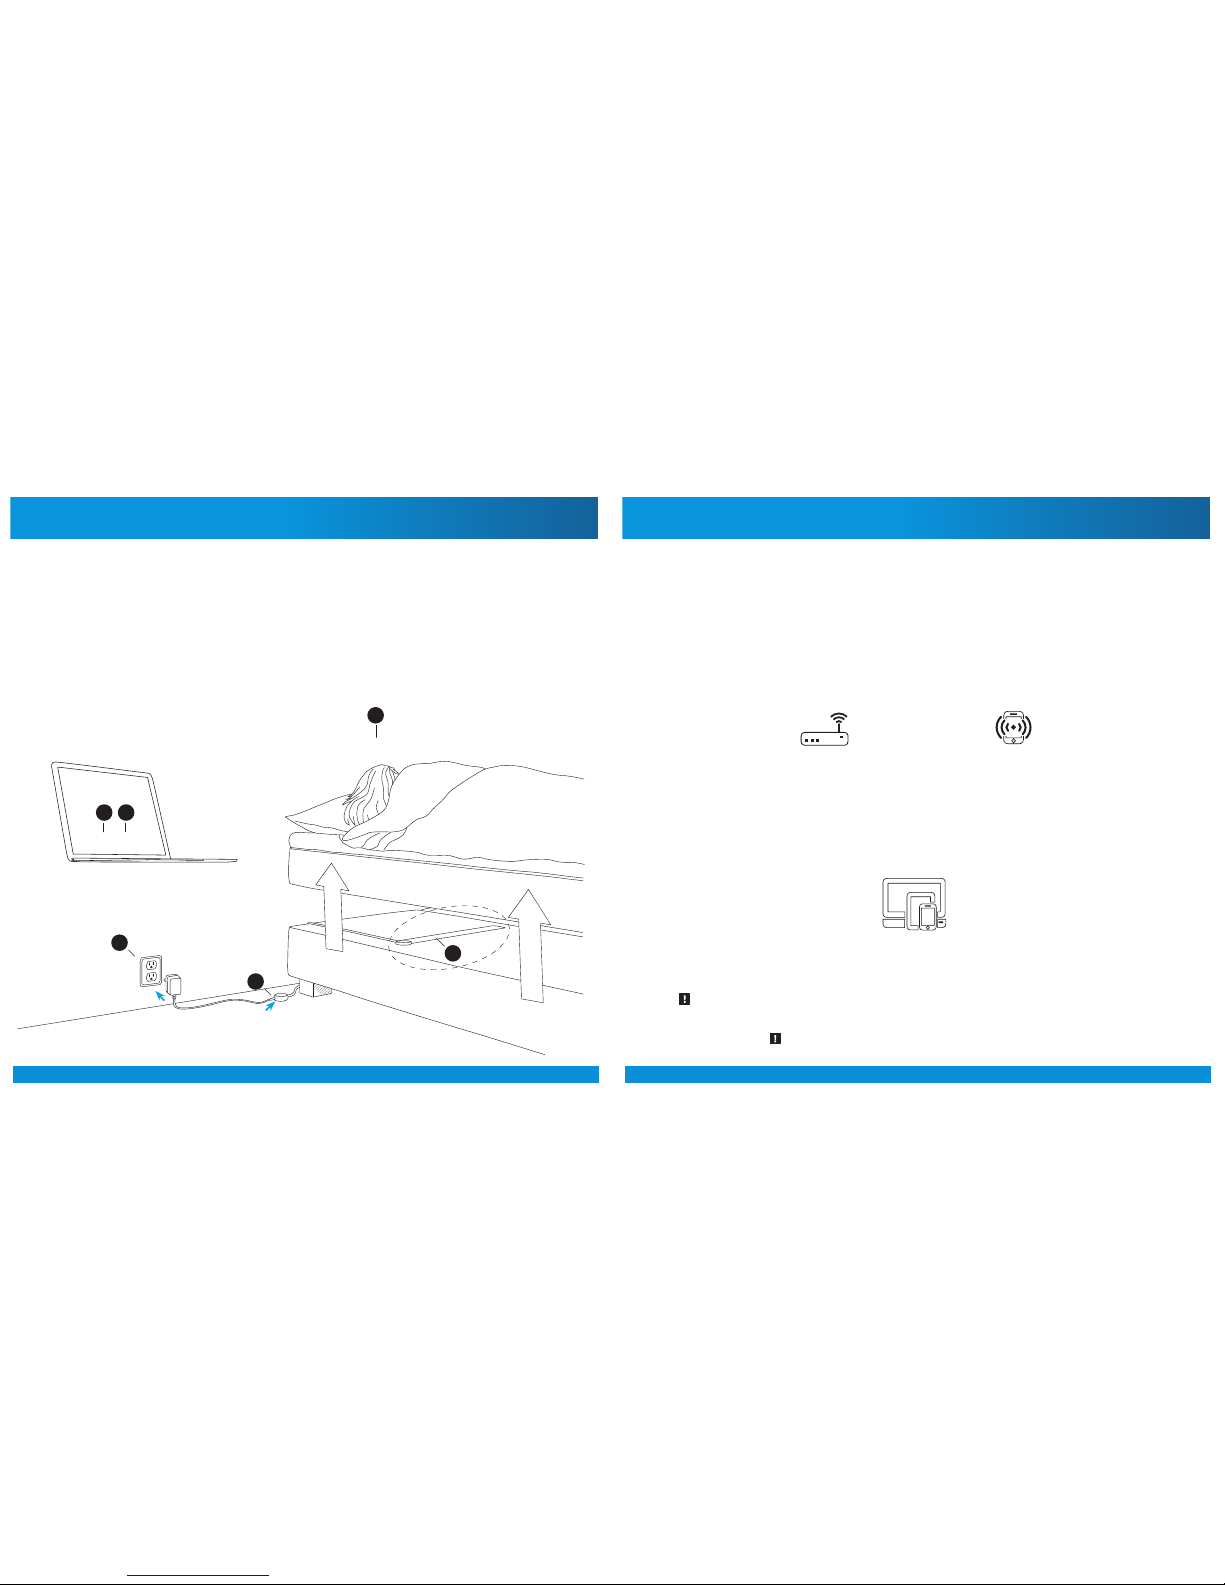
1. PLUG IN THE POWER SUPPLY TO ELECTRICAL OUTLET (110-230V)
2. PLUG IN THE POWER CORD TO THE DEVICE
3. CONNECT THE EMFIT QS TO YOUR HOME WI-FI
4. REGISTER THE DEVICE
5. INSTALL THE EMFIT QS IN YOUR BED
6. GO TO SLEEP 6.
1.
2.
3. 4.
5.
See the minimum requirements on page 3.
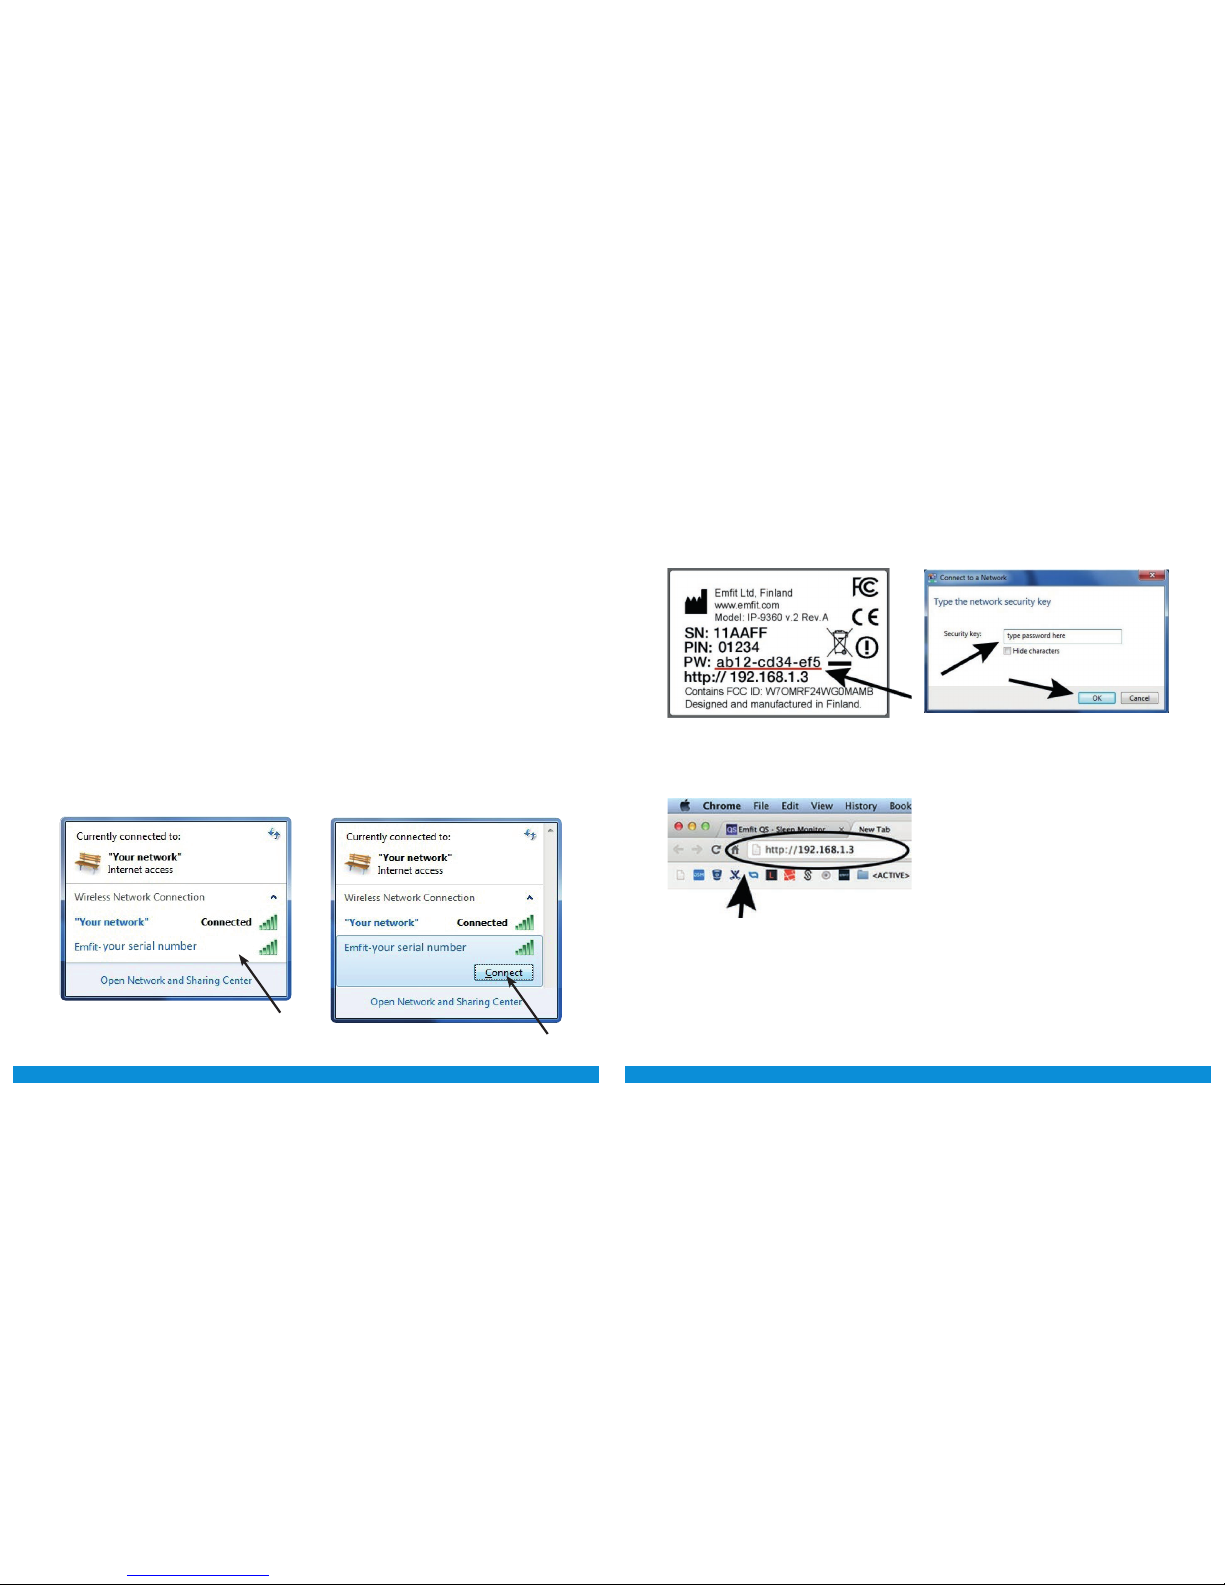
6.1. Connecting Emfit QS device to your Wi-Fi network – Quick guide
(without using WPS button; if your router has WPS button, please see next chapter)
Note! As per experience in May 2017, using Windows 10
for Wi-Fi setup process is dicult or impossible.
or
Your Wi-Fi network
password
or
Home Wi-Fi
with Internet access
Mobile device as
Wi-Fi hotspot
Your hotspot Wi-Fi
network password
Computing device
(computer or tablet or smartphone with browser)
For Wi-Fi set up
you need (only once):
To operate, EMFIT QS needs:
Note! To use your phone/tablet as hotspot to provide Wi-Fi for EMFIT QS, you need once some
other computing device to enable this setup.

10 11
Note! If only the red led flashes you
need to restore the device into AP
mode. Please see chapter 9 on page 17.
Power cord
Red
Green
Power cord Sensor cord
1Select a suitable adapter from the four
alternatives. 2Connect the correct adapter to the power
supply and ensure that it locks in its place.
CLICK!
3Connect the power supply to
electrical outlet (110 - 230V AC)
and connect the power cord to
Emfit QS.
Green and red lights start to flash
alternately and device makes
beep sounds.
Steps:
With your computing device search for wireless
networks.
4
6Fill in the requested password
(PW: XXX-XXXX-XXX).
5Connect your computing device to the network:
Emfit_xxxxxx (where xxxxxx is the serial number
of your device).
Ignore possible “No internet connection”.
Emt Ltd, Finland | Product: Emt QS | Model: IP-9360
Contains FCC ID: W70MRF24WG0MAMB
Contains transmitter module IC:
7693A-24WG0MAMB
Designed and manufactured in Finland.
SN: XXXXXX
PIN: XXXXX
PW: XXX-XXXX-XXX
http://192.168.1.3
Windows Mac OSX
Networks Turn Wi-Fi O
Emt _1234567
AppleWiFi
Testwork
Join Other Network…
Create Network…
Open Network Preferences…
Wi-Fi: On
Connections
Wi-Fi
ConnectedNetwork
Emt_1234567
Some-Guest-2.4GHz
2WIRE123

12 13
7
8
Open your computing devices’ browser
(Mozilla, Safari, Chrome, Internet Explorer etc.).
Type in address/url bar:
http://192.168.1.3 and hit enter.
Select your own Wi-Fi network from the list
and type its password.
If you cannot access above IP-address,
check that your computing device did not
disable itself from EMFIT QS and is perhaps
again connected to your own Wi-Fi. Problem
especially arise with desktop computer and
LAN/ethernet cable connected. To solve
possible problem, simply remove LAN/eth-
ernet cable temporarily.
http://192.168.1.3
http://192.168.1.3
Emt
“Your network”
Detected Wireless Networks
Other Network…
9Press enter and EMFIT QS will now try to
connect to your Wi-Fi network. Connecting
can take up to few minutes. You hear short
“beep” sounds and see the red led flashing.
Successful connection type 1
Device will emit high tone sounds. In about
1-3 minutes red light will stop flashing and
green light will start flashing.
Successful connection type 2
Device will emit high tone sounds. However
red light will not stop flashing. It flashes one
or two or three times between pauses.
9
You are done! Your device is now
connected and ready to track your sleep.
Sorry, you are not done yet! Please see
chapter Troubleshooting page 21 in the
Main Manual. This occurs usually in a
corporate Wi-Fi network.
Only red light remain flashing.
Red light starts flashing.
Green light will start flashing.
14 15
Aer succesful Wi-Fi connection,
it is time to register your device.
Go to chapter 7.
Examples of WPS button in router.
Press when using
WPS method.
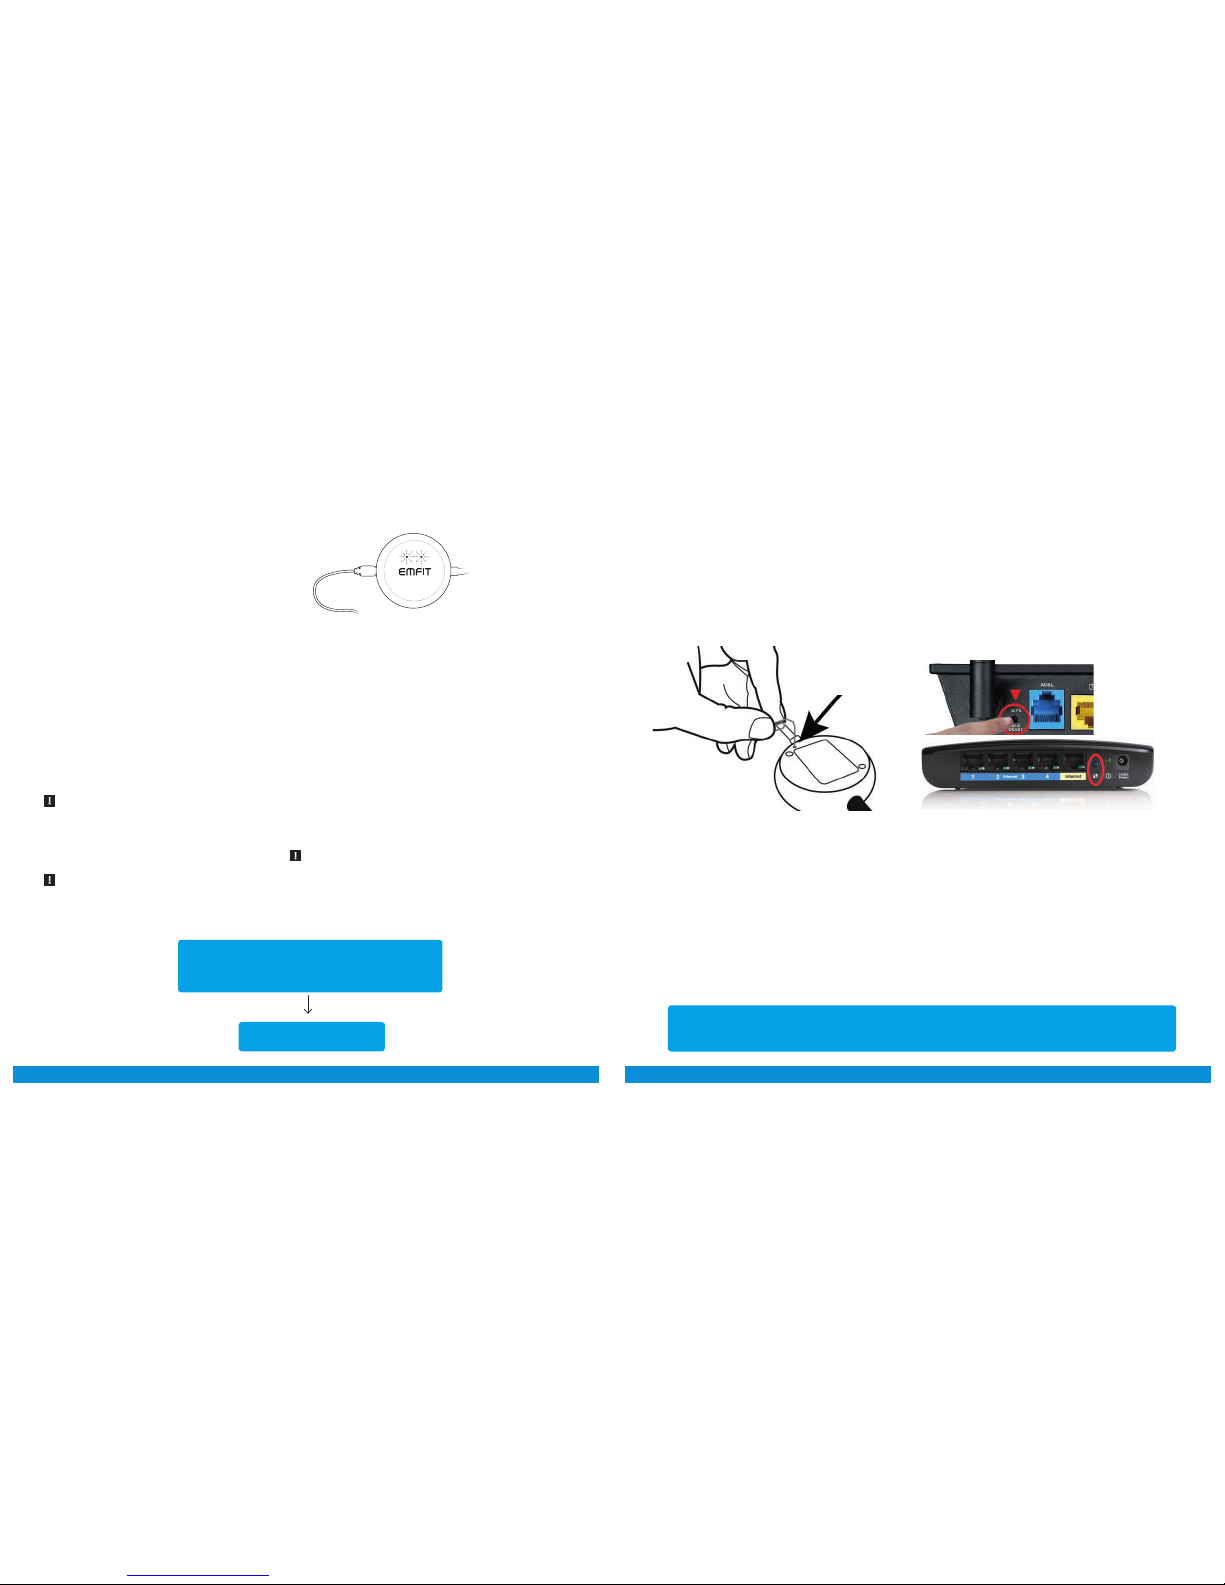
6.2. Connecting through Wi-Fi Protected Setup (WPS) button
1) Enable your home Wi-Fi router’s WPS button. De-
pending on your router, you may need to push the but-
ton for 2-3 seconds or more. Aer you have pressed
the WPS push button of your router, it will be in pairing
mode usually for 1-2 minutes.
2) Press and hold your EMFIT QS device WPS button
for 2-3 seconds until you hear a sound. Button is ac-
cessible via the tiny hole in the back. Use for example
a paper clip. Lights of the device will flash. Aer you
have pressed both your router and EMFIT QS device
WPS buttons, pairing of the devices begins.
Pairing of the devices can take up to few minutes. Usu-
ally it is less though. During this time QS device will
keep emitting short sounds and red light is blinking.
Successful pairing
If pairing of the devices is successful and Wi-Fi con-
nection is enabled, EMFIT QS device will emit 3 short
notes with rising tone and red light will go off wihin 2
minutes and green light starts to blink.
Unsuccessful pairing
If the pairing fails, you will hear three quick tones - low
high low - and red light will keep blinking. EMFIT QS
device will automatically return to the state it was in
at the beginning of this chapter i.e. AP (access point).
Check again that your router goes into pairing mode
and make sure its WPS push button is enabled. Try
to pair the devices again. It is worth to try this at least
three times.
If the pairing still fails you will need to connect manu-
ally. See next chapter 8.2.2. on page 14.
NOTE: Videos that will help you to understand how
the WPS pairing is done are available in the User’s
Guide at qs.emfit.com aer you have logged in.
Aer succesful Wi-Fi connection, it is time to register your device.
Go to chapter 7.
Unsuccesful connection
Red and green lights flash alternately again.
This means device has returned to AP mode.
This is common, you may have to try even 10-
15 times, so please be patient. This is com-
mon issue in Wi-Fi networks.
Please start again from step 1. Check that
your computing device has automatically re-
turned connection to your home Wi-Fi. You
need to search again for available Wi-Fi net-
works and reconnect to EMFIT QS.
With your next attempt(s) you propably can
skip step 3 as your laptop/tablet/smart-
phone remembers the EMFIT QS password.
Please don’t get confused if your browser says
“http://192.168.1.3 is not replying.” It is because
your computer propably switched automatically
to your home Wi-Fi and there is no device in that
address in Internet.
Check however again that you write your own
home Wi-Fi network password correctly. Also, if
aer few attempts still no success, check that
your router is not 5 GHz version only or operating
at channels 12-13. For troubleshooting, see page
21.
You may also get reply from some other than
EMFIT QS device. For example if you have IP
camera.
Red and green lights are flashing alternately.
Device is again at AP mode.
16 17
6.3. Connecting EMFIT QS device to your Wi-Fi network
(without WPS button) – Detailed guide with pictures
Getting started (check that you have the following
ready):
• EMFIT QS with power supply
• Computer or tablet/phone with Wi-Fi access
• Wi-Fi network is available and you know the
password to it
1) Use your computer/tablet to search for wireless
networks. There should be a new wireless network
named Emfit-xxxxxx (where xxxxxx is your QS de-
vice’s serial number).
NOTE: The screenshots in this manual are used for explan-
atory purposes. Your actual screens may differ from the
screenshots in this manual.
2) Network is password protected, you can find the
password on the label of your device.
3) Open your web browser and go to address
http://192.168.1.3.
Use this password for connecting to the network. When
OK is pressed the device will emit a sound indication.
18 19
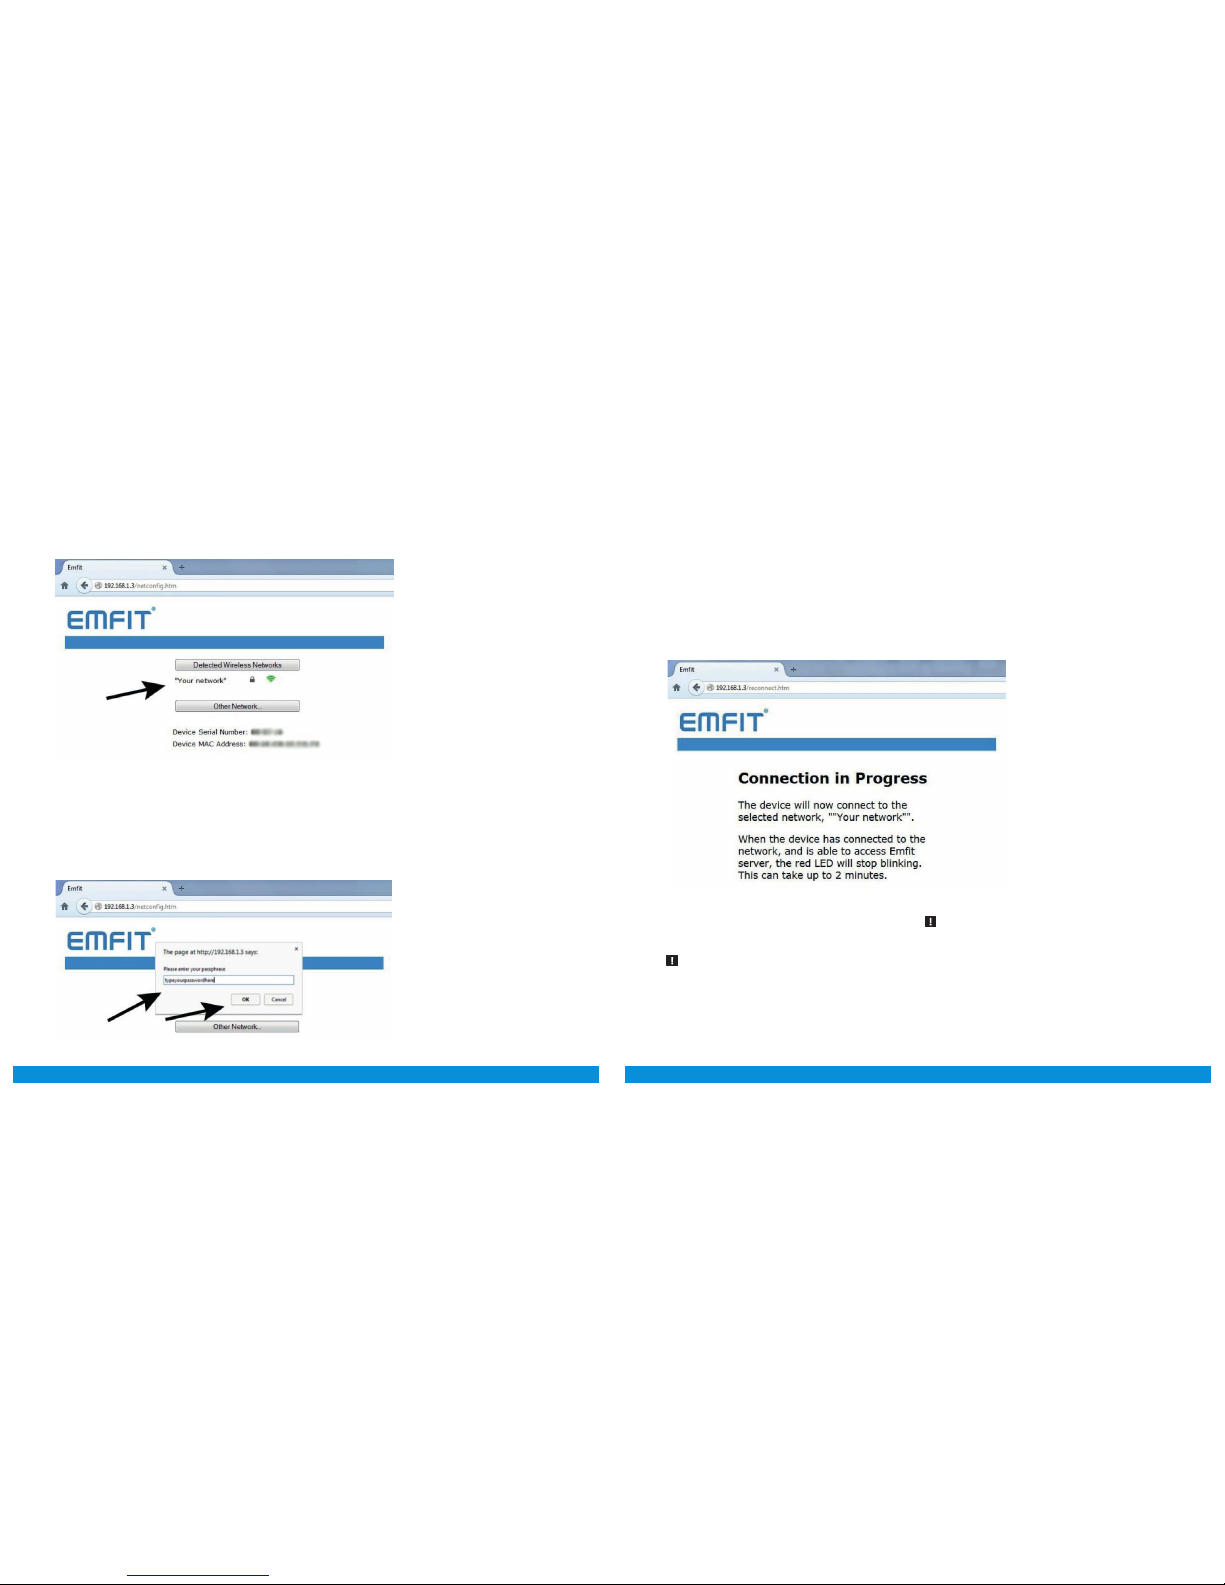
4) Emfit setup page will appear. Click your home Wi-Fi network.
If you don’t see your network on the list, see chapter 13. Trouble-
shooting on page 32.
5) Type your Wi-Fi network password and click OK. The pass-
word you type is visible on purpose because you must ensure
that you type it correctly. The field is case sensitive. If you don’t
have a password for your network (your network is open), leave
the password field empty and click OK.
6) When you click OK, the device will start connect-
ing to the network. Connection in progress -page will
appear. Notification sounds emit indicating that con-
nection attempt has begun. During the connection at-
tempt the device will emit continuous sounds. Aer
successful connection you will hear three short notes
with rising tone. Red light goes off aer about one
minute and green will start blinking.
NOTE! If connecting fails, you will hear three quick tones of
low-high-low and red light will keep blinking. The Emfit QS
device will automatically return to access point (AP). Try
again and make sure you have typed the Wi-Fi network’s
password correctly.
Red light will stop blinking. Your QS device has now
been connected to your wireless network.
NOTE! When QS device is connected to the selected
wireless network, you will not be able to access your device
from this page anymore without resetting your device to
Access Point (AP) again. But you have no need for it unless
you wish to connect to a different wireless network or if you
have changed your home network’s password.
NOTE! If red light is still blinking aer 2 minutes, some-
thing went wrong and your device is not connected to our
server. Try once more by restoring to factory settings. See
chapter 9. on page 23 for instructions for instructions on
Restoring Emfit QS device to Access Point (AP) mode and
factory settings

20 21
6.3.1. MY NETWORK IS HIDDEN
First you will need to find out what type of encryption your home Wi-Fi network uses.
With Windows OS computer, move the mouse cursor over the network. WPA2 is a common encryption.
Take note on this security method’s name as you will use it on next actionstep.
On Mac, click the top right toolbar icon while holding
ALT key pressed down. This lists networks with addi-
tional details:
On Windows see network listing and hover mouse
over your network:
If you don’t have the toolbar icon enabled alternatively you can view it here:

22 23
Next, on the web page in your browser, click “Other
network” button and type your network’s name and
choose the correct encryption method. Press join.
Type your Wi-Fi network password and click OK. The
password you type is visible on purpose because you
must ensure that you type it correctly. The field is case
sensitive. If you don’t have a password for your net-
work (your network is open), leave the password field
empty and click OK.
When you click OK, the device will start connecting to
your selected network. Connection in progress page
will appear. Notification sounds emit indicating that
connection attempt has begun. During the connection
attempt the device will emit continuous sounds. Aer
successful connection you will hear three short notes
with rising tone. Red light goes off and green will keep
blinking.
Note! If connecting fails, you will hear three quick tones of
low-high-low and red light will keep blinking. The Emfit QS
device will automatically return to access point (AP). Try
again and make sure you have typed the Wi-Fi network’s
password correctly.
Red light will stop blinking. Your QS device has now
been configured.
NOTE! When QS device is connected to the selected
wireless network, you will not be able to access your device
from this page anymore without resetting your device to
Access Point (AP) again. But you have no need for it unless
you wish to connect to a different wireless network or if you
have changed your home network’s password.
NOTE! If red light is still blinking aer 2 minutes, some-
thing went wrong and your device is not connected to our
server. Try once more by restoring to factory settings. See
chapter 9. on page 23 for instructions for instructions on
Restoring Emfit QS device to Access Point (AP) mode and
factory settings
6.4. Checking device’s data flow to
server’s database
The system begins to gather data aer one minute of
detected presence in the bed (green light will turn on
as the system has noticed that you are lying on the
bed).
To check this, lie on the bed until green light stops
blinking and turns on. “Monitor” section of qs.emfit.
com should now start showing graphs. Then leave the
bed. Aer a short while “Monitor” section should say
“Absent”.
Please note that Sleep Period data will not be availa-
ble until at least one hour of sleep. Sleep classification
however needs a minimum of two hours of presence
in bed.
NOTE! Trends are not available until four nights of
sleep.
24 25
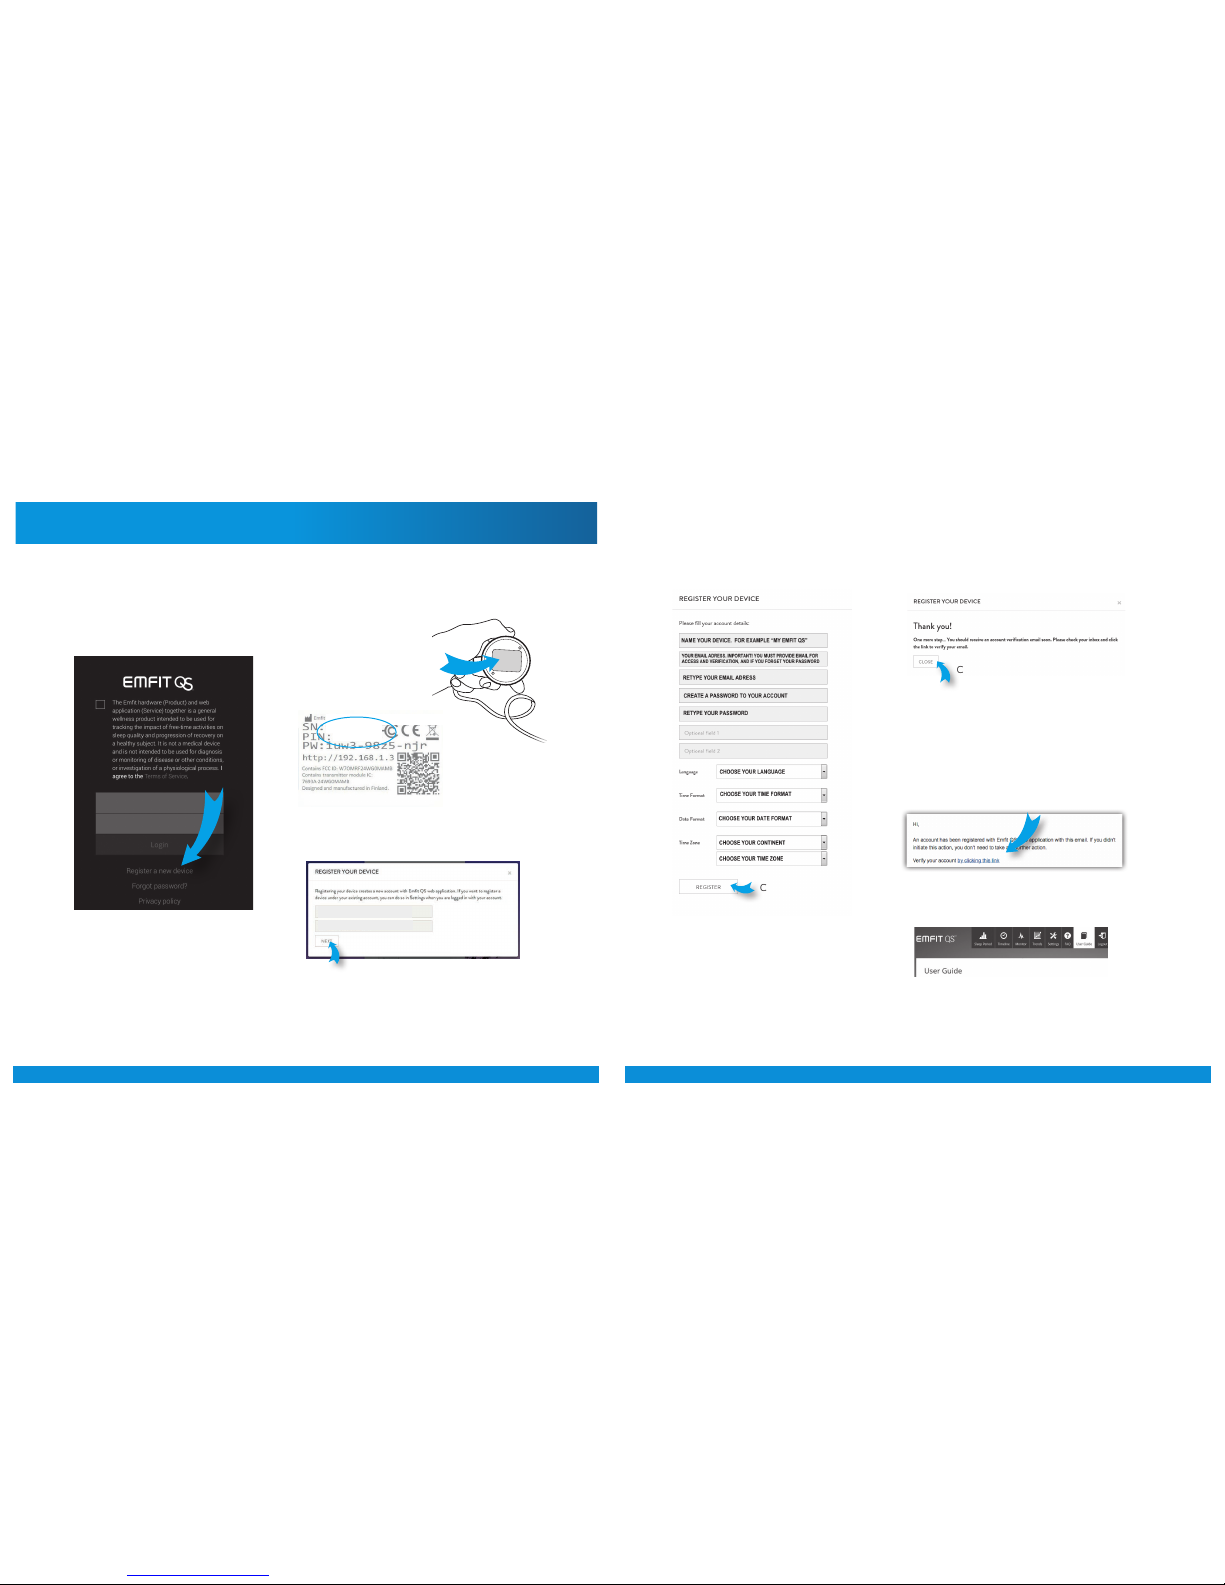
7. Register the device
Aer succesful Wi-Fi connection, it is time to register your device.
Go to https://qs.emfit.com
and click “Register your device”.
Locate your serial and PIN
numbers on the back of
the device.
YOUR SERIAL NUMBER
YOUR PIN NUMBER
Insert serial number and PIN number of your
device.
PASSWORD TO YOUR DEVICE (AP ACCESS POINT)
YOUR SERIAL NUMBER
YOUR PIN NUMBER
1 2
3
Click “next”.
Fill/choose the details.
Click “register”.
4This will open.
Go and check your email for our verification
email. Open it and click the link in it.
(If you do not receive the confirmation message
within a few minutes of signing up, please check
your Spam folder just in case the confirmation
email got delivered there instead of your inbox.)
Click “close”.
5
6
You will be directed to the Emfit QS web
application.
7

26 27
8. Set up the Emfit QS in your bed
Follow these steps if you need to connect Emfit QS
device to a different wireless network that has Inter-
net access, or if you experience any problems with
setting up your device. This action restores the device
back to factory default settings (NOTE: Sleep data or
registration details will not be deleted), and returns
the device back in Access Point (AP) mode:
A) Remove the power supply cord from the device.
B) With using a paperclip or a needle, press and hold
down the WPS / multifunction button on the back of
the device:
C) Connect the power supply cord while keeping the
button pressed down. Remain keeping the button
pressed down.
9. Restoring Emfit QS device to
Access Point (AP) mode
D) As the red light starts flashing, keep the button
pressed down about 10 seconds until the red light
stops flashing and turns on.
E) Release the button. Green and red light will start
blinking alternately. Factory settings have been re-
stored.
NOTE: Videos that will help you to understand how the re-
storing is done are available in the User’s Guide at
qs.emfit.com aer you have logged in.
Place the bed sensor beneath the mattress or mattress topper across the bed under your chest area:
If you sleep with a partner in a double bed,
place the sensor on to your side of the bed
as far as possible from your partner. Make
sure the sensor is still under your chest area.
The device works most reliably when the
sensor is located directly below your heart.
Place the electronics unit on the floor and
at minimum 20 cm distance from your
body.
28 29
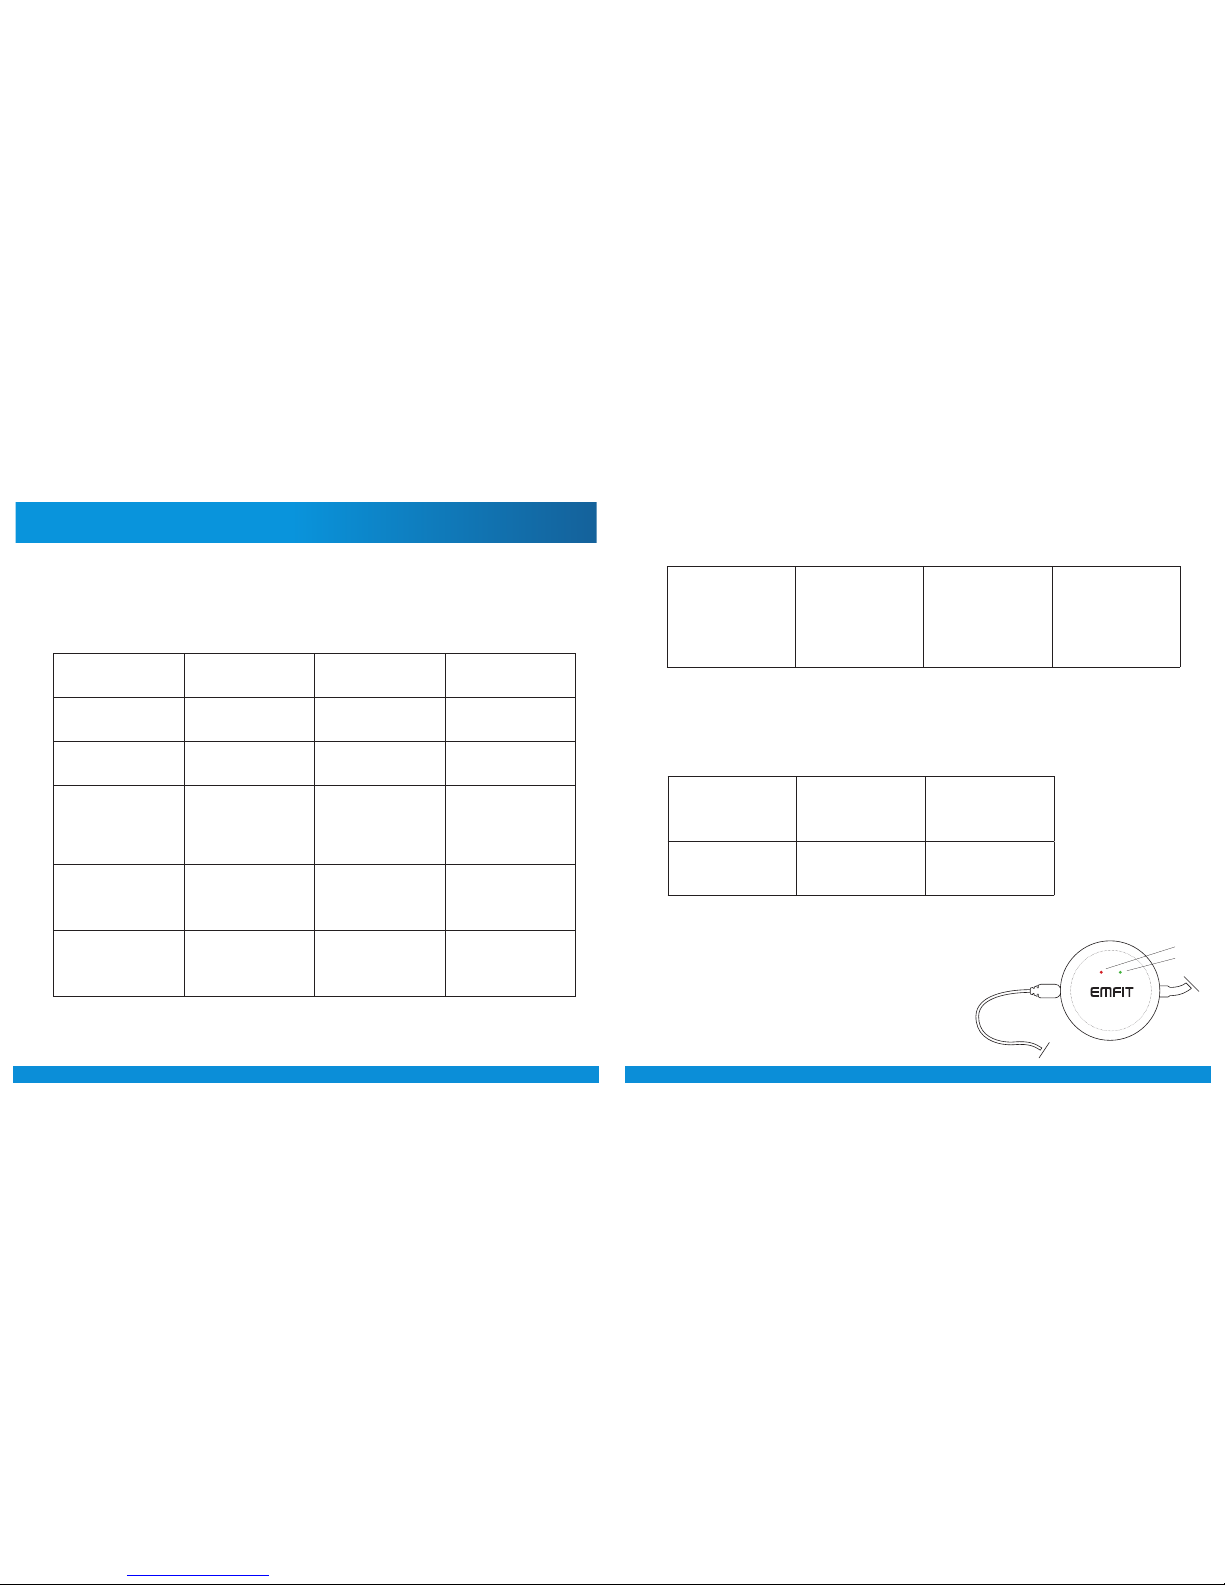
10. Meanings of lights and sounds
Fault cases:
How EMFIT QS device LED lights and sound notifications behave in different situations.
Sound signals are used during setup only to help the user interpret the status of the device.
During Setup
When everything goes well:
Case Red LED light
(light on the right)
Green LED light
(light on the le)
Sound
description
The device is powered and
it is an AP (access point)
Flashing alternately with
green LED (about once per
second)
Flashing alternately with
red LED (about once per
second)
Beep - beep
(two short beeps)
You connect to the device
while it is an AP
No change. Green LED flash-
ing alternately (about once
per second)
No change. Flashing alter-
nately with red LED (about
once per second)
Beep
(one short beep)
You went to the device’s
internal html-page at IP ad-
dress: 192.168.1.3., choosed
your own home Wi-Fi
network and clicked to
establish connection to it.
Flashes three times fast,
then about 3 seconds pause,
again 3 fast flashes, and
pause, and so on…
No flashing
light
Several low short beeps
while establishing
connection
Successfully connected to
your home Wi-Fi network
and Emfit server
Stops
flashing
Starts flashing every 3 sec-
onds (slowly). Lit when you
are in bed for longer than
one minute.
Two times short beep and
one long beep (something
like beep-beep-beeeeep)
Connects to your home Wi-Fi
network but router is not
connected to the Internet
Aer connection to Wi-Fi
network remains flashing
once every three seconds.
QS is no longer in AP mode.
Stops flashing when con-
necting to Wi-Fi, but does
not start flashing aer con-
nection: no connection to the
Internet.
Two short beeps and
one long beep
(”beep-beep-beeeeep”).
Wrong password for your
home Wi-Fi network
or
unknown connectivity issue
between your router and
EMFIT QS
Three fast flashes, 3 seconds
pause, again 3 fast flashes
and pause. When the device
notices the connection can-
not be established it returns
back to the AP mode and
red and green start flashing
alternately.
Stops flashing during con-
nection attempt. When QS
notices that connection
cannot be established it
returns to AP mode and
red and green start flashing
alternately.
Several long beeps when
establishing connection.
Low pitched beep and beep-
beep indicate return to AP
mode.
Network problems:
During use
Your home Wi-Fi network
has no Internet connection
(for example temporary loss
of Internet connection)
Flashes in cycles of three Does not flash
(person out of bed)
or
stays on
(person in bed)
Emfit server does not
respond (temporarily)
Flashes once
(person out of bed)
Does not flash
(person in bed)
Does not flash
(person out of bed)
Power cord
Red
Green
Sensor cord

30 31
Data buffering, network connection is lost:
Data buffering release, network connection up again:
Case Red LED light
(light on the right)
Green LED light
(light on the le)
Person is sleeping or lying
in bed. WiFi network or
connection to Emfit server
reverts.
Flashes in parallel
with green led in every
2 seconds
Flashes in parallel
with red led in every
2 seconds
Emfit QS has an internal memory where sleep data is stored if network or server connec-
tion is lost. Blinking LED lights are used to inform user when device is buffering sleep data
to memory and when sleep data is released from memory to Emfit server.
Aer you have registered your device, installed it to
your bed and hooked it up to your wireless network
the device is ready to track your sleep.
You can acccess your sleep data at qs.emfit.com.
Please note that a minimum of two hours of sleep is
required before sleep results can be viewed.
11.1. Overview of web interface
When you log in at qs.emfit.com for the first time the
interface will take you to Devices tab. There may not
necessarily be anything visible yet as the QS needs to
track presence (at least one minute in bed until green
light turns on) before device becomes visible.
First sleep results will be available aer minimum of
two hours of sleep.
Sleep periods tab gives you overview of your last
night’s sleep. You can click the small arrow next to
each graph for detailed view.
Trends tab collects your sleep data for 30 day period.
Here you can take a closer look how your sleep may
have changed during the month. By navigating the up-
per buttons you are again able to see detailed view for
each graph.
Monitor tab tells you current status of the device.
While in bed it shows your breathing rate etc. in real
time. It also shows how long you have been absent
and if there is something wrong with network connec-
tion.
Timeline tab shows presence and absence periods for
last 7 days.
On the Settings tab you are able to edit your account
details and add new devices. You can also link your
device with third party apps and enable Raw signal
view.
User’s guide tab includes the latest user guide.
You can log out from the web application by pressing
the log out tab
Support button on the le bottom corner is used to
contact us for any question or comment.
11. Using the device
32 33
1.
3.
5.
7.
9.
2.
4.
6.
8.
10.
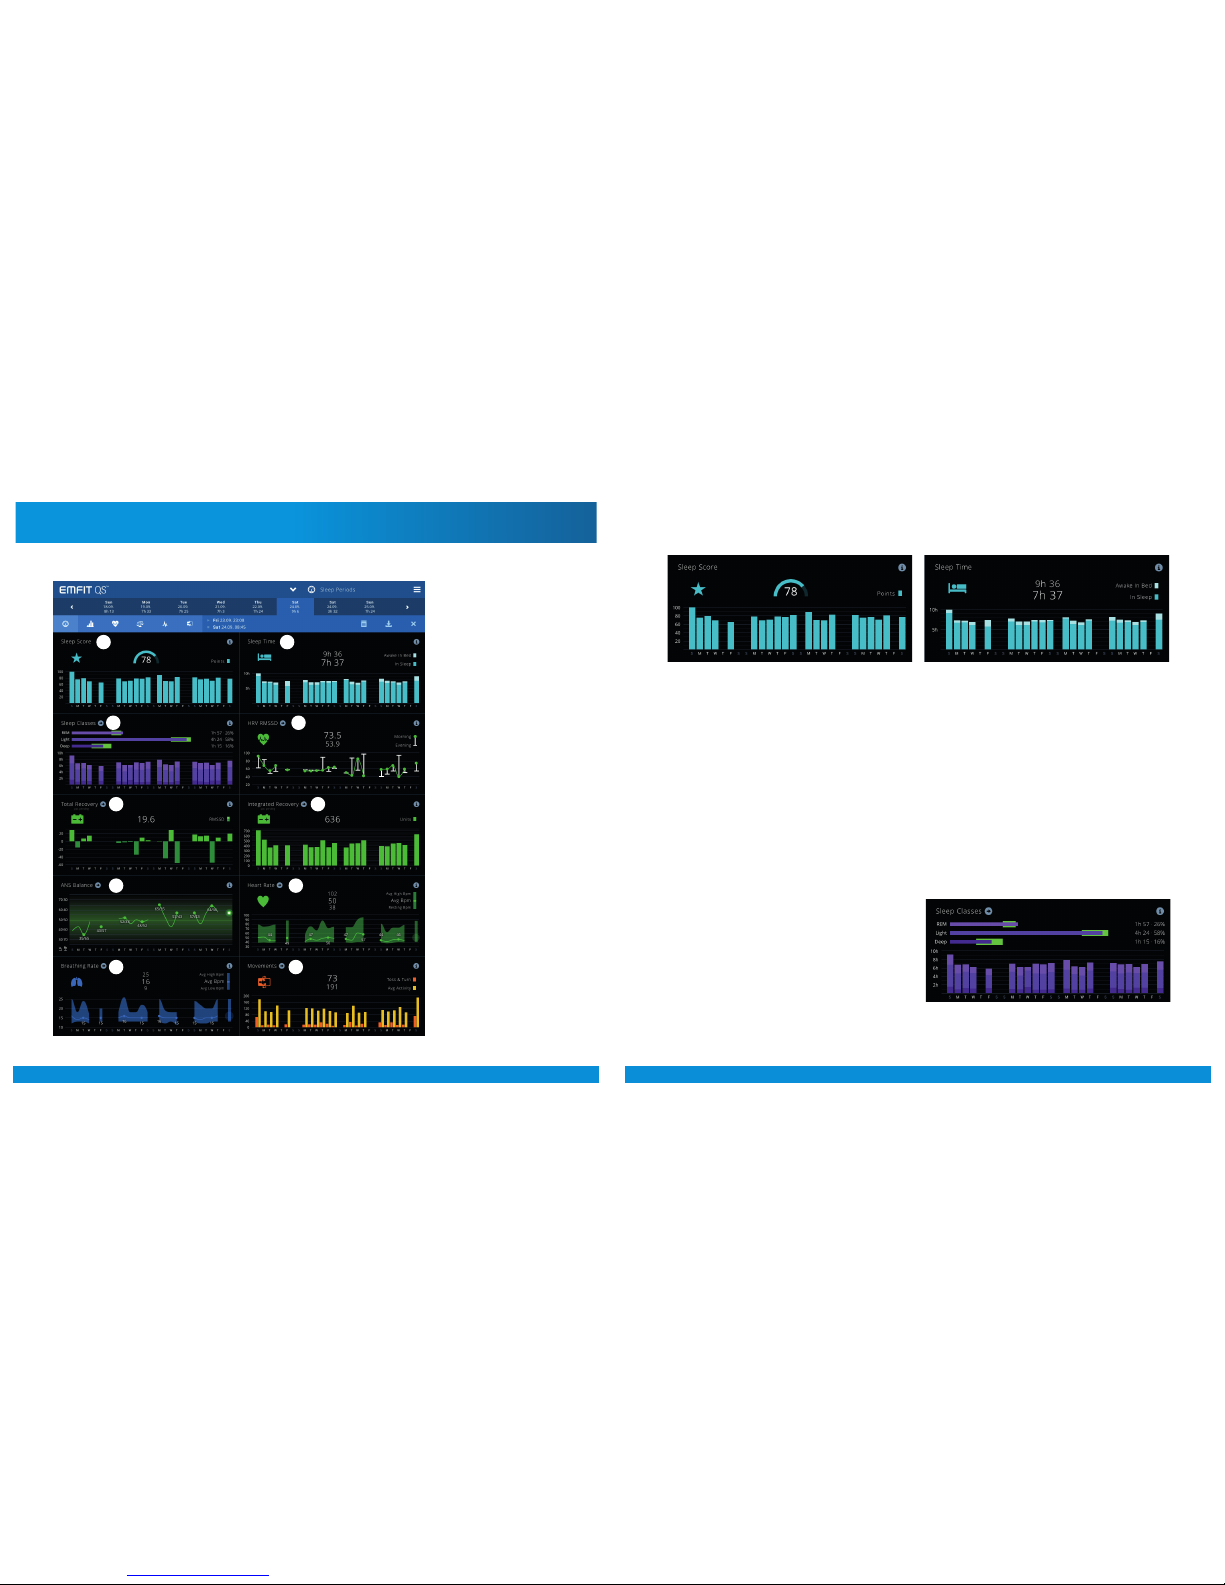
12. Analyzing the measurements
12.1. Main display (dashboard) items
1. SLEEP SCORE
This is single number indicating how well slept night
was. Number consists of total sleep time, amount of
REM and DEEP sleep, and number of wakenings. Sleep
Score breakup: Sleep Score= (total_duration_of_sleep
+ (duration_of_REM_sleep) *0.5 + (duration_of_
DEEP_sleep) *1.5) - ((duration awake/3600) *0.5 +
number_of_wakenings/15) ) * 8.5
Simply said, this means that the more you sleep, the
more you have REM sleep, and the more you have
DEEP sleep, and the better your Sleep Score is. On the
other hand, the more you are awake and the more of-
ten you wake up during the night, the worse your Sleep
Score is.
By this formulation Sleep Score can reach values
over 100, but in this case the value is truncated to
a maximum of 100, which is indication of very good
sleep.Usually values around 80 and higher can be
regarded as good.
2. SLEEP TIME
Here you see both time spent in bed and amount of
sleep.
For adults, 7-8 hours of sleep is considered optimal,
of course there are individual differences — some can
manage with less sleep and some require more.
In one study it was found that people who sleep less
than 6 hours perform worse in cognitive tests than
those who sleep 7-8 hours, but people who sleep more
than 9 hours also perform worse.
The need for sleep also changes according to a per-
son’s age. Infants may require up to 14 hours of sleep,
whereas elderly people may be fine even with 5 hours
of sleep.
With athletes, the research has shown that in several
different sports, including swimming, tennis, football
and basketball, increasing sleeping time to 10 hours
per night resulted in improved speed, reaction time,
sprint time and accuracy.
3. SLEEP CYCLES
Here you see breakdown of sleep in to three cycles:
Light, REM and Deep sleep.

34 35
Green brackets indicate optimal range for each of the
classes, and total durations and percentages are also
given in numerical format.
All three stages have different physiological character-
istics, and their meaning to your body is different.
• LIGHT sleep is transitionary state from awake state
to DEEP sleep. Eyes are not moving, and muscle tone
is decreased.
• In DEEP sleep physical movement and muscle tone is
almost non-existent. Breathing rate is slow and steady,
heart rate is slow and blood pressure low. DEEP sleep
is essential for physical recovery and most physiolog-
ical systems in you are in a heightened anabolic state,
showing increased production of proteins, the essen-
tial building blocks needed for cell growth and repair
and rejuvenation of the immune, nervous, skeletal and
muscular systems.
• REM sleep is dreaming phase, characterized by rap-
id eye movements, paralyzed muscles, and variable
blood pressure and heart rate. REM sleep is needed
for mental recovery; during this sleep stage synaptic
connections can be re-organized, which enables learn-
ing, storage of memories, and forgetting unnecessary
things.
For complete recovery of your body and mind you
need to have sucient amount sleep in general,
but also enough both REM and DEEP sleep.
REM sleep should constitute 20-25 % of your total
sleep, and DEEP sleep 10-20 %. This leaves some
50-60 % for LIGHT sleep.
4. HRV RMSSD
RMSSD, “Root Mean Square of Successive Differenc-
es”, is one of the most widely used time domain heart
rate variability values. It tells about the activity of
our central nervous system, higher number indi-
cates better recovery, lower stress, etc.
We show both evening and morning values. Low
evening value tells that the day has been heavy, either
due to mental stress, or due to physical exercise. With
evening value athletes can see whether their training
has been effective.
Morning value should usually be higher than evening
value, indicating that there has been ecient recovery
and resting during the night. Mathematically, RMSSD
is the square root of the mean of the squares of the
successive differences between adjacent heart’s beat-
to-beat intervals.
In the scientific literature RMSSD is widely accepted as
a measure of parasympathetic nervous system (PNS)
activity. According to Wikipedia, PNS is responsible for
stimulation of “rest-and-digest” or “feed and breed”
activities that occur when the body is at rest, and com-
plementary to that of the sympathetic nervous system
(SNS), which is responsible for stimulating activities
associated with the fight-or-flight response.
For ecient recovery from training and stress, it is es-
sential that parasympathetic nervous system is active,
and our body gets sucient rest and replenishment.
With HRV RMSSD value one can monitor what his/her
general baseline value is and see how heavy exercise,
stress, etc. factors influence it, and see when the value
gets back to baseline, indicating for example capability
to take another bout of heavy exercise. RMSSD can be
measured in different length time windows and in dif-
ferent positions, e.g. supine, sitting or standing.
Morning RMSSD value presented here is average of all
3 minute window RMSSD values measured during last
90 minutes prior to waking up. This should give you in-
dication of how ready and well rested your body is for
the new day. Evening value is similarly measured within
first 90 minutes in bed.
For more detailed analysis of full night HRV data you
can delve in to the details by using arrow button next
to i-button.
RMSSD value is highly individual and depends
on age, gender, fitness level, stress level, lifestyle
choices, etc. For this reason, one should monitor
values for a few weeks, and only aer that make
conclusions on what kind of implications different
values have for him/her.
Generally, higher values indicate better health, fit-
ness, etc. In short term RMSSD indicates readiness
for the day, and in long term, for example along with
training, RMSSD values tend to climb up.
Long term decrease in RMSSD may be indication of
approaching over training condition.
5. TOTAL RECOVERY
Total Recovery is simply difference between morn-
ing and evening RMSSD values. Usually it should
be positive, indicating that there has been ecient
recovery and resting during the night.
Of course, this should be analyzed with regard to activ-
ities of previous day: if previous day was very light (no
stress, no heavy exercise) and evening RMSSD is rela-
tively high, it is not reasonable to expect high Recovery
number, because there is no load to recover from.
Values of Recovery are highly individual, and you
should inspect them against your own baseline values,
and also in comparison to Evening RMSSD values.
6. INTEGRATED RECOVERY
This is the total area of recovery during the whole night.
36 37
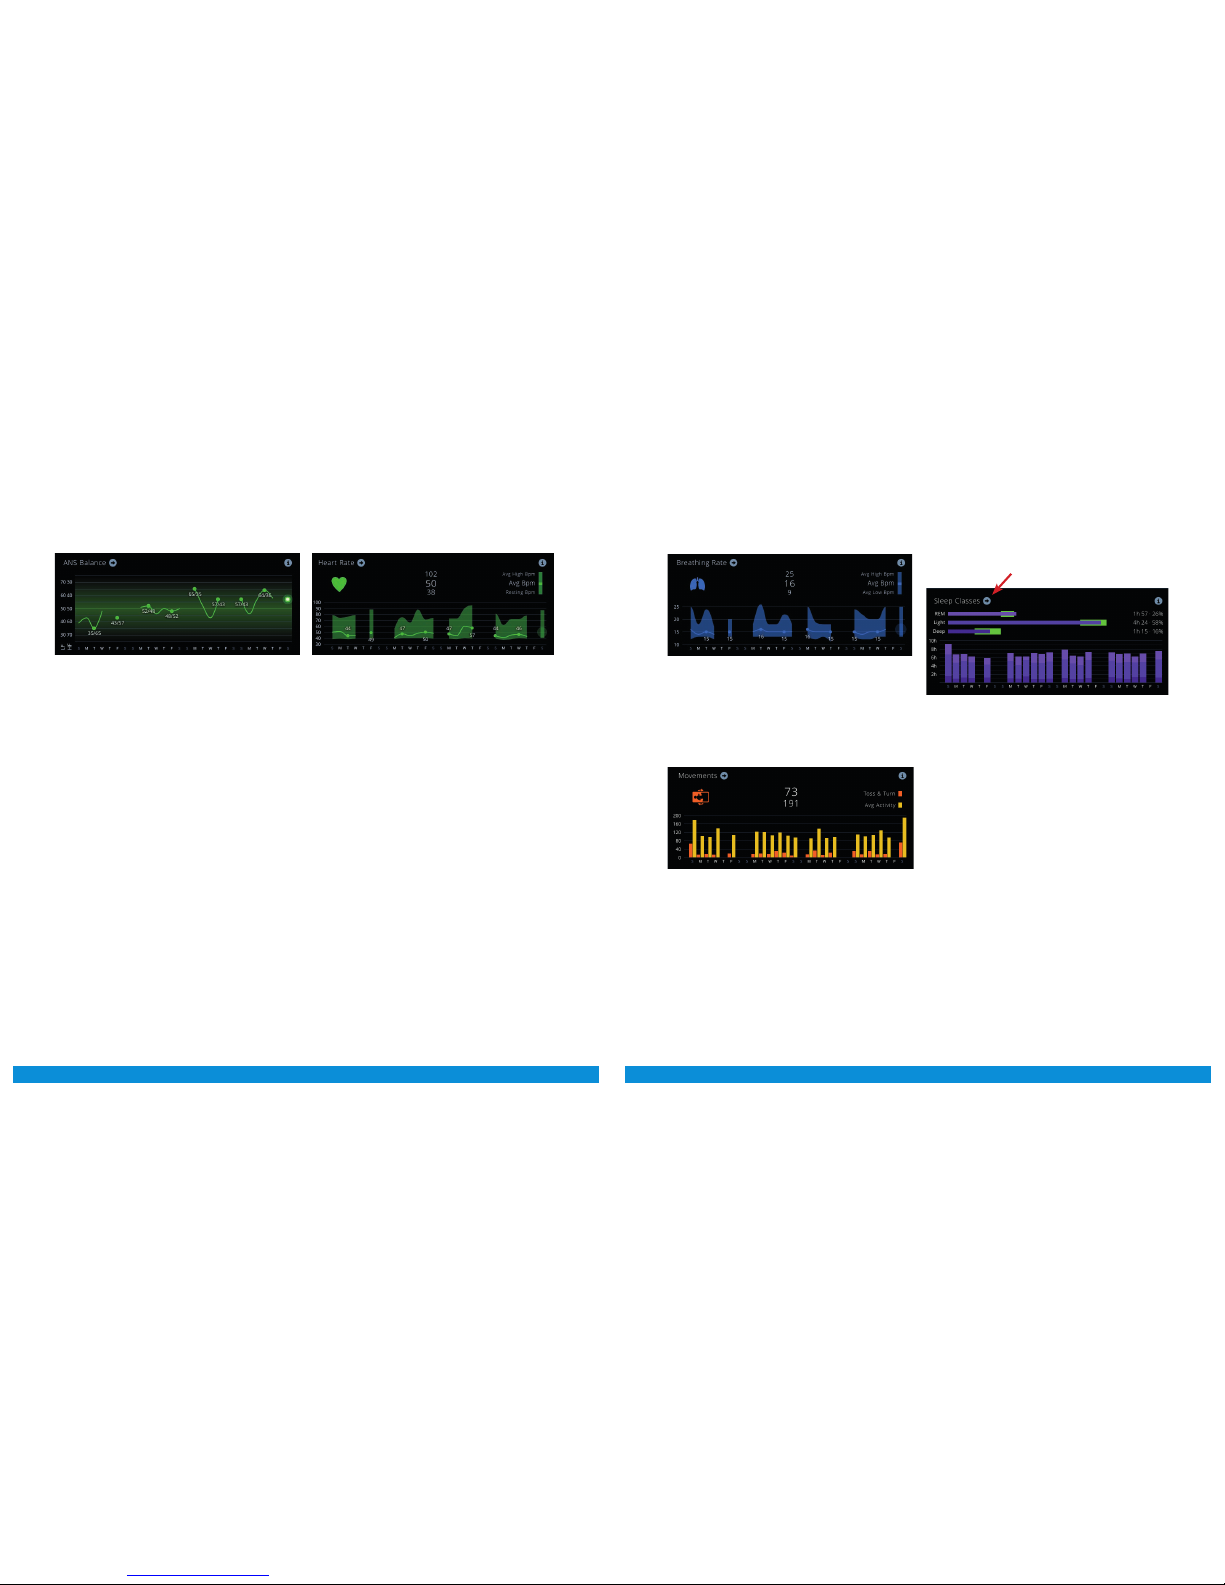
7. ANS BALANCE
Autonomic Nervous System Balance tells whether
the user is too excited (high LF value) or too phleg-
matic (high HF value).
LF and HF refer to Low Frequency and High Frequency,
respectively, and they both are common frequency do-
main measures of heart rate variability.
LF is the area measured in a frequency band of 0.04-
0.15 Hz, and it is considered as a state indicator of both
sympathetic/parasympathetic nervous systems.
HF is the area measured in a frequency band of 0.15-
0.4 Hz, and it is considered as a state indicator of par-
asympathetic nervous systems.
In our system we use normalized units LFn and HFn,
and the normalized units have been expressed as a
percentage of the sum of LF+HF, i.e. LFn=LF/(LF+HF).
Diagram displays both LFn and HFn, and ideally, the
indicator should stay near the 50-50 shaded line be-
tween values of 25 and 75.
Deviation beyond 25-75 or 75-25 line may be indica-
tion of insucient recovery, high or chronic stress, gen-
eral fatigue or some other malfunction in your body.
8. HEART RATE
Avg BPM is simply average heart rate for the whole
night.
To find the Resting BPM, your average heart rate is
computed for every three-minute time window during
the whole night, and the smallest value is chosen out
of all these. In other words, it is the smallest 3-minute
average heart rate you had during sleep.
Resting BPM can be used as a mild indication of
stress or overtraining. Aer you have established
your baseline Resting BPM during a couple of
weeks, you can check out for notable deviations
from this norm.
General rule of thumb is that if your Resting BPM
bumps up more than 7 beats per minute, you should
consider skipping the exercise or exercise little bit
lighter, and find some means to relieve your stress. The
same rule applies also if there is a notable decrement
in Resting BPM value.
Rapid changes in Resting BPM should not be confused
with long-term changes. For example, physical exer-
cise tends to decrease resting heart rate over time, and
this only tells that you are getting more fit!
9. BREATHING RATE
Avg BPM is simply average respiration rate for the
whole night. The typical respiratory rate for a
healthy adult at rest is 12–20 breaths per minute.
Respiration rates may increase with medical condi-
tions, such as fever or illness, and rise in Avg BPM may
indicate this condition.
10. MOVEMENTS
Avg Activity measures larger movements than
those caused by heart beating and respiration,
such as twitching leg or arm or changing position
only slightly.
Bigger movements of your body are indicated by
number Toss & Turn.
Higher value both in Avg Activity and Toss & Turn might
indicate restless night, and these should be inspected
against your own baseline values. Long term increase
in these numbers may be indication of approaching
over training condition.
12.2. More detailed information acces-
sible through arrow button or tabs
• Sleep Classes. Shows sleep architecture and bed
exits. From this figure the user can see how different
sleep classes are distributed throughout the night.
Usually deep sleep phases should occur in 90-120
minute cycles, 4-6 times during the night. Alcohol or
drug use, heavy trainiing, or stress may change the
pattern.
• Heart Rate / Respiration Rate. This figure helps to
see when and how deep person’s heart and respira-
tion rate gets. Healthy individual should see clear pat-
tern where heart rate goes down as sleep deepens,
and goes up in light sleep and REM sleep.
• Activity / Turns. Gives indication how restless sleep
has been. If there is lots of activity and turns, sleep
quality is probably poor too.
• Nervous System Balance. This should remain gen-
erally near 50 %. If it peaks oen over 25/75 % line, or
it leans continuously to other side, one should consid-
er relaxing (in case of high LF) or stimulating (in case
of high HF) himself a little bit.

38 39
• RMSSD / Heart Rate. This tab gives most informa-
tion to the athlete. Aer heavy exercise the evening
RMSSD should be clearly down from the baseline
(this can be used as indication of exercise load), and
towards the morning there should be rising and fluc-
tuating trend. This tells about the recovery rate dur-
ing the night. If curve trends downwards, one may be
getting ill, having digestive problems, sleeping bad,
or stressing about work, relationship, or something
else. Ideally RMSSD curve should be either horizontal
(if there is no stress / exercise to recover from), or it
should form rising trend towards morning (indicating
healthy recovery).
NOTE! All screens have history of seven last days
graphically displayed, which makes it easy to see where
one goes each day in relation to other days.
RMSSD GRAPH (ESPECIALLY USEFUL FOR ATH-
LETES)
At dashboard, seven days mini graphs should give in-
stantly indication how this particular day is in relation
to earlier days, and whole night RMSSD graph gives
useful information about daily loads and recovery
during the nigh time. Here is short information about
how to interpret whole night RMSSD graph:
In this graph we display total recovery in terms of
RMSSD value, and also speed of recovery as RMSSD
units / hour.
This should give several kinds of information:
1) If Evening RMSSD value is low (enough), it is indica-
tion that exercise has been (suciently) heavy.
1) If Morning RMSSD value is high (enough), it is in-
dication that recovery throughout the night has pro-
gressed as expected, and you are ready for another
heavy exercise.
2) If graph has upward trend, and Recovery Ratio is
clearly > 1 there has been recovery during night.
3) If graph is mostly horizontal and Recovery Ratio is
around 1, there probably has been no load nor recov-
ery.
4) If graph has downward trend and Recovery Ratio
is clearly < 1, it might be indication of uncontrollable
stress, or about some physical condition (some sick-
ness creeping in, digestive problems, overreaching,
etc.)
This information might help you to adjust your train-
ing load. Also resting HR value is useful, if it suddenly
bumps up, there might be something wrong in your
body.
RMSSD graph should consist of equally spaced dots
(one at every 3 mins, 20 dots / hour). If there are miss-
ing dots, it is indication of bad signal. In this case you
should check the location of sensor, so that it is direct-
ly under your chest while you sleep.
• QS can’t find my wireless network during setup
QS searches for open network when powered up in AP
mode (aer factory reset or taken first time out from the
sales Box). Make sure that wireless network is available
and it is not hidden. For connecting to hidden networks
please see chapter 8.2.4.
• QS fails to connect to my wireless network (fail
sound aer connecting attempt)
QS supports only Wi-Fi 802.11 b/g/n (2,4 Ghz only). Wi-Fi
channels 11-13 are not supported. Make sure your router is
not set to these channels and that speed is 2,4 Ghz. Refer
to your router’s user manual for help.
Make sure you have typed the Wi-Fi password correctly.
If you can’t get it connected aer another attempt please
contact customer support.
• Red light keeps blinking even though I have connect-
ed QS to my wireless network successfully (success
sound aer connecting attempt)
Red light should stop flashing completely within 2 min-
utes aer successfully hooking QS up to your Wi-Fi. This
means that QS is communicating with Emfit cloud server.
There is nothing that the user can do to speed up this pro-
cess. Occasionally red light may flash when the device is
being used. There may be a temporary error that prevents
the device from communicating with the cloud service.
You can leave it be even though the red light is flashing.
If red light does not stop flashing within 24 hours please
contact customer service.
• Red light is constantly on
There may be something wrong with your sensor. Please
contact customer support.
• My sleep period is too long
Too long sleep periods are usually caused by the device
not registering that you have le the bed. If you need to re-
move power supply aer wake up please wait until green
turns from continuous on state to blinking. This happens
usually within 10 seconds aer getting up and means that
the device has registered bed exit. Too long sleep periods
can also be edited manually at the user interface.
• My sleep period is not registered or data is missing
Usually sleep periods will be available within one hour af-
ter getting up from bed. Connection cutoffs (either with
your wireless network or at Emfit server) may however
prolong this time. If you continue having this issue please
contact customer support.
• My sleep data is inaccurate
Device may every now and then make false assumptions
about your sleep. For example device may interpret that
you were asleep while in reality you were awake but com-
pletely still. We are constantly working to improve our
sleep algorithms to make sleep detection as precise as
possible.
Your QS will always be automatically updated to the new-
est possible firmware with newest improvements.
• Green light stays on even if I have le the bed or green
light keeps blinking when I’m on bed
If you have just recently taken the device into use please
wait for a couple of days. During the first days sensitivi-
ty adjustments are being made and most likely problem
settles on its own over time. If you continue having this
problem aer a few days of use please contact customer
support.
13. Troubleshooting
Table of contents


