VitalSignum Beat2Phone User manual

Powered by VitalSignum
www.beat2phone.com
Version 1.1
Android
10/2017
Beat2Phone User Guide

1
Beat2Phone product is not a medical device in compliance with Directive 93/42/EEC.
VitalSignum Oy assumes no responsibility for the correctness of the measurement
results or any procedures carried out based on said results.
Contents
1. Taking Beat2Phone into use for the first time .................................................................... 2
2. Taking electrocardiogram, ECG .............................................................................................. 2
3. Analysis of the recorded data ................................................................................................ 4
4. Beat2Phone in exercise .......................................................................................................... 6
5. Beat2Phone in different Android devices .............................................................................. 7
6. Figures .................................................................................................................................... 7

2
Beat2Phone product is not a medical device in compliance with Directive 93/42/EEC.
VitalSignum Oy assumes no responsibility for the correctness of the measurement
results or any procedures carried out based on said results.
1. Taking Beat2Phone into use for the first time
Charge the Beat2Phone device (heart sensor) with the Beat2Phone charger. Plug
e.g. a phone charger that has microUSB-B connector into the Beat2Phone
charger. Charging time is approx. 1h. The device is fully charged when the red
light turns off.
Install Beat2Phone application on your phone from Google Play Store. You phone
must have an Android operation system 4.33 or higher.
It is recommended that you keep the Bluetooth activated on your phone always.
Start Beat2Phone application. Grant the two permissions requested: in order to
run Beat2Phone must have permission to read and write files. If you want get
GPS data in outdoors spots, grant permission for location also.
In the initial menu, press SETTINGS and then Profile. Give the information by
pressing the items. The last item Username is important. Beat2Phone organises
the recorded data according to the Username. Every user must have an
individual Username. It is recommended that the Username has exactly three
characters; only a-z, A-Z, or 0-9 are allowed. If username is not given, nnn is
used. Press the back-button of the phone to go to the initial menu.
Shake the heart sensor to turn it on. (Heart Sensor has no switch.)
On Beat2Phone initial menu, press START RECORDING. Wait a moment until a
smaller window appears on the screen. The window lists the names and MAC
addresses of all the active Beat2Phone devices nearby (this may take even a
minute). As soon as device name b2p BLE 0.1 with MAC address identical with
that of your Heart Sensor given on its label tag appears, touch the name text. In a
few seconds, the phone should make a connection to the Heart Sensor and
signals appear on the screen. Now the Beat2Phone application is paired with your
Heart Sensor. Later it makes connection to your Sensor automatically after
pressing START RECORDING.
Press the phone’s back button twice to close Beat2Phone application.
2. Taking electrocardiogram, ECG
Adjust the length of the strap to fit around your chest. The strap should stay firmly.
Moisten the electrodes of the strap with tap water, saliva or ECG electrode paste.
This is necessary to obtain a high-quality ECG signal.
Tie the strap around your chest as the ordinary heart rate belts. Shake the sensor
to turn it on and attach it on strap’s snap fasteners. Check that the heart logo on
the sensor is not upside down. (See Fig. 1)
Start Beat2Phone application on the phone.
Press START RECORDING
You should see ECG in millivolts (white), Heart Rate in beats per minute (yellow), and
Heart Rate Variability (HRV) in milliseconds (RMSSD, Root-Mean-Square-of-
Successive Differences) (red), see Fig. 2. You can select the curves you want to see
via SETTINGS button (at lower right). ECG may be zoomed in and out both

3
Beat2Phone product is not a medical device in compliance with Directive 93/42/EEC.
VitalSignum Oy assumes no responsibility for the correctness of the measurement
results or any procedures carried out based on said results.
horizontally and vertically, HR and HRV only horizontally with two-finger gestures.
You can move ECG with one-finger sweeps up and down.
The data goes into files on the phone’s internal SD card. (Unfortunately, writing to the
external SD card is prohibited from Android 4.4 on). Each recording is labelled with
date, time (hour, minutes), Username, and 4 last digits of Heart Sensor’s Bluetooth
MAC address for later analysis. The data is stored into a folder
Beat2Phone/Recordings/nnn, where nnn is the Username given in the Profile. Each
recording creates in this folder a new folder named according to date and time:
yyyy_mm_dd-hh_MM_.
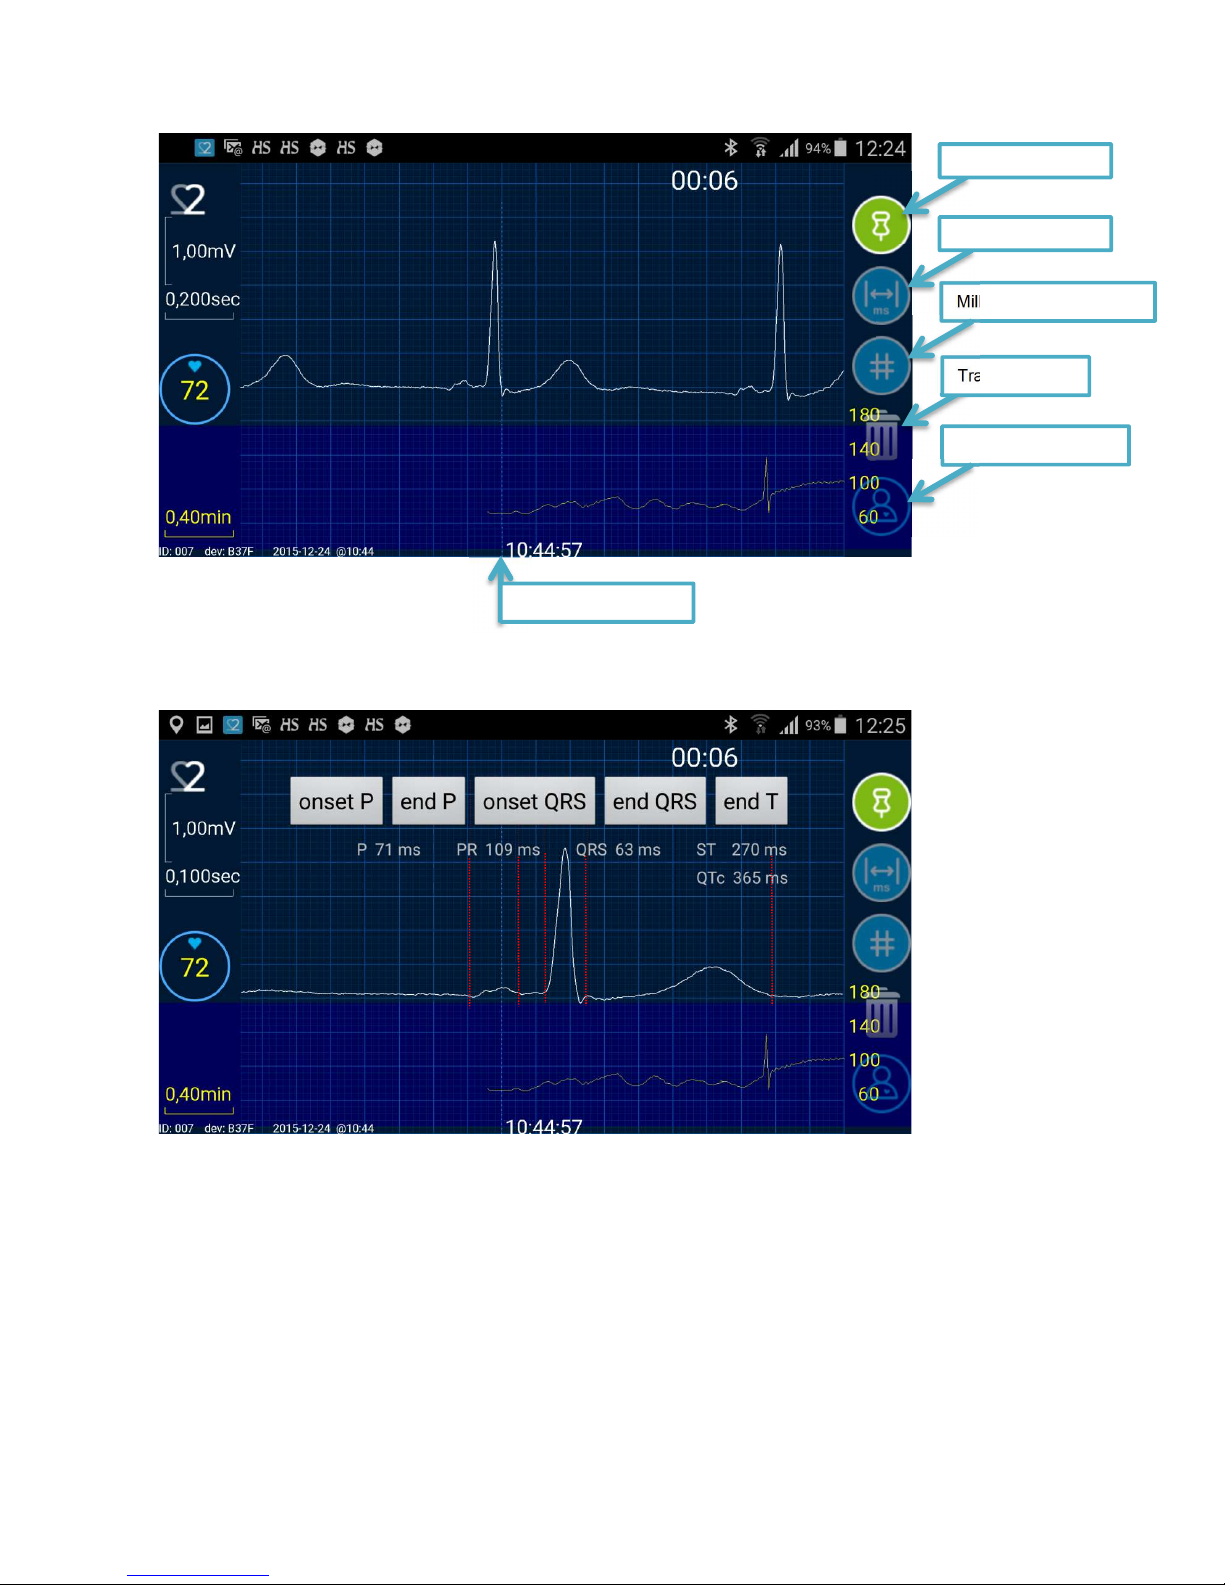
When recording, the following buttons on the right are active on the screen (from top
down, see Fig. 2):
Event button allows making an event on the recording if you have symptoms or want
to make a comment. You can select from the list four symptoms or by pressing
Comment you can type your own event. A light blue circle on the heart rate curve
indicates the time point the event was made at.
Stop button stops recording (alternatively press the back-button of the phone).
History button (magnifying glass) starts analysing the data.
Settings button (lowest one) opens a view to change Profile and select which data
are shown on the screen:
Heart Rate (When checked heart rate in shown.)
HRV (When checked heart rate variability is shown.)
ST analysis (ST segment levels of the ECG are computed; not active if
recording is on)
Posture (When checked, 3 acceleration signals are shown on the screen
indicating the posture and activity of the person. On the upper left corner is
shown the head (grey) and nose (red) of the user viewed from the right,
indicating the posture of the user.)
GPS data (When this is checked, Beat2Phone goes into sports mode and
GPS data (latitude, longitude, altitude, and speed) is also recorded. This
should not be checked if only ECG is taken.). The altitude is calculated from
the phone’s pressure sensor data if it is available.
Heart Rate Histogram (When this is checked, Beat2Phone shows histogram
of the HR in the analysis mode.)
Scales (When checked scales of the signals are shown on the screen. ECG
scales are not shown when Posture is checked.)
Grid (When checked vertical and horizontal scale lines are shown on the
screen. Small div = 1 mm.)
ECG 50Hz notch filter (50Hz noise is removed from the real-time ECG)
When you want to stop the recording press Stop button, confirm, and close the
Beat2Phone application by pressing back button of the phone on the initial menu.

4
Beat2Phone product is not a medical device in compliance with Directive 93/42/EEC.
VitalSignum Oy assumes no responsibility for the correctness of the measurement
results or any procedures carried out based on said results.
Unsnap the Heart Sensor from the strap. The Heart Sensor will turn itself off
automatically if it is not touched or moved for a couple of minutes after the
Beat2Phone application is closed.
Hints 1:
ECG quality is poor when torso muscles are used or flexed. Relax when
taking ECG.
When the Bluetooth radio connection between the phone and the heart
Sensor is poor, for example, when the devices are near out of range (about 5
m) or there is a great number of other active Bluetooth radios nearby, small
red circles may appear on the ECG and HR, meaning that the date are
corrupted and is not valid for analysis at those time instants.
If the Bluetooth connection is lost (e.g. the device is out of range), there will
be a break in the recording but the recording is automatically resumed when
the phone’s Bluetooth connection to the heart sensor is restored.
On some mobile devices, displaying the signals on the screen consumes
battery power. You can save battery by turning the screen off: press phone’s
power button shortly. (This option does not work properly on all phones:
Bluetooth data stream may stop. There is a workaround: pair Beat2Phone
device via Bluetooth settings and make it a trusted device). Another way is to
make a long a press on the upper left part of the screen after which the
signals are not shown.
When making long recordings (several hours), charge the phone all the time.
Heart sensor’s battery must be charged after 24 hours of recordings. For
charging the heart Sensor unsnap it from the belt and snap it to the charger.
Red and yellow light indicates that battery is charging. When the red light
goes off the battery is fully charged.
Beat2Phone allows continuous 24 h measurements, but the recordings are
automatically split so that their length is less than 12 hours.
Heart sensor must not be kept above temperatures of 50 degrees Celsius,
and must not be charged above 40 degrees.
Beat2Phone heart sensor may be used in sweaty conditions e.g. in sports
activities, but it must not be worn in shower or when swimming.
If the Beat2Phone sensor appears not working properly or the phone cannot
get Bluetooth radio connection to it, charge the sensor for a few seconds on
the Beat2Phone charger. This resets the sensor.
3. Analysis of the recorded data
Start Beat2Phone app and in the initial menu press HISTORY. A calendar view
appears, see Fig. 3, and the recordings are shown by their starting times on the day
they were taken. The month can be changed by sweeping the calendar horizontally.
Pressing >>> or <<< changes calendar view three months onwards or backwards at
once.

5
Beat2Phone product is not a medical device in compliance with Directive 93/42/EEC.
VitalSignum Oy assumes no responsibility for the correctness of the measurement
results or any procedures carried out based on said results.
If data from several persons with different Username (ID) have been collected with
the phone, you can choose the user by pressing the ID number on the upper left and
selecting the corresponding user. The data base can be viewed in “Folder & File
View” by pressing that option. If you have moved the data from the internal SD card
to external SD card into folder Beat2Phone/Recordings/nnn, you can select external
SD card for analysis by toggling intSD on upper right. The data can be moved from
internal SD card into the external card with a computer or with an application File
Expert (available in the Google Play Store).
In calendar view, press the day and then select one of the recordings that are listed
according to their starting time. After that, the display is in the analysis mode showing
all the data of the recording selected, see Fig 4.
The analysis time instant is indicated with a vertical light blue dotted line in the
middle of the screen. By sweeping horizontally on the blue area of the lower part of
the screen you can change the analysis time instant. The heart rate curve shifts in
time and the ECG strip that corresponds heart rate’s time instant is shown left from
the vertical dotted line. ECG can also be moved in time with a horizontal sweep.
Finger gestures can be used for zooming and moving ECG vertically and
horizontally. Heart rate curve can be zoomed only horizontally.
When in analysis mode, the following buttons on the right are active (from top down):
Annotation button: You can select from a great number of possible standard
annotations or by pressing Comment (lowest item) you can type your own annotation.
A light blue circle on the heart rate curve indicates the time instant of the annotation.
Intervals button allows you to calculate the important wave durations (P wave and
QRS complex) and time intervals (PR, ST, and QTc) of the ECG for one selected
heartbeat. When Intervals button is pressed, buttons named onset P, end P, onset
QRS, end QRS, and end T appear, see Fig. 5. Select one heart beat by sweeping HR
or ECG. Zoom ECG. Move ECG horizontally so that the onset of the P wave is at the
vertical dotted light blue line in the middle of the screen. Then press onset P button.
Next move EGG left so that the end of P wave is at the vertical dotted line and press
end P button. Continue the same way for the onset and end of QRS, and end of T
wave.
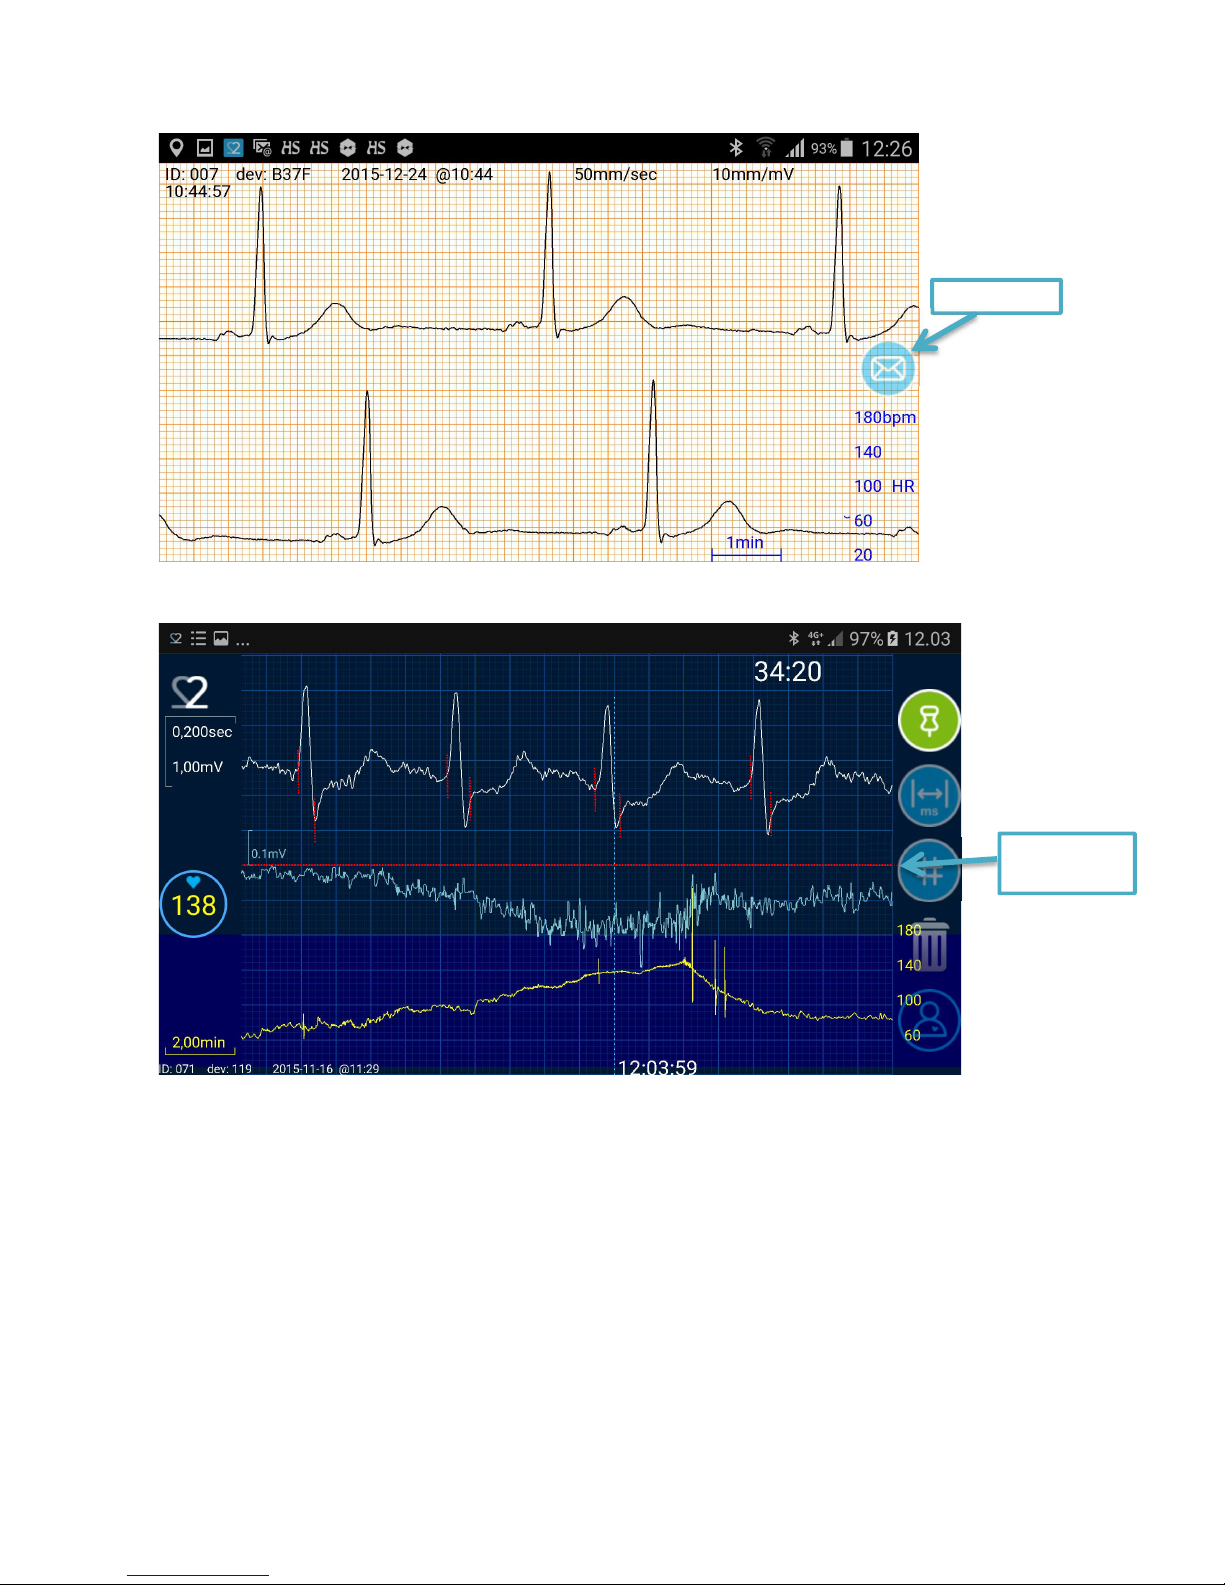
Millimetre paper view button: ECG (black) and HR (blue) are shown on standard
millimetre paper format, see Fig 6. In this format, you can move analysis time point
(which is for this view 1 cm left from the screen right) by sweeping the heart rate
curve (blue) horizontally. You can send the image from the phone by pressing the
envelope button on the right of the millimetre paper view, and then selecting, for
example, email and the image is sent as an email attachment. For returning to the
analysis view, press phone’s back button.

6
Beat2Phone product is not a medical device in compliance with Directive 93/42/EEC.
VitalSignum Oy assumes no responsibility for the correctness of the measurement
results or any procedures carried out based on said results.
Trash bin button allows deleting a recording. It is recommended that only recordings
that clearly have failed are deleted.
Settings button: see above
Hints 2:
Do not make any analysis from the ECG for those instants marked with red
circles on ECG or HR. Bluetooth connection has been poor during those time
instants and the ECG is corrupted.
For viewing events and annotations, zoom heart rate curve in time and move
the light blue circle on the dotted vertical analysis time line. The event or
annotation text appears on the top left in light blue. You can remove or edit
the annotation by pressing the text.
The ST segment level of the ECG can be computed when the analysis is
made for the recording taken from a file as follows: Press the Settings button
in the analysis view, check ST-SEGMENTS, and press back button of the
phone. See explanations in caption of Fig. 7.
4. BeatPhone in exercise
Beat2phone application supports ECG and other cardiac signal monitoring
during sports activities. Beat2Phone goes into sports mode when GPS data is
checked in Settings.
For outdoor exercise, the following data is obtained (see Fig. 8):
o ECG
o Instantaneous, average, maximum heart rate, and heart rate
histogram
o GPS data: speed, latitude, longitude, and altitude (from phone
pressure sensor)
o Time and distance travelled
o Instantaneous, average, and maximum speed
o Average speed and average heart rate for speed above speed
threshold (set in Profile)
o Kilocalories burned
o Cadence (Stride rate)
o Performance indicator: distance progressed in one heart beat
o The course travelled is plotted and shown on map in real time, tracked
with heart rate and GPS data. All data can be also later analysed.
o When the exercise is finished Beat2Phone suggests to save the
summary of the results into calendar for keeping exercise diary.
An orthostatic test protocol is implemented (SETTINGS -> Orthostatic test). In
the orthostatic test mode, the application first connects to the Beat2Phone
device, instructs (bird song) the person to rest in supine position for 5
minutes, and then (again with a bird song) to stand up and stay standing for 4
minutes. Finally, a 4-minute rest in supine position completes the test. The

7
Beat2Phone product is not a medical device in compliance with Directive 93/42/EEC.
VitalSignum Oy assumes no responsibility for the correctness of the measurement
results or any procedures carried out based on said results.
average resting and standing heart rate and heart rate variability (RMSSD)
are automatically computed, displayed, and stored into a file on SD card. The
history of orthostatic test results can be viewed with an application DataPlot.
5. BeatPhone in different Android devices
Beat2Phone has not been tested on all phones or tablets but it works fine at least on
the following ones:
Samsung models: Galaxy S3, S4, S5, S6, A5, and Note (tablet)
LG G3
Huawei Honor
Motorola Moto G
Sony Experia M4
Google Nexus 7 (tablet).
On the following devices Beat2Phone does not work properly (Bluetooth problem):
Huawei Media Pad M3
Sony Xperia Z5 Compact
Lenovo Yoga TAB3 Plus (YT-X703L), Android 6.0
OnePlus OnePlus5 (OnePlus5), Android 7.1
6. Figures
Fig. 1. Heart sensor on the chest

8
Beat2Phone product is not a medical device in compliance with Directive 93/42/EEC.
VitalSignum Oy assumes no responsibility for the correctness of the measurement
results or any procedures carried out based on said results.
Fig. 2. Beat2Phone application is recording.
Fig. 3. Beat2Phone’s calendar view showing recordings.
Event button
Stop button
Analysis button
Settings button
Heart rate (yellow)
Heart rate variability (red) Present time point
Press ID number for
selecting another
Toggle for external
SD card
Press <<< for moving three
months backwards
9
Beat2Phone product is not a medical device in compliance with Directive 93/42/EEC.
VitalSignum Oy assumes no responsibility for the correctness of the measurement
results or any procedures carried out based on said results.
Fig. 4. Beat2Phone application in analysis mode.
Fig. 5. ECG time intervals calculated.
Millimetre paper view
Trash bin
Settings button
Annotation bu
t
t
on
Intervals
button
Analysis time point
10
Beat2Phone product is not a medical device in compliance with Directive 93/42/EEC.
VitalSignum Oy assumes no responsibility for the correctness of the measurement
results or any procedures carried out based on said results.
Fig. 6. Screen shot of the millimetre paper view.
Fig. 7. Screen shot of ST segment level evolution (light blue) during an exercise ECG. ST
segment level is calculated for each heart beat and shown in the light blue curve with the same
time scale as the heart beat curve (yellow). The reference level (0 mV) is the thin red dotted
horizontal line in the middle of the screen. The ST level scale 0.1 mV corresponds to 5 mm on the
screen. Note the short vertical dotted red lines on the ECG indicating the onsets and ends of QRS
complexes.
ST segment
zero level
Send
button

11
Beat2Phone product is not a medical device in compliance with Directive 93/42/EEC.
VitalSignum Oy assumes no responsibility for the correctness of the measurement
results or any procedures carried out based on said results.
Fig. 8. Beat2Phone in a running exercise
HR
Altitude
(magenta)
Average values for speed
over the speed threshold
Speed
Metres travelled
per one heart beat
Cadence
Average values for the entire exercise
Speed
(green)
Other manuals for Beat2Phone
2
Table of contents
Popular Health Care Product manuals by other brands


HoMedics
HoMedics CIRCULATION PRO instruction manual

Modus
Modus Trex Quick reference guide

Bircher Reglomat
Bircher Reglomat CareMat A05T EK2.4 operating instructions

LifeWatch
LifeWatch MCT 3L quick start guide

I-Tech
I-Tech MIO-CARE PRO user manual

ARJO HUNTLEIGH
ARJO HUNTLEIGH Sara Stedy Instructions for use


