EMG Mediair SUF01-A10 User manual


INDEX
Important Safeguards.........................................................................................1-2
International Travel................................................................................................ 2
Introduction............................................................................................................ 2
Accessory/Replacement items.............................................................................. 3
Set-Up ................................................................................................................... 4
How to Operate your Portable Suction Pump .......................................................5-8
Battery Charging. .................................................................................................. 9
Check the battery quality......................................................................................10
Replace the battery ..............................................................................................10
Cleaning Instructions........................................................................................... 11
Maintenance ........................................................................................................ 11
Troubleshooting................................................................................................... 12
Specifications/Classifications .............................................................................. 13
Warranty.............................................................................................................. 14

SAFETY
IMPORTANT SAFEGUARDS
DANGER
To reduce the risk of electrocution:
1.
Do not use while bathing.
2.
Do not place or store product where it can fall or be pulled into a tub orsink.
3.
Do not place in or drop into water or other liquid.
4.
Do not reach for a product that has fallen into water. Unplug immediately.
WARNING
To reduce the risk of burns, electrocution, fire or injury to persons:
1.
Close supervision is necessary when this product is used by, on, or near children
or invalids.
2.
Use this product only for its intended use as described in thisguide.
3.
Never operate this product if:
a.
It has a damaged power cord or plug.
b.
It is not working properly.
c.
It has been dropped or damaged.
d.
It has been dropped into water.
Return the product to an authorized service center for
examination and repair
4.
Keep the power cord away from heated surfaces.
5.
Never use while drowsy or asleep.
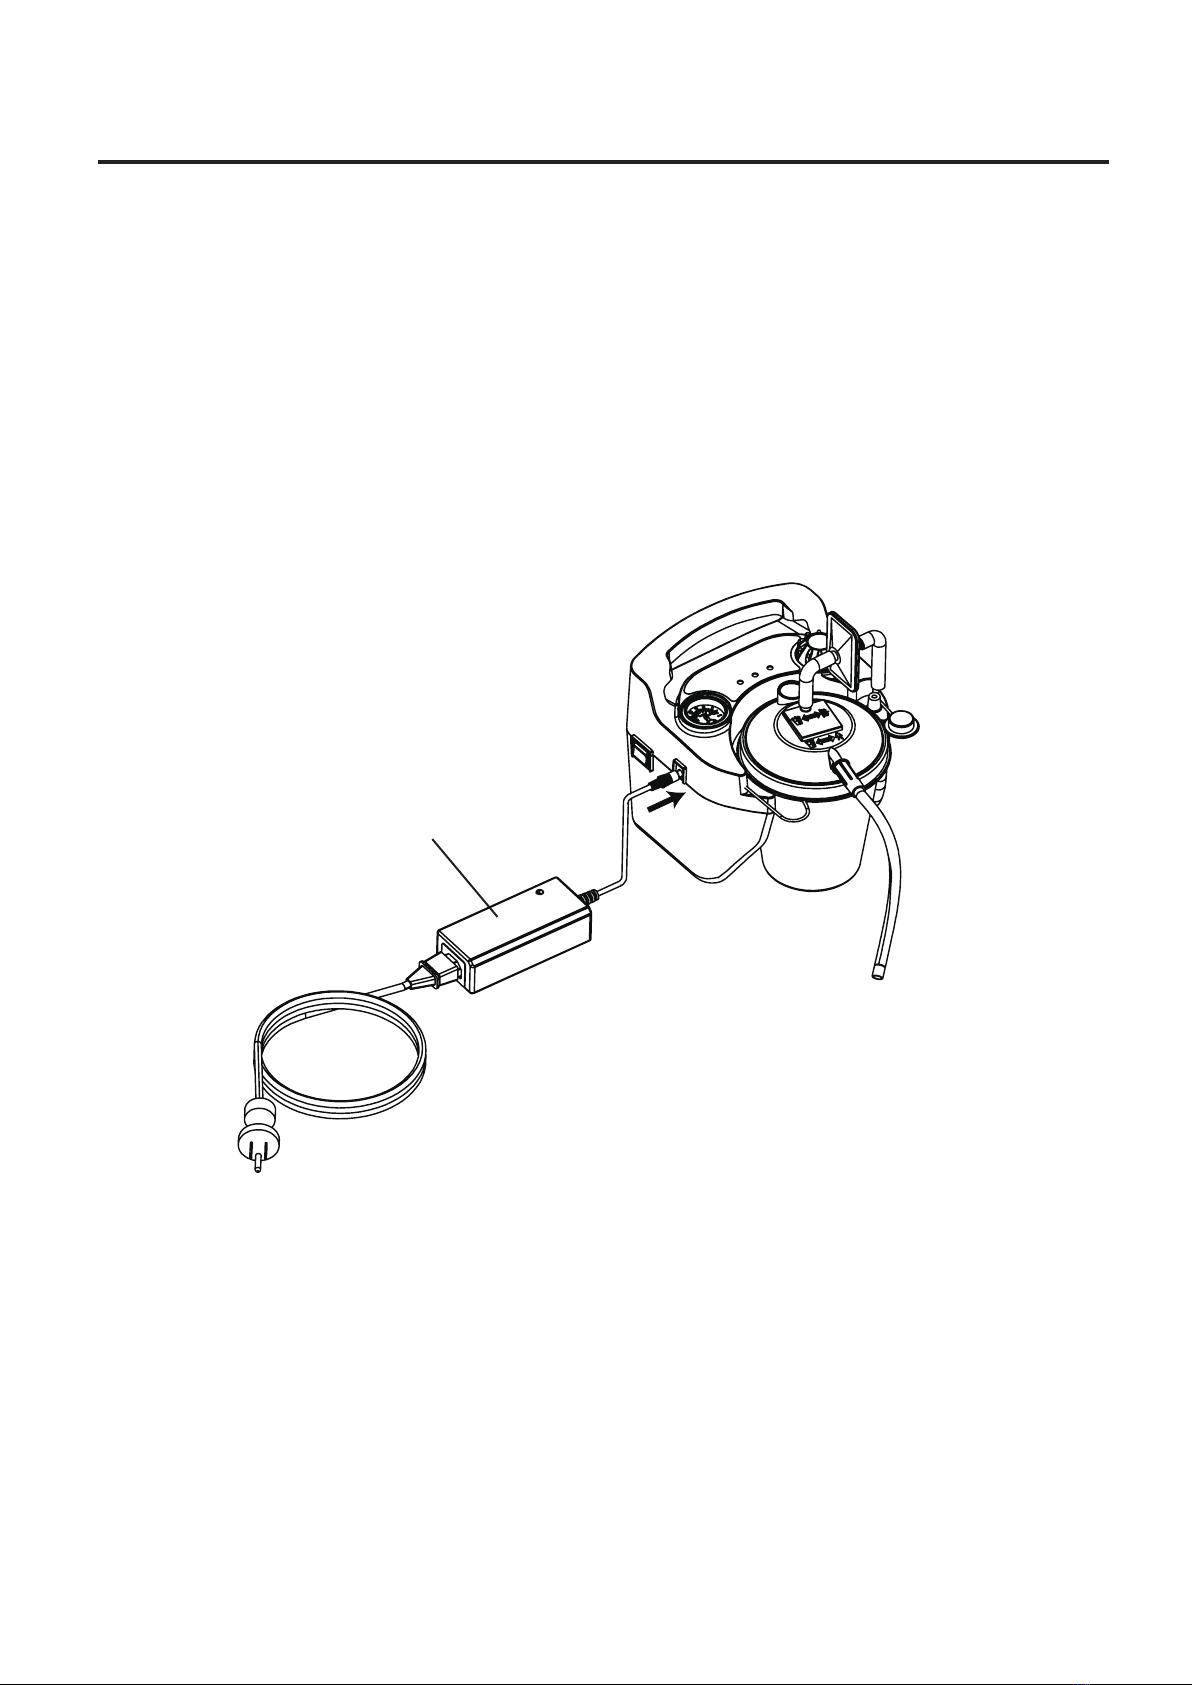
NOTE: The unit is factory equipped with an internal rechargeable battery and all
information regarding battery operation in this guide is applicable.
DANGER
WARNING
CAUTION
NOTE
Information for preventing damage to the product.
Information to which you should pay special attention.
Urgent safety information for hazards that will cause serious injury
or death.
Important safety information for hazards that might cause serious
injury.
When using electrical products, especially when children are present, basic safety
precautions should always be followed. Read all instructions before using. Important
information is highlighted by these terms:
READ ALL INSTRUCTIONS BEFORE USING.
-1--1-

SAFETY/ INTRODUCTION
DANGER
The unit is a vacuum suction device designed for the collection of nonflammable fluid
materials in medical applications only. Improper use during medical applications can
cause injury or death.
For all medical applications:
1.
All suctioning should be done in strict accordance with appropriate procedures that
have been established by a license medical authority.
2.
Some attachments or accessories may not fit the tubing supplied. All attachments
or accessories should be checked prior to use to assure proper fit.
INTERNATIONAL TRAVEL
The unit is equipped with a switch mode power supply allowing operation on any AC
voltage (100-240 VAC, 50/60 Hz). However the correct power cord must be used to
connect to adaptable wall power.
NOTE Check power cord for adaptability before using.
INTRODUCTION
The unit is a compact medical suctioning device which has been designed for reliable,
portable operation. Because of the small size, light weight and DC operation, the unit is
ideal for providing suction in the home, in transport with optional DC cord, or if your
model has an internal rechargeable battery, the unit can be operated anywhere. One
800 ml canister bottle is the only choice. Following the recommended operating and
maintenance procedures outlined in this instruction guide will maximize the life of this
product.
Intended Use Statement
The device is to be used to remove fluids from the airway or respiratory support
system and infectious materials from wounds. The device creates a negative
pressure (vacuum) that draws fluids through disposable tubing that is connected to a
canister. The fluids are trapped in the canister for proper disposal. It is for use on the
order of a physician only.
-2-

IMPORTANT PARTS
ACCESSORY/REPLACEMENT ITEMS
Description
1. Collection Canister, 800cc
2. Bacterial Filter and 30cm Tubing set
3. Connection Tubing, 180cm , 1/4” ID
The following items can be purchased separately as accessories or replacement
items for your unit.
-3-
1
3
2
1
3
2

SET UP
Set-Up
1. Connect either end of the 180cm tubing to the tubing connector then connect the
other end to the bacteria filter. Ensure that the clear side of the bacteria filter is
toward elbow and bottle when installing/re-installing. Do not reverse direction of the
filter.
2. The bacteria filter should be connected to the elbow connection, and the elbow con-
nection should be connected to the top of the canister lid where it says <Vacuum>.
3. The 180cm connection tubing should be connected to the canister lid at the outlet
says <Patient>.
4. Please assure that all connections are secure and without leakage before using.
5. Verify that unit is at desired suction level before beginning patient suction.
30cm Tubing with
Bacterial Filter
Connection Elbow
Vacuum
Patient
Connection Bottle Lid
180cm Connection
Tubing
-4-

OPERATION
How to Operate your Portable Suction Pump
1.
Before connecting the unit to the AC adapter or 12V DC cord, make sure that the
power switch located on the side of the unit is in the ’Off’ position. Select power
source desired.
LED EXPLANATIONS: (SUF01-A10)
POWER - Green/Yellow: When external power is supplied to the unit from AC power
source or DC cord, the power light will be illuminated as green. When internal
power is supplied to the unit from an internal rechargeable battery, the power light
will be illuminated as yellow.
CHARGING - Yellow: When the battery is being charged, the yellow light on the front
cover will be illuminated. At the same time, the red light on the AC adapter will also
be illuminated. When the battery is fully charged, the red light on the AC adapter will
turn to green.
LOW BATTERY- Red Low Battery: Seek another power source and charge the battery
as soon as possible when the red light remains flashing and the audio alarm sounds.
-5-
CHARGING
LOW BATTERYPOWER
“ON” POSITION

OPERATION
2.
Select Power Source Desired
AC OPERATION: Plug the small connector of the AC adapter into the DC power input
located on the side of the unit. Plug the AC end into a grounded wall-outlet power
source.
NOTE: The power supply may become warm to the touch during charging or running
of the unit. This is normal.
12V DC OPERATION: (such as a car lighter receptacle.) Plug the small connector of
the DC power cord into the DC power input on the side of the unit. Plug the large
connector into the 12V DC power receptacle of the automobile.
BATTERY OPERATION: Verify that your unit has an internal rechargeable battery; To
ensure proper operation from internal battery, fully charge the battery for 1-1.5 hours
(depending on the depth of discharge) as explained in the Battery Charging section. To
operate the unit from an internal rechargeable battery, ensure that no external power
sources are plugged into the DC power input on the side of the unit.
-6-
AC Adapter

OPERATION
3.
Once the power source is selected, simply turn the unit “On” using the power
switch located on the top of the unit. The power indicator light (displayed on the
top of the unit) will indicate which power source is being used by staying
continuously lit when external power is connected.
-7-
“ON” POSITION

OPERATION
4.
WARNING
Tightening the knob above 600 mmHg will damage the valve.
NOTE: Gauge is for reference only. If the unit sustains a severe drop, accuracy of the
gauge must be checked.
Suction at the patient is automatically obstructed when liquid level reaches the float shut-
off located on the underside of the canister lid.
NOTE: Always transport unit with vacuum regulator knob rotated fully clockwise in case
unit is dropped.
CAUTION: When automatic float shut-off is activated, contents of the canister should be
emptied. Further suctioning could cause damage to the vacuumpump.
CAUTION: Should fluid be aspirated back into the unit, equipment provider servicing is
necessary as possible vacuum pump damage may result.
Adjust the vacuum level from 50 to 600 mmHg by turning the vacuum regulator knob
located on the side of the unit (clockwise to increase vacuum and counter- clockwise to
decrease vacuum). The desired level of vacuum can be set by using the gauge located
on the top of the unit near the handle. To accurately read the gauge, block the patient
end of the hose or cap off the canister and allow the gauge to reach a stable vacuum
reading.
5. Position the patient tubing to patient and begin suctioning.
6. When the contents of the 800 cc canister reaches the safe full level, suctioning will
automatically stop (float shut-off).
7. Switch the power to “O” position (off), shut off the suction motor.
8. After the motor stops turning completely, remove the canister and replace with Canister
(See page 5 for accessory / replacement parts.)
9. Power suction unit back up and resume use.
-8-

OPERATION / BATTERY CHARGING
BATTERY CHARGING
The unit is equipped with a factory-installed rechargeable battery. The unit will have a
low battery and charge indication.
Once you’ve determined that your unit is equipped with an internal rechargeable
battery, connect the unit to the proper AC or DC power source using the AC adapter
or DC power cord. The green external power light shall be illuminated. The yellow
charge indicator will be illuminated while the battery is charging. At the same time, the
red light on the AC adapter will be also illuminated. Verify that this illuminates when
charging begins. As the charge nears a full charge, the red light on the AC adapter
will turn to green.
-9-

BATTERY
NOTES
1. A discharged battery will require 1-1.5 hours (depending on depth of discharge) of
charging to reach a full capacity.
2. Do not connect the AC adapter to an outlet controlled by a switch to ensure power is
supplied to unit at all times.
3. Do not connect the DC power cord to a outlet that is not constantly energized.
4. A fully charged battery, on the unit will provide approximately 50 minutes of
continuous operation at a zero vacuum level (free flow).
5. If unit is not in use for extended periods, battery should be recharged every month,
even in storage.
6. When charged the battery, the battery charging indicator light will remain lit. If your
unit does not hold a charge, please be sure the model you are using has a battery
installed prior to returning it to your authorized provider or to us. Verify that the
charge light turns on when the external power is applied with the switch in the “Off”
position.
7. Units equipped with an internal rechargeable battery must be recycled.
CAUTION
Discharging the battery completely will shorten the life of the battery. Do not operate the
unit more than a few minutes if the low battery indicator light is lit. Recharge as soon as
possible.
Check the Battery Quality
If poor battery quality is suspected, charge the battery for a minimum of 24 hours and
then perform the following tested without connection to external power:
1. Run the device and then let the suction unit operate continuously at 300mmHg.
2. If the “Low Battery” red light flashes within 20 minutes, the battery should be
discarded.
-10-

BATTERY / CLEANING
CLEANING INSTRUCTION
1. With the power switch in the “Off” position, disconnect the Suction Unit from all
external power sources.
2. Wipe the housing with a clean cloth and any commercial (bacterial-germicidal)
disinfectant.
CAUTION
Do not submerge in water and this will result in damage to the vacuum pump.
MAINTENANCE
DANGER
Electric shock hazard, Do not attempt to open or remove cabinet, there are no user-
serviceable internal components. If service is required, return unit to a qualified provider
or an authorized service center. Opening or tampering with the unit will void warranty.
Filter Changing:
1. Change bacteria filter if overflow occurs or every two months, whichever comes first.
2. Remove filter by disconnecting it from the suction unit and lid assembly.
3. Replace with a clean bacteria filter (non-sterile) and remount to suction unit.
Inspect suction tubing and collection canister for leakage, cracks, etc., before each use.
-11-

TROUBLESHOOTING
TROUBLESHOOTING
NOTE: Your unit contains no user-serviceable parts. If you believe your unit is not
working properly, BEFORE YOU RETURN IT TO THE EQUIPMENT PROVIDER
WHERE YOU PURCHASED IT OR TO OHIO MEDICAL CORPORATION, please take
a few moments to check for these possible causes:
PROBLEM
Unitdoesnotturn on.
(Green external
power
indicator
shouldbe
illuminated
when poweris
applied.)
Pump runs, but no
vacuum.
Low vacuum.
Battery willnothold
charge.
(Charge
indicator should
be
illuminated if bat-tery
is connected during
charge mode)
ACTION
1. Check power sources and connections.
2. Ensure wall outletis livebyplugging inalamp.
3. If running from an internal battery, ensure that
your Unit has a battery installed.
4. If battery is installed, check that is fully charged.
1.
Check that all tubing is connected properly.
2. Check tubing connections for breaks or leaks.
3.
Ensurethatflowshut-offisnotactivated.
4.
Check for leaks or cracks in bottle assembly.
1. Use vacuum adjustment knob to increase vacuum
level.
2.
Check system for leaks.
3.
Push vacuum adjustment knoband then release.
1. Ensure that unit is equipped with an internal battery
by
contactingyourmedicalequipmentprovider
2.
Verify that charge light turns on.
3.
Checkelectricalconnectionsduringcharging
4.
Ensure walloutletislivebyplugginginalamp.
-12-

SPECIFICATIONS / CLASSIFICATIONS
Dimensions: (L) 8.3 x (W) 7.5 x (H) 7.7 inch
(L) 210 x (W) 190 x (H) 195 mm
Weight: 3.59 lb (1.63 kg)
Maximum Vacuum: 600 ± 30 mmHg
Flow Range (Free air Flow): 22±10% LPM
Sound Level (at 1m,300mmHg): 60 ± 3 dBA
Electrical Requirements: DC 12V, 3A max (+/-8%)
Power consumption 52 W
Power Input AC 100-240V, 50-60 Hz, 0.45A
Power Output DC12V/ 55W max
Battery Type: (SUF01-A09) Lithium Ion
Bacteria Filter port size: 0.45 microns
Canister Capacity: 800cc (ml)
Operation Temperature: 32o- 104oF (0o- 40oC)
Operating Humidity: 0-95% RH
Operating Atmospheric Pressure: 10.2 - 15.4 psi (70 - 106 kPa)
Storage Temperature: -14oF- 158 oF (10o- 70oC)
Storage Humidity: 0 - 95%
Storage Atmospheric Pressure: 7.3 - 15.4 psi (50 - 106 kPa)
Equipment Classifications: With respect to protection from electric
shock Class II
Mode of Operation: Intermittent operation 30 minutes ON, 30
minutes OFF
NOTE: Equipment not suitable for use in the presence of a flammable anesthetic mixture with air
or nitrous oxide.
-13-

WARRANTY
TWO-YEAR LIMITED WARRANTY
The compressor portion of the suction unit is warranted to be free from defective
workmanship and materials for a period of two years from date of purchase.
Any defective part(s) will be repaired or replaced at our option if the unit has not been
tampered with or used improperly during that period. Make certain that any
malfunction is not due to inadequate cleaning or failure to follow the instructions. If
repair is necessary, contact your medical provider or our service department for
instructions.
NOTE
This warranty does not cover providing a loaner unit, compensating for costs incurred
in rental while said unit is under repair, or costs for labor incurred in repairing or
replacing defective part(s).
THERE IS NO OTHER EXPRESS WARRANTY, IMPLIED WARRANTIES,
INCLUDING THOSE OF MERCHANTABILITYAND FITNESS FORAPARTICULAR
PURPOSE, ARE LIMITED TO THE DURATION OF THE EXPRESS LIMITED
WARRANTY AND TO THE EXTENT PERMITTED BY LAW ANY AND ALL IMPLIED
WARRANTIES ARE EXCLUDED. THIS IS THE EXCLUSIVE REMEDY AND
LIABILITY FOR CONSEQUENTIAL AND INCIDENTAL DAMAGES UNDER ANY AND
ALL WARRANTIES ARE EXCLUDED TO THE EXTENT EXCLUSION IS PERMITTED
BY LAW. SOME STATES DO NOT ALLOW LIMITATIONS ON HOW LONG AN
IMPLIED WARRANTY LASTS, OR THE LIMITATION OR EXCLUSION OF
CONSEQUENTIAL OR INCIDENTAL DAMAGES, SO THE ABOVE LIMITATION OR
EXCLUSION MAY NOT APPLY TO YOU.
-14-


EMG MANUFACTURING CO.,LTD.
Second floor, no.8, weijian road, chashan town,
dongguan city,guangdong China
K14041100RA REV.0 2019/08
This manual suits for next models
2
Table of contents
Popular Water Pump manuals by other brands

Unibloc-Pump
Unibloc-Pump UNIBLOC-PD 501 Operation & service manual

Circor
Circor HOUTTUIN 236 Series ORIGINAL INSTALLATION, OPERATION AND MAINTENANCE MANUAL

Biral
Biral VariA-E Installation and operating instructions

Binks
Binks MX1212PL manual

Wilo
Wilo DrainLift BOX Installation and operating instructions

Bell
Bell HP250 AP Use and maintenance manual