Emme Esse 87460 WiFi uCare Cam User manual
1
87460
WiFi uCare Cam
Manuale rapido di installazione
1. Installazione APP (Richiede Smartphone con sistema operativo
Android 4.0 e superiore o iOS 5.0 e superiore)
Passo 1.
Scaricare “uCare Cam” App da Google Play o App store
Dispositivo Android Dispositivo iOS
Google Play Store App Store
“uCare Cam” Collegamento Download “uCare Cam” Collegamento Download

2
Passo 2.
Dopo che l’installazione del software è completata, cliccare sull’icona per lanciare
l’applicazione. La Figura 1 mostra la finestra principale “Camera List” .
Default uCare Cam password : 0000
Manager’s Name : admin
Manager’s Password : 0000
2. Installare una nuova uCare Cam –modalità Router
Passo 1. Accensione
Inserire il connettore dell’adattatore di alimentazione nella porta di ingresso DC della uCare Cam
e quindi collegare l’adattatore di alimentazione in una presa a muro. Il LED sulla telecamera
uCare Cam diventerà verde per circa 15 secondi. Poi il Led lampeggerà per circa 15 secondi
prima di alternare tra rosso e verde.
Passo 2. Modalità di collegamento Router
Attendere fino a che il colore del LED si alterna tra rosso e verde. Se il
LED non lampeggia, utilizzare una punta sottile e tenere premuto per
più di 10 secondi il pulsante WPS/REST posizionato sul lato della
UCare Cam per riavviare la telecamera. È possibile rilasciare il pulsante
una volta che il LED si accende di colore verde, si ferma, lampeggia due
volte di colore rosso e diventa poi di colore verde fisso. Attendere che
il LED alterni il suo colore tra rosso e verde.
Passo 3. Impostare uCare Cam per la connessione al Router Wifi
Android
Figura 1
3
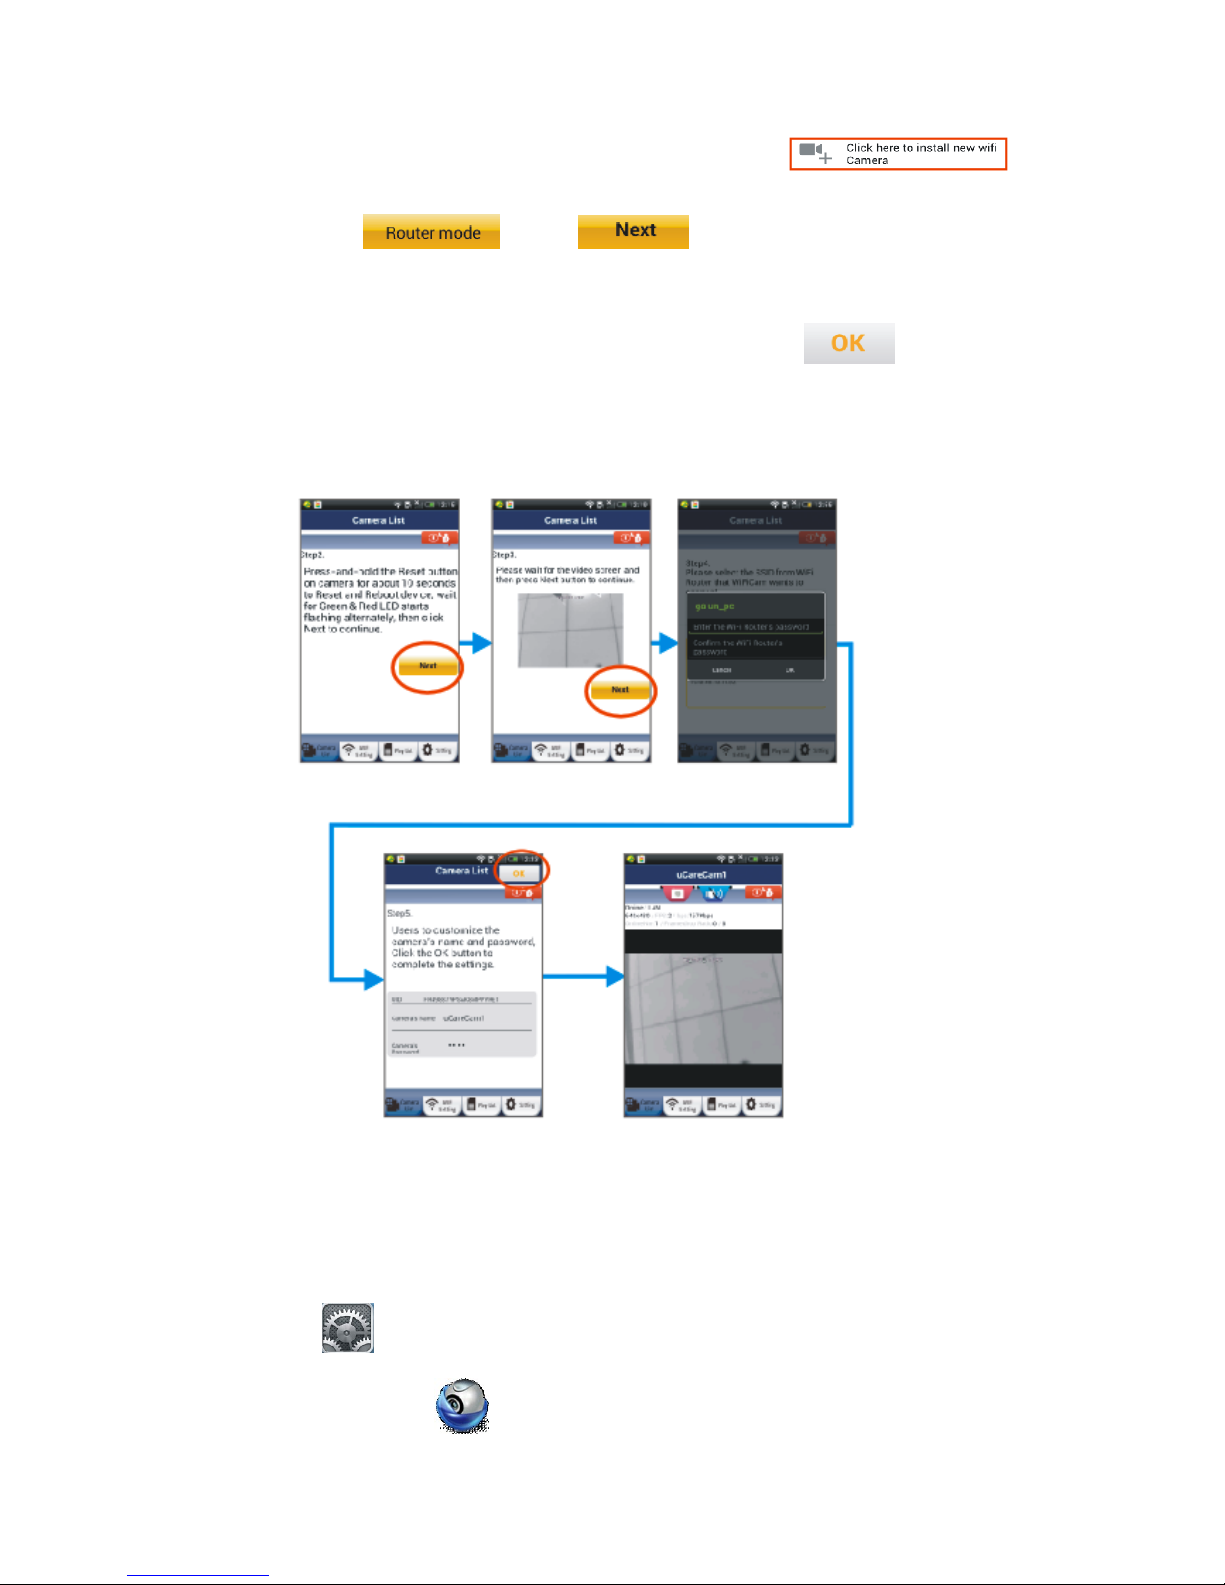
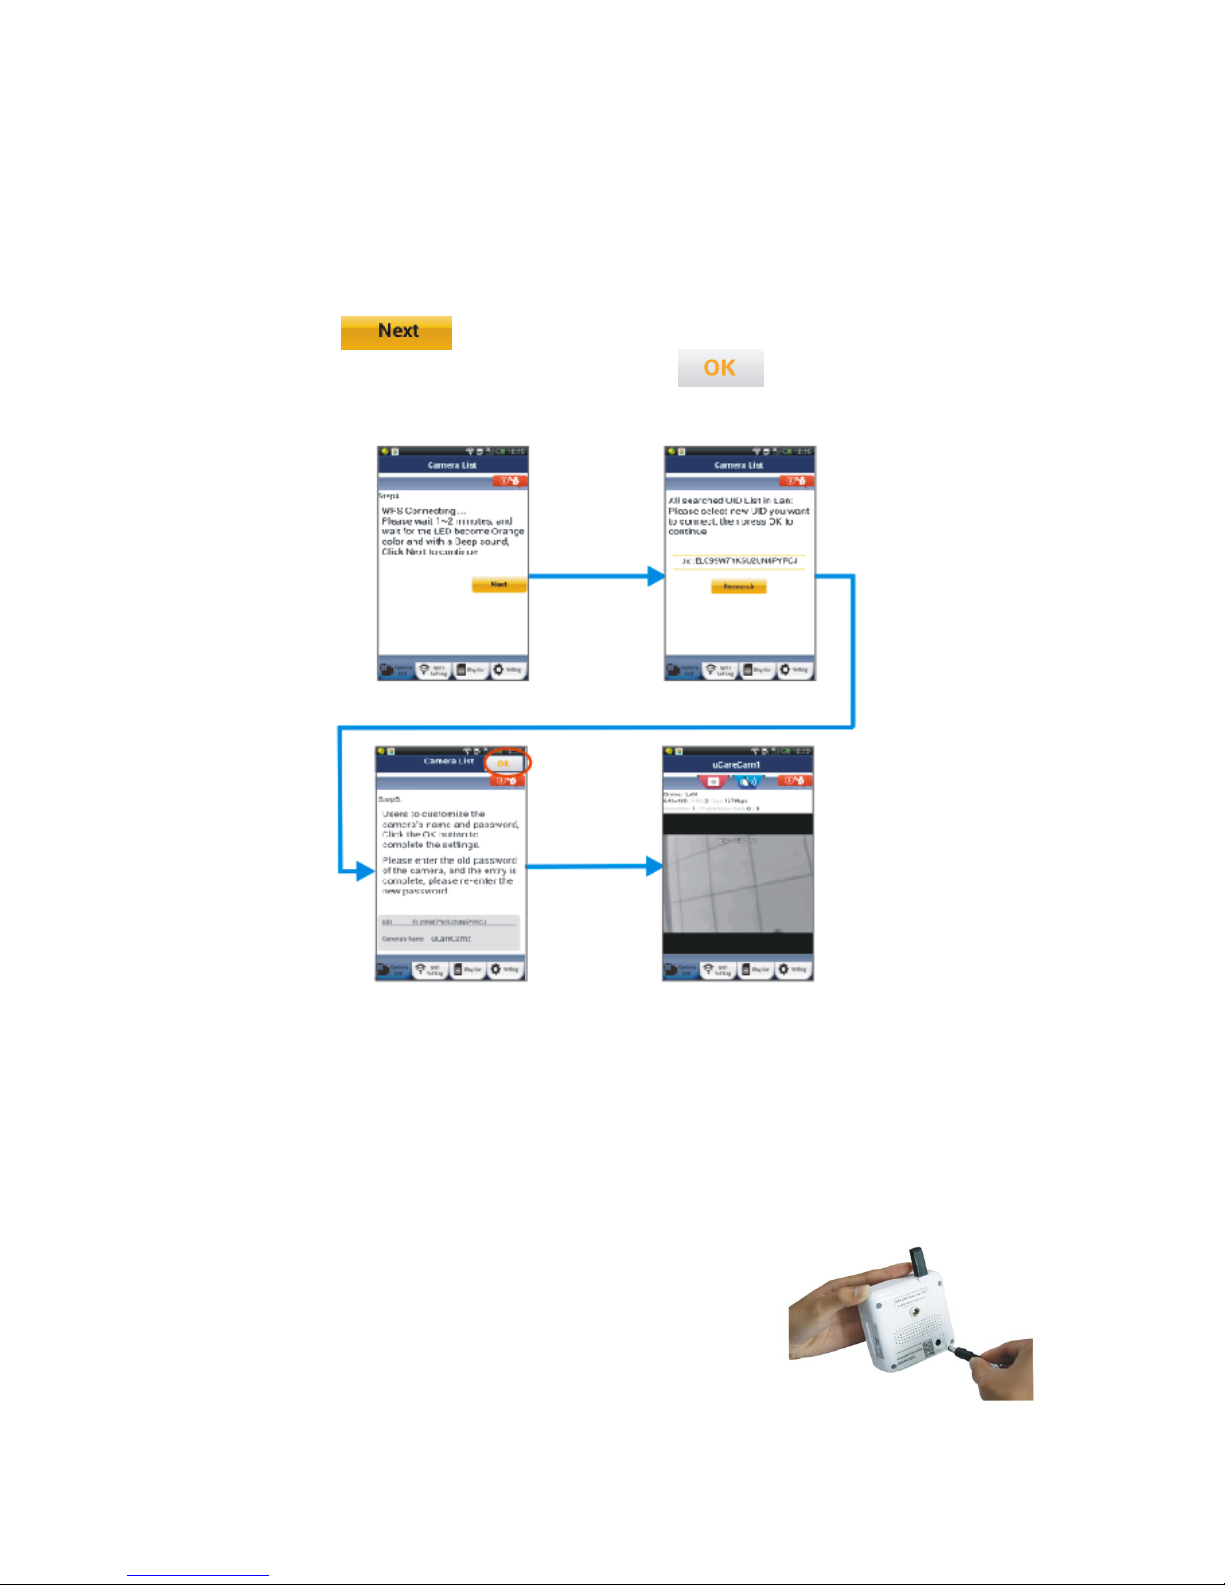
Lanciare l’applicazione “uCare Cam” e cliccare sull’opzione
nella parte superiore dello schermo nella finestra “Camera List”.
Cliccare l’etichetta e poi per accedere al passo successivo (ved.
Figura 2). Seguire passo passo le istruzioni nella finestra “Camera List” (ved. Figura 3 e Figura 4 ).
Inserire un nome telecamera e una password (default 0000); si consiglia di cambiare la password
di default dopo l’installazione per ragioni di sicurezza. Cliccare il tasto (ved. Figura 5).
La telecamera mostrerà automaticamente la finestra di visualizzazione (ved. Figura 6) e il colore
del LED diventerà arancione.
Apple
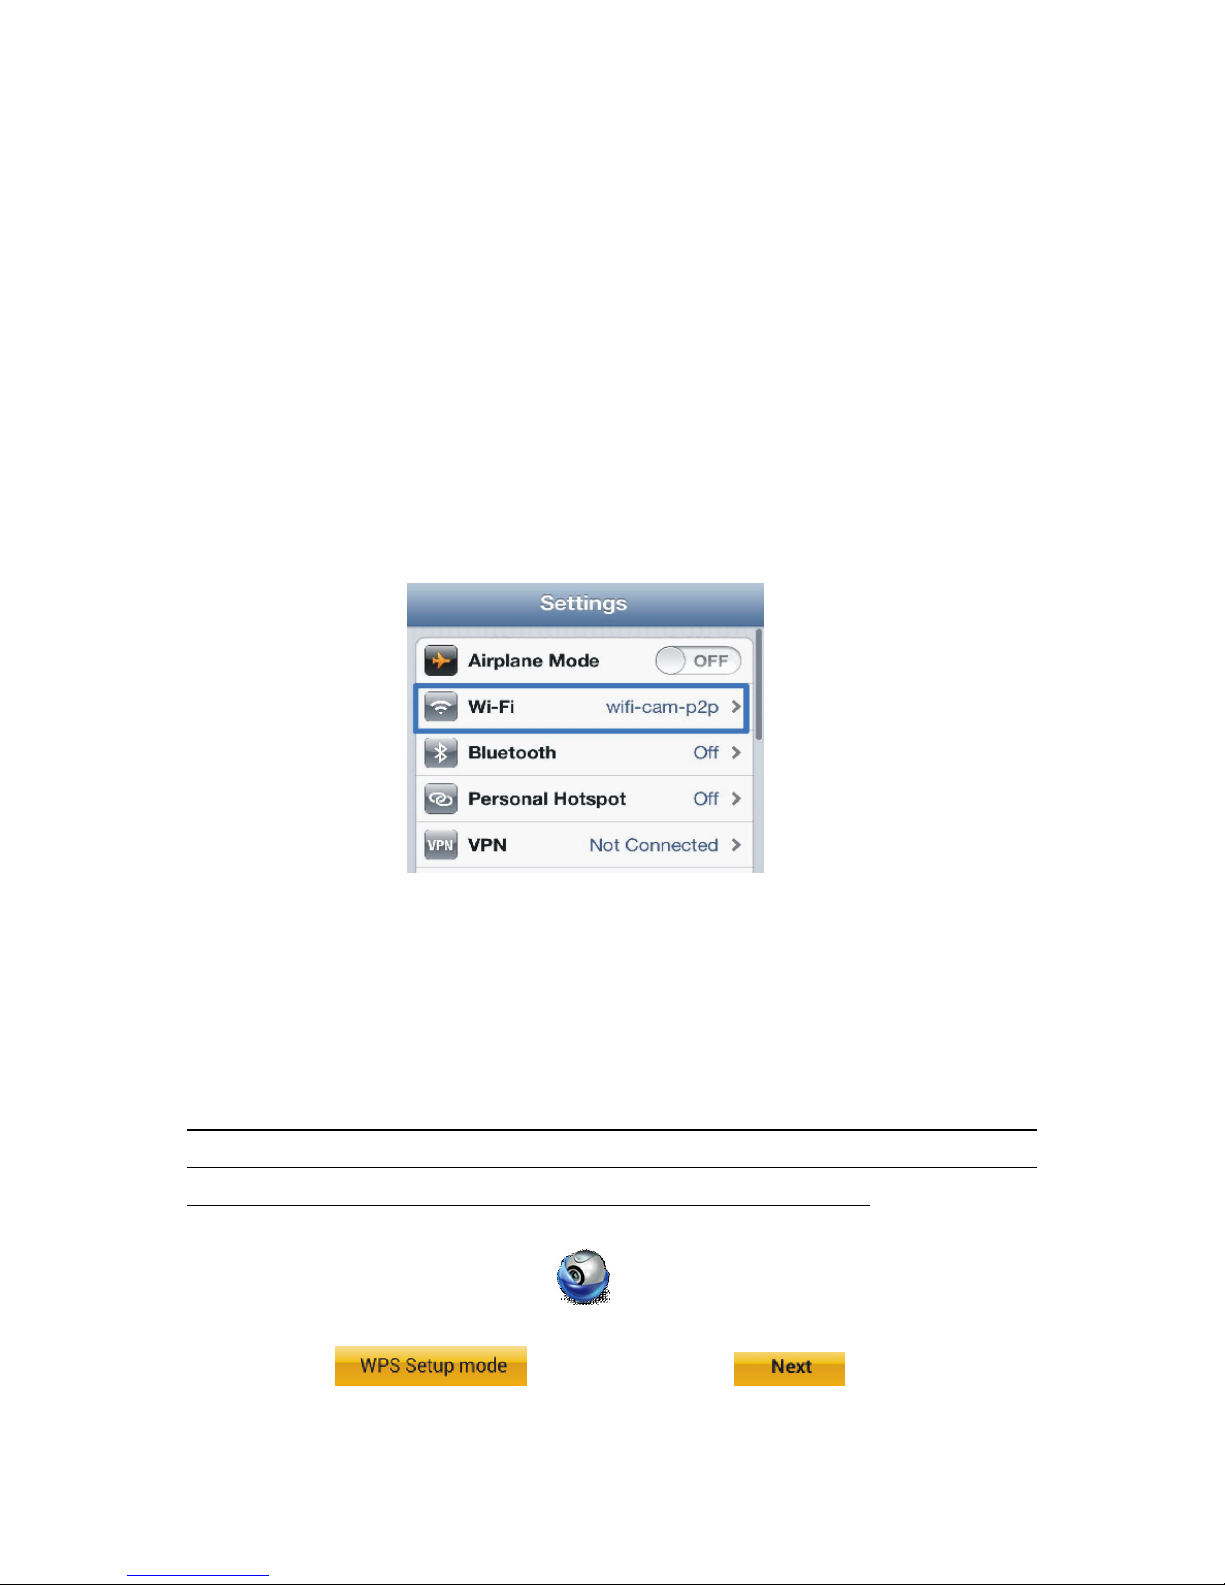
Collegare innanzitutto il dispositivo iOS con il router interno a UCare Cam. Aprire poi
“Impostazioni” , “Wi-Fi” (ved. Figura7) ed avviare la ricerca della rete. La rete sarà
“wifi-cam-p2p” (ved. Figura7). Cliccare su “wifi-cam-p2p” per la connessione. Aprire poi
l’applicazione “uCare Cam” sullo smartphone e cliccare sul tasto in basso allo schermo
Figura2
Figura3
Figura4
Figura6
Figura5
4
che riporta “WiFi Connect”. Cliccare su “Router mode”, poi “Next”. Inserire il SSID WiFi del router
e la password del router personale. Ad esempio, potrebbe essere “TP-Link-XXXXX” o
“NETGEAR”. Cliccare “Next”. Dopo che uCare Cam ha ricevuto queste informazioni, si avvierà.
Cliccare “Next”, poi inserire il nome della telecamera e una password (default 0000); si consiglia
di cambiare la password di default dopo l’installazione per ragioni di sicurezza. Attendere l’avvio
ed il collegamento al router personale. Quando la connessione è stabilita, il colore del LED
diventerà arancione. L’operazione potrebbe richiedere fino a 10 minuti. Cliccare poi
nell’applicazione “uCare Cam” sul nome della telecamera per effettuare il collegamento. Se il
colore del LED non diventa arancione, controllare il router e assicurarsi che uCare Cam si trovi
all’interno dell’area di segnale del router WiFi. Riprovare quindi ad effettuare l’installazione,
partendo dal passo 1.
3. Installare una nuova telecamera uCare Cam –modalità di
connessione WPS
Se il Vostro router WiFi dispone di un pulsante WPS (WiFi Protected Setup) è possibile utilizzarlo
per configurare la uCare Cam (si deve abilitare la crittografia WPA/WPA2 nel router). Sul router è
presente il pulsante “WPS”, che può anche essere chiamato “QSS” o “AOSS”.
Passo 1. Setup WiFi –modalità WPS su Smartphone
Lanciare l’applicazione “ uCare Cam ” e cliccare sul tasto in basso allo schermo
“WiFi Setting” o “WiFi Connect”.
Cliccare il tasto e poi cliccare il tasto per accedere al
passo 2 (ved. Figura 8).
Figura7
5
Passo 2. Accensione
Accendere la telecamera uCare Cam. Il LED diventerà verde per circa 15 secondi. Poi il LED si
illuminerà di rosso per circa 15 secondi prima di alternare il colore tra rosso e verde.
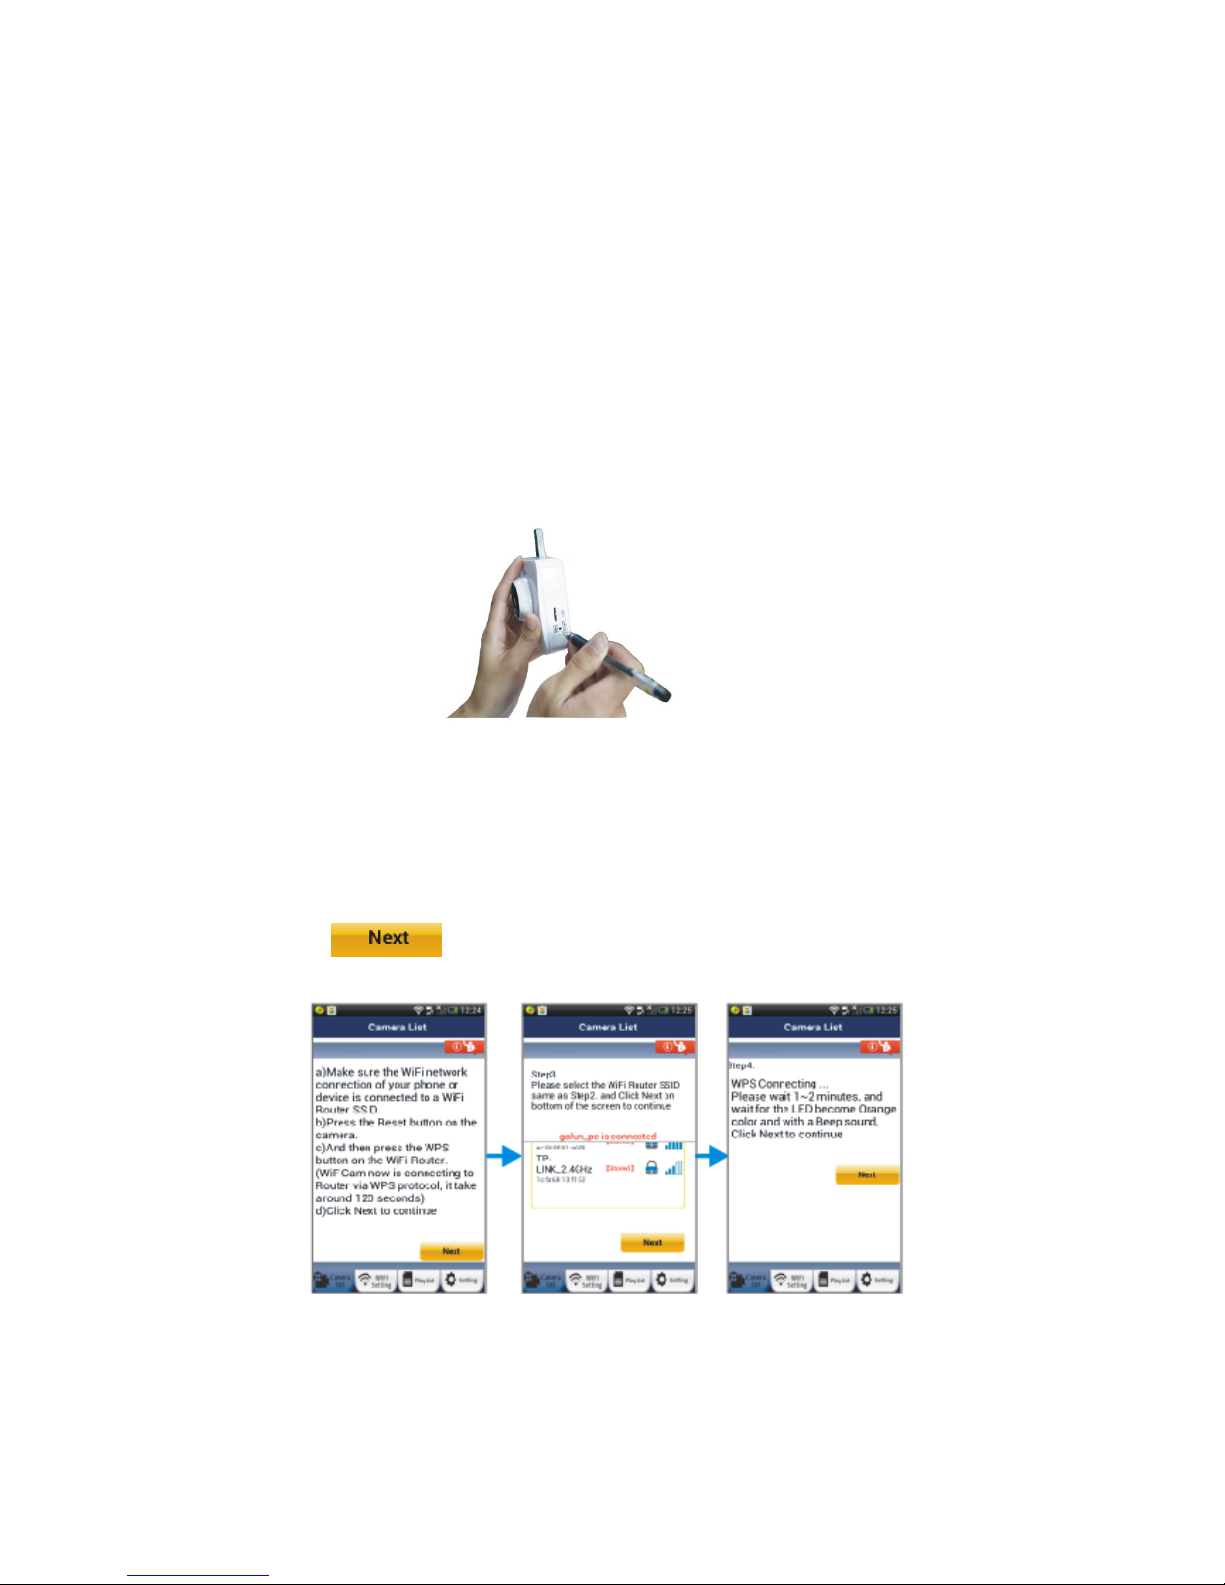
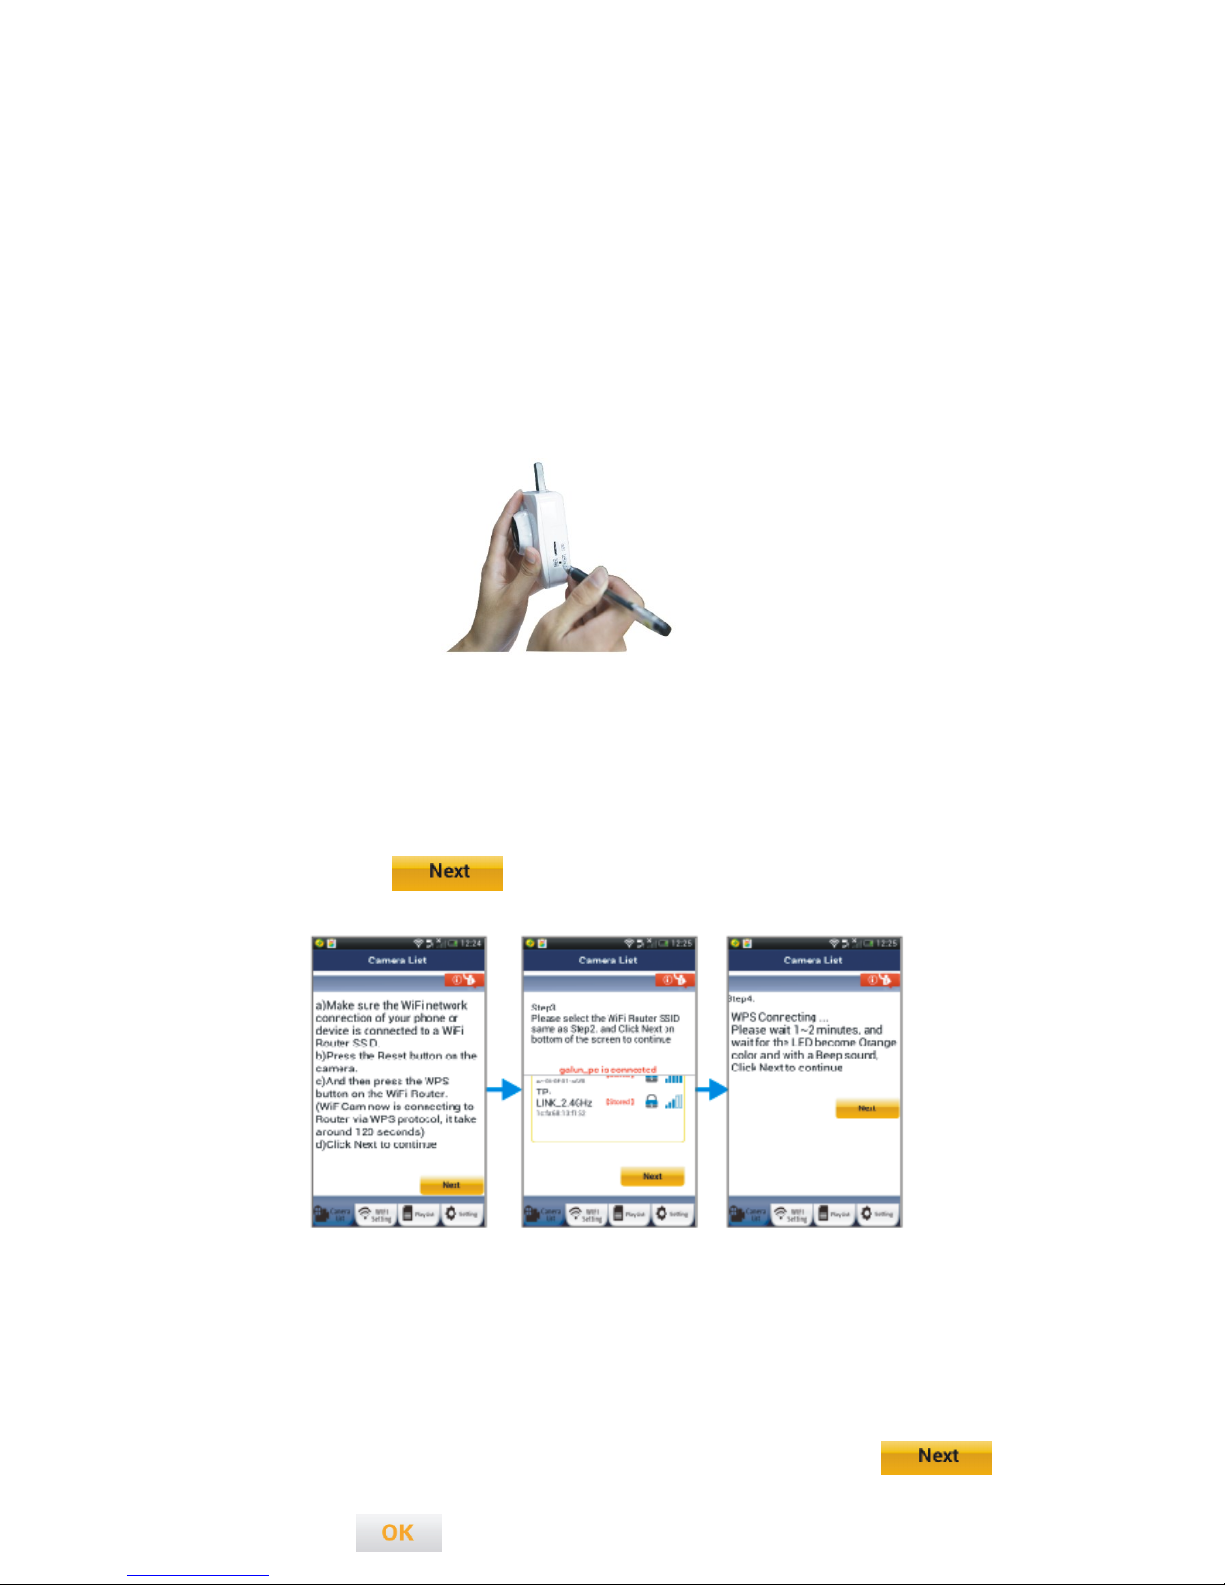
Passo 3. Entrare in modalità WPS mode su uCare Cam
Attendere che il LED lampeggi di colore rosso e verde, quindi premere per circa 2 secondi il
pulsante WPS / RESET posto sul lato della telecamera per circa 2 secondi per entrare in modalità
WPS. Il LED avrà una luce verde lampeggiante.
Passo 4. Entrare in modalità WPS su Router WiFi
Premere il bottone WPS sul Router WiFi.
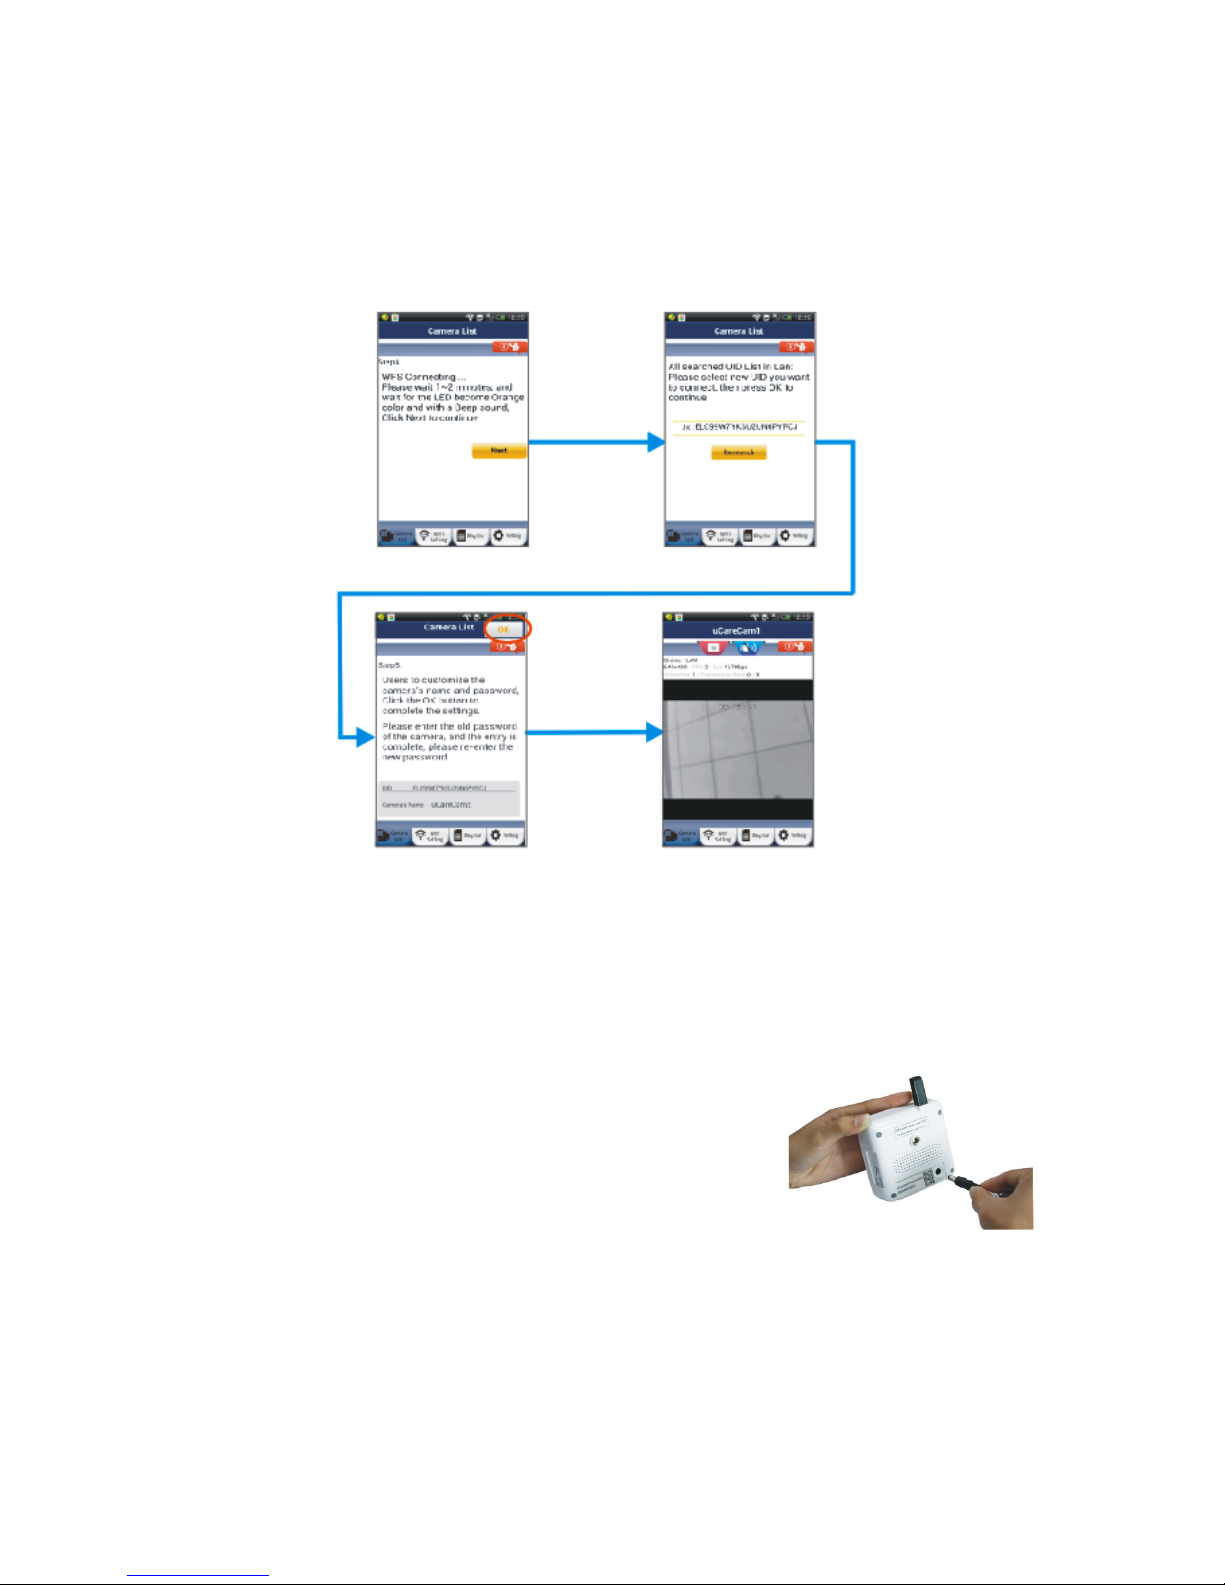
Passo 5. Selezione del Router WiFi
Selezionare il Router WiFi desiderato dallo schermo dello smartphone (ved. Figura 9) e poi
cliccare il tasto per accedere al passo successivo (ved. Figura10).
Figura8
Figura9
Figura10
6
Passo 6. Connessione della telecamera uCare Cam con Router WiFi
Attendere circa 1-2 minuti. Se uCare Cam si connette correttamente al router, la luce del LED
diventerà arancione. In caso contrario, la luce del LED diventerà rossa lampeggiante. Se
l’installazione non va a buon fine, tornare al punto 1 e riprovare. In caso di corretta installazione,
cliccare il tasto (ved. Figura 11) e seguire le istruzioni. Inserire il nome della
telecamera e la password di sicurezza e cliccare il tasto (ved. Figura 13). La telecamera
uCare Cam mostrerà automaticamente la finestra di visualizzazione (ved. Figura 14).
4. Startup di una telecamera uCare Cam che ha già completato
l’impostazione della connessione WiFi
Passo 1. Accensione
Inserire il connettore dell’adattatore di alimentazione nella porta di
ingresso DC della UCare Cam e quindi collegare l’adattatore di
alimentazione in una presa a muro. Utilizzare solo l’adattatore di
alimentazione fornito in dotazione. L’indicatore LED sulla
telecamera diventerà verde per 15 secondi. Poi il Led lampeggerà
per circa 15 secondi prima di alternare tra rosso e verde.
Figura11
Figura12
Figura14
Figura13

7
Passo 2. Ricerca del router WiFi
Il LED di stato assumerà un colore verde lampeggiante fino a che non è stato trovato Il router WiFi
(fino a 10 minuti). Una volta che il router è stato trovato, il LED diventa di colore arancione. Se
uCare Cam non si riesce a connettere al router, controllare lo stato del router o ripetere la
procedura di installazione.
Nell’applicazione sullo Smartphone, è possibile selezionare il nome della telecamera mostrato
nella finestra “Camera list”accedendo alla finestra di visualizzazione (ved.Figura 15).
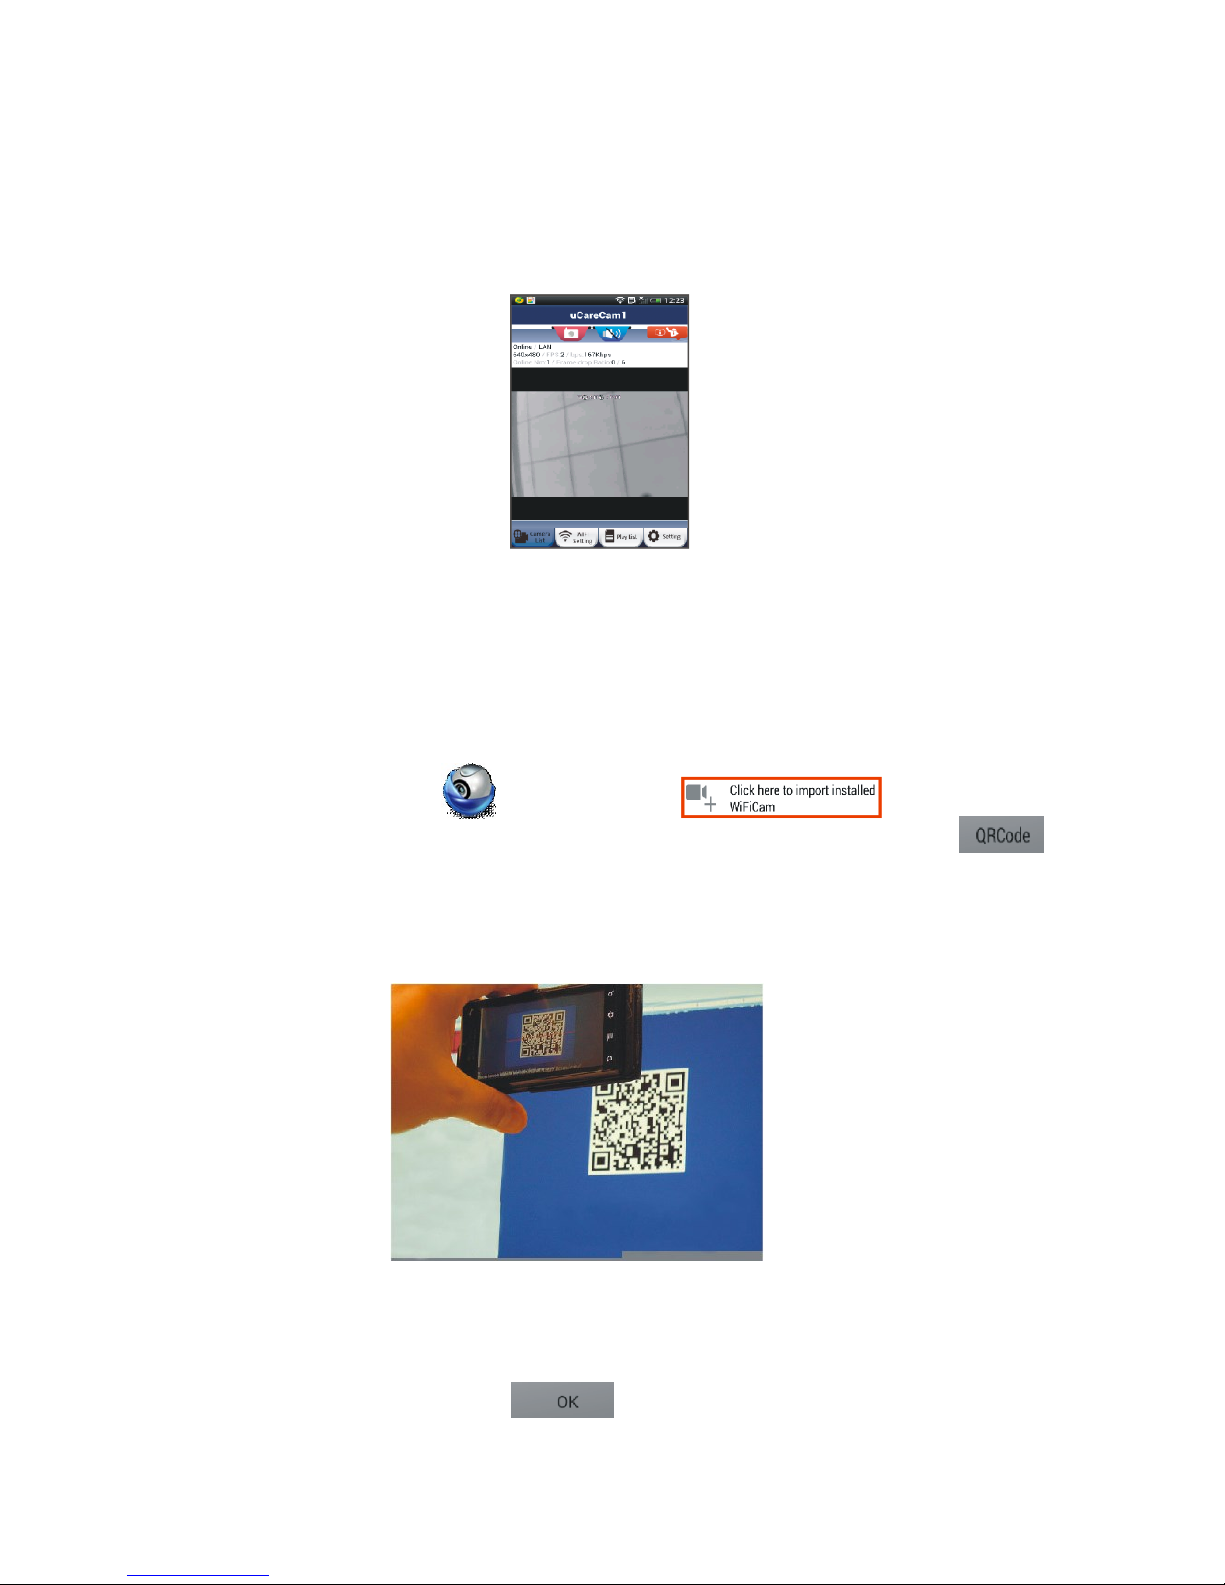
5. Aggiungere una telecamera uCare Cam già installata all’interno
dell’applicazione dello smartphone
Android
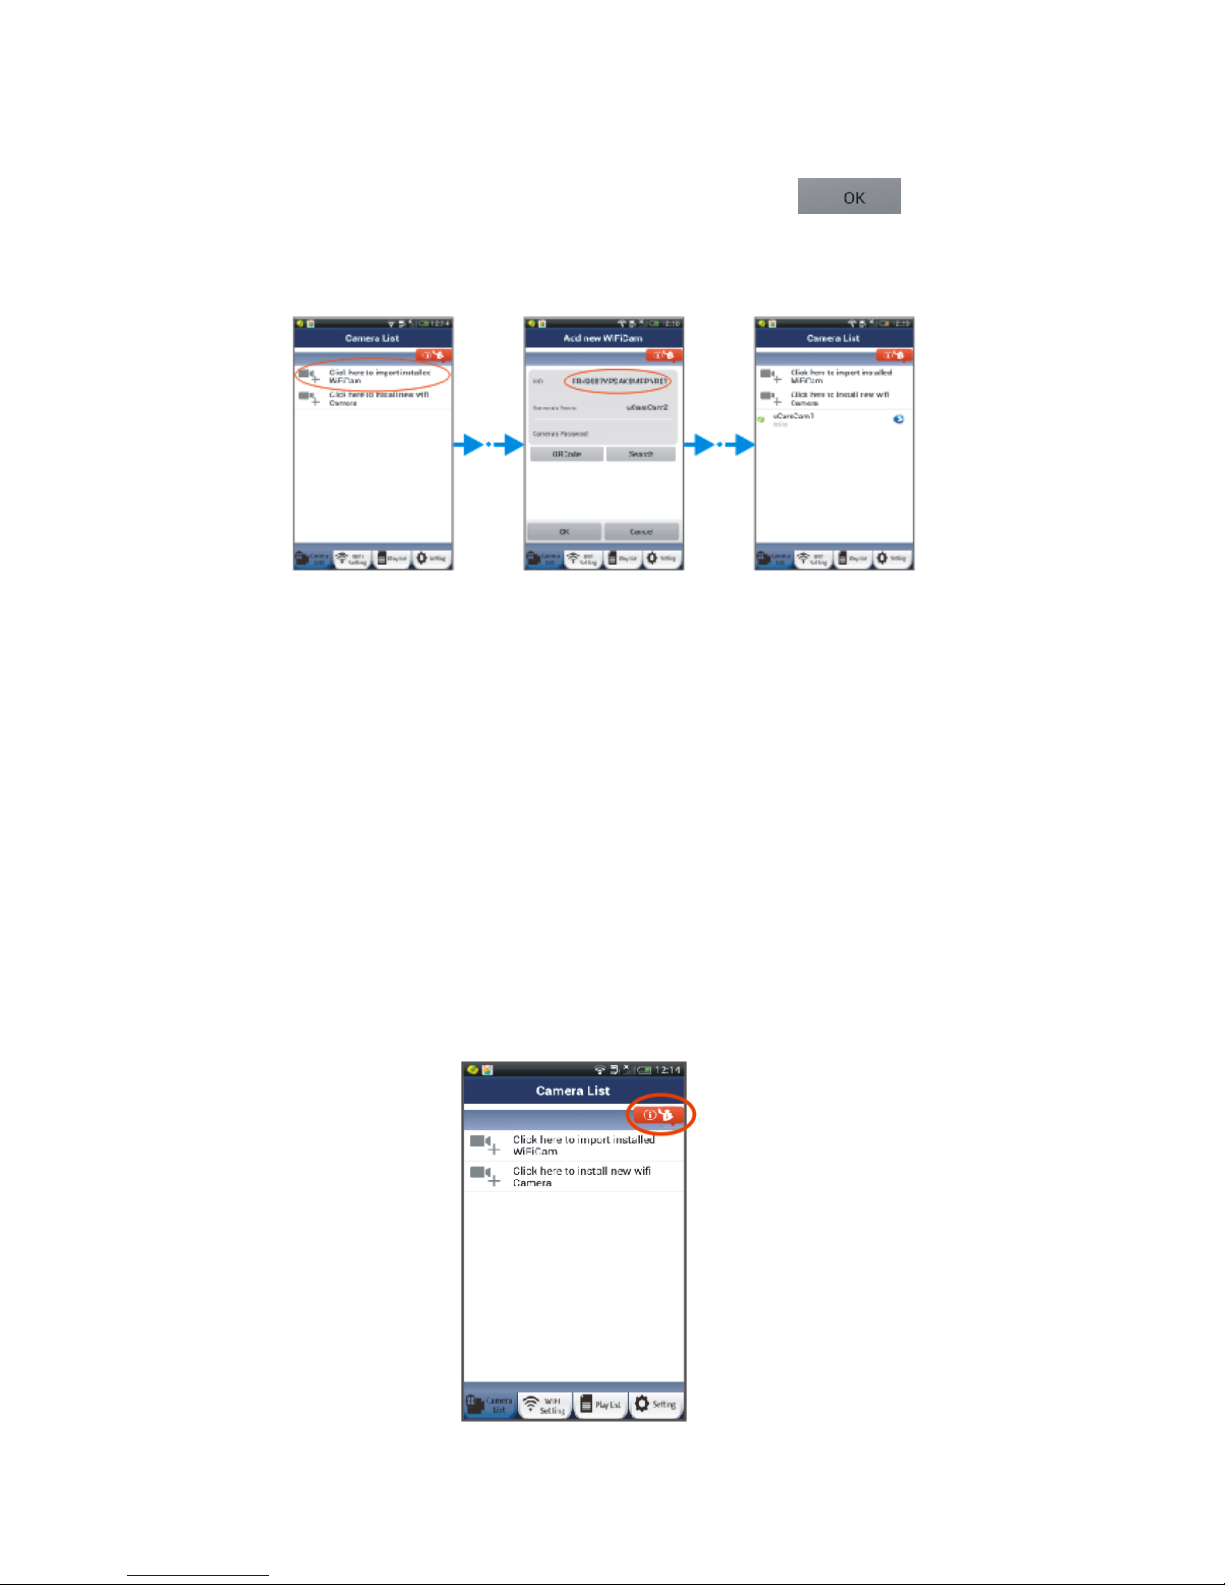
Aprire l’App “uCare Cam” . Cliccare sull’opzione in alto allo
schermo nella finestra “Camera List” ( ved. Figura 16) per aggiungere la telecamera.
Poi premere il tasto e mantenere lo smartphone fermo fino a quando non è terminata
la scansione del codice. Assicurarsi che il codice QR sia chiaro e stia all’interno dello schermo del
device mobile.
Figura15
8
Verrà identificato il codice UID dopo la scansione del codice QR (ved. Figura 17). Dopo aver
inserito il nome della telecamera e la password, premere il tasto . Una nuova
telecamera sarà aggiunta alla finestra “Camera List” (ved. Figura 18).
Apple
Aprire l’applicazione “uCare Cam”. Nella finestra “Camera list”, clicca sul segno “+” sul lato
superiore destro della finestra. Cliccare sull’opzione “Scan camera QR code”. Mantenere fermo lo
smartphone, inquadrando il codice QR, fino a che non è terminata la scansione. Assicurarsi che il
codice QR sia chiaro e stia all’interno dello schermo del device mobile.
Verrà identificato il codice UID dopo la scansione del codice QR. Dopo aver inserito il nome della
telecamera e la password, cliccare “Done” sul lato superiore destro della finestra.
6. Manuale dettagliato e FAQ
Per un manuale di istruzioni più dettagliato e per accedere alla sezione FAQ, cliccare sul bottone
nell’angolo superiore destro dell’app (ved. Figura 19).
Figura16
Figura17
Figura18
Figura19

9
7. Risoluzione di problemi generali
Si prega di scollegare il cavo di alimentazione e ricollegarlo.
Si prega di resettare la telecamera premendo il pulsante di reset per più di 10 secondi.
Come resettare e cancellare le impostazioni di uCare Cam?
Risp: Accendere uCare Cam e attendere fino a che il LED lampeggia in rosso per circa 15
secondi. Poi tenere premuto per 10 secondi il bottone WPS/REST sul retro della
telecamera fino a che il LED non diventa verde , lampeggia due volte in rosso e poi si
illumina di una luce verde fissa.
Non riesco a collegare la mia uCare Cam al Router
1) Si prega di spostare la telecamera uCare Cam più vicino al Router in modo da garantire una
buona potenza del segnale WiFi. Dopo l’installazione è possibile provare a spostare
nuovamente la posizione della telecamera. Se nel fare ciò si perde la connessione con il
router, la nuova posizione potrebbe non avere un segnale WiFi abbastanza forte.
2) Si prega di verificare di aver digitato correttamente il nome SSID e la password del WiFi,
comprese le lettere maiuscole ove richiesto.
L’applicazione uCare Cam mostra la scritta “Connessione fallita”
Risp: Se l’applicazione mostra “Connessione fallita”, potrebbe essere necessario forzare la
riconnessione. Per forzare la riconnessione, si prega di (Android) tenere premuto il
nome della telecamera nella finestra “Camera List”o (iOS) cliccare sulla freccia accanto
al nome della fotocamera nella finestra “Camera List”. Si aprirà una schermata in cui
comparirà l’opzione “Reconnect” per ricollegare la telecamera. Dopo la riconnessione lo
stato della telecamera dovrebbe cambiare in “Online”. Se non diventa “Online”, si prega
di ricontrollare il router domestico e la connessione internet.

10
8. SPECIFICHE
Banda di frequenze
2.400~2.4835GHz
2.4GHz Antenna
Antenna omnidirezionale esterna
Compressione
M-JPEG
Sensore immagine
1/6″CMOS a colori
Lenti
f3.6mm/90° Campo visivo
Risoluzione
VGA 640x480 / QVGA 320x240 / QQVGA 160x120
Frame rate
1~25 fps QVGA
Allarme
Motion Detection / RIlevamento audio / Email
Allarme / Notifica messaggi Smartphone
Microfono
Condensatore elettronico
Scheda di memoria
Supporta fino a scheda 32GB microSD
Sicurezza Wireless
Crittografia WEP & WPA / WPA2
Standard Wireless
WiFi 802.11 b/g/n
Ingresso/Uscita Audio
Microfono/ altoparlante incorporato
Visione notturna IR-LED
11 LED infrarossi
Dimensioni
90mm*60mm*22mm
Peso
Circa: 82g
Alimentazione
5VDC /1A
Le specifiche possono essere soggette a modifiche senza preavviso.
Distribuito da:
Emme Esse S.p.A
Via Moretto 46, 25025 Manerbio (BS) Italy
Te. +39.030.9938500 r.a. Fax +39.0309380592
www.emmeesse.it email: info@emmeesse.it
11
87460
WiFi uCare Cam
Quick Install Guide
1. APP installation (Requires Smartphone running Android 4.0 and up or
iOS 5.0 and up)
Step 1.
Download “uCare Cam” App from Google Play or App store
Android Device iOS Device
Google Play Store App Store
“uCare Cam” Download Link “uCare Cam” Download Link

12
Step 2.
After the software installation is complete, click the icon to run the App. Figure1 is the
main screen “Camera List” window.
Default uCare Cam password : 0000
Manager’s Name : admin
Manager’s Password : 0000
2. Install new uCare Cam - Router mode
Step 1. Power On
Plug the power adapter DC connector into the DC input port of uCare Cam and then plug the
power adapter into a wall outlet. Use only the power adapter provided. The status LED on the
uCare Cam will turn green for about 15 seconds. Then the status LED will flash red for about 15
seconds before alternating between Red and Green.
Step 2. Router Link Mode
Wait until the status LED color alternates between Red and Green. If the
LED does not become Red and Green, use a thin rod to press and hold
the WPS/REST button on the side of uCare Cam for more than 10
seconds to restart the uCare Cam. You can release the button once the
green LED lights up, pauses, the red LED flashes twice and then
becomes a steady green LED light. Wait until the status LED color
alternates between Red and Green.
Figure1

13
Step 3. Set the uCare Cam to connect to the WiFi Router
Android
Open the Smartphone App “uCare Cam” and click on this option
at the top of the screen in Camera List window. Click the Tab then click the Tab
to enter next step (see Figure2). Follow the instructions in Camera List window
step by step (see Figure3 and Figure4). Please enter a camera name and password, default 0000,
you are encouraged to change the default password after setup for security purposes. Click the
Tab (see Figure5). uCare Cam will automatically enter the viewing window (see
Figure6), and uCare Cam L ED color will turn Orange.
Apple
First connect your iOS device to the router inside uCare Cam. Open up “Settings” , then
“Wi-Fi” (see Figure7) and let it search for network. The network will be “wifi-cam-p2p” (see
Figure2
Figure3
Figure4
Figure6
Figure5

14
Figure7). Click on “wifi-cam-p2p” to connect. Now, open the Smartphone App “uCare Cam”
and click on the tab at the bottom of the screen that says “WiFi Connect”. Click on “Router mode”,
then “Next”. Enter the WiFi router SSID and password for your home router. For example, it might
be “TP-Link-XXXXX” or “NETGEAR”. Click “Next”. After uCare Cam receives this information, it
will restart. Click “Next”, then please enter a camera name and password, default 0000, you are
encouraged to change the default password after setup for security purposes. Please wait for it to
start up and connect to your home router. When it successfully connects, the status LED color will
turn Orange. It may take up to 10 minutes. Then in “uCare Cam” Smartphone App, you can click
on the camera name to connect. If the status LED color does not turn Orange, please check your
router and make sure uCare Cam is within the signal area of your WiFi router. Then try setup
again, starting from Step 1.
3. Install new uCare Cam - WPS connection mode
If your WiFi router has a WPS (WiFi Protected Setup) button, you can use it to setup the uCare
Cam, (Must enable WPA/WPA2 encryption in Router). On the Router, you will see a button
labeled “WPS”. It may also be called “QSS” or “AOSS”.
Step 1. Setup WiFi - WPS mode on Smartphone
Open the Smartphone App “uCare Cam” and click on the tab at the bottom of the screen
that says “WiFi Setting” or “WiFi Connect”. Click the Tab then click the
Tab to enter Step2 (see Figure8).
Figure7
15
Step 2. Power on
Power on uCare Cam. The status LED on the uCare Cam will be green for about 15 seconds.
Then the status LED will flash red for about 15 seconds before alternating between Red and
Green.
Step 3. Enter WPS mode on uCare Cam
Wait until the status LED color flashes between Red and Green, then press and hold the
WPS/REST button on the side of uCare Cam for about 2 seconds to enter WPS mode. The status
LED will have a blinking green light.
Step 4. Enter WPS Mode on WiFi Router
Press WPS button on WiFi Router.
Step 5. Selecting the WiFi Router
Select the WiFi Router you want which will appear in the screen of the Smartphone (see Figure9)
and then click the Tab to enter next step (see Figure10).
Step 6. uCare Cam connects with WiFi Router
Wait about 1-2 minutes. If uCare Cam successfully connects to the Router, the status LED light
will become Orange. Otherwise the status LED will become a blinking red light. If the setup is not
Figure8
Figure9
Figure10
16
successful, please go back to Step 1 and try again. If successful, click the Tab (see
Figure 11), and follow the instructions. Please enter a camera name and password for security
and click the Tab (see Figure13). uCare Cam will automatically enter the viewing
screen (see Figure14).
4. Startup uCare Cam that has already completed WiFi connection setup
Step 1. Power On
Plug the power adapter DC connector into the DC input port of
uCare Cam and then plug the power adapter into a wall outlet.
Use only the power adapter provided. The status LED on the
uCare Cam will turn green for about 15 seconds. Then the status
LED will flash red for about 15 seconds before alternating
between Red and Green.
Step 2. Searching WiFi Router
The status LED will flash green until the WiFi router is found (up to 10 minutes). Once the router is
found, the status LED will turn a steady orange color. If uCare Cam can not connect to Router,
Figure11
Figure12
Figure14
Figure13
17
please check Router status or re-install again.
In the Smartphone App, you can select the camera name that shows in the Camera List, and will
enter viewing window (see Figure15).
5. Add already installed uCare Cam into smartphone App
Android
Open the App “uCare Cam” Click on this option at the top of the
screen in Camera List window ( see Figure 16) for adding a camera. Then click this Tab
and hold the Smartphone still until it is done scanning the code. Please make sure the QR code is
clear and fills up the Smartphone screen.
UID will show up after scanning the QRCode ( see Figure 17). After entering a camera name and
the camera password, click the Tab . New camera will be added to the Camera List
Figure15

18
(see Figure 18).
Apple
Open the App “uCare Cam”. In Camera list window, click on the “+” sign on the top right hand of
the window. Click on this option “Scan camera QR code”. Hold the Smartphone still, facing the QR
code, until it is done scanning the code. Please make sure the QR code is clear and fills up the
Smartphone screen. UID will show up after scanning the QR code. After entering a camera name
and the camera password, click “Done” on the top right hand side of the window.
6. Detailed manual and FAQ
For a more detailed instruction manual and FAQ, please click on the button on the top right corner
of the Smartphone App (see Figure19).
Figure16
Figure17
Figure18

19
7. General Trouble Shooting
Please pull power cable and reconnect .
Please reset camera by pressing reset button for more than 10 seconds.
How to reset and clear the uCare Cam settings?
Ans: Power on uCare Cam and wait until the LED flashes Red for about 15 seconds. Then
press and hold the WPS/REST button at the back of the camera for 10 seconds until the
green LED lights up, the red LED flashes twice, and then becomes a steady green LED
light.
I cannot connect my uCare Cam to the Router
1) Please move uCare Cam closer to the Router to make sure uCare Cam has good WiFi signal
strength. After setup, you can try to move it back to planned location to connect. If the uCare
Cam can connect when closer to the Router, but can not connect when moved to another
location, then your planned location does not have a strong enough WiFi signal.
2) Please verify that you have typed in your SSID and WiFi password accurately, including
upper-case letters where required.
My uCare Cam status on the Smartphone APP shows “Connect failed”
Ans: If uCare Cam status shows “Connect Failed”, you may need to force Reconnect. To force
Reconnect, please (Android) press and hold the name of Camera in Camera List window
or (iOS) click on the arrow next to the Camera name in Camera List window. It will bring
you to a screen where there will be an option to “Reconnect”. Please Reconnect and the
camera status should change to “Online”. If it does not change to “Online”, please check
Figure19

20
your home Router and internet connection.
8. SPECIFICATIONS
Frequency Band
2.400~2.4835GHz
2.4GHz Antenna
External omni-directional antenna
Compression
M-JPEG
Image Sensor
1/6″color CMOS
Lens
f3.6mm/90° Field of View
Resolution
VGA 640x480 / QVGA 320x240 / QQVGA 160x120
Framte rate
1~25 fps QVGA
Alarm
Motion Detection / Sound Detection / Email
Alarm / Smartphone Notify Message
Microphone
Electronic Condenser
Card Storage
Support up to 32GB microSD cardc
Wireless Security
WEP & WPA / WPA2 Encryption
Wireless Standard
WiFi 802.11 b/g/n
Audio Input/Output
Built-in Microphone /Built-in Speaker
IR-LED night vision
11 infrared LEDs
Dimensions
90mm*60mm*22mm
Weight
Approx.: 82g
Power supply
5VDC /1A
Specifications subject to change without notice.
This manual suits for next models
2
Table of contents
Languages:


