Empire Gaming COOLER 120 User manual

EMPIRE
COOLER
120
UK
FR
NL
DE
PT
ES
IT
............................. 03
............................. 07
............................. 08
............................. 09
............................. 10
............................. 11
............................. 12
02
Package contents / Contenu de l’emballage :
4 PCS
13
Vis de fixation de la pompe
Fastening screws for Pump
9Vis à ressort/pression
Corner fixing screw
Corner fixing screw Fastening screws for Fans
4 PCS
10 Vis de fixation d’angle
4 PCS
11 Vis de fixation des ventilateurs
4 PCS
12 Vis de fixation du radiateur
Fastening screws for Radiator
4 PCS
5Pattes de fixation d’angle Intel
Intel corner fixing brackets AM4 corner fixing brackets
2 PCS
6Pattes de fixation d’angle AM4
2 PCS
7Crochets AM4
AM4 hooks
2 PCS
8Pâte thermique
Thermal paste
1 PCS
2Ventilateurs
Fans
1 PCS
3CPU adapter
Adaptateur CPU
1 PCS
4Pattes de fixation d’angle AMD
AMD corner fixing brackets
2 PCS
1
1 PCS
Radiator / Tubes / Pump
Radiateur / Tubes / Pompe
03
1
2
3
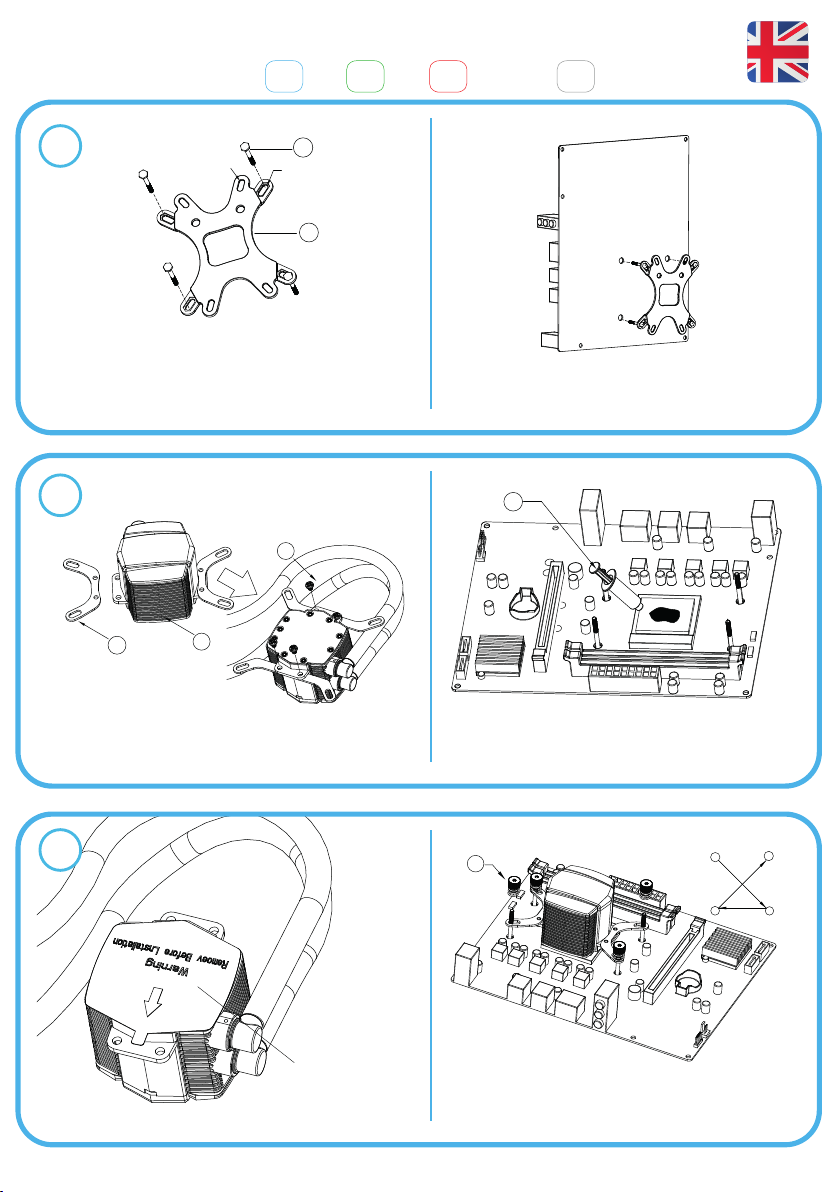
Then install the adapter on the back of your motherboard.
3
10
Intel mounting hole
8
C
9
B
D
A
AD
C
B
AMD mounting hole
4
1
13
Depending on your Intel CPU, place the 4 corner screws (10) in
the corresponding hole of the CPU adapter (3), Be careful of
the direction!
Depending on your Intel processor, please use the correspond-
ing corner brackets (5). Then fix the corner brackets on the
pump using the screws (13)
Then remove the
protective film
Attention do not
forget this step as
this may damage
your installation!
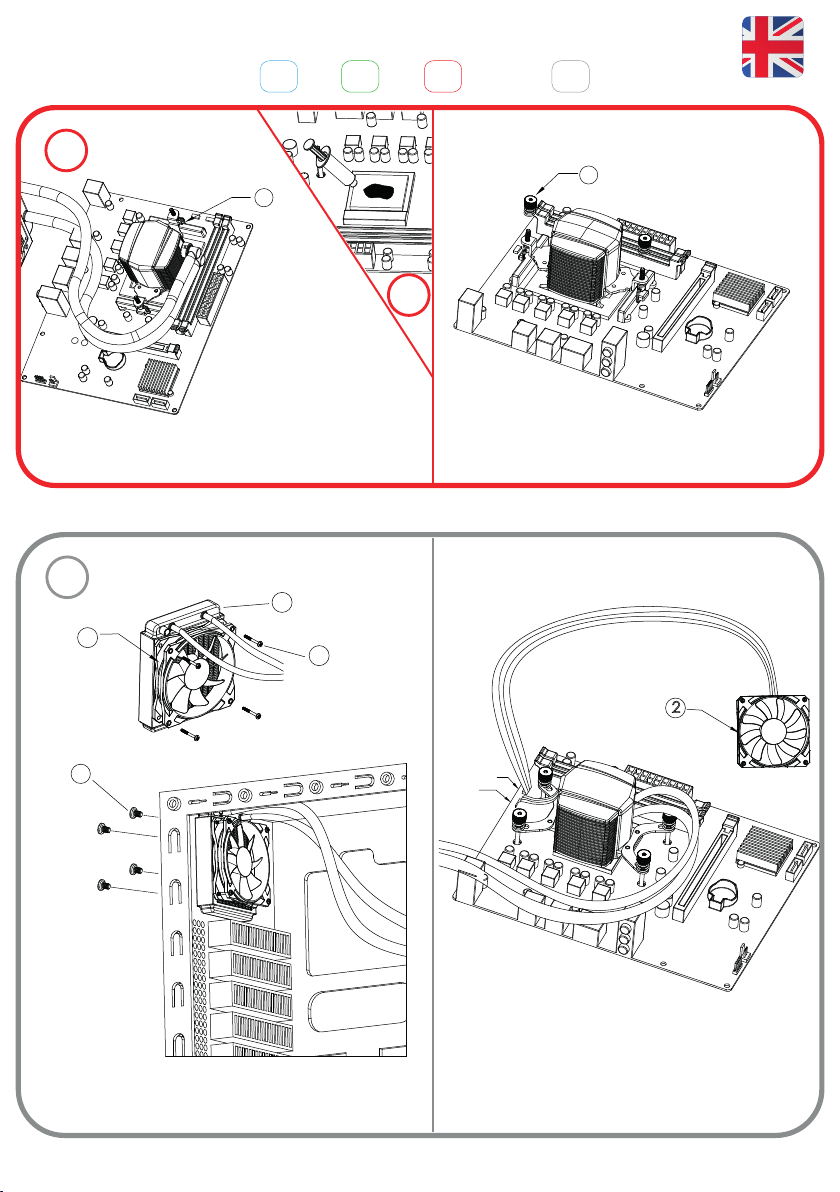
Position the pump on your CPU previously coated with
thermal paste. Then fix the spring / pressure screws (9). Start
by adjusting the screws then tighten the screw A, the screw
C, then B and finally D.
1 2 3INTEL AMD1 2 3 AM4 1 2 3 UNIVERSEL 4
Install Liquid Force step by step
Apply the thermal paste (8) evenly to the CPU.
Apply the thermal paste (8) evenly to the CPU.

04
1
1
2
3
8
3
10
1
4
13
6
13
7
Then fix the corner
brackets on the
pump using the
screws (13).
Be careful do not
forget this step as
this may damage
your installation!
Position the pump on your CPU previously coated
with thermal paste. Then fix the spring / pressure
screws (9). Start by adjusting the screws then tighten
the screw A, the screw C, then B and finally D.
Depending on your AM AM4 processor, please use
the corresponding hooks (7). Then fix the hooks on the
pump using the screws (13)
According to your AMD CPU,
place the 4 corner screws (10)
in the corresponding hole of
the CPU adapter (3), Attention
to the direction!
Then install the adapter on
the back of your mother-
board.
Depending on your AMD processor, please use
the corresponding corner brackets (5).
C
9
B
D
A
AD
C
B
1 2 3INTEL AMD1 2 3 AM4 1 2 3 UNIVERSEL 4
Install Liquid Force step by step
05
1 2 3INTEL AMD1 2 3 AM4 1 2 3 UNIVERSEL 4
Install Liquid Force step by step
3
2
Then fix the spring / pressure screws (9)
7
9
After performing step 2 (AMD), position the pump on your
CPU previously coated with thermal paste.
Fasten the fan (s) to the radiator with the fixing screws (11).
Then fix the radiator to the chassis using the fixing screws (12)
Finally, connect the power supply to the pump to your
motherboard. Then power the fans. Note: At startup you
may hear a slight noise while you start the pump.
4
2
fan socket
water pump socket
11
1
2
12
06
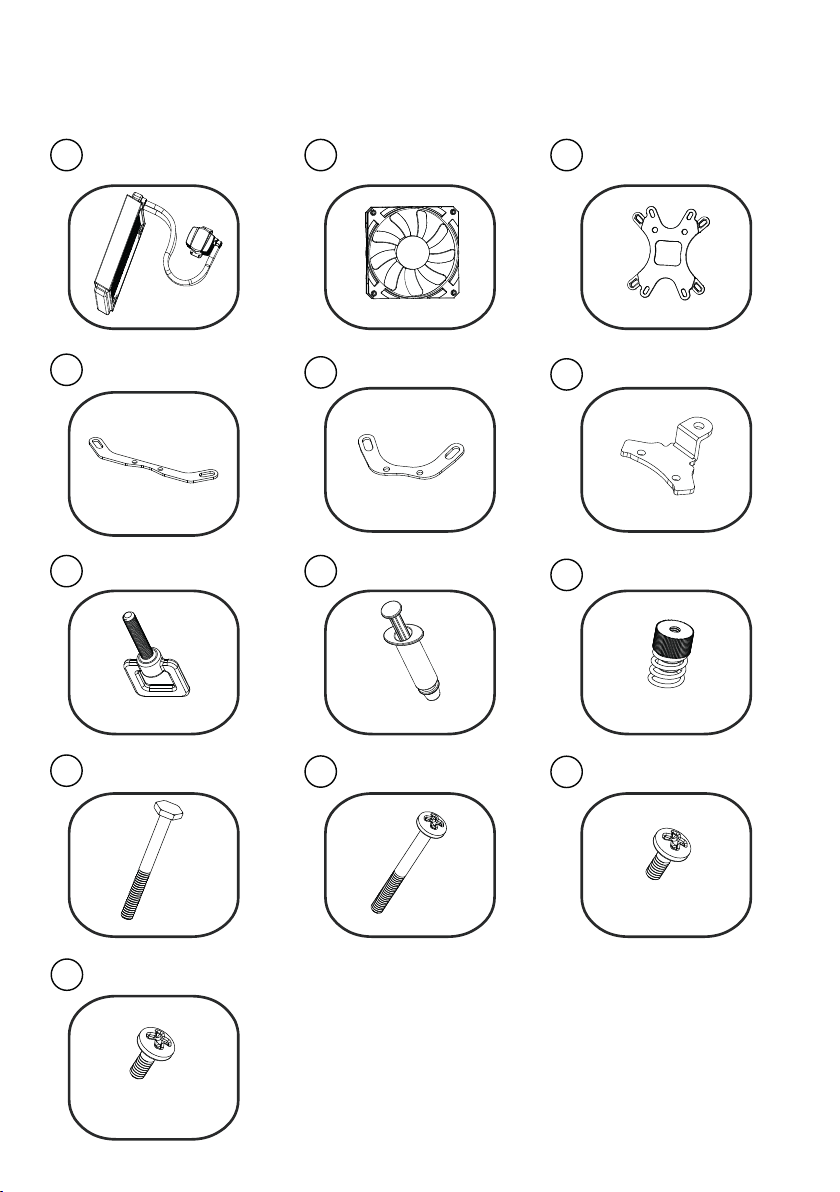
Package contents
1. Radiator / Tubes / Pump
2. Fans
3. CPU adapter
4. AMD corner fixing brackets
5. Intel corner fixing brackets
6. AM4 corner fixing brackets
7. AM4 hooks
8. Thermal paste
9. Spring / pressure screw
10. Corner fixing screw
11. Fastening screws for Fans
12. Fastening screws for Radiator
13. Fastening screws for Pump
AMD mounting hole
Intel mounting hole
Depending on your Intel CPU, place the 4 corner screws (10) in the corresponding hole of the CPU
adapter (3), Be careful of the direction! Then install the adapter on the back of your motherboard.
Depending on your Intel processor, please use the corresponding corner brackets (5). Then fix the corner
brackets on the pump using the screws (13)
AMD mounting hole
According to your AMD CPU, place the 4 corner screws (10) in the corresponding hole of the CPU
adapter (3), Attention to the direction! Then install the adapter on the back of your motherboard.
Depending on your AMD processor, please use the corresponding corner brackets (5). Then fix the
corner brackets on the pump using the screws (13)
Apply the thermal paste (8) evenly to the CPU. Then remove the protective film.
Be careful do not forget this step as this may damage your installation!
Position the pump on your CPU previously coated with thermal paste. Then fix the spring / pressure
screws (9). Start by adjusting the screws then tighten the screw A, the screw C, then B and finally D.
Depending on your AM AM4 processor, please use the corresponding hooks (7). Then fix the hooks on
the pump using the screws (13)
After performing step 7, position the pump on your CPU previously coated with thermal paste. Then fix
the spring / pressure screws (9)
Fasten the fan (s) to the radiator with the fixing screws (11). Then fix the radiator to the chassis using the
fixing screws (12)
Finally, connect the power supply to the pump to your motherboard. Then power the fans. Note: At
startup you may hear a slight noise while you start the pump.
Apply the thermal paste (8) evenly to the CPU. Then remove the protective film Attention do not forget
this step as this may damage your installation!
Position the pump on your CPU previously coated with thermal paste. Then fix the spring / pressure
screws (9). Start by adjusting the screws then tighten the screw A, the screw C, then B and finally D.
AMD CPU
AM4
UNIVERSEL
INTEL CPU
1
2
3
1
2
3
4
1
3
07
Contenu de l’emballage
1. Radiateur / Tubes / Pompe
2. Ventilateurs
3. Adaptateur CPU
4. Pattes de fixation d’angle AMD
5. Pattes de fixation d’angle Intel
6. Pattes de fixation d’angle AM4
7. Crochets AM4
8. Pâte thermique
9. Vis à ressort/pression
10. Vis de fixation d’angle
11. Vis de fixation des ventilateurs
12. Vis de fixation du radiateur
13. Vis de fixation de la pompe
Trou de montage AMD
Trou de montage Intel
Selon votre CPU Intel, placez les 4 vis d’angle (10) dans le trou correspondant de l’adaptateur CPU (3),
Attention au sens ! Puis installer l’adaptateur au dos de votre carte-mère.
Suivant votre processeur Intel, veuillez utiliser les pattes de fixation d’angle (5) correspondantes. Puis fixer
les pattes sur la pompe à l’aide des vis (13)
Trou de montage AMD
Selon votre CPU AMD, placez les 4 vis d’angle (10) dans le trou correspondant de l’adaptateur CPU (3),
Attention au sens ! Puis installer l’adaptateur au dos de votre carte-mère.
Suivant votre processeur AMD, veuillez utiliser les pattes de fixation d’angle (5) correspondantes. Puis
fixer les pattes sur la pompe à l’aide des vis (13)
Appliquer la pâte thermique (8) uniformément sur le CPU. Puis retirer le film de protection.
Attention ne pas oublier cette étape sous peine d’endommager votre installation !
Positionner la pompe sur votre CPU préalablement enduit de pâte thermique. Puis fixer les vis à
ressort/pression (9). Commencer par ajuster les vis puis serrer la vis A, la vis C, puis B et enfin D.
Suivant votre processeur AM AM4, veuillez utiliser les crochets de fixation (7) correspondantes. Puis fixer
les pattes sur la pompe à l’aide des vis (13)
Après avoir effectué l’étape 7, positionner la pompe sur votre CPU préalablement enduit de pâte
thermique. Puis fixer les vis à ressort/pression (9)
Fixer le(s) ventilateur(s) au radiateur à l’aide des vis de fixation (11). Puis fixer le radiateur au châssis à
l’aide des vis de fixation (12)
Pour terminer, connectez l’alimentation de la pompe à votre carte-mère. Puis l’alimentation des
ventilateurs. Note : au démarrage vous pouvez entendre un léger bruit le temps d’amorcer la pompe.
Appliquer la pâte thermique (8) uniformément sur le CPU. Puis retirer le film de protection.
Attention ne pas oublier cette étape sous peine d’endommager votre installation !
Positionner la pompe sur votre CPU préalablement enduit de pâte thermique. Puis fixer les vis à
ressort/pression(9). Commencer par ajuster les vis puis serrer la vis A, la vis C, puis B et enfin D.
AMD CPU
AM4
UNIVERSEL
INTEL CPU
1
2
3
1
2
3
4
1
3
08
Inhoud Package
1. Radiator / Tubes / Pomp
2. Fans
3. CPU-adapter
4. AMD corner bevestigingsbeugels
5. Intel corner bevestigingsbeugels
6. AM4 hoekbevestigingsbeugels
7. AM4-haken
8. Thermische pasta
9. Veer- / drukschroef
10. Corner bevestigingsschroef
11. Bevestigingsschroeven voor Fans
12. Fastening schroeven voor Radiator
13. Bevestigingsschroeven voor Pump
AMD-montagegat
Intel montagegat
Afhankelijk van uw Intel CPU, plaatst u de 4 schroeven op de hoeken (10) in het corresponderende gat
van de CPU adapter (3), Wees voorzichtig met de richting! Installeer vervolgens de adapter aan de
achterkant van uw moederbord.
Afhankelijk van uw Intel-processor, gebruik dan de corresponderende hoek beugels (5).Bevestig
vervolgens de hoekbeugels op de pomp met de schroeven (13)
AMD-montagegat
Plaats volgens uw AMD CPU de 4 hoekschroeven (10) in het overeenkomstige gat van de CPU-adapter
(3), Let op de richting! Installeer vervolgens de adapter aan de achterkant van uw moederbord.
Afhankelijk van uw AMD-processor, gebruik dan de corresponderende hoek beugels (5).Bevestig
vervolgens de hoekbeugels op de pomp met de schroeven (13)
Breng de koelpasta (8) gelijkmatig op de CPU aan. Verwijder vervolgens de beschermende film.
Wees voorzichtig hoeft deze stap als dit uw installatie kan beschadigen niet vergeten!
Plaats de pomp op uw CPU die eerder is gecoat met koelpasta. Bevestig vervolgens de veer
/drukschroeven (9). Begin met het afstellen van de schroeven en draai vervolgens de schroef A, de
schroef C, dan B en tot slot D. vast.
Breng de koelpasta (8) gelijkmatig op de CPU aan. Verwijder vervolgens de beschermfolie Let op
vergeet deze stap niet, dit kan uw installatie beschadigen!
Plaats de pomp op uw CPU die eerder is gecoat met koelpasta. Bevestig vervolgens de veer /
drukschroeven (9). Begin met het afstellen van de schroeven en draai vervolgens de schroef A, de
schroef C, dan B en tot slot D. vast.
Gebruik de bijbehorende haken (7) afhankelijk van uw AM AM4-processor. Bevestig vervolgens de
haken aan de pomp met de schroeven (13)
Na stap 7, plaatst de pomp CPU vooraf bekleed met thermische pasta. Dan Bevestig de veer/
drukschroeven (9)
Bevestig de ventilator (en) aan de radiator met de bevestigingsschroeven (11). Bevestig vervolgens de
radiator aan het chassis met behulp van de bevestigingsschroeven (12)
Verbind tot slot de stroomtoevoer naar de pomp met uw moederbord. Zet vervolgens de ventilatoren
aan. Opmerking: Bij het opstarten kunt u een lichte ruis horen terwijl u de pomp start.
AMD CPU
AM4
UNIVERSEL
INTEL CPU
1
2
3
1
2
3
4
1
3

09
Package Inhalt
1. Kühler / Rohre / Pumpen
2. Fans
3. CPU-Adapter
4. AMD Ecke Befestigungswinkel
5. Intel Ecke Befestigungswinkel
6. AM4 Eckbefestigungswinkel
7. AM4 Haken
8. Wärmeleitpaste
9. Feder / Druckschraube
10. Corner Fixierschraube
11. Befestigungsschrauben für Fans
12. Befestigung Schrauben für Radiator
13. Befestigungsschrauben für Pumpe
AMD Montageloch
Intel Montageloch
Abhängig von Ihrem Intel - CPU, legen Sie die 4 Eckschrauben (10) in dem entsprechenden Loch des
CPU - Adapters (3) Sind Sie die Richtung vorsichtig! Installieren Sie dann den Adapter auf der Rückseite
Ihres Motherboards.
Abhängig von Ihrem Intel - Prozessor, verwenden Sie bitte die entsprechenden Eckwinkel
(5).Anschließend wird der Eckwinkel an der Pumpe mit den Schrauben (13)
Nach dem Durchführen von Schritt 7 positionieren , die Pumpe auf dem CPU zuvor mit Wärmeleitpaste
aufgetragen. Dann fixiert die Feder / Druckschrauben (9)t
Befestigen Sie den oder die Lüfter mit den Befestigungsschrauben (11) am Kühler. Dann befestigen Sie
den Kühler mit den Befestigungsschrauben (12) am Gehäuse
Schließen Sie schließlich die Stromversorgung der Pumpe an Ihr Motherboard an. Dann treiben Sie die
Lüfter an. Hinweis: Beim Start hören Sie möglicherweise ein leichtes Geräusch, während Sie die Pumpe
starten.
Tragen Sie die Wärmeleitpaste (8) gleichmäßig auf die CPU auf. Dann entfernen Sie die Schutzfolie
Achtung, vergessen Sie diesen Schritt nicht, da dies Ihre Installation beschädigen kann!
Positionieren Sie die Pumpe auf Ihrer CPU, die zuvor mit Wärmeleitpaste beschichtet wurde.Dann die
Feder- / Druckschrauben (9) befestigen. Beginnen Sie mit der Einstellung der Schrauben und ziehen Sie
dann die Schraube A, die Schraube C, dann B und schließlich D fest.
AMD Montageloch
Stecken Sie die 4 Eckschrauben (10) laut AMD-CPU in die entsprechende Bohrung des CPU-Adapters (3),
Achtung auf die Richtung! Installieren Sie dann den Adapter auf der Rückseite Ihres Motherboards.
Je nach Ihrem AMD - Prozessor, verwenden Sie bitte die entsprechenden Eckwinkel (5).Anschließend
wird der Eckwinkel an der Pumpe mit den Schrauben (13)
Tragen Sie die Wärmeleitpaste (8) gleichmäßig auf die CPU auf. Dann entfernen Sie die Schutzfolie.
Seien Sie vorsichtig , nicht vergessen , diesen Schritt , da dies die Installation beschädigen!
Positionieren Sie die Pumpe auf Ihrer CPU, die zuvor mit Wärmeleitpaste beschichtet wurde.Anschließend
wird die Feder / Druckschrauben (9). Beginnen Sie mit der Einstellung der Schrauben und ziehen Sie dann
die Schraube A, die Schraube C, dann B und schließlich D fest.
Verwenden Sie je nach AM-AM4-Prozessor die entsprechenden Haken (7). Anschließend wird der Haken
an der Pumpe mit den Schrauben (13)
AMD CPU
AM4
UNIVERSEL
INTEL CPU
1
2
3
1
2
3
4
1
3
10
Orifício de montagem AMD
Orifício de montagem Intel
Dependendo da sua CPU Intel, coloque os 4 parafusos de canto (10) no furo correspondente da placa
CPU (3), Tenha cuidado com o sentido! Em seguida, instale o adaptador na parte traseira da
placa-mãe.
Dependendo do seu processador Intel, use os suportes de canto correspondentes (5). Em seguida, fixar
os suportes de canto na bomba usando os parafusos (13)
Orifício de montagem AMD
De acordo com sua CPU AMD, coloque os 4 parafusos de canto (10) no orifício correspondente do
adaptador da CPU (3), atenção à direção! Em seguida, instale o adaptador na parte traseira da
placa-mãe.
Dependendo do seu processador AMD, use os suportes de canto correspondentes (5). Em seguida, fixar
os suportes de canto na bomba usando os parafusos (13)
Aplique uniformemente a pasta térmica (8) na CPU. Em seguida, retire a película protetora.
Tenha cuidado para não se esqueça este passo, pois isso pode danificar sua instalação!
Posicione a bomba em sua CPU previamente revestida com pasta térmica. Em seguida, fixar os
parafusos de mola / pressão (9). Comece ajustando os parafusos e aperte o parafuso A, o parafuso C,
depois B e finalmente D.
Dependendo do seu processador AM AM4, use os ganchos correspondentes (7). Em seguida, fixar os
ganchos na bomba usando os parafusos (13)
Após executar o passo 7, posicione a bomba em seu CPU previamente revestida com pasta térmica.
Então fixar os parafusos de mola / pressão (9)
Aperte o (s) ventilador (s) ao radiador com os parafusos de fixação (11). Em seguida, fixe o radiador no
chassi usando os parafusos de fixação (12)
Finalmente, conecte a fonte de alimentação à bomba na placa-mãe. Em seguida, acenda os fãs.
Nota: Na inicialização, você pode ouvir um ligeiro ruído enquanto você inicia a bomba.
Aplique uniformemente a pasta térmica (8) na CPU. Em seguida, remova a película protetora.
Atenção, não esqueça este passo, pois isso pode danificar sua instalação!
Posicione a bomba em sua CPU previamente revestida com pasta térmica. Em seguida, fixe os
parafusos mola / pressão (9). Comece ajustando os parafusos e aperte o parafuso A, o parafuso C,
depois B e finalmente D.
1. Radiador / tubos / Bomba
2. Fãs
3. Adaptador de CPU
4. AMD suportes de fixação canto
5. Intel suportes de fixação canto
6. Suportes de fixação de canto AM4
7. Ganchos AM4
8. Pasta térmica
9. Parafuso de mola / pressão
10. Canto parafuso de fixação11.
Parafusos de fixação da Fans
12. Fixação parafusos para Radiator
13. Parafusos de fixação da Pump
Conteúdo Package
AMD CPU
AM4
UNIVERSEL
INTEL CPU
1
2
3
1
2
3
4
1
3
11
Agujero de montaje AMD
Orificio de montaje Intel
Dependiendo de su CPU Intel, colocar los 4 tornillos de las esquinas (10) en el orificio correspondiente
del adaptador de CPU (3), tenga cuidado de la dirección! Luego instala el adaptador en la parte
posterior de tu placa base.
Dependiendo de su procesador Intel, por favor utilice los soportes de esquinacorrespondientes (5). A
continuación, fije los soportes de la esquina de la bomba con los tornillos (13)
Agujero de montaje AMD
De acuerdo con su CPU AMD, coloque los 4 tornillos de esquina (10) en el orificio correspondiente del
adaptador de CPU (3), ¡Atención a la dirección! Luego instala el adaptador en la parte posterior de tu
placa base.
Dependiendo de su procesador AMD, por favor utilice los soportes de esquinacorrespondientes (5). A
continuación, fije los soportes de la esquina de la bomba con los tornillos (13)
Aplique la pasta térmica (8) uniformemente a la CPU. Luego quita la película protectora.
Tenga cuidado de no se olvide de este paso ya que podría dañar su instalación!
Coloque la bomba en su CPU previamente recubierta con pasta térmica. Entonces fijar lostornillos de
primavera / presión (9). Comience ajustando los tornillos y luego apriete el tornillo A, el tornillo C, luego B
y finalmente D.
Dependiendo de su procesador AM AM4, utilice los ganchos correspondientes (7). A continuación, fije
los ganchos de la bomba con los tornillos (13)
Después de realizar el paso 7, la posición de la bomba en su CPU previamente recubierta con pasta
térmica. Entonces fijar los tornillos de primavera / presión (9)
Fije los ventiladores al radiador con los tornillos de fijación (11). A continuación, fije el radiador al chasis
con los tornillos de fijación (12)
Finalmente, conecte la fuente de alimentación a la bomba a su placa base. Luego enciende los
ventiladores. Nota: Al arrancar, es posible que escuche un ligero ruido al encender la bomba.
Aplique la pasta térmica (8) uniformemente a la CPU. A continuación, retire la película protectora
¡Atención, no olvide este paso, ya que puede dañar su instalación!
Coloque la bomba en su CPU previamente recubierta con pasta térmica. Luego, fije los tornillos de
resorte / presión (9). Comience ajustando los tornillos y luego apriete el tornillo A, el tornillo C, luego B y
finalmente D.
1. Radiador / Tubos / Bomba
2. Fans
3. Adaptador de CPU
4. soportes de fijación esquina AMD
5. soportes de fijación esquina Intel
6. Soportes de fijación de esquina AM4
7. ganchos AM4
8. Pasta térmica
9. Tornillo de resorte / presión
10. Corner tornillo de fijación
11. Tornillos de fijación para Fans
12. Fijación tornillos para Radiator
13. Tornillos de fijación para PUMP
Contenidos Package
AMD CPU
AM4
UNIVERSEL
INTEL CPU
1
2
3
1
2
3
4
1
3

12
Foro di montaggio AMD
Foro di montaggio Intel
A seconda della CPU Intel, inserire le 4 viti d'angolo (10) nel foro corrispondente della scheda CPU (3),
fare attenzione alla direzione! Quindi installare l'adattatore sul retro della scheda madre.
A seconda del processore Intel, si prega di utilizzare le staffe angolari corrispondenti (5).Quindi fissare le
staffe d'angolo sulla pompa con le viti (13)t
Foro di montaggio AMD
Secondo la CPU AMD, posizionare le 4 viti d'angolo (10) nel foro corrispondente dell'adattatore CPU (3),
attenzione alla direzione! Quindi installare l'adattatore sul retro della scheda madre.
A seconda del processore AMD, si prega di utilizzare le staffe angolari corrispondenti (5).Quindi fissare le
staffe d'angolo sulla pompa con le viti (13)
Applicare la pasta termica (8) uniformemente alla CPU. Quindi rimuovere la pellicola protettiva. Fare
attenzione a non dimenticare questo passaggio in quanto ciò potrebbe danneggiare la vostra
installazione!
Posizionare la pompa sulla CPU precedentemente rivestita con pasta termica. Quindi fissare le viti a
molla / di pressione (9). Iniziare regolando le viti quindi serrare la vite A, la vite C, poi B e infine D.
A seconda del processore AM AM4, utilizzare i corrispondenti ganci (7). Poi fissare i gancidella pompa
con le viti (13)
Dopo aver eseguito il passaggio 7, posizionare la pompa della CPU precedentemente rivestito con
pasta termica. Poi fissare le viti molla / pressione (9)
Fissare il ventilatore (s) al radiatore con le viti di fissaggio (11). Quindi fissare il radiatore al telaio
utilizzando le viti di fissaggio (12)
Infine, collegare l'alimentatore alla pompa alla scheda madre. Allora alimenta i ventilatori.Nota:
all'avviamento si può sentire un leggero rumore mentre si avvia la pompa.
Applicare la pasta termica (8) uniformemente alla CPU. Quindi rimuovere la pellicola protettiva. Non
dimenticare questo passaggio in quanto ciò potrebbe danneggiare l'installazione!
Posizionare la pompa sulla CPU precedentemente rivestita con pasta termica. Quindi fissare le viti della
molla / pressione (9). Iniziare regolando le viti quindi serrare la vite A, la vite C, poi B e infine D.
1. Radiatore / Tubi / pompa
2. Ventilatori
3. Adattatore CPU
4. staffe di fissaggio angolo AMD
5. staffe di fissaggio angolo Intel
6. Staffe di fissaggio angolare AM4
7. Am4 ganci
8. Pasta termica
9. Vite a molla / pressione
10. Fissaggio a vite d'angolo
11. viti per il fissaggio Fans
12. Fissaggio viti per Radiator
13. viti per il fissaggio Pompa
Contenuti Package
AMD CPU
AM4
UNIVERSEL
INTEL CPU
1
2
3
1
2
3
4
1
3
Table of contents
Popular Computer Hardware manuals by other brands

Texas Instruments
Texas Instruments BQ28Z610-R2 Technical reference manual

FreeWave
FreeWave IOEX-4440 quick start guide

Intel
Intel Core i3 Desktop Series installation instructions

Moxa Technologies
Moxa Technologies CP-602U-I-T Quick installation guide

Mellanox Technologies
Mellanox Technologies SX1710 quick start guide

SPE ware
SPE ware CEREX System-48-II operating instructions

Crestron
Crestron CNXENET+ Operations & installation guide

Lenze
Lenze EPZ 10202 Mounting instructions

Intel
Intel 852GME Design guide

Cypress Semiconductor
Cypress Semiconductor CY7C1380C Specification sheet

Texas Instruments
Texas Instruments TPS25762Q1EVM-146 user guide

Seagate
Seagate Cheetah 18LP FC installation guide


