EMYCSA RealSimulator Home Series User manual
ELECTRONICA, MECANICA Y CONTROL, S.A.
RealSimulator
User Guide
F18CGRH


Contents
Document Revision History 4
READ ME FIRST 5
Overview 6
Package Content and Technical Data 10
Package content 10
Technical data 10
Installation 12
Powering in standalone mode 13
Powering from a stick base 13
Connecting the device to the computer 14
Tools Installation 18
Firmware Update 23
RS_HID_DEV_TOOL and F18CGRH 30
Overview 30
Connecting RS_HID_DEV_TOOL and F18CGRH 33
How the F18CGRH works 36
Pairing F18SGRH 40
Axes calibration overview 44
X and Y axes calibration 46
Z axis calibration 47
Manually configure Raw Axes 48
Slot Configuration 50
Keystrokes and Explanations 56
Macros 61
DX events and Keystrokes generation by Pulses 64
Shifter and Toggle 65
Digital Mouse 66
Overlay Settings 67
Load, Save and Print an .xml configuration file 69
Working offline with the F18CGRH 71
Documentation 72
F18CGRH and FSSB-R3L 73
Overview 73
Firmware MJF_FW_F16-F18_4_00_0 73
FAQ 76
I have just received my RealSimulator device and I want to install it, but I do not find the drivers in anyplace. 77
Requirements to use RealSimulator grips. 77
I want to install a new version of RS_HID_DEV_TOOL or DCC, but I cannot uninstall the older one. 77
How to know if the computer has Bluetooth BLE hardware installed? 78
I can’t attach/pair my grip. Is it locked? 78
Why does pressing the trigger change my axes measures? 79
What firmware should I install in my R3 to work with the F18CGRH? 79
Can the F18CGRH work on W7 or W8.0? 80
Direct actions with buttons. 80
My F18CGRH is frozen with the left status led ON. 80

Document Revision History
Revision Number
Date
Description
1.00
2020.07.17
First release
5 / 81
EMYCSA
RealSimulator
READ ME FIRST
Date: 17/07/2020
Version: 1.00
PICTURE
DESCRIPTION
The F18 Center Grips family are wireless devices that include a Bluetooth Low Energy
(BLE) module for firmware update purposes. In these devices this module is also used
as an independent channel for communications with the computer.
Although this feature was going to be only available for the F18CGRH-CE model,
Realsimulator has left opened to the F18CGRH’s users the possibility of using this
functionality but it won’t receive support from Realsimulator since we have been
able to verify that the problems some users had with this functionality was caused by
the BLE devices used (MB or dongles), wrong installations or even by
electromagnetics interferences with other devices or nets; in any case, home problems
not product problems that as you imagine they are very difficult to fix remotely.
For your peace of mind, typically the grips must work without problems but if you have
them, you must find the source of the problem to fix it.
In conclusion, the use of the BLE module and the features linked to it are unsupported
in the F18CGRH grip.
Finally, as the F18CGRH and the F18CGRH-CE are similar products, with the only
difference of superficial finish and the BLE functionality (as we just said, in the
F18CGRH it is a feature unsupported), in this User Guide we will always refer to them
as F18CGRH and we will explain all features without reference to whether it is
supported or not.; the user must always understand that if the feature is related to the
BLE module it is unsupported in the F18CGRH model. And we will distinguish between
both models only when absolutely necessary.
6 / 81
EMYCSA
RealSimulator
Overview
Date: 17/07/2020
Version: 1.00
PICTURE
DESCRIPTION
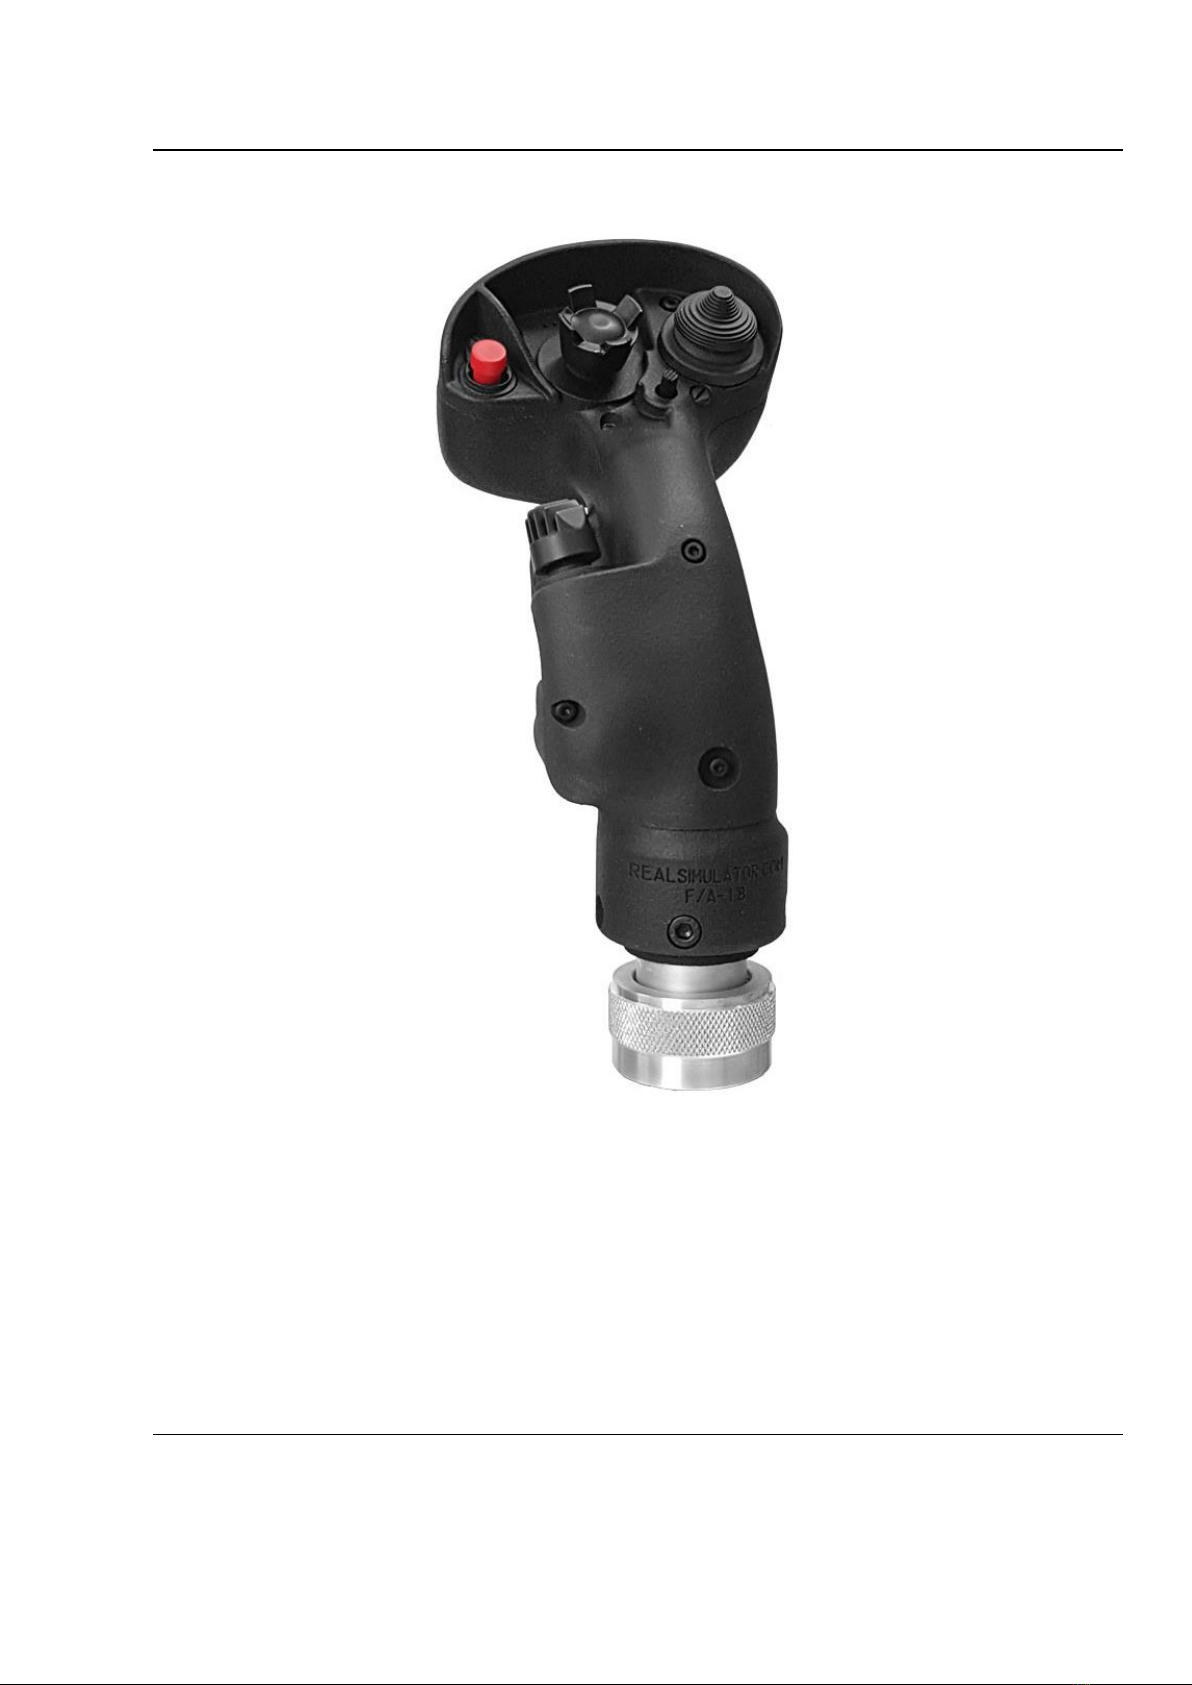
The F18CGRH as well as the RS grips family come in two lines, Professional and
Home. All of them are replica of F/A-18E Super Hornet with its true and ergonomic
shape.
The Professional range uses its own software and real military switches as well as
custom socket and connector, according to the client specifications.
The Home range is manufactured in two versions, the F18CGRH and a special version
named Collector’s Edition (F18CGRH-CE). The main differences are the superficial
finish, the BLE communication module and the analog axes. Both are identical to the
professional unit, with the same dimensions, the same high-grade fixation system, the
same high density resin in an one-piece body construction, but with the addition of the
following features:
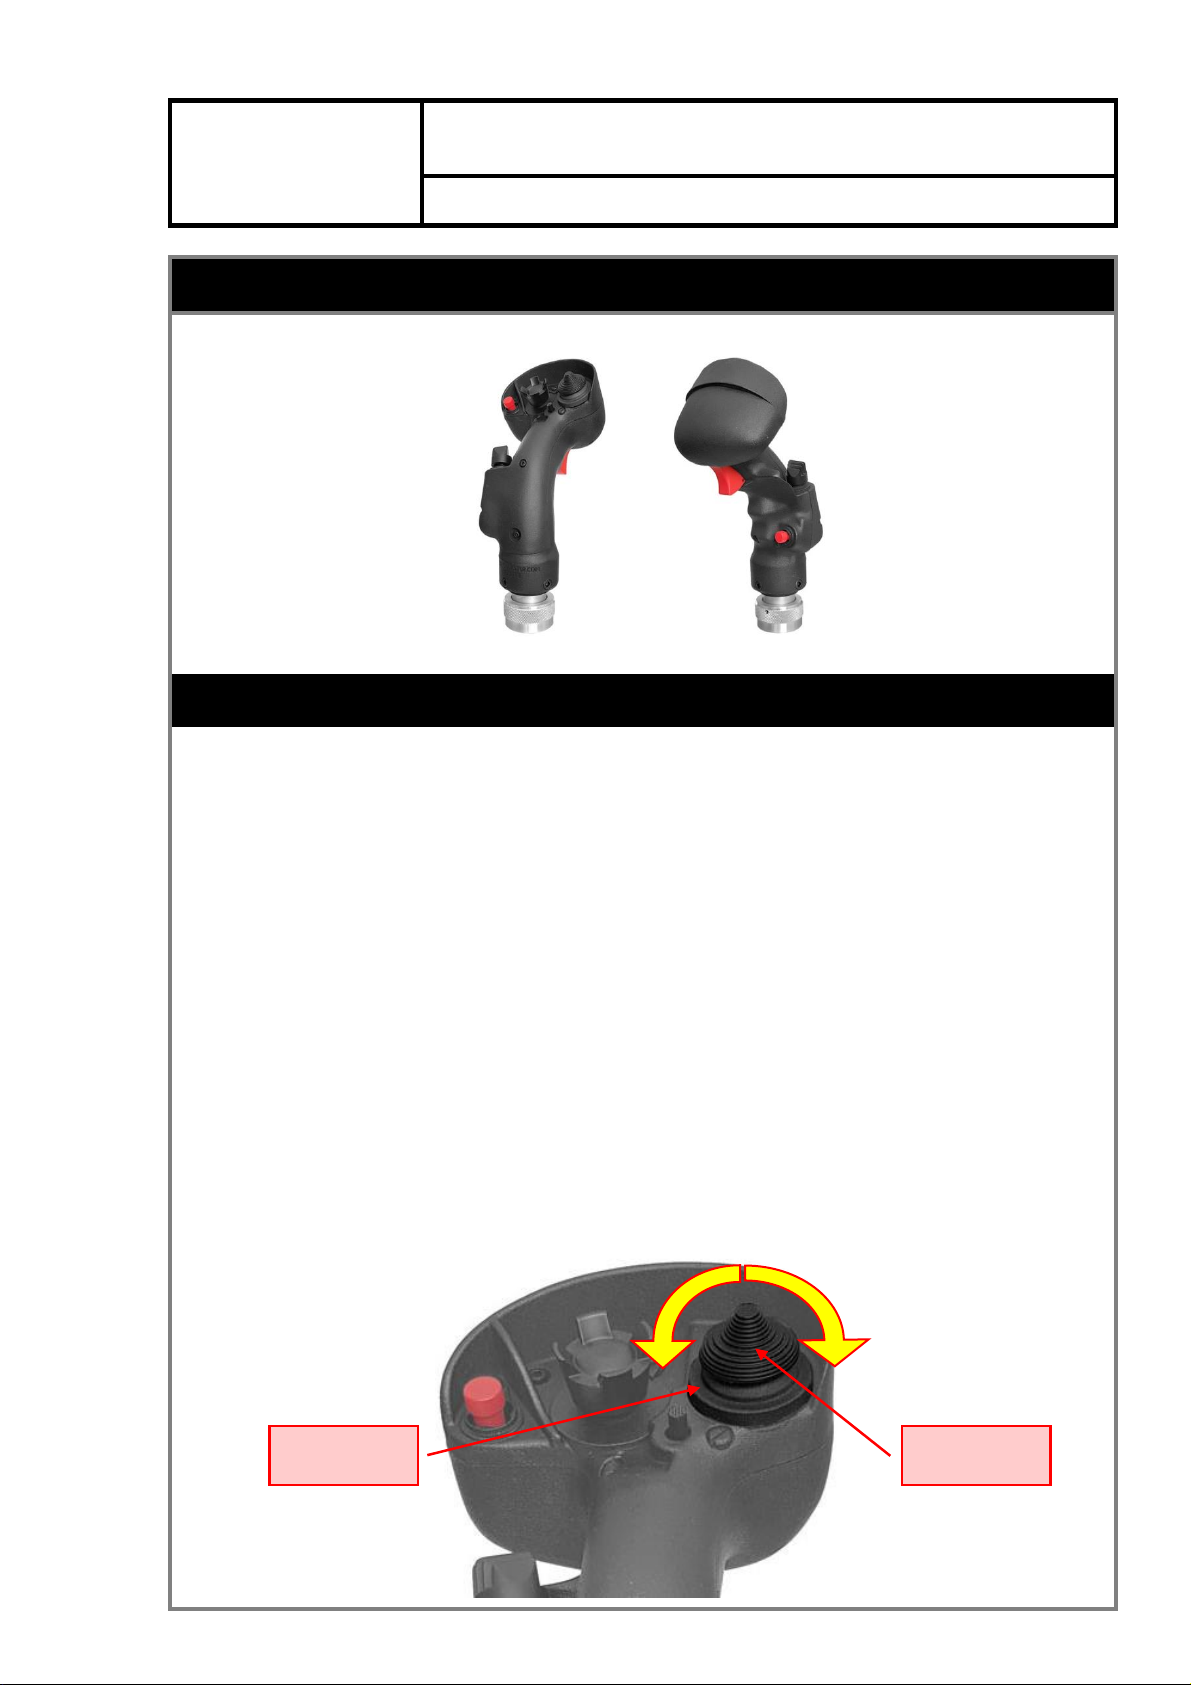
a) A rotary switch, installed under the TRIM hat switch cap, to easily hot swap
between 8 configurable memory slots. With a single thumb movement, you can
reconfigure the whole system in a fraction of a second.
ROTARY
SWITCH
TRIM HAT
SWITCH
7 / 81
b) Orientation of switches actuations perfectly adapted to the natural movement
of the pilot’s finger when actuated it.
c) 5-way switches in all the hat switches (TRIM, SENSOR and WEAPON
SELECT), with the possibility to disable the center position.
d) 5-way switches where in real life there is only 1 way (WR, NWS and RECCE),
with the possibility to disable the additional directions.
Note: between brackets the name of equivalent F-16 switch.
e) Three status LEDs used to show the Slot in use.
f) Very realistic Trigger with an audible and tactile click for second stage.
g) Add extra features to the FSSB-R3 Lighting when is connected to the R3L
base.
h) Firmware upgradeable through BLE, so you could need a 4.0 or higher BLE
dongle if your PC doesn’t have BLE included.
The F18CGRH is manufactured in high density resin with a matte finish and a slightly
grainy feel. The F18CGRH-CE is also manufactured in high density resin, but it
features a handmade finish with 2K painting. Both models have a high-grade fixation
system manufactured in aeronautic aluminum with a knurled nut.
Before to continue reading this chapter, you should read the previous chapter (READ
ME FIRST) to understand perfectly the differences about the BLE module integrated in
the F18CGRH models.
This BLE module, whose main purpose, as we said before is to update the device, is
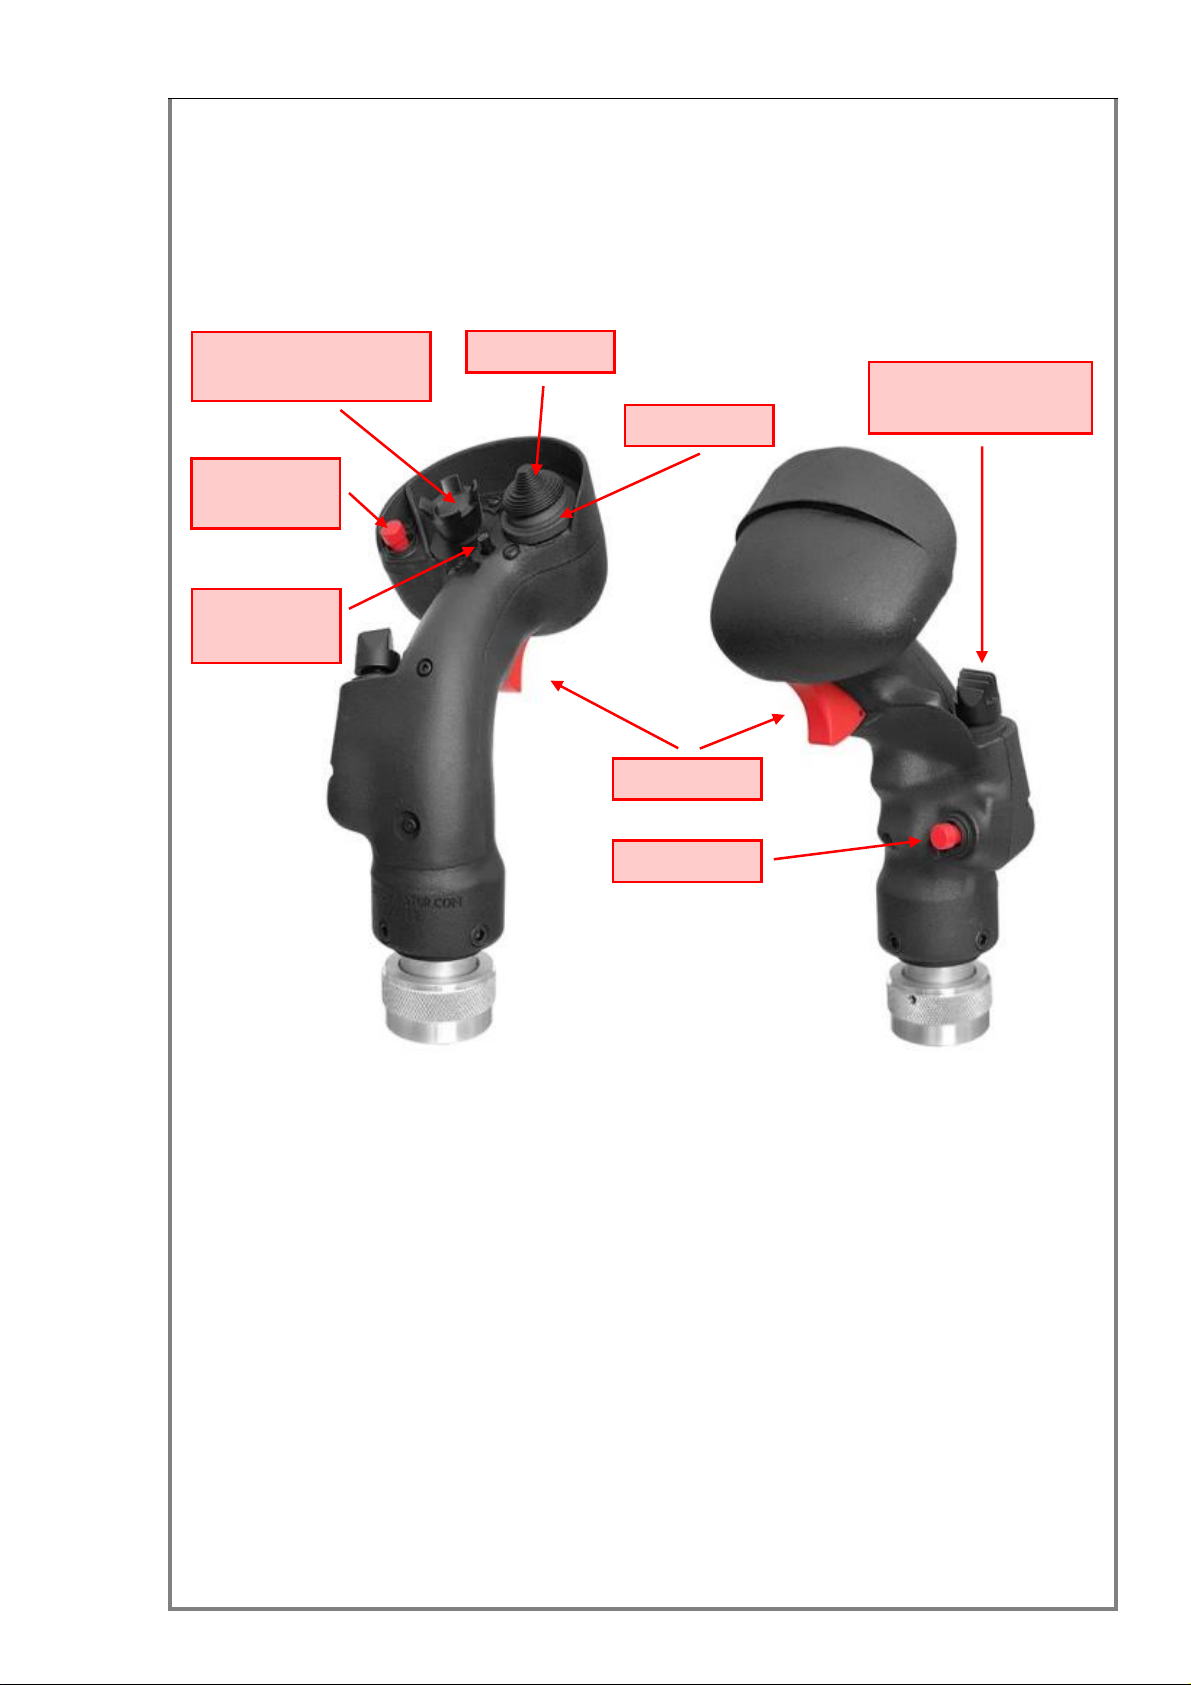
TRIGGER
TRIM
WEAPON SELECT
(CMS)
WEAPON
RELEASE
SENSOR CONTROL
(TMS)
NWS
ROTARY
RECCE
(DMS)

8 / 81
also used as an independent communications channel with the computer. This
functionality let you use the F18CGRH alone or with an X/Y base and read the
information of included sensor for Roll, Pitch and Yaw axes.
The F18CGRH family corresponds to the stereotype of standard grips, i.e.
communications with the base is achieved through a 5-pin mini-Din connector, just like
all Thrustmaster compatible grips. It has 5-way switches that offer up to 64 different
buttons and a rotary switch with 8 positions. The information the user can obtain from
the F18CGRH only depends on the base connected. That means that if the F18CGRH
is used with a TM Cougar base, the features will be identical to that of a Cougar stick.
But if it is used with a FSSB-R3L, you will be able to enjoy all the new features
included in the new firmware created for the FSSB-R3L: 8 different configurable slots,
64 buttons to send keystrokes, a digital mouse, etc. If you are a F18CGRH owner, we
suggest looking for more information about these new features in the FSSB-R3 User
Guide because this user guide is focused on the F18CGRH family grips.
As the F18CGRH has a BLE module, if it is connected to a FSSB-R3L, you can enjoy
the new features from the FSSB or directly from the F18CGRH, and if you connect it to
a TM compatible base or use it in standalone mode, you will be able to enjoy the
features directly from the F18CGRH.
As the F18CGRH is a wireless device connected by Bluetooth (BLE), no available USB
port is necessary. The computer only needs a BLE connection, integrated in the
motherboard or through a dongle.
The computer must run under Windows 8.1 or higher because windows 7 and 8.0 do
not support BLE devices and with these OS versions, the device is not fully operational
it is just a standard stick not configurable or upgradeable. We suggest using
Windows 10. We have fully tested the device functionality and software tools supplied
in this OS.
!
The F18CGRH can be used without losing functionality in Windows 7 and
8.0 platforms if it is connected to a FSSB-R3 Lighting.
The F18CGRH can be used with an USB wire as a standalone system or connected to
a TM© system (Cougar or Warthog) or any R1, R2 or R3 RealSimulator system.
When the F18CGRH is connected to a FSSB-R3L base, the latter offers the following
additional features: slot number goes from 4 to 8, no SMM system just as you have 8
different configurations with hot swap (fast change), and 56 buttons to achieve the
center position and center + up, down, right, left, and additional keyboard functions.
The F18CGRH is supplied with a firmware update tool (DCC) that can be used to
install new versions of the firmware and a GUI application (RS_HID_DEV_TOOL) used
to configure the device. Both tools can be extracted from the same file available on the
download page of our website.
https://realsimulator.com/downloads/
The RS_HID_DEV_TOOL application enables you to fully configure the device,
allowing you to perform the device pairing, axes calibration, analog control and
keystrokes assignation in each memory slot, light intensity of status LEDs, etc.

9 / 81
The analog control of each axis can be used to independently adjust roll, pitch and yaw
to anyone´s liking for each memory slot. In every slot you can configure:
Full Scale Control
Roll Sensitivity
Pitch Sensitivity
Yaw Sensitivity
Roll Control Assistance
BFA Roll level
BFA Pitch level
Precision mode
Other additional features are:
HAT as POV or TRIM
Keystrokes ON/OFF
DX Buttons ON/OFF
DX Center Buttons in four modes: native (ON), basic (COMP), center removed
(OFF) and double click (DClick).
Test window called Output
56 DX buttons can be enabled or disabled for every slot.
56 keystrokes can be enabled or disabled for every slot, and of course can be
different in every slot
DX events and Keystrokes generation by pulses, additional slot change thanks
to the Shifter and Toggle functions, and Digital Mouse.
SWLed function to enable/disable showing switches activation in status LEDs
when pressed.
Adjustable LEDs lighting level.
Sound and graphic overlay with the slot name over the desired application with
the OVERLAY function.

10 / 81
EMYCSA
RealSimulator
Package Content and Technical Data
Date: 17/07/2020
Version: 1.00
PICTURE
DESCRIPTION
Package content
The F18CGRH package, shown in the picture above, contains the following components:
F18CGRH device.
F18CGRH is supplied as a plug and play device with no drivers.
!
IMPORTANT: Communication for configuration, upgrading and full device
information is made by BLE1, so you will need a computer running Windows
8.1 or 10 preferably and a BLE connection. If your computer does not have
BLE included, you will need a BLE dongle. We suggest the models SVEON
STC400 or CSR 4.0, they are tested and work fine.
Technical data
F18 grip true replica of F/A-18E Super Hornet.
One-piece body manufactured in high-density resin.
High-grade fixation system with knurled nut.

11 / 81
5-direction switches in all switches.
8 memory slots for quick custom configuration with hot swap
Firmware update by Bluetooth (BLE).
Additional BLE1functionalities:
Wireless communications by Bluetooth Low Energy (BLE).
Configuration by Bluetooth (BLE).
Integrated sensor for Pitch, Roll and Yaw and information available only
through BLE communications.
Composite device: joystick (axes and buttons), keyboard (keystrokes) and
mouse.
Functional as standalone or with FSSBs (R1, R2 and R3), Thrustmaster bases
(Cougar or Warthog) or compatibles.
HAT as POV or TRIM.
Full-scale control with 4 levels, 1:1, 3:4, 1:2 & 1:4.
Sensitivity control for Roll, Pitch and Yaw (0 –100%).
Roll Control Assistance (ON - OFF).
BFA Pitch and Roll level (Off –Min - Med - High - Full).
Precision mode (ON - OFF).
Keystrokes (ON - OFF).
DX Buttons (ON - OFF).
DX Center Buttons in four modes: native (ON), basic (COMP), center removed
(OFF) and double click (DClick).
DX events and Keystrokes generation by pulses.
Additional slot change thanks to the Shifter and Toggle functions.
Digital mouse.
SWLed function to enable/disable showing switches position in status LEDs
when pressed.
Adjustable LEDs lighting level.
Three red status LEDs with light intensity adjust.
Weight: 390 gr.
(1) Please, for a correct understanding of BLE module and its use in the F18SGRH, you
should read first the chapter READ ME FIRST.

12 / 81
EMYCSA
RealSimulator
Installation
Date: 17/07/2020
Version: 1.00
PICTURE
.
DESCRIPTION
The F18CGRH can be used as a center stick like in the real jet and as a side stick. It is
shipped as a center stick, but if it is going to be used as a side stick, you can easily turn
its position for a more ergonomic pilot usage.
For that, you only need to unscrew the two screws, turn the black grip part on the fixation
system until the new position and screw the two screws in the new position holes.
13 / 81
The F18CGRH can be used in two ways, as a standalone device or connected to a stick
base like the FSSBs (R1, R2 and R3), Thrustmaster (Cougar or Warthog) or compatible
bases.
To install the device and use it, two steps are necessary: power it and connect it to the
computer.
Powering in standalone mode
In this mode, the 5-pin mini-DIN connector is used to power the device. For this, you
must power the F18CGRH from a USB connector in a PC, a power bank, a USB wall
socket, etc.
All the buttons and axes information will be sent by the BLE module.
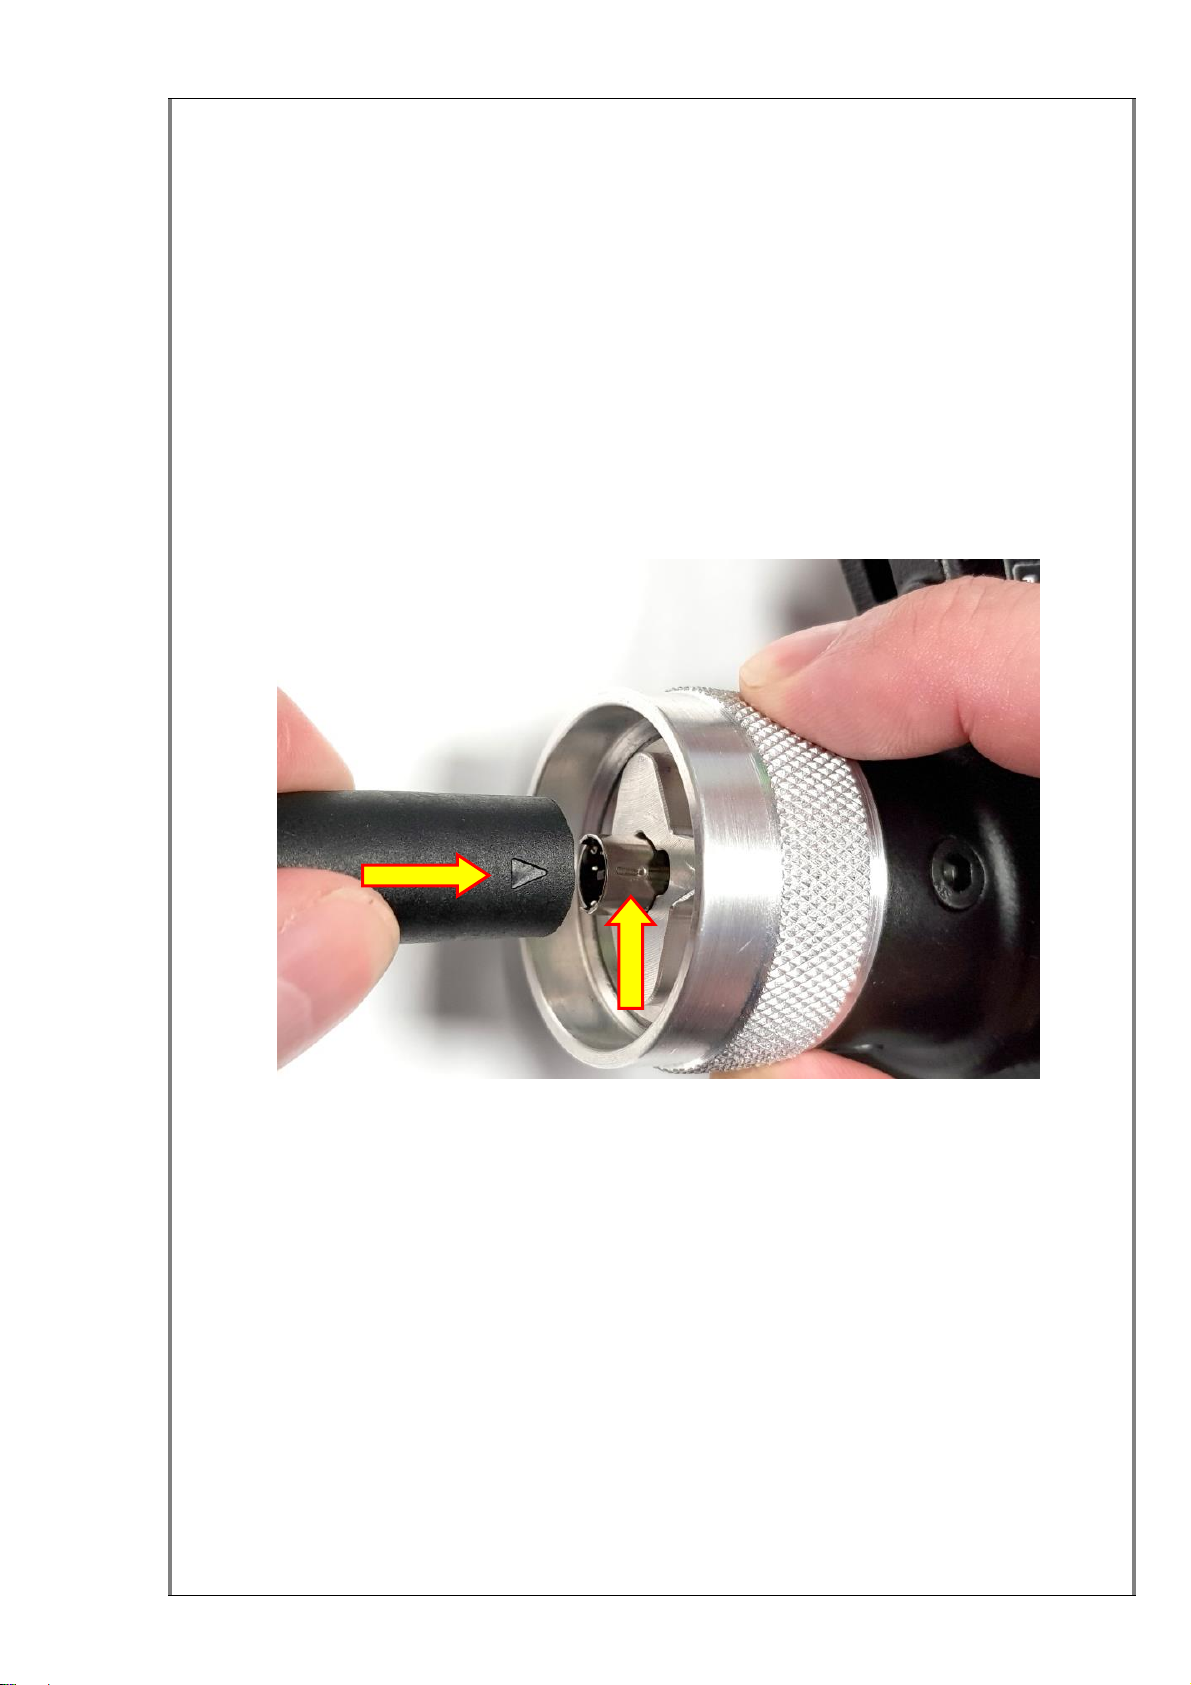
Please, when you connect the cable to the grip, pay special attention to correctly align
the two connectors to avoid damaging the pins or connectors. For that purpose, both
connectors have visible marks as you can see in the picture above.
Powering from a stick base
The F18CGRH grip can be connected to a stick base, such as the FSSBs (R1, R2 and
R3) and a Thrustmaster (Cougar or Warthog) compatible base.
This way, the 5-pin mini-DIN connector is used to power the grip and to read the grip
buttons status, just like a standard grip. In this mode, the F18CGRH sends the standard
18 buttons and the other buttons and the hat switch information to the stick base.
If the grip is connected to a FSSB-R3L base, it can manage the 58 different buttons and
the rotary switch information. In this way, the R3 slots are increased from 4 to 8, the
SMM is disabled and the change between slots is made with the rotary switch.

14 / 81
Up to this point, the stick functions like a standard grip, but as the F18CGRH has
Bluetooth wireless communications, you can continue getting all the extra information
from it, as for example the use of keystrokes, the other 40 extra buttons, etc.
In Windows 7 and 8.0 platforms where BLE devices are not supported: If you use the
F18CGRH with the FSSB-R3 Lighting, you do not lose the extra information and
functionality of F18CGRH with the new firmware developed for the FSSB-R3L. You will
find more information in the Firmware MJF_FW_F16-18_4_00_X section
Connecting the device to the computer
As the grip is a Bluetooth (BLE) wireless device, no USB port is necessary. The
computer only needs a BLE connection, integrated in the motherboard or through a
dongle.
In addition, some operating system requirements need to be met because Windows 7
and 8.0 do not support BLE devices. In these OS versions, the F18CGRH is not fully
operational; it is just a standard stick not configurable or upgradeable. Only windows 8.1
and higher OS support these devices. We suggest using Windows 10. In this OS, we
have fully tested the device functionality and software tools supplied.
To determine whether your computer has Bluetooth BLE hardware, check the Device
Manager for Bluetooth by following the steps below:
1. Press “Windows + X”to open the menu, and choose Device Manager.
2. Check for Bluetooth and verify if the item Microsoft Bluetooth LE Enumerator is
present.
To turn on your Bluetooth follow the next steps:
1. Press “Windows + X”to open the menu, and choose Settings.
2. Click “Devices”.
3. Click “Bluetooth”and move the Bluetooth toggle to the On setting.
4. Click the “X”in the top right corner to save the changes and close the settings
window.

15 / 81
If your computer has BLE connection, you are ready to connect the stick to the
computer.
First, make sure the stick is on (through a power wire or connected to a powered base)
and the left status led is blinking. If it is not blinking, unplug and plug the power or press
the SENSOR CONTROL (TMS) center + RECCE (DMS) center
buttons simultaneously on the stick to restart the blinking.
Now, in the Control Panel, open the Devices and Printers window and right-click over
the window and select the Add devices and printers option.
16 / 81
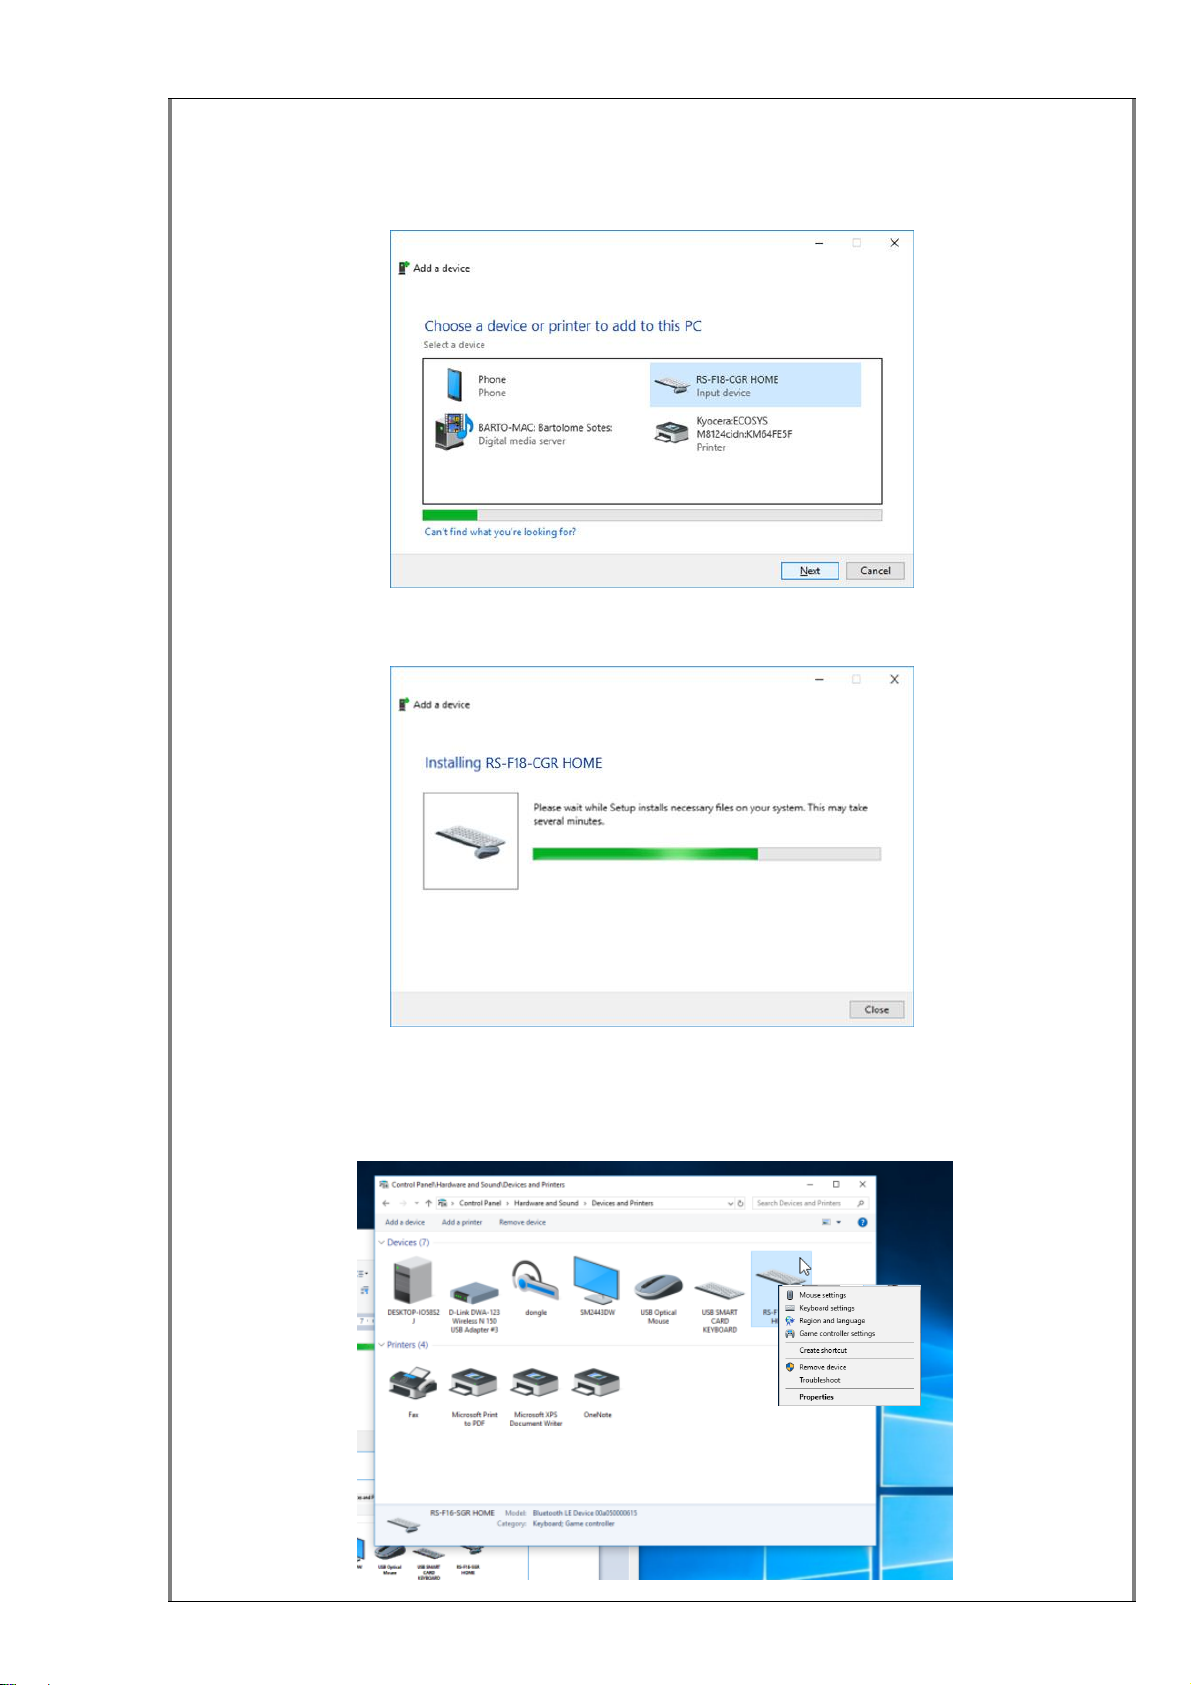
A new window opens: Choose a device or printer to add to this PC. Wait until the
system finds the device and displays it in the window. Then select the ‘RS-F18-CGR
Home’ icon and press Next to install it.
A new window for installation will open showing an installation progress bar and it will be
closed automatically when the device is installed.
Now the device is displayed in the Device and Printers window and if you click with the
right mouse button over it, you can see it has three devices associated: a keyboard to
send programmable keystrokes, a game controller for analog axes and buttons and a
mouse.

17 / 81
Right clicking the Game Controller option opens the Game Controller window. You will
see the two new HID devices named “RS-F18-CG-RH HOME”. The first one has the
axes (at this moment only three are operatives for roll, pitch and yaw), 32 buttons and
hat POV, and the second one only shows the other 32 buttons.
!
IMPORTANT: this connection procedure needs to be performed only once,
when you receive the device, or also after a remove action (for upgrade for
example). It will be connected automatically every time you turn on the
computer.
We made a video guide called “F16SGRH Installation” where you can watch step by
step how to install the F16SGRH (this product is similar to the F18CGRH) on your
computer. You can find this video guide on the VIDEOS page of the RealSimulator
website:
(https://realsimulator.com/videos-f16/)
or, directly clicking the image or the hyperlink below.
F16SGRH Installation
18 / 81
EMYCSA
RealSimulator
Tools Installation
Date: 17/07/2020
Version: 1.00
PICTURE
DESCRIPTION
The product is supplied with two software tools, a firmware update utility (DCC) to
allow installing new versions of the firmware in the device and a GUI application
(RS_HID_DEV_TOOL) to configure the device.
Both tools can be downloaded from the Downloads page of RealSimulator website
inside the same package. The package also includes the RealSimulator device
metadata files, the latest firmware and the product User Guide.
To download the tools, please, go to the Downloads page of the RealSimulator website
by clicking the hyperlink below:
https://realsimulator.com/downloads/
and download the latest version of RS_TOOLS and save it in a location of your choice.
!
If you have a previous version installed, please uninstall it before installing
the new one, although the latest installers automatically remove the previous
versions of RS_TOOLS.
System requirements are Microsoft .NET Framework 4.5.2 and Microsoft Visual C++
2017 Redistributable (x86).
In platforms with Windows 8.1 or higher, DCC v1.08 will be installed (with support for
BLE devices). In previous versions of Windows, the package installs a “light” version of

19 / 81
the application without support for BLE, named DCC v1.08 (NO_BLE). This version
does not allow upgrading BLE devices as the F16SGRH and F18CGRH.
To start the installation, run the downloaded software by double-clicking the file icon.
Presently, the file is named “setup_RS_Tools_V1_03.rar”, but the procedure will be
identical with any new version.
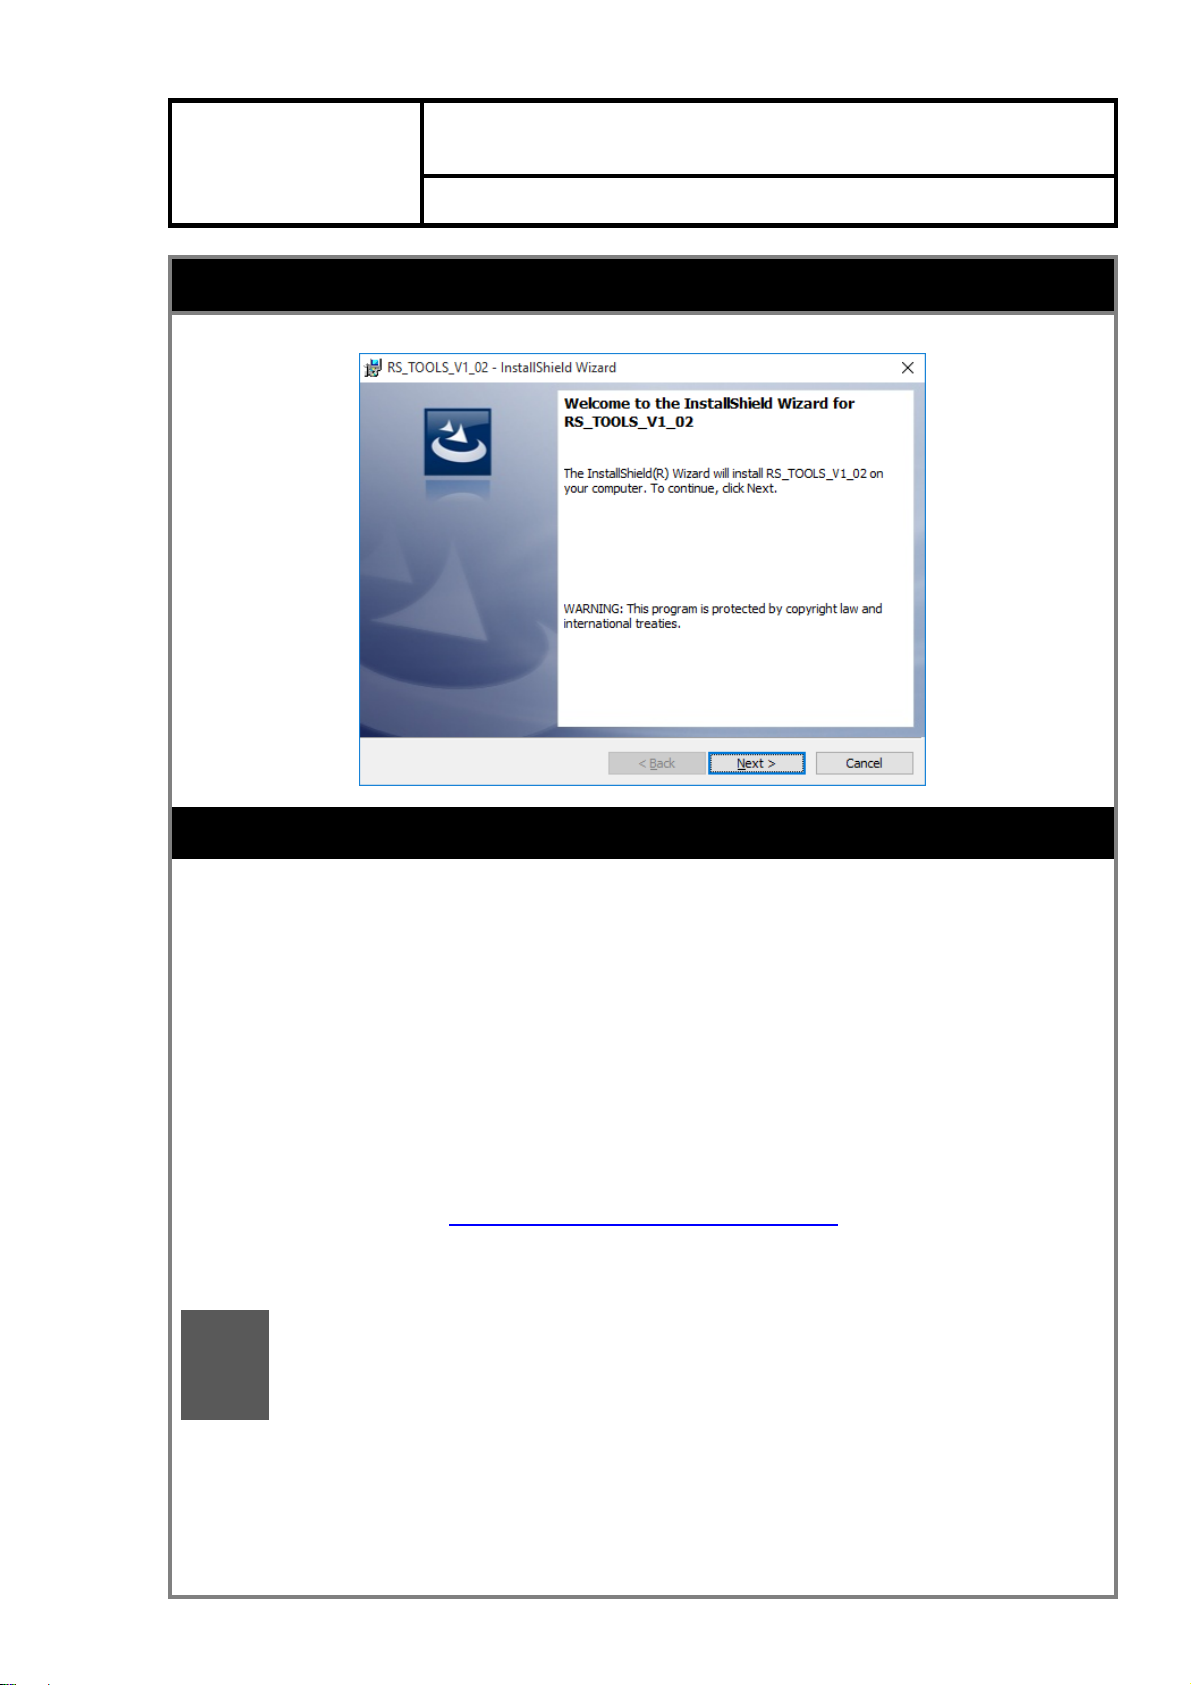
In any case, you should have the following window:
where setup_RS_Tools_V1_03.exe is the tools installer. To install it, please, run the
file by double clicking on the file name.
After a few seconds extracting and decompressing the package, the installation wizard
will launch. Select Next to continue.
A standard licensing agreement must be accepted before moving on. Choose I accept
the terms of the license agreement and click Next.
20 / 81
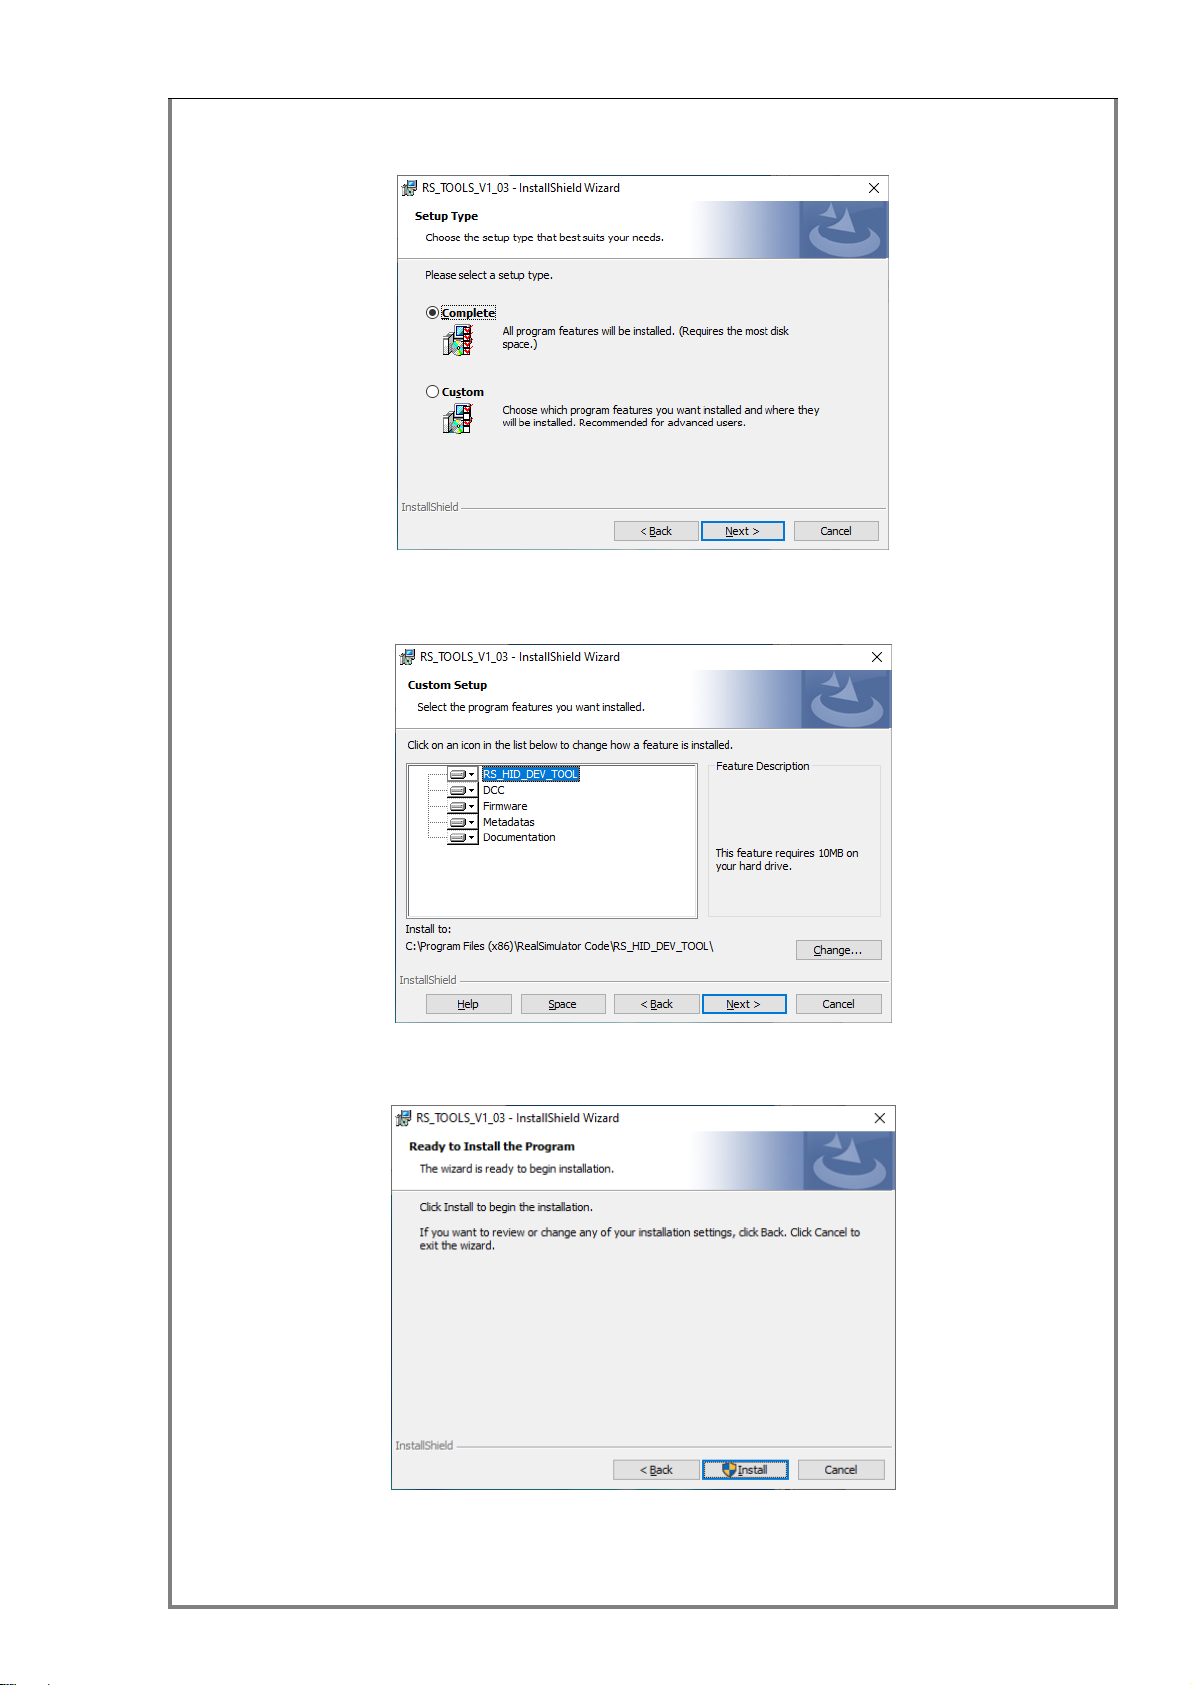
If you want to install all program features (DCC, RS_HID_DEV_TOOL, Metadata files,
firmware and User Guide) select the Complete setup type and click Next to continue.
Or select Custom if you want to choose the features to install and click Next to
continue.
The wizard is now ready to start the installation. Please, click on Install.
If the User Account Control window appears, click the Yes button to continue.
This manual suits for next models
2
Table of contents


