Enchanted Garden 343-1786 User manual

READ AND SAVE THESE INSTRUCTIONS
343-0440
Low Voltage
LANDSCAPE
LIGHTING KIT
DEAR CUSTOMER,
Congratulations on your purchase of a ENCHANTED GARDEN® lighting product. Our products will help to enhance the beauty of your
home and provide many years of enjoyment. ENCHANTED GARDEN® offers a wide selection of lighting products of the highest
professional quality. Ask your dealer about the many other ENCHANTED GARDEN® products that will help to create your own paradise.
To ensure the maximum performance of your garden light, please read and save these instructions.
Replacement parts may be ordered by using the xture model number and the part’s name.
INSTRUCTIONS PERTAINING TO A RISK OF FIRE, OR INJURY TO PERSONS
IMPORTANT SAFETY INSTRUCTIONS
• To reduce the risk of FIRE OR INJURY TO PERSONS turn off, unplug transformer and allow lamp to cool before replacing it. Lamp gets HOT quickly.
• Keep the lamp away from materials that may burn.
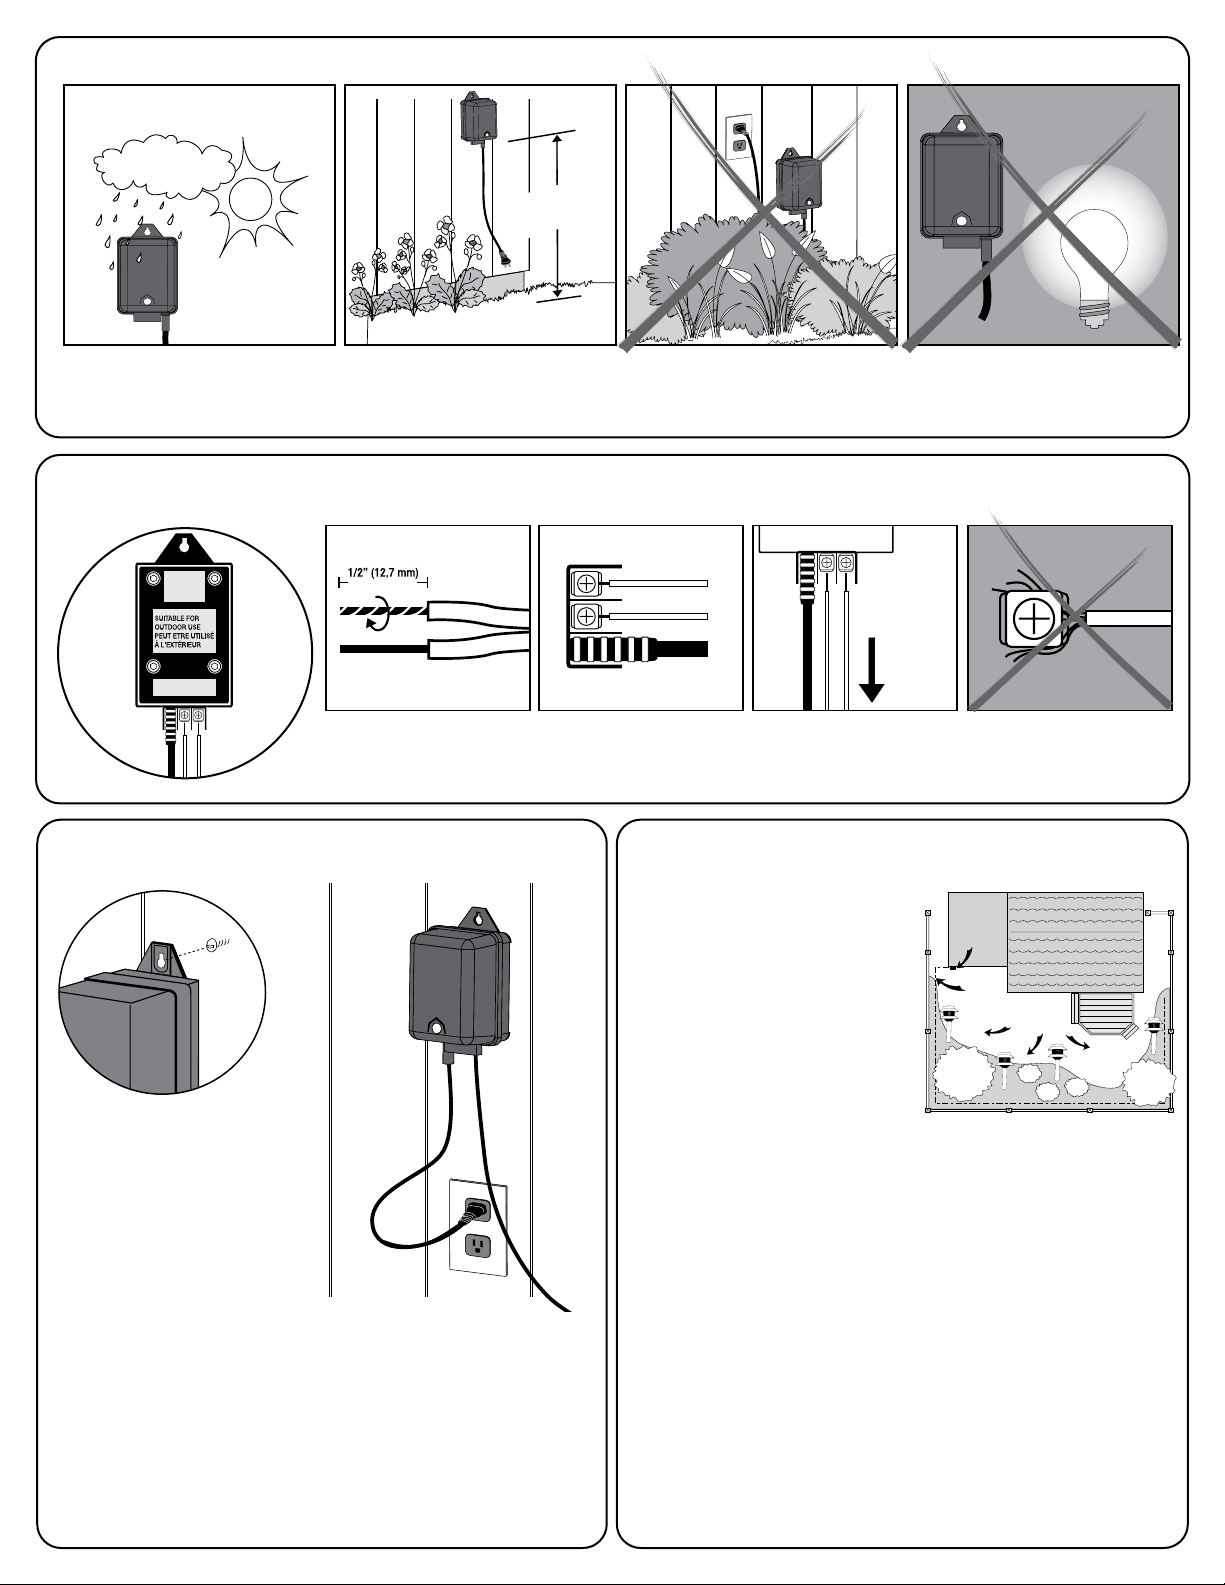
• WARNING - Risk of Electric Shock. Install all luminaires 10 feet (3.05 m) or more from a pool, spa or fountain.
• Install in accordance with all local codes and ordinances.
Only for use with low voltage power units with a maximum output rating of 15V, 300W per secondary.
Pathlight (343-1786)
4W incandescent T5 bulb
Floodlight (343-1799)
4W incandescent T5 bulb
Landscape wire
18 gauge • 50’• (15,24 m)
5004-343_0440-EN_110310
1-888-867-6095 • cust[email protected]
CUSTOMER SERVICE
FOR LANDSCAPE LIGHTING SYSTEMS ONLY. OUTDOOR USE ONLY.
THE DEVICE IS ACCEPTED AS A COMPONENT OF A LANDSCAPE LIGHTING SYSTEM WHERE THE SUITABILITY OF THE COMBINATION
SHALL BE DETERMINED BY CSA OR LOCAL INSPECTION AUTHORITIES HAVING JURISDICTION.
x8 x2
40W Transformer
with photosensor and timer

1. Assembly of the Light Fixture
1.1 Carefully remove the xture from its protective packaging.
1.2 Insert spike by pressing it into the post.
1.3 Install the post by pressing it into the lens.
1.4 Insert the bulb into the bulb socket.
1.5 Snap the disk into the slot in the lens.
1.6 Turn the cover on the lens until it stops.
Post section
Disk
Slot
Lens
Cover
Spike
Wire
Connector
4W Incandescent
T5 Wedge Base
2. Assembly of the Light Fixture
2.1 Carefully remove the xture from its protective packaging.
2.2 Remove the lens by turning it anticlockwise.
2.3 Insert the bulb into the bulb socket.
2.4 Put back the lens on the body by turning it clockwise
until it stops.
Spike
Body
Lens
Wire
Connector
4W Incandescent
T5 Wedge Base
from 12” to 48”
(30cm to 121cm)
SAFE
3.1 Outdoor use, weather proof. 3.2 Install the transformer at
a level where the controls are
visible and accessible.
3.3 Do not install behind shrubs.
It will affect photocell.
3.4 Photocell will not operate
properly if installed too close to
a night time light source.
3. Find a location for the transformer
4.1 Remove the landscape
wire insulation 1/2” from
both wires and twist ends.
4.2 Insert wires under
each terminal plate and
tighten screws.
4.3 Gently pull on the
landscape wire to verify if
the connection is strong.
4.4 Verify that there are
no loose cable strands.
4. Connect cable to transformer
PULL
Landscape wire to the xtures.
The landscape wire should run from the
transformer to each light without being
cut. Do not run the landscape wire within
10 feet (3m) of a pool, spa or fountain.
If the landscape wire is too long, cut it
with a cable cutter.
The landscape wire should be protected
by routing it close to proximity of the
light xture or next to a building, deck
or fence. Use the low voltage landscape
lighting cable included in this kit.
For uniform brightness and longer bulb life, attach rst xture at least
10 feet from transformer.
5. Mount the transformer 6. Run the Landscape Wire (Not Included)
Insert a screw in a wall near an
electrical outlet and mount the
transformer.
* llustration of xture is for example only.
Transformer
Cable
Fixtures
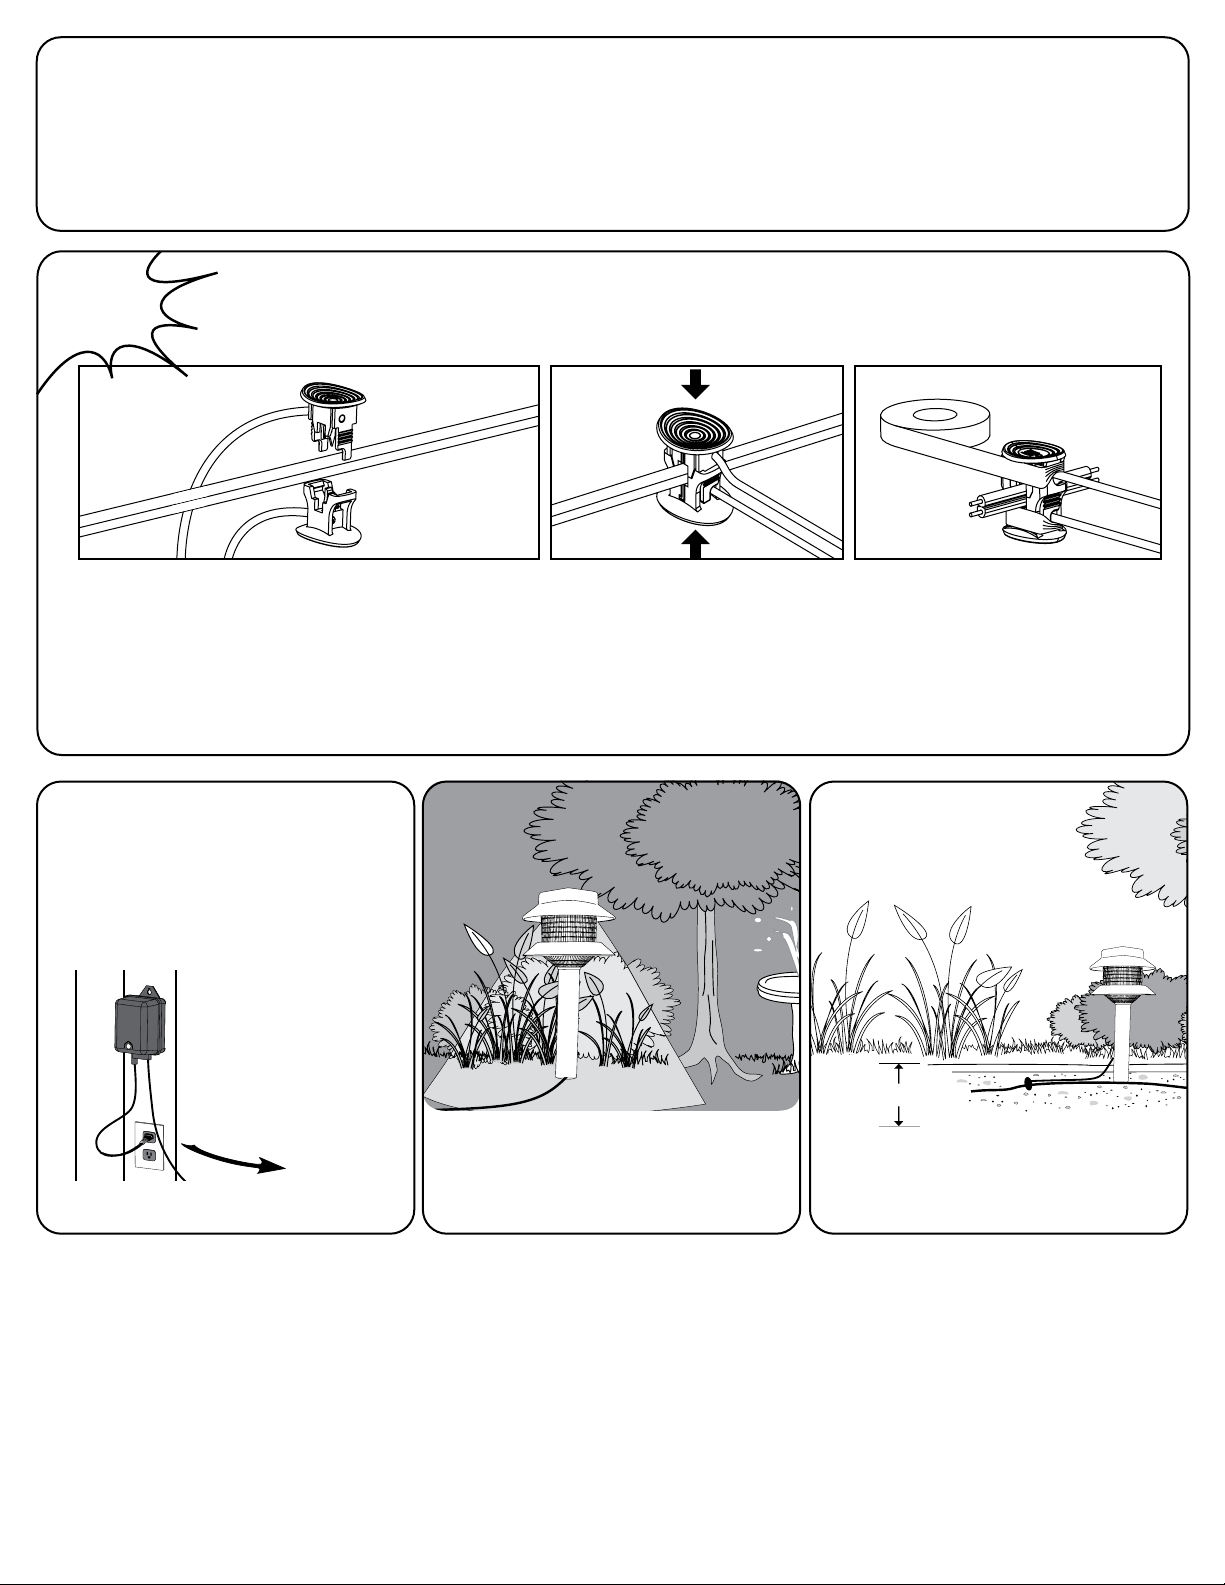
10. Light adjustment
* llustration of xture is for example only.
It is recommended to adjust your lighting
effect at night before burying the cable.
6 ’ ’ (15.24cm) max.
11. Bury the landscape wire
* llustration of xture is for example only.
The landscape wire and connector can also be
hidden under mulch, stone or buried
under grass at a maximum depth of 6” (15.24cm).
9. Power up the transformer
• Plug the transformer into a GFCI electrical
receptacle.
• To test the xtures, cover the photocell with
black tape and turn the control switch to the
ON position
•
After the installation is complete, remove the tape.
Landscape wire
to the xtures
7. Choosing Lighting Fixture Location
For uniform brightness and longer bulb life, attach rst xture at least 10 feet from transformer.
Once you have decided where you will install your xtures, verify the type of soil.
•If the soil is of a loose, sandy or organic type, grasp the xture post, close to the spike, with both hands and rmly push into the ground.
• If the soil is heavy or stony, dig a small hole, insert the xture spike, replace the soil and tap down.
Never push the xture into the ground by the xture head.
CAUTION
BE CAREFUL!
THE WIRE STABS
ARE VERY
SHARP!
8.2 Align and t the main
low voltage cable vertically to
the slot of wire connector as
shown.
8.3 Press the wire connector together
until fully seated and locked around
the cable. Pre-set prongs will pierce
the cable insulation and establish
contact. Turn on the power unit. If the
light xture does not turn on, repeat
operations 8.2 and 8.3.
8.4 Once the clip-on connector is in
place, wrap it with electrical tape for
additional protection.
8. Connect the xture wire to the landscape wire
8.1 Place the wire connector
on opposite sides of the
low voltage cable where the
xture will be located.

CUSTOMER SERVICE
1-888-867-6095 • cust[email protected]
All of the lights fail to
work
Only some lights work
The light switch “ON”
during the day
The light do not switch
“ON” at dusk
• To clean, wash with a damp
soft cloth.
• To replace the bulb, reverse
the procedure in the
“Assembly of the light
xture”.
• Replacement parts may be
ordered by using the xture
model number and the part’s
name.
• Check that the transformer power is on.
• Check if there is a loose connection at the transfomer screw terminal.
• Check that the control switch is not in the OFF setting.
• The problem here is with the xture's connector or light bulb.
• Check the connector to make sure the wire stabs have pierced the
landscape wire.
• To check a light bulb, exchange it with one from a xture that is working
(remember to be careful, as the bulbs can get very hot – also touch bulbs
with a soft cloth only).
• The power unit is in a dark area which triggers the photocell to turn ON the lights.
13. Troubleshooting 14. Maintenance
• The power unit is in a area where there is too much light at night.
12. How to operate the transformer
Photocell
Photocell
This component reacts to light conditions. It should not have direct contact with
any other light sources. A 30 second delay may be experienced when light condi-
tions change.
To test the system during day time, simply cover the photocell with black tape.
IMPORTANT SAFETY INFORMATION PERTAINING TO RISK OF FIRE OR INJURY TO PERSONS.
• Do not install within 10 feet (3 m) of a pool, spa or fountain.
• For use with 12 volt low voltage outdoor landscape lighting system only. Not for use with submersible light or pool/spa equipment.
• There are no serviceable parts inside the power supply unit. DO NOT DISASSEMBLE.
• Do not submerge transformer.
• Do not connect two or more transformers in parallel.
• Do not use with a dimmer.
• Plug the power supply unit directly into a GFCI outlet that is marked “wet location”.
• Do not use an extension cord.
• The maximum output of this transformer is 40 watts. Do not overload the transformer. Be sure that the total cumulative wattage of all 12 volt xtures
connected to the transformer is equal to or less than 40 watts.
PLEASE NOTE: This garden light system must be installed in accordance with all local codes and ordinances. If you are experiencing problems, contact a
qualied electrician.
This transformer is also equipped with a timer that controls the length of time the lights stay ON after dark.
• 8 H This position turns the system on at dusk for 8 hours, then turns off.
• 6 H This position turns the system on at dusk for 6 hours, then turns off.
• 4 H This position turns the system on at dusk for 4 hours, then turns off.
• AUTO This position turns the system on at dusk and off at dawn, automatically.
Control switch on the back of the transformer
ONE (1) YEAR LIMITED WARRANTY
This product, excluding electronic and/or electrical parts (if applicable), is guaranteed to be free from defects in material and workmanship for one (1) year. Should a defect occur, please contact our
customer service line at 1-888-867-6095 or at the following email address: customerservice@niinorthern.com. A proof of purchase (sales receipt) is required. If we cannot replace the defective part you
require, you can return your product to the original point of purchase for a full refund or a replacement product. The consumer is responsible for the removal and reinstallation of the product. Damage to
any parts as such by accident, misuse, or improper installation is NOT covered by this warranty. Our policy does not include liability for incidental or consequential damages. Some states or provinces do not
allow the exclusion or limitation of consequential damages; therefore, the above exclusion may not apply to you. This warranty gives you specic legal rights and you may also have other rights that vary from
place to place.
This manual suits for next models
1
Table of contents
Other Enchanted Garden Landscape Lighting manuals

Popular Landscape Lighting manuals by other brands

LIGMAN
LIGMAN DU-10206-2 installation manual

LIGMAN
LIGMAN NYBRO 8 installation manual

LIGMAN
LIGMAN NYB-80001 installation manual

Beckett
Beckett Accent Lighting TR3LT10 Specifications

AMP Lighting
AMP Lighting ASM-2407 Installation & maintenance guide

Cooper Lighting
Cooper Lighting Avenue ARC25MWW5C652 Specification sheet


One Stop Gardens
One Stop Gardens 91072 operating instructions

Cooper Lighting
Cooper Lighting McGraw-Edison WTM Specification sheet

LIGMAN
LIGMAN LIGHTALK 14 LA-30035 installation manual

BTR
BTR BT6026 SOLAR installation manual

Osram
Osram PrevaLED SKY Technical application guide

LIGMAN
LIGMAN NYB-80111 installation manual