Energer ENB519GRB User manual

Original instructions : MNL_ENB519GRB _V1
BENCH GRINDER
150W
ENB519GRB
Barcode:5052931248209
WARNING! Read the instructions before using the product!

Thank you for choosing a product it will give you full satisfaction in your
craft in the work.
The band saw is a product easy to use, it comes with accessories. For best use,
you must read this noice. It will provide key information on the functions of the device
and the rules to follow for maintenance.
Please keep this manual for future reference later.

ENB519GRB by Energer
GB
IE
03
In more detail... 15
03
04
05
11
Getting started...
Your product
Technical and legal information
Before you start
These instructions are for your safety. Please read through them thoroughly
before use and retain them for future reference.
Let’s
get started…
Getting started...
GB
04
Your product
Your product
IE
1
2
3
4
5
6
7
8
1. Wheel guard
2. Eye shield with mounting bracket
3. Adjustable tool rest
4. On/Off switch
5. Eye shield securing nut, screw & washer
6. Wheel guard securing nut, screw & washer
7. Adjustable tool rest securing bolt & knob
8. Mounting holes
ENB519GRB by Energer
Care and maintenance
Trouble shooting
Guarantee
EC declaration of conformity
Operation
Recycling and disposal
16
18
22
22
23
24

05
Getting started...
Technical and legal
information
Technical specifications
GB
IE
>Voltage :230V~50Hz
>Rated input :150 W
>Duty type :S2:30min
>No load speed :2950min -1
>Grinding wheel size :ø150mm x 16 x 12.7mm
>Coarse wheel grit :#36
>Medium wheel grit :#60
>Weight :5.5kg
Noise data
>Sound power level (LWA*) :62.6dB(A)
>Uncertainty KpA :3dB
>Noise pressure level (LPA*) :75.6dB(A)
>Uncertainty KwA :3dB
Vibration level :2.5 m/s2
Uncertainty K :1.5m/s2
ENB519GRB by Energer Technical and legal
information
Symbols
06
Getting started...
GB
IE
Warning!Denotes risk of personal
injury, loss of life, or damage to the
tool in case of non-observance
Read the instruction manual
The product complies with the
applicable European directives
and an evaluation method of
conformity fort his directives
was done
Take a power tool in the domestic
waste! In accordance with
European Directive 2002/96/EC on
waste electrical and electronic
equipment and its implementation
in national law, electric tools
collected separately and
environmentally friendly recycling
are fed. Take advantage of the
collection facilities. Ask your local
government for the collection
systems. If electrical appliances
are disposed of, can be poisoned
for years while the cause
hazardous substances into the
groundwater and entering the food
chain, or flora and fauna
ENB519GRB by Energer
The declared vibration total value has been measured in accordance with a
standard test method and may be used for comparing one tool with another.
The declared vibration total value may also be used in a preliminary assessment
of exposure.WARNING: The vibration emission during actual use of the power
tool can differ from the declared total value depending on the ways in which the
tool is used. The need to identify safety measures and to protect the operator are
based on an estimation of exposure in the actual conditions of use (taking account
of all parts of the operating cycle, such as the times the tool is switched off, when it
is running idle, in addition to trigger time).
Load factor:
A load factor of S2 30 min(temporary duty)means that you may operate the
motor continuously at its nominal power level (250W) for no longer than the
time stipulated on the specifications label (30minutes ON period). If you fail to
observe this time limit the motor will overheat. During the OFF period the motor
will cool again to its starting temperature.
W A R N I N G : When using electric tools basic
safety precautions should always be followed to
reduce the risk of fire, electric shock and personal
injury including the following.
Read all these instructions before attempting to
operate this product and save these instructions.
Wear respiratory protection.
Wear ear protection.
Wear eye protection.

Getting started...
GB
07
IE
Technical and legal
information
Safety warnings
WARNING:
When using electric tools basic safety precautions
should always be followed to reduce the risk of fire, electric shock and
personal injury including the following. Read all these instructions
before attempting to operate this product and save these instructions.
SAFE OPERATION
> Keep work area clear
Cluttered areas and benches invite injuries.
> Consider work area environment
Do not expose tools to rain.
Do not use tools in damp or wet locations.
Keep work area well lit.
Do not use tools in the presence of flammable liquids or gases.
> Guard against electric shock
Avoid body contact with earthed or grounded surfaces (e.g. pipes,
> Keep other persons away
Do not let persons, especially children, not involved in the work
cord and keep them away from the
> Store idle tools
When not in use, tools should be stored in a dry locked-up place,
> Do not force the tool
It will do the job better and safer at the rate for which it was intended.
> Use the right tool
Do not force small tools to do the job of a heavy duty tool.
Do not use tools for purposes not intended; for example do not use
or logs.
> Dress properly
Do not wear loose clothing or jewellery, they can be caught in moving
Non-skid footwear is recommended when working outdoors.
Wear protective hair covering to contain long hair.
> Use protective equipment
Use safety glasses.
Use face or dust mask if working operations create dust.
radiators, ranges, refrigerators).
touch the tool or the extension
work area.
out of reach of children.
circular saws to cut tree limbs
parts.
> Connect dust extraction equipment
If the tool is provided for the connection of dust extraction and
are connected and properly used.
> Do not abuse the cord
Never yank the cord to disconnect it from the socket.
Keep the cord away from heat, oil and sharp edges.
collecting equipment, ensure these
ENB519GRB by Energer
08
Technical and legal
information
Getting started...
GB
IE
> Secure work
Where possible use clamps or a vice to hold the work.
It is safer than using your hand.
> Do not overreach
Keep proper footing and balance at all times.
> Maintain tools with care
Keep cutting tools sharp and clean for better and safer performance.
Follow instruction for lubricating and changing accessories.
Inspect tool cords periodically and if damaged have them repaired by an
authorized service facility.
Inspect extension cords periodically and replace if damaged.
Keep handles dry, clean and free from oil and grease.
> Disconnect tools
When not in use, before servicing and when changing accessories such as
blades, bits and cutters,disconnect tools from the power supply.
> Remove adjusting keys and wrenches
Form the habit of checking to see that keys and adjusting wrenches are
removed from the tool before turning it on.
> Avoid unintentional starting
Ensure switch is in "off" position when plugging in.
> Use outdoor extension leads
When the tool is used outdoors, use only extension cords intended for outdoor
use and so marked.
> Stay alert
Watch what you are doing, use common sense and do not operate the tool
when you are tired.
> Check damaged parts
Before further use of tool, it should be carefully checked to determine that it
will operate properly and perform its intended function.
Check for alignment of moving parts, binding of moving parts, breakage of
parts, mounting and any other conditions that may affect its operation.
A guard or other part that is damaged should be properly repaired or replaced
by an authorised service centre unless otherwise indicated in this instruction
manual.
Have defective switches replaced by an authorised service centre.
Do not use the tool if the switch does not turn it on and off.
> Warning
The use of any accessory or attachment other than one recommended in this
instruction manual may present a risk of personal injury.
> Have your tool repaired by a qualified person
This electric tool complies with the relevant safety rules. Repairs should only
be carried out by qualified persons using original spare parts, otherwise this
may result in considerable danger to the user.
ENB519GRB by Energer

09
Technical and legal
information
Getting started...
GB
IE
> Secure work
Where possible use clamps or a vice to hold the work.
It is safer than using your hand.
> Do not overreach
Keep proper footing and balance at all times.
> Maintain tools with care
Keep cutting tools sharp and clean for better and safer performance.
Follow instruction for lubricating and changing accessories.
Inspect tool cords periodically and if damaged have them repaired by an
authorized service facility.
Inspect extension cords periodically and replace if damaged.
Keep handles dry, clean and free from oil and grease.
> Disconnect tools
When not in use, before servicing and when changing accessories such as
blades, bits and cutters,disconnect tools from the power supply.
> Remove adjusting keys and wrenches
Form the habit of checking to see that keys and adjusting wrenches are
removed from the tool before turning it on.
> Avoid unintentional starting
Ensure switch is in "off" position when plugging in.
> Use outdoor extension leads
When the tool is used outdoors, use only extension cords intended for outdoor
use and so marked.
> Stay alert
Watch what you are doing, use common sense and do not operate the tool
when you are tired.
> Check damaged parts
Before further use of tool, it should be carefully checked to determine that it
will operate properly and perform its intended function.
Check for alignment of moving parts, binding of moving parts, breakage of
parts, mounting and any other conditions that may affect its operation.
A guard or other part that is damaged should be properly repaired or replaced
by an authorised service centre unless otherwise indicated in this instruction
manual.
Have defective switches replaced by an authorised service centre.
Do not use the tool if the switch does not turn it on and off.
> Warning
The use of any accessory or attachment other than one recommended in this
instruction manual may present a risk of personal injury.
> Have your tool repaired by a qualified person
This electric tool complies with the relevant safety rules. Repairs should only
be carried out by qualified persons using original spare parts, otherwise this
may result in considerable danger to the user.
ENB519GRB by Energer
10
Technical and legal
information
Getting started...
GB
IE
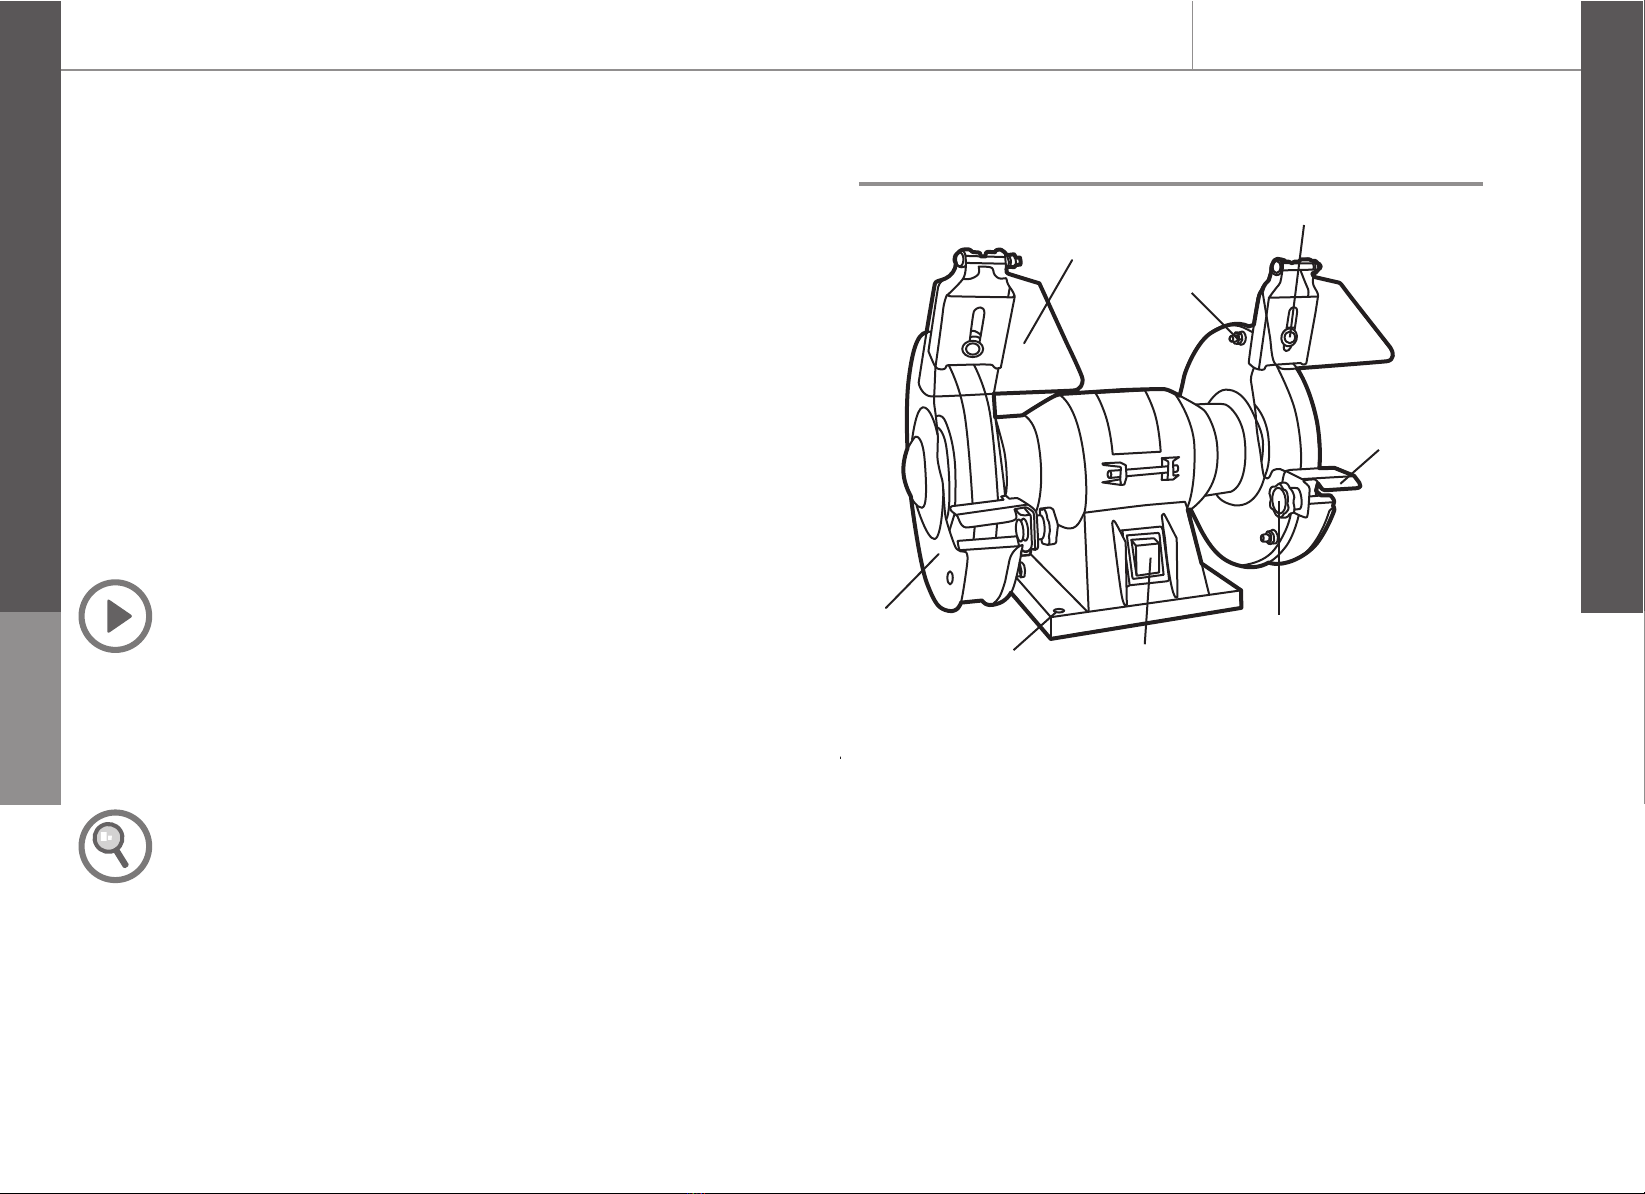
ADDITIONAL SAFETY RULES FOR
BENCH GRINDERS
> Never drape the power cable over the machine bench!
> Wear protective clothing. Wear full face protection, eye protection or safety
goggles, in accordance with the job at hand. Where appropriate, wear a dust mask,
ear defenders, protective gloves or special aprons that keep grinding and material
particles away from you. Protect your eyes from the foreign bodies that fly off
during certain applications.
Dust or breathing masks must be used to filter particles generated by the
application. Hearing loss can be caused by exposure to high intensity noise.
> Always wear a dust mask and safety goggles. Contact with or breathing in
noxious / toxic dust produced by grinding metal that is finished with lead paint can
be dangerous for the user and surrounding people.
> This power tool must not be used for wet grinding.Use for dry grinding only.
Coolant can weaken the bonding strength of the wheel and cause it to fail.
> This bench grinder should only be used when stationary. Secure to a solid, even
surface.
> Do not use any accessories that have not been especially designed and
recommended for this power tool by the manufacturer. Simply because an
accessory can be connected to your power tool does notguarantee it can be used
safely.
> Only use grinding disks whose diameter, thickness and intended use meet the
requirements of this power tool. Incorrectly sized grinding disks may not be
sufficiently screened or controllable. Use of unsuitable grinding disks can result in
danger to the user or damage to the power tool.
> Never touch the spinning grinding disks! Make sure the grinding disks have come
to a complete standstill after turning off before you touch them.
> When you have checked the tool attachment and have attached it, make sure
you and others nearby keep away from the area of the rotating tool attachment and
let the appliance run at the maximum speed for a minute. Most damaged tool
attachments will break off in this test period.
> Make sure bystanders are a safe distance from your work area. Anyone entering
the work area must wear personal protective clothing. Pieces may break off the
work piece or sparks may fly off and can also cause injuries outside the direct work
area.
> Position the power cable clear of the spinning tool attachment. If you lose control
of the appliance,the power cable can be severed or tangled and your hands or
arms may get caught in the spinning tool attachment.
> Do not leave the power tool running when you are not using it. Your clothing can
become entangled when it comes into contact with the spinning tool attachment,
causing the tool attachment to drill into your body.
> Clean the power tool’s air vents regularly. The motor’s fan draws dust into the
housing and the heavy build-up of metal dust can result in electrical hazards.
> Do not use the power tool in the vicinity of flammable materials. Sparks may
cause these materials to ignite.
> Do not use any tool attachments that require liquid coolants. Use of water or
other liquid coolants can result in electric shock.
ENB519GRB by Energer

Before you start
Getting started...
GB
11
IE
> Before starting up the bench grinder for the 1st time, check the grinding
wheels with a sound test. Faultless grinding wheels will make a clear sound
when struck gently with a plastic hammer (or piece of wood). If new grinding
discs are attached, check these also beforehand.
> Always use the protective features and wheel guard fitted to or supplied with
this power tool.The wheel guard and protective features should be attached
securely to the power tool and set so that the maximum safety level can be
achieved. The protective features are there to protect the user from broken
pieces and accidental contact with the grinding disks.
ENB519GRB by Energer
Unpack
You will need
> Unpack all parts and lay them on a flat, stable surface.
> Remove all packing materials and shipping devices if applicable.
> Make sure the delivery contents are complete and free of any
damage. If you find that parts are missing or show damage do not
use the product but contact your dealer. Using an incomplete or
damaged product represents a hazard to people and property.
> Ensure that you have all the accessories and tools needed for
assembly and operation. This also includes proper personal
protective equipment.
Items not supplied Items supplied
1. Protective gloves 1. worepiece support
2. Screwdriver with PH2
head
2. spark guard
3. Mounting nuts, bolts and
washers
WARNING! Do not connect to power supply until assemb
is complete. Failure to comply could result in accidental startin
and possible serious injury.
12
Before you start
Getting started...
GB
IE
ENB519GRB by Energer
Install the spark guard
> To fit the eye shields locate the nut, screw and washers provided through
the slot in the eye shield and hole on the grinding wheel guard and finger
tighten. Position the eye shield so it does not come in to contact with the
grinding wheel. Tighten the nut and screw to secure the eye shield in place.
WARNING! The adjustable safety plate (1) of the spark
guard must be assembled in such a way that the gap
between cutting disc and adjustable safety plate is max. 5 m
≤5 mm
1

13 14
Connection to the power supply
> Connect the plug with a suitable socket.
WARNING! Check the voltage! The voltage must comply with the
information on the rating label!
> Your product is now ready to be used.
WARNING! Do not use until the product has been
securely installed to a work bench.
Mounting the bench grinder
> The machine is to be assembled firmly on a suitable place. Four holes are
available to fix on a firm and solid base e.g. on a workbench or machine stand.
– Ensure that the mains connection is located not more than approx.
100–150cm from the place of fixation.
– The machine must be easily accessible from front and left side.
Install the workpiece support
> The workpiece support (2) must be assembled in such a way that the gap
between grinding disc and workpiece support is max. 3mm.
Max. 3 mm
2
Before you start
Getting started...
GB
IE
ENB519GRB by Energer Before you start
Getting started...
GB
IE
ENB519GRB by Energer

15
GB
IE
16
GB
IE
Getting started...
In more detail...
Care and maintenance
Trouble shooting
Guarantee
EC declaration of conformity
Operation
Recycling and disposal
GB
IE
In more detail...
GB
IE
In more detail...
Dry grinding
Operation
16
18
22
22
23
24
> Hold the workpiece to be worked on with both the hands and support it on the
workpiece support.
> Press the workpiece with proper pressure against the grinding disc.
NOTE: The machine is designed for rough and fine grinding.
The dry grinding disc is thus suitable only for rough grinding
(roughing).
SWITCHING ON AND OFF
Before connecting to the power supply rotate the wheel by hand to ensure that it is
running free from obstruction. Connect to the mains supply and press the rocker switch
to the ON position (I) and allow your grinder to reach the maximum speed before
commencing grinding. Hold the workpiece firmly against the work rest and feed it
smoothly and evenly to the grinding wheel. Grinding action tends to slow the wheel
down, pressure should therefore be occasionally released to allow the wheel to regain
the full speed.
ENB519GRB by Energer ENB519GRB by Energer

17
18
Operation GB
IE
GB
IE
In more detail...
In more detail...
Care and maintenance
General operation
Grinding wheel replacement
General cleaning
1. Clean the product with a dry cloth. Use a brush for areas that are hard to reach.
2. Check for worn or damaged parts. Replace worn parts as necessary or contact
an authorised service centre for repair before using the product again.
The golden rules of care
1. Keep the product clean. Remove debris from it after each use and before storage.
2. Regular and proper cleaning will help ensure safe use and prolong the life of the
product.
3. Inspect the product before each use for worn and damaged parts. Do not operate
it if you find broken and worn parts.
NOTE: Do not use chemical, alkaline, abrasive or other
aggressive detergents or disinfectants to clean this
product as they might be harmful to its surfaces.
WARNING! Always switch the product off, disconnect it
from power supply and let the product cool down before
performing inspection, maintenance and cleaning work!
WARNING! Only perform repairs and maintenance
work according to these instructions! All further works
must be performed by a qualified specialist!
1. After switching the grinder on, allow it to reach full speed before performing
grinding operation.
2. The eye shields are able to be adjusted and should be positioned to allow the
operator a clear view of the work through the shields.
3. The appropriate adjustments of the tools rests will provide the correct working
angle for efficient grinding. As the diameter of the grinding wheel is subject to
wear. It will be necessary to re-adjust the edge of the grinding wheel.
Fix the grinder to horizontal, stable surface before using. Positing the grinder towards
the front edge of the bench will facilitate the handing of long tools. If possible, leave
space to the left hand side of the machine for easy access to the wet wheel. An
alternative method is to secure the grinder to a sheet of plywood which can then be
clammed to a bench or table to present the grinder in the most convenient position.
Before using the dry wheel ensures that the spark guard (behind the eye shield) is
positioned as close to the surface of the wheel as possible and that the eye shield is
in a position to prevent sparks flying up. It is a sensible precaution to wear safety
spectacles as well when operating a grinding machine.
The dry wheel can be used for grinding profiles or virtually any cutting tool; plane
irons, chisel, gouges, turning tools, drill bits, etc. The aluminum oxide will cut cleanly
and without undue heating of the tip of the tool. However care should be taken not to
grind a tool too hard or for too long in case over-heating occurs.
To renew or change the grinding wheels, follow these series of steps:
1. Switch off the unit and disconnected from the mains supply.
2. Remove the fixing screws(1) on the outside cover(2) and then pull out the
outside cover(2).
3. Remove the nut (3) from the spindle (5) using spanner supplied. The nut on the
right spindle has a right thread; the nut on the left spindle has a left thread.
4. Take out the outer flange (4) from the spindle (5).
5. Place the new wheel onto the spindle. once secured rotate the grinding wheel
by hand to confirm that the wheel moves freely and doesn't contact any surfaces.
6. Reassemble the flange, nut, and outside cover.
7. Switch on the machine and let the wheel run with no load for one minute to
check for cracks.
ENB519GRB by Energer ENB519GRB by Energer

Getting
FR
IE
Getting started...
19 20
GRINDING WHEEL INFORMATION
GB
IE
GB
IE
Getting started...
Getting started...
Care and maintenance Care and maintenance GB
IE
In more detail...
GB
IE
In more detail...
The following information is a guide only on the different types of grinding wheels
and their uses.
TYPES OF ABRASIVE GRAIN
Grinding wheels are made of four main types of abrasive grain: aluminum oxide,
silicon carbide, CBN (cubic boron nitride) and diamond. In the home workshop you
will probably only use wheels of aluminum oxide or silicon carbide. Both types are
available from your tool stockiest. Grain size is separated into four main categories:
course, medium, fine and very fine. Table 1 shows the breakdown of grain size in
each category. For most work a medium or fine wheel is recommended.
TABLE 1
The four main categories of abrasive grains
Coarse Medium Fine Very Fine
12 46 70 150
14 60 80 180
16 90 220
20 100 240
24 120
30
36
TYPES OF BOND
There are five main kinds of bonding agents namely, ceramic (vitrified), phonetic
resin, rubber, shellac and metal. The abrasive can be bonded with its particles close
together or with spaces between each grain particle. Bond material creates a link
between each grain. The spaces between the grains will determine how dense the
wheel is, large spaces will give an open wheel and smaller spaces will give a close
or dense wheel.
The structure is measured on a scale of 0-14 with 0 being very close and 14 being
very open with wide spacing between the grains.
WHEEL HARDNESS OR GRADE
Grade or hardness is the strength of bonding between the abrasive grains. Wheel
hardness is graded alphabetically, in increasing order of hardness; letters A through
D represent very soft wheels, and letters V through Z represent very hard ones.
Letter K in the illustration below represents a soft to medium wheel.
9A – 46 – K5 – V 22
Kind of
Abrasive
9A
Grain
Size
46
Grade
K
Destiny
5
Bond
Type
V
Manufacturers
Symbol
22
The number shown in the above illustration is an example of a grinding wheel
description. 9A means that the abrasive is aluminum oxide46 means that the
grain size is medium, K means that the wheel is soft, 5 means that the wheel
is dense, V stands for vitrified bonding and 22 is the manufacturer’s symbol.
Wheels supplied with bench grinders are generally “N” on the hardness scale,
which is considered hard. Do not try to sharpen carbide tools, knives, scissors
or high-speed tools (router bits, wood turning tools) with this hard wheel. A
tandard wheel will not cut carbide. If you try, you will only create heat and glaze
over the wheel. Hard wheels will burn router bits and other high-speed tools.
Overheating the tools will destroy their hardness and render them useless.
Soft wheels give themselves up while grinding. When grinding, only a small
amount of material is removed, and the wheel releases grains a little at a time,
presenting new cutting edges. This releasing activity helps to keep the tool from
heating up and gives a finer grinding result.
Table 2 shows wheel hardness and uses.
Wheel Hardness (Grade) Uses for designated hardness Description of hardness
A B C D
E F G H I J K L
M N O P Q R S T
U
V W X Y Z
Not used very often
Use these soft wheels to sharpen high -speed
-steel tools, such as router bits,drills, and tool bits.
Use these wheels for rough grinding on
soft materials.
This hard grade is used for dressing sticks
to dress grinding wheels.
Not used very often
Very soft
Soft to medium
Medium to hard
Hard
Very hard
TABLE 2
The following table 3 should help you to select the correct grinding wheel for the
job. New bench grinders are supplied with grey wheels. All other types of grinding
wheel are available from your tool stockiest.
TABLE 3
Type of tool
Drill bits
Spade boring bits
Masonry drill bits
Lathe tool bits
Chisels
Router bits
High-speed steel carbide tipped
Rotary lawnmower blade
Scissors & snips
Tool material
High-speed steel
High-speed steel
Cutting edge is carbide
High-speed steel
High-speed steel
High-speed steel
Cutting edge is carbide
Non heat-treated steel
Hard steel (but not file hard)
Recommended wheel type
Aluminum oxide (grey)
Silicon carbide (green)
Soft aluminum oxide(Pink or white)
Silicon carbide (green)
Aluminum oxide(grey)
Aluminum oxide (Pink or white)
ENB519GRB by Energer ENB519GRB by Energer

21 22
Care and maintenance
GB
IE
GB
IE
In more detail...
In more detail...
Power cord
If the power cord is damaged, it must be replaced by the manufacturer, its
service agent or similarly qualified persons in order to avoid a safety hazard.
Repair
1. This product does not contain any parts that can be repaired by the
consumer. Contact a qualified specialist to have it checked and repaired.
Storage
1. Clean the product as described above.
2. Store the product and its accessories in a dry, frost-free place.
3. Always store the product in a place that is inaccessible to children. The
ideal storage temperature is between 10 and 30°C.
4. We recommend using the original package for storage or covering the
product with a suitable cloth to protect it against dust.
Transportation
1. Switch the product off and disconnect it from power supply before
transporting it anywhere.
2. Attach transportation guards, if applicable.
3. Always carry the product by its handle.
4. Protect the product from any heavy impact or strong vibrations which may
occur during transportation in vehicles.
5. Secure the product to prevent it from slipping or falling over.
> No connection is to be made to the Earth terminal of the plug.
> Only fit an approved 13 Amp BS1363/a plug and the correct rated fuse.
> If in doubt, consult a qualified electrician.
> NOTE: If a moulded plug is fitted and has to be removed take great care in
disposing of the plug and severed cable, it must be destroyed to prevent
engaging into a socket.
UK plug
> As the colours of the wire in the mains lead of this appliance may not
correspond with the coloured markings identifying the terminals in your
plug, proceed as follows. The wire, which is coloured blue, must be
connected to the terminal, which is marked with N or coloured black. The
wire, which is coloured brown, must be connected to the terminal, which is
marked L or coloured red.
Trouble shooting
Recycling and disposal
Waste electrical products should not be disposed of with
household waste. Please recycle where facilities exist. Check
with your Local Authority or local store for recycling advice.
Suspected malfunctions are often due to causes that the user can fix
themselves. Therefore check the product using this section. In most cases the
problem can be solved quickly.
WARNING! Only perform the steps described within
these instructions! All further inspection, maintenance
and repair work must be performed by an authorised
service centre or a similarly qualified specialist if you
cannot solve the problem yourself!
Problem Possible cause Solution
1. Product does
not start
1.1 Not connected to
power supply
1.2 Power cord or plug
is defective
1.3 Other electrical
defect to the product
1.1. Connect to power
supply
1.2. Check by a specialist
electrician.
1.3. Check by a specialist
electrician
2. Product does not
reach full power
2.1 Extension cord not
suitable for operation
with this product
2.2 Power source (e.g.
generator) has too low
voltage
2.3 Air vents are
blocked
2.1. Use a proper
extension cord
2.2. Connect to another
power source
2.3. Clean the air vents
3. Unsatisfactory
result
3.1 Accessory not
suitable for work piece
material
3.1. Use proper accessory
Trouble shooting
ENB519GRB by Energer ENB519GRB by Energer

FR
Guarantee
2423
FR
Guarantee
détail...
Plus en détail...
Plus en détail...
GB
IE
In more detail...
FR
Et dans le détail...
GB
IE
In more detail...
GB
IE
In more detail...
FR
Et dans le détail...
GB
IE
In more detail...
EC declaration of
conformity
Declaration of conformity
Signature:_________________
Authorised Signatory and technical file holder
Date : 10/09/2013
Name / title: Peter Harries / Quality Manager
Powersmith (UK) LTD. Trade House Mead Avenue, BA22 8RT
We, Importer
Powersmith Ltd., BA22 8RT
Declare that the product:
Designation: 150w Bench grinder
Model: ENB519GRB
Complies with the following Directives
2004/108/EC Electromagnetic Compantibility Directive
2006/42/EC Machinery Directive
2006/95/EC Low voltage Directive
2011/65/EU Restrictions of the Use of Certain Hazardous Substances
in Electrical and Electronic Equipment
2002/96/EC and 2003/108/EC Waste Electrical and Electronic Equipment(WEEE)
Standards and technical specifications referred to:
EN61029-1/A11:2010
EN61029-2-4:2011
EN55014-1/A2:2011
EN55014-2/A2:2008
EN61000-3-2/A2:2009
EN61000-3-3:2008
2013
ENB519GRB by Energer ENB519GRB by Energer
This ENERGER product carries a guarantee of 12months.
If your product develops afault within this period, you should,in the first instance contact
the retailer where the item was purchased.
This guarantee specifically exclude slosses caused due to:
> Fair wear and tear
> Misuse or abuse
> Lack of routine maintenance
> Failure of consumable items
> Accidental damage
> Cosmetic damage
> Failure to follow manufacturer’s guidelines
> Loss of use of the goods This guarantee does not affect yours tatutory rights.
This guarantee is onlyvalid in theUK. For any enquiries relating to the guarantee
please refer to your retailer.

GB-IE
Powersmith (UK) LTD.
Trade House Mead Avenue, BA22 8RT
This manual suits for next models
1
Table of contents
Other Energer Grinder manuals
Popular Grinder manuals by other brands

Graphite
Graphite 59G207 Translation of the original instructions

Altocraft
Altocraft AG370 Operator's manual

Hitachi Koki
Hitachi Koki G 13SD Handling instructions

Deprag
Deprag GDS027-320BY Operating instruction booklet

Makita
Makita DGA411 instruction manual

Hitachi Koki
Hitachi Koki G18SW Handling instructions