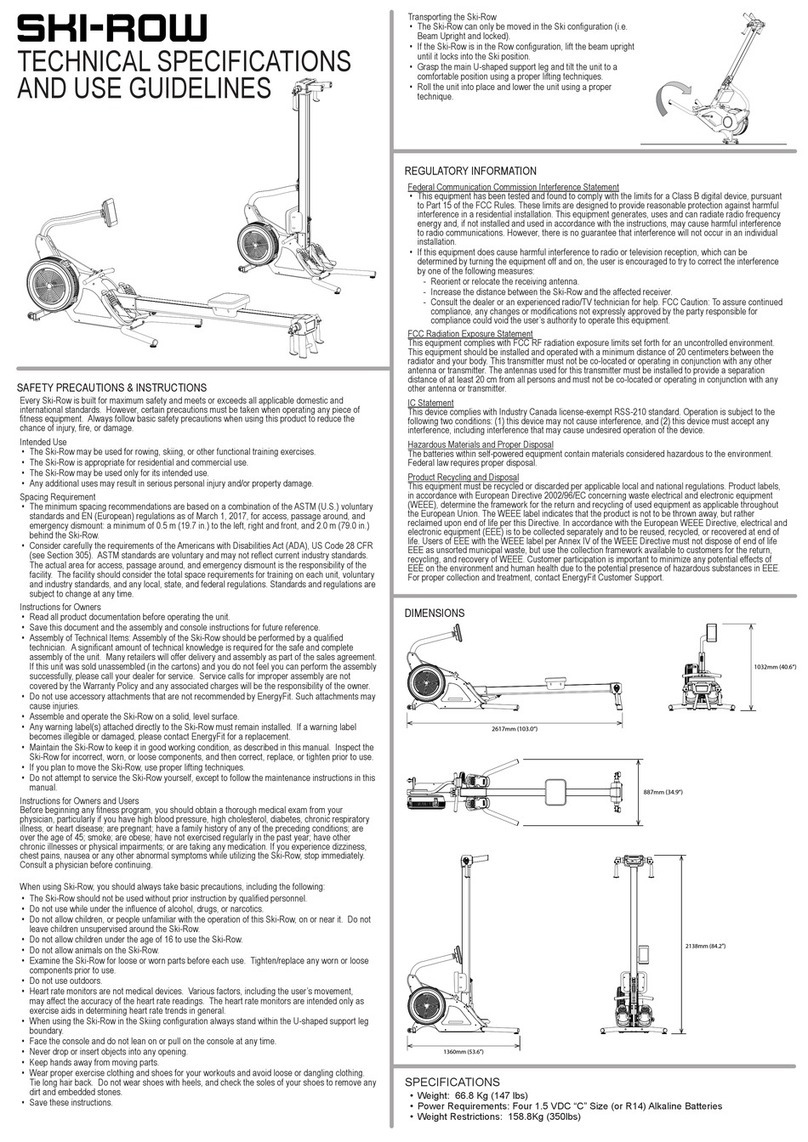
EnergyFit SKI-ROW User manual

BASE FRAME
SEAT ASSEMBLY
CONSOLE
BEAM ASSEMBLY
REAR FOOT
MAST SHROUDS
PIVOT SHROUD
LEG ASSEMBLY
CONSOLE MAST
GAS SPRING
SEAT STOP
M6 x 10mm Cap Head Screw
M8 x 15mm Button Head Screw
M4 x 20mm Flat Head Phillips Screw
HARDWARE DESCRIPTION DRAWING QUANTITY
M4.2 x 19mm Self Threading Phillips Screw
M5 x 12mm Round Head Phillips Screw
M5 x 45mm Cap Head Screw
4
4
4
5
2
1
M8 x 15mm Flat Head Screw
M8 x 35mm Cap Head Screw
M8 x 55mm Cap Head Screw
M10 x 20mm Cap Head Screw
M10 x 65mm Cap Head Screw
1
1
2
4
4
M8 Lock Nut
M8 Washer
1
2
ASSEMBLY TOOLS
5 mm
Hex Wrench
8 mm
Hex Wrench
Combo
Wrench
6 mm
Hex Wrench
4 mm
Hex Wrench
M8 Lock Nut (Black)
M8 Washer (Black)
1
2
ASSEMBLY AND
OPERATING INSTRUCTIONS
ASSEMBLY
The EnergyFit Ski-Row requires minimal assembly. All tools required to complete the initial setup and
assembly have been included in the Assembly Hardware Kit. Prior to assembly, remove the unit and all
parts from the carton and packaging. Conrm all parts shown in the section tiltled “As Shipped” above
are included before attempting to assemble the Ski-Row.
1582 Parkway Loop, Suite A Tustin, California 92780 Ph. 1-657-345-4530
For more information or questions regarding your product, please visit our website at www.energy.t
© EnergyFit 2020
Assembly Step 1:
Install the Beam Foot Assembly to the Beam End with two M10 x 20mm Socket Head Screws using an
8mm hex wrench. Next, slide the Seat Assembly onto the front end of the beam, being sure to orient the
wide end of the seat toward the rear of the beam. Finally, install the Seat Stop to the beam with two M5
x 15mm Phillips Drive Round Head Machine Screws and a #2 Phillips Screwdriver.
Assembly Step 3:
Press down on the Beam Release Lever and move the Beam Bracket down into the horizontal position.
Place the beam on the oor behind the Base Frame and carefully slide the Beam all the way onto the
Beam Bracket, and secure it with four M8 x 15mm at head socket screws and four M8 x 15mm Button
Head Screws using a 5mm Hex wrench.
Next, install the Beam Pivot Cover by snapping it down in place over the Beam Bracket, and secure it with
four M4 x 20mm Flathead Machine Screws and a #2 Phillips Screwdriver.
Assembly Step 4:
WARNING:
THE ORDER OF THE
FOLLOWING STEPS ARE
CRITICAL FOR SUCCESSFUL
ASSEMBLY AND OPERATION.
Raise the beam to the vertical position
untill the Beam Lock clicks into place.
Install the Ski Pulley M5 x 45mm Link
Screw with a 4mm hex wrench through
the lower hole in the access cover, then
REMOVE the M5 shoulder screw to free
the ski pulley assembly.
Assembly Step 5:
Install the gas spring by screwing the threaded
stud on the cylinder into the end tting on the Base
Frame. Align the end tting on the top of the gas
spring rod to the clevis on the Beam, and secure
with a M8 x 35 mm socket head cap screw, two M8
washers, and M8 lock nut using 6mm hex wrench
and multi-wrench.
AS SHIPPED
Assembly Step 6:
Uncoil and straighten out the Console Cable.
Carefully feed the cable through the Console
Support Mast and all the way out the end. Attach
the Console to the Console Support Mast with a
M8 x 55mm bolt, two Black M8 Washers, and one
Black M8 Lock Nut.
Next, attach the Console Support to the base
frame with four M6 x 10mm screws and a 5mm
Hex Wrench, being carefull not to pinch the cable
between the Console Support and the Base
Frame.
Assembly Step 2:
Install the Leg Assembly onto the Base Frame with
four M10 x 65mm Socket Head Cap Screws and a
8mm Hex wrench.
Assembly Step 7:
Connect cables together.
Next, install the two Mast Shrouds to the Base Frame
with ve M4.2 x 19mm Phillips Head Screws using a #2
Phillips Screwdiver.
Finally, install four C type alkaline batteries in the back
of the console housing. Note that there are two battery
compartments and two batteries must be installed in
each compartment in the orientation specied for the
console to operate correctly.

OPERATING INSTRUCTIONS DISTANCE GOAL Program
For the DISTANCE GOAL program, the user may set a single target value and the program will continue
until that goal has been achieved. The user can select a time from 100 to 99999 meters.
Launch: Press the WORKOUT key to bring up the workout menu. Then use the UP/DOWN keys
to navigate the menu to nd the DISTANCE program. Press START/ENTER to conrm the
selection.
Setup: The default distance will then be shown. Adjust the displayed value by pressing the UP
or DOWN keys, followed by the START/ENTER key to conrm. The program will begin
automatically.
Run: The display elds will light and begin to track the progress of the user toward the specied goal.
End: The program will end automatically when the selected target has been achieved. To end the
program at any time, press the STOP key. The Workout Summary will launch and show a
record of the workout data.
CALORIE GOAL Program
For the CALORIE GOAL program, the user may set a single target value and the program will continue until
that goal has been achieved. The user can select a time from 50 to 1000 calories.
Launch: Press the WORKOUT key to bring up the workout menu. Then use the UP/DOWN keys
to navigate the menu to nd the DISTANCE program. Press START/ENTER to conrm the
selection.
Setup: The default calories will then be shown. Adjust the displayed value by pressing the UP
or DOWN keys, followed by the START/ENTER key to conrm. The program will begin
automatically.
Run: The display elds will light and begin to track the progress of the user toward the specied goal.
End: The program will end automatically when the selected target has been achieved. To end the
program at any time, press the STOP key. The Workout Summary will launch and show a
record of the workout data.
TIME INTERVAL Program
The TIME INTERVAL Program gives the user the ability to set the length of the work and rest intervals as
well as the total number of intervals.
Launch: Press the WORKOUT key to bring up the workout menu. Then use the UP/DOWN keys to
navigate the menu until INTERVALS is displayed. Press the START/ENTER key to select
INTERVALS as the desired workout type. Then use the UP/DOWN keys to navigate the
intervals menu until the TIME INTERVAL type is displayed. Press START/ENTER to conrm
the selection.
Setup: The default work interval time will then be shown. Adjust the displayed value by pressing the
UP/DOWN keys, followed by the START/ENTER key to conrm. The default rest interval time
will be shown. Adjust the value and conrm by pressing START/ENTER. Next, the default
number of desired intervals shall be displayed. Adjust the displayed value by pressing the
UP/DOWN keys, followed by the START/ENTER key to conrm. The program will begin
automatically.
Run: The console will display the current Work/Rest interval and the time display will count down for
each interval.
End: The program will run until the last segment ends. To end the program at any time, press the
STOP key. The Workout Summary will launch at the end of the program and post a record of
the workout data.
DISTANCE INTERVAL Program
The DISTANCE INTERVAL Program gives the user the ability to set the length of the work and rest
intervals as well as the total number of intervals.
Launch: Press the WORKOUT key to bring up the workout menu. Then use the UP/DOWN keys to
navigate the menu until INTERVALS is displayed. Press the START/ENTER key to select
INTERVALS as the desired workout type. Then use the UP/DOWN keys to navigate the
intervals menu until the DISTANCE INTERVAL type is displayed. Press START/ENTER to
conrm the selection.
Setup: The default work interval distance will then be shown. Adjust the displayed value by pressing
the UP/DOWN keys, followed by the START/ENTER key to conrm. The default rest interval
distance will be shown. Adjust the value and conrm by pressing START/ENTER. Next, the
default number of desired intervals shall be displayed. Adjust the displayed value by pressing
the UP/DOWN keys, followed by the START/ENTER key to conrm. The program will begin
automatically.
Run: The console will display the current Work/Rest interval and the distance display will count down
for each interval.
End: The program will run until the last segment ends. To end the program at any time, press the
STOP key. The Workout Summary will launch at the end of the program and post a record of
the workout data.
HEART RATE TRAINING
The best way to determine exercise intensity is to monitor your heart rate. To aid in heart rate training,
the Ski-Row console is equipped with a wireless heart rate receiver which can detect a HR signal being
transmitted by a wireless chest strap (not included).
Calculated Maximum Heart Rate
A user’s target heart rate depends primarily upon their age. It is key to work within a safe and productive
zones to be able to make gains in strength and cardiovascular tness.
It is generally perceived that it is most effective to train at a heart rate between 65% and 85% of your
maximum heart rate. Calculated Maximum Heart Rate is calculated as a percentage of your Maximum
Heart Rate (estimated as 220 Bpm minus your age). To calculate your Calculated Maximum Heart Rate
and nd the appropriate target training zone, use the following formulas. The following estimations are
relevant for a 35-year-old user:
220 – 35 = 185 BPM (220 – Age = Calculated Maximum Heart Rate in bpm)
0.65 x 185 = 120 BPM (65% of 185 BPM [Calculated Maximum Heart Rate] = 120 bpm)
0.85 x 185 = 157 BPM (85% of 185 BPM [Calculated Maximum Heart Rate] = 157 bpm)
The recommended heart rate training zone for this user would be between 120 bpm and 157 bpm.
Using the Wireless Heart Rate Receiver
In general, a wireless heart rate chest strap is the most accurate and convenient method of detecting
and monitoring a heart rate signal on tness equipment. The Ski-Row is equipped with a wireless heart
rate receiving system. In order for the console to detect and display your heart rate wirelessly, four(4)
conditions must be present:
• A compatible heart rate chest strap must be functioning and worn. The console is compatible with either
an ANT+ or Bluetooth Smart heart rate chest strap. For proper function of the chest strap, please refer
to the manufacturer’s instructions.
• Both the console and heart rate chest strap must be powered on/activated.
• A workout program must be running.
• The ANT+/Bluetooth Smart heart rate chest strap is paired to the console.
Pairing the wireless ANT+/Bluetooth Smart Heart Rate Chest Strap to the console.
There are two ways to connect the heart rate chest straps to the console.
• Bluetooth: If monitoring the workout through a compatible mobile device and application, pairing of the
heart rate strap will occur via the Bluetooth radio from within the application. Follow the application
instructions which will include turning the Bluetooth radio on in the mobile device, pressing the
CONNECT key on the console and select the Ski-Row from the mobile application.
• ANT+: If a mobile device is not used, pairing is available via the ANT+ radio. Ensure the chest strap
is on and worn correctly. Press and hold the CONNECT key for 5 seconds. “ANT+HR” will begin to
ash in the upper alpha-numeric display until the heart rate strap pairs to the console. When paired, the
display will ash “Connected” to conrm connection.
TIME Window
STROKE RATE Window
PACE Window
DISTANCE Window
WATTS, CALORIES, and
HEART RATE Window
The WORKOUT key is used to select from four (4) different types of workouts: Time,
Distance, Calories, and Intervals.
The START/ENTER key will launch a program and restart a paused program. The ENTER
key conrms values entered when adjusting a program. Pressed along with the STOP key
and UP key, the Maintenance Mode will launch.
Use the STOP key to end a program or pause a running program. To reset the console and
erase all user-entered data, press the STOP key for more than two seconds.
The UP/DOWN Arrow keys allow the user to increase and decrease console values. Pressing
the UP/DOWN Arrow keys together for ve seconds will launch the Comp Setup Mode.
Connections to a mobile device or wireless chest strap via the on-board Bluetooth or ANT+
radios are initiated by pressing the CONNECT key.
Console Keys
Battery Installation. The console operates on four (4) C batteries (included). There are two battery
compartments on the back side of the console. Two batteries are to be installed in each compartment.
Note the polarity when installing the batteries. Only use alkaline batteries of the same brand and age
to prevent damage to the electrical components. Removal/replacement of batteries will erase clock and
user settings.
ANT+ 2.4Ghz Wireless Technology. Connection of an optional ANT+ heart rate chest strap can be made
via the on-board wireless receiver. See the section titled Heart Rate Training for more information.
Permanent Memory. Total run time and service interval reminder data will always be maintained.
Sleep Mode. After thirty (30) seconds of inactivity, the console will enter the Sleep Mode. All display
features will switch off, however previously entered data will be saved. To wake the console from Sleep
Mode press any button or simply begin exercising.
Ready Mode. The Ready Mode is designed to notify the user that the console is powered on and ready
for use. “SKI-ROW” will be displayed in the upper alpha-numeric display. “PRESS START OR SELECT
PROGRAM TO BEGIN“ will be displayed in the lower alpha-numeric display. The Ready Mode will time
out in thirty (30) seconds.
Pause Mode. While any program is running, pressing the STOP key will launch the Pause Mode. Pause
Mode will also be entered when the fan speed reaches a very low RPM. The time, distance, and calories
metrics display elds will freeze and stops incrementing within Pause Mode. The average and maximum
values for pace, stroke rate, watts, and heart rate will also begin to be shown. To return to the previous
program, press the START key or resume exercising. If no further input is made, the Pause Mode will
end and console will enter the Ready Mode in ten (30) seconds.
Program Quick Start. The console allows users to begin a workout without the selection of a program.
When launched, the metrics will begin to display within seconds of pressing the START key or pulling on
either the row handle or either ski handle. The program will run continuously and all metrics will count up
from zero.
Workout Results. At the end of each workout, the console will post a workout summary of the workout
data. The workout time, calories and distance will be displayed, followed by average pace, stroke rate,
watts, and heart rate, then maximum pace, stroke rate, watts, and heart rate.
PROGRAM OPERATION
WARNING. Please read all included information, user guides and warnings before use.
QUICK START Program
The Quick Start program option is for users wishing to bypass the on-board programming setup steps
and begin their workout immediately. The Quick Start program will launch as soon as the the row
handle or ski handles are pulled or the START/ENTER key is pressed. The console will begin to display
all metrics, including the user’s heart rate (if a signal is detected from a user’s heart rate strap). The
program will run continuously until the fan RPM has reached a very low rate or the STOP key is pressed.
Launch: Press the START/ENTER key or begin walking/running on the belt.
Run: All metrics will begin to post.
End: Press the STOP key. The Results summary will be displayed for total, average and maximum
values.
WORKOUT Selection
The console provides four (4) different workout types that can selected from and consist of TIME,
DISTANCE, CALORIE, and INTERVALS. Press the WORKOUT key to bring up the workout menu.
Then use the UP/DOWN keys to navigate the menu to nd the desired workout type. Press START/
ENTER to conrm the selection.
TIME GOAL Program
For the TIME GOAL program, the user may set a single target value and the program will continue until
that goal has been achieved. The user can select a time from 5 to 99 minutes.
Launch: Press the WORKOUT key to bring up the workout menu. Then use the UP/DOWN keys to
navigate the menu to nd the TIME program. Press START/ENTER to conrm the selection.
Setup: The default time will then be shown. Adjust the displayed value by pressing the UP or
DOWN keys, followed by the START/ENTER key to conrm. The program will begin
automatically.
Run: The display elds will light and begin to track the progress of the user toward the specied
goal.
End: The program will end automatically when the selected target has been achieved. To end the
program at any time, press the STOP key. The Workout Summary will launch and show a
record of the workout data.
BLUETOOTH / ANT+
CONNECT Key
Other manuals for SKI-ROW
3
Other EnergyFit Fitness Equipment manuals
Popular Fitness Equipment manuals by other brands

LifeCore Fitness
LifeCore Fitness LC-R88 Rower User's product manual

AIREX
AIREX Balance-pad Instructions for use and care
TKO
TKO 7011-G2 owner's manual
aqua greek products
aqua greek products F-PWRWV Series manual
Stairmaster
Stairmaster StepMill 3 Assembly manual
Body Solid
Body Solid SDKRDBL Assembly instructions
Nautilus
Nautilus Inspiration Strength NP-R8008 Owner's manual and installation instructions
K-SPORT
K-SPORT KSSL025/2 Assembly instruction
Men'sHealth
Men'sHealth Active+ Squat Rack Assembly & user instructions
Huffy
Huffy 211387 owner's manual
Impact Sports
Impact Sports PowerGlove user manual
Mobiclinic
Mobiclinic K2 user manual
