Engine Quicksilver 303 User manual

!
multitrack sequencer
USER GUIDE
Social Entropy Electronic Music Instruments


•Do not expose the unit to rain, moisture, dripping or splashing and avoid placing objects filled with liquid, such as cans or
cups, on or near the unit.
•Do not expose the unit to direct sunlight or use it in ambient temperatures exceeding 30°C as this can lead to malfunction.
•Do not open the main casing of the unit. There are no user repairable or adjustable parts inside. Service and repairs
should be performed by trained service technicians only.
•The adapter is not safety grounded and may only be used indoors.
•To ensure good ventilation for the adapter, do not place it in tight spaces. To prevent risk of electric shock and fire
because of over-heating, ensure that curtains and other objects do not prevent adapter ventilation.
•Do not expose the power adapter to direct sunlight, nor use it in ambient temperatures exceeding 40°C.
•In the EU, only use CE approved power cords.
SPECIFICATIONS SUBJECT TO CHANGE
Social Entropy LLC reserves the right to modify or change any specifications without notice or obligation at any time, including
changes to hardware features, software capabilities, colors and/or design.
Any company names, products or logos used in this manual are trademarks of their respective owners.!
IMPORTANT SAFETY AND MAINTENANCE INSTRUCTIONS
1. Do not use this product near water - for example, in the rain, near a bathtub or sink, in a wet basement, or near a
swimming pool.
2. This product, in combination with an amplifier and headphones or speakers, may be capable of producing sound
levels that could cause permanent hearing loss. Do not operate for a long period of time at a high volume level or at
a level that is uncomfortable.
3. Never use aggressive cleaners on the casing. Remove dust, dirt, and fingerprints with a soft, dry, non-abrasive
cloth. If the unit is extremely dirty use a slightly damp cloth using only water. If the dirt still persists use a damp cloth
with a conservative amount of dishwashing liquid.
4. Install in accordance with the instructions. Make sure you place the unit on a stable surface before use.
5. The product should be located away from heat sources such as radiators, heat registers, or other products that
produce heat.
6. Connect the unit to an easily accessible electrical outlet that is close to it.
7. The product should only be connected to a power supply of the type described in the operating instructions or as
marked on the product.
8. Unplug the unit during lightning storms, before cleaning or when not in use for long periods of time.
9. Care should be taken so that objects do not fall and liquids are not spilled into the enclosure through openings.
10. When transporting the unit, use the original box and padding.
11. Social Entropy LLC is not responsible for any damage caused by improper operation of this instrument.
!

TABLE OF CONTENTS
"
BACKGROUND!1.........................................................................
CONCEPTS!2...............................................................................
DIAGRAM CONVENTIONS!3.......................................................
THE BASICS
WHAT’S IN THE BOX!6.................................................................
FRONT PANEL!7...........................................................................
REAR PANEL!8.............................................................................
PHYSICAL SPECIFICATIONS!8.......................................................
SEQUENCER BASICS!9.................................................................
TRACKS!9..........................................................................................................
SONGS!11.........................................................................................................
FUNCTIONS!12..................................................................................................
QUICK START
QUICK START!14..........................................................................
CONNECTIONS !14.................................................................................
CONNECTING MIDI!14...................................................................................
CONNECTING AUDIO!14................................................................................
CONNECTING POWER!14...............................................................................
SELECT A TRACK!15.................................................................................
CREATE A PATTERN!15.............................................................................
MODIFY A PATTERN!16............................................................................
CREATE SNAPSHOTS!16..........................................................................
CREATE A SONG!17................................................................................
REFERENCE GUIDE
TRACKS!20..................................................................................
SELECTING TRACKS!20............................................................................
SELECTING PATTERNS AND PATTERN CHAINS FOR A TRACK!21..............
SELECTING PATTERNS USING MIDI!23.............................................................
MUTING TRACKS!24................................................................................
SOLOING TRACKS!25..............................................................................

SETTING THE TRACK MIDI CHANNEL!26..................................................
MIDI EFFECTS!27.....................................................................................
VELOCITY OFFSET!27.......................................................................................
GATE OFFSET!27..............................................................................................
DELAY OFFSET!28............................................................................................
NOTE REPEAT!28.............................................................................................
UTILITY MODE!29....................................................................................
SETTING TRACK KNOB CONTROLLER NUMBERS!29.........................................
PATTERN PROGRAM CHANGE MESSAGES!31...................................................
SYSTEM EXCLUSIVE DUMPS!32........................................................................
TRANSPOSING TRACKS USING MIDI!33..........................................................
SETTING STEP PITCH USING MIDI!34...............................................................
TRACK QUANTIZATION!35..............................................................................
CV/GATE OUTPUT MODE!36...........................................................................
PATTERNS!37...............................................................................
TIME MODE!37........................................................................................
SETTING PATTERN LENGTH!38.........................................................................
EXTENDING A PATTERN!39..............................................................................
SETTING PATTERN TIME SCALE!40....................................................................
SETTING PATTERN SHUFFLE!42.........................................................................
SKIPPING PATTERN STEPS!44...........................................................................
REALIGN A PATTERN!45...................................................................................
TEMPO LOCK!45.............................................................................................
TAP TEMPO!46................................................................................................
INCREMENT/DECREMENT TEMPO!46..............................................................
PATTERN TYPES!47...................................................................................
CHANGING PATTERN TYPES!47.......................................................................
DRUM TYPE PATTERNS!48........................................................................
SELECTING DRUM INSTRUMENTS!48...............................................................
PROGRAMMING DRUM TYPE PATTERNS!49.....................................................
GRID PROGRAMMING!49...............................................................................
ADDING OR REMOVING A TRIGGER!49......................................................
SETTING NOTE REPEAT!50............................................................................
SETTING STEP DELAY!50...............................................................................
REALTIME RECORDING!51...............................................................................
STEP RECORDING!52......................................................................................
MUTING DRUM INSTRUMENTS!54..................................................................
SOLOING DRUM INSTRUMENTS!55.................................................................
DRUM ROLLS!56.............................................................................................
CHANGING THE DRUM ROLL RESOLUTION!57............................................
LATCHING DRUM ROLLS!58.........................................................................
RECORDING A DRUM ROLL!59....................................................................
SETTING DRUM NOTE MAPPINGS!60..............................................................

SYNTH TYPE PATTERNS!61.......................................................................
PROGRAMMING A SYNTH TYPE PATTERN!61...................................................
GRID PROGRAMMING!61...............................................................................
ADDING OR REMOVING A STEP EVENT!62..................................................
POLYPHONIC PROGRAMMING!63...............................................................
SELECTING THE PITCH SLOT TO PROGRAM!63.............................................
CHANGING STEP PITCHES!64......................................................................
QUICKLY ENTERING MULTIPLE PITCHES!66...................................................
TRANSPOSING POLYPHONIC STEPS!67........................................................
SETTING STEP LENGTH!68............................................................................
FINE TUNING GATE LENGTH!68...................................................................
ADDING SLIDE!70........................................................................................
SETTING NOTE REPEAT!70............................................................................
SETTING VELOCITY OR ACCENT!71..............................................................
SETTING STEP DELAY!72...............................................................................
REALTIME RECORDING!73...............................................................................
QUANTIZATION!73......................................................................................
STEP RECORDING!74.......................................................................................
TRANSPOSING SYNTH PATTERNS!77...............................................................
ALL ACCENT!79...............................................................................................
NO ACCENT!79...............................................................................................
ALL SLIDE!80...................................................................................................
NO SLIDE!80...................................................................................................
REALTIME RECORDING TRANSPOSE, ACCENT AND SLIDE!81............................
REALTIME ARPEGGIATOR!82............................................................................
CHANGING THE ARPEGGIO DIRECTION!83................................................
CHANGING THE ARPEGGIO OCTAVES!83...................................................
LATCHING THE ARPEGGIATOR!84................................................................
RECORDING AN ARPEGGIO!85...................................................................
CHORD MEMORY!86......................................................................................
STEP FUNCTIONS!87...............................................................................
OPERATING ON ALL DRUM INSTRUMENTS!87.............................................
STEP ROTATE!88...........................................................................................
STEP CLEAR!88.............................................................................................
STEP COPY!89..............................................................................................
STEP PASTE!90..............................................................................................
PATTERN FUNCTIONS!91.........................................................................
OPERATING ON ALL DRUM INSTRUMENTS!91.............................................
APPLY TRANSPOSE!92..................................................................................
PATTERN ROTATE!93.....................................................................................
PATTERN CLEAR!94.......................................................................................
PATTERN COPY!94........................................................................................
PATTERN PASTE!95.......................................................................................
PATTERN RANDOMIZE!96............................................................................
PATTERN DIRECTION!97...............................................................................

SNAPSHOTS!98...........................................................................
RECORDING SNAPSHOTS!99..................................................................
RECALLING SNAPSHOTS!100..................................................................
SONGS!101.................................................................................
PLAYING SONGS!101..............................................................................
ENTERING SONG PLAY MODE!101..................................................................
SELECTING SONGS!102..................................................................................
CREATING SONG CHAINS!102........................................................................
SONG LOCATION SHORTCUTS!103.................................................................
RECORDING SONGS!104........................................................................
REALTIME SONG RECORD!104........................................................................
SONG STEP RECORD!105................................................................................
SELECTING CURRENT SONG STEP !106........................................................
SETTING SONG STEP REPEATS!107...............................................................
ASSIGNING SNAPSHOTS TO SONG STEPS!108...........................................
SETTING THE LAST SONG STEP!108.............................................................
GLOBAL CONFIG!109..................................................................
SETTING KNOB CHANNELS!110..............................................................
SETTING KNOB CONTROLLER NUMBERS!111..........................................
DUMP MACHINE STATE!112.....................................................................
CV EXPANSION MODE!113.....................................................................
CV MODE: 8 TRACKS!114................................................................................
CV MODE: 4 SYNTHS!115................................................................................
CV MODE: 1 DRUM!116..................................................................................
CV MODE: 6 CONTROLS AND CLOCKS!117.....................................................
SETTING INPUT MIDI CHANNEL!118........................................................
ENABLING MIDI THRU!119.......................................................................
SYNC SOURCE!120.................................................................................
SENDING MIDI CLOCK!121.....................................................................
FORMAT ALL PATTERNS!122....................................................................
USB MIDI!123..........................................................................................
DIMMING LEDS!124................................................................................
CHECKING OS VERSION!125..................................................................
SUPPORT FOR ELEKTRON TURBOMIDI!126..............................................
UPDATING FIRMWARE!127..........................................................
FACTORY RESET!128.....................................................................
CV GATE OUTPUT EXPANSION!129..............................................
INSTALLING THE CV EXPANSION BOARD!129.........................................

ENABLING CV EXPANSION MODE!131...................................................
DRUM TYPE PATTERNS!131......................................................................
SYNTH TYPE PATTERNS!131......................................................................
HARDWARE SLIDE CIRCUIT!131................................................................
CV CONVERTER MODE!132.....................................................................
ENABLING CV CONVERTER MODE!132............................................................
DISABLING CV CONVERTER MODE!133...........................................................
SELECTING USB OR DIN MIDI INPUT!133.........................................................
MONOPHONIC/POLYPHONIC CONVERSION!134...........................................
SETTING CONVERSION MIDI CHANNELS!135..................................................
ENABLING HARDWARE SLIDE!136....................................................................
CV/GATE OUTPUT MODE!137..........................................................................
MIDI IMPLEMENTATION CHART!138............................................

BACKGROUND
"
Social Entropy started business developing the Quicksilver upgrades for the TR-606
and TB-303. This was specifically a challenge because we were adding new
features and capabilities to a machine that already had a defined interface, buttons
and labelling. There were many places where adding extra capability just didn’t
make sense in the context of the interface.
As part of our creative process, we always enjoy a dedicated hardware device that
had a particular workflow, whether it was for drums or synthesizer. This is where
the old machines really shine. But we also wanted even greater control over
multiple machines and the ability to control any device with the same type of
dedicated interface, whether it was a VST, a sound module or even a modular
synthesizer.
At this point we decided it was time to design and build a sequencer of our own. A
machine that had the best parts of a dedicated hardware sequencer, streamlined
workflow and connectivity to multiple devices.
Four years later, we are finally ready to release Engine. We hope you enjoy it as
much as we do!!
USER GUIDE1

CONCEPTS
"
Engine is a multitrack step sequencer with eight polyphonic tracks. Composing music with
Engine consists of selecting tracks, assigning patterns or pattern chains to a track, setting
pattern types and recording steps into the patterns. These configurations can be captured
into snapshots and sequenced into a song structure. The remainder of this manual will
focus on these activities.
Engine is all about the ability to both compose and perform live from a dedicated
interface. This means several things in the context of Engine.
First, almost everything that you can do as a live performance can be recorded directly
into a sequence. This includes pitches, arpeggiators, drum rolls, accents, slides, etc. The
sequencer can enter or leave record mode from almost any of the live performance
modes, making it extremely easy to capture an interesting musical event.
Second, most changes to a sequence are quantized to the loop point. This means that
changing the selected pattern, snapshot, scale, shuffle or length won’t cause patterns to
fall out of sync with each other during live performance. There are still a few functions
that apply immediately, such as muting and transpose which can be used for other
interesting performance options.
Almost all functions can be used momentarily or they can be double-clicked (pinned) to
stay in a function without being forced to hold down a button. This is great when certain
functions are needed consistently for live performance, such as track muting or drum
muting.
Everything in Engine can be done while the sequencer is running. This means that your
performance doesn’t need to be interrupted by stopping the sequencer to access certain
functions or enter certain modes.
USER GUIDE2

DIAGRAM CONVENTIONS
"
Throughout this document, diagrams are used to illustrate the buttons used to perform
various actions.
Some diagrams will not show buttons being held or pinned to stay in a certain mode
while functions are performed. For example, for functions associated with TIME MODE, it
is assumed that the TIME button is being held or pinned, the TIME button will not be
shown in every diagram."
"
To illustrate that a button should be pressed and held, the button will be displayed as
RED."
"
To illustrate that a button should be pressed and released (clicked), the button will be
displayed as WHITE."
"
Example:
When multiple buttons are used to perform an action, the diagram will use a plus sign to
show the combination of buttons used.
Example:
!
USER GUIDE3
This shows one button being clicked
This shows one button being held
This shows one button being held and then a second button being clicked

A brightly lit LED is represented as red, a dim LED is represented in pink.
When an LED is blinking, it is represented with a dotted line around the LED.
Example:
When a knob should be turned, it will be shown with a red arrow.
!
USER GUIDE4
Showing that a knob should be turned
A blinking LED
One brightly lit LED and two dimly lit LEDs

THE BASICS!
USER GUIDE5

WHAT’S IN THE BOX
"
Included in the box are the following:
• 1x Engine hardware sequencer: white/red or white/blue edition
• 1x USB cable
• 1x 9V DC international power supply
• 5x International power plug attachments
• 1x Quickstart postcard
• 1x Sticker!
USER GUIDE6

FRONT PANEL
USER GUIDE7
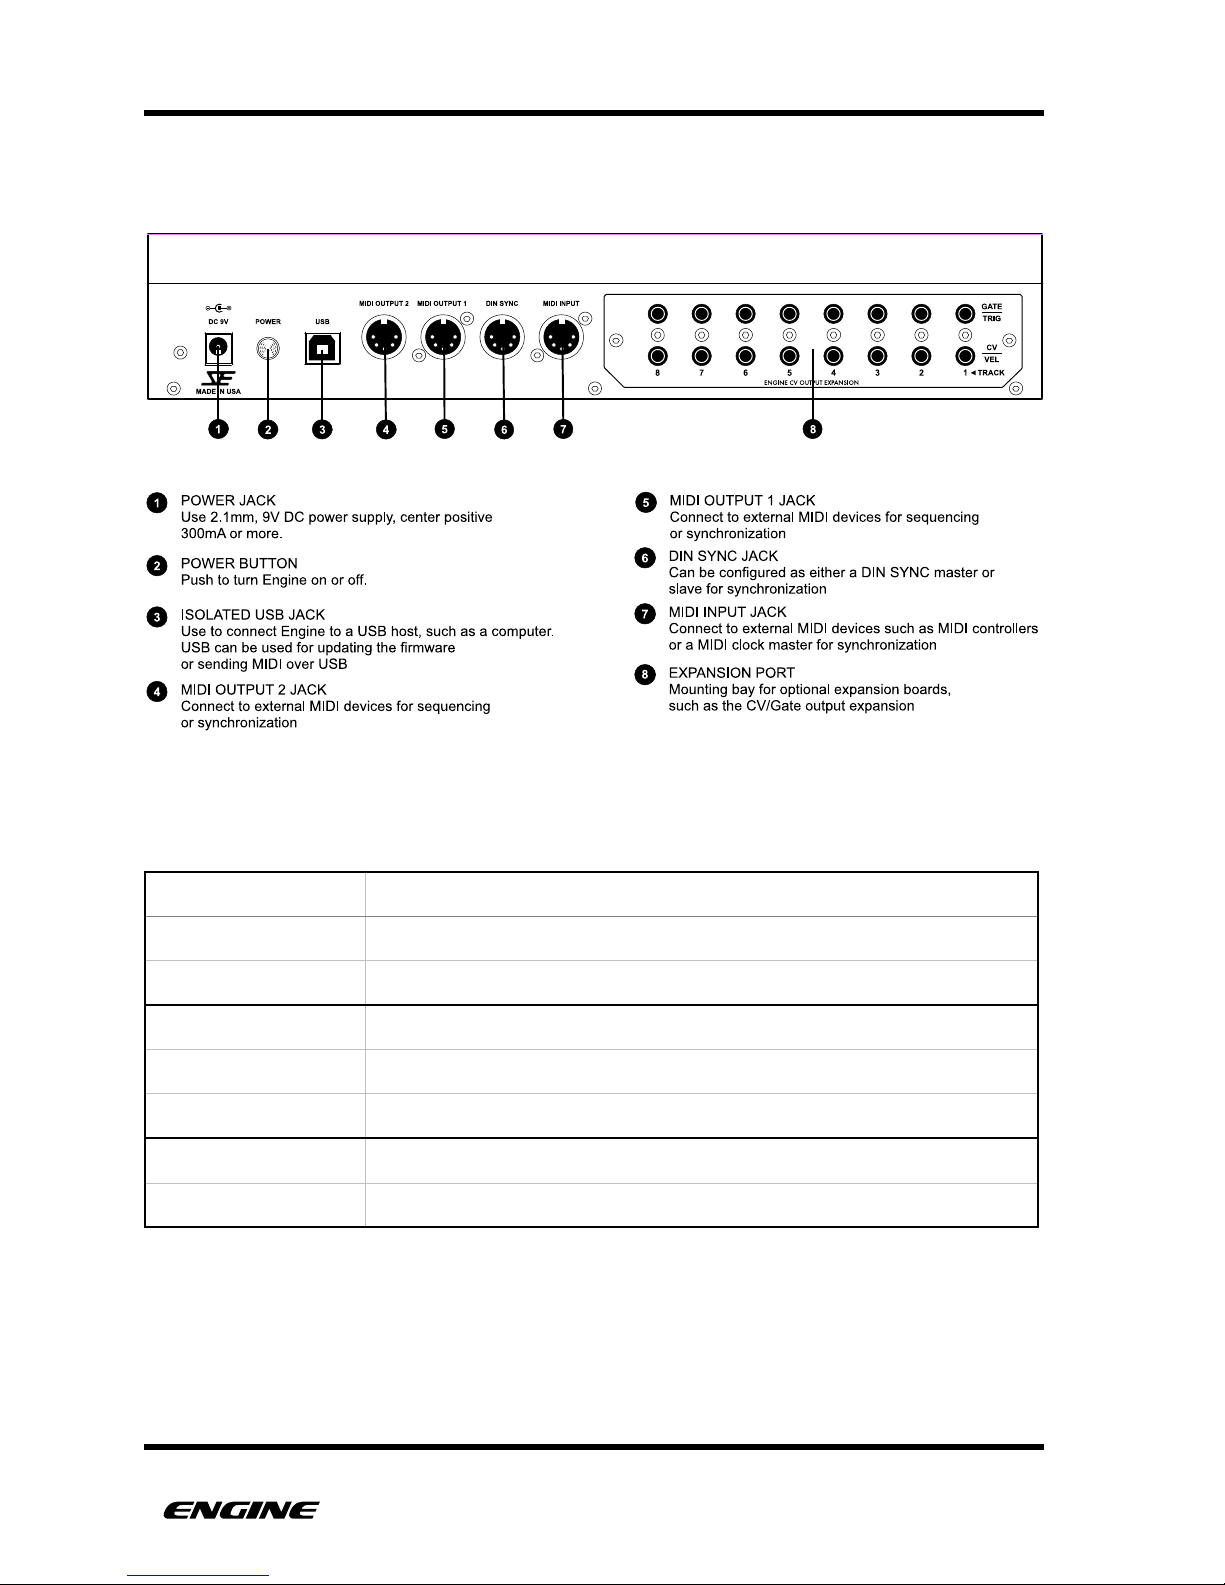
REAR PANEL
PHYSICAL SPECIFICATIONS
DIMENSIONS
327 (W) x 66 (D) x 133 (H) mm
12-7/8 (W) x 2-5/8 (D) x 5-1/4 (H) inches
WEIGHT
1.2kg (excluding power supply, options)
2 lbs 9 oz (excluding power supply, options)
POWER
9V DC 300mA, 2.1mm center positive
USER GUIDE8
SOCIAL ENTROPY ELECTRONIC MUSIC INSTRUMENTS

BASICS
SEQUENCER BASICS
"
This section covers the basic features and building blocks of Engine.
The Engine sequencer works with five main components; TRACKS, PATTERNS, STEPS,
SNAPSHOTS and SONGS. "
TRACKS
A good place to start is the TRACK. Engine has eight tracks which play simultaneously.
A track shouldn’t be confused with a song, on some synthesizers/sequencers the term
“track” is used to describe a song structure.
A track contains settings for a selected pattern or pattern chain, MIDI channel, drum note
mappings, accent velocity, MIDI effects and track mute status.
Each track has four dedicated banks of sixteen patterns (64 patterns per track). A track
can play a single pattern or a chain of patterns can be selected to play back in sequence.
"
PATTERNS
Within each track is a selected pattern (or chain of patterns). A pattern contains all of
the steps that make up a musical passage up to 64 steps.
There are two distinct pattern types, DRUM type patterns and SYNTH type patterns. Each
pattern type has different capabilities specifically designed for programming either drum
or synth type sequences, we will cover these differences in more detail later in the
manual.
Each pattern contains settings for type, timing scale, shuffle and last step (length) in
addition to programmed steps. Synth type patterns also include settings for pattern
transpose and chord memory. Drum type patterns store the individual drum instrument
mute status.
There are 512 total patterns spread across the 8 tracks
STEPS
Steps are the lowest level component that make up a pattern. A STEP typically represents
one musically significant event, such as a 16th note, although this can change depending
on the timing scale.
A step has different STEP ATTRIBUTES depending on the pattern type it belongs to.
USER GUIDE9

BASICS
For SYNTH type patterns, a step has attributes that determine PITCH, TIME, VELOCITY
(ACCENT), GATE LENGTH (SLIDE), REPEAT and ACTIVE.
"
For DRUM type patterns, a step has attributes that determine TRIGGER, ACCENT and
REPEAT for eight drum instruments, in addition to ACTIVE.
SNAPSHOTS
Snapshots are useful for storing the current state of Engine across all tracks. This allows
all settings to be recalled with a single button press. This can be used to build a song
structure in realtime for live performance.
A SNAPSHOT stores the settings for selected patterns or pattern chains per track, MIDI
effects, the mute status of tracks, the mute status of individual drum instruments in drum
type patterns and the transpose value of synth type patterns.
There are 4 banks of 16 snapshots for a total of 64 available snapshot locations.!
PITCH 1-4
Defines the pitches of the step
VELOCITY
The velocity of the note to be played, accent is a
quick way to set the velocity to a preset value
GATE LENGTH
Defines the note length, slide is created when a
note overlaps the next note, also known as legato.
This is interpreted by most 303 clones as a “slide”
TYPE
The step type can be a step, tie or rest. The total
length of a note is determined by the combination
of a step event along with subsequent tie events
ACTIVE
Determines if the step will be played or skipped
REPEAT
Activates the note repeat effect for the step
TRIGGER
Defines which drum instruments will be played on
this step
ACCENT
Tiggers the note to be played at higher velocity
per drum instrument
ACTIVE
Determines if the step will be played or skipped
REPEAT
Activates the note repeat effect for the step
USER GUIDE10
SYNTH
STEP
TYPE
VELOCITY
GATE
ACTIVE
REPEAT
PITCH 1
PITCH 2
PITCH 3
PITCH 4
DRUM STEP
EXT
BASSDRUM
SNARE
LOW TOM
HI TOM
CYMBAL
OPEN HAT
CLOSED HAT
ACC
ACC
ACC
ACC
ACC
ACC
ACC
ACC
ACTIVE
RPT
RPT
RPT
RPT
RPT
RPT
RPT
RPT

BASICS
SONGS
"
A SONG is a sequence of snapshots. SONGS allow for an entire performance to be
constructed with different snapshots and played back in sequence automatically.
Each SONG is made up of a series of SONG STEPS (not to be confused with pattern
STEPS). A SONG can contain up to 64 individual SONG STEPS.
"
Each SONG STEP has settings for:
•SNAPSHOT – Snapshot location recalled on the song step
•REPEATS – How many times a SNAPSHOT will play before advancing to the next
step. Playback of the longest pattern or pattern chain in the snapshot counts as one
repeat.
A SONG also contains settings for SONG LENGTH. After reaching the last song step, a
SONG will loop back to the beginning or move to the next song in the chain.
There are 32 total songs in memory.
MODES
There are many modes accessible using different buttons on the front panel. "
Some examples of available modes are:
•MUTE MODE - Mute individual tracks
•TRANSPOSE MODE - Transpose a synth type pattern
•PATTERN SELECT MODE - Select the pattern or pattern chain assigned to a track
•TIME MODE - Edit time parameters for a pattern, such as scale, shuffle or last step
Each available mode will be covered in detail later in this manual.!
USER GUIDE11
PATTERN
SONG
SNAPSHOT
REPEAT
SONG
STEP 1
SONG
STEP 2
SONG
STEP 3
SONG
STEP 4
SONG
STEP 5
SNAPSHOT SNAPSHOT SNAPSHOT SNAPSHOT . . .
This manual suits for next models
1
Table of contents


