Englefield MILANO User manual

BEFORE YOU BEGIN
TOOLS & MATERIALS REQUIRED - (Not supplied)
1260048-A02-B
INSTALLATION
INSTRUCTIONS
ACCESSORIES
Englefield
MILANOTM
Accessory Range
If you are building a
bathroom from scratch,
giving your bathroom a
makeover or just
replacing an old tap,
Englefield can provide a
solution for you.
CONTACT AND WARRANTY INFORMATION
SPARE PARTS LIST
NEW ZEALAND
KOHLER NZ LTD
Free Ph: 0800 100 382
Free Fax: 0800 664 488
www.englefield.co.nz
AUSTRALIA
KOHLER CO.
Free Ph: 1 800 ENGLEFIELD
(1 800 364 533)
www.englefield.com
INSTALLATION INSTRUCTIONS
MILANO
TM
Accessories
11/09/2015
Before proceeding with the installation, please read these instructions
carefully to familiarise yourself with the required tools and materials, and
to ensure proper care and installation of the accessory.
Prior to installation, inspect the accessory to ensure that no damage has
occurred in transit. If damage has occurred, or a visible defect exists, do
not proceed with installation, and advise your supplier immediately.
Please keep these instructions for future reference.
1. Do not install where the product might be used as a grab or support
bar.
2. Prior to drilling into walls, check there are no hidden electrical wires,
cables or water supply pipes with the aid of an electronic detector.
3. These accessories are designed to be mounted to a wall and it is
strongly recommended that the product is installed on a stud, noggin
or to concrete.
4. When mounting to a stud or noggin we recommend using an electronic
stud finder to locate studs before installation.
5. Wear safety glasses when drilling.
CAUTION
!
Englefield
2.5mm drill bit#2 square driveStud finder
For warranty information, please visit our website.
Glass soap dish
1259729
Glass tumbler
1259730
Toilet brush
1259732
Glass toilet
brush holder
1259731
slotted drive
5mm
6mm
tile/masonry
drill bit
Milano accessories fixing kit
1267292
For use with:
-Milano double towel rail
-Milano single towel rail
-Milano hand towel bar
-Milano toilet roll holder
-Milano soap dish holder
-Milano tumbler holder
-Milano toilet brush holder
Glass shelf fixing kit
1267294
For use with:
-Valencia glass shelf
Milano robe hook fixing kit
1267293
For use with:
-Milano robe hook
CLEANING INSTRUCTIONS
1. LOCATING AND MARKING
2. BRACKET INSTALLATION
Select an appropriate location to install the accessory.
It is strongly advised to install the product on a solid base,
and the use of an electronic stud finder is recommended for
stud/nog installation. (Fig. 1)
NOTE: Refer to assembled accessory for bracket alignment and
orientation.
•For accessories with one bracket
Use a level to ensure the holes are aligned either horizontally or
vertically and that the bracket is correctly oriented with tapered
holes facing you (Fig. 2 & 3). Mark the location of the holes with a
sharpened pencil.
•For accessories with two brackets
Towel rails: A hole location template is provided. Select a location
to place the template. Use a level to ensure that the template is
horizontal. Ensure it is pressed flat and fix the template to the wall.
(Fig. 4)
Glass shelf: The bracket positions on the glass shelf are
adjusable. Choose an appropriate bracket distance (400mm
minimum). Use a level to ensure that the brackets are horizontal.
Mark the location of the holes with a sharpened pencil. (Fig. 5)
NOTE: When drilling holes make sure to do so as accurately as
possible.
Stud or a nog installation (Fig. 5)
•Pre-drill 2.5mm diameter holes at the marked locations. When
using the installation template - drill directly through the template
on marked locations.
•Align the bracket so that it is correctly oriented and secure the
bracket in place with the supplied screws using a #2 square drive.
•Ensure that the screws are firmly fastened.
Ceramic tile or concrete installation (Fig. 6)
•Drill 6mm diameter holes at the marked locations using a tungsten
carbide tipped drill bit for tiles, or a masonry bit for concrete.
•Gently tap the supplied toggles into the holes using a mallet until
they are fully inserted.
Fig. 2
Page 3
Page 2
MILANO
TM
Accessories INSTALLATION INSTRUCTIONS
MILANO
TM
Accessories INSTALLATION INSTRUCTIONS
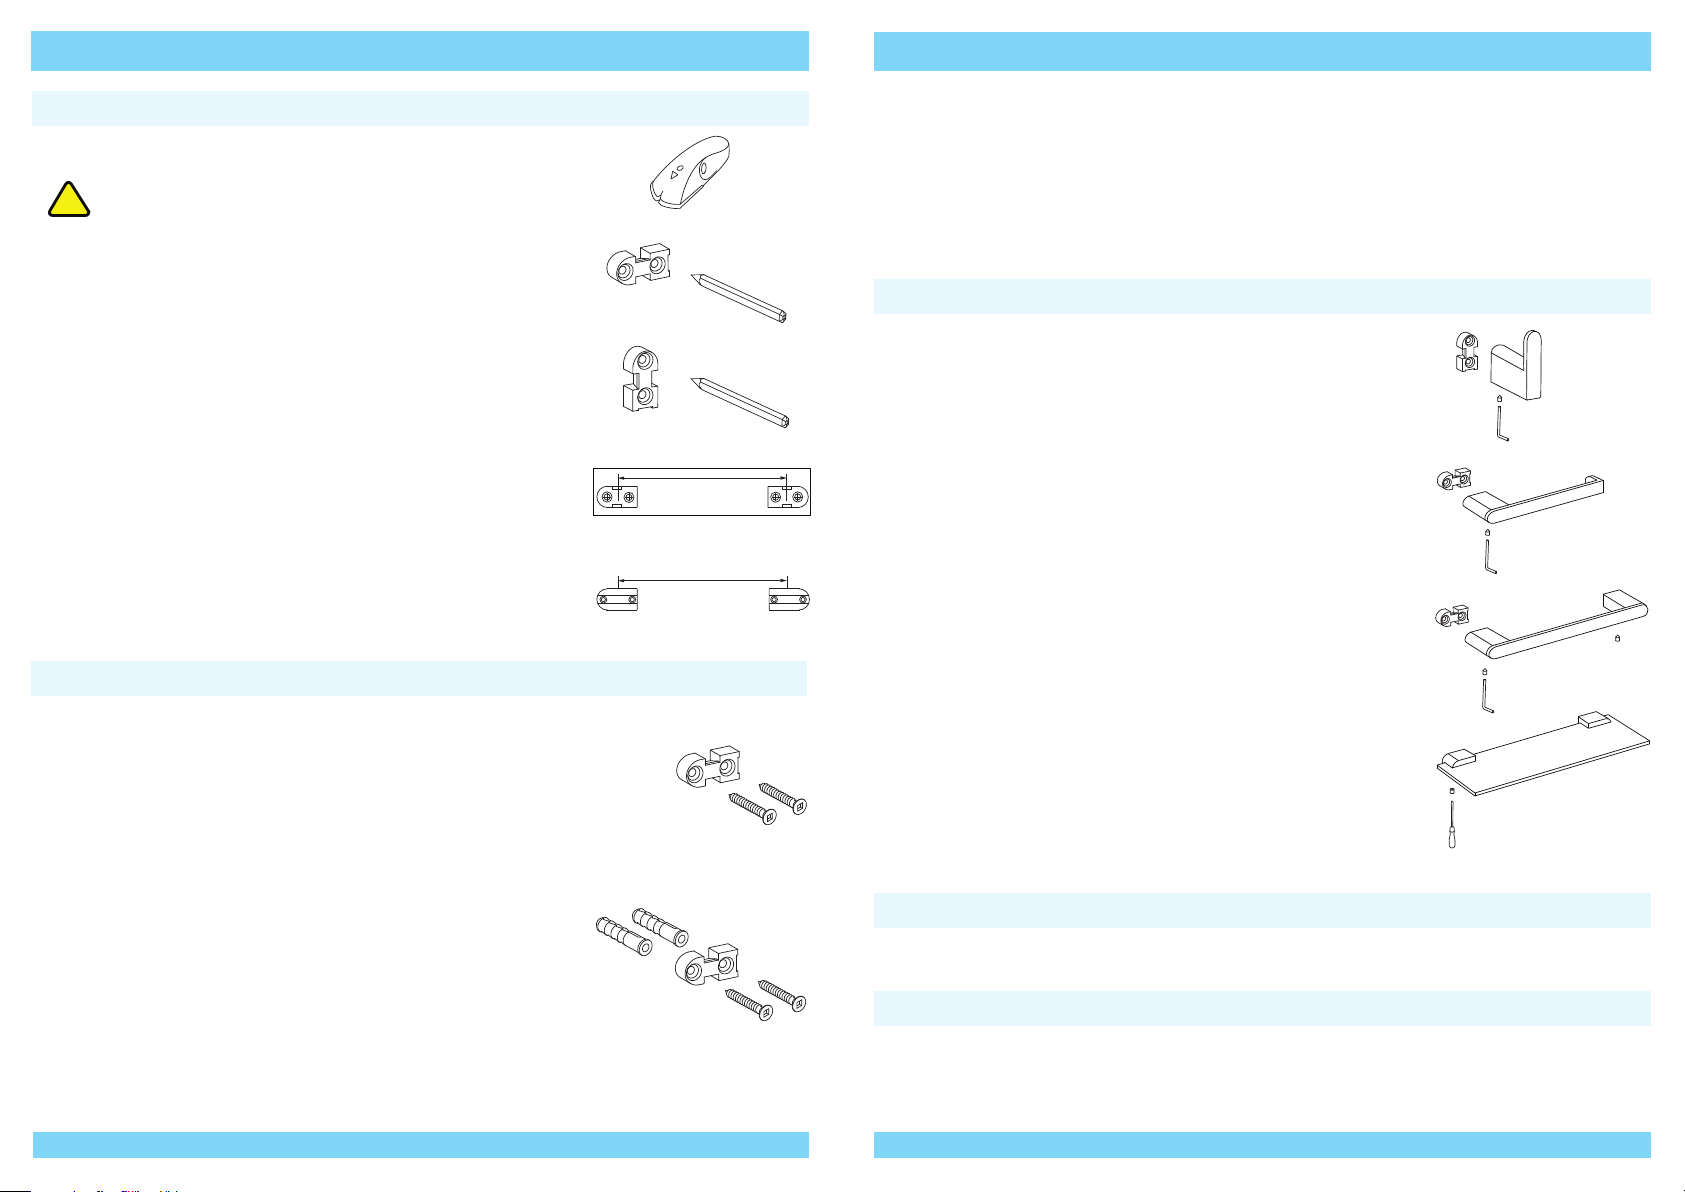
3. ACCESSORY INSTALLATION
4. CHECK INSTALLATION
Clean accessories with mild soap and warm water. Wipe entire surface completely dry with a
clean soft cloth. Harsh cleaning products including those that contain ammonia and chlorine
may adversely affect the finish and are not recommended for cleaning.
Step 3.1
NOTE: For all accessories ensure that the grub screw hole is
oriented downwards.
• For the robe hook
Slide the accessory onto the bracket. (Fig. 7)
• For toilet roll holder, tumbler holder, soap dish holder &
toilet brush holder
Slide the accessory onto the bracket. (Fig. 8)
• Single and double towel rail & hand towel bar
Slide the assembled towel rail over the brackets. (Fig. 9)
• Glass shelf
Slide the glass shelf into the bracket slots and centre. (Fig. 10)
Step 3.2
Align and firmly press the accessory against the wall while
screwing in the grub screw/s with the provided hex key. Make sure
the grub screw/s are firmly tightened.
Fig. 5
Fig. 6
Ensure that all connections are tight. Place glass components onto appropriate accessories.
ENGLEFIELD
ENGLEFIELD
Fig. 3
!
Fig. 4
Fig. 5
Fig. 1
Fig. 7
Fig. 8
Fig. 9
Fig. 10
•Orient the bracket correctly over the wall plugs and ensure the recesses on the back of the
bracket fit over the rim of the wall plugs so that the bracket is flush with the wall.
• Secure the bracket firmly in place with the supplied screws using a #2 square drive.
Plaster board installation
Please consult your local hardware store for appropriate wall plugs for installation on plaster board.
Template
Minimum distance 400mm
Other manuals for MILANO
1


