Enigma xs2 User manual

enigma xs2
aluminium wheelchair
w. i e e l. omww dr vmdica c
.d iv md a .c .ukwww re e ic l o
wdr v m di a de
ww. i e e c l.
US
UK
DE
r i
Dive Med cal, NY 11050
e c 5 P
Driv Medi al Ltd, HX 9J
d G -1
Drive Me ical GmbH & Co. K,D 883 6 Isny
a p n l ts© 2011 Medic l De ot, I c. Al Righ Reserved
a
Drive is trademark of Medical Depot Inc
e
Port Washington, N w York NY 11050
Made in China
US
UK
DE

Enigma XS2 Wheelchair Page 2 of 12
contents
1. Contents
2. Introduction
3. Parts Description
4. Adjustment Features
i. Rear Wheels
ii. Upholstery Tension
iii. Brake Adjustments
iv. Leg Rest Adjustment
v. Arm Rest Position
5. Folding Back Mechanism
6. Disassembly and Folding
7. Using the Stepper Tube
8. Installing a Powerpack
9. Specification
10. Warranty
11. Use as Seat In a Motor Vehicle
introduction
This Enigma XS2 wheelchair is designed for occasional or frequent use, and
can be used indoors and outdoors. The wheelchair is designed for a single
user of up to 135kg (21 stone). The frame can accommodate either 24” self
propel wheels or 12.5” transit wheels.
The wheelchair can be manually moved in forward and reverse and is
propelled either by the wheelchair user or a carer, depending upon the
model of wheelchair in use.
parts description
1/2 FOLD
MECHANISM
PUSH
HANDLE
ARM
REST
LEG
RESTS
BRAKE
FRONT
CASTOR
24" REAR
WHEEL *
STEPPER
TUBE
SELF
PROPEL
VERSION
1/2 FOLD
MECHANISM
PUSH
HANDLE
ARM
REST
LEG
RESTS
BRAKE FRONT
CASTOR
12½" REAR
WHEEL
TRANSIT
VERSION

Enigma XS2 Wheelchair Page 3 of 12
adjustment features
A number of adjustments may be made to the wheelchair to suit a user’s
individual requirements:
i. Rear Wheels. Use the axle bracket to alter the vertical or horizontal
position of the 24” self-propel wheel, or the horizontal position of the
12½”. Remove the two screws and nyloc nuts and reposition as required.
Reattach the fasteners and alter the brakes as required. We
recommend this is adjusted by your Drive Medical dealer.
ii. Upholstery. This wheelchair features a tension adjustable back canvas.
To adjust the tension, first remove the cushion and then adjust the
Velcro straps. Ensure the straps are not too taut as this can damage
the wheelchair.
iii. Brake Adjustment. Adjustment is made to the brake by loosening the
Allen key bolt heads and by sliding the brake unit along the frame. The
brakes will have to be readjusted if the rear wheel position has been
altered. We recommend this is adjusted by your Drive Medical dealer.
iv. Leg Rest Adjustment. The leg rest height and footplate angle can be
adjusted. To alter the leg rest height, remove the Allen head bolt and
nyloc nut. Reposition as required, and then resecure fasteners. To alter
the footplate angle, loosen the allen head bolt on the plastic footplate.
Reposition as required then retighten bolt.
v. Adjusting the Arm Pad Position. Press the silver button on the arm pad
and push the arm pad forwards and backwards to the required
position.
vi. Adjusting the Anti-Tip Wheels. See the Using a Stepper Tube section.

Enigma XS2 Wheelchair Page 4 of 12
folding back mechanism
Push the black paddle (arrowed) towards the
back post with your thumb whilst pulling the
handle down. Repeat this operation for the
other handle. To put the backrest back into
position, lift both handles together and the
folding mechanism will lock back
automatically.
Do not push down on the handles to raise the
front of the wheelchair, as this could result in
damage to the wheelchair. Use the stepper
tube as described later in the handbook.
disassembly and storage
This wheelchair has a number of quick release components and the
wheelchair frame is easily foldable to facilitate a light carry weight and
minimize storage space.
1. Leg Rests
Leg rests will swing in or out to reduce the
length of the wheelchair. Pull lever “A”
whilst rotating the leg rest “B”.
To remove, swing out the leg rest
approximately 45º and pull up on the leg
rest.
Please note on some models the lever “A”
is replaced with a looped handle. In this
case, pull the looped handle.

Enigma XS2 Wheelchair Page 5 of 12
2. Armrests
Press the lever at the front of the armrests
to release the front of the armrest. The
armrest can now be flipped up.
To remove, first flip up the armrest then
pull the lever (arrowed) and the armrest
can be removed by pulling upwards on the
tubing.
3. Quick Release Wheel.
On the self propel model, the rear wheels can be removed. To remove the
rear wheel, push the button in the centre of the wheel hub and slide the
wheel from its axle.
4. Half Folding Back. Follow the previous instructions to fold the back.
5. Folding the wheelchair.
Remove the seat and back cushions. Then grab the centre of the front and
rear edges of the seat sling. Pull upwards on the seat sling and the wheelchair
should naturally fold up.
See back page for details on restraining the wheelchair in a motor vehicle.
using the stepper tube
Use the stepper tube to raise the front castors (when mounting a kerb for
example). To use, push down on the stepper tube with a foot. Do not raise the
front castors by pushing down on the push handles as this could result in
damage to the wheelchair.
To mount a kerb. Approach the kerb head on. Then the attendant uses the
stepper tube to raise the front castors, and lowers the front castors on the
raised kerb. Finally the attendant should push the wheelchair forward, lifting it
up slightly to mount the kerb if required.

Enigma XS2 Wheelchair Page 6 of 12
To go down a kerb. Line up the front castors with the edge of the kerb. The
attendant uses the stepper tube to raise the front castors and tip the user
slightly back. Keeping the castors raised, slowly lower the wheelchair down
the kerb.
Adjusting Anti-Tip Wheel Height
The stepper tube comes with an integral
anti-tip wheel. To adjust the height of
this wheel pull the metal disc (arrowed)
and move the wheel to the correct
height, and release.
Warning: When going down a kerb, the front castors must be raised to
prevent the user from falling out. The above are only recommendations
and may not be suitable for all events / users.
brake operation
Parking Brakes
To apply the parking brakes, push the handle on the brake unit until locked in
place. To release the brake, push the handle in the opposite direction.
The brakes should always be applied when the wheelchair is stationary.
Cable Brakes
On the transit model, the attendant
pushing the wheelchair may use cable-
operated brakes to slow or park the
wheelchair. To apply the brakes,
squeeze the large lever (A) on the push
handles and the brakes will be applied.
The brakes will remain applied until the
small lever (B) on the brake handle is
pressed to release the lever.

Enigma XS2 Wheelchair Page 7 of 12
operation and propulsion
!
Before Using the Wheelchair read the safety notices below:
Use slow speeds on gradients. Do not exceed the
maximum gradient stated.
The wheelchair is only suitable for single occupancy.
Keep your feet on the footplates when moving. Do not
stand on the footplates.
Do not use escalators.
Do not reverse down a gradient
Maintain proper balance at all times. Users should not
move their centre of gravity out of the seating area.
Do not reach for items further than your arm will extend.
Be aware of hazards in your environment, such as narrow
doorways, steps, household appliances, children’s toys,
etc.
We recommend you consult your healthcare professional
for advice about transferring to and from the wheelchair.
The parking brakes should always be applied when
transferring.
Ensure that fingers and objects do not get caught in the
spokes of the rear wheels.
The transit wheelchair can only be propelled by an attendant. The
attendant should push the wheelchair from behind using the handgrips, and
following the safety advice above.
The self propel wheelchair can be propelled by an attendant (as directed
above) or the wheelchair user. The user can propel themselves by pushing
on the handrims attached to the side of the rear wheels, and slow
themselves down by applying pressure to the handrims.
When stationary the brakes should always be applied.
Enigma XS2 Wheelchair Page 8 of 12
care and maintenance
Before each use of the wheelchair, the brakes and tyres should be
checked.
The wheelchair should be stored in a dry environment, away from
direct sunlight. When in storage the wheelchair can be folded up
The wheelchair should be kept clean and dust free. This can be done
with a duster or damp cloth.
The user should routinely check the following items. It is recommended
that a Drive Medical dealer services the wheelchair annually, where
these items should be repaired, replaced, adjusted and/or lubricated if
required:
Tyre wear
Wheel bearings
Castors
Brakes
Legrest locking
mechanism
Seat upholstery
Back upholstery
Arm pads
Rear wheel quick release pin
Half folding back mechanism
Back posts
Wheelchair (folds up)
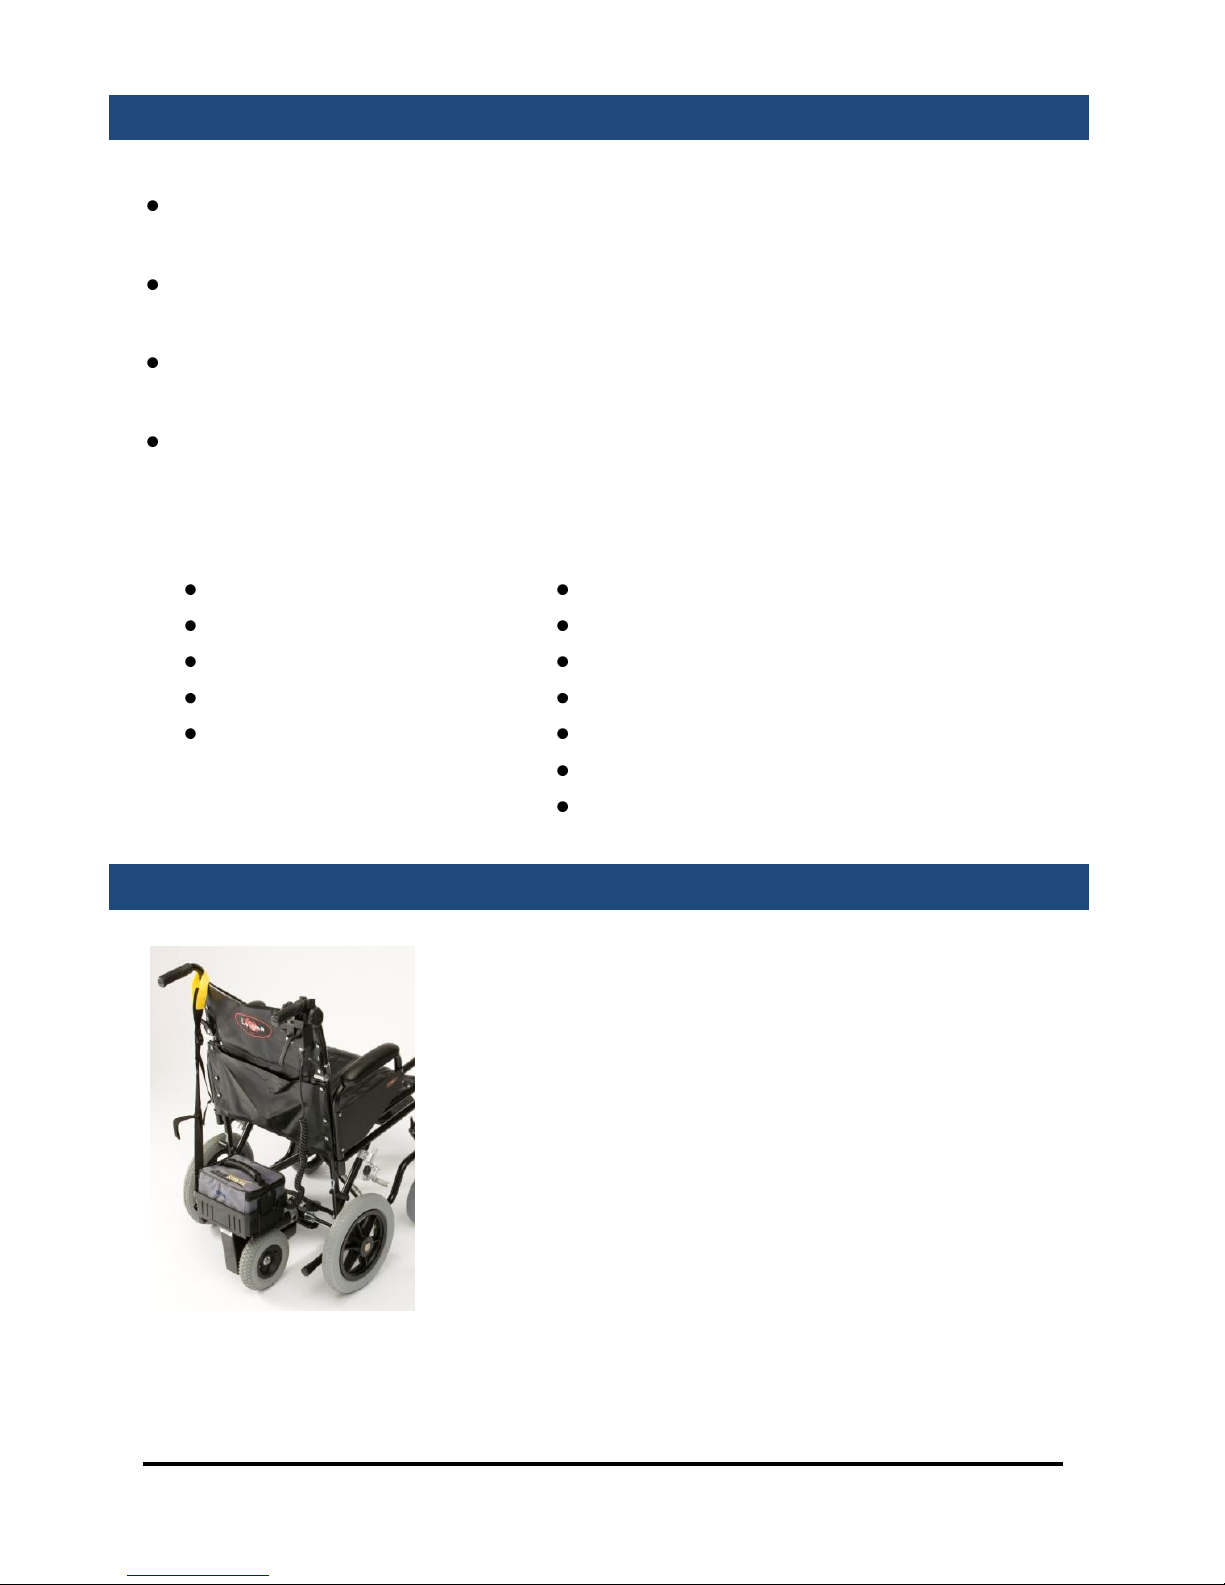
powerpack installation
This wheelchair is suitable for some retrofit
powerpacks, such as the PowerStroll. A
suggested configuration is shown left.
Note this is a suggestion, and the mounting
position will need adapting to be suitable for
the user and the powerpack used. For more
information about the PowerStroll contact
your Drive Medical dealer or visit
www.drivemedical.co.uk for more details.

Enigma XS2 Wheelchair Page 9 of 12
specification
Self Propel
Transit
Dimensions *1
L x W1/W2/W3 x H
103 x 58/63/68cm x 93cm
40” x 23 - 27” x 37”
92 x 58 / 63 / 68cm x 93cm
37” x 23 - 27”x 37”
Dimensions *2
(L x W x H)
83cm x 26cm x 63cm
33” x 10” x 25”
83cm x 26cm x 63cm
33” x 10” x 25”
Seat
W1/w2/w3 x D x H
40/45/50cm x 42xm x 52cm
16”/18”/20” x 17” x 20.5”
40/45/50cm x 42xm x 52cm
16”/18”/20” x 17” x 20.5”
Wheel Spacing
43cm –51cm /17” – 20”
43cm –51cm / 17” – 20”
Armrest Height
71 –82cm / 28” – 32”
71 –82cm / 28” – 32”
Max Gradient
10º
10º
Max User Mass
135kg / 21 stone
135kg / 21 stone
All dimensions are based on the wheelchair in its default configuration.
Dimensions * 1 refers the wheelchair assembled
Dimensions *2 refers to the wheelchair folded and parts removed
Weight *1 is the total weight
Weight *2 is the weight without removable components
We reserve the right to change designs and specifications.
W1 refers to 16” model, W2 to 18” model and W3 to 20” model
warranty
Your Drive branded product is warranted to be free of defects in
materials and workmanship for one year from date of purchase. This
device was built to exacting standards and carefully inspected prior to
shipment. This warranty is an expression of our confidence in the
materials and workmanship of our products and our assurance to the
customer.

Enigma XS2 Wheelchair Page 10 of 12
In the event of a defect covered by this warranty, we will at our option
supply parts or replace the device. This warranty does not cover device
failure due to owner misuse or negligence, or normal wear and tear. The
warranty does not extend to non-durable components, such as rubber
accessories, castors and grips, which are subject to normal wear and need
periodic replacement. The wheelchair frame has a 5-year warranty.
If you have any queries or require full warranty conditions, please contact
your Drive stockist.
Drive Germany:
Drive Medical GmbH & Co. KG
Leutkircher Straße 44
D-88316 Isny/Allgäu (Germany)
Web www.drivemedical.de
Drive UK:
Drive Medical Limited
Ainley’s Industrial Estate, Elland.
UK WEST YORKSHIRE HX5 9JP
Web www.drivemedical.co.uk
spare parts available
The following spare parts are available for your wheelchair. For frames and
cross brace replacements contact your Drive Medical dealer.
Z17180-01: Plastic cross brace support
Z17205-01A: Seat canvas
Z17250-01: Back canvas
Z17325-01SIL: Push handle
Z17350-01: Half fold mechanism
Z17400-01: Castor wheel and fork
Z17425-01: Castor housing
Z17450-01: Quick release pin for 24” wheel
Z17460-01ST: 24” rear wheel
Z10480-01ST: 12.5” rear wheel
Z17530-01: RHS adjustable arm rest
Z17580-01: LHS adjustable arm rest
Z17600-01SIL: LHS leg rest
Z17650-01SIL: RHS leg rest
Z17800-01: Anti-tip wheel
Z17705-01: LHS brake (for 24” wheel)
Z17755-01: RHS brake (for 24” wheel)
EB004-01: Brake set (for 12.5” wheel)
The parts are available exclusively from Drive Medical stockists. To order
the parts please visit the stockist where you bought the wheelchair or visit
www.drivemedical.co.uk to find your local stockist. Spare part catalogues
and other documentation can also be found at www.drivemedical.co.uk

Enigma XS2 Wheelchair Page 11 of 12
using the wheelchair as a seat in a motor vehicle
This Enigma wheelchair has been tested to Wheelchair Crash Test standard
ISO 7176/19 using restraints from Q-Straint. Wherever possible the
wheelchair user should use the vehicle’s fitted seats and the wheelchair
should be folded away and placed safely in the luggage compartment of the
vehicle or restrained.
If it is not feasible to transfer to the vehicle’s seat then the Enigma
wheelchair may be used as a chair whilst the vehicle is moving with the
necessary restraints and with the wheelchair facing the front of the vehicle.
Drive Medical recommends that the following types of restraints be used:
a) Buckle and tongue or standard hook restraints for the front of the
wheelchair,
b) ‘J’ restraints for the rear of the wheelchair,
c) 3-point harness for the user restraint.
The lap belt should be worn across the front of the pelvis, with the
webbing fed between the back posts and armrest.
The upper torso belt should be worn over the shoulder. The belt should be
worn as firm as possible without being uncomfortable. Ensure the webbing is
not twisted. For more information on restraints please contact Drive Medical.
Below is a diagram illustrating the recommended positions for the restraints.
The securement points for the restraints are marked on the wheelchair using
the symbol (below right).
Wheelchair Restraints
Occupant Restraints
LEGEND
45
Table of contents
Other Enigma Wheelchair manuals


Popular Wheelchair manuals by other brands


Pride Mobility
Pride Mobility Jazzy Select 6 Ultra PG VR2 Specifications

B+B
B+B Pyrostart instruction manual

Vermeiren
Vermeiren Inovys II E user manual

GILANI ENGINEERING
GILANI ENGINEERING JRWD1003 user manual

Rascal
Rascal P327 Owners manual & service record

Golden Technologies
Golden Technologies Compass TRO GP615 SS owner's manual