Enjoy-Motors JE50R4SH User manual
1
1- INSTRUCTIONSFORUSEANDSECURITYFORINSTALLATION
The radio motor JE50R4SH (eRS4) has been designed to be insta-
lled with roller shutters in aluminium or pvc window shutter box and
traditional roller shutter system.
• RollingCode system. Frequency R4433.92 MHz
• Automaticlimit switch set upor manual from hand-set
• Obstacle detection,indownwardsby addingpulleyAS1960/99 it
canbe enable or disablefrom the remote control
• Automaticanomalousresistancedetection,initsupwardsmove-
mentby freezing or slatsdisplacement
• Easilyset up midpoint limitswitch
Dear customer please read carefully following advice in order to
guarantee the correct operation of the motor and safety of people.
• Keep remote controls away from children
• Watchthe movingshutter andkeep peopleaway untilit stops.
• Frequently examine the installation for imbalance and signs of
wearordamage.Donotuseif repair or adjustment is necessary
• Disconnect the rolling shutter/awning from the power supply
when maintenance work such as window cleaning is carried
out nearby
INCORRECTINSTALLATIONCANLEADTOSEVEREINJURY
BEFOREINSTALLINGTHEMOTOR,READALLINSTRUCTIONS
• Additional components for the implementation of the installation,
such as adaptors and brackets must be chosen among those of-
feredby the producer “EnjoyMotors, s.l.”
• Our motors are exclusively designed for moving various types of
rolling shutters and awnings in private homes. The manufacturer
mustexpressivelygivepriorapprovaltoanyotheruseofthemotor.
• Before installing the motor remove any unnecessary cords and
equipmentnot required for motorizedoperation
• Theadapterringthatoperatesthelimitswitchmustnottobedrilled
before installation and must be perfectly t inside the roller tube
• Our motors are correctly designed and operations are compatible
with the characteristics of the operated parts, only if the operating
loads comply with: “Application diagram for rolling shutters” and
“Applicationdiagram for sun awnings”
• Any screws used to x to the tube rolling shutters / awnings must
inno way touch themotor
• The motormust be safeguardedfrom any watercontact.
• Themovingpartsofthemotorinstalledataheightlowerthan2.5m
from the oor must be protected from access.
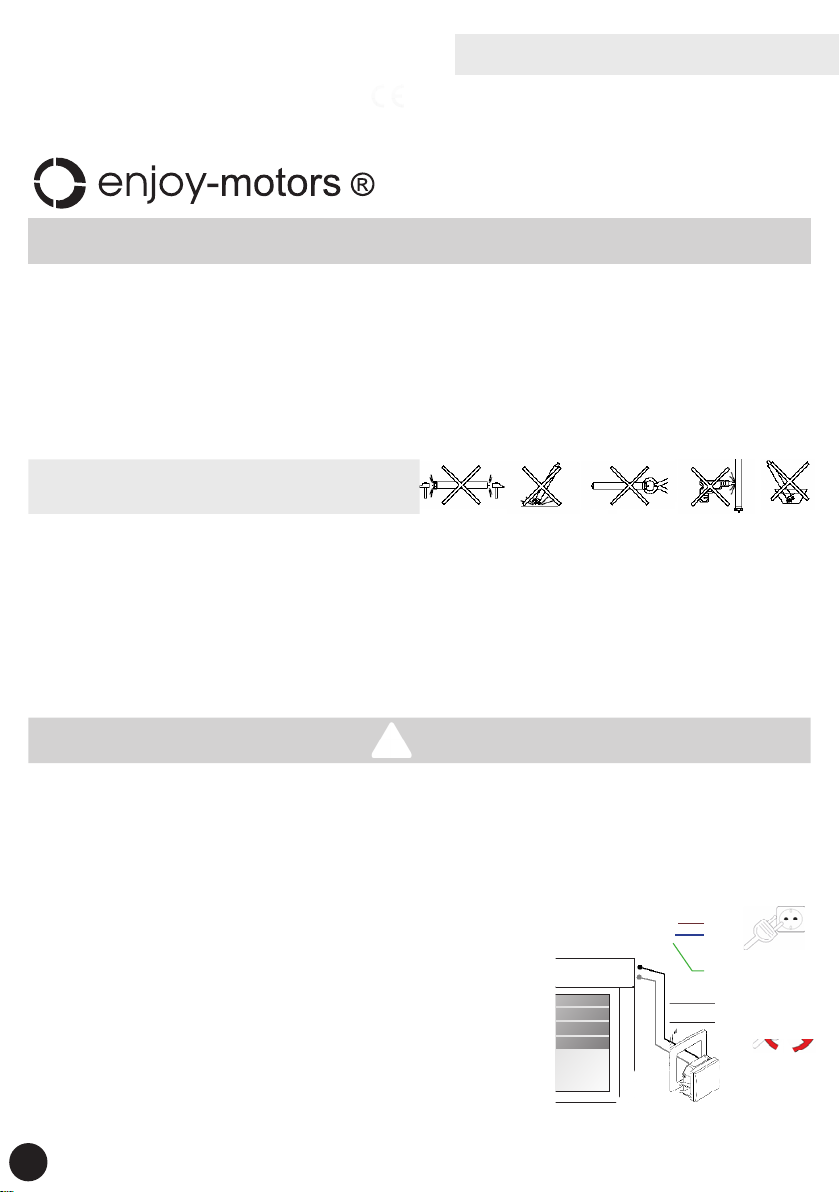
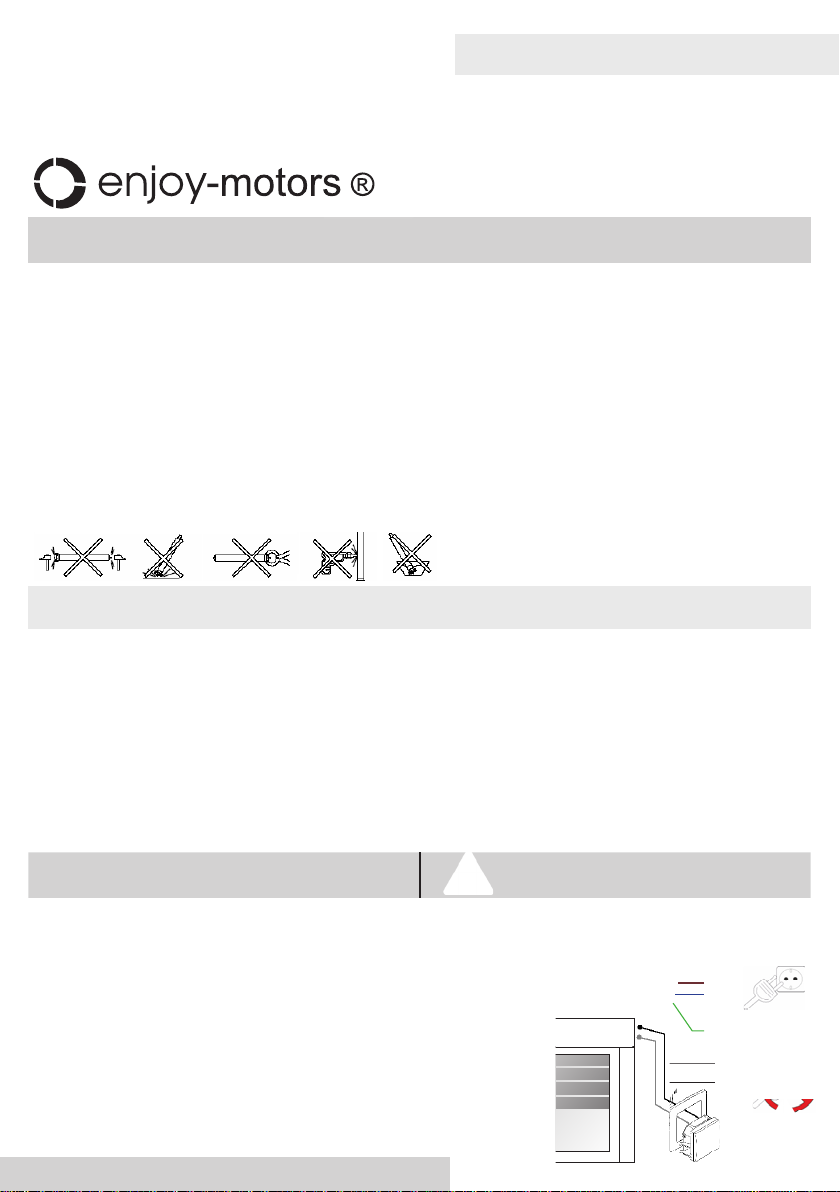
2-ELECTRICCONNECTIONS CONNECTINGWIRESBLACKANDGRAYTOELECTRICITY,
SUPPOSEDCANCELLATIONOFWARRANTY
• The connection to the supply line (in
the switchboard) must be made by a
two-poleswitch with an opening distance
of 3mmbetween contacts.
• The motor is made for intermitent use.
However, it is provided by an internal
thermalprotection,whichstopsthepower
supplyin case ofoverheating (after conti-
nuous operations). The motor re-func-
tioning after a time not lower than 10
minutes, at the end of which the thermal
protection resets itself automatically. But,
after thisresetting, themotor canfunction
at a reduced rate; the normal functioning
willbe possible only after acompletemo-
torcooling(about60minutes).
• For motor installations where the cable
is outdoor, the special 05RN-F cable
must be used (to be requested from the
manufac-
turer), or else it is necessary to protect
the standard P.V.C cable (that is sup-
plied with the motor), by inserting it in
special protection tubes (conduits) to
protect it from the weather and the sun
radiation.
• If the electricity supply cable of this
motor is damaged, it must be replaced
only by a repair centre, recognised by
the manufacturer, as it is necessary to
use special equipment. In cases where
such indications are not adhered to, the
guarantee will be rendered invalid. It’s
dangerous to replace the cable, it must
bereplaced only by arepair centre.
• If there are any disturbances on the
supply line, it is advisable to connect to
the motor a special lter, which can be
suppliedon request.
THEMEANINGOFTHECOLOUROFTHE
WIRESISTHEFOLLOWING:
POWER SUPPLY: BLUE: neutral ofthe electrical
supply BROWN:phase ofthe electricalsupply
YELLOW/GREEN:ground connection
PUSH BUTTON (power free contacts): BLACK
& GREY
YELLOW/GREEN
BLUE
GREY
BROWN
BLACK
230V-50Hz
JE50R4SH
ELECTRONICMOTORBUILTINRECEIVER
TOBEUSEDWITHROLLERSHUTTERS
JE50R4SH_ENG_VER.26112018
novelty: detection of obstacles with activation or cancellation from
the control. The engine starts with the function disabled pag.4

2
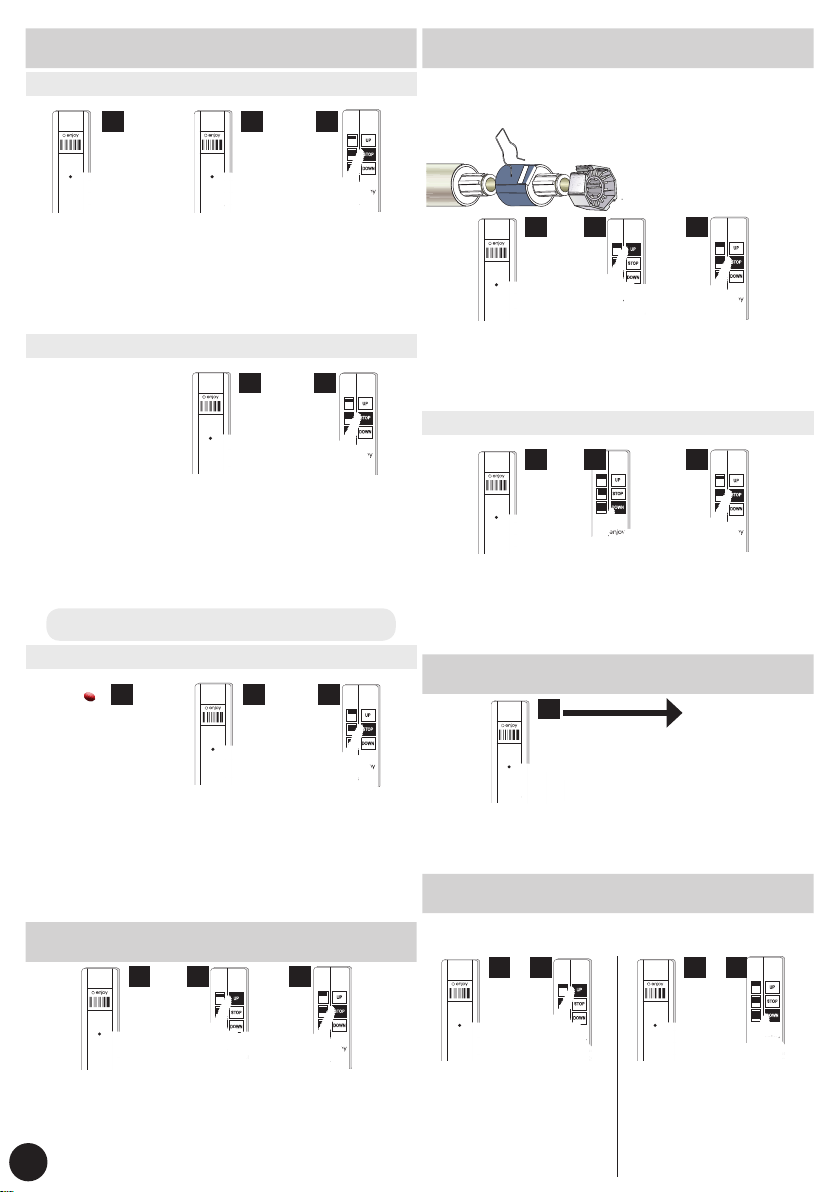
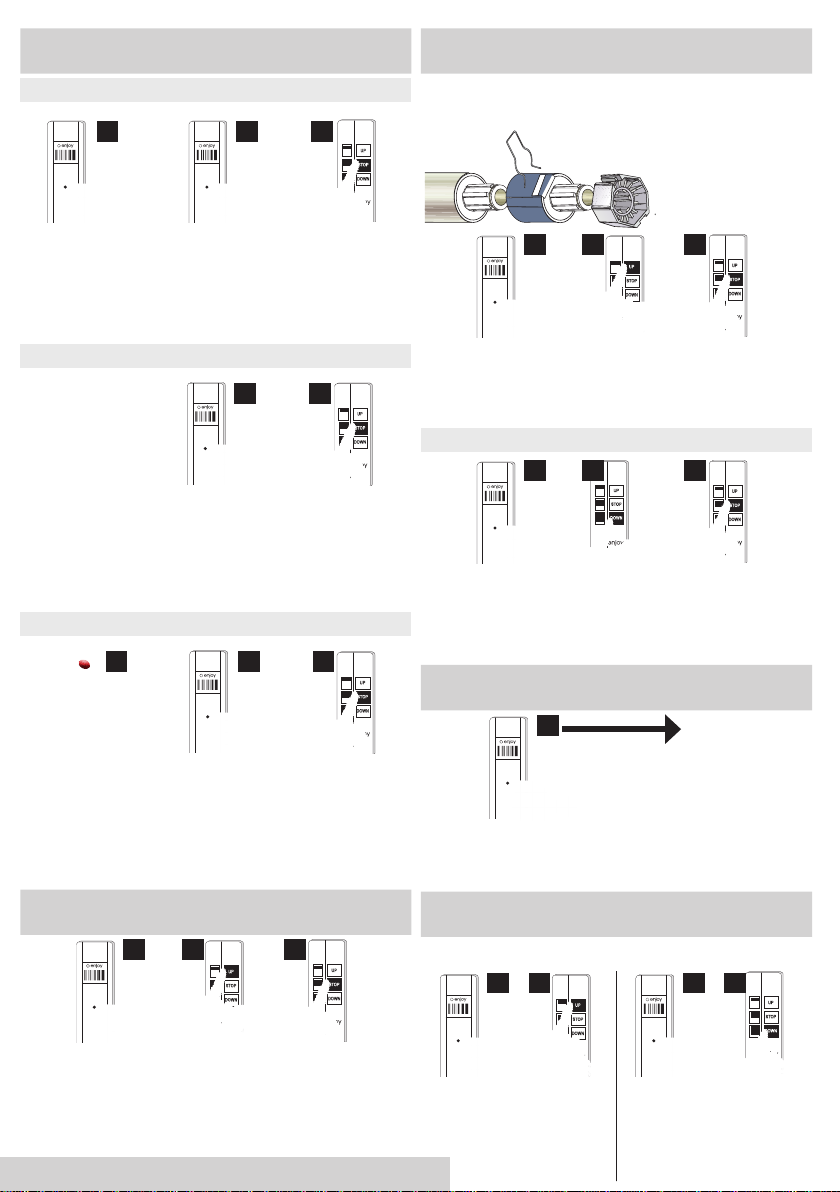
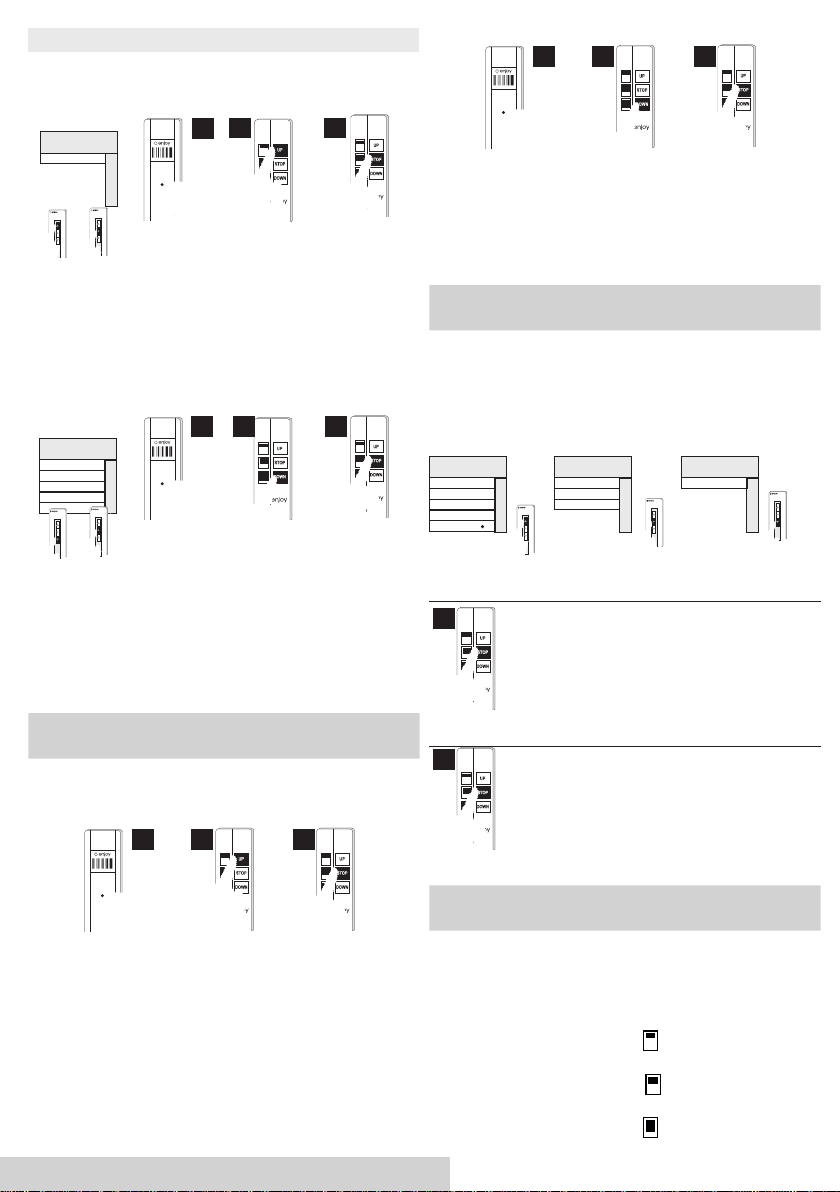
3- FIRSTREMOTECONTROLLEARNING
Option1:bypoweringthemotor230v
x1x1
1. Switch On the motor in which the transmitter have to be learned
Motor conrns that it is ready by doing a tilt movement
2. Within 10 seconds, press 1 time on the programming button P3
Motor conrns that it has learned the remote by doing a tilt movement
3. Press 1 time on the Stop button to exit from programming set up
NOTE: if more than 1 motor are powered ON at the
same time, all of them are opening the memory
Option2:byusingthebuttononthemotorhead
x1x1x1
with the motor powered up
1. Press 1 time on the button from the motor head
Motor conrns that it is ready by doing a tilt movement
2. Within 10 seconds, press 1 time on the programming button P3
Motor conrns that it has learned the remote bu doing a tilt movement
3. Press 1 time on the Stop button to exit from programming set up
4- ROTATIONSENSEANDTRANSMITTERBUTTONS
Check if command buttons up and down have a right correlation,
with the motor manoeuvres. Otherwise, proceed in one of the fol-
lowing two ways, to change the rotation to the right one
Option1:byusingtheremotecontrol
x6x1x1
1. Press 6 times on the programming button P3
2. Then, press 1 time on the down button
Motor conrns that it has changed the rotation by doing a tilt movement
3. Press 1 time on the Stop button to exit from programming set up
Option2:byusingthebuttononthemotorhead
x1x1
1. Press down and hold (± 4 seconds) on the button from the
motor head
Motor conrns that it has changed the rotation by doing a tilt movement
2. Press 1 time on the Stop button to exit from programming set up
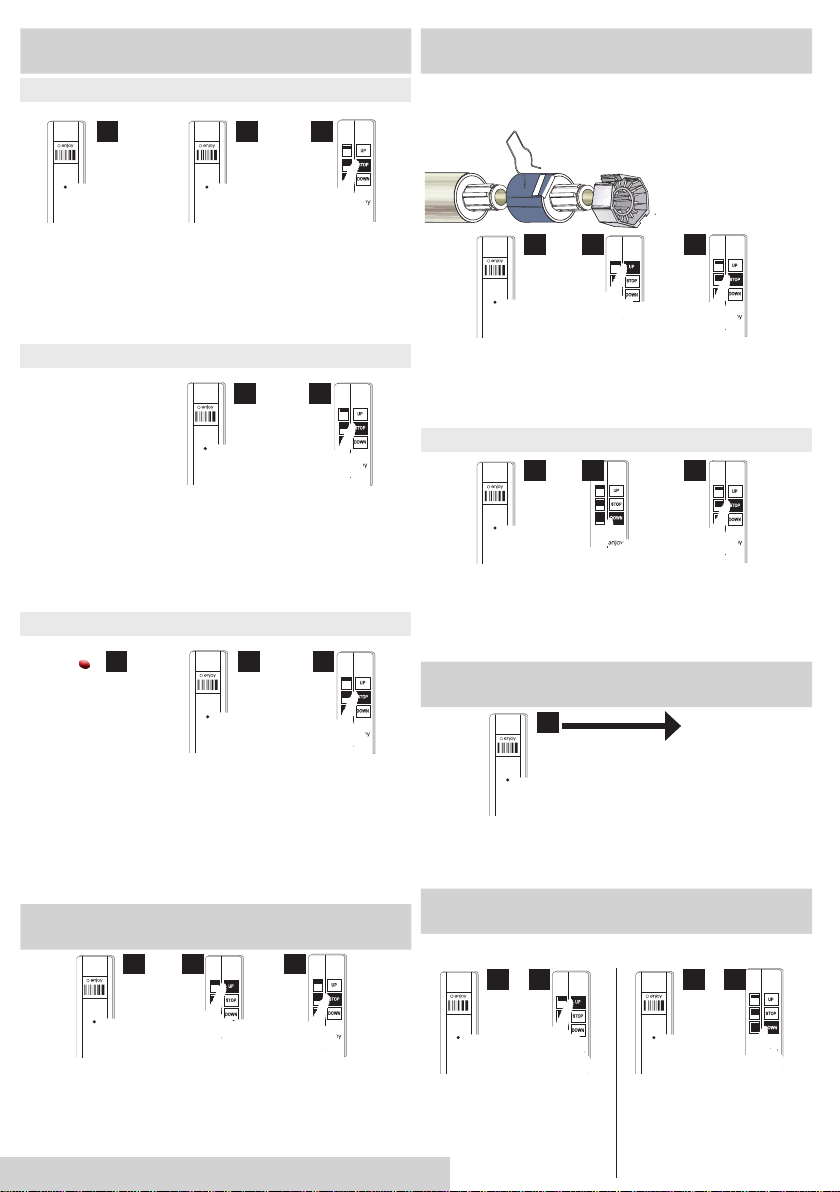
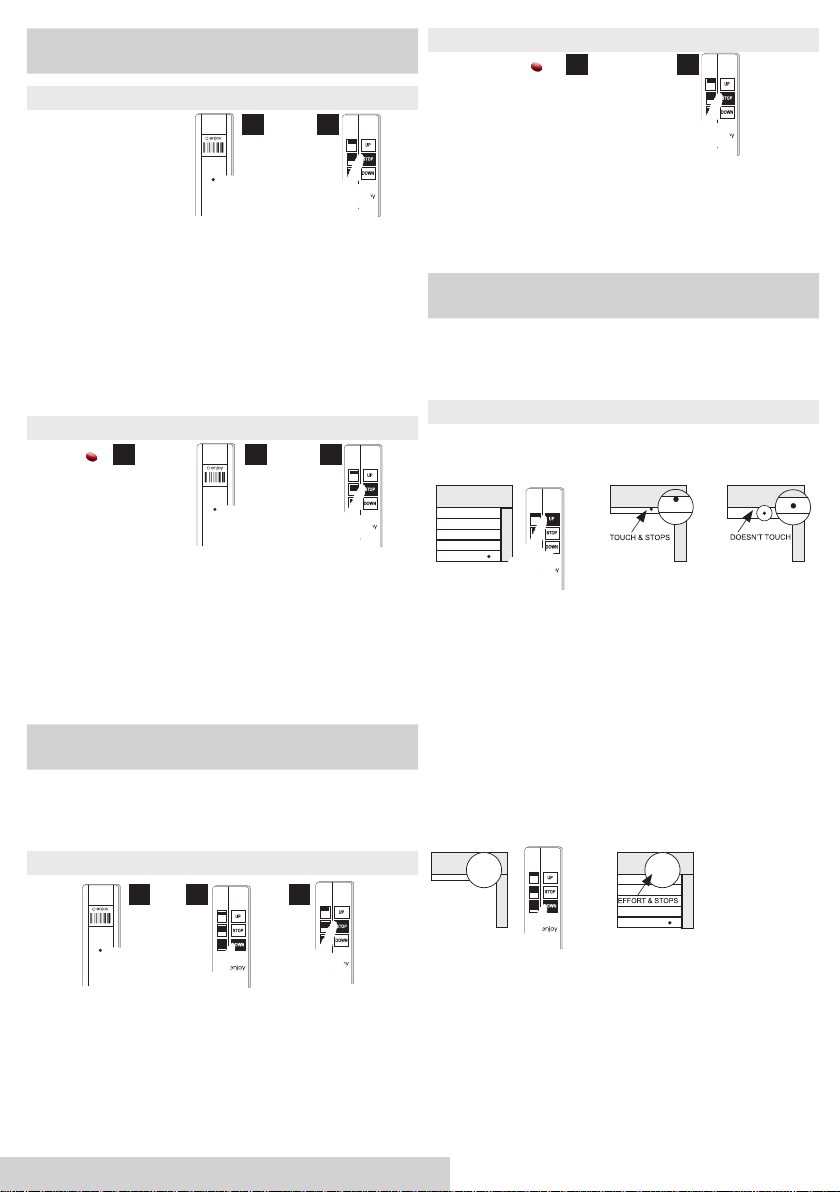
5- LIMITSWITCHSETTING
Limit switch setting can be performend in an automatic way (if roller
shutters is provided of rigid springs and stoppers) or manually from
the remote control
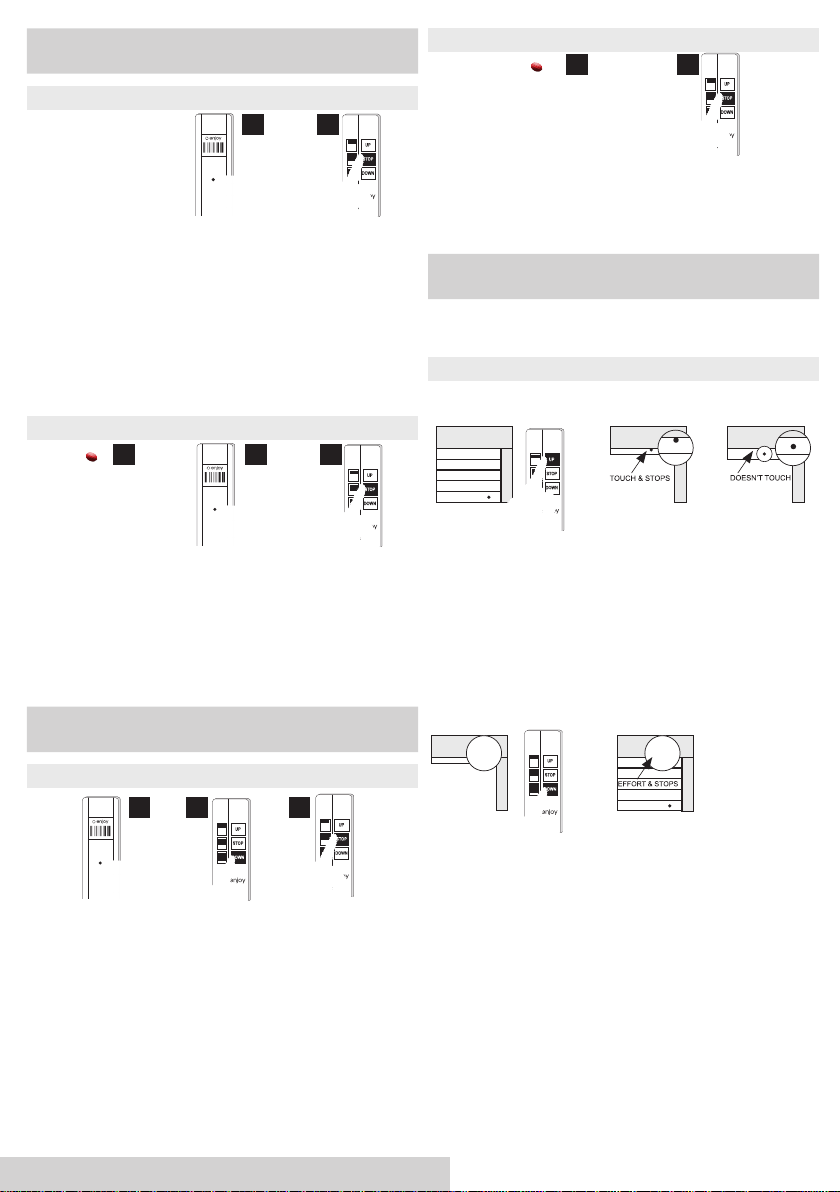
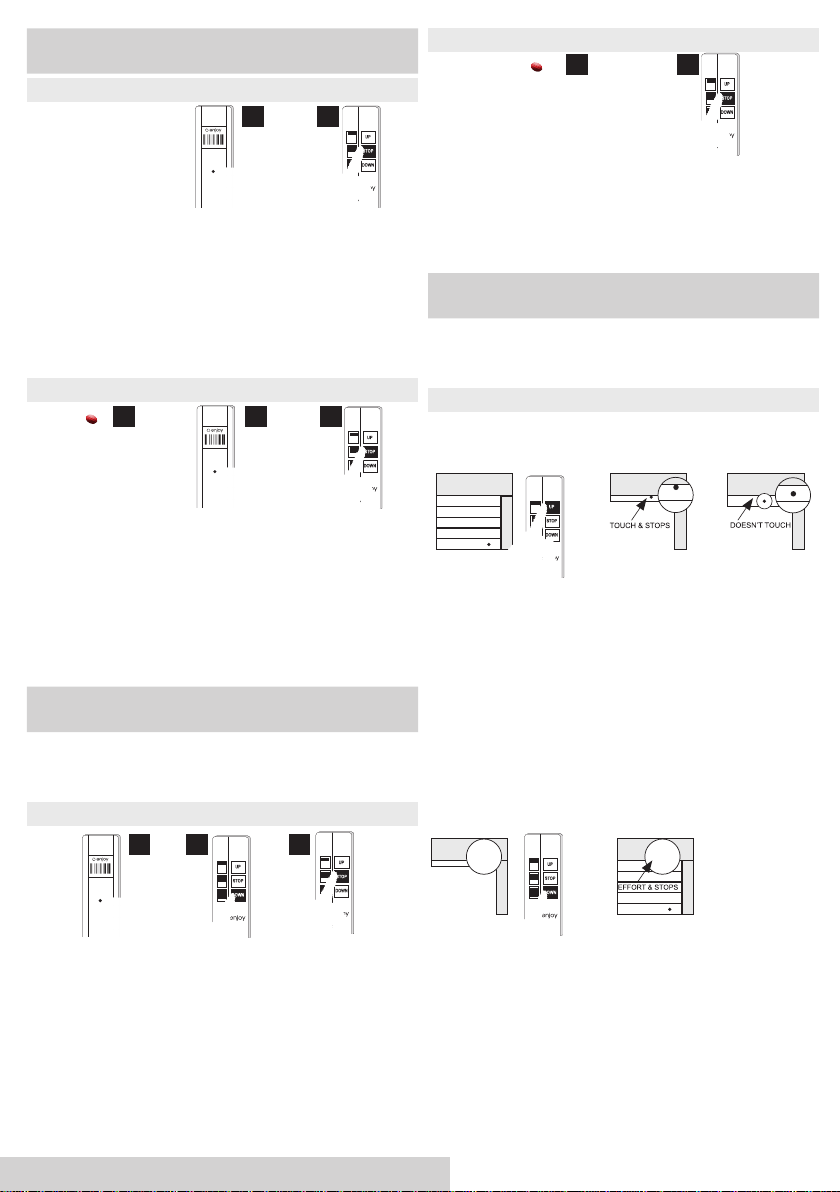
Option1:AUTOMATICALLY
Whenthe rollershutteris installed andbeingsure that ithasprovid-
ed with rigid springs and stoppers:
UPPERLIMITSWITCH
1. Being sures that roller shutters has STOPPERS on its end slat,
press UP button from the remote control and let it to be raised
completely
2. As soon as the stopper reaches to the upper side, the shutter
is stopped
3. Motor will learned the upper limit switch in a point a little bit
lower (stopper will not touch anymore on the shutter drawer)
• Note: Uplimit switch isset up byresistance, it meansas soon as
the stopperwill hit thewindow box, motorwill understand thatit is
theup limit switch position.
LOWERLIMITSWITCH
1. Being sures that roller shutters has RIGID SPRINGS, press
DOWN button from the remote control and let it to be closed
completely
2. As soon as the rigid spring works, shutter will be stopped
• Note:The Down limit switch set-up might fail if the tubular mo-
tor does not turn a full circle. In this case, make the downwards
travel longer distance and re-set the Down limit.

3
LOWERLIMITSWITCHDELETING
x1x1x3
1. Press 3 times on the programming button P3
2. Then, press 1 time on the up button
Motor conrns the limits cancelation, by doing a tilt movement
3. Press 1 time on the Stop button to exit from programming set up
8- CONFORTPOSITION
The comfort position is a programmable point between the upper
and the lower limit switch, which the user can access from the stop
button on his remote control.
The programming of this point is also done from the Stop button,
which ensures that the end user will not involuntarily change the
higher or lower limits...
Place the roller shutter in the desired comfort position:
x4To memorize that point as the comfort posi-
tion:
1. Press 4 times on the Stop button
Motor conrns the confort point, by doing a tilt
movement
x1To go to the confort position, from any point
where the awning is placed:
2. Press the Stop button once, holding
down the button until the roller shutter
starts to move (± 4 seconds)
9- INTERMEDIATEPOSITIONS:EMSTEEL1M
If you are using an EMSTEEL1M, in addition to the comfort po-
sition, you will have other 3 intermediate positions, which in this
case, are perfomed automatically by the. User can accedes to
them, using the frontal buttons (left side) of said remote:
By pressing : motor goes to intermediate posi-
tion, nearly to the opened point
By pressing : motor goes to intermediate posi-
tion more centered
By pressing : motor goes to intermediate posi-
tion, nearly to the total closed point
Option2:FROMTHEREMOTECONTROL
If the roller shutters hasn’t rigid springs or stopeers, it is possible to
set one or both limits by the remote control:
UPPER LIMIT SWITCH
x1x1x1
1. Open completely the roller shutter, stopping it in the desired
upper position
2. Press 1 time on the programming button P3
3. Then, press 1 time on the UPbutton
Motor conrns the upper point, by doing a tilt movement
4. Press 1 time on the Stop button to exit from programming set up
LOWER LIMIT SWITCH x1x1x1
5. Closed completely the roller shutter, stopping it in the desired
lower position
6. Press 1 time on the programming button P3
7. Then, press 1 time on the down button
Motor conrns the lower point, by doing a tilt movement
8. Press 1 time on the Stop button to exit from programming set up
6- LIMITSWITCHESCANCELLATION
Limit switches are independant one from other, so deleting has to
be done by separate:
UPPERLIMITSWITCHDELETING
x1x1x3
At any point in where is placed the roller shutteer (doesn’t matter it)
1. Press 3 times on the programming button P3
2. Then, press 1 time on the up button
Motor conrns the limits cancelation, by doing a tilt movement
3. Press 1 time on the Stop button to exit from programming set up
4
10- ADDITIONALREMOTECONTROL
Option1:Fromaremotecontrolalreadyadded
x8
already added new remote new remote
x1x1
On a control that already works,
1. Press the P3 programming button 8 times
On a new remote control,
2. Immediately press the programming button P3 one time
Motor conrns the new remote control, by doing a tilt movement
3. Press 1 time on the Stop button to exit from programming set up
Option2:bypoweringthemotor230v
new remote new remote
x1x1
1. Switch On the motor in which the transmitter have to be learned
Motor conrns that it is ready by doing a tilt movement
On a new remote control,
2. Immediately press the programming button P3 one time
Motor conrns the new remote control, by doing a tilt movement
3. Press 1 time on the Stop button to exit from programming set up
NOTE: if more than 1 motor are powered ON at the same time,
all of them are opening the memory
Option3:byusingthebuttononthemotorhead
new remote new remote
x1x1x1
1. Press 1 time on the button from the motor head
Motor conrns that it is ready by doing a tilt movement
On a new remote control,
2. Immediately press the programming button P3 one time
Motor conrns the new remote control, by doing a tilt movement
3. Press 1 time on the Stop button to exit from programming set up
11- DELETINGAREMOTECONTROL
x6x1x1
1. Press 6 time on the programming button P3
2. Then, press 1 time on the UPbutton
Motor conrns the remote deleting, by doing a tilt movement
3. Press 1 time on the Stop button to exit from programming set up
11- DETECTIONOBSTACLES
motorissuppliedwiththefunctiondeactivated
If you want to use the obstacle detection function, you must install
the pulley AS1960 or AS1999 on the tip of the gearbox and also
activate this function from the remote:
x5x1x1
1. Press 5 time on the programming button P3
2. Then, press 1 time on the UPbutton
Motor conrns the obstacle detection activation, by a tilt movement
3. Press 1 time on the Stop button to exit from programming set up
DEACTIVATETHEFUNCTION
x5x1x1
1. Press 5 time on the programming button P3
2. Then, press 1 time on the DOWN button
Motor conrns the obstacle detection deactivation, by a tilt movement
3. Press 1 time on the Stop button to exit from programming set up
12- FULLRESET(MEMORYCLEANING)
x7keep on the 7th
until conrmation
1. Press 7 times on the programming button P3, at short inter-
vals, holding down the 7th time for ± 4 seconds
Motor conrns the full memory cleaning, by doing a double tilt movement
2. Press 1 time on the Stop button to exit from programming set up
13- ENABLEMENTORDISABLEMENTOFTHETILT(step
bystep)FUNCTION
JE50R4SH motors, have a function by which it can works in step
by step function also called Dead Man or Tilt function.
x2x1x2x1
1. Press 2 times on the P3
2. Press 1 time on the UP button
Motor conrns the Tilt activation,
by doing a tilt movement
1. Press 2 times on the P3
2. Press 1 time DOWN button
Motor conrns the Tilt deactiva-
tion, by doing a tilt movement

Enjoy Motors SL | www.enjoy-motors.com | Seite 1 - 4
1-WICHTIGESICHERHEITSHINWEISEFÜRDENBENUTZER
Der elektronische Funkmotor JE50R4SH R4 ist einsetzbar in allen
Rollladenanlagen, egal ob es sich um eine Standardmontage oder
den Einbau in Vorbauelemente und Aufsatzkästen handelt. Über 2
zusätzliche Adern besteht die Möglichkeit eines optionalen Taste-
ranschlusses (Funktionsweise:AUF-STOPP-AB-STOPP)
• Elektronische Endschalter mit integriertem Empfänger
• Rolling Code System. Frequenz 433,92 MHz
• Einfache Programmierung der Endlagen über Sender
• Zwischenposition leicht programmierbar
• Programmierung neuer Sender über den Master-Sender
• Betriebsart “Totmann” möglich
• opt.Tasteranschl
ZurSicherheit von Personenisteswichtig, folgende Hinweisezubeach-
ten.DieseHinweisebitteaufbewahren:
• Dieses Gerät ist nicht dafür bestimmt, durch Personen - einschließlich
Kinder - mit eingeschränkten physischen, sensorischen oder geistigen
Fähigkeiten odermangels Erfahrungund/oder mangelsWissen benutzt
zuwerden,esseidenn,siewerdendurcheinefürihreSicherheitzustän-
dige Person beaufsichtigt oder erhielten von ihr Anweisungen, wie das
Gerätzubenutzenist
• Kindern nieerlauben, mitSchaltern undSteuereinrichtungen zuspielen.
InsbesondereFernbedienungenvonKindernfernhalten
• Rollläden und Markisen bei ihrer Betätigung beobachten und Personen
davonfernhalten,bisdieVorrichtunganhält.
• Die Anlage regelmäßig überprüfen, um eventuelle Ungleichgewichte,
Abnutzungen oder Schäden festzustellen. Die Anlage nicht benutzen,
wenneineReparaturoderEinstellungnotwendigist
• DieAnlagenichtbetreiben, wennArbeiten wiez.B. Fensterputzenin der
Nähe durchgeführt werden. Zur Sicherheit die Netzspannung ausschal-
tenundgegenWiedereinschaltensichern
UnsachgemäßeInstallationkannzuschwerstenVerletzungenführen!FolgendeHinweisebitteunbedingtbeachten!
• Die oben aufgeführten Antriebe sind ausschließlich zum Betrieb von
Rollläden, .AndereAnwendungenderAntriebemüssenvorher mitdem
HerstellerbesprochenwerdenundbedürfenderZustimmungdesHers-
tellers.AufdieBeachtungderjeweiligenProduktnormwirdausdrücklich
verwiesen
• DerAbstand des optionalen Tasters zum Boden muss mindestens 1,5
mbetragen.
• Ist derAntrieb/dieAnlage nichtdurch eineVerkleidunggeschützt, muss
derAntriebin mindestens 2,5 m Höhe über dem Boden montiert sein.
• Zubehörteile zumAntrieb wieWellenadapterundAntriebslagermüssen
ausdem VerkaufsprogrammdesHerstellers sorgfältig gewählt werden.
• Bei den Befestigungen des Antriebes (Antriebslagern) ist jeweils die
sichersteundgeeignetsteVariantezu wählen.
• Sind beiAntriebslagern vom Hersteller bestimmte maximale Drehmo-
mente angegeben, so dürfen diese nur mit Antrieben geringer oder
maximalgleicherKraft(Nm)verwendetwerden
• Der Stellring der automatischen Endabschaltung darf nicht angebohrt
werden und muss ebenfalls passgenau in der Prolwelle sitzen.
• Es istder Mindest-Innendurchmesserder Wickelwellezu beachten
• Die NetzanschlussleitungdesAntriebesmusssorgfältig verlegtsein und
darfaufkeinenFallindenWickelbereichdesRollladensgelangen
• DenAntriebnicht dem Wasser/Regenaussetzen.
• Bei Befestigung des Behanges an der Wickelwelle darauf achten, dass
dieSchraubenendendenAntriebnicht berühren.
• Das angegebeneDrehmomentdesAntriebes darfan keinemPunkt des
FahrbereichesvonderangehängtenLastüberschrittenwerden.
• FestmontierteSteuereinrichtungenmüssensichtbar angebrachtwerden.
• Wird der Antrieb in einem Rollladenkasten untergebracht, , dass der
Kasten eine Revisionsklappe nach DIN hat, die einen leichten Tausch,
Wartung,EinstellungundNachjustagederAnlageermöglicht.
• Die Netzanschlussleitung diesesAntriebes darf nur durch den gleichen
LeitungstypvomHerstellerersetztwerden.
2-CONEXIONESELÉCTRICAS DAS ANSCHLIESSEN DER SCHWARZEN UND GRAUEN
GEWINDEANDENSTROMISTDERABBRUCHDERGARANTIE
• Für eine normgerechte Installation muss
eine allpolige Trennung vom Stromnetz mit
mindestens 3 mm Kontaktöffnungsweite
geschaffenwerden
• Die gelieferte Netzleitung darf nur durch den
gleichen Leitungstyp, geliefert durch den
Hersteller, ersetzt werden
• Werden Antriebe im Freien installiert, muss
die Zuleitung durch ein Schutzrohr oder Ka-
belkanalgeschütztwerden
• Die Zuleitungen müssen der gültigen VDE-
Normentsprechen
• Wird kein optionaler Taster benötigt / anges-
chlossen,so endendieAderninderAbzweig-
doseundsindfachgerechtzu isolieren
• Der Anschluss des Antriebes muss durch
eine Elektro-Fachkraft nach den gültigen
VDE-Bestimmungen und den Vorschriften
der örtlichen Energieversorgungsunterneh-
menvorgenommenwerden
GRÜN/GELB : Schutzleiter - PE
BLAU : Neutralleiter - N / BRAUN : Phase - L
GRAU / SCHWARZ: Tasteranschluss
GRÜN/GELB
BLAU
GRAU
BRAUN
SCHWARZ
230V-50Hz
JE50R4SHv4
ELEKTRONISCHEFUNKMOTORFUR
ROLLLADENANLAGEN
JE50R4SH_V.4_GER_VER.02122019
Neuheit: Hinderniserkennung mitAktivierung oder Löschung mit
dem Sender. Der Motor startet mit deaktivierter Funktion Seite 4
Enjoy Motors SL | www.enjoy-motors.com | Seite 2 - 4
3- Erstsendereinlernen
Möglichkeit1:nachNetz-Ein
x1x1
1. Nach korrektem, Netzanschluss, Netzversorgung inschalten
Motor bestätigt mit einer kurzenAUF- /ABBewegung
2. Innerhalb 10 Sekunden, einmal die P3 Taste betätigen
Motor bestätigt mit einer kurzenAUF- /ABBewegung
3. Zum Verlassen der Programmierung die Stopp-Taste betätigen
Möglichkeit2:überTasteamMotorkopf
x1x1x1
1. Taste am Motorkopf kurz betätigen
Motor bestätigt mit einer kurzenAUF- /ABBewegung
2. Innerhalb 10 Sekunden, einmal die P3 Taste betätigen
Motor bestätigt mit einer kurzenAUF- /ABBewegung
3. Zum Verlassen der Programmierung die Stopp-Taste betätigen
4- Richtungswechsel
Möglichkeit1:überSender
x6x1x1
1. 6 x P3 Taste kurz betätigen
2. Unmittelbar dieAb-Taste betätigen
Motor bestätigt mit einer kurzenAUF- /ABBewegung
3. Zum Verlassen der Programmierung die Stopp-Taste betätigen
Möglichkeit2:überTasteamMotorkopf
x1x1
1. Taste am Motorkopf für 4 Sekunden betätigen
Motor bestätigt mit einer kurzenAUF- /ABBewegung
2. Zum Verlassen der Programmierung die Stopp-Taste betätigen
5- ENDLAGENEINSTELLUNG
• Automatische Programmierung der Endschaltung (sind feste
Wellenverbinder erforderlich)
• Einfache Programmierung der Endlagen über Sender
Möglichkeit1:AutomatischeEndlageneinstellung
OBEREENDLAGE
1. Zur automatischen Endlageneinstellung werden feste Endan-
schläge benötigt (Endstopper, Winkelendleiste etc.)
2. Auf-Taste des Senders kurz drücken. Motor fährt selbstständig
nach oben
3. Motor stoppt automatisch bei Erreichen der oberenAnschläge
4. Motor speichertdie obere Endlagenach dreimaligemAnfahren
der Endlage.Zur Entlastung desRollladenpanzers erfolgen alle
weiterenFahrten mit Reduzierung
UNTEREENDLAGE
1. Zur automatischen unteren Endlageneinstellung müssen starre
Wellenverbinder und die CBKupplung verwendet werden
2. Ab-Taste des Senders drücken. Motor fährt selbstständig nach
unten
3. Motor stoppt automatisch bei Erreichen der unteren Endlage
und speichert diese ab
4. Die Korrekte Endlage wird nach dreimaligemAnfahren der
Endlage abgespeichert.

Enjoy Motors SL | www.enjoy-motors.com | Seite 3 - 4
LÖSCHUNGUNTEREENDLAGE
x1x1x3
1. Drücken Sie 3 x die rückseitige P3-Taste des Senders
2. Unmittelbar dieAb-Taste betätigen
Motorbestätigtmit einer kurzenAuf-/Ab-Bewegun
3. Zum Verlassen der Programmierung die Stopp-Taste betätigen
8- ProgrammierungZwischenposition
Die Zwischenposition kann über die Sender-Stopptaste program-
miert
Diese Position kann eine beliebige Position zwischen der oberen
und der unteren Position des Rolladens
Gewünschte Zwischenposition anfahren:
x4Programmierung Zwischenposition:
1. Drücken Sie 4 x die Stopp-Taste
Motor bestätigt Zwischenposition mit einer
kurzenAUF- /AB-Bewegung
(Ändern der Zwischenposition erfolgt in glei-
cher Weise)
x1Zwischenposition anfahren:
1. Stopp-Taste für ±4 Sekunden festhalten
(Die Zwischenposition kann aus einer beliebigen
Position heraus angefahren werden)
9- ANDEREZWISCHENPOSITIONEN:EMSTEEL1M
EMSTEEL1MHandsenderhat3festeZwischenpositionenundau-
tomatisch programmiert (oberes Drittel / Mitte / unteres Drittel) die
über Tasten direkt ansteuerbar sind:
• Taste einmal kurz betätigen: das rollladen ben-
det sich im oberes Drittel (ungefähr)
• Taste einmal kurz betätigen: das rollladen ben-
det sich im Mitte (ungefähr)
• Taste einmal kurz betätigen: das rollladen ben-
detsich im unteren Drittel(ungefähr)
Möglichkeit2:ManuelleEndlageneinstellungüberSender
OBEREENDLAGE
x1x1x1
1. Obere gewünschte Endlage anfahren
2. P3 Taste einmal kurz betätigen
3. Unmittelbar dieAuf-Taste betätigen
Motor bestätigt mit einer kurzenAUF- /ABBewegung
4. Zum Verlassen der Programmierung die Stopp-Taste betätigen
UNTEREENDLAGE
x1x1x1
1. Untere gewünschte Endlage anfahren
2. P3 Taste einmal kurz betätigen
3. Unmittelbar dieAb-Taste betätigen
Motor bestätigt mit einer kurzenAUF- /AB-Bewegung
4. Zum Verlassen der Programmierung die Stopp-Taste betätigen
6- LÖSCHUNGENDLAGEN
Endlagen werden separat entfernt, wobei Sie auswählen, welche
der beiden Endlagen Sie in jedem Moment entfernen möchten
LÖSCHUNG OBERE ENDLAGE
x1x1x3
1. Drücken Sie 3 x die rückseitige P3-Taste des Senders
2. Unmittelbar dieAuf-Taste betätigen
Motorbestätigt miteiner kurzenAuf- /Ab-Bewegung
3. Zum Verlassen der Programmierung die Stopp-Taste betätigen

Enjoy Motors SL | www.enjoy-motors.com | Seite 4 - 4
10- EINLERNENWEITERERSENDER
Möglichkeit1:mittelseingelerntenSenders
x8
eingelernten sender neuen Senders neuen Senders
x1x1
in einem Sender, bereits eingelernten
1. Drücken Sie 8 x die rückseitige P3-Taste
in einem neuen Senders
2. Drücken Sie 1 x die rückseitige P3-Taste
Motor bestätigt mit einer kurzenAuf-Ab-Bewegung
3. Zum Verlassen der Programmierung die Stopp-Taste betätigen
Möglichkeit2:nachNetz-Ein
neuen Senders neuen Senders
x1x1
1. Nach korrektem, Netzanschluss, Netzversorgung inschalten
Motor bestätigt mit einer kurzenAUF- /ABBewegung
in einem neuen Senders
2. Innerhalb 10 Sekunden, einmal die P3 Taste betätigen
Motor bestätigt mit einer kurzenAUF- /ABBewegung
3. Zum Verlassen der Programmierung die Stopp-Taste betätigen
Möglichkeit3:überTasteamMotorkopf
neuen Senders neuen Senders
x1x1x1
1. Taste am Motorkopf kurz betätigen
Motor bestätigt mit einer kurzenAUF- /ABBewegung
in einem neuen Senders
2. Innerhalb 10 Sekunden, einmal die P3 Taste betätigen
Motor bestätigt mit einer kurzenAUF- /ABBewegung
3. Zum Verlassen der Programmierung die Stopp-Taste betätigen
11- SENDERLÖSCHEN
x6x1x1
1. Drücken Sie 6 x die rückseitige P3-Taste des zu löschenden
Senders
2. Drücken Sie 1 x dieAUF-Taste des zu löschenden Senders
Motorbestätigt miteiner
kurzenAuf- /Ab-Bewegung.
3. Zum Verlassen der Programmierung die Stopp-Taste betätigen
12- HINDERNISERKENNUNG
DerMotorstartetmitdeaktivierterFunktion
Hinderniserkennung in Abfahrrichtung mittels CM-Kupplung
(AS1960/AS1999). Nun kann diese Funktion aktiviert oder storniert
werdenmit dem Sender.Der Motor startet mitdeaktivierterFunktion
x5x1x1
1. Drücken Sie 5 x die rückseitige P3-Taste
2. Unmittelbar dieAuf-Taste betätigen
Motorbestätigt miteiner kurzenAuf- /Ab-Bewegung
3. Zum Verlassen der Programmierung die Stopp-Taste betätigen
DeaktivierenSiedieFunktion
x5x1x1
4. Drücken Sie 5 x die rückseitige P3-Taste
5. Unmittelbar dieAb-Taste betätigen
Motorbestätigtmit einer kurzenAuf-/Ab-Bewegun
6. Zum Verlassen der Programmierung die Stopp-Taste betätigen
13- TOTALRESETEINESMOTORS
x7Halten Sie die 7.
Taste bis zur Bestäti-
gung gedrückt
1. Drücken Sie 7 x die rückseitige P3-Taste, in kurzen Abständen,
Halten Sie die 7. Taste bis zur Bestätigung gedrückt (± 4 Sek.)
Motorbestätigtmit einer kurzenAuf-/Ab-Bewegun
2. Zum Verlassen der Programmierung die Stopp-Taste betätigen
14- Totmann–Funktion(Tippbetrieb)
AKTIVIEREN
x2x1DEAKTIVIEREN
x2x1
1. 2 x P3 Taste kurz betätigen
2. 1xdieAuf-Taste betätigen
MotorbestätigtmitAuf/AbBewegun
•Tippbetrieb bis 2 Sekunden. Für
eine selbstständige Fahrt die
jeweilige Richtungstaste länger
drücken (>2 s)
1. 2 x P3 Taste kurz betätigen
2. 1x dieAb-Taste betätigen
MotorbestätigtmitAuf/AbBewegun
•Nach Deaktivierung, die jew-
eilige Richtungstaste für eine
selbstständige Fahrt nur kurz
betätigen

Enjoy Motors SL | www.enjoy-motors.com | page 1 de 4
1-INTRODUCTION,INSTRUCTIONSD’INSTALLATIONETSÉCURITÉ
• LemoteurJE50R4SHradio (eRS4)aétéconçupour êtreinstallé
avec les volets roulants (aluminium ou PVC) renovation ou le
système de volet roulant traditionnel.
• La programmation automatique des ns de course
• Détection d’obstacle (en descente) pouvant être activée par
la télécommande. Utiliser avec poulie spéciale AS1960 ou
AS1999Détection automatique de résistanceanormale, pendant
la montée (la glace ou le déplacement des lames)
• Système Rolling Code. 433.92 MHz
• Réglage facilement des mi-parcours
• Programmation denouveaux émetteurs, par d’origine
• Possibilité de connecter à un invereur unipolaire
• Cherclient, s’il vousplaît lisez attentivementles conseils suivan-
ts pour assurer la bon fonctionnement du moteur et la sécurité
des personnes.
• Ne pas laisser les enfants jouer avec les dispositifs de comman-
de
• Regardez le volet roulant pendant son fonctionnement et as-
surez-vous que personne ne s’approche avant qu’il ne se soit
complètement fermé
• Vériez périodiquement le bon fonctionnement de l’installation
• Dans le cas ou les volets roulants sont contrôlés par des sy-
stèmes automatiques, vériez que le moteur ne puisse pas être
actionné, particulièrement si l’on travaille à proximité.
NEMAUVAISEINSTALLATIONPEUTCAUSERDEGRAVESDOMMAGES.
SUIVEZATTENTIVEMENTTOUTESLESINSTRUCTIONSD’INSTALLATION
• Des éléments supplémentaires pour la réalisation de l’installation,
tels que les adaptateurs et supports, doivent être choisis avec soin
à ceux offerts par le fabricant “Enjoy Motors, s.l.” ou son réseau de
vente.Ces éléments sont présentsdans le catalogue.
• Nos moteurs sont conçus pour les stores et les volets roulants avec
un usage intermittent non intensif. Des utilisations différentes de
celles-ci devront être discutées au préalable avec le producteur et
nécessitentson autorisation.
• Avant de xer le moteur dans son l’axe, retirer les bavures et tout ce
quipeut nuire au bonfonctionnement du moteur.
• Les dimensions de nos moteurs sont calculées correctement et leur
fonctionnement est compatible avec les caractéristiques des éléme-
ntsqu’ilscommandent,à conditionbiensûr derespecterles charges
defonctionnementreportéesdanslestableaux:“Diagrammed’appli-
cationpour volets roulants”.
• Le câble d’alimentation et câble de commande doivent être
établies avec soin à l’intérieur de la boîte pour éviter d’entrer en
contactavec des pièces mobiles(tube ou volet roulant).
• Ne pas utiliser de vis de xation trop longue pour xer la toile ou le
tabliersur la partie dul’axe/moteur.
• Lemoteur doit être protégécontre tout contact avecl’eau.
• Nepas tourner la couronnedumoteur avant d’avoir insérerlemo-
teur dans le tube. Ne pas percer la couronne et est parfaitement
situédans le tube d’enroulement.
• On doit protéger les parties en mouvement d’un produit installé à
unehauteur de moins de2.50 m du sol.
• Lorsquelemoteurestmontédansuncaisson,celuicidoitposséd-
er une trappe de visite an de permettre le réglage et le contrôle de
l’installationsuivant les normes DIN.
• Lediamètre intérieur de tubedoivent être âgés de47 mm.
2-CONNEXIONÉLECTRIQUE(230V-50Hz) LA CONNEXION DES FILS NOIR ET GRIS AU COURANT
ELECTRIQUECONSTITUEL’ANNULATIONDELAGARANTIE
• Le raccordement à la ligne doit être réalisé
avecundéviateurbipolaireavecunedistan-
ced’ouverturede3mmentrelescontacts.
• Le motoréducteur est doté d’une protection
thermique qui interrompt l’alimentation en
cas de surchauffe, par exemple après un
entraînementencontinu.Lemoteurredém-
arre après un délai d’au moins 10 minutes,
au bout duquel la protection thermique est
automatiquement restaurée. Un fonction-
nement normal ne sera possible qu’après
refroidissement completdumoteur (environ
60minutes).
• Silecordond’alimentationestendommagé,
il doit être remplacé par le fabricant. Sinon,
lagarantieexpirera.
• Pour les installations où le l est externe,
le câble 05RN-F doit être utilisé. Sinon,
protégez le câble en PVC standard en l’in-
sérant dans des conduits spéciques.
• Le l d’antenne en n de course (littéral-
ement sur le câble d’alimentation) doit
être réparti à l’intérieur du boîtier, dans une
position telle qu’il ne puisse pas entrer en
contact avec des pièces en mouvement. Si
nécessaire, sécurisez la position avec des
attachesenplastique
TENSION: BLEU: neutre de l’alimentation MAR-
RON: phase de l’alimentation JAUNE / VERT:
connexion à la terre
BOUTON-POUSSOIR (contacts
de tension libres): NOIR et GRIS
JAUNE / VERT
BLEU
GRIS
MARRON
NOIR
230V-50Hz
JE50R4SH
MOTEURÉLECTRONIQUERADIO
POURLESVOLETSROULANTS
JE50R4SH_FRA_VER.10012019
news: détectiond’obstaclesavecactivation ouannulationdepuisla
télécommande.Lemoteur démarre avec lafonctiondésactivée page 4
Enjoy Motors SL | www.enjoy-motors.com | page 2 de 4
3- MÉMORISERLEPREMIERTÉLÉCOMMANDE
Option1:enalimentantlemoteurà230v
x1x1
1. Activer le moteur dans lequel télécommande doit être appris
moteur fait un mouvement de va-et-vient, indiquant qu’il est prêt
2. Avant 10 sec. appuyez 1 fois le bouton de programmation P3
moteur conrme le télécommande, faisant un mouvement de va-et-vient
3. Appuyez 1 fois le bouton STOP pour sortir de la programmation
Option2:enutilisantleboutonsurlatêtedumoteur
x1x1x1
avec le moteur sous tension
1. Appuyez 1 fois le bouton sur la tête du moteur
moteur fait un mouvement de va-et-vient, indiquant qu’il est prêt
2. Avant 10 sec. appuyez 1 fois le bouton de programmation P3
moteur conrme le télécommande, faisant un mouvement de va-et-vient
3. Appuyez 1 fois le bouton STOP pour sortir de la programmation
4- SENSDEROTATIONETBOUTONSDETÉLÉCOM-
MANDE
Vériez que les manoeuvres de l’automobile, correspondant aux
touches haut et bas sur l’émetteur. Si elles ne correspondent pas,
procédez comme suit:
Option1:enutilisantlatélécommande
x6x1x1
1. Appuyez 6 fois le bouton de programmation P3
2. Ensuite, appuyez sur 1 fois sur le bouton vers le bas
moteur conrme le changement, faisant un mouvement de va-et-vient
3. Appuyez 1 fois le bouton STOP pour sortir de la programmation
Option2:enutilisantleboutonsurlatêtedumoteur
x1x1
1. Appuyez et maintenez (± 4 secondes) sur le bouton de la tête
du moteur
moteur conrme le changement, faisant un mouvement de va-et-vient
2. Appuyez 1 fois le bouton STOP pour sortir de la programmation
5- RÉGLAGEDESFINSDECOURSE
Le réglage du n de course peut être effectué de automatiquement
(si des volets roulants sont fournis avec des verrous rigides et des
butées) ou manuellement à partir de la télécommande
Option1:AUTOMATIQUEMENT
Lorsque le volet roulant est installé, et d’être sûr que, elle est pour-
vu du verrous rigides et des butées:
FINDECOURSESUPÉRIEURE
Étant sûr que, les volets roulants ont BUTÉES sur sa lame nale
1. Appuyez 1foisle bouton HAUT de la télécommande et lais-
sez-le monter complètement
2. Dès que le bouchon atteint au tiroir, le volet est arrêtée
3. Le moteur mémorise un point légèrement inférieur (an de
protéger le tablier du volet et sa coffre), comme le n de course
SUPÉRIEURE
• ATTENTION: Le n de course est enregistré grâce à l’effort de
résistance, cela signie que dès que les butées du volet vont
appuyer sur le coffre. La mémorisation du n de course supérieur
esteffectuéeà la troisième fois
FINDECOURSEINFÉRIEURE
Étant sûr que, les volets roulants ont des VERROUS RIGIDES
4. Appuyez 1foisle bouton BAS de la télécommande et laissez-le
monter complètement
5. Dès que les verrous rigides sont bloqués, le volet est arrêtée
6. Le moteur mémorise cette position comme son n de course
INFÉRIEURE

Enjoy Motors SL | www.enjoy-motors.com | page 3 de 4
ANNULATION DUFINDECOURSEINFÉRIEURE
x1x1x3
A n’importe quel point où est placé le volet roulant (peu importe)
1. Appuyez 3 fois le bouton de programmation P3
2. Ensuite, appuyez 1 fois le bouton vers le BAS
moteur conrme l’annulation, faisant un mouvement de va-et-vient
3. Appuyez 1 fois le bouton STOP pour sortir de la programmation
8- POSITIONDUCONFORT
La position de confort est un point programmable entre le n de
course supérieur et inférieur, à laquelle l’utilisateur peut accéder à
partir du bouton d’arrêt (STOP) de sa télécommande.
La programmation de ce point s’effectue également à partir du
bouton Stop, ce qui garantit que l’utilisateur nal ne changera
pas involontairement, le n de course supérieure ou inférieure
Positionnez le volet dans la position de confort désirée:
x4Pour mémoriser ce point comme la position
de confort:
1. Appuyer 4 fois le bouton Stop
moteur conrme ce point comme la position de
confort, faisant un mouvement de va-et-vient
x1Pour y aller à la position du confort, à partir
de n’importe quel point où le volet est placé:
2. Appuyez 1 fois le bouton Stop, en main-
tenant le bouton enfoncé, jusqu’à ce que
le volet commence à se déplacer (± 4
secondes)
9- POSITIONSINTERMEDIAIRES:EMSTEEL1M
Si nous utilisons l’émetteur EMSTEEL1M, en plus de la position de
confort, nous aurons d’autres 3 POSITIONS INTERMÉDIAIRES, qui
dans ce cas, le moteur les effectueAUTOMATIQUEMENT et auquel
l’utilisateur nal accède en utilisant les boutons frontaux (côté gauche):
En appuyant le moteur ira à la position partielle
plus proche de l’ouverture complète de le volet
En appuyant le moteur ira à une position, qui
représente la position centrale de le volet
En appuyant le moteur ira à la position partielle
plus proche de le fermerure complète de le volet
Option2:DELATÉLÉCOMMANDE
Si les volets roulants n’ont pas de verrous rigides ou de butées, il est
possible de régler une ou les deux n de course par la télécommande
FINDECOURSESUPÉRIEURE
x1x1x1
1. Ouvrir complètement le volet roulant, l’arrêter dans la position
supérieure souhaitée
2. Appuyez 1 fois le bouton de programmation P3
3. Ensuite, appuyez 1 fois le bouton vers le HAUT
moteur conrme le point supérieur, faisant un mouvement de va-et-vient
Appuyez 1 fois le bouton STOP pour sortir de la programmatio
FINDECOURSEINFÉRIEURE x1x1x1
1. Fermer complètement le volet roulant, l’arrêter dans la position
inférieure souhaitée
2. Appuyez 1 fois le bouton de programmation P3
3. Ensuite, appuyez 1 fois le bouton vers le BAS
moteur conrme le point inférieur, faisant un mouvement de va-et-vient
4. Appuyez 1 fois le bouton STOP pour sortir de la programmation
6- ANNULATIONDESFINSDECOURSE
Les n de course (supérieur et inférieur) sont indépendants l’un de
l’autre, donc la suppression doit être effectuée séparément:
ANNULATION DUFINDECOURSESUPÉRIEURE
x1x1x3
A n’importe quel point où est placé le volet roulant (peu importe)
1. Appuyez 3 fois le bouton de programmation P3
2. Ensuite, appuyez 1 fois le bouton vers le HAUT
moteur conrme l’annulation, faisant un mouvement de va-et-vient
3. Appuyez 1 fois le bouton STOP pour sortir de la programmation
Enjoy Motors SL | www.enjoy-motors.com | page 4 de 4
10- TÉLÉCOMMANDEADDITIONNELLE
Option1:àpartird’unetélécommandedéjàajoutée
x8
déjà ajouté neuf neuf
x1x1
Sur une télécommande qui fonctionne déjà,
1. Appuyez 8 fois le bouton de programmation P3
Sur une nouvelle télécommande
2. Ensuite, appuyez 1 fois le bouton de programmation P3
moteur conrme le nouvelle télé., faisant un mouvement de va-et-vient
3. Appuyez 1 fois le bouton STOP pour sortir de la programmation
Option2:enalimentantlemoteur230v
neuf neuf
x1x1
1. Activer le moteur dans lequel le télécommande doit être appris
moteur fait un mouvement de va-et-vient, indiquant qu’il est prêt
Sur une nouvelle télécommande
2. Ensuite, appuyez 1 fois le bouton de programmation P3
moteur conrme le nouvelle télé., faisant un mouvement de va-et-vient
3. Appuyez 1 fois le bouton STOP pour sortir de la programmation
Option3:enutilisantleboutonsurlatêtedumoteur
neuf neuf
x1x1x1
1. Appuyez 1 fois le bouton sur la tête du moteur
moteur fait un mouvement de va-et-vient, indiquant qu’il est prêt
Sur une nouvelle télécommande
2. Avant 10 sec. appuyez 1 fois le bouton de programmation P3
moteur conrme le télécommande, faisant un mouvement de va-et-vient
3. Appuyez 1 fois le bouton STOP pour sortir de la programmation
11- SUPPRESSIONDELATÉLÉCOMMANDE
x6x1x1
4. Appuyez 6 fois le bouton de programmation P3
5. Ensuite, appuyez 1 fois sur le bouton vers le bas
moteur conrme la suppression, faisant un mouvement de va-et-vient
6. Appuyez 1 fois le bouton STOP pour sortir de la programmation
12- DÉTECTIOND’OBSTACLES
lemoteurestfourniaveclafonctiondésactivée
Si vous souhaitez utiliser la fonction de détection d’obstacle, vous
devez installer la poulieAS1960 ouAS1999 sur le dessus du réduc-
teur et l’activer également à partir de télécommande:
x5x1x1
1. Appuyez 5 fois le bouton de programmation P3
2. Ensuite, appuyez 1 fois le bouton vers le HAUT
moteur conrme l’activation, faisant un mouvement de va-et-vient
3. Appuyez 1 fois le bouton STOP pour sortir de la programmation
DÉSACTIVER LA FONCTION
x5x1x1
4. Appuyez 5 fois le bouton de programmation P3
5. Ensuite, appuyez 1 fois le bouton vers le BAS
moteur conrme la désactivation, faisant un mouvement de va-et-vient
6. Appuyez 1 fois le bouton STOP pour sortir de la programmation
13- RESETCOMPLET(NETTOYAGEDELAMÉMOIRE)
x7tenir le 7ème jus-
qu’à conrmation
1. Appuyez sur7 fois surle bouton deprogrammation P3, àde
courtsintervalles, maintenant la 7èmefois pendant ± 4secondes
moteur conrme le reset, faisant un mouvement de va-et-vient
2. Appuyez 1 fois le bouton STOP pour sortir de la programmation
14- ACTIVEROUDÉSACTIVERLAFONCTIONTILT
le moteur fonctionne par impulsions (travail pas à pas pour des
raisons de sécurité)
x2x1x2x1
1. Appuyez 2 fois le boutonP3
2. Appuyez 1 fois vers le HAUT
moteur conrme la activation,
faisant un mouvement de va-
et-vient
1. Appuyez 2 fois le boutonP3
2. Appuyez 1 fois vers le BAS
moteur conrme la désactivation,
faisant un mouvement de va-
et-vient

Enjoy Motors SL | www.enjoy-motors.com | pagina 1 di 4
1-INTRODUZIONE,ISTRUZIONIPERLASICUREZZAEINSTALLAZIONE
Il motore radio JE60R4 è stato progettato per essere installato con
delle tapparelle.
• Programmazione dei necorsa dal telecommando
• Sistema Rolling Code. 433.92 MHz.
• Posizione preferita dell’utente facilmente programmabili
• Rilevamento ostacoli (in discesa) che può essere attivato dal
telecomando.UtilizzareconpuleggiaspecialeAS1960oAS1999
• Rilevazione di resistenze anomale in salita (da ghiaccio o spo-
stamento delle lamelle)
• Blocco di tapparelle quando è chiusa (insieme a cinghie rigidi)
• Inserimento dei nuovi telecomando dal l’originale
• Possibilità di collegamento a un pulsante unipolare
Gentile Cliente, vi preghiamo di leggere attentamente i seguenti
suggerimenti, per garantire il corretto funzionamento del motore e
la sicurezza delle persone.
• Non permettere ai bambini di giocare con interruttori o altri di-
spositivi di comando
• Vedere la tapparella mentre si muove ed assicurarsi che nessu-
no si avvicina, prima che sia completamente chiuso.
• Vericare periodicamente il corretto funzionamento della struttura
• Assicurarsi che non si può azionare il motore durante i lavori
nelle vicinanze (ad esempio, quando si lava le nestre è consi-
gliabile togliere l’alimentazione)
INSTALLAZIONINONCORRETTEPOSSONOPORTARESEVERECONSEGUENZE
PRIMAD’INSTALLAREILMOTORELEGGERELEISTRUZIONICONATTENZIONE
• Altri componenti aggiuntivi per l’installazione come adattatori e
supporti devono essere scelti tra quelli offerti dal produttore “Enjoy
Motors s.l.” attraverso la sua rete di vendita. Questi prodotti sono
contenutinel catalogo fornito arichiesta.
• I nostri motori sono progettati esclusivamente per movimentare vari
tipidi tapparelle otende in caseprivate. Qualsiasi altro usonon indi-
catodal produttore, suppone l’annullamentodella garanzia.
• Prima di procedere all’installazione del motore rimuova ogni inutile
cordao altro equipaggiamento nonrichiesto per la motorizzazione.
• Qualsiasi altro accessorio necessario per l’installazione del motore
cosi come adattatori e supporti deve essere scelto, con attenzione,
nella gamma offerta dal costruttore. Questi componenti meccanici
possono essere trovati nel catalogo e nel sito web del costruttore
www.enjoy-motors.com
• Il cavo di connessione deve essere ssato con attenzione per
impedireil contatto accidentale conqualsiasi parte in movimento
• Le viti che vengono utilizzati per il ssaggio della tapparella, non
dovrebberotoccare il motore innessun caso.
• Ilmotore deve essere protettocontro il contatto conl’acqua.
• L’adattatore corona che si posiziona sulla parte del ne corsa non
deve essere mai ssata con il trapano e deve combaciare perfetta-
mentealle dimensioni del tuboin cui va inseritoil motore.
• Le parti in movimento del motore installato ad un altezza inferiore
ai2,.5metridal pavimentodevonoessere protettadaogni possibi-
leaccesso un involontario
• Seilmotoreèinstallatoinuncassonettodovràesservigarantitoun
accessodi servizio per ispezioni,riparazioni o controlli.
• Il diametro interno minimo del tubo dell’applicazione deve essere
maggioredi 70 mm
2-COLLEGAMENTIELETTRICI(230V-50Hz) COLLEGAREEIFILINERIEGRIGIALLACORRENTEELETTRICA,
COSTITUISCELACANCELLAZIONEDELLAGARANZIA
• Laconnessioneallalineacdeveesserefatta
con un deviatore bipolare con distanza d’a-
perturadi3mmtraicontatti.
• Il motoriduttore è provvisto di una protezio-
ne termica che interrompe l’alimentazione
elettrica in caso di surriscaldamento, ad
esempioinseguitoadazionamenticontinui.
Il motore riprende a funzionare dopo un
tempo non inferiore ai 10 minuti, al termine
dei quali la protezione termica si ripristina
automaticamente. Il funzionamento rego-
lare sarà possibile solo dopo il completo
raffreddamentodelmotore(circa60minuti).
• Se il cavo di alimentazione è danneggiato,
deve essere sostituito dal fabbricante. In
casocontrariolagaranziadecadrà.
• Per installazioni dove il lo è esterno, deve
essereutilizzatoilcavo05RN-F.Occorreal-
trimenti proteggere il cavo standard in PVC
inserendolo in condotti specici.
• Il lo d’antenna sul ne corsa (letteralmente
al cavo di alimentazione), deve essere di-
stesoall’internodelcassonetto,inposizione
tale da non poter entrare in contatto con
parti in movimento.All’occorrenza vincolar-
nelaposizionecon dellefascettein plastica
TENSIONE: BLU: neutro dell’alimentazione
MARRONE: fase dell’alimentazione GIALLO /
VERDE: collegamento di terra
PULSANTE (contati liberi di tensione): NERO e
GRIGIO
GIALLO / VERDE
BLU
GRIGIO
MARRONE
NERO
230V-50Hz
JE50R4SH
MOTORERADIOCONFINECORSAELETTRONICO
PERTAPPARELLEAVVOLGIBILE
JE50R4SH_ITA_VER.10062018
novità: rilevamento di ostacoli con attivazione o cancellazione dal
telecomando. Il motore si avvia con la funzione disabilitata pag.4

Enjoy Motors SL | www.enjoy-motors.com | pagina 2 di 4
3- ASSOCIAZIONEPRIMOTELECOMANDO
Opzione1:collegatoilmotoreacorrente230V
x1x1
1. Accendere il motore in cui il trasmettitore deve essere aggiunto
il motore fa un movimento avanti e indietro, indicando che è pronto
2. Entro10secondi,premere1voltailpulsantediprogrammazioneP3
motore conferma di aver appreso il telecomando facendo un movimento
3. Premere 1 volta il tasto Stop per uscire dalla programmazione
Opzione1:utilizzandoilpulsantesullatestadelmotore
x1x1x1
con il motore sotto tensione
1. Premere 1 volta il tasto della testa del motore
motore fa un movimento avanti e indietro, indicando che è pronto
2. Entro10secondi,premere1voltailpulsantediprogrammazioneP3
motore conferma di aver appreso il telecomando facendo un movimento
3. Premere 1 volta il tasto Stop per uscire dalla programmazione
4- SENSODIROTAZIONEEITASTIDELTRASMETTITORE
Controllare che il senso di rotazione del motore corrisponda ai pul-
santi di comando. Altrimenti procedere come segue per invertire il
senso di rotazione
Opzione1:utilizzandoiltelecomando
x6x1x1
4. Premere6volteilpulsantediprogrammazioneP3
5. Quindi, premere 1 volta il pulsante di Discesa
motore conferma il cambiamento di rotazione facendo un movimento
6. Premere 1 volta il tasto Stop per uscire dalla programmazione
Opzione2:utilizzandoilpulsantesullatestadelmotore
x1x1
1. Tenere premuto (± 4 secondi) sul pulsante dalla testa del
motore
motore conferma il cambiamento di rotazione facendo un movimento
2. Premere 1 volta il tasto Stop per uscire dalla programmazione
5- REGOLAMENTODEIFINECORSA
La regolazione dei necorsa può essere in modalità automatica (se
la tapparelle ha cinghie di bloccaggio rigidi e tappi nella sua lama
nale) o eseguito manualmente dal trasmettitore
Opzione1:AUTOMATICAMENTE
Una volta che la tapparella è stata assemblata e le cinghie di bloc-
caggio rigidi sono state ssate, facciamo i necorsa
FINECORSASUPERIORE
1. Essendo sicuri che la tapparella ha tappi nella sua lama nale,
premiamo il pulsante di salita, permettendo alla tapparelle di
salire completamente
2. Non appena il tappi vano a battuta, il motore si arresta
3. Il motore memorizza, un punto leggermente inferiore, come il
ne corsa di salita
• Nota: il necorsa di salita e memorizzato per resistenza, questo
signica che la parte superiore del terminale deve premere il cas-
sonetto dellatapparella (in fasedi programmazione).Come misura
di auto-protezione,della tapparella, ilmotore memorizza, unpunto
leggermente inferiore, come il ne corsa di salita
FINECORSAINFERIORE
1. Essendo sicuri che la tapparella ha cinghie di bloccaggio rigidi,
premiamo il pulsante di discesa, permettendo alla tapparelle di
scendi completamente
2. Non appena le cinghie sono bloccati, il motore si arresta
3. Il motore memorizzerà quel punto come suo ne corsa infe-
riore
• Nota: la memorizzazione non possono essere effettuati se
il motore non riesce a fare un giro completo. In questo caso
prorogare il giro per tornare a memorizzare il ne corsa.

Enjoy Motors SL | www.enjoy-motors.com | pagina 3 di 4
CANCELLAZIONEFINIECORSAINFERIORE
x1x1x3
1. Premere 3 volte il pulsante di programmazioneP3
2. Quindi, premere 1 volta il pulsante di Discesa
motore conferma la cancellazione inferiore facendo un movimento
3. Premere 1 volta il tasto Stop per uscire dalla programmazione
8- POSIZIONEDICOMFORT
Laposizione di comfortè un punto programmabiletra la parte supe-
riore e l’inferiore, che l’utente può accedere dal pulsante di arresto
sul suo telecomando.
La programmazione di questo punto è anche fatto dal pulsante di
arresto, che assicura che l’utente nale non cambierà involontaria-
mente i limiti superiori o inferiori
Posizionare la tapparella nella posizione comfort desiderato:
x4Per memorizzare quel punto come posizione
di comfort:
4. Premere 4 volte il tasto Stop
motore conferma il punto di comfort, facendo
un movimento
x1Per passare alla posizione comfort, da qual-
siasi punto dove si trova la tenda:
5. Premere il pulsante Stop una volta, te-
nendo premuto il pulsante no a quando
la tenda inizia a muoversi (± 4 secondi)
9- POSIZIONIINTERMEDIE:EMSTEEL1M
Se si usa un trasmettitore EMSTEEL1M, oltre alla posizione
comfort, avremo altre 3 posizioni intermedie, che in questo caso,
il motore li esegue automaticamente e in cui l’utente nale accede
utilizzando i pulsanti frontali (lato sinistro) del detto telecomando:
Premendoiltasto ilmotoreandràalla posizione
intermedia più vicina alla apertura
Premendo il tasto il motore andrà ad una posi-
zione che rappresenta la posizione centrata
Premendoiltasto ilmotoreandràalla posizione
intermedia più vicino al punto più basso
Opzione2:UTILIZZANDOILTELECOMANDO
Se la tapparella non dispone di cinghie di bloccaggio rigidi e tappi,
possiamo realizzare uno o entrambi i necorsa dal trasmettitore
FINECORSASUPERIORE
x1x1x1
1. Aprire completamente la tapparella, fermandola al punto supe-
riore desiderato
2. Premere 1 volta il pulsante di programmazioneP3
3. Quindi, premere 1 volta il pulsante di Salita
motore conferma il ponto superiore facendo un movimento
4. Premere 1 volta il tasto Stop per uscire dalla programmazione
FINECORSAINFERIORE x1x1x1
5. Chiudere completamente la tapparelle, fermandolo nella po-
sizione inferiore desiderata
6. Premere 1 volta il pulsante di programmazioneP3
7. Quindi, premere 1 volta il pulsante di Discesa
motore conferma il ponto inferiore facendo un movimento
8. Premere 1 volta il tasto Stop per uscire dalla programmazione
6- CANCELLAZIONEDEIPUNTIDIFINECORSA
Ei punti di ne corsa vengono eliminate separatamente, scegliendo
quale dei due desideri eliminare in qualsiasi momento
CANCELLAZIONEFINIECORSASUPERIORE
x1x1x3
1. Premere 3 volte il pulsante di programmazioneP3
2. Quindi, premere 1 volta il pulsante di Salita
motore conferma la cancellazione superiore facendo un movimento
3. Premere 1 volta il tasto Stop per uscire dalla programmazione
Enjoy Motors SL | www.enjoy-motors.com | pagina 4 di 4
10- TELECOMANDOSUPPLEMENTARE
Opzione1:dauntelecomandogiàaggiunto
x8
già aggiunto nuovo nuovo
x1x1
in un telecomando che funziona già,
1. Premere 8 volte il pulsante di programmazioneP3
Su un nuovo telecomando,
2. Quindi, premere 1 volta il pulsante di programmazioneP3
motore conferma di aver appreso il telecomando facendo un movimento
3. Premere 1 volta il tasto Stop per uscire dalla programmazione
Opzione2:alimentandoilmotore230v
nuovo nuovo
x1x1
1. Accendere il motore in cui il trasmettitore deve essere aggiunto
il motore fa un movimento avanti e indietro, indicando che è pronto
Su un nuovo telecomando,
2. Quindi, premere 1 volta il pulsante di programmazioneP3
motore conferma di aver appreso il telecomando facendo un movimento
3. Premere 1 volta il tasto Stop per uscire dalla programmazione
Opzione3:utilizzandoilpulsantesullatestadelmotore
nuovo nuovo
x1x1x1
con il motore sotto tensione
1. Premere 1 volta il tasto della testa del motore
motore fa un movimento avanti e indietro, indicando che è pronto
Su un nuovo telecomando,
2. Entro10secondi,premere1voltailpulsantediprogrammazioneP3
motore conferma di aver appreso il telecomando facendo un movimento
3. Premere 1 volta il tasto Stop per uscire dalla programmazione
11- CANCELLAZIONEDIUNTELECOMANDO
x6x1x1
sul telecomando da eliminare,
4. Premere 6 volte il pulsante di programmazioneP3
5. Quindi, premere 1 volta il pulsante di Salita
motore conferma la cancellazione facendo un movimento
6. Premere 1 volta il tasto Stop per uscire dalla programmazione
12- RILEVAMENTODEIOSTACOLI
ilmotorevienefornitoconlafunzionedisattivata
Se si desidera utilizzare la funzione di rilevamento ostacoli, è ne-
cessario installare la puleggiaAS1960 o AS1999 sulla punta della
riduttore e attivare anche questa funzione dal comando:
x5x1x1
1. Premere 5 volte il pulsante di programmazioneP3
2. Quindi, premere 1 volta il pulsante di Salita
motore conferma l’attivazione facendo un movimento
3. Premere 1 volta il tasto Stop per uscire dalla programmazione
DISATTIVARE LAFUNZIONE
x5x1x1
4. Premere 5 volte il pulsante di programmazioneP3
5. Quindi, premere 1 volta il pulsante di Discesa
motore conferma la disabilitazione facendo un movimento
6. Premere 1 volta il tasto Stop per uscire dalla programmazione
13- RESETTOTALE(PULIZIADIMEMORIA)
x7tenere al 7º
no alla conferma
1. Premere 7 volte il tasto di programmazione P3, a brevi inter-
valli, tenendo premuto il 7 ° per ± 4 secondi
motore conferma il reset facendo un movimento
2. Premere 1 volta il tasto Stop per uscire dalla programmazione
14- ATTIVAZIONEODISABILITAZIONEFUNZIONEDITILT
il motore funziona a impulsi o in uomo presente (lavorare in moda-
lità passo passo per ragioni di sicurezza)
x2x1x2x1
1. Premere 2 volte il pulsante di
programmazioneP3
2. Premere 1 volta Salita
motore conferma l’attivazione
facendo un movimento
1. Premere 2 volte il pulsante di
programmazioneP3
2. Premere 1 volta Discesa
motore conferma la disabilitazione
facendo un movimento
Enjoy Motors SL | www.enjoy-motors.com | página 1 de 4
1-INTRODUCCIÓN,INSTRUCCIONESDEUSOYSEGURIDADPARALAINSTALACIÓN
El motor radio JE50R4SH está especialmente diseñado para ser
instalado en persianas con cajón de aluminio o pvc y persianas en-
rollables tradicionales
• Programación automática de los nales de carrera.
• Detección de obstáculos (en bajada) que puede activarse desde
elmando. Uso con lapolea especialAS1960 oAS1999
• Detección de resistencias anómalas en subida (por hielo o des-
plazamientode las lamas).
• Bloqueo dela persiana cuandoestá cerrada (conjuntamentecon
tirantes rígidos),
• SistemaRolling Code. 433.92 MHz.
• Puntointermedio fácilmente programable.
• Memorizaciónde nuevos emisores através del original.
• Posibilidad de conexión a un pulsador unipolar
Estimadocliente,lerogamoslea atentamente los siguientes conse-
jos a n de que se pueda garantizar el correcto funcionamiento del
motor y la seguridad de las personas.
• No permitir a los niños que jueguen con los dispositivos de
control. Mantener a los niños lejos de los controles remotos.
• Mirar el toldo mientras esté en funcionamiento para asegu-
rarse de que nadie se acerca mientras esté en movimiento.
• Vericar periódicamente el correcto funcionamiento de la
instalación.Noaccionandonuncael motor si se precisa cual-
quier manutención.
• Enel caso que lostoldosse activen mediante sistemasauto-
máticos,asegurarsequeelmotor nosepodrá accionarcuan-
do se realicen trabajos cerca de ellos (por ejemplo, cuando
se lavan los toldos se aconseja quitar la alimentación) even-
tualmente desconectando el interruptor general.
UNAINSTALACIÓNINCORRECTAPUEDECAUSARLESIONESGRAVES
SEGUIRTODASLASINSTRUCCIONESDEINSTALACIÓN
• Nuestros motorreductores están previstos y dimensionados exclusi-
vamenteparaaccionarpersianas,pequeñascortinasmetálicasenel
ámbito privadoy toldos parael sol.
• Antes de instalar el motorreductor, quitar todos los accesorios inúti-
lesydejarfueradeserviciotodoelequipoquenoseanecesariopara
unfuncionamiento motorizado.
• No perforar el tubo con el motor en su interior. La jación de los
tirantes enlas persianasy las grapasen lostoldos deberárealizarse
utilizando tornillos cuya longitud garantice que la parte saliente en
el interior del tubo sea como máximo de 1 mm, con el n de evitar
interferencias mecánicas entre la parte ja y la parte rotativa.
• El cable de alimentación debe jarse con cuidado de modo que
no pueda entrar en contacto con las partes en movimiento (como
puedeser el tubo enrollador.)
• El anillo adaptador que acciona el nal de carrera no debe perforar-
seo rebajarse; debe insertarseperfectamente en el tubo
• Laspartesdemovimientosdelmotor,instaladasaunaalturamenor
de 2,5m del suelodeben estar protegidas.
• Eldiámetrointernomínimodeltubo debesermayor47mm,paralas
• Componentes suplementariospara la instalaciones(adaptadores y
soportes)deben ser elegidos delcatálogo
2-CONEXIONESELÉCTRICAS CONECTAR LOS HILOS NEGRO Y GRIS A LA CORRIENTE
ELÉCTRICA,SUPONELACANCELACIÓNDELAGARANTÍA
• Laconexiónal cuadro general debe efectuar-
se con un protector bipolar cuya distancia de
aperturaentreloscontactossea de3mm
• El motorreductor esta preparado para un
funcionamiento intermitente. Posee una
protección térmica, la cual interrumpe la
alimentación eléctrica en caso de sobreca-
lentamiento (funcionamientocontinuado).La
vuelta al funcionamiento del motor llega de-
spués deun tiempono inferiora 10minutos,
al nal de los cuales la protección térmica se
reanuda automáticamente (completo enfria-
mientodelmotoralrededorde60minutos)
• Para una instalación exterior, debe utilizarse
el cable H05RN-F o bien, deberá proteger
el cable estándar, introduciéndolo en tubos
especícos para protegerlo de los agentes
atmosféricos
• Si el cable estuviese dañado, deberá ser
sustituido sóloporaquellos establecimientos
de reparación reconocidos por el fabricante.
Encasocontrariolagarantíapierdevigencia.
• Sihay interferencias en la líneadealimenta-
ción, se aconseja instalar un ltro fabricado
atalefecto
TENSIÓN: AZUL: NeutroAC 230V MARRON:
FaseAC230V AMARILLO /VERDE: Tierra
PULSADOR (contacto sin tension): NEGRO:
hilo a pulsador GRIS: hilo a pulsador
AMARI / VERDE
AZUL
GRIS
MARRON
NEGRO
230V-50Hz
JE50R4SHv4
MOTORRADIOCONFINALDECARRERAELECTRÓNICO
PARAPERSIANAS
JE50R4SH_V.4_ESP_VER.13092019
novedad: detección de obstáculos con activación o cancelación
desde el mando. El motor parte con la función desactivada pag.4
Enjoy Motors SL | www.enjoy-motors.com | página 2 de 4
3- PROGRAMACIÓNPRIMEREMISOR
Opción1:conectadoelmotoracorriente230v
x1x1
1. Conectar el motor en el que se va a grabar el mando a corriente
El motor conrma que está listo, con un doble movimiento
2. Antes 10 segundos, pulsar 1 vez el botón de programación P3
El motor conrma que lo ha reconocido, con un doble movimiento
3. Pulsar el botón de stop para cerrar la programación
Opción2:atravésdelbotónsituadoenlacabezadelmotor
x1x1x1
Con el motor conectado en corriente
1. Pulsar 1 vez el botón rojo situado en la cabeza del motor
El motor conrma que está listo, con un doble movimiento
2. Antes 10 segundos, pulsar 1 vez el botón de programación P3
El motor conrma que lo ha reconocido, con un doble movimiento
3. Pulsar el botón de stop para cerrar la programación
4- SENTIDODEROTACIÓNYBOTONESEMISOR
Vericar que el sentido de rotación del motor, se corresponde con
los botones de subida y bajada del emisor. Si estas no se corres-
ponden, proceder de la siguiente manera
Opción1:utilizandoelemisorpreviamentereconocido
x6x1x1
1. Pulsar 6 veces el botón de programación P3
2. Seguidamente, pulsar 1 vez el botón de bajada
El motor conrma que invertido el giro, con un doble movimiento
3. Pulsar el botón de stop para cerrar la programación
Opción2:atravésdelbotónsituadoenlacabezadelmotor
x1x1
1. Pulsar 1 vez y mantener (± 4 segundos), el botón rojo situado
en la cabeza del motor
El motor conrma que invertido el giro, con un doble movimiento
2. Pulsar el botón de stop para cerrar la programación
5- REGULACIÓNDELOSFINALESDECARRERA
La regulación de los nales de carrera, puede ser en modo
automático (si la persiana cuenta con tirantes rígidos y topes) o
realizados manualmente desde el emisor
Opción1:AUTOMÁTICAMENTE
Una vez colocada la persiana y estando ésta provista de topes y
tirantes rígidos, realizamos los nales de carrera
FINALDECARRERASUPERIOR
1. Estando seguros que la persiana cuenta con Topes, pulsamos
el botón de subida, dejando que la persiana ascienda por
completo
2. Cuando el tope presione en el cajón, la persiana se parará
3. El motor memorizará un punto ligeramente inferior como el
nal de carrera SUPERIOR (a la tercera vez)
• Nota: el nal de carrera de subida se memoriza por resistencia,
esto signica que el tope del terminal debe presionar el cajón de la
persiana(en la fase dememorización). Como medida deautopro-
tección de la persiana, el motor memorizará el nal de carrera de
subidaen un punto ligeramenteinferior al punto inicial
FINALDECARRERAINFERIOR
1. Estando seguros que la persiana cuenta con TIrantes Rígidos,
pulsamos el botón de bajada, dejando que la persiana desci-
enda por completo
2. Cuando el tirante rígido haga fuerza, la persiana se parará
3. El motor memorizará un punto ligeramente inferior como el
nal de carrera INFERIOR (a la tercera vez)
Enjoy Motors SL | www.enjoy-motors.com | página 3 de 4
CANCELARFINALDECARRERAINFERIOR
x1x1x3
1. Pulsar 3 veces el botón de programación P3
2. Seguidamente, pulsar 1 vez el botón de bajada
El motor conrma la cancelación de ambos puntos, con un doble movimiento
3. Pulsar el botón de stop para cerrar la programación
8- POSICIÓNDECONFORT
La posición de confort, es un punto programable entre el nal de
cerrera superior y el nal de carrera inferior, al que el usuario podrá
acceder desde el bótón de stop de su mando a distancia.
La programación de este punto se realiza también desde el botón
de Stop, lo que asegurá que el usuario nal no cambiará involunta-
riamente los puntos de parada superior o inferior
Posicionar la persiana en la posición de confort deseada:
x4Para memorizar ese punto como la posición
de confort:
1. Pulsar 4 veces el botón de Stop
El motor conrma ese punto, con un doble
movimiento
x1Para acceder hasta esa posición, desde
cualquier punto en el que se encuentre el
toldo:
2. Pulsar 1 vez el botón de Stop, mante-
niendo pulsador hasta que toldo co-
mience a moverse (± 4 segundos)
9- POSICIONESINTERMEDIAS:EMSTEEL1M
Si estamos utilizando un emisor EMSTEEL1M, además de la po-
sición de confort, contaremos con otras 3 posiciones intermedias,
que en este caso, el motor las realiza de manera automática y a
las cuales el usuario nal accede utilizando la botonera frontral
(parte izquierda) del mencionado mando:
• Pulsandoelbotón elmotoriráhastalaposición
intermediamás cercana a laapertura total
• Pulsandoel botón el motorirá hasta unaposi-
ciónque representa la posicióncentrada
• Pulsandoelbotón elmotoriráhastalaposición
intermediamás cercana al puntoinferior
Opción2:DESDEELEMISOR
Si la persiana no cuenta con topes o tirantes rígidos, podemos
hacer uno o ambos nales de carrera desde el emisor
FINALDECARRERASUPERIOR
x1x1x1
1. Abrir completamente la persiana,parándola en el punto supe-
rior deseado
2. Pulsar 1 vez el botón de programación P3
3. Pulsar 1 vez el botón de subida
El motor conrma ese punto, con un doble movimiento
4. Pulsar el botón de stop para cerrar la programación
FINALDECARRERAINFERIOR x1x1x1
5. Cerramos completamente la persiana, parándola en la posición
inferior deseada
6. Pulsar 1 vez el botón de programación P3
7. Pulsar 1 vez el botón de bajada
El motor conrma ese punto, con un doble movimiento
8. Pulsar el botón de stop para cerrar la programación
6- CANCELACIÓNDELOSFINALESDECARRERA
Los nales de carrera se eliminan por separado, eligiedndo cual de
los dos queremos eliminar en cada momento
CANCELAR FINAL DE CARRERASUPERIOR
x1x1x3
1. Pulsar 3 veces el botón de programación P3
2. Seguidamente, pulsar 1 vez el botón de subida
El motor conrma la cancelación de ambos puntos, con un doble movimiento
3. Pulsar el botón de stop para cerrar la programación

Enjoy Motors SL | www.enjoy-motors.com | página 4 de 4
10- RECONOCIMIENTODEUNEMISOR
Opción1:desdeunmandoyareconocido
x8
mando reconocido mando nuevo mando nuevo
x1x1
En un mando que ya funcione
1. Pulsar 8 veces el botón de programación P3
En un mando nuevo
2. Inmediatamente pulsar 1 vez el botón de programación P3
El motor conrma que lo ha reconocido, con un doble movimiento
3. Pulsar el botón de stop para cerrar la programación
Opción2:conectadoelmotoracorriente230v
mando nuevo mando nuevo
x1x1
1. Conectar el motor a la corriente eléctrica
El motor conrma que está listo, con un doble movimiento
En un mando nuevo
2. Inmediatamente pulsar 1 vez el botón de programación P3
El motor conrma que lo ha reconocido, con un doble movimiento
3. Pulsar el botón de stop para cerrar la programación
Opción3:atravésdelbotónsituadoenlacabezadelmotor
mando nuevo mando nuevo
x1x1x1
1. Pulsar 1 vez el botón rojo situado en la cabeza del motor
El motor conrma que está listo, con un doble movimiento
En un mando nuevo
2. Inmediatamente pulsar 1 vez el botón de programación P3
El motor conrma que lo ha reconocido, con un doble movimiento
3. Pulsar el botón de stop para cerrar la programación
11- CANCELACIÓNDEUNEMISOR
x6x1x1
1. Pulsar 6 veces el botón de programación P3
2. Seguidamente, pulsar 1 vez el botón de subida
El motor conrma la cancelación del emisor, con un doble movimiento
3. Pulsar el botón de stop para cerrar la programación
12- DETECCIÓNOBSTÁCULOS
elmotorsesuministraconlafuncióndesactivada
Si se quiere utilizar la función de detección de obstáculos, se debe
instalar en la punta de la reductora la polea AS1960 o AS1999 y
además activar dicha función desde el mando:
x5x1x1
1. Pulsar 5 veces el botón de programación P3
2. Seguidamente, pulsar 1 vez el botón de SUBIDA
El motor conrma la activación de la función, con un movimiento
3. Pulsar el botón de stop para cerrar la programación
DESACTIVARLAFUNCIÓN
x5x1x1
1. Pulsar 5 veces el botón de programación P3
2. Seguidamente, pulsar 1 vez el botón de BAJADA
El motor conrma la cacelación de la función, con un movimiento
3. Pulsar el botón de stop para cerrar la programación
13- RESETTOTALDEUNMOTOR
x7mantener en la 7ª
hasta conrmación
1. Pulsar 7 veces el botón de programación P3, a intervalos cor-
tos, manteniendo pulsado en la 7ª vez durante ± 4 segundos
El motor conrma el borrado total de la memoria, con un doble movimiento
2. Pulsar el botón de stop para cerrar la programación
14- ACTIVACIÓNOCANCELACIÓNDELAFUNCIÓNTILT
Funcionamiento del motor a impulsos u hombre presente (en modo
pasoa paso, por cuestionesde seguridad)
x2x1x2x1
1. Pulsar 2 veces el botón P3
2. Pulsar 1 vez el botón Subida
El motor conrma la activación,
con un movimiento doble
1. Pulsar 2 veces el botón P3
2. Pulsar 1 vez el botón Bajada
El motor conrma la cancelación,
con un movimiento doble
Table of contents
Languages:
Popular Garage Door Opener manuals by other brands


B&D
B&D Roll-A-Door 2 Series installation instructions

Beninca
Beninca Aurora Super Operating instructions and spare parts catalogue

Wayne-Dalton
Wayne-Dalton Quantum 3214 Owner installation and user manual

RTS
RTS DEXXO PRO RTS user manual

SOMFY
SOMFY Dexxo Pro 800 user manual

Chamberlain
Chamberlain ML810EV Assembly and operating instructions
 installation instructions")


