enorossi DMC TREX 250 User manual

ENOAGRICOLA ROSSI s.r.l. - Via Cortonese, 36 - Calzolaro di Umbertide 06019 - Pg Italia Tel. (39) 075-930 22 22
DMC TREX
250 - 290 - 320
Falciatrice A Dischi Rotanti / Rotating Disc Mower
MANUALE DI USO E MANUTENZIONE
USE AND MAINTENANCE MANUAL
rev.- issue 4a - 9/2020
ISTRUZIONI
ORIGINALI
TRANSLATION
OF THE ORIGINAL
INSTRUCTIONS

ENOAGRICOLA ROSSI s.r.l.
Via Cortonese, 36
Calzolaro di Umbertide 06019 Pg Italia
Tel. (39) 075-930 22 22 - Telefax (39) 075-930 23 28
DICHIARAZIONE CE
DI CONFORMITÀ
(All.IIA Direttiva Macchine 2006/42/CE)
EC DECLARATION
OF CONFORMITY
(Annex IIA - Machinery Directives 2006/42/EC
Il Fabbricante ENOAGRICOLA ROSSI s.r.l.
con sede in via Cortonese, 36 - 06019
Calzolaro di Umbertide (PG) - Italia
dichiara sotto la propria responsabilità
che la macchina
The Manufacturer ENOAGRICOLA ROSSI s.r.l.
with head office in via Cortonese, 36 - 06019
Calzolaro di Umbertide (PG) - Italy
it declares under its own responsibility
that the machine
le cui funzioni sono descritte in questo manuale
è conforme ai requisiti essenziali
di Sicurezza e di Tutela della Salute di cui alla
Direttiva Macchine 2006/42/CE
Per la verifica della Conformità di cui alle Direttive
sopra menzionate, sono state consultate le seguenti
Norme Armonizzate EN:
whose functions are described in this manual
is conform to the Essential Requirements of
Safety and Health Protection, as per
Machinery Directive 2006/42/EC
To check the conformity of the Directives mentioned
up here, the following EN Harmonized Norms
have been consulted:
EN 13854:2020 - EN ISO 4254-1:2015 - EN ISO 4254-13:2010
EN ISO 4413:2012 - ISO 11684 (1995) - EN 12100:2010
EN ISO 12965:2020 - EN ISO 13857:2020
E autorizza Enorossi
Via Cortonese, 36 - 06019
Calzolaro di Umbertide (PG) - Italia
a costituire il Fascicolo Tecnico per suo conto
and it authorizes Enorossi
Via Cortonese, 36 - 06019
Calzolaro di Umbertide (PG) - Italia
to compile the relevant technical documentation
GIOVANNINI ADELMO
Calzolaro di Umbertide, …….. ……. …… ….……………………….
Legale rappresentante - Legal representative
FALCIATRICE A DISCHI - DISC MOWER
……………………………………………………………………………………….…………………………………..
Denominazione generica e commerciale –Generic denomination and commercial name
DMC TREX ....
…………………………..
Serie/Modello - Series/Model
….
……………………………………………
Matricola - Serial number
20..
…………….
Anno costruzione
Manufacturing year

3
INDICE - INDEX
DICHIARAZIONE CE DI CONFORMITÀ
2
EC DECLARATION OF CONFORMITY
2
INDICE
3
INDEX
3
AVVERTENZE
7
WARNINGS
7
PITTOGRAMMI
10
PICTOGRAMS
10
SCARICO E SBALLAGGIO
12
UNLOADING AND UNPACKING
12
INSTALLAZIONE E MESSA IN FUNZIONE
13
INSTALLATION AND SETTING
13
POSIZIONE DI LAVORO
14
WORKPOSITION
14
REGOLAZIONE ALTEZZA DA TERRA
15
ADJUSTMENT OF THE HEIGHT FROM THE
GROUND
15
REGOLAZIONE DELLA SOSPENSIONE
16
ADJUSTMENT OF THE SUSPENSION
16
ADATTAMENTO ALLA CARREGGIATA TRATTORE
17
ADJUSTEMENTS TO THE TRACK OF THE TRACTOR
17
REGOLAZIONE ALBERO CARDANICO
18
ADJUSTMENT OF THE CARDAN SHAFT
18
POSIZIONE DI TRASPORTO
19
TRANSPORT POSITION
19
CONTROLLO DEI COLTELLI
20
CHECK OF THE CUTTING BLADES
20
PATTINI DI PROTEZIONE DELLA BARRA DI
TAGLIO
21
PROTECTION SKIDS OF THE CUTTING BAR
21
IMPIANTO IDRAULICO
22
HYDRAULIC SYSTEM
22
TENSIONAMENTO DELLE CINGHIE
23
STRAINING OF THE BELTS
23
REGOLAZIONE DELLE MACCHINE CON
CONDIZIONATORE (CF)
25
TUNING OF THE MACHINES WITH
CONDITIONING DEVICE (CF)
25
REGOLAZIONE DELLE MACCHINE CON
CONDIZIONATORE (CG)
26
ADJUSTING OF DISC MOWER EQUIPPED WITH
(CG) RUBER ROLL CONDITIONER.
26
LUBRIFICAZIONE
27
LUBRICATION
27
SCATOLA INGRANAGGI
28
GEAR BOX
28
RICOVERO INVERNALE
29
WINTER STORAGE
29
ASSISTENZA TECNICA
29
TECHNICAL ASSISTANCE
29

4
Direttiva Macchine e Norme armonizzate
Le Falciatrici a dischi rotanti sono state progettate
seguendo le norme descritte nella Direttiva Macchine
2006/42CE ed in particolare soddisfano le seguenti Norme
armonizzate:
EN 349: Sicurezza del macchinario. Spazi minimi per
evitare lo schiacciamento di parti del corpo (1993) + A1
(2008)
EN ISO 4254-1:2013 Macchine agricole - Macchine
agricole semoventi, portate, semiportate e trainate -
Requisiti comuni di sicurezza
EN ISO 4254-13: Macchine agricole - Macchine agricole
semoventi, portate, semiportate e trainate - Sicurezza -
Parte 13: Falciatrici e trinciatrici (2010)
EN ISO 4413:2010 Oleoidraulica - Regole generali e
requisiti di sicurezza per i sistemi e i loro componenti.
ISO 11684: Trattrici, macchine agricole e forestali,
macchine a motore da giardinaggio - Segni grafici per la
sicurezza e pittogrammi di segnalazione dei pericoli -
Principi generali (1995)
EN 12100:2010 Sicurezza del macchinario - Principi
generali di progettazione - Valutazione del rischio e
riduzione del rischio
EN 12965: Trattori e macchine per l'agricoltura e la
silvicoltura. Presa di forza (PTO), alberi di trasmissione e
le loro guardie. Sicurezza (2003) + A1 (2004) + A1 (2009)
EN 13857: Sicurezza del macchinario - Distanze di
sicurezza per impedire il raggiungimento di zone pericolose
con gli arti inferiori (2008)
Tutti i diritti sono riservati. È vietata la riproduzione di
qualsiasi parte di questo manuale, in qualsiasi forma,
senza l’esplicito permesso scritto della ENOROSSI. Il
contenuto di questo manuale può essere modificato
soltanto dalla ditta costruttrice e senza preavviso al Cliente.
Machinery Directive and Harmonised standards
The Rotating disc mowers have has been designed in
accordance with the norms described in the Machinery
Directive 2006/42/EC and particularly it satisfies the
following Harmonized norms:
EN 349: Safety of machinery. Minimum gaps to avoid
crushing of parts of the human body (1993) + A1 (2008)
EN 4254-1:2013 Agricultural machinery - Self-propelled,
mounted, semi-mounted and trailed machines - Common
safety requirements
EN ISO 4254-13: Agricultural machinery - Safety - Part 13:
Large rotary mowers (2010)
EN ISO 4413:2010 Hydraulic fluid power - General rules
and safety requirements for systems and their components.
ISO 11684: Tractors, machinery for agriculture and
forestry, powered lawn and garden equipment - Safety
signs and hazard pictograms - General principles (1995)
EN ISO 12100-2010: Safety of machinery - General
principles for design - Risk assessment and risk reduction
EN 12965: Tractors and machinery for agriculture and
forestry. Power take-off (PTO) drive shafts and their
guards. Safety (2003) + A1 (2004) + A2 (2009)
EN 13857: Safety of machinery - Safety distances to
prevent hazard zones being reached by upper and lower
limbs (2008)
All rights are reserved. It is forbidden reproducing or coping
any parts of this manual, in any form, without the explicit
permission signed by ENOROSSI. The contents of this
manual can only be modified by the Manufacturer and
without notifying the Customer.

5
Leggete etenete presente le informazioni
contenute in questo libretto di istruzioni.
Eviterete in tal modo incidenti, conserve-
rete la garanzia del Fabbricante e
disporrete sempre di una macchina
funzionale e pronta per l’uso.
Il presente libretto costituisce parte inte-
grante del prodotto edeve essere conservato
in modo adeguato permettendo, in qualsiasi
momento, un’agevole consultazione da parte
dell’operatore. Si consiglia di eseguire una
copia di questo libretto.
Al presente libretto è allegata la DICHIARA-
ZIONE DI CONFORMITÀ” che attesta la
conformità alle normative vigenti in materia e
che deve essere esibita achi ne fa
espressamente richiesta. Inoltre tale dichia-
razione riporta il NUMERO DI MATRICOLA
della macchina.
Alla consegna controllare la corrispondenza
del NUMERO DI MATRICOLA della macchi-
na con quello scritto sulla “DICHIARAZIONE
DI CONFORMITÀ”. Nel caso in cui non ci sia
la corrispondenza dei numeri contattare
immediatamente il rivenditore per icontrolli
del caso.
Please read this Instruction Manual
carefully and constantly keep its
contents in mind. In this way, you will
avoid accidents, respect the terms of the
Manufacturer Warranty, and keep your
machine constantly in ideal working
condition and ready for use.
This Manual is an integral part of the product
and must be conserved in good condition for
rapid consultation whenever required by the
operator. We recommend making an extra
copy of the Manual.
The CONFORMITY CERTIFICATE that
certifies the conformity of the machine to the
standards in force, lists its SERIAL NUMBER
and must be presented upon request by the
localauthoritiesis enclosed to this Manual.
Upon arrival, make sure that the SERIAL
NUMBER stamped on the machine is the
same as the number written in the
CONFORMITY CERTIFICATE”, otherwise
contact your dealer immediately.

6
Per poter sfruttare al meglio le qualità di
questa macchina, si raccomanda di dedicare
un po’del Vostro prezioso tempo alla lettura
di questo libretto; la miglior conoscenza della
macchina Vi ripagherà ampiamente in
termini di durata, di sicurezza e di qualità di
lavorazione.
In caso di dubbi, Vi preghiamo di rivolgerVi al
rivenditore ENOROSSI, che Vi consiglierà
dandoVi una assistenza corretta nel più
breve tempo possibile.
La falciatrice DMC TREX èstata concepita
esclusivamente per l’usuale impiego nel-
l’agricoltura (uso appropriato). Ogni altro
uso della macchina non èda considerarsi
tale esi intende arischio dell’utilizzatore.
Per uso appropriato si intende anche
l’osservanza delle istruzioni di servizio edi
manutenzione prescritte dal produttore.
Solamente persone autorizzate e competenti
circa i possibili rischi devono usare, riparare
e provvedere alla manutenzione della
macchina.
Devono essere osservate le relative pre-
scrizioni per la prevenzione degli infortuni,
come pure tutte le altre disposizioni tecniche
generali, le norme per la circolazione
stradale, per la sicurezza el’igiene.
Non apportate mai alla macchina alcuna
modifica di Vostra iniziativa. In caso contrario
si declina ogni responsabilità per idanni da
ciò causati.
La ENOROSSI s.n.c. si riserva il diritto di
sospendere in qualsiasi momento la
produzione di alcuni modelli, di variarne le
caratteristiche ed il disegno senza impegnarsi
aqualsiasi titolo di darne notizia.
In order to utilize the qualities of this machine
to best advantage, please dedicate sufficient
time to reading this Manual: the more
knowledge that you come to learn about
your machine will be amplyrewarded in terms
of longerworking life, greater safety, and
better performance.
If you have any questions, please contact
your nearest dealer: ENOROSSI, who will
be able to offer you the correct assistance
as soon as possible.
The DMC TREX mowing machine has been
exclusively designed for appropriate
agricultural use; all other applications must
be considered unauthorized and performed
at the operator own risk.
The execution of the maintenance
procedures prescribed by the Manufacturer
is also avery important part of the a.m.
appropriate use, and must be performed
exclusively by authorized and competent
personnel with full knowledge of the risks
involved.
The respective accident-prevention
prescriptions, and all the general technical
regulations, road circulation rules, and health
and safety norms must be scrupulously
respected.
Never make modifications on the machine by
yourself. The Manufacturer declines all
liability for any damages that may result.
The ENOROSSI s.n.c. company reserves
the right to suspend the production of its
models and modify their technical features
and design in any moment without notice.

7
AVVERTENZE
GLI ADESIVI POSTI SULLA MACCHINA
SONO PARTE INTEGRANTE DELLA
MACCHINA STESSA.
Gli adesivi eventualmente danneggiati, o
comunque non leggibili, devono essere
richiesti e sostituiti.
In questo manuale il simbolo mostrato
qui, segnala gli aspetti più importanti che
riguardano la sicurezza Vostra e quella
altrui.
Si raccomanda di osservare scrupolosa-
mente queste annotazioni allo scopo di
ridurre al minimo possibile le situazioni di
pericolo.
1. Oltre alle indicazioni del presente ma-
nuale è necessario rispettare analoga-
mente anche le disposizioni di carattere
generale relative alla sicurezza, previste
per gli utilizzatori di macchine agricole
dalle leggi di ciascun Paese.
2. Osservare i pittogrammi sulla macchina,
soprattutto quelli che riguardano la
sicurezza.
3. Innestare la macchina solo in posizione
di lavoro ed abbassata.
4. Non oltrepassare mai il regime di giri
prescritto della presa di forza.
5. Assicurare il tubo protettore dell’albero
cardanico contro la rotazione aggan-
ciando le catenelle (vedi libretto allegato).
6. Osservate le avvertenze concernenti il
fissaggio delle lame e la loro sostituzione.
7. Abbassare la falciatrice fino al livello del
suolo prima di metterla in posizione
di lavoro, assicurandosi che non vi siano
persone nel raggio di azione della
macchina.
WARNINGS
THE STICKERS APPLIED ARE AN
INTEGRAL PART OF THE MACHINE.
Any stickers that come to be damaged or
no longer legible must be re-ordered and
replaced.
The symbol shown here indicates
important safety information in the
Manual
.
Extra attention must be paid to these points
in order to reduce all risk to a minimum:
1. In addition to the indications provided in
this Manual, all the general safety
regulations governing the use of
agricultural machinery in the nation of
destination must be respected.
2. Observe the prescriptions and warnings
contained in the stickers applied to the
machine, especially those regarding
safety.
3. Engage the power take-off only when the
machine is lowered in its work position.
4. Never run the machine at rpm higher than
the limit prescribed.
5. Prevent the cardan shaft protection pipe
from rotating by fastening the chains
(see enclosed Cardan Shaft Instruction
Booklet).
6. Observe the warnings regarding the
fastening of the cutting blades and their
replacement.
7. Lower the mowing machine to the level of
the soil prior to setting it into work
position, making sure that no persons or
animals are within the machine range of
action.

8
8. Assicurarsi che tutti i dispositivi di
sicurezza siano perfettamente efficienti
prima di iniziare il lavoro.
9. Prestare molta attenzione sui terreni
sassosi, assicurandosi che non vi siano
persone nelle immediate vicinanze.
10.Prima di tutti gli interventi sulla falciatrice,
assicurarsi che tutti gli elementi rotativi
siano fermi e togliere alla macchina la
fonte di energia.
11.Per iniziare l’operazione di falciatura,
innestare lentamente la presa di forza e
portare la macchina a pieno regime di
giri prima di entrare a contatto con il
prodotto.
12.La velocità di avanzamento deve essere
in relazione alle condizioni di terreno e
del prodotto da falciare.
13.Durante il trasferimento sulle strade
pubbliche, osservare le norme del codice
della strada.
14.Usare particolare prudenza durante le
operazioni di aggancio o sgancio
dell’attrezzo dal trattore.
15.Prima di abbandonare il trattore, assi-
curare l’attrezzo e abbassarlo completa-
mente. Spegne il trattore e estrarre la
chiavetta di accensione.
16.Prima dell’aggancio o dello sgancio della
macchina all’attacco a tre punti, disporre
i comandi in modo che sia impossibile,
anche inavvertitamente, sollevare o
abbassare la macchina.
17.Controllare che siano rispettati i carichi
massimi ammessi per l’attacco a tre punti.
18.Eseguire il montaggio e lo smontaggio
degli alberi cardanici solo con presa di
forza disinnestata, motore spento e
chiave d’avviamento estratta.
8. Make sure that all the safety devices are
in perfect condition prior to working.
9. Be very careful when mowing over stony
land to make sure that no persons
or animals are in the immediate vicinity.
10.Make sure that all the mowing machine
rotating elements have stopped turning
and cut off the power supply before
performing any operations at all on the
machine.
11.In order to start mowing, slowly engage
the power take-off and bring the machine
up to normal running rpm level before
bringing it into contact with the product.
12.The speed of advance must be set
according to the soil conditions and
the product to be cut.
13.Observe the rules of the road when
transferring the mowing machine on
the public traffic network.
14.Take particular care when hitching/
unhitching the mowing machine to the
tractor.
15.Before leaving the tractor, fasten the
mowing machine and lower it completely,
and then switch the tractor off and take
out the ignition key.
16.Prior to hitching/unhitching the mowing
machine to the 3-point attachment, set
the controls so that the machine cannot
be raised or lowered even by accident.
17.Always check to make sure that the
maximum permissible loads for the 3-
point attachment are respected.
18.Assemble/disassemble the cardan
shafts only after the power take-off has
been disengaged, the motor switched off
and the ignition key removed.

9
19.Prima di innestare la presa di forza
assicurarsi che il regime e il senso
di rotazione della presa di forza del
trattore, sia compatibile con quella
dell’attrezzo.
20.Non innestare mai la presa di forza a
motore di forza a motore spento.
21.Prima di innestare la presa di forza
assicurarsi che nessuno si trovi nella
zona di pericolo.
22.Lavorando con presa di forza, nessuno
deve trattenersi nei pressi dell’albero
cardanico o della presa di forza stessa
quando sono in rotazione.
23.Disinnestare sempre la presa di forza in
presenza di grossi avvolgimenti
oppure quando essa non viene utilizzata.
24.Prima di accedere all’attrezzo verificare
che questo sia completamente fermo
(inerzia del volano).
19.Before engaging the power take-off,
make sure that the tractor power take-off
running level and rotation direction are
compatible with those of the mowing
machine.
20.Never engage the power take-off when
the motor is off.
21.Before engaging the power take-off,
make sure that no persons or animals
are within the machine range of action.
22.Make sure that no one is in the
immediate vicinity of the cardan shaft or
the power take-off during rotation.
23.Always disengage the power take off in
the presence of serious tangling of
grass, substantial obstacles, and
whenever the power take-off is not being
used.
24.Make sure that the mowing machine is
completely stationary (flywheel inert)
before approaching the machine.

10
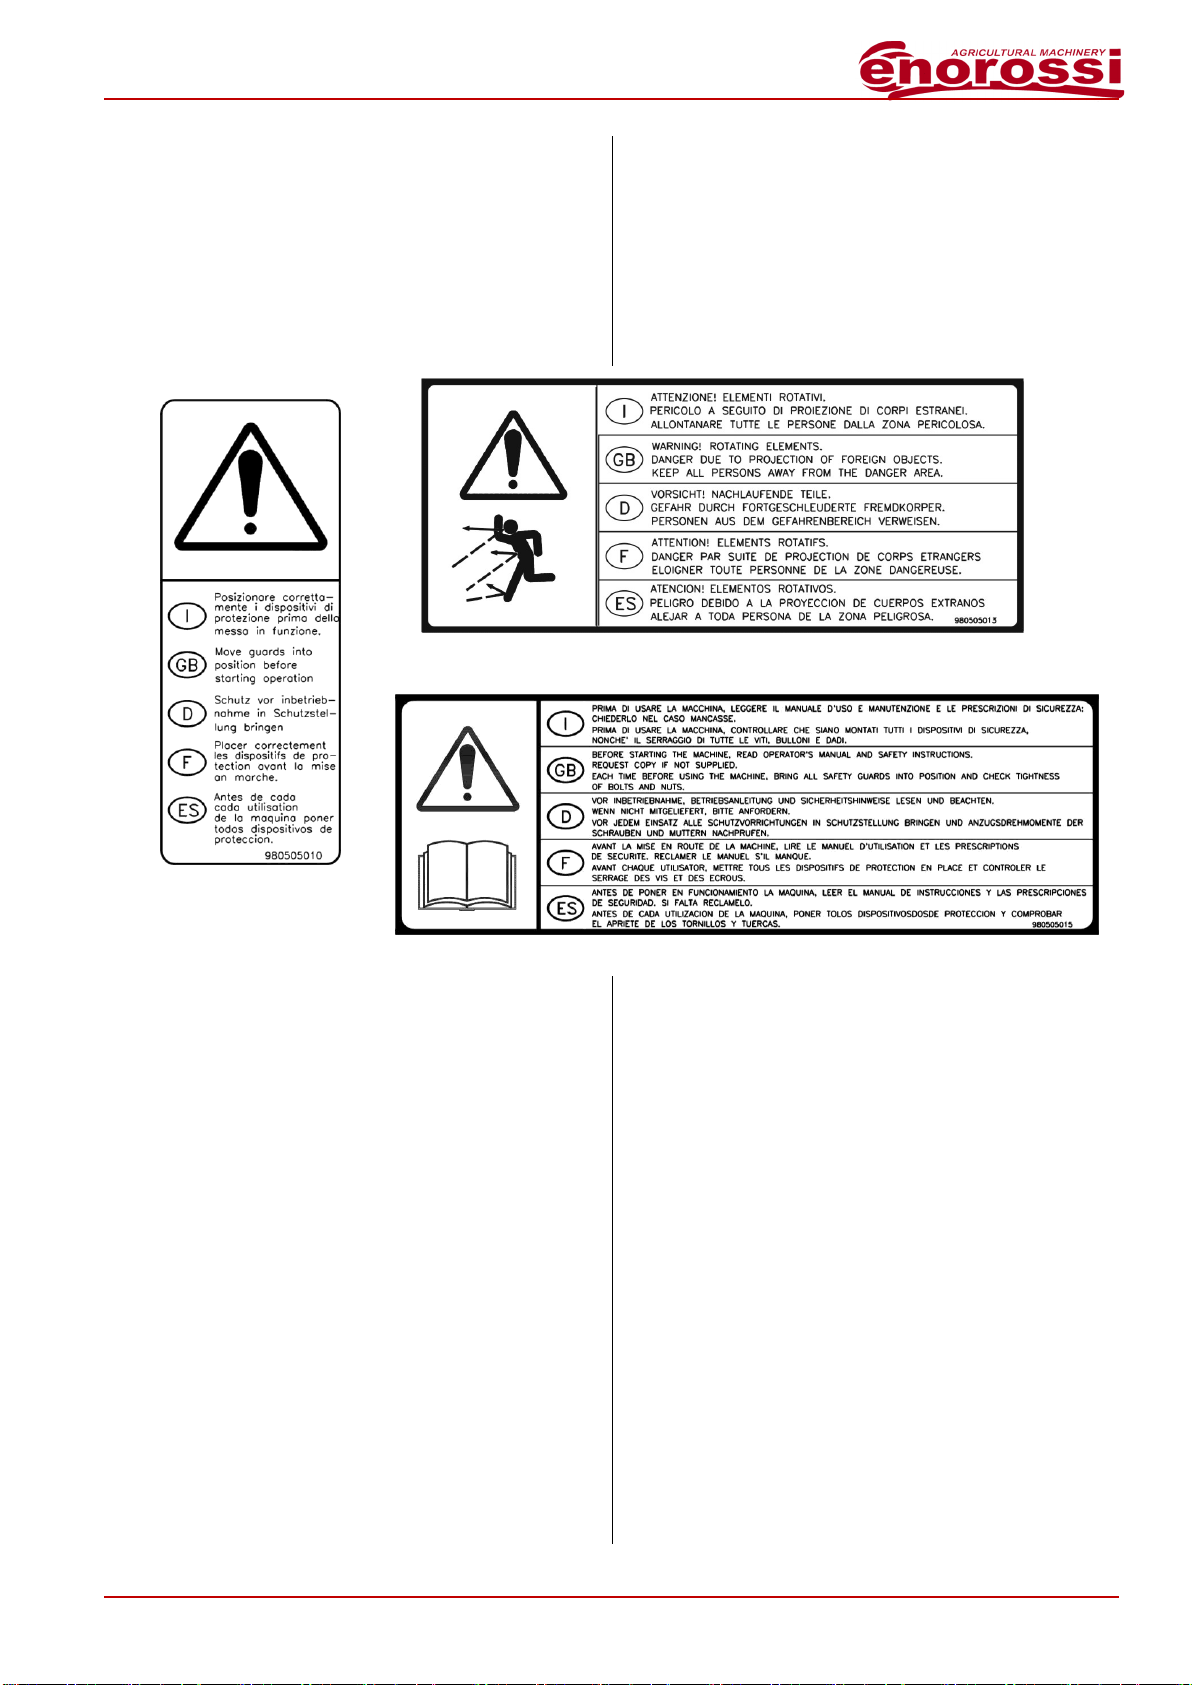
PITTOGRAMMI
Fig.1: Non toccare le parti meccaniche in
movimento. Attendere che siano ferme.
Fig.2: Tenere le distanze di sicurezza
durante il funzionamento del motore.
Fig.3: Attenzione alle mani.
Fig.4: Non oltrepassare mai il regime di giri
prescritto della presa di forza.
PICTOGRAMS
Fig.1: Never touch moving mechanical parts;
wait until they have come to a rest.
Fig.2: Maintain a respectable safety distance
while the motor is running.
Fig.3: Dangerous for hands.
Fig.4: Never exceed the permissible power
take-off rpm level.
Fig.1
Fig.2 Fig.3
Fig.4
11
Fig.5: Posizionare correttamente i dispositivi
di protezione prima della messa in funzione.
Fig.6: Pericolo aseguito di proiezione di corpi
estranei. Allontanare tutte le persone dalla
zona pericolosa.
Fig.7: Prima di usare la macchina, leggere il
manuale di uso emanutenzione ele
prescrizioni di sicurezza: chiederlo nel caso
mancasse. Prima di usare la macchina,
controllare che siano montati tutti i dispositivi
di sicurezza, nonché il serraggio di tutte le
viti, bulloniedadi.
Fig.5: Position all safety devices correctly
prior to starting.
Fig.6: Beware of foreign objects flying out.
Keep away from danger zone.
Fig.7: Read the Instruction and Maintenance
Manual and all safety regulations carefully
prior to using the machine. Request such
material if lacking. Make sure that all the
safety devices have been correctly mounted
and that all the screws, nuts and bolts are
tightened to the correct torque before using
the machine.
Fig.6
Fig.5
Fig.7

12
SCARICO E SBALLAGGIO
Il trasporto delle falciatrici DMC avviene
normalmente per mezzo di autocarri
attrezzati di gru.
Lo scarico dall’autocarro viene eseguito per
mezzo di tali gru o di carri ponte, imbragando
opportunamente la falciatrice. - I punti di
ancoraggio sono evidenziati nella fig.8.
CONTROLLARE CHE LE CAPACITA’DI
CARICO DI TALI MEZZI SIANO ADEGUATE
ALLA MASSA DELLA MACCHINA DA
SOLLEVARE. LA MASSA E’ RIPORTATA
SULLA TARGHETTA DI IDENTIFICAZIONE.
PRIMA DELL’OPERAZIONE DI SOLLEVA-
MENTO ACCERTARSI CHE NESSUNA
PERSONA SI TROVI NELLA IMMEDIATE
VICINANZE DELLA ZONA DI LAVORO.
UNLOADING AND UNPACKING
The transport of the DMC disc mowers is
usually made by means of trucks with loading
crane.
After suitably slinging the disc mower, you
have to unload it from the truck by means of a
crane or acatwalk-car. - The connection
points are shown in fig.8.
MAKE SURE THAT THE LIFTING
CAPACITY OF THESE CRANES IS
ADEGUATE TO THE WEIGHT OF THE
MACHINE TO BE LIFTED (LISTED ON THE
RATING PLATE).
MAKE SURE THAT NO ONE IS IN THE
IMMEDIATE VICINITY OF THE WORK
AREA PRIOR TO LIFTING.
Fig.8

13
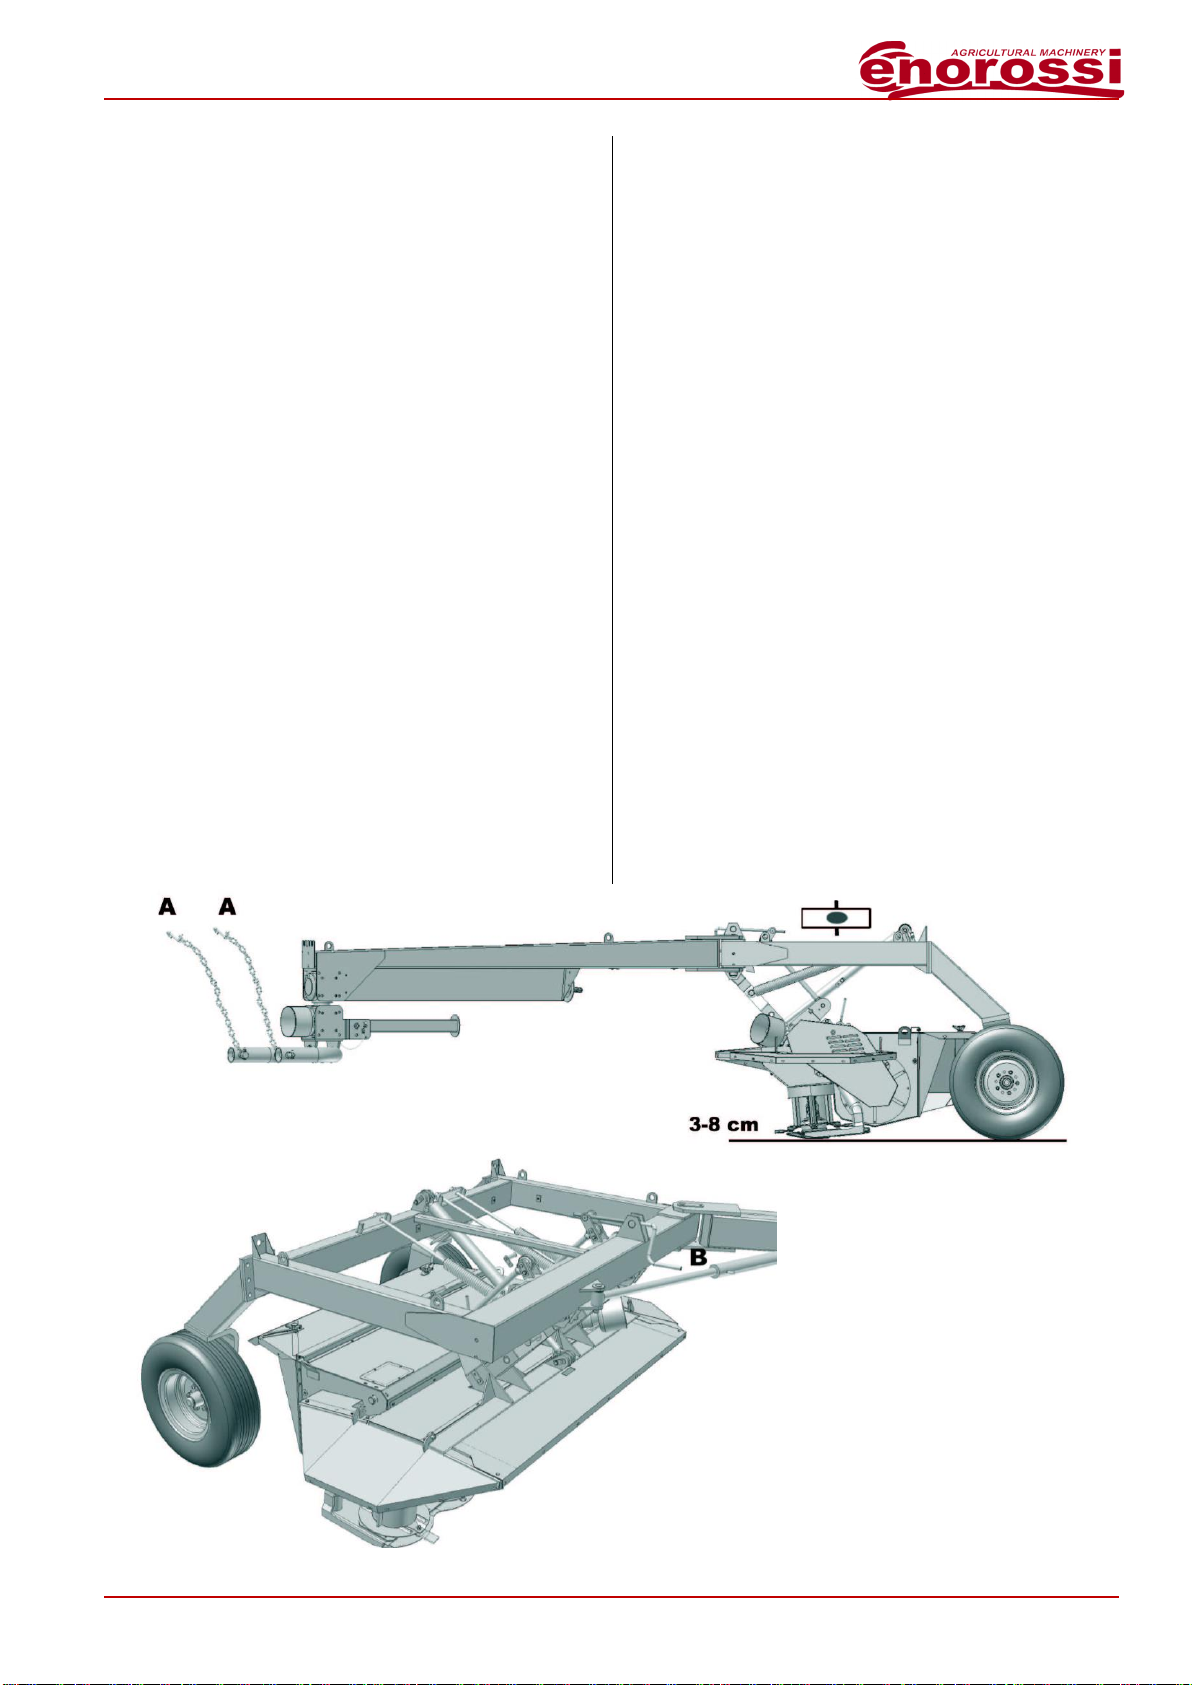
INSTALLAZIONE E MESSA IN FUNZIONE
Installazione al trattore.
Assicurarsi che la trattrice abbia le caratte-
ristiche adatte per trasportare la falciatrice
acquistata (peso, dimensioni epotenza)
rilevabili dalla scheda tecnica.
Per ciò che concerne le dimensioni attenersi
al codice della strada del paese di utilizzo.
Dopo aver collegato la falciatrice assicuran-
do tutti gli spinotti con le relative coppiglie
di fermo.
Collegare Itubi idraulici dei due cilindri, il
primo per alzare la falciatrice a semplice
effetto (A) il secondo (B) adoppio effetto per
aprire il timone della falciatrice. Collegare
infine l’impianto luci eassicurarsi del loro
corretto funzionamento.
ATTENZIONE
Non interporsi fra il trattore e la macchina
durante le operazioni di installazione e di
rimozione.
INSTALLATION AND SETTING AT WORK
Installation to the tractor
Make sure that the tractor machine is
suitable to transport the bought disc mower
(weight, dimensions and power -written on
the technical card).
About dimensions, follow the highway code of
the country where you are going to use the
machine.
After connecting the disc mower, put the
safety stops on each gudgeon pin.
Connect the hydraulic tube of two cylinders.
The first (A) to lift the machine. The second
(B)to open and close the draw bar. Connect
the electric lightning plat and control the
correct operation.
WARNING
Never stand between the machine and the
tractor during hitching/unhitching operations.
Fig.9

14
POSIZIONE DI LAVORO
Ora che la macchina èagganciata al trattore,
sollevarla di qualche centimetro, alzare il
piedino di sostegno del timone efissarlo in
posizione di lavoro con l’apposito fermo a
molla (fig.10).
Aprire il timone fino afine corsa attraverso il
cilindro (A) eabbassare la falciatrice con il
cilindro (B).
ATTENZIONE
Nelle adiacenze dell’attacco a tre punti sussi-
stono punti che possono creare pericoli di
schiacciamento e di taglio.
Non stazionare mai fra il trattore e l’attrez-
zatura durante l’azionamento dei comandi
esterni per l’attacco a tre punti.
WORKPOSITION
After hitching the disc mower to the tractor, lift
it some centimetres, raise the support device
of the shaft and fix it in the work position by
means of the proper spring stop (fig.10).
The machine is equipped with hydraulic
cylinder to move the bar from the work to
the transport position.
WARNING
The risk of cutting and crushing in the vicinity
of 3-point attachment must always be borne
in mind.
Never stand between the mowing machine
and the attachment are being used.
Fig.10
15
REGOLAZIONE DELL’ALTEZZA DA
TERRA
Per i trattori equipaggiati con limitatore del
sollevatore idraulico con l’indicatore delle
posizioni, regolare la posizione della
falciatrice in modo che il telaio risulti piano
(fig.11).
Per trattori non equipaggiati con limitatore
del sollevatore idraulico con indicatore di
posizione, la catena di ritegno in dotazione
deve essere utilizzata (A)
.
REGOLAZIONE DELL’ALTEZZA DI
TAGLIO
L’altezza di taglio può essere regolata da un
minimo di 3 cm ad un massimo di 8 cm. Per
far ciò agire sulla manovella (B).
Non scendere mai sotto I 3 cm per evitare di
forzare troppo gli organi meccanici della
falciatrice e per garantire il funzionamento del
condizionatore.
ADJUSTMENT OF THE HEIGHT FROM
THE GROUND
If you have a tractor machine equipped with a
limiting device of the hydraulic lifter with
position indicator, adjust the disc mower
position in order to the frame results piano
(fig.11).
If you have a tractor machine without a
limiting device of the hydraulic lifter with
position indicator, use the check - chain
supplied with (A).
ADJUSTMENT CUTTING HEIGHT
The cutting height can be adjusted from 3 to
8 cm, moving crank (B)
Never bellow 3 cm. to avoid damage to the
machine and to improve the conditioner
operation.
Fig.11

16
REGOLAZIONE DELLA SOSPENSIONE
La sospensione permette alla lama di taglio
di reagire diversamente quando un trattore
circola su dei terreni più o meno accidentati.
Per regolare la sospensione agire sulle viti
delle molle (A).
In generale la sospensione deve essere
regolata seguendo le caratteristiche del
suolo e la velocità, il peso a terra del
gruppo falciante non dovrà comunque
superare mai i 200 Kg circa
.
ADJUSTMENT OF THE SUSPENSION
By means of the suspension the cutting blade
reacts in adifferent way when you drive the
tractor machine on uneven grounds.
To adjust the suspension of the cutting group,
act on the spring screws (A).
In general, you have to adjust the suspension
following the ground features and the speed,
the weight of the cutting set while on the
ground has to be under 200 kg (ca.).
Fig.12

17
ADATTAMENTO ALLA CARREGGIATA
DEL TRATTORE
Attraverso i fori per l’attacco del cilindro
presenti del timone èpossibile adattare
l’apertura della falciatrice in funzione della
carreggiata del trattore.
Sono previste 4posizioni relative alle quattro
carreggiate più comuni eventualmente
spostare l’attacco del cilindro su quella più
vicina aquella del vostro trattore.
ADJUSTEMENTS TO THE TRACK OF THE
TRACTOR
With the 4 holes of cylinder fastening on the
draw bar it is possible to adapt the machine
to the tractor carriageway.
There are 4 positions corresponding to the
four most common tracks, if possible move
the cylinder hitch to the one closer to your
tractor.
Fig.12

18
REGOLAZIONE DELL’ALBERO DI TRAS-
MISSIONE A CARDANO
Accoppiare l’albero di trasmissione acardano
da una parte all’albero di comando della
macchina edall’altra alla presa di forza del
trattore.
Assicurassi che la lunghezza dell’albero di
trasmissione a cardano sia giusta:
In allungamento massimo la ricopertura dei
tubi deve esserci per 250 mm minimo.
In ricopertura massima (albero di trasmissio-
ne a cardano compresso), itubi non devono
mai puntare contro igiunti. Una corsa di
sicurezza di 1 cm minimo deve esserci. Se
necessario, accorciate le protezioni ed i tubi
della medesima lunghezza, cianfrinare e
pulire i tubi e spalmare di grasso l’interno
del tubo esterno.
Non far lavorare l’albero di trasmissione a
cardano spesso con una angolazione troppo
accentuata massimo 20°.
PRECAUZIONI DEGLI ALBERI DI TRAS-
MISSIONE A CARDANO
Etassativo effettuare questi controlli e regole
di base, pena il rischio di deterioramento
prematuro dell’albero di trasmissione a
cardano.
Al fine di evitare degli incidenti che
potrebbero rivelarsi gravi, vigilare attenta-
mente ache le protezioni dell’albero di
trasmissione acardano siano sempre beneal
loro posto ed immobilizzate nella rotazione
per mezzo delle catenelle in dotazione per
questo. Fissare sempre le catenelle del
cardano su entrambi ilati. Sostituire
immediatamente le protezioni che sono state
danneggiate.
Fare molta attenzione al secondo albero di
trasmissione acardano, non può essere
invertito perché itubi andrebbero apuntare
contro igiunti in chiusura, ciò causerebbe
danni alle scatole di trasmissione.
ADJUSTMENT OF THE CARDAN
TRANSMISSION SHAFT
Connect one side of the cardan transmission
shaft of the machine and the other side to the
power take-off of the tractor.
Make sure the length of the cardan
transmission shaft is right.
In the max. lengthening there must be are-
covering of the tubes for 250 mm at least.
In max. re-covering (with compressed cardan
transmission shaft) the tubes have never to
point at the joints. There must be asecurity
stroke of 1cm at least. If necessary, shorten
the protections and the tubes of the same
length, re-strike the nails of the joint, clean the
tubes and grease the inside of the external
tube.
Don’t let work the cardan transmission shaft
too often with astrong angularity (max. 20°).
PRECAUTIONS OF THE CARDAN
TRANSMISSION SHAFTS
It is absolutely necessary to check the cardan
transmission shaft and to follow some basic
rules, otherwise the cardan transmission
shaft is subject to hasty deterioration.
In order to avoid troubles which could be
serious ,check that the protections of the
cardan transmission shaft are steadily in
their proper places and immobilized in the
rotation by means of the appropriate
chains. Fix always the cardan chains on both
sides. Substitute immediately the damaged
protections.
Be careful about the second cardan
transmission shaft: you cannot invert it since
the tubes would point at the closing joints
and as aconsequence there would be
damages in the transmission boxes.
19
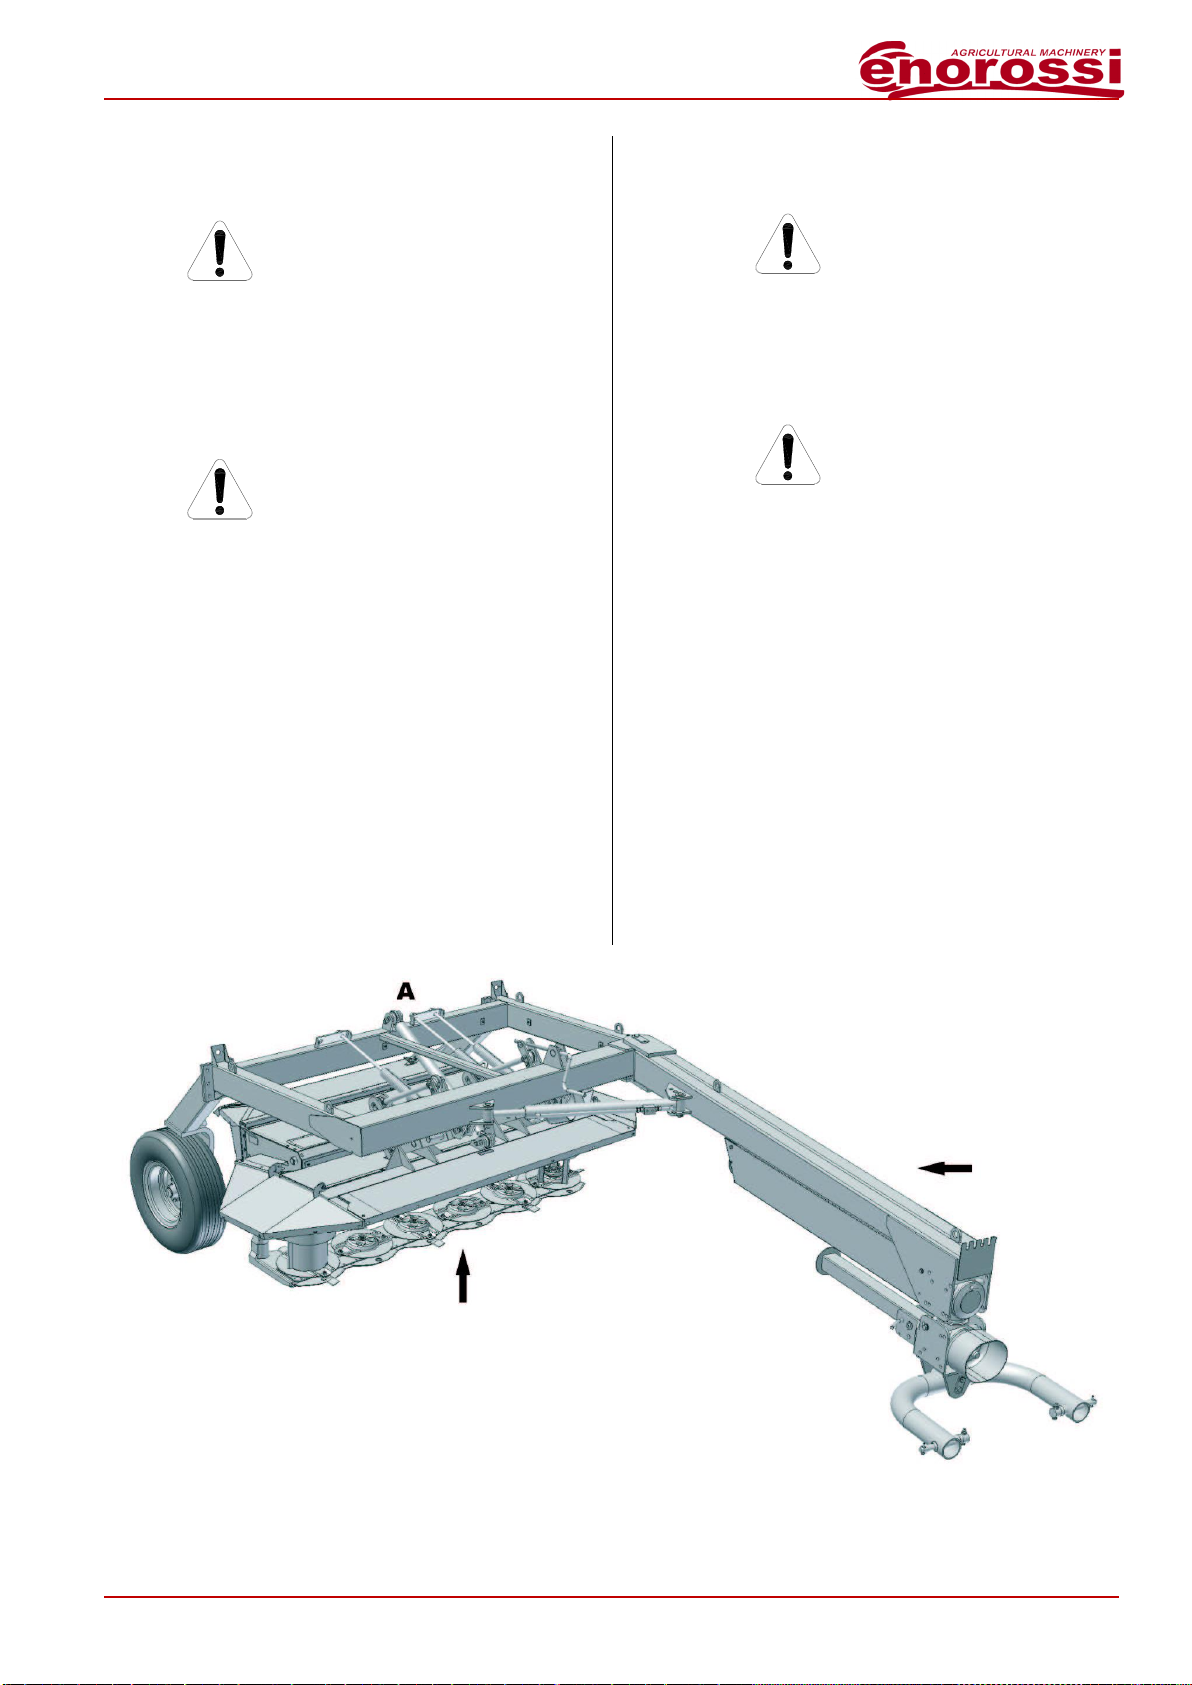
POSIZIONE DI TRASPORTO
ATTENZIONE
Prima di portare la falciatrice in posizione di
trasporto, attendere l’arresto completo della
rotazione dei dischi ed allontanare qualsiasi
persona dalla zona di azione del gruppo
falciante.
ATTENZIONE
Prima di trasportare la macchina sulla
pubblica strada l’utilizzatore deve sempre
assicurarsi che la stessa sia conforme al
codice della strada.
Per la messa in posizione di trasporto,
operare come segue:
-Attendere l’arresto completo della rotazio-
ne dei dischi.
-Sollevare la macchina con il solleva-
mento idraulico del trattore.
-Bloccare attraverso il RUBINETTO DEL
CILINDRO (A) il gruppo falciante.
-Chiudere il timone fino al fermo.
TRANSPORT POSITION
WARNING
Before putting the cutting set in the transport
position, wait for the complete stop of the
disk rotation and send away everyone from
the movement zone of the cutting set.
WARNING
Before transporting the machine on the public
road, you have always to make sure that it is
in conformity with the Highway Code.
To put the machine in the transport position,
do as follows:
-Wait for the complete stop of the disk
rotation.
-Lift the machine with three points of the
tractor hydraulic service.
-block the cutting group with THE TAP
OF CYLINDER (A)
-close the draw bar until the stop.
Fig.12

20
CONTROLLO DEI COLTELLI
Controllarli sistematicamente prima di utiliz-
zare la macchina.
Per garantire la qualità della falciatura,
nonché la sicurezza d’uso, controllare in
modo accurato esistematico i coltelli. Icoltelli
vanno sostituiti nei seguenti casi:
1. Coltelli danneggiati
Un terreno irregolare può creare fessu-
razioni edeformazioni dei coltelli (fig.13)
che comportano:
-un aumento di rischio incidenti;
-una riduzione della qualità della
falciatura;
-rischio di deterioramento dei
portadischi.
2. Coltelli consumati
La lunghezza (A)di un coltello (fig.13)
deve essere superiore a70 mm. La
larghezza (B)di un coltello (fig.13),
misurata a10 mm dal disco, deve essere
superiore a35 mm. Il passaggio (C)della
vite di fissaggio (fig.13) non deve essere
ovalizzato di oltre 23 mm per un alesatura
di 21 mm.
CHECK OF THE CUTTING BLADES
Check them systematically before using the
disc mower.
To get aquality mowing and ause security,
check the cutting blades carefully and
systematically. You have to substitute the
cutting blades in the following cases:
1. Damaged cutting blades
Because of an uneven ground the cutting
blades can have clefts or deformations
(fig.13) which cause:
-an increase of accident risks,
-a reduction in mowing quality,
-deterioration risks of the disk holder.
2. Used cutting blades
The length (A)of acutting blade (fig.13)
has to be more than 70 mm. The width
(B)of acutting blade (fig.13), measured
at 10 mm from the disk, has to be more
than 35 mm. The pitch (C)of the fixing
screw (fig.13)has not to be deformed
more than 23 mm for a boring of 21 mm.
Fig.13
This manual suits for next models
2
Table of contents
Other enorossi Lawn Mower manuals


Popular Lawn Mower manuals by other brands

MTD
MTD 135-430A Owner's operating service instruction manual

Swisher
Swisher ZTR2760BS owner's manual

Husqvarna
Husqvarna AUTOMOWER 520H Operator's manual

EINHELL
EINHELL FREELEXO LCD BT+ Original operating instructions

Agria
Agria 4500 HYDRO operating instructions

Toro
Toro Groundsmaster 220-D Service manual


