Enpuly MLG1 User manual
MLG1 Portable Water Flosser
User Manual

CONTENT
1.English Manual....................................(1-12)
2.German Manual...................................(13-22)
3.French Manual.....................................(23-32)
4.Italian Manual......................................(33-42)
5.Spanish Manual...................................(43-52)

♻Environmental Protection :
●This product contains lithium ion battery, please do not treat this
product or its accessories as ordinary household garbage.
●Please place the waste lithium batteries in the corresponding
recycling area according to the local garbage classification
principle.
●Please conrm that you have fully understood the use methods
and techniques of this product before use.
Warning :
Do not disassemble the product or pick up the built-in battery.
If the product or battery runs out its life, please dispose of it in
accordance with local environmental regulations.
Battery Safety :
●This product adopts a built-in battery that can't be removed.
To avoid damage to the battery or the device, please DO NOT
disassemble the product or try to replace the battery yourself.
●To avoid battery overheating or explosion caused by battery
short circuit, DON'T directly connect any metal conductor to
the battery poles.
●Do not expose the battery to high temperature or near heating
devices, such as sunlight, heaters, microwaves, ovens, and water
heaters. An overheated battery may cause an explosion.
●If the battery leaks, do not let the leaking fluid come into
contact with your skin or eyes.In case of accidental contact
with skin or eyes, rinse them immediately with plenty of
water and seek medical attention.
●Do not allow children or pets to swallow the battery, as this may
cause injury.
●Do not drop, squeeze the product or puncture the battery. Avoid
exposing the battery to excessive external pressure, which may
lead to internal short circuit and overheating.
●Do not use damaged batteries.
surgery in the past 2 months should consult their dentist doctor
before using.
●To prevent internal clogging, it is not recommended to add anti-
inammatory drugs or other particles to the water tank of the
product.
●To prevent corrosion of internal lines, do not use high-
concentration mouthwash. Instead, you can add a small amount
of mouthwash and more than half amount of water to the water
tank.
●This product can deeply clean the oral and effectively prevent
the formation of tartar. However, it CAN'T be used to replace
the toothbrush.
2
1.Safety Instructions
2.Precautions
⚠Safety Alert :
In order to avoid injury caused by improper operation, do not
hurry to use the product if you do not understand the operation
process and safety instructions.
Do not disassemble or replace the product parts by yourself, so as
not to damage the product and invalidate the warranty.
To avoid burns, do not put hot water above 50 ℃ into the water
tank and clean your mouth.
Please check the product carefully before use, if the power cord or
plug is damaged, please replace it.
Do not put this product into re or heat it. And do not charge, use
or place it in any high temperature environment.
Cautions :
●Do not use this product for any purpose other than oral cleaning
or for other purposes. This product is not a toy, please do not
play with it.
●Children from age 8 and above or people with reduced physical,
sensory or mental abilities or lack of experience and knowledge
should be taught how to use the water osser safely before rst
use and must operate the device only when accompanied by
guardian.
●This product is not suitable for children under 8 years old or any
infants.
●Do not press the nozzle too hard on the gums or teeth to avoid
damaging your gums.
●Do not damage, destroy, modify the power cord, do not stretch,
bend or twist the power cord.
●Do not place heavy objects on the power cord or sandwich it
between objects, and keep the product and power cord away
from hot or hot objects.
●Do not store the product in a heat or humidity place, avoid direct
sunlight.
●Do not charge the product in humid or high-temperature places
such as bathrooms and toilets. Do not use the product during
charging.
●If the product will not be used for a long time, please unplug the
power plug and charging cable to avoid product damage or
other dangers.
Notes :
●Do not disassemble or repair the product by yourself.
●Do not use without plugging any nozzle.
●Please conrm that you have fully understood the use methods
and techniques of this product before use.
●This product is not suitable for children under 8 years old or any
infants. Please keep this product out of reach of children or
infants. Do not use it as a toy.
●Patients with periodontal disease or those who have had oral
1
English Manual
EN EN
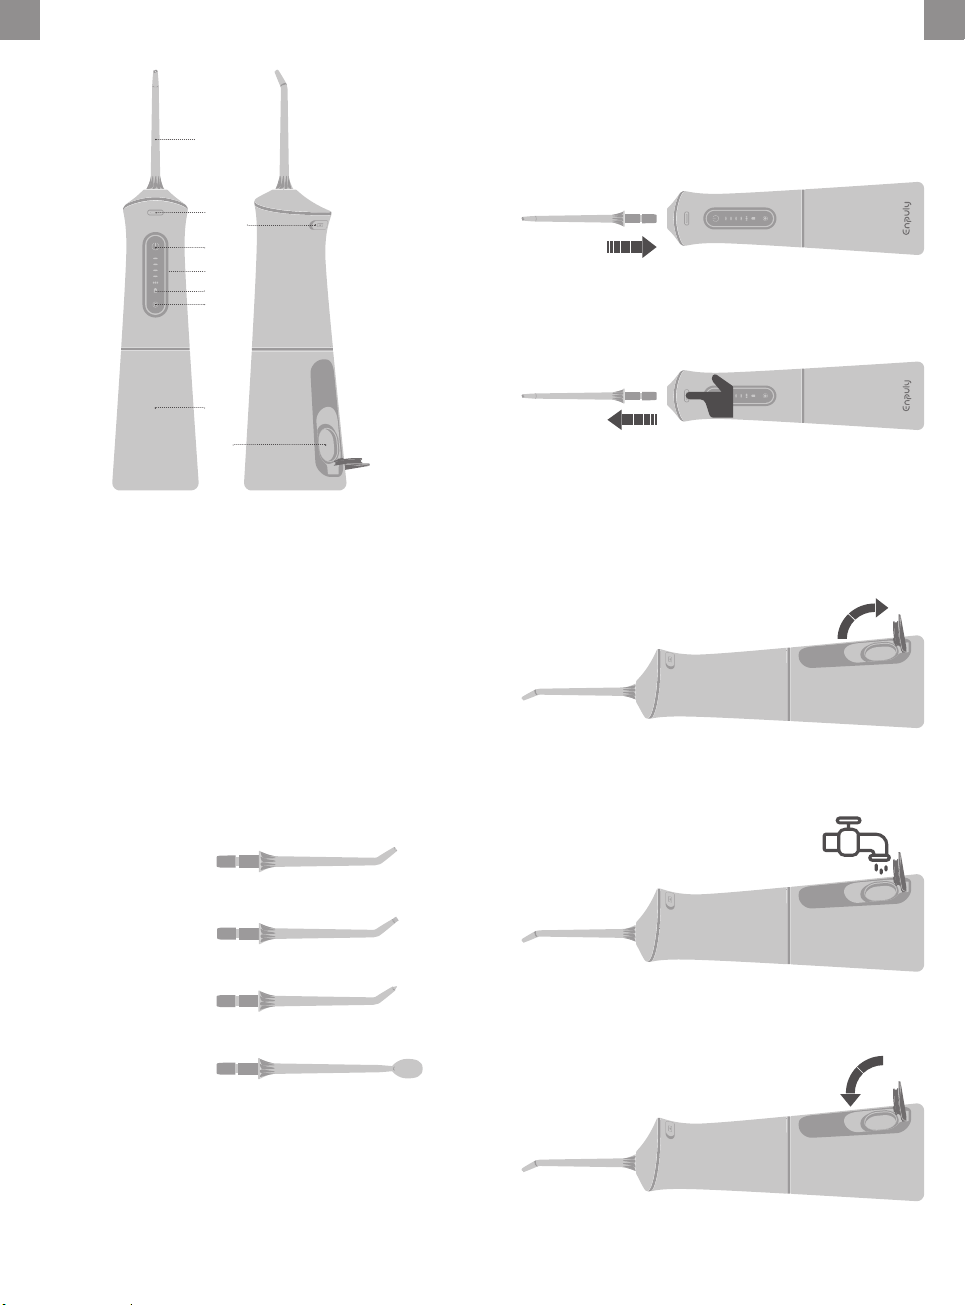
4.Instructions
A. Installation and removal of nozzles
B. Water injection method 1 :
/ Installation
/ Disassembly
Insert the nozzle into the body hole. When you hear a sound of
the plug button, it is installed in correct place.
1.Open the water tank cap.
2.Keep the product horizontal and pour water into the tank
through the water tank cap.
3.After lling the appropriate amount of water, close the water
tank cap.
Press and hold the nozzle unlock button, then gently pull out
the nozzle.
4
3. Product Icon
Parts List :
Enpuly MLG1 Water Flosser * 1
Standard Nozzle * 2 Orthodontic Nozzle * 2
Periodontal Nozzle * 1 Tongue Nozzle * 1
Type-C Cable * 1 User Manual * 1
① Nozzle
② Nozzle unlock button
③ Start/Pause button
④ Mode indicator
⑤ Power indicator
④
③
②
⑦
①
⑤
⑥
⑨
⑧
}
⑥ Mode switch button
⑦ Type-C charging port
⑧ Water tank cap
⑨ Water tank
Periodontal nozzle
Cleans hard-to-clean food debris from between teeth.
Orthodontic Nozzle
Suitable for cleaning the hard-to-clean areas of the braces.
Standard Nozzle
For daily cleaning of interdental residues and soft scales
Tongue Nozzle
Clean the dirt on the tongue coating.
Attention:
Please conrm whether the power is sucient before using. The
new machine should be charged before the rst use. If the power
indicator blinks red, it means the battery is low. Please charge it in
time.
3
EN EN
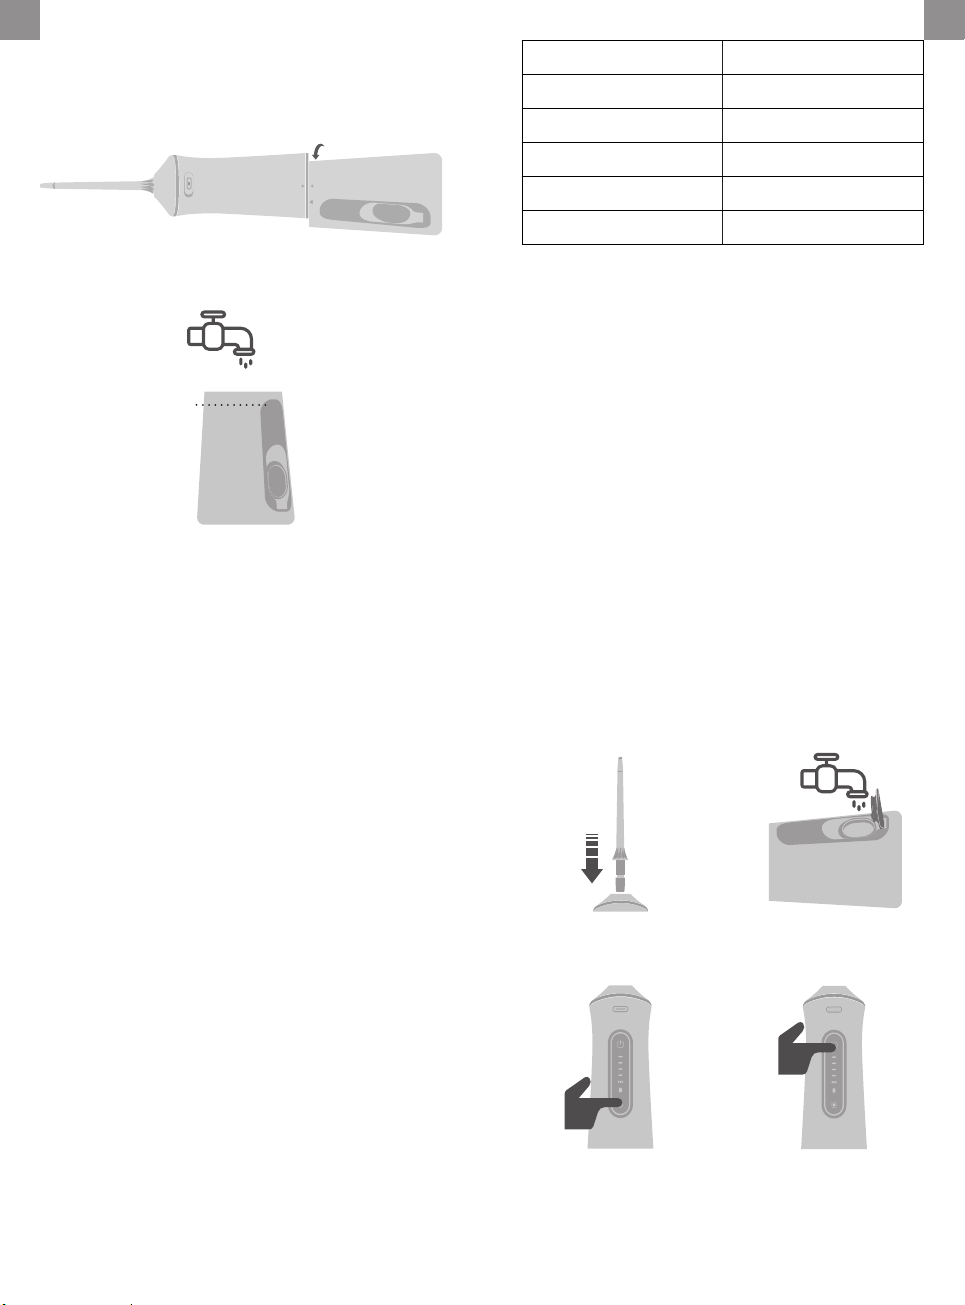
LED indicator status(From the
bottom) Model name
The 2nd, 3rd, 4th and 5th mode
lights are on Intense
The 2nd, 3rd and 4th mode lights
are on Normal
The 2nd and 3rd mode lights are
on Medium
The 2nd mode light is on Sensitive
The 1st mode light is on Pulse
❖Start
❖Shutdown
❖Mode Switch
❖Memory function
❖Pause
Press the start button. After the indicator lights up, press
the start button again to use. (the flosser factory default is
sensitive mode)
Press the start button during work to stop the water flosser.
In standby, the LED light will keep on for 10S and then
automatically shut down.
Press the mode switch to turn to dierent modes.
The last working mode is activated by default after each start.
1.Choose the nozzle that
suits your needs and install
it on the water osser.
3.Press the mode switch to
select the mode that suits
you.
2.Open the water tank cap,
add an appropriate amount
of water, and close it.
4.Place the nozzle between
your teeth and press the
start button to start washing.
Press the start button to pause the water ow.
E. How to use it:
6
C. Water injection method 2:
D. Mode Description
Remove the water tank
a:Hold the body and twist the water tank to remove the water
tank.
b:Fill water to the MAX water level.
C:Install the water tank, and then rotate the water tank
until it is aligned with the lock mark. Then the installation is
completed.
1.Start:Press the start button to wake up the water flosser.
The indicator light will be turned on successively and then
stay in the former mode before last shutdown. The indicator
light of this mode will be steady on. If it is used for the rst
time, it defaults to sensitive mode.
2.Pause:This button can be used to pause the water irrigation
while the power indicator lights. If there is no operation
within 10 seconds after the pause, the water flosser will
automatically shut down and the power indicator will be
turned o.
3.One-button boost function:When your water flosser works
in sensitive, medium or standard modes, you can press
the mode button long to start one-key pressure boost.
This function can make the water pressure rise steadily to
the maximum pressure.The indicator light will rise and fall
accordingly.
4.Mode switch button:Except for the start button, this mode
switch button can also be used to turn on the water osser
either. When the water flosser is on working, you can use
this button to switch dierent modes, from intense, normal,
medium to sensitive and pulse mode.
(The following table describes indicators in dierent modes)
5
MAX
EN EN
Table of contents
Languages:


