Entity YU631 User manual

YU631
21.5” All In One Computer
Instrucon Manual

02
Contents
Getting Started 03
Box Contents 03
Product Overview 04
Device Description 04
Features 06
Desktop Layout 07
About The Screen 08
Using The Computer 09
Before First Use 09
Starting Up 09
Using The Mouse and Keyboard 10
Computer Power 10
Connections 12
WiFi 12
Computer 12
User Interface 13
Start Menu 13
Moving a Desktop shortcut 14
Removing a Desktop Shortcut 14
Cortana Search 14
Windows Action Centre 14
Task View 15
Changing your wallpaper and themes 15
To download new apps 15
External Storage 16
Inserting a Memory Card 16
Formatting a microSD card 16
Data Management & Security 17
Backing up your Computer 17
Improving security on your Computer 17
Product Support 19
Troubleshooting 19
Specication 20
Safety Information 21
After Sales Support 23
Product Guarantee (UK Only) 23
Disposal Information 23

03
Getting Started
Congratulaons on choosing to buy an Enty product. All products brought to you by Enty are manufactured to
the highest standards of performance and safety. Before use, please read this manual carefully. It gives important
instrucons about safety, use and maintenance of your Computer.
We hope you enjoy using your purchase for many years to come. Remove all packaging material. You may wish to keep
the packaging for future use or storage of your Computer. Alternavely, dispose of accordingly.
When opening the box please ensure that the items listed below are included within. If an item is missing please
contact where you purchased the item.
• 21.5” All In One Screen
• 2 Part Stand
• Power Adaptor
• Instrucon Manual
• Mouse - USB Adaptor found in baery compartment.
• Keyboard
Box Contents

04
Product Overview
Device Description
2
1
34
5 6 78
9
12
11
10
11
13
14
15

05
Name Descripton
1Power Press to turn the unit on, or to turn the screen on or o. Press and hold to access the
Power O menu.
2Reset Press Buon to reset device sengs.
3Speaker Rear speaker for audio output.
4 HDD Service Panel for HDD.
5Lock Lock Device.
6HDMI Port for HDMI cable connecon.
7Cable Connet power adapter for product to funcon.
8Aux Jack Audio output connecon for headphones.
9Mic Use internal mic to record sound.
10 Ethernet Connect computer to the internet.
11 USB USB 3.0 x2
12 USB USB 2.0 x3
13 SD Card Slot to put SD card into the computer.
14 Mouse Computer Mouse
15 USB Adapter USB Adapter located on the base of the mouse.

06
Features
Browse the Web
Visit your favourite websites.
Check your e-mail
Keep in touch with friends and family.
Watch Youtube™ videos
Browse the world’s most popular video-sharing community.
Discover thousands of apps for Windows™
Games, applicaons and more with the installed market
place.
Enjoy your media library anywhere
Portable powerhouse plays your chosen music, videos and
photos.
microSD memory card reader
Browse the world’s most popular video-sharing community.
Built-in camera
Convenient front-facing and rear-facing cameras.

07
Desktop Layout
Expand
Most Used
Apps
Microso
Account Tile
Documents
Pictures
Sengs
Power
Start
Cortana
Search Bar
Task
View File
Explorer
BrowserE-mail
Show
Hidden
Icons Volume
Date &
Time
Nocaons
Desktop
View
Dynamic
App Tiles

08
About The Screen
This computer is quipped with an easy to use full HD Screen.
The computer does not have touch screen funconality.
Protecve Film:
A thin lm has been applied to the screen to protect it during shipping. This lm should be removed before the Computer is
used. To remove, simply take a corner of the lm and peel away from the screen.
Note: Do not use any sharp object to remove lm as this could cause damage to the screen

09
Using The Computer
Before First Use
• Before rst use, please make sure the Computer is plugged into the mains power.
• Ensure that you have a good wi connecon, with your network name and password available.
• Ensure the USB Adaptor is plugged into one of the USB ports on the product.
Starting Up
Turn on the device by holding in the power buon for 2/3 seconds.
The rst me you use your device, the startup wizard will help you set up your device:
• Language
• Date & Time
• WiFi Connecon
• Locaon service opons
• Third-party applicaons
• Necessary Updates
• Account Synchronizaon

10
Computer Power
Using The Mouse And Keyboard
Connecng Keyboard and Mouse to the Computer:
To connect the wireless keyboard and mouse to the computer, you must
use the included dongle which can be found in the baery compartment
of the mouse. It is recommended that you insert the dongle into the port
on the base of the product (11), this reduces the
risk of interferance from cables on the rear of the
product.
Turning The Computer On or O:
- To turn the Computer on:
Press and hold the Power key unl the screen turns on. Wait unl the Desktop screen
appears; the Computer is now ready for use.
- To turn the Computer o:
Press the start buon and click on the power icon. This then gives the opon to shutdown
sleep or restart.

11
Turning the Screen On or O:
When the Computer is on, you can turn o the screen to conserve
power and protect the screen. Simply press the start buon and
click on the power icon, then choose sleep.
NOTE: To conserve baery power, the screen can be set to turn
o automacally when the Computer is not in use (between 1
minute and 5 hours). The screen meout opon can be found in
the display menu.
It is strongly recommended that you sign into/register for a
Windows account (needed for the installaon of new apps).
When prompted it is also recommended that you agree to
backing up your computer. This creates copies of all of your les
should you ever need to restore the Computer.

12
The Nocaon bar displays icons that indicate your Computer’s Internet status.
Connected Via Ethernet.
Connected to a Wi-Fi network (waves indicate connecon strength).
There are no Wi-Fi networks in range, or the Wi-Fi is not connected.
Open the Sengs menu by pressing the start buon and clicking on the
cog/sengs icon.
Open the Network and Internet menu and turn the WiFi on before
selecng the network you wish to join.
When Wi-Fi is on, the Computer will look for and display a list of available
networks.
NOTE: You can also acess the WiFi sengs by clicking on the icon on the taskbar near the
date and me
In the same Wi-Fi sengs menu above, touch a network in the list. If the
network is open,the Computer will prompt you to conrm connecon
to the network. Touch Connect to conrm. If the network is secured
(as indicated by a Lock icon), the Computer will prompt you to enter a
password or other credenals.
Connections
WiFi

13
Start Menu
To open the start menu select the icon in the boom le hand corner of
the Computer desktop. Once the menu has been opened you will be greeted
with a variety of opons.
Applicaons
Once in the start menu, a list of all installed applicaons is visible, sorted
alphabecally. Tiled shortcuts will appear on the right for selected pre-
installed applicaons. There is also the opon to add le shortcuts for easier
access to your most used applicaons.
Adding a shortcut le to start menu
Click the start buon. Right click on an applicaon icon and select pin to start. This will create a le
in the start menu for the selected programme.
Removing shortcut le from start menu
Click the start buon. Right click on an applicaon le and select unpin from start. This will remove
the desired program from the start menu but not from your Computer.
Adding shortcut to the taskbar
Click the start buon. Right click on an applicaon le and select pin to taskbar. This will add the applicaon icon to the
taskbar at the boom of your screen.
User Interface

14
Moving a Desktop shortcut
Click and hold onto the icon you wish to move. As you drag the icon it will become semi-
transparent. You can then slide it to the desired locaon, and then release your the mouse.
Removing a Desktop Shortcut
Right click on an applicaon icon and select delete from the drop down menu that appears.
Cortana Search
Windows 10 comes with the feature of Cortana. This is a search feature on the task bar. To use this
click into the search bar and type what you wish to search for. This can be a feature or seng on
your device, or on the web.
Windows Action Centre
The Acon Center is where you’ll nd applicaon nocaons and quick acons. On the taskbar,
look for the Acon Center icon. The Acon Center allows access to quick sengs, in the form
of small boxes at the boom of the panel.
Nocaons within the acon centre are sorted into categories by app, and users can click a
small ‘x’ to clear nocaons.
The Acon Center also supports aconable nocaons, such as recent text messages, emails or
social media integraon.

15
Task View
Task View allows you to quickly locate an open window, quickly hide all windows and show the desktop,
and to manage windows across mulple monitors or virtual desktops. Clicking the Task View buon on the
taskbar displays all open windows and allows users to switch between them, or switch between mulple
workspaces.
Changing your wallpaper and themes
Press start and select the sengs icon . Select the personalisaon menu where you will be
greeted with the opons to change your background/theme for the Desktop and lockscreen. In
this secon you also have the opon to change the Windows accent colours and choose which
elements will use the colour.
To download new apps
To install new apps approved by Windows, click the Windows Store icon on the boom task bar. There you
will nd over 1 million apps including many of which are free. Even if you only going to use free apps you
will sll need to create a Windows account but you dont need to enter your credit card details to do this.
16
Inserting a Memory Card
This Computer accepts microSD memory cards. This allows you to increase the memory capacity of your Computer and
also to play media les that are stored on the memory card (e.g. music, photos or video les).
To insert a memory card:
• Align the memory card with the microSD slot. The metal poron of the memory card should be facing away from the
screen.
• Push the card into the slot, unl you hear a click. This signies that the card is clicked into place.
Do not aempt to insert objects other than a SD card into the card slot. A compable memory card should t easily into the card slot. If the card will
not easily t, check the alignment of the card. Do not aempt to force it into the slot. Avoid touching the metallic contacts of the memory card.
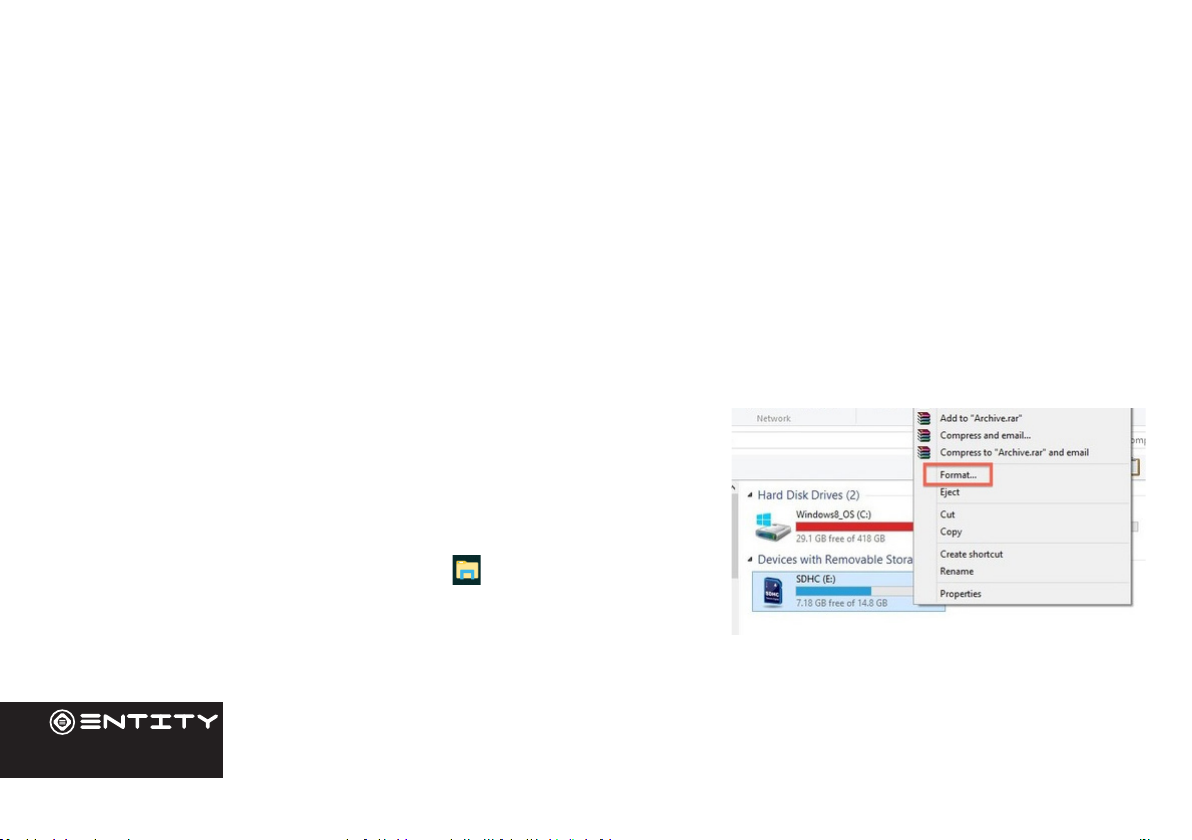
Formatting a microSD card
Note: Formang an SD card will wipe any and all data from the SD card’s storage. If
you wish to retain any les please transfer then onto a Computer or other device before
formang.
• Please ensure the correct drive is selected before formang. Once
formaed this cannot be undone.
• Open File Explorer by clicking on the icon on the task bar and
navigate to “This PC”
• Find the drive where your SD Card is Located
• Right-click, and when the menu appears click Format.
External Storage

17
Data Management & Security
Backing up your Computer
File History
Use File History to back up to an external drive or network locaon. Select
the Start buon > Sengs > Update & Security > Backup > Add a drive ,
and then choose an external drive or network locaon for your backups.
If you’re missing an important le or folder that you’ve backed up, here’s
how to get it back:
In the search box on the taskbar, enter Restore les, and then select Restore
your les with File History. Look for the le you need, then use the arrows
to see all its versions. When you nd the version you want, select Restore to
save it in its original locaon. To save it in a dierent place, press and hold
(or right-click) Restore, select Restore to, and then choose a new locaon.
Improving security on your Computer
Online
In order to avoid online threats we recommend that you install anvirus and security
soware on your device immediately aer set up and keep these and your browser and other soware up to date
to take advantage of security xes.

18
Physical the
If you store valuable informaon on your Computer including passwords and logins for personal accounts etc. you may want
to enhance the security of your Computer in case it is stolen or lost. This includes enforcing the log in with your windows
account and a PIN.
Erasing your personal data
If you sell your Computer on, or discard it you should erase the data in memory, before you do so. This securely erases your
data so that it cannot be recovered. Please note that simply returning your Computer to factory sengs is not a reliable
way of erasing your personal data (unless you have rst encrypted your data).
Encrypng your data
Sign in to Windows with an administrator account. Select the Start buon, then select Sengs > Update & Security > Device
encrypon. If device encrypon is turned o, select Turn on.
If device encrypon is not available on your device, follow these steps to turn on standard BitLocker encrypon instead:
Sign in to your Windows device with an administrator account. In the search box on the taskbar, type Manage BitLocker and
then select it from the list of results. Select Turn on BitLocker and then follow the instrucons. (If BitLocker is turned on and
you want to turn it o, select Turn o BitLocker.)

19
Product Support
Troubleshooting
Your PC isn't working well and you recently installed
an app.
Restore from a system restore point
Your PC isn't working well and you recently installed
an update.
Remove an installed Windows update
Your PC won't start and you've created a recovery
drive.
Use a recovery drive to restore or reset your PC
Your PC won't start and you haven't created a
recovery drive.
Use installaon media to restore or reset your PC
Your PC won't start, you haven't created a recovery
drive, and reseng your PC didn't work.
Use installaon media to reinstall Windows 10
You want to reinstall your previous operang
system.
Go back to your previous version of Windows
The wireless keyboard and/or mouse are not
responding.
Replace the AA baeries.
Check that the USB dongle is inserted properly.

20
Specication
Operang system: Windows 10
CPU: Intel Apollo Lake N3350
GPU Processor: Intel® HD Graphics 500
Internal RAM: 4GB
Internal Flash: 32GB
Display: 21.5” Screen
Resoluon: 1920*1080 FULL HD IPS
Memory Card: SD Card up to 128GB
WIFI Module WIFI 802.11b/g/n+BT
I/O: USB 3.0 x2, USB 2.0 x3, 3.5mm
earphone jack, SD card x 1, Ethernet x
1, HDD x1, HDMI x1.
Bluetooth: 4.0
Table of contents


