Entra Health System BLE Smart User manual
BLE Smart™
Blood Glucose Monitoring System
USER MANUAL
P/N: MU-BLE-FDA-EN Rev: 2017JAN24

1
IMPORTANT
Before using the BLE Smart Blood Glucose Monitoring System for the
rst time, read all instructions for use and this User Manual. Consult your
Healthcare Professional to manage your diabetes daily with the BLE Smart
Blood Glucose Monitoring System.
OUR COMMITMENT TO YOU
We understand that self-testing your blood sugar levels provides a way for
you to control your diabetes. As a result, the BLE Smart Blood Glucose
Monitoring System was developed to help you manage your diabetes by the
most comfortable and convenient way possible. Our goal at Entra Health is
to provide you with the best quality products and superior customer service.
If you have any questions or comments, please visit our website at
www.entrahealth.com.
Please contact Customer Support by telephone at +1-877-458-2646 (USA) or
+1-619-684-6232 (International) or by email: [email protected]
INDICATIONS FOR USE
The BLE Smart Blood Glucose Monitoring System (“BLE Smart”) is
comprised of the BLE Smart Meter (with Bluetooth upload capability), BLE
Smart Control Solution, BLE Smart Test Strips and reusable Lancing Device.
The system is intended for the quantitative measurement of glucose (sugar)
in fresh capillary whole blood. Fresh capillary whole blood samples may be
drawn from the ngertips, ventral palm, dorsal hand, upper arm, forearm, calf
and/or thigh. Alternative site testing should be done during steady–state times
(when glucose is not changing rapidly).
BLE Smart Blood Glucose Monitoring System is intended to be used by a
single patient and should not be shared with others.
BLE Smart Blood Glucose Monitoring System is intended for testing outside
the body (in vitro diagnostic use) by people with diabetes at home as an aid
to monitor the eectiveness of diabetes control. It should not be used for the
diagnosis of or screening of diabetes or used on neonates.
BLE Smart Control Solution is for use with the BLE Smart Meter and BLE
Smart Test Strips only. Control solution is used to conrm the meter and test
strips are working together properly.
WARNINGS AND SAFETY INSTRUCTIONS
The Centers for Disease Control and Prevention (CDC) and the US Food and
Drug Administration (FDA) have become increasingly concerned about the
risks for transmitting hepatitis B virus (HBV) and other blood borne pathogens
from shared use of ngerstick (lancing) devices and blood glucose meters.

2
Reports of HBV infection outbreaks linked to diabetes care have been
increasing. Blood glucose meters should be assigned to an individual person
and not be shared.
Fingerstick devices are for single patient use only and should not be shared
with others, including family members. BLE Smart Blood Glucose Monitoring
System comes with a reusable lancing device. The reusable lancing device is
for single patient use only.
Lancets are for single use only. Always use a new, sterile lancet. Always
dispose of used lancets and used test strips in a biohazard container.
Unused supplies and medications should be maintained in a clean area,
separate from used supplies and equipment. Do not carry supplies in your
pockets.
*Guidance for Industry and Food and Drug Administration Sta Blood Lancet
Labeling (November, 2010)
http://www.fda.gov/MedicalDevices/DeviceRegulationandGuidance/
GuidanceDocuments/ucm234577.htm
*CDC Clinical Reminder: Use of Fingerstick Devices on More than One Person
Poses Risk for Transmitting Bloodborne Pathogens (February 2011).
http://www.cdc.gov/injectionsafety/Fingerstick-DevicesBGM.html
*Infection Prevention during Blood Glucose Monitoring and Insulin
Administration http://www.cdc.gov/injectionsafety/blood-glucose-monitoring.
html
Close supervision is required when BLE Smart is used by, on, or near
children, handicapped or disabled individuals.
Do not place the meter in liquid. Keep meter dry at all times. If the
equipment becomes wet, remove the batteries and allow to dry thoroughly.
Do not use other branded products which are not supplied or recommended by
the manufacturer or your healthcare professional.
All parts of the kit are considered bio-hazardous and can potentially transmit
infectious diseases, even after cleaning and disinfection.
Please refer to the cleaning and disinfecting section for care instructions for
the BLE Smart Monitoring System.

3
Do not change your medication based on the BLE Smart meter blood
glucose test results without rst contacting your physician or healthcare
professional.
GENERAL
1. Wash your hands with warm water and soap before testing. Dry your
hands completely before testing.
2. Avoid contamination from hand lotions, oil, dirt or debris on hands, test
strips, lancets, and lancing device. Contamination may aect blood
glucose results.
3. Practice using the BLE Smart system and supplies.
4. Avoid testing in direct sunlight.
5. Store the BLE Smart system and all supplies between 36~86°F (2~30°C)
and 10~85% relative humidity. Keep out of direct sunlight.
6. Store the test strips in their original vial and do not mix test strips.
7. Make a note of the discard date for test strips and control solution.
Discard after 3 months from rst use.
8. Do not bend, cut, or alter test strips.
LIMITATIONS
The BLE Smart System provides accurate results when the following
constraints are observed:
• Use only BLE Smart test strips with the BLE Smart meter.
• Use fresh capillary whole blood only.
• Test strips are for single use only. Do not reuse.
• Dehydration may cause higher glucose test results.
• Inaccurate results may occur when in shock, during illness,
hypotensive, hyperglycemic, or hyperosmolar state, with or without
ketosis.
• Critically ill patients should not be tested with this meter.
• In altitudes higher than 10,000, test results may be aected.
OTHER LIMITATIONS AND INTERFERENCES
BLE Smart test strip results can be used with hematocrit levels in the range
of 25% to 65%. If your hematocrit range is out of the range (25%~65%),
your test results may be lower or higher than the actual value.
Interferences: Acetaminophen, uric acid, ascorbic acid (vitamin C), and
other reducing substances (when occurring in normal blood or normal
therapeutic concentrations) do not signicantly aect results. However,
abnormally high concentrations in blood may cause higher test results.
Lipemic samples; Cholesterol up to 500 mg/dL or triglyceride up to 3000
mg/dL do not signicantly aect results. Values beyond these levels should
be interpreted with caution.

4
• Do not use during or soon after xylose absorption testing. Xylose in the
blood will cause interference.
• Icodextrin does not interfere with BLE Smart test strips.
TABLE OF CONTENTS
About Your BLE Smart Blood Glucose Monitoring System........................4-7
BLE Smart Kit contents.............................................................................4
BLE Smart Meter......................................................................................5
BLE Smart Meter display..........................................................................6
BLE Smart Blood Glucose Test Strip........................................................7
Before You Test........................................................................................7-14
Comparing Your Meter and Laboratory Results........................................8
Initial Meter Set-Up ...................................................................................8
Performing a Control Solution Test..........................................................11
Performing A Blood Glucose Test...........................................................14-19
Performing a blood test with your ngertip...............................................14
Using the lancing device .........................................................................16
Filling the test strip...................................................................................17
Getting your results .................................................................................18
Safe Disposal of used Test Strips and Lancets............................................19
Reviewing Your Test Results...................................................................19-21
Range of Expected Values ......................................................................19
Reviewing Your Blood Sugar Test Results...............................................20
Reviewing Your Averages........................................................................20
Alternate Site Testing .............................................................................21-23
Cleaning and Disinfection.......................................................................23-24
Storage Conditions .................................................................................24-25
Bluetooth Wireless Data Transmission.......................................................24
Battery Installation ......................................................................................25
Troubleshooting Your Meter ...................................................................26-29
MyHealthPoint Account Set-Up ...................................................................29
Warranty .................................................................................................30-31
Declaration of Conformity ............................................................................31
Specications..............................................................................................31
ABOUT YOUR BLE SMART BLOOD GLUCOSE MONITORING
SYSTEM
BLE Smart Kit Contents
1. BLE Smart Meter
2. Reusable Lancing Device
3. Carrying Case
4. 3V Li Batteries (CR2032) (2)

5
5. User Manual
6. Quick Start Guide
NOTE: BLE Smart Blood Glucose Test Strips, BLE Smart Blood Glucose
Control Solutions and Lancets are not included and must be purchased
separately.
BLE Smart Blood Glucose Control Solution is available in three levels: Low,
Normal and High available in one box. To purchase control solution, contact
Customer Support.
USA +1-877-458-2646;
International +1-619-684-6232
Your BLE Smart System packaging is sealed to protect the contents. If you
nd your seal is broken, please return it to the place of purchase.
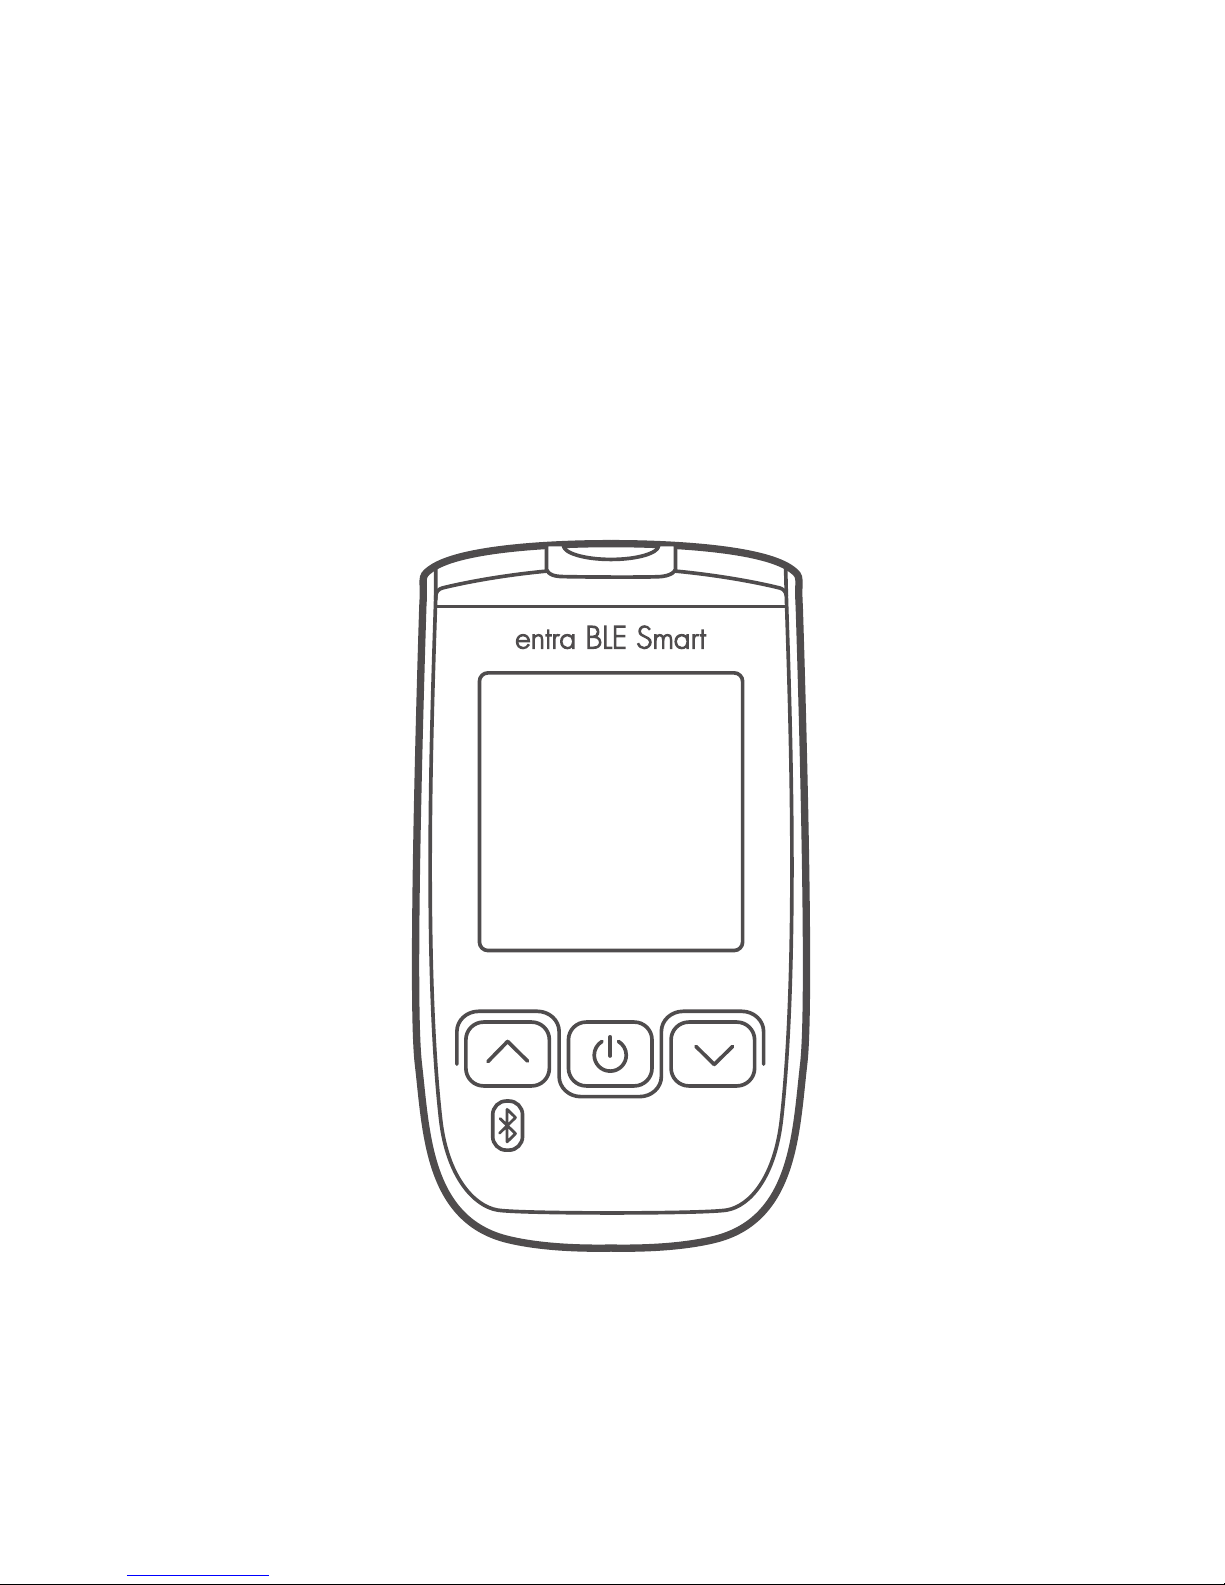
BLE Smart Meter (Front side)
Test Strip Port:
Insert the BLE Smart test strip
here.
Display Screen:
Displays your test results,
symbols, and messages.
Power/Enter Button:
Powers the meter on/o, prompts
memory data and acts as an enter
button during setup and after tests.
Up/Down Buttons:
Scroll up or down to adjust the
settings or retrieve the results in
the memory.
6
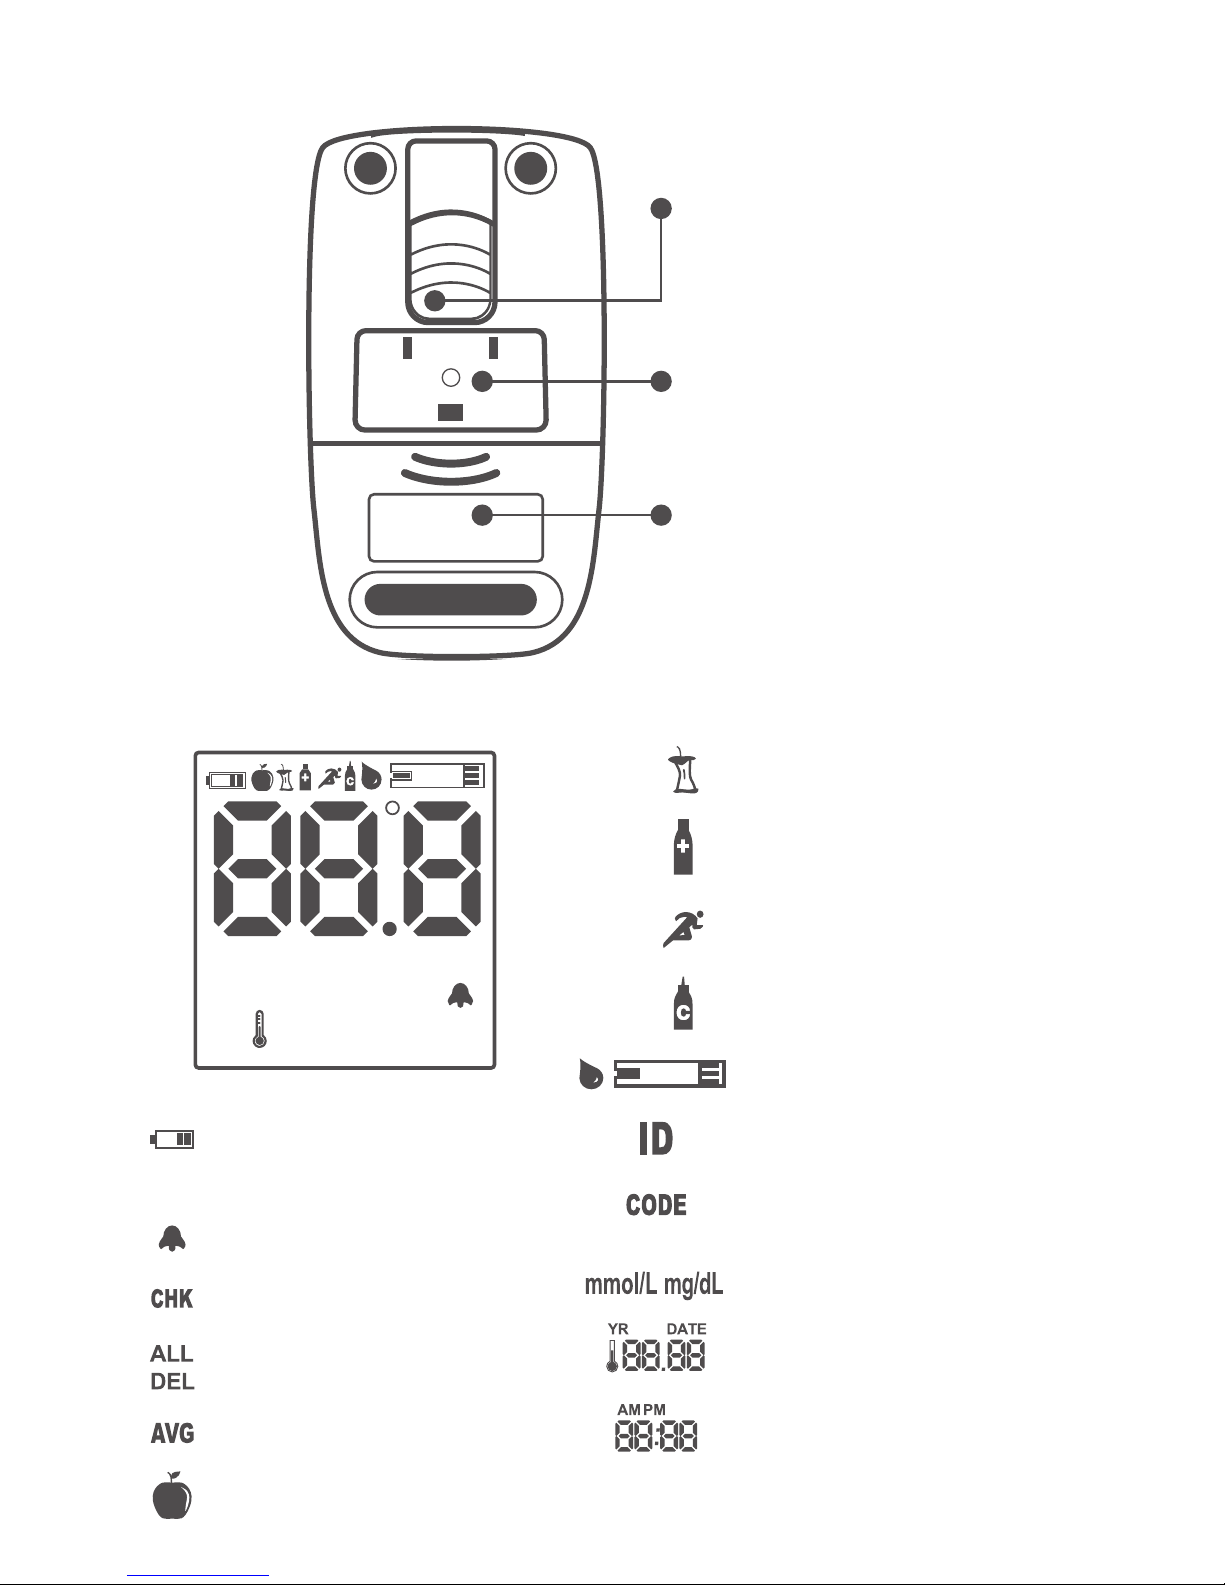
BLE Smart Meter (Back side)
BLE Smart Meter display
Test Strip Ejector:
Releases and
discards test strip.
Serial Number
Battery Cover
88:88
88.88
AMPMDATEYR
ALL
DEL
mmol/L mg/dL
ID CODE
AVG CHK
Low Battery Warning
Symbol
Alarm Symbol
Troubleshooting Symbol
Delete Results
Average Test Result System
Before Having a Meal
After Having a Meal
After Taking Medication
After Sport Activity\
Control Solution Symbol
Blood Drop Symbol for Test
User ID Symbol
Test Strip Code Symbol
Test Result Unit Symbol
Temperature/Date
Time/Test Result Amount
7
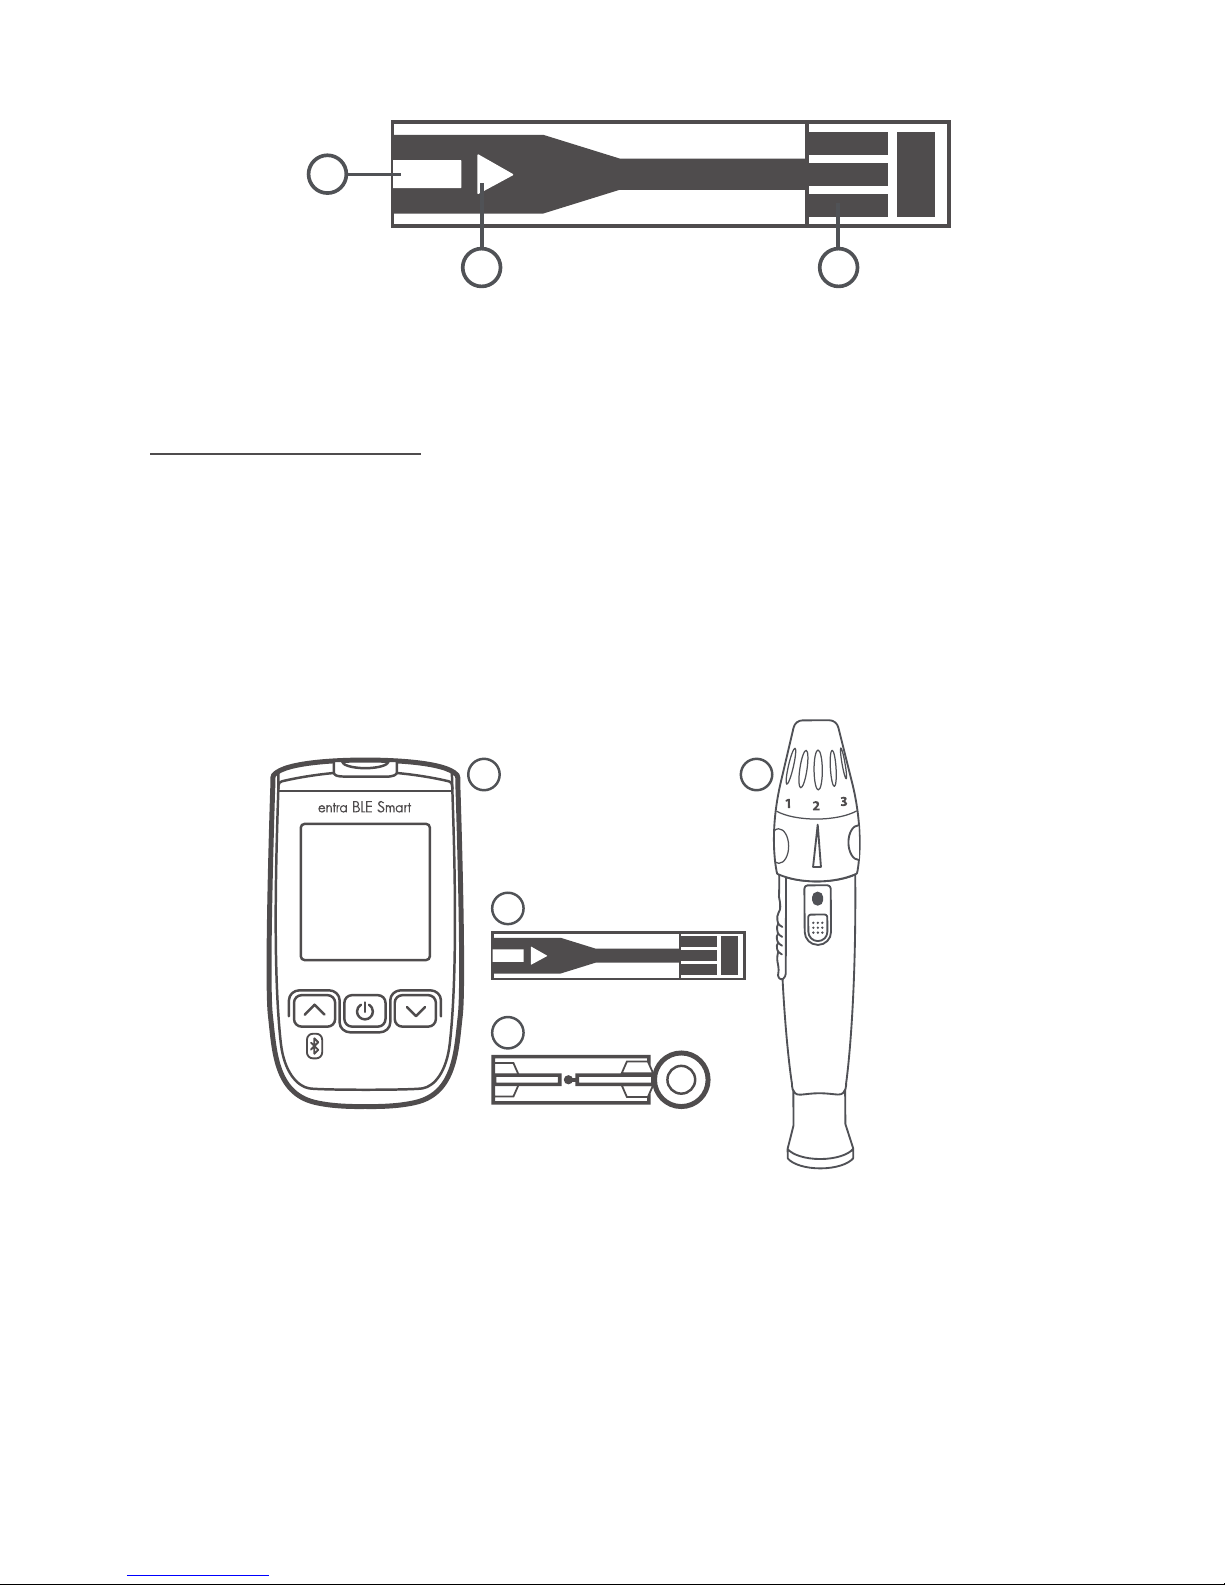
BLE Smart Blood Glucose Test Strip
BEFORE YOU TEST
Read and carefully follow the BLE Smart test strip instructions before using.
Gather all the necessary items to begin testing.
1. BLE Smart Meter
2. BLE Smart Test Strip
3. Reusable Lancing device
4. Sterile lancet
5. Manual (not shown)
If the meter is moved from one temperature to another, allow 30 minutes for
the meter to adjust to the new temperature before testing.
Do not use the BLE Smart Monitoring System in direct sunlight.
WARNING:
1. BLE Smart meter and reusable lancing device is for single patient use
only.
2. Always use a new sterile lancet and a new blood glucose test strip.
3. Lancets and blood glucose test strips are for single use only and should
be properly disposed of after use.
1. Target to apply blood
2. Conrmation window
3. Electrode
3
2
1
1 3
2
4

8
Comparing your meter and laboratory results
Test results with the BLE Smart System are plasma equivalent. This method
will help you and your Healthcare Professional compare your meter results
with laboratory test results. However, your glucose meter results may
dier from your laboratory results due to normal variation. Your glucose
meter results can be aected by factors and conditions that may not aect
laboratory results in the same way.
The following may aect the accuracy of your test results:
1. You are severely dehydrated.
2. Lifestyle habits: Diet or eating patterns. Fasting blood glucose levels
dier from random blood glucose levels.1
3. Hematocrit level above 65% or below 25%.
1 Sacks, D.B.: Carbohydrates.: “Carbohydrates.: Burits, C.A. and Ashwood,
E.R. (ed.), Tietz Textbook of Clinical Chemistry. Philadelphia: W.B.
Saunders Company (1994), 959
If you perform a blood sugar test with the system at a cold temperature near
the low end of the operating range, it may result in a false high blood sugar
result. It’s recommended to repeat the test in a warmer environment with a
new test strip.
For additional information on possible limitations for validity and precision,
please refer to your BLE Smart test strip insert.
In order to make the most accurate comparison to your laboratory results,
please follow a few basic guidelines:
Before going to the lab:
- Do not eat for at least two hours before you test your blood.
- Take your meter with you to the lab.
While at the lab:
- Perform a blood sugar test with your meter within 30 minutes after blood is
drawn from the lab technician.
- Use only fresh capillary whole blood from the ngertip.
You may still experience a dierence from the laboratory test results
because blood sugars can change very rapidly over a short period of time.
This can be caused by a variety of reasons such as exercise, medication,
stress or dehydration.
Initial meter set-up
The BLE Smart meter has a wide variety of functions. In the setup mode
you have the ability to turn ON or OFF activity/meal ags, set the date/time,
adjust the number of days for your glucose average calculation and set up
9
to ve daily alarms.
Settings: Year, Activity, Date/Time, Temperature, Average Glucose,
Alarms and Sending a Reading
The year can range from 2015 to 2099.
User Activity
Option
Press and release
the or buttons
to turn the User
Activity Option on/
o. Conrm by
pressing .
Date / Time
Use the
or buttons
to set the date and
time. Conrm both
by pressing .
Temperature
To view the ambient
temperature in °F or
°C, use the or
buttons. Conrm by
pressing .
Year
Press and release
the or buttons
to set the year.
Conrm by
pressing .
Power On
Press and at
the same time for
3 seconds or until
the meter beeps.
Number of days
for average
Use the
or buttons
to set the number
of days (1~99)
for average
calculation. Conrm
by pressing .
YR

10
Set the number of days that you would like to calculate your average glucose.
The number of days can range from 1 to 99 days. To increase or decrease
the number of days, press the or arrows. You have three options to set
the number of days. The meter default settings are 7 days, 14 and 21 days.
Precaution
1. Your BLE Smart Meter is pre-set to measure in mg/dL by default. If
you need your meter set to another unit of measure (mmol/L), please
contact Customer Support. USA & Canada: +1-877-458-2646.
International: +1-619-684-6232 or email [email protected]
2. If the Date is not set properly, the average glucose test results in the
memory will not calculate the proper values. It is recommended you
set up the glucose meter before you use it and when new batteries are
installed.
3. Blood glucose testing cannot be performed while in Set-up mode.
4. To turn the meter o during the set up, press and hold for 5 seconds
or until the meter beeps.
Alarm time
Use the
or buttons to
set the alarm hour
and minute, conrm
by pressing .
Alarm
After programming
the number of
desired alarms
(5 alarms are
available), exit set-
up by pressing .
Strip Eject
Select ON to activate test
strip eject transmit. Conrm
by pressing .
SEnd
Alarm on / o
Use the or
buttons to turn
the alarm on/o.
Conrm by pressing
ajks.

11
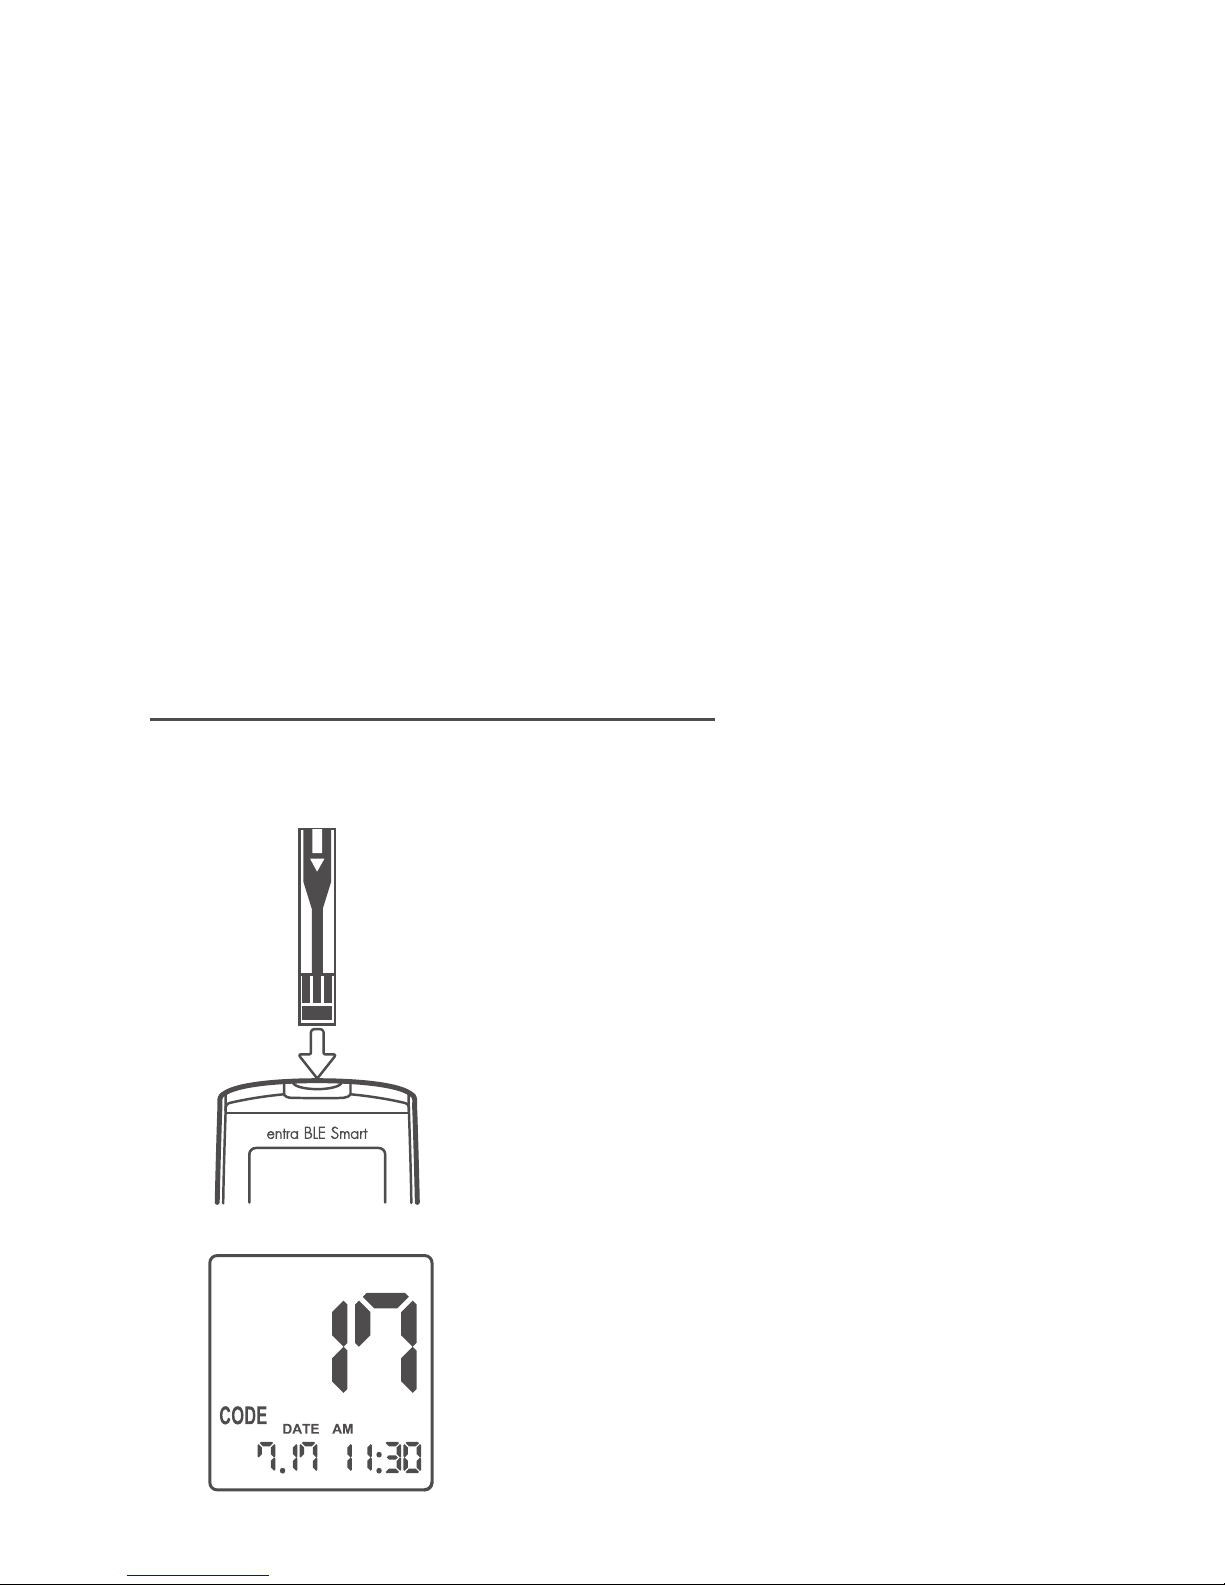
Auto-Coding
IMPORTANT
1. Do not bend the test strip.
2. Verify the code displayed on the Display Screen matches the code on
your test strip vial.
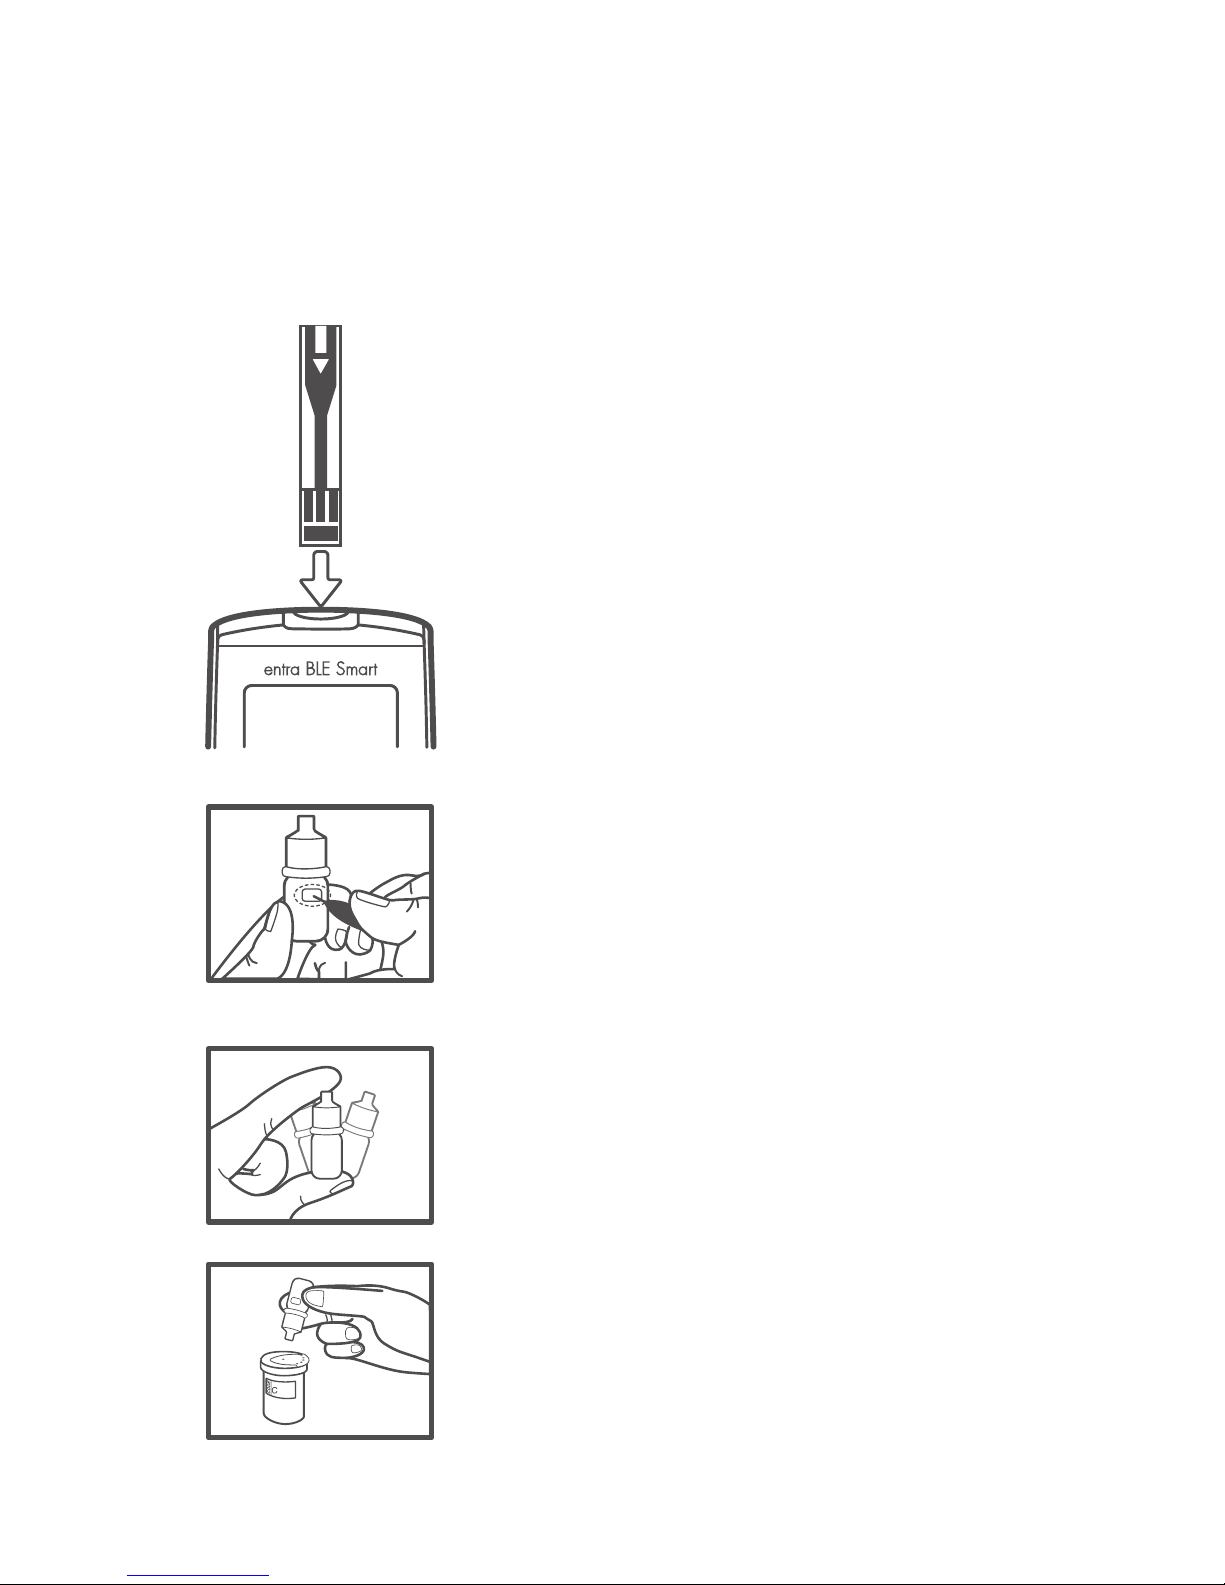
Performing a Control Solution Test
Refer to the BLE Smart Control Solution Instructions for Use. Control
solution contains a known amount of glucose that reacts with the BLE
Smart Test Strip. By comparing your control solution test results with the
expected range printed on the test strip vial, you can verify the meter and
test strips are working properly, and you are performing the test properly.
It is very important to perform a control solution test routinely to ensure
accurate results and to conrm proper performance of the system.
CODE
11:307.17
AMDATE
17
1. BLE Smart Meter has automatic
test strip code recognition.
2.The BLE Smart Meter
recognizes the test strip code
automatically. This convenient
feature eliminates the need to set
the test strip code on the meter
with every new box of test strips.
CODE
11:307.17
AMDATE
17
17
12
A control solution test should be performed:
• Whenever you suspect the blood glucose test meter or blood glucose
test strip are not functioning properly.
• If your blood glucose test results are not consistent with your symptoms
or if you think they are not accurate.
• If you have dropped the blood glucose test meter.
• To teach someone or to learn how to use the meter properly.
1. With the meter OFF, rmly insert the
test strip into the test strip port with the
arrow pointed toward the meter and
visible from the front of the meter.
NOTE: Do not insert the test strip
upside down.
2. When you insert the test strip into
meter port, the meter will automatically
turn ON and the test strip code will be
displayed.
3. Check the expiration date before
performing a control solution test.
Make a note of the expiration date on
the control solution bottle when rst
opened. Do not use if expired. Discard 3
months after opening.
4. Gently shake the control solution
before use.
5. Discard the 1st drop of control
solution, this will eliminate any residue.
Place a drop of control solution on a
clean, dry surface (e.g. the lid of the test
strip vial)
17

13
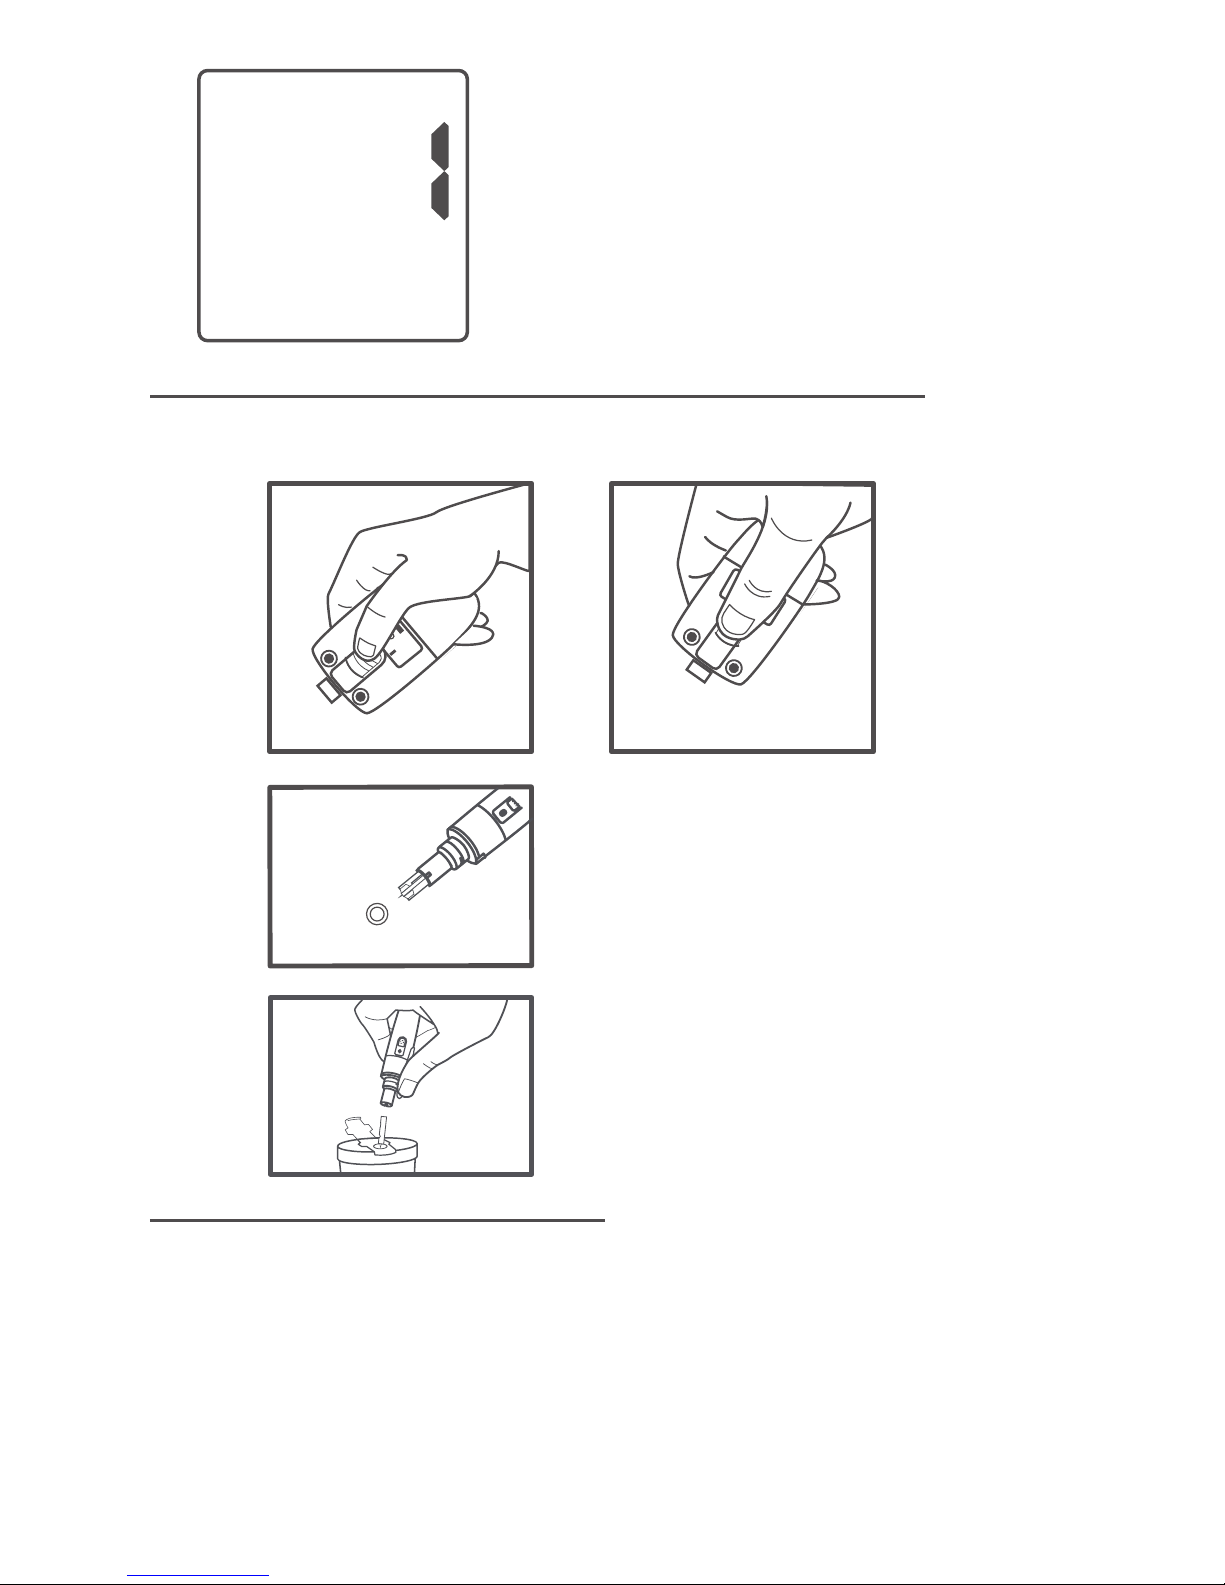
6. Touch the test strip to the control
solution.
Results will appear in 5 seconds.
Compare the result to the range
printed on the test strip vial. The
result should fall within that range.
17
11:30
7.
17
AM
DATE
The control solution bottle icon contains the letter ‘C’ so it will not to
be confused with the medication bottle icon. This icon allows you to
dierentiate between a test done with control solution and an actual blood
test.
NOTE: The ranges pictured above are examples only. Please refer to your
BLE Smart test strip vial label for the exact ranges.
7. If the user activity/meal feature is
ON
- Scroll through the icons with the
or buttons until the control solution
bottle blinks, then press .
8. If the activity/meal feature is OFF
- Press and release either the or
button. The control solution bottle will
appear. Press to select.
X.X-X.X
X.X-X.X
XX.X-XX.X
XX-XX
XX-XXX
XXX-XXX
BLE Smart
Control Solution
(LOW)
BLE Smart
Control Solution
(NORMAL)
BLE Smart
Control Solution
(HIGH)
14
STORAGE AND HANDLING
- It is recommended control solution is stored at 46~86°F (8~30°C) before
testing.
- Check the expiration date before performing a glucose control solution
test.
- Do not use if expired. Once opened, the control solution expires after 3
months.
Precaution
If your control solution test falls out of range, follow the next steps.
• Try another control solution test. If this test falls out of range, try another
control solution test with a new unopened bottle of test strips.
• Check the expiration dates on all the products you are using. Be sure
you are using only BLE Smart control solution.
• After following the appropriate steps and the control solution test still
falls out of range, do not perform a glucose test. Contact customer
support, USA & Canada: +1-877-458-2646. International: +1-619-684-
6232 or email [email protected].
PERFORMING A BLOOD GLUCOSE TEST
Performing a blood test with your ngertip
1. With the meter OFF, rmly insert the test
strip into the test strip port on the meter
with the arrow pointed toward the meter
and visible from the front of the meter.
NOTE: Do not insert the test strip upside
down or backwards.
2. When you insert the test strip into the
meter port, the meter will automatically
turn ON and the test strip code will be
displayed.
3. Verify the code displayed on the meter
matches the code on the test strip vial. The
BLE Smart meter automatically recognizes
the test strip code.

15
Precaution
1. If the code is not displayed on the meter within a short amount of time,
slide the test strip ejector to discard the test strip. Restart the procedure
with a new test strip.
2. If the code on the display screen and the code on the test strip vial do
not match, try another unused BLE Smart Blood Glucose Test Strip. If
the mismatch persists, contact Customer Support.
3. If you apply your blood sample before the blood symbol blinks on the
display screen, an Er5 message will appear on the screen. Begin your
test from the beginning with a new test strip.
SAFETY WARNING
1. BLE Smart meter and reusable lancing device are for single patient use
only. Do not share your supplies with anyone, including other family
members.
4. A blinking test strip will appear in the
top right corner indicating the meter is
ready for testing.
7. If the user activity/meal feature is OFF,
then your test result will display in ve (5)
seconds.
5. Lance the clean ngertip with the
lancing device. BLE Smart meter requires
0.5 ul sample volume only.
Bring the edge of the test strip to the drop
of blood.
The blood will be automatically ‘drawn’ into
the test strip channel.
• When your blood sample size is
enough, your meter will sound an
audible “beep.” Do not remove your
nger from the test strip until you hear
the beep sound. The test result will
display in ve (5) seconds.
6. If the user activity/meal feature is ON,
choose the desired activity/meal ags
( ) by pressing and releasing the
or button to select the activity that
will correlate with your results. Then press
and release the power button ( ) to
select that activity.

16
2. All parts of the kit are considered to be bio-hazardous and can
potentially transmit infectious disease, even after cleaning and
disinfection.
3. Refer to the cleaning and disinfecting your BLE Smart Monitoring
System on Page 10.
4. Wash your hands thoroughly with soap and clean water after handling
the meter, reusable lancing device and/or test strip.
Using the Lancing Device
Follow the Lancing Device Instructions for Use prior to using.
1. Unscrew the cap of the
reusable lancing device.
2. Insert a new sterile
lancet into the reusable
lancing device.
3. Twist o the protective
cover.
Do not discard.
4. Put the cap back on
the lancing device and
screw it tightly.

17
5. Adjust the depth setting:
1-2 for soft skin
3-4 for average skin
5 for thick or calloused skin.
7. Place the lancing device on
the skin and hold rmly. Press
the release button to activate.
Remove the device to collect
the blood sample.
6. Pull back on the end of the
lancet device to prepare for
lancing.
8. If the blood smears or runs, wipe away and gently squeeze another drop
or puncture a new site
.
Filling the Test Strip
INCORRECT COMPLETELY FILLED
Incorrectly Filled; Do Not Apply Blood to Top of
Strip
Correctly Filled; Applying Blood to End of Strip

18
IMPORTANT
1. If the countdown does not start, do not add more blood to the glucose
test strip. Discard the glucose test strip and begin the test procedure
again.
2. If you do not conduct the test within 3 minutes, the meter will
automatically power OFF. Begin the test procedure again.
3. If the blood sample is not completely lled, the error code (Er3) will
appear to indicate insucient sample.
Precaution
1. If the test result is out of the test range, the Hi/Lo message will be
displayed on the meter. Repeat the test and if Hi/Lo message persists,
contact Customer Support.
2. Used blood glucose test materials may contain blood borne pathogens
that could transmit disease to others. Please contact your Healthcare
Provider for instructions on disposal of your glucose test strips and
lancets.
Your Test Results
• After the beeping sound, the meter will count down ve (5) seconds and
your test results will be displayed.
• The display will alternate between the date and ambient temperature.
19
SAFE DISPOSAL OF USED TEST STRIPS AND LANCETS
Once the test is complete, push the strip ejector button forward to remove
the test strip from the meter.
REVIEWING YOUR TEST RESULTS
Range of Expected Values
The fasting adult blood glucose range for a person without diabetes:
Before meals < 100 mg/dL
After meals < 140 mg/ dL
Reference: American Diabetes Association: Diabetes Care, 2015;
38(Supplement 1):S8-S16
c
• Eject the test strip to automatically
begin Bluetooth transmission to your
phone, tablet or laptop. When the meter
successfully pairs to a device it will display
a “C” to conrm the paired and connected
status.
Unscrew the cap of the
lancing device and push the
needle into the protective
cover that was removed
during preparation of the
lancet.
Push the lancet ejector
forward until the lancet is
removed. Dispose of the
used lancet according
to instructions from your
Healthcare Professional.
Table of contents
Other Entra Health System Blood Glucose Meter manuals


