Freestyle LIBRE PRO User manual

Operator’s Manual
FLASH GLUCOSE MONITORING SYSTEM
CAUTION: Federal law restricts this device
to sale by or on the order of a physician.
Spine depth for perfect binding will be determined by supplier.
ART26944_rev-C_cover.indd 1 9/23/16 9:02 AM

Contents
Reader Symbols ......................................... 1
Important Safety Information........................... 2
Indications for Use........................................ 2
Contraindications ........................................ 3
Getting to Know the System............................. 7
Reader Kit . . . . . . . . . . . . . . . . . . . . . . . . . . . . . . . . . . . . . . . . . . . . . . . 8
Sensor Kit ................................................ 9
FreeStyle Libre Pro Software .............................11
Setting up the Reader for the First Time................12
Using the Sensor . . . . . . . . . . . . . . . . . . . . . . . . . . . . . . . . . . . . . . . 14
Applying the Sensor .....................................15
Starting the Sensor . . . . . . . . . . . . . . . . . . . . . . . . . . . . . . . . . . . . . . 19
Patient Wear.............................................21
Getting Sensor Data .....................................22
Removing the Sensor . . . . . . . . . . . . . . . . . . . . . . . . . . . . . . . . . . 25
Charging the Reader . . . . . . . . . . . . . . . . . . . . . . . . . . . . . . . . . . . 26
ART26944_rev-C_manual.indd 1 9/23/16 9:19 AM

Reader Symbols
Symbol What It Means
View previous/next screen
Options
Low battery
Battery charging
Conrm Sensor reminder
Communication strength
Data to report
Reader Options.........................................27
Maintenance and Disposal .............................30
Troubleshooting . . . . . . . . . . . . . . . . . . . . . . . . . . . . . . . . . . . . . . . 31
Reader Does Not Power On . . . . . . . . . . . . . . . . . . . . . . . . . . . . . . 31
Problems at the Sensor Application Site ..................32
Problems Starting the Sensor . . . . . . . . . . . . . . . . . . . . . . . . . . . . 33
Problems Getting Sensor Data . . . . . . . . . . . . . . . . . . . . . . . . . . . 34
Reader Error Messages...................................36
Perform a Reader Test....................................37
Customer Service........................................37
System Specications . . . . . . . . . . . . . . . . . . . . . . . . . . . . . . . . . . 38
Labeling Symbols . . . . . . . . . . . . . . . . . . . . . . . . . . . . . . . . . . . . . . 42
Performance Characteristics . . . . . . . . . . . . . . . . . . . . . . . . . . . 44
Electromagnetic Compatibility.........................64
Limited Warranty.......................................74
1
ART26944_rev-C_manual.indd 2-1 9/23/16 9:19 AM

Important Safety Information
Indications for Use
The FreeStyle Libre Pro Flash Glucose Monitoring System is a professional
continuous glucose monitoring (CGM) device indicated for detecting trends
and tracking patterns in persons (age 18 and older) with diabetes. The System
is intended for use by health care professionals and requires a prescription.
Readings from the FreeStyle Libre Pro Sensor are only made available to
patients through consultation with a health care professional. The System
does not require user calibration with blood glucose values.
The FreeStyle Libre Pro System aids in the detection of glucose level
excursions above or below the desired range, facilitating therapy adjustments.
Interpretation of the FreeStyle Libre Pro Flash Glucose Monitoring System
readings should be based on the trends and patterns analyzed through time
using the reports available.
IMPORTANT: The device may inaccurately indicate hypoglycemia.
The results of the clinical study conducted for this device
showed that 40% of the time when the device indicated that
user sensor glucose values were at or below 60 mg/dL, user
glucose values were actually in the range of 81-160 mg/dL.
Therefore, interpretation of the FreeStyle Libre Pro Flash Glucose
Monitoring System readings should only be based on the trends
and patterns analyzed through time using the reports available
per the intended use.
Contraindications
The FreeStyle Libre Pro Flash Glucose Monitoring System
must be removed prior to Magnetic Resonance Imaging (MRI),
Computed Tomography (CT) scan, or high-frequency electrical
heat (diathermy) treatment. The eect of MRI, CT scans, or
diathermy on the performance of the System has not been
evaluated. The exposure may damage the Sensor
and may impact proper function of the device to detect
trends and track patterns in the user’s glucose values during
the wear period.
WARNING: The FreeStyle Libre Pro Flash Glucose Monitoring
System contains small parts that may be dangerous if
swallowed.
CAUTION:
• Performance of the System when used with other implanted
medical devices, such as pacemakers, has not been evaluated.
• Some individuals may be sensitive to the adhesive that
keeps the Sensor attached to the skin. If your patient notices
signicant skin irritation around or under their Sensor, they
should remove the Sensor and stop using the FreeStyle Libre
Pro System. Follow your facility’s procedures for handling
skin reactions.
2 3
ART26944_rev-C_manual.indd 2-3 9/23/16 9:19 AM

Warnings/Limitations
• Review all product information before use.
• Physiologic dierences between the interstitial uid and capillary blood
may result in dierences in glucose readings. Dierences in glucose
readings between interstitial uid and capillary blood may be observed
during times of rapid change in blood glucose, such as after eating,
dosing insulin, or exercising.
• Severe dehydration and excessive water loss may cause inaccurate
results.
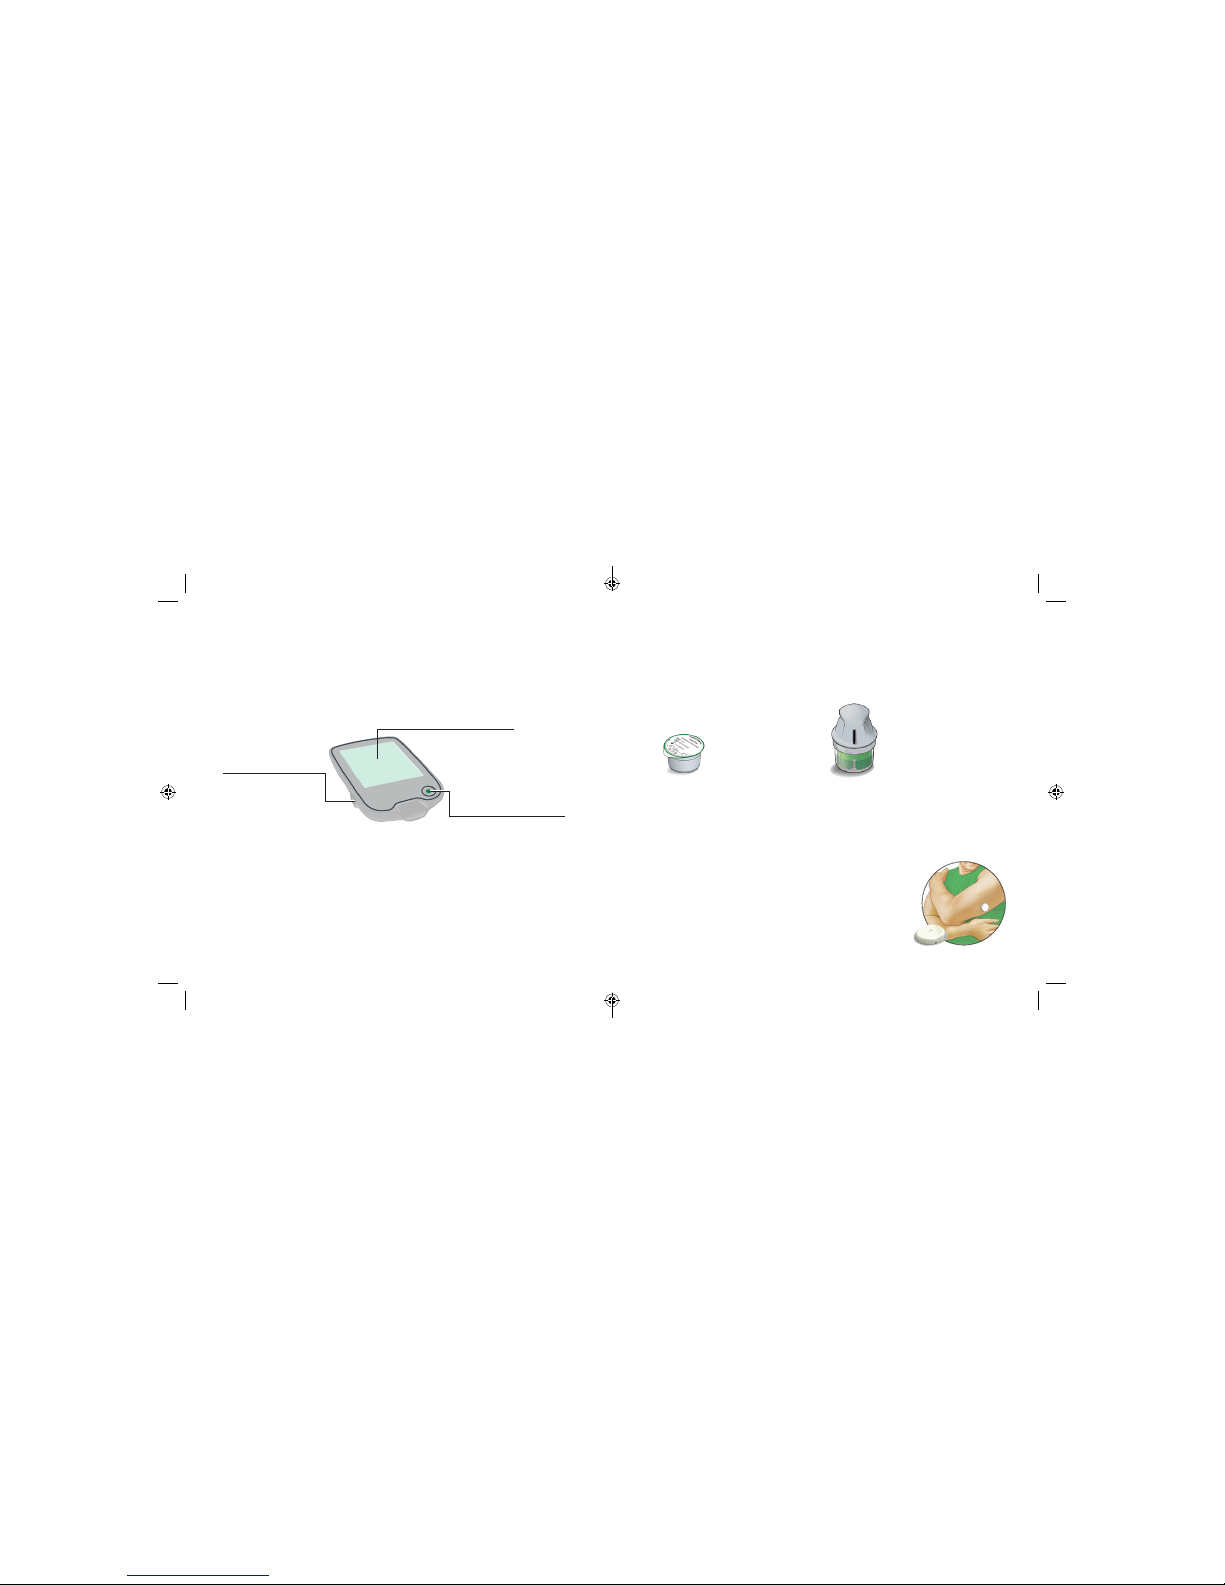
• Do not reuse Sensors. The Sensor and Sensor Applicator are designed
for single use. Reuse may result in no glucose readings and infection.
Not suitable for re-sterilization. Further exposure to irradiation may
cause inaccurate results.
• Interfering Substances: Taking ascorbic acid (vitamin C) while wearing
the Sensor may falsely raise Sensor glucose readings. Taking salicylic
acid (used in some pain relievers such as aspirin and some skin care
products) may slightly lower Sensor glucose readings. The level of
inaccuracy depends on the amount of the interfering substance active
in the body. Test results did not indicate interference for methyldopa
(used in some drugs to treat high blood pressure) or tolbutamide
(infrequently used in some drugs to treat diabetes in the US) at
maximum circulating levels. However, concentrations of potential
interferents in interstitial uid are unknown compared to circulating
blood. Taking medications with acetaminophen (such as Tylenol and
some cold medicines) while wearing the Sensor may falsely raise
Sensor glucose readings. The level of inaccuracy depends on the
amount of acetaminophen active in the body and may be dierent for
each person.
• Take standard precautions for transmission of blood borne pathogens
to avoid contamination.
• The Reader should be cleaned between patients.
• If a Sensor breaks inside a patient, remove with tweezers, treat any
medical complications and call Customer Service.
• Use of the System is not recommended in the critically ill population
since performance is unknown due to dierent conditions and
medications.
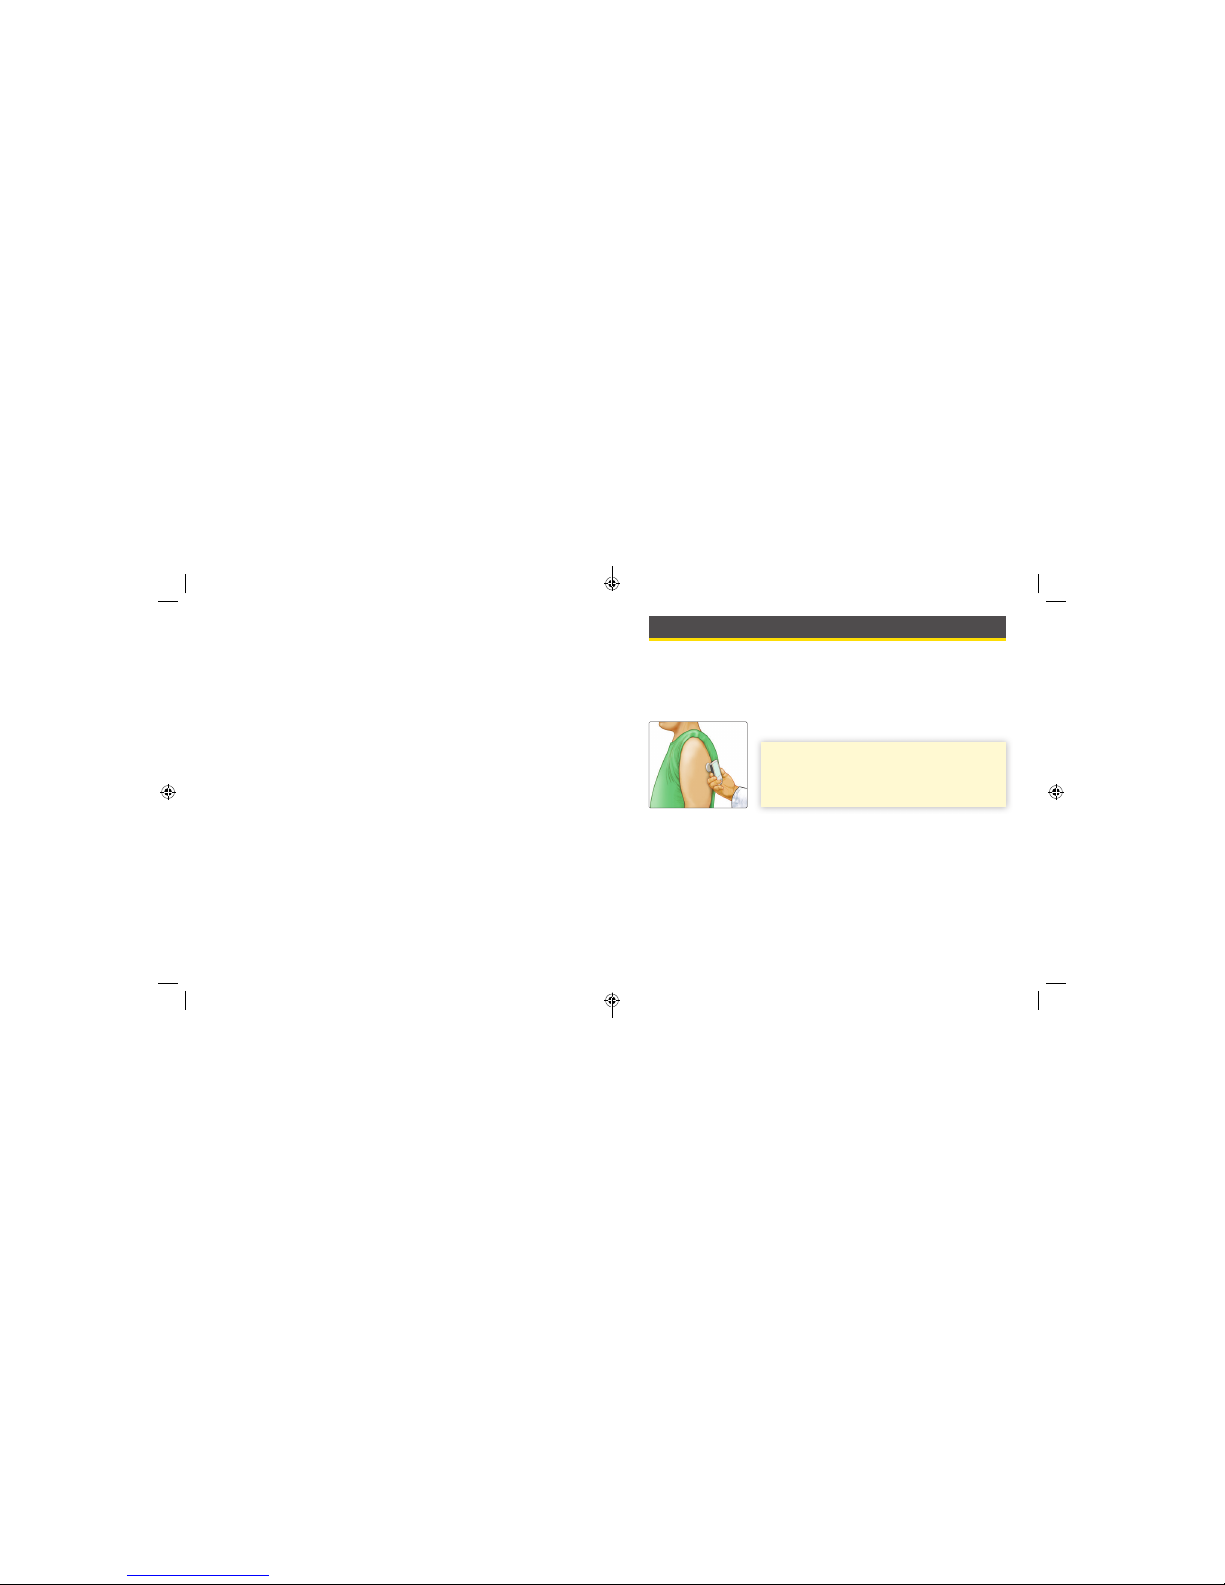
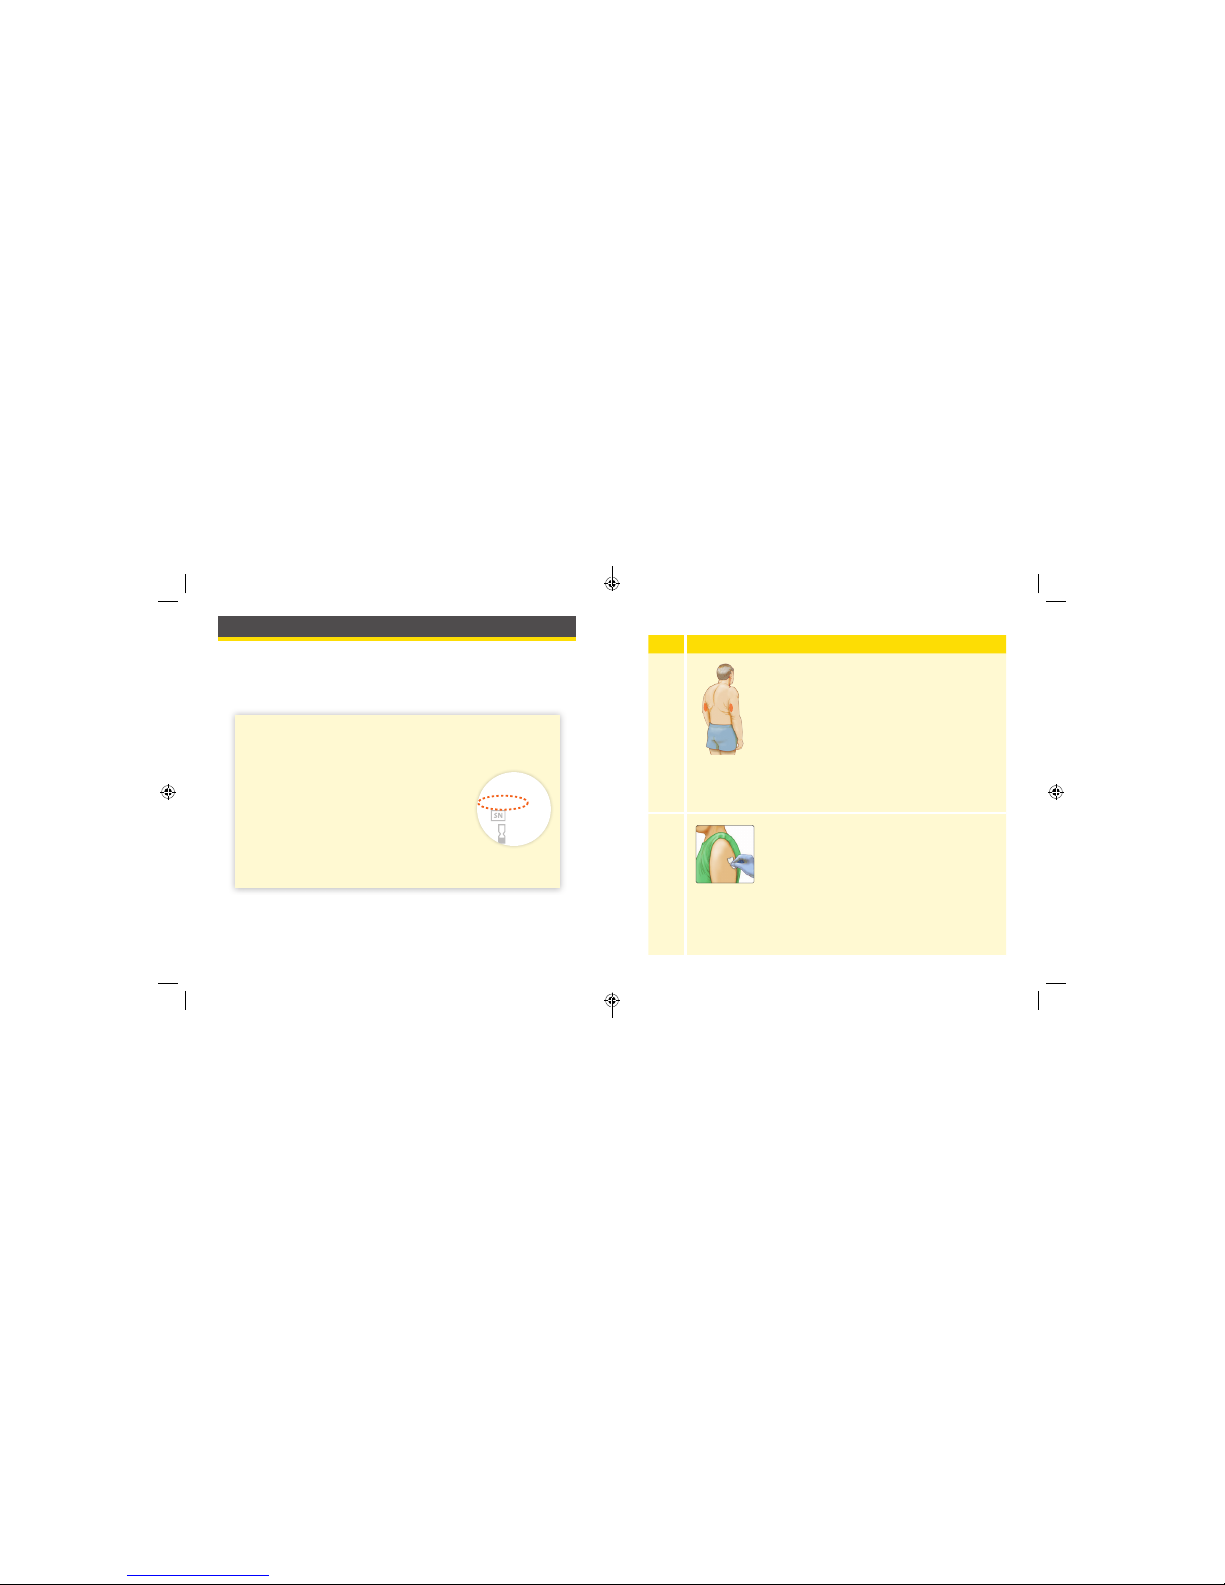
• Sensor placement is not approved for sites other than the back of the
arm. If placed in other areas, the Sensor may not function properly.
• If the Sensor Kit package or contents or the Reader appear to be
damaged, do not use as there may be a risk of electric shock, no results,
and/or infection.
• Store the Sensor Kit between 39°F-77°F. While you don’t need to keep
the Sensor Kit in a refrigerator, you can as long as the refrigerator is
between 39°F-77°F.
• Store the Sensor Kit between 10-90% non-condensing humidity.
• The System does not provide real-time results. Patients need to rely on
blood glucose readings for monitoring glucose during System use.
• Clean hands prior to Sensor handling/insertion to help prevent
infection.
4 5
ART26944_rev-C_manual.indd 4-5 9/23/16 9:19 AM

• Clean the application site and ensure that it is dry prior to Sensor
insertion. This helps the Sensor stay attached to the body.
• Change the application site for the next Sensor application to prevent
discomfort or skin irritation.
• Select an appropriate Sensor site to help the Sensor stay attached to the
body and prevent discomfort or skin irritation. Avoid areas with scars,
moles, stretch marks, or lumps. Select an area of skin that generally stays
at during normal daily activities (no bending or folding). Choose a site
that is at least 1 inch away from an insulin injection site.
• The Sensor should not be worn more than 14 days. Readings are not
obtained after 14 days.
• The Sensor should be removed prior to exposing it to an X-ray machine.
The eect of X-rays on the performance of the system has not been
evaluated. The exposure may damage the Sensor and may impact
proper function of the device to detect trends and track patterns in the
user’s glucose values during the wear period.
• The FreeStyle Libre Pro Flash Glucose Monitoring System has not been
evaluated for use in pregnant women, persons on dialysis, or people less
than 18 years of age.
Getting to Know the System
The FreeStyle Libre Pro Flash Glucose Monitoring System has three main
parts: a handheld Reader, a disposable Sensor, and FreeStyle Libre Pro
software. A single FreeStyle Libre Pro Reader can be used to gather data
from FreeStyle Libre Pro Sensors on multiple patients.
When opening the Reader Kit and Sensor Kit, check that the contents
are undamaged and that you have all parts listed. If any parts are missing
or damaged, contact Customer Service.
IMPORTANT: Safety information about the
System is in this Operator’s Manual. Read all of
the information in the Operator’s Manual before
using the System.
6 7
ART26944_rev-C_manual.indd 7 9/23/16 9:19 AM

Reader Kit
The Reader Kit includes:
• FreeStyle Libre
Pro Reader
• USB Cable
• Power Adapter
• Operator’s Manual
• Quick Start Guide
The Reader is used to start the Sensor on a patient and gather their
glucose readings. Multiple patients can have their Sensor started by the
same Reader.
USB Port
Used to charge the
Reader and connect
it to a computer.
Touchscreen
Home Button
Turns the Reader on/o
and takes you to the
Home Screen from any
other screen.
Sensor Kit
The Sensor Kit includes:
• Sensor Pack
• Sensor Applicator
• Alcohol wipe
• Product insert
Sensor Pack
Used with the Sensor Applicator to
prepare the Sensor for use.
Sensor Applicator
Applies the Sensor to the patient’s body.
The Sensor measures and stores glucose readings when worn on the
body. It initially comes in two parts: one part is in the Sensor Pack and
the other part is in the Sensor Applicator. By following the
instructions, prepare and apply the Sensor on the back
of the patient’s upper arm. The Sensor has a small,
exible tip that is inserted just under the skin. The
Sensor can be worn for up to 14 days.
Sensor
Measures glucose while on body
(only visible after applied).
8 9
ART26944_rev-C_manual.indd 8-9 9/23/16 9:19 AM

FreeStyle Libre Pro Software
FreeStyle Libre Pro software can be used to create reports based on
glucose readings from the most recently downloaded Sensor. The
software is compatible with most Windows and Mac operating systems.
Go to www.FreeStyleLibrePro.com and follow onscreen instructions to
download and install the software.
INTENDED USE
The FreeStyle Libre Pro software is intended for use by health
care professionals to aid in the review, analysis and evaluation of
a patient’s glucose readings uploaded from the FreeStyle Libre
Pro Flash Glucose Monitoring System in support of an eective
diabetes health management program.
The Reader Home Screen provides access to starting a new Sensor, getting
Sensor data, and information about the System.
Home Screen
10:23pm
Start New
Sensor
Get Sensor
Data
Time
Current time set on
the Reader.
Battery Level
Battery charge remaining.
Options
Touch to view or change
the Reader’s options.
Get Sensor Data
Touch to download all
glucose readings from the
Sensor into the Reader.
Start New Sensor
Touch to start a new
Sensor.
10 11
ART26944_rev-C_manual.indd 10-11 9/23/16 9:19 AM

Step Action
4Set the Current Time. Touch next to continue.
5
mg
dL
80 to 140
back next
Target Glucose
Range
?Set the Target Glucose Range. Touch next to
continue.
Note: The Target Glucose Range is displayed on
the Daily Graph on the Reader once Sensor data
has been downloaded. While the glucose data
are gathered in the System range of 40-500 mg/dL,
the Daily Graph display range is 0-350 mg/dL for
ease of review on screen.
6
doneback
While using the Reader, press
the Home button to return to
the Home screen.
The Reader now indicates how to return to the
Home Screen from any other screen. Touch done
to go to the Home Screen.
Note: Charge the Reader if the battery level is low. Only use the USB
cable and power adapter included with the System.
12am 00
back next
Current Time
CAUTION: It is very important to set the time
and date correctly for correct interpretation
of Sensor data.
Setting up the Reader for the First Time
Before using the System for the rst time, the Reader must be set up.
Step Action
1Press the Home Button to turn on the Reader.
2If prompted, use the touchscreen to select your
preferred language for the Reader. Touch OK to
continue.
Note: Use the pad of your nger. Do NOT use
your ngernail or any other object on the screen.
3Set the Current Date using the arrows on the
touchscreen. Touch next to continue.
11
back next
Current Date
June
2017
12 13
ART26944_rev-C_manual.indd 12-13 9/23/16 9:19 AM

Applying the Sensor
Step Action
1Apply Sensors only on the back of your patient’s
upper arm. Avoid areas with scars, moles, stretch
marks, or lumps.
Select an area of skin that generally stays at
during normal daily activities (no bending or
folding). Choose a site that is at least 1 inch
(2.5 cm) away from an insulin injection site.
To prevent discomfort or skin irritation, you
should select a dierent site other than the
one most recently used.
2Clean application site with an alcohol wipe and
allow site to dry before proceeding. This helps
the Sensor stay attached to the body.
Note:The area MUST be clean and dry, or the
Sensor may not stick to the site.
Using the Sensor
After you assemble and apply the Sensor to your patient’s body, start
the Sensor with the Reader and conrm it is working. The Sensor stores
glucose readings every 15 minutes for up to 14 days. The rst reading is
stored 1 hour after the Sensor is successfully started.
CAUTION:
The Sensor Pack and Sensor Applicator are packaged as a set
(separately from the Reader) and have the same Sensor code.
Check that the Sensor codes match before using
the Sensor Pack and Sensor Applicator. Sensor
Packs and Sensor Applicators with the same
Sensor code should be used together or
Sensor glucose readings may be incorrect.
CODE
FreeStyle Libre
Sensor Pack
A
b
b
o
t
t
D
i
a
b
e
t
e
s
C
a
r
e
L
t
d
.
R
a
n
g
e
R
o
a
d
,
W
i
t
n
e
y
,
O
x
o
n
,
O
X
2
9
0
Y
L
,
U
K
D
O
C
3
0
3
9
1
R
e
v
.
B
0
9
/
1
3
XXXXXXXXX
XXX
YYYY-MM-DD
14 15
ART26944_rev-C_manual.indd 14-15 9/23/16 9:19 AM

Step Action
6The Sensor Applicator is prepared and ready to
apply the Sensor.
7Place the Sensor Applicator over the prepared
site and push down rmly to apply the Sensor to
the body.
CAUTION: The Sensor Applicator now
contains a needle. Do NOT touch inside the
Sensor Applicator or put it back into the
Sensor Pack.
CAUTION: Do NOT push down on the Sensor
Applicator until placed over prepared site to
prevent unintended results or injury.
Step Action
3Open the Sensor Pack by peeling the lid o
completely. Unscrew cap from the Sensor
Applicator and set the cap aside.
4Line up the dark mark on the Sensor Applicator
with the dark mark on the Sensor Pack. Press
rmly down on the Sensor Applicator until it
comes to a stop.
5Lift the Sensor Applicator out of the Sensor Pack.
Lid
Cap
CAUTION: Do NOT use if the Sensor Pack or
the Sensor Applicator seem to be damaged
or already opened. Do NOT use if past
expiration date.
16 17
ART26944_rev-C_manual.indd 16-17 9/23/16 9:19 AM

Starting the Sensor
Step Action
1Press the Home Button to turn on the Reader.
2Touch Start New Sensor.
3Hold the Reader within 1.5 inches (4 cm) of the
Sensor to start it. If sounds are turned on, the
Reader beeps when the Sensor has been started.
You can check the Sensor has successfully started
in 2 minutes.
Note: If communication is not established within
15 seconds, the Reader displays a prompt to try
again. Touch OK to return to the Home Screen
and touch Start New Sensor to start the Sensor.
10:23pm
Start New
Sensor
Get Sensor
Data
Check Sensor status
when prompted in:
minutes
OK
Sensor Starting
2
Step Action
8Gently pull the Sensor Applicator away from the
body. The Sensor should now be attached to the
skin.
Note: Applying the Sensor may cause bruising
or bleeding. If there is bleeding that does not
stop, remove the Sensor, and apply a new one at
a dierent site.
9Make sure the Sensor is secure after application.
Put the cap back on the Sensor Applicator.
Discard the used Sensor Pack and Sensor
Applicator according to your facility’s procedures.
Sensor
18 19
ART26944_rev-C_manual.indd 18-19 9/23/16 9:19 AM

Step Action
4When prompted, touch yes to check the Sensor
status. Hold the Reader within 1.5 inches (4 cm)
of the Sensor to verify Sensor is working.
5Touch OK to go to the Home Screen.
Reminder
yesno
Check Sensor Status?
Sensor can be used for
up to 14 more days.
OK
Sensor Working
Patient Wear
The Sensor stores your patient’s glucose readings every 15 minutes for up
to 14 days. The rst reading is stored 1 hour after the Sensor is successfully
started.
IMPORTANT:
• The Sensor should not be worn for more than 14 days.
• Data can be downloaded at anytime from Sensors that are on or o
the body.
• Before your patient goes home, review and give them the “Living
with Your FreeStyle Libre Pro Sensor” section of the insert in the
Sensor Kit.
CAUTION: Intense exercise may cause the Sensor to loosen
due to sweat or movement of the Sensor. If the Sensor
becomes loose, the Sensor readings may be unavailable or
unreliable. Your patient should return to your facility for
application of a new Sensor.
20 21
ART26944_rev-C_manual.indd 20-21 9/23/16 9:19 AM

Step Action
4The Reader will indicate how many days of
Sensor wear are left, if any. Touch view to
view the daily graph. Touch next. For more
information about the daily graph, see Daily
Graph section.
5To create reports, connect the Reader to a
computer. See Creating Reports section in the
FreeStyle Libre Pro software User’s Manual. The
User’s Manual can be found in the Help Menu of
the software. Touch done to return to the Home
Screen.
Note: The Home Screen will show this
symbol near the top of the screen when
there is new Sensor data in the Reader that has
not been transferred to a computer. A report
should be generated from this data before the
next Sensor is downloaded.
Sensor can be used for
up to 7 more days.
Sensor Data Received
view next
Days Recorded
7
doneback
To create reports,
connect Reader to a
computer.
Getting Sensor Data
Data can be downloaded at anytime from Sensors that are on or o
the body.
Step Action
1Press the Home Button to turn on the Reader.
2Touch Get Sensor Data.
3Hold the Reader within 1.5 inches (4 cm) of the
Sensor. If sounds are turned on, the Reader will
beep when all the data has been successfully
downloaded from the Sensor. This may take up
to 5 seconds.
Note: If communication is not established within
15 seconds, the Reader displays a prompt to try
again. Touch OK to return to the Home Screen
and touch Get Sensor Data again.
10:23pm
Start New
Sensor
Get Sensor
Data
22 23
ART26944_rev-C_manual.indd 22-23 9/23/16 9:19 AM

Removing the Sensor
The Sensor automatically stops working and should be removed 14 days
after being started. You should also replace the Sensor if there is any
irritation or discomfort at the application site or if the Reader reports a
problem with the Sensor currently in use.
Step Action
1Pull up the edge of the adhesive that keeps the
Sensor attached to the skin. Slowly peel away
from the skin in one motion.
Note: Any remaining adhesive residue on the
skin can be removed with warm soapy water or
isopropyl alcohol.
2Discard the used Sensor according to your facility’s procedures.
See Maintenance and Disposal section.
Daily Graph
The Daily Graph shows the Sensor glucose readings
by day and the Target Glucose Range that is set on
the Reader. You can change the target glucose range
by touching the Options symbol on the Home
Screen and selecting Target Range.
Notes:
• If you want the graph to show the current
patient’s target range, set their target range before
downloading their data.
• The graph displays glucose readings up to
350 mg/dL. Glucose readings above 350 mg/dL
are displayed at 350 mg/dL. For sequential
readings above 350 mg/dL, a line is displayed at
350 mg/dL.
12
am
6
am
12
pm
6
pm
12
am
350
250
150
50
OK
Daily Graph
(mg/dL)
22 Feb
Wednesday
24 25
ART26944_rev-C_manual.indd 24-25 9/23/16 9:19 AM

Reader Options
You can go to the Options menu to check Sensor or System Status or
change settings on the Reader, like Time & Date or Sounds.
Step Action
1To get to the Options menu, touch the Options
symbol on the Home Screen.
10:23pm
Start New
Sensor
Get Sensor
Data
Check Sensor Status
Target Range
Sounds
1 / 2
Options
Charging the Reader
A fully charged Reader battery should last up to 2 weeks. The battery life
may vary depending on your usage.
Plug the included USB cable into an electrical
outlet using the included power adapter. Then,
plug the other end of the USB cable into the USB
port on the Reader.
OK
Please charge the Reader to
continue using it.
Low Battery
Charging
CAUTION: Be sure to select a location for
charging that allows the power adapter to be
easily unplugged.
Notes:
• You must charge the Reader when the battery is low to
keep using the Reader.
• To fully charge the battery, charge the Reader for at least
3 hours.
• Only use the USB cable and power adapter included with
the system.
• Fully charge the Reader before storing it for more than
3 months.
26 27
ART26944_rev-C_manual.indd 26-27 9/23/16 9:19 AM

Step Action
2
(cont.)
•Perform a Reader Test: The Reader Test will perform internal
diagnostics and allow you to check that the display is
showing all pixels, sounds (including both tones and
vibrations) are working, and the touchscreen is responding
when touched
•View Event Logs: A list of events recorded by the Reader,
which may be used by Customer Service to help troubleshoot
the System
Touch OK when you are done.
Step Action
2Touch the option you want to view or change:
Check Sensor Status – Check if a Sensor is working or has
ended
Target Range – Set range displayed on Reader Daily Glucose
graph
Sounds – Set tones and vibrations
Time & Date – Change the Time or Date
Language – Change the language on the Reader (option only
available on Readers with multiple languages)
System Status – Check Reader information and performance
•View System Information: The Reader will display information
about the system including:
- Reader serial and version numbers
- Sensor serial number for most recently downloaded Sensor
- Sensor version for most recently downloaded Sensor
- Sensor start date and time for most recently downloaded
Sensor
- Sensor download date and time for most recently
downloaded Sensor
- Amount of data downloaded from Sensor
28 29
ART26944_rev-C_manual.indd 28-29 9/23/16 9:19 AM

Troubleshooting
This section lists problems or observations that may occur, the possible
cause(s), and recommended actions. If the Reader experiences an error, a
message will appear on the screen with directions to resolve the error.
Reader Does Not Power On
Problem What It May Mean What To Do
Reader does not
power on after
you press the
Home Button.
Reader battery is
too low.
Charge the Reader.
Reader is outside
of its operating
temperature range.
Move the Reader to a
temperature between 50 °F
and 113 °F and then try to
power it on.
If the Reader still does not power on after trying these steps, contact
Customer Service.
Maintenance and Disposal
Cleaning
You may clean the Reader using a damp cloth. Gently wipe the exterior of
the Reader and allow to air dry.
Maintenance
The FreeStyle Libre Pro Flash Glucose Monitoring System has no
serviceable parts.
Disposal
This product should be disposed of in accordance with all applicable local
regulations related to the disposal of electronic equipment, batteries,
sharps, and materials potentially exposed to body uids.
Contact Customer Service for further information on the appropriate
disposal of system components.
CAUTION: Do NOT place the Reader in water or other liquids.
Avoid getting dust, dirt, water, or any other substance in the
USB port.
30 31
ART26944_rev-C_manual.indd 30-31 9/23/16 9:19 AM

Problems Starting the Sensor
Display What It May Mean What To Do
Sensor Ended You may be trying
to start a used
Sensor.
If you need to start a Sensor,
then apply and start a new
one. Otherwise, return to the
Home Screen to get Sensor
data.
Communication
Error
The Reader
was unable to
communicate with
the Sensor.
Hold the Reader within
1.5 inches (4 cm) of the Sensor.
Note:You may need to
move away from potential
sources of electromagnetic
interference.
Replace Sensor The System
has detected a
problem with the
Sensor.
Apply and start a new Sensor.
Problems at the Sensor Application Site
Problem What It May Mean What To Do
The Sensor is not
sticking to the
patient’s skin.
The site is not free
of dirt, oil, hair, or
sweat.
1. Remove the Sensor.
2. Consider shaving and/or
cleaning the site with soap
and water.
3. Follow the instructions in
Applying and Starting the
Sensor sections.
Skin irritation
at the Sensor
application site.
Seams or other
constrictive
clothing or
accessories causing
friction at the site.
Ensure that nothing rubs on
the site.
The patient may
be sensitive to the
adhesive material.
Follow your facility’s
procedures for handling
skin reactions.
32 33
ART26944_rev-C_manual.indd 32-33 9/23/16 9:19 AM

Problems Getting Sensor Data
Display What It May Mean What To Do
Data Transfer
Error
The Reader is not
held close enough
or long enough to
the Sensor.
Hold the Reader within
1.5 inches (4 cm) of the
Sensor for up to 5 seconds.
New Sensor
Found
The Sensor was
never started.
If you would like to begin
using this Sensor, touch Yes.
Communication
Error
The Reader
was unable to
communicate with
the Sensor.
Hold the Reader within
1.5 inches (4 cm) of the
Sensor.
Note:You may need to
move away from potential
sources of electromagnetic
interference.
Display What It May Mean What To Do
Sensor Starting The Sensor has
not completed
starting.
Wait for the reminder to
check Sensor status. This
will take approximately 2
minutes.
No Data
Available
There is no data
available to
download.
Sensor data is usually
available for download
80 minutes after a Sensor
was started. Try again after
this time.
Sensor Error There is no data
available from
this Sensor. The
Sensor may not
be working.
If the Sensor was recently
applied, wait 1 hour and try
again. If this doesn’t work,
contact Customer Service.
34 35
ART26944_rev-C_manual.indd 34-35 9/23/16 9:19 AM
Table of contents
Other Freestyle Blood Glucose Meter manuals

Freestyle
Freestyle Libre 2 User manual

Freestyle
Freestyle FREEDOM LITE User manual

Freestyle
Freestyle Libre 14 day User manual

Freestyle
Freestyle Lite User manual

Freestyle
Freestyle Libre 14 day User manual

Freestyle
Freestyle Precision Neo User manual

Freestyle
Freestyle Libre User manual

Freestyle
Freestyle Precision Neo User manual

Freestyle
Freestyle Libre 2 User manual

Freestyle
Freestyle Libre User manual