Eon Lilith Banshee AGP User manual

Lilith Banshee
AGP/PCI
User Guide

Technical Support Services
Phone Assistance: 1-800-859-9569 or 1-714-990-6889
Monday - Friday: 9 am - 5 pm Pacific Standard Time
If you need additional information or help during installation or normal use of this product, please contact your retailer. If this is not
possible, call EONtronics Technical Support. Our customer support staff will attempt to solve your installation problem by phone or
issue a service authorization number for repair or replacement of your product. Unauthorized returns will not be accepted.
On Line Services: http://www.eontronics.com
Email Support: tech@eontronics.com
Fax Support: 1-714-990-6960
For your convenience, please record your EONtronics Lilith Banshee serial number in the area below:
Lilith Banshee S/N:
i

FCC Compliance Statement
ii
This equipment has been tested and found to comply with the limits for a Class B digital device, pursuant to Part 15 of the FCCRules.
These limits are designed to provide reasonable protection against harmful interference in residential installation. This equipment
generates, uses and can radiate radio frequency energy and, if not installed and used in accordance with the instructions, may
cause harmful interference to radio communications. However, there is no guarantee that interference will not occur in a particular
installation. If this equipment does cause interference to radio or television, which can be determined by turning the equipment off
and on, the user is encouraged to try to correct the interference by one or more of the following measures:
• Reorient or relocate the receiving antenna.
• Increase the separation between the equipment and receiver.
• Connect the equipment into an outlet on a circuit different from that to which the receiver is connected.
• Consult the dealer or an experienced radio/TV technician for help.

Table of Contents
iii
Technical Support Services i
FCC Compliance Statement ii
Table of Contents iii
Introduction 1-1
Resolution and Color Depth Table 1-3
Hardware Installation 2-1
Before You Start 2-2
Card Layout for Lilith Banshee AGP 2-6
Figure A - Lilith Banshee AGP Layout 2-7
Card Layout for Lilith Banshee PCI 2-8
Figure B - Lilith Banshee PCI Layout 2-9
Installing the EONtronics Lilith Banshee 2-10
System Setup 2-13
Software Installation 3-1
Software Overview 3-2
Windows 95 and 98 Driver Installation 3-3
Windows NT 4.0 Driver Installation 3-5
Windows 2000 Notes 3-5
Appendices A-1
Appendix A - Systems With Built In Video A-2
Appendix B - Microsoft Operating System Updates A-3
Appendix C - Socket 7 AGP Motherboards A-7
Appendix D - Hardware Specifications A-8
Appendix E - Trouble Shooting A-9
Software License and Copyright Agreement B-1

Introduction
The EONtronics Lilith Banshee is a
powerful 2D/3D video card that comes in
both AGP and PCI versions. Both cards
support a full 128 bit 2D graphics engine,
with every Windows GDI feature supported
in hardware, the Lilith Banshee is one of
the fastest 2D accelerators for the PC that
has ever been made. This makes for the
fastest and most powerful 2D windows
acceleration for many business,
educational, and entertainment
applications.
The Lilith Banshee also supports one of
the most powerful 3D feature sets in the
industry with its fully 3Dfx Voodoo2
compatible 3Dfx Voodoo Banshee graphics
chip.
The EONtronics Lilith Banshee is fully
supported in Windows 95, Windows 98,
and Windows NT 4.0; and takes full
advantage of the Microsoft Direct X set
of APIs, the OpenGL API, and the famous
3Dfx Glide API.
The Lilith Banshees features include:
• Ultra High Performance - The ×1 AGP
and the PCI 2.1 Lilith Banshee provide for
excellent bus throughput, with each
capable of operating at as high as 66 MHz.
•16 MB of Memory - The 16 MB of fast
memory allows the card to run in high
resolutions with excellent color depths.
And its unified memory structure allows it
to dynamically set frame buffer and texture
memory as needed.
•Flicker-free Refresh Rates - With refresh
rates as high as 110 MHz, you will be
assured a clear, flicker free, non-interlaced
image.
•Photo-Realistic Images - Full True Color
displays at resolutions up to 1280 × 1024
means brilliant business presentations,
CAD and graphics displays, and incredible
gaming.
•Impressive 3D Features
-Integrated Voodoo2 pixel unit
-High Precision 16 bit Z Buffer
-Transparency Effects
-Chroma-key with Color Mask
-Source and Destination Alpha Blending
-Fog and Haze Effects
-Per Pixel MIP Mapping
-Per Pixel Tri-Linear Filtering
1-1

-Full Scene and Edge Anti Aliasing
-Bump Mapping
-Perspective Correction
•Full Driver Support - The EONtronics
Lilith Banshee is fully supported in
Windows 95, Windows 98, and Windows
NT 4.0.
•Continuing Support - Upcoming support
for Windows 2000
•Superior Customer Service
-Five Year Warranty
-Fast Response to Technical Issues
-World Wide Web and Email support for
fast driver updates and technical bulletins
-Technical Support Hotline
Note: Please refer to the inside front cover
for the complete list of technical services
available.
1-2

noituloseR lexiPrePstiB/sroloCforebmuN ycneuqerF
)zH(
tib4/61tib8/652tib61/K46tib23/noilliB4
084×046
seYseYseYseY
021,001,58,57,06
006×008
seYseYseYseY
021,001,58,57,06
867×4201
seYseYseYseY
021,001,58,57,06
4201×0821
seYseYseYseY
001,58,57,06
0021×0061
seYseYseYseY
58,57,07,56,06
4431×2971
seYseYseYseY
27,06
2931×6581
seYseYseYseY
06
0441×0291
seYseYseYseY
06
1-3


Hardware Installation
2-1

Before You Start
Package Contents
Your EONtronics Lilith Banshee box should
contain the following:
•The Lilith Banshee AGP or PCI Card
•One EONtronics Driver Installation CD
•One User Manual
•One Product Registration Card
•Optional Bundled Software
Installation Overview
This section provides the following
information and instructions for installing
your EONtronics Lilith Banshee card.
•System Requirements
•Gather necessary supplies
•Identify your system and monitor
•Handling Procedures
•Locate important components on the
video card
•Remove or disable existing video
hardware
•Install the EONtronics Lilith Banshee
video card
Note: Refer to the Software Installation
section for information on installing and
configuring video drivers for the
EONtronics Lilith Banshee video card.
System Requirements
Before attempting to install your
EONtronics video card into a computer,
make sure that there is an available AGP
or PCI expansion slot, as appropriate, on
the motherboard. Additionally, it is
recommended that your computer meet
the following requirements:
-A Pentium II based system
-A minimum of 32 MB of Memory
-Microsoft Windows 95 or 98, Microsoft
Windows NT 4.0
-Microsoft Direct X 5 or later
2-2

Note: If you are installing the EONtronics
Lilith Banshee AGP video card on a
Windows 95 based system, you need to
have the following items installed.
- Direct X 5.0 or later
- USB Supplement for OSR2
Note: If you are installing the EONtronics
Lilith Banshee video card on a Windows
NT 4 based system, you need to have the
following items installed.
- Service Pack 3 for Windows NT 4
Note: If you are installing the EONtronics
Lilith Banshee AGP video card on a Socket-
7 AGP motherboard you will need to make
sure that you have the necessary AGP
drivers from your motherboard
manufacturer. For more information
please contact your motherboard
manufacturer.
Gather Necessary Supplies
- No. 2 Phillips screwdriver
- User manuals for your computer
- User manuals for your monitor
- User manuals for Windows 9X or NT
Identify Your System & Monitor
Your system must be an AGP bus
compatible system (Pentium II i440LX, or
i440BX, or Socket-7 AGP) to use the
EONtronics Lilith Banshee AGP video card.
Any PCI 2.1 compatible expansion slot may
be used for the Lilith Banshee PCI.
Determine whether your analog VGA
monitor is an interlaced or non-interlaced
monitor. You will need to know its vertical
and horizontal refresh frequencies. This
information should be found in your
monitor user guide.
Additionally, make sure that you have the
latest drivers for Windows 95/98.
For questions about your monitor
2-3

capabilities and other monitor related
questions, please contact your dealer or
your monitor manufacturer.
Handling Procedures
Static electricity can severely damage your
equipment. Handle the EONtronics PCI or
AGP video card and any other device in
your system with care and avoid contact
with components on the card.
Handle the EONtronics PCI or AGP card
by its metal bracket and edges where
there are no contacts.
Always work on an antistatic surface to
avoid possible damage to the card from
static discharge. The packing material
placed on a table top makes a good anti-
static work surface.
We assume no responsibility for any
damage to the EONtronics Lilith Banshee
which results from failure to follow
installation instructions or failure to
observe safety precautions.
2-4
CAUTION
The enclosed device is electrostatic
sensitive. Do not open or handle
without following proper procedures.

2-5

Card Layout for the EONtronics Lilith Banshee AGP
Figure 1 (on the next page) shows the
following significant components of the
EONtronics Lilith Banshee AGP video card.
•Video Connector: The monitor is
connected to this 15 pin female connector.
•Video Feature Connector: These
connectors and their associated circuits
are for the video feature connectors that
are used for connecting video capture
cards, DVD decoders, and other compliant
devices.
•AGP-bus Slot Connector: The
EONtronics Lilith Banshee AGP video card
communicates with the computer through
its AGP-bus connector that plugs into the
AGP-bus expansion slot on your computer
motherboard.
The EONtronics Lilith Banshee AGP MUST
be installed in the AGP slot of the
motherboard. It will not work or fit in a
PCI slot.
•Memory: These memory chips provide
high speed 100 MHz SGRAM to the 3Dfx
Banshee chip.
•Bios: This Bios chip provides the basic
instructions for the operation of the
EONtronics Lilith Banshee AGP video card.
•The 3Dfx Banshee Chip: This is the
brain of the video card. This high
performance graphics chip provides all of
the powerful graphics processing
capabilities that make the EONtronics Lilith
Banshee such a high performance card.
2-6
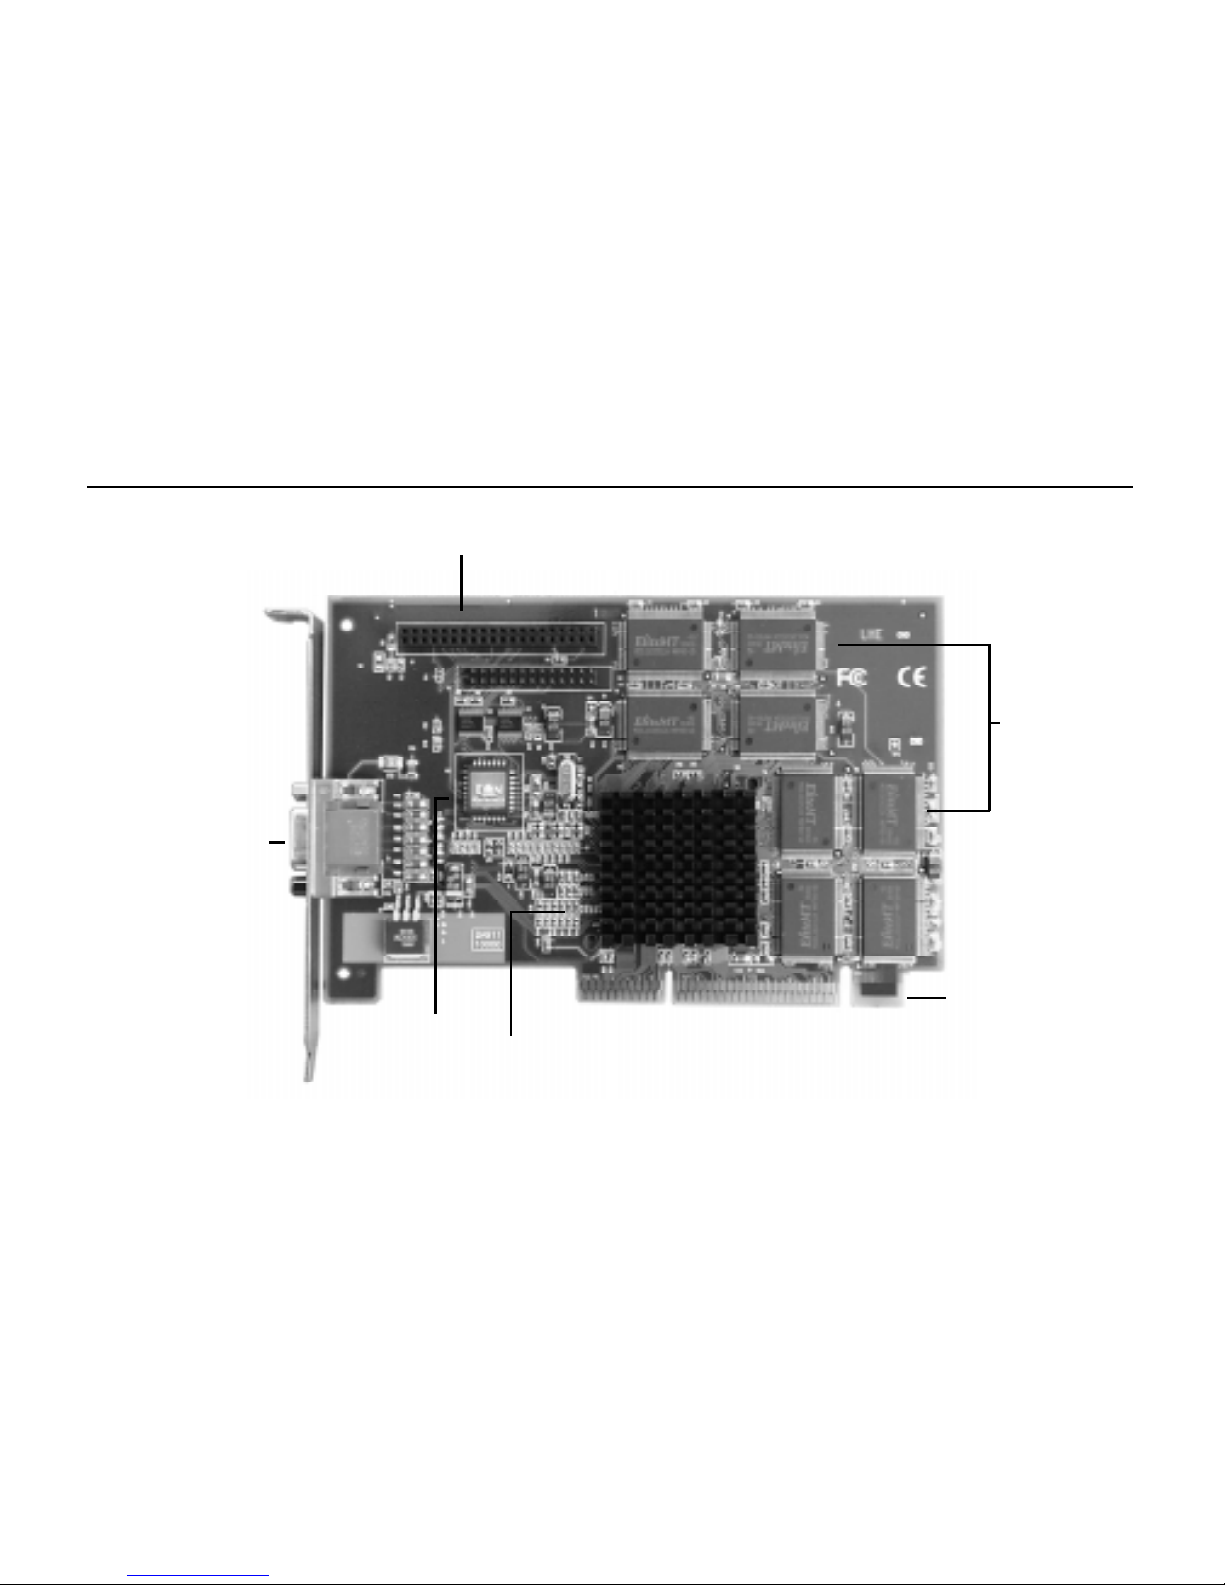
Figure 1 - EONtronics Lilith Banshee AGP Layout (Picture May Vary)
2-7
Memory
Video Feature Connector
AGP
Connector
3Dfx Banshee Chip
BIOS
Video
Connector

2-8
Card Layout for the EONtronics Lilith Banshee PCI
Figure 2 (on the next page) shows the
following significant components of the
EONtronics Lilith Banshee PCI video card.
•Video Connector: The monitor is
connected to this 15 pin female connector.
•Video Feature Connector: These
connectors and their associated circuits
are for the video feature connectors that
are used for connecting video capture
cards, DVD decoders, and other compliant
devices.
•PCI-bus Slot Connector: The EONtronics
Lilith Banshee PCI video card
communicates with the computer through
its PCI-bus connector that plugs into the
PCI-bus expansion slot on your computer
motherboard
The EONtronics Lilith Banshee PCI MUST
be installed in the PCI slot of the
motherboard. It will not work or fit in an
AGP slot.
•Memory: These memory chips provide
high speed 100 MHz SDRAM to the 3Dfx
Banshee chip.
•Bios: This Bios chip provides the basic
instructions for the operation of the
EONtronics Lilith Banshee PCI video card.
•The 3Dfx Banshee Chip: This is the
brain of the video card. This high
performance graphics chip provides all of
the powerful graphics processing
capabilities that make the EONtronics Lilith
Banshee such a high performance card.
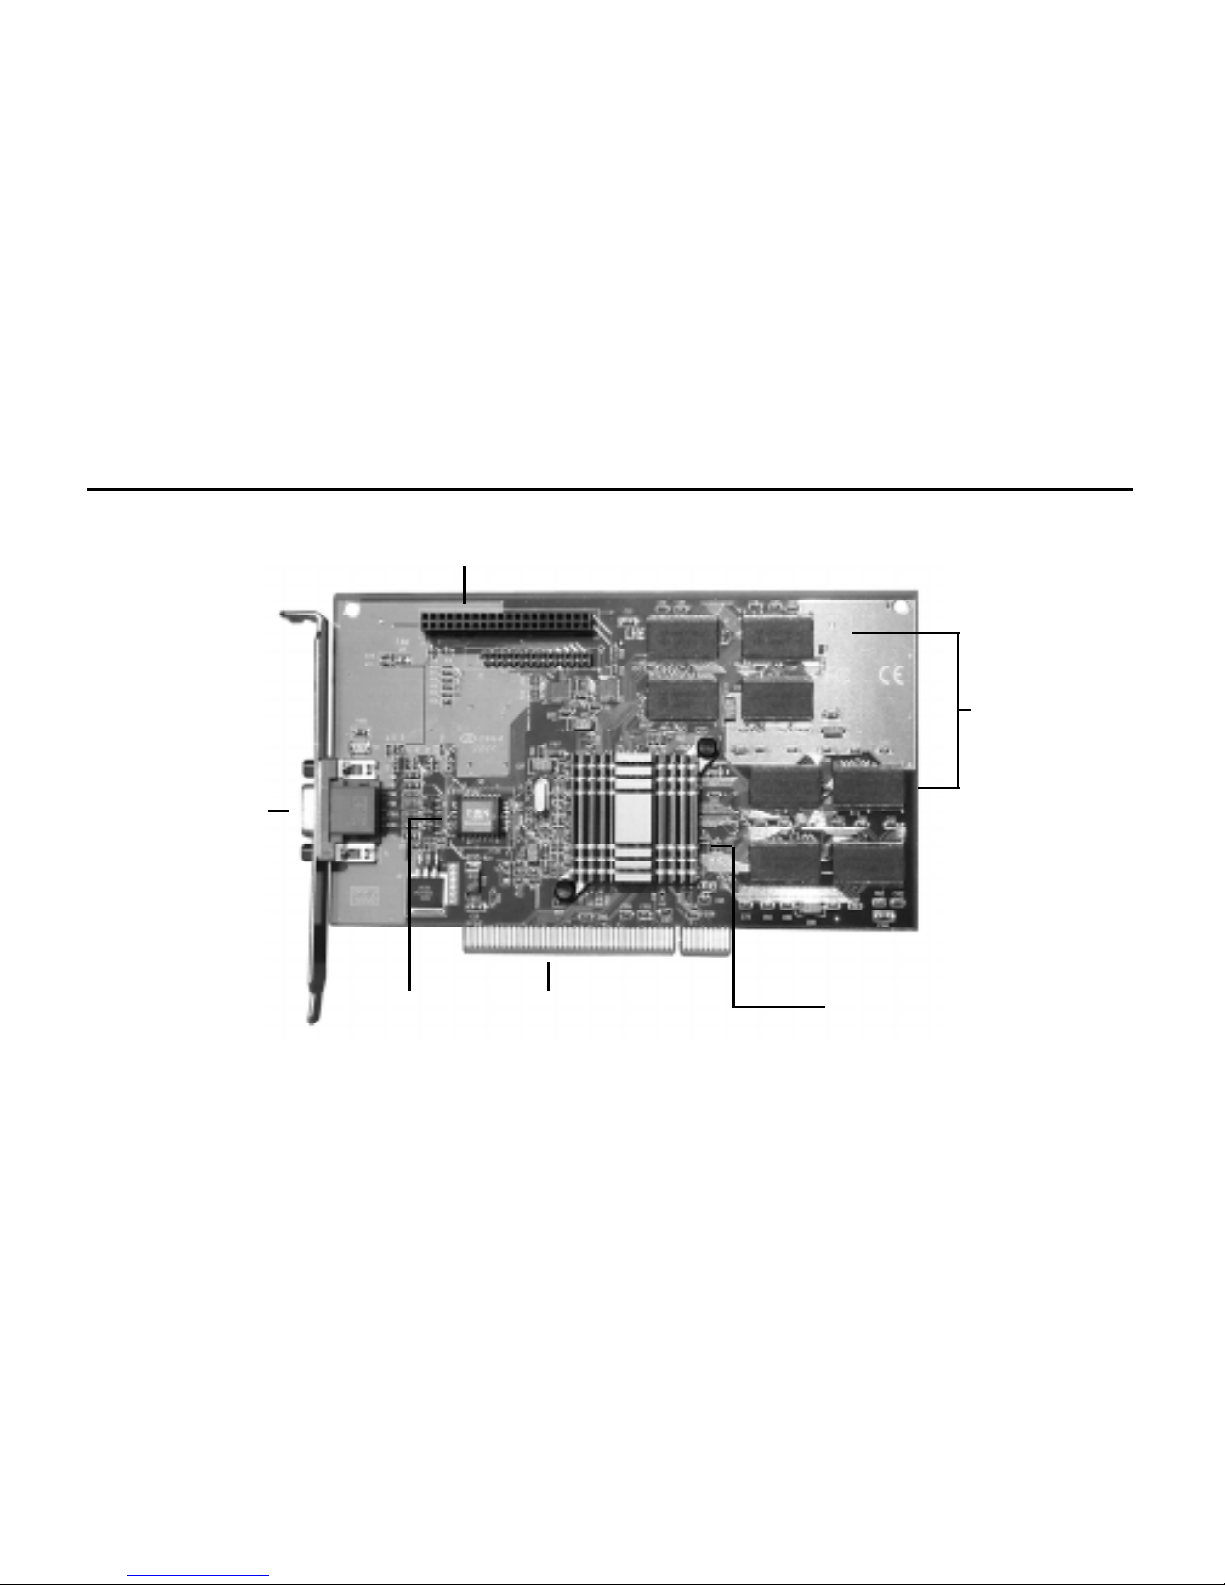
2-9
Figure 2 - EONtronics Lilith Banshee PCI Layout (Picture May Vary)
Video Feature Connector
Memory
3Dfx Voodoo
Banshee
PCI
Connector
Video
Connector
BIOS
Installing the EONtronics Lilith Banshee
Installation Procedures
1. Turn off the system power. We
recommend that you also unplug the
power cord from the computer.
2. Remove the system cover according to
the manufacturers instructions.
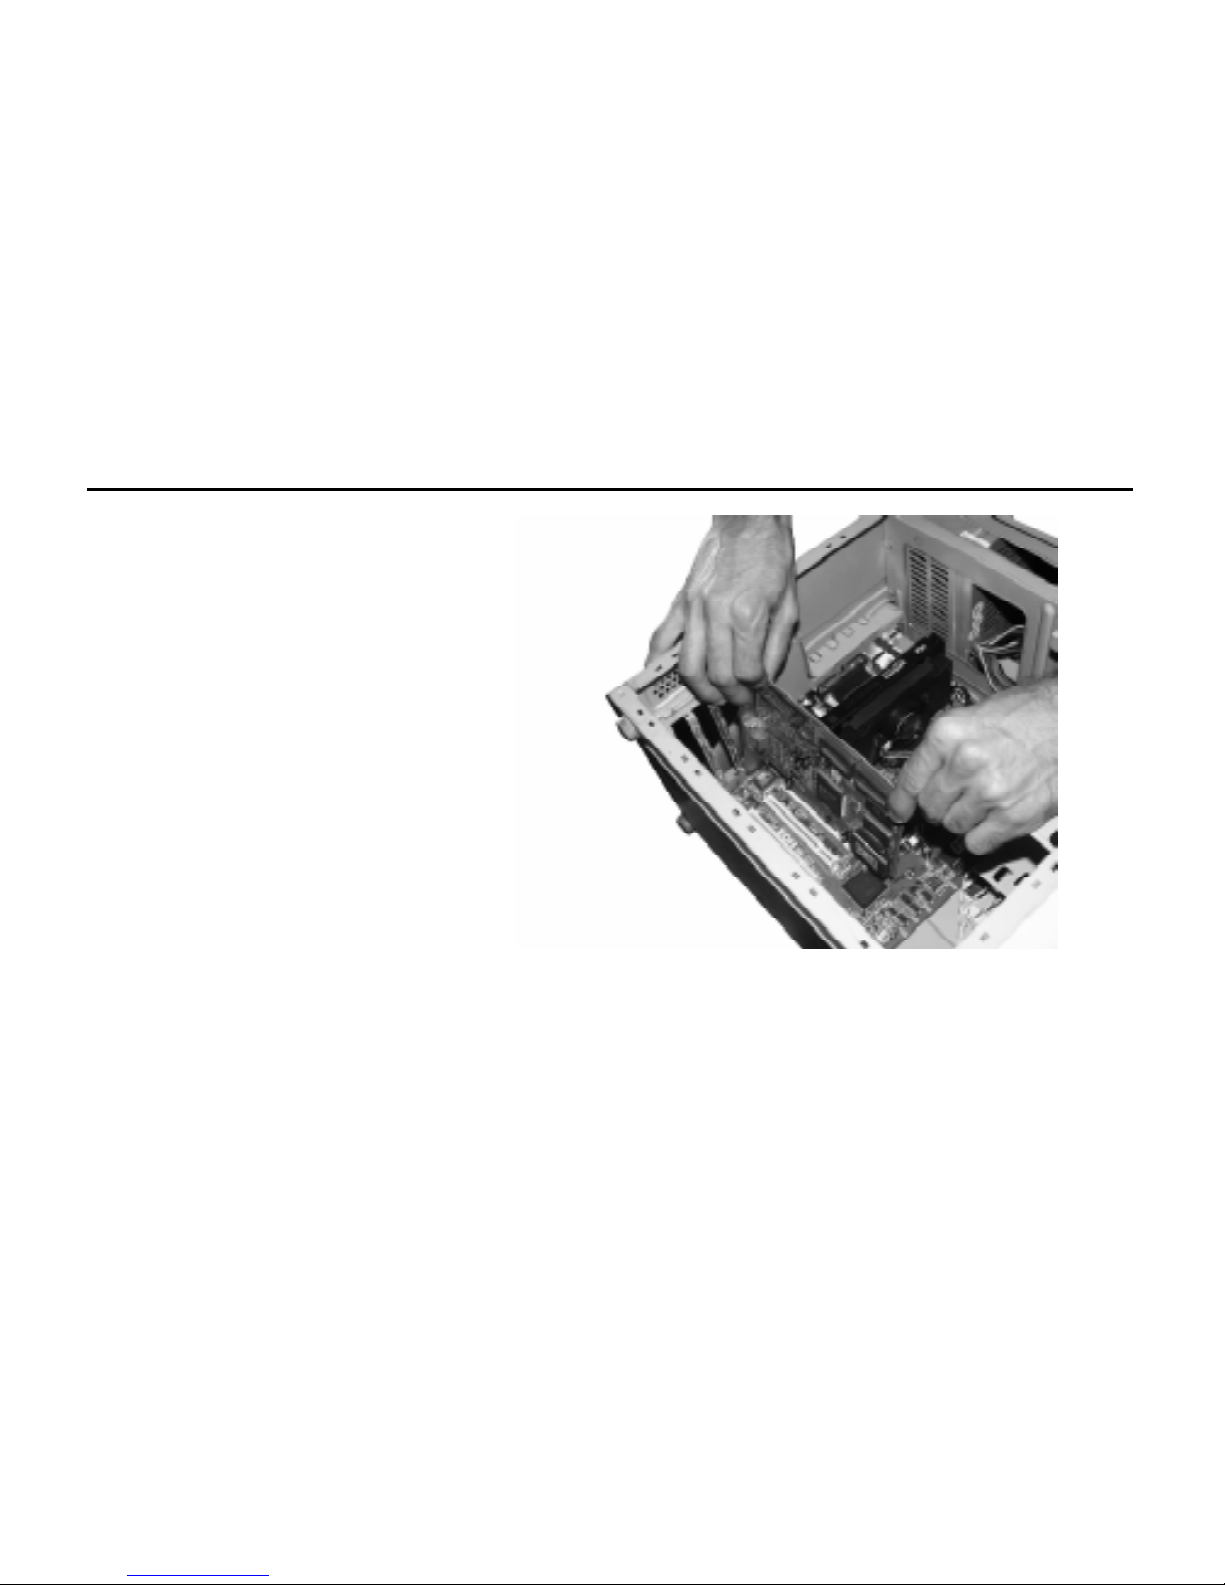
3. Remove any other video card in the
system or disable any video adapter that
is built into the motherboard. Please refer
to Appendix A for more information on built
in video adapters.
Step 3 Illustration
2-10
4. If necessary, remove the expansion slot
cover to gain access to the AGP slot. Do
this by removing its screw and lifting out
the slot cover. Retain the screw for later
use in securing the EONtronics PCI or AGP
video card.
5. Verify that any video switches for the
computer are correctly set. Please refer
to your motherboard or system information
to determine if you need to do this.
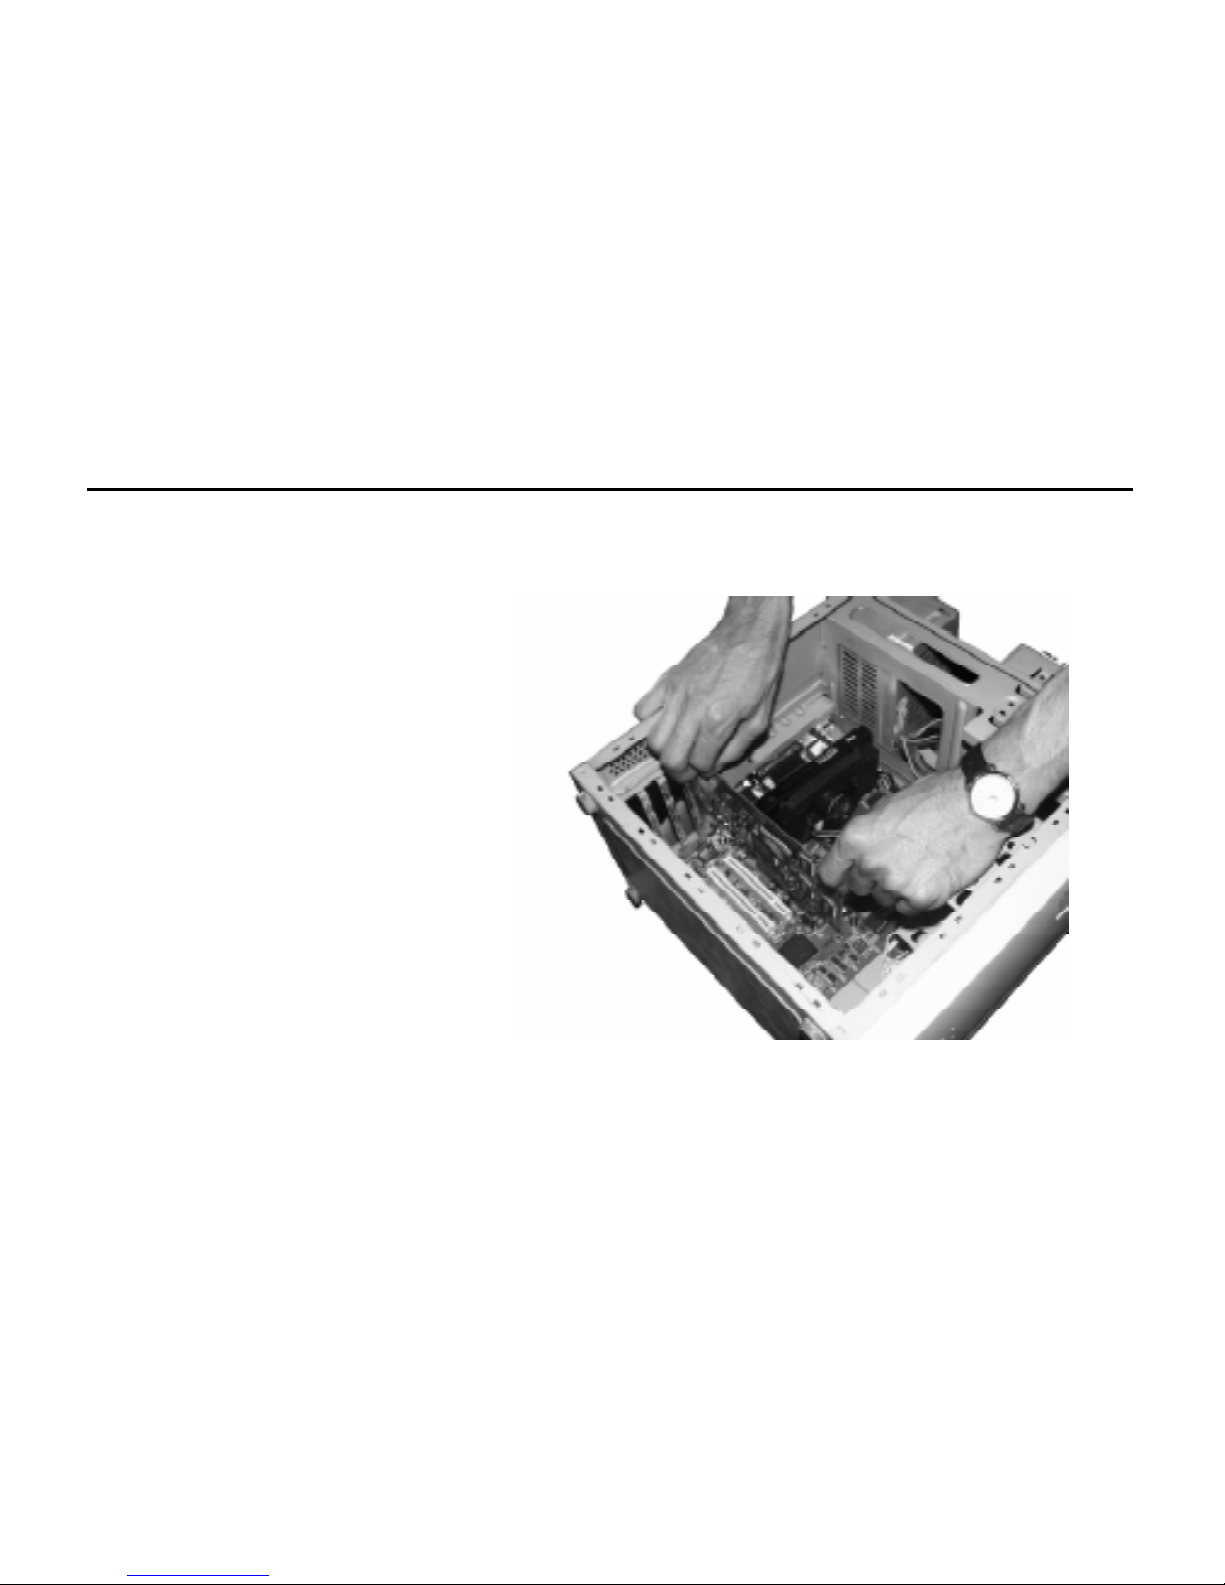
6. Hold the EONtronics video card by its
top corners and slide it into the AGP
expansion slot (refer to your system
manual). Line up the card so that it fits
into the slot guides at either end. The
board connector pins should line up this
the expansion slot underneath. Press
down on the card until it is firmly seated
in the expansion slot. The bracket should
be flush with the screw hole.
Step 6 Illustration
2-11

7. Verify that the EONtronics video card
(except for the connector and bracket)
does not touch any components on the
motherboard or adjacent to the card.
Then, secure the card with the screw that
was previously removed in step 4.
8. Replace and secure the system cover.
9. Plug the monitor connector into the 15-
pin, D-shaped, analog video connector on
the EONtronics video card and secure it
with the mounting screws.
10. Place the monitors ON/OFF switch in
the ON position. This ensures that when
you turn on your system it can properly
identify the monitor type.
You are now ready to turn on your system.
2-12
Identification Notes
When installing your EONtronics video
card, it is useful to note the quantity and
type of expansion slots on your
motherboard.
With the motherboard in front of you, and
the expansion slots running left to right,
they typically are as follows:
Far left and black in color, the ISA slots
are 16 bit expansion slots used for older
legacy devices like modems and sound
cards.
To the right of the ISA slots, and typically
white in color, the PCI slots are 32 bit
expansion slots that are used for many of
todays modern expansion cards.
To the very right of PCI slots there is one
single brown slot that is set off center
when compared to the other slots. This is
the AGP slot. Please note that if you do
not have an AGP motherboard, that you
will not have this slot.
This manual suits for next models
1
Popular Video Card manuals by other brands

Diamond Multimedia
Diamond Multimedia ATI Radeon SKU 4870PE51GDT Specification sheet

NEC
NEC N8116-29 user guide

ATI Technologies
ATI Technologies RADEON 137-40225-20 user guide

MSI
MSI N220GT series user manual

ATI Technologies
ATI Technologies RADEON 7000 MAC EDITION user guide

SIIG
SIIG aurora Quick installation guide


