EOVOLT Confort User manual

Manual


INTRODUCTION
Thank you and congratulations on the purchase of your EOVOLT Confort Electrically Assisted
Bike (EAB). This bike is designed for everyday use in both town and country. It allows you to
move around in traffic and green areas in complete safety. Your bike is equipped with an
electric pedal assistance system that will make all your journeys easier.
This manual is intended to provide you with the information you need to use, adjust and
maintain your bicycle correctly in order to maximise its lifetime. Therefore, please read it
carefully before using your bicycle for the first time and keep it for the life of your bicycle. We
recommend that you always have your bicycle inspected, serviced and repaired by an
authorised technician.
This EOVOLT electric bicycle for adults has been designed according to the requirements of
the European standards: EN 14764 and EN 15194.

Contents :
General information p1
Warnings / Precautions p1
Settings p2
Lighting p2
Doorbell p2
Tyres p2
Brakes p2
Wheels and motor p2
Battery p2
Charger p5
Getting started p6
Folding the bike p6
Connecting the battery p7
Saddle and handlebar adjustments p7
Using the on-board computer p8
LCD-07 p8
LCD Bafang p10
Assembly of the mudguard p12
maintenance p14
Warranty p15
List of tools provided p16
Maintenance booklet p17
General information

Warnings / Precautions
Choose a safe place away from traffic to familiarise yourself with your new bike. The assistance can be
triggered with more force than you might imagine.
We strongly advise you to wear protective gear before getting on the bike, as wearing a helmet is strongly
recommended and mandatory for children under 12 years of age. Wear a helmet that complies with CE standards and
is correctly adjusted.
Furthermore, traffic on public roads requires compliance with the highway code. According to the highway
code, it is compulsory to carry lighting and signalling devices and a warning device on your bicycle.
Since 1 September 2008, all drivers and passengers on bicycles must wear a reflective waistcoat when riding outside
built-up areas at night, or during the day when visibility is poor.
Lion Distribution SAS declines all responsibility if the bicycle driver does not comply with the regulations in force.
This bike is intended for use in urban areas. It is not intended to be used on land in very poor condition. It
is not designed for off-road use. Failure to heed these warnings may result in a fall or accident and may prematurely
and irreversibly damage the condition of your electric bicycle.
If the bike is used by a child, parents must supervise and ensure that the user is able to use the bike safely.
In the event of unusual weather conditions (rain, cold, night...), be particularly vigilant and adapt your speed and
reactions accordingly.
When transporting your bicycle outside your vehicle (bicycle rack, roof rack, etc.), it is advisable to remove the battery
and store it in a temperate place.
For safety reasons, it is strongly recommended that you start pedalling with level 0 or 1 pedal assistance when you are
stationary and then gradually increase the pedal assistance.
Finally, it is strongly recommended that you do not push your EAB while walking alongside when the pedalling
assistance is activated.
ATTENTION !
Like any mechanical component, a bicycle is subject to high stress and wear. Different materials and components can
react differently to wear or fatigue.
If the service life of a component has been exceeded, it may break off in one go, possibly causing injury to the cyclist.
Cracks, scratches and discoloration in areas of high stress indicate that the component has exceeded its life and
should be replaced. In case of doubt, do not hesitate to meet with a cycling professional, he or she will give you the
best advice following the diagnosis of your bike.
Settings
Although your EOVOLT bike has been meticulously prepared in our workshops, it is important that you
make sure of the following points before use.
Lighting
Page1

Your EAB is equipped with high quality LED front lighting. It is switched on and off via the on-board
computer. See p 7/9.
Your EAB is equipped with rear lighting. It is switched on and off by means of the on/off button on the lamp itself.
Doorbell
A bell is installed on your handlebars. It will allow you to be heard at 50 m.
Tyres
Periodically check the tyre pressure. Driving with underinflated or overinflated tyres may impair
performance, cause premature wear, lead to rim damage, reduce range or increase the risk of an accident.
If severe wear or a notch is visible on one of the tyres, replace it before using the bicycle.
The recommended maximum and minimum tyre pressure is indicated on the sidewalls of your tyres.
Brakes
Your EOVOLT is equipped with 160mm diameter disc brakes. The right handle activates your rear brake,
while the left handle activates the front brake.
It is recommended that you distribute your braking force on average 60/40 between the front and rear.
You should be able to obtain maximum braking power without the brake levers touching the grips.
If this is not the case, your brakes need to be adjusted. If this is the case, contact a specialist dealer to make
sure your brakes are correctly adjusted.
Warning: In case of rain, braking distances are extended.
Wheel and motor
When starting the engine, you will hear a slight noise. This noise is normal because the engine starts and
assists the pedalling. It may become louder when the engine is fully loaded.
After the first month of use, it is advisable to tighten your spokes to limit the impact of the engine's
propulsion on your rear wheel.
Suspended fork
On the right side of the fork you will find an adjustment wheel so that you can either lock the suspension
or refine its flexibility.
Battery
The lithium battery is the heart and engine of your EOVOLT. Proper maintenance will help you maximize its life span.
Here are a few tips on how to take care of your EOVOLT battery. Like all batteries, our batteries age.
This means that over time, the battery life decreases and is no longer the same as that of a new battery.
Remember to recharge your battery regularly even if you don't use it (at least once a month). Charging
your electric bicycle battery regularly prevents deep discharge. This means that one or more cells, if they are not
recharged for too long, will no longer function and may cause you to lose autonomy or even prevent your battery
from working.
Store your battery in a dry, cool place that is not conducive to wide temperature variations.
When charging your battery, first connect your charger to your wall socket before attaching it to your
battery. Why should you do this? When connecting your charger to your wall socket, an electric arc may form. While
chargers are designed to absorb this electric arc without damaging the charger, the battery is not designed to do so.
The second important element is the charge level of your battery when it is stored. During a long period
of storage without use, the ideal charge level for your battery is 40% in order to limit the self-discharge phenomenon
of the battery. As an example, a battery stored at a 100% charge level may, depending on the temperature, be 20%
more self-discharged than a battery stored at a 40% charge level.
Never forget your battery on the EAB when not in use because the controller (which is the brain of the
electric bicycle) always consumes a little energy, thus discharging the battery.
Page2

The more you use your EOVOLT bike, the more regularly the battery will need to be recharged and the
longer it will last compared to an inactive battery.
Attention! Never leave the battery connected to the charger after a full charge, as this will cause
unnecessary fatigue.
Précautions
•Check that the battery is correctly attached to the EAB.
•Make sure that the charging cap is correctly fitted on the battery.
•Do not leave your battery exposed to direct sunlight.
•Do not store the battery in the sun for long periods.
•Handle your battery with care. Dropping the battery may cause fluid leakage or inflammation of the
battery.
•Do not apply pressure to the charger lead or plug. Danger of electric shock or fire if you hold the power
cord between a wall and a window frame or if you place heavy objects on the cord or plug.
•Be sure to insert the plug securely into the wall outlet when charging.
•Do not touch the plug with wet hands.
•Keep out of the reach of children and pets.
•Do not use the plug or the electrical outlet if they are dusty.
•Unplug and clean them with a dry cloth.
•To remove the power cord from the wall outlet, do not pull on the cord but on the plug. Always pull the
charging cord gently.
•Do not rotate the pedals while the battery is charging, installed on the bicycle. The cord may wrap around
the pedals or the crankset and damage the plug, posing a risk of electric shock or fire.
•- Do not use plugs, connectors, or other wiring devices with a power source other than the recommended
220V power source.
•Do not use electrical parts if they are damaged. Replace them with original parts.
•- If your battery is abnormally hot while charging, unplug the charger from the mains and then carefully
move the charger and battery pack.
•- When charging is complete, unplug the charger and disconnect the battery from the charger.
•- Charge the battery in a dry place indoors with an ambient temperature between 0°C and 20°C.
•- Charge the battery away from flammable materials.
•- Only use the original charger supplied with the bike.
•- Do not charge the battery immediately after using the bike.
•- Plug the charger connector into the battery socket.
•- Plug the mains plug into an electrical outlet.
•- The charger indicator light is red while charging.
•- As soon as the light turns green, charging is complete.
•- Do not place the charger on the battery while charging.
•- Remove the mains plug from the mains socket.
•- Remove the plug from the battery socket.
DANGER ! –Danger de mort dû à un choc électrique
•Do not operate the charger at temperatures
Above 50°C, at a relative air humidity above 80%. Only charge the battery in dry areas. Excessively high humidity can
cause electrical malfunction.
•Do not touch the battery contacts or plug with metal objects. Avoid dirt and contact with chemical
substances and cleaning agents.
•Do not cover the charger.
•Do not charge in direct sunlight.
Page3

WARNING - Material damage
•Do not charge the battery at temperatures below 0°C.
WARNING !
•The battery should always be charged in a ventilated area.
•The battery must be clean and dry before being charged.
•To unplug, first disconnect from the mains and then the battery.
•Do not use the battery if it emits an unusual smell or becomes unusually hot.
•Do not disassemble the charger or the battery (loss of warranty).
•Store your battery in a dry, ventilated place.
•Use your bicycle at a maximum temperature of 40°C.
•The temperature of the battery should never be higher than 60°C (140°F).
•Store your battery between 0°C and 20°C (Your battery will age prematurely if stored above 30°C).
•Under no circumstances should the battery be exposed to frost.
•Prolonged storage at -10°C can significantly reduce battery performance.
•The temperature of the storage location should not exceed 50°C to avoid increasing the risk of fire.
•Charge the battery until the green indicator lights up.
•Never fully discharge the battery as this may damage it. Never store a discharged battery, but recharge it
immediately. This will impair the performance of the battery and shorten its life.
•When the bike is stopped - even for short pauses or when the battery is discharged while riding: always
stop the engine (on the control panel on the handlebars), otherwise the battery will be deeply discharged
and the damage will be irreparable.
•The battery must never be opened (loss of warranty).
DISPOSAL, RECYCLING
Do not dispose of the battery or charger in the open or with your household waste. Take it back to your
dealer or to a collection point specialised in recycling. This will help to protect your environment.
Charger
Precautions
•There is high voltage inside the charger, do not try to open it.
•The charger is designed for indoor use only.
•Do not attempt to charge non-rechargeable batteries with this charger.
•Contact the manufacturer or retailers if you encounter any problems.
•This appliance is not intended for use by persons (including children) with reduced physical, sensory or
mental capabilities or lack of experience and knowledge, unless they have been supervised or instructed
by a person responsible for their safety.
•Children must be supervised to ensure that they do not play with the appliance.
•Important safety instructions, keep these instructions.
•Danger ; to reduce the risk of fire or electric shock, follow these instructions carefully.
•If the shape of the plug does not match the outlet, use a plug adapter of the appropriate configuration for
the outlet.
•If the power cord is damaged, it must be replaced to avoid danger.
Page4

•Do not dispose of electrical appliances with unsorted municipal waste, use separate collection facilities.
Contact your local authority for information on available collection systems. If electrical appliances are
disposed of in landfills, hazardous substances can seep into the groundwater.
Features
•The charger for your Eovolt bike is an intelligent charger that uses power communication
technology, it is specially designed for Li-ion (lithium) batteries.
•Its advantages are as follows;
•Input voltage range: 100-240 V AC, operating temperature is storage: 0-30°C
•Low noise
•Automatically prevents reverse connection. The electrical power of the reverse connection is
0, which prevents the battery from being damaged by a reverse power supply.
•Allows a long period of short circuit.
•Adopts all the sealing instruction, can be used safely.
•Meets all the requirements set by the RoHS instructions of the European Union.
Compatibility
•This charger is designed to charge 7 batteries, 29.4+0.5V Li-ion battery pack of 8-20 AH.
Use
•First connect the connector pin to the battery and then to the mains socket.
•During the charging process, the charge indicator light will light red, after a full charge, the charge
indicator light will light green.
•When the battery is fully charged (when the green indicator light is on), first disconnect the mains plug
and then the battery plug.
Troubleshooting
The power indicator does not light up :
•Check if there is an AC power supply.
•Check if there is a bad connection at the input interface. After checking the above conditions without
success, ask your dealer for help.
•Do not try to repair it yourself.
The charge indicator does not work :
•Check that the output connector is properly connected.
•Check if the battery can be used. After checking the above conditions without success, ask your dealer for
help.
The charge indicator is always red :
•Check if the battery is damaged. After checking the above conditions without success, ask your dealer for
help.
Getting started
Folding your EOVOLT
1. Loosen the saddle clamp
2. Slide the seat post to the ground slowly.
Tighten the seat clamp
3. Loosen the handlebar with the clamp in the centre of the handlebar.
4. Swivel the handlebars downwards until the brake levers are in the upright position.
Tighten the handlebars with the clamp in the centre of the handlebars.
Page5

5. Loosen the lever that bends the top tube and the handlebars. Then fold
along the fork.
6. Fold the pedals by pressing on them and turning them on themselves.
7. Swivel the frame folding lever safety catch upwards.
8. Pull the frame folding lever and fold the bike onto itself.
Connecting the battery
The charging port is located under the saddle, covered by a cover to
protect against dust and moisture.
Remove the cover and plug in the charger, replace the cover when loading
is complete.
If you want to charge the battery separately, unscrew the safety device from
the connection port to the controller, loosen the saddle clamp, and remove
the entire seat post.
Repeat the above steps to replace and connect it.
Saddle and handlebar adjustments
The rod must be inserted at the minimum depth or lower as indicated on
the steering pivot to ensure safety. Tighten the rod clamp
Page6

The height of your seat is adjusted by a quick-locking system. Pull on the
quick-release lever. Insert your seat post at least up to the minimum insertion line
indicated on the seat post. Tighten the adjusting nut with the quick-release lever
and then push the quick-release lever to the closed position.
The seat angle is adjusted using the nuts that secure the seat to the seat
rail. Ensure that the nuts are tight and that the seat does not move forward or
backward when you sit on it.
Adjusting the seat cushion
The adjustment method is as follows:
Loosen the manual seat post unlocking, remove the seat post from the
saddle; Adjust the screw, bring the seat post back into the frame tube as the old
position and tighten the seat position clamp.
Using the LCD screen
LCD-07
LCD display version for City one, 4 Speed, Comfort models.
1
Fleche haut
12
KM/H
Vitesse en
km/h
2
On/Off Validation
MPH
Vitesse en
Miles
3
Fleche bas
MXS
Vitesse
maximale
4
ASSIST
AVS
vitesse
moyenne
5
Indicateur du niveau de la batterie
13
KM
Distance en
Km
6
Lumière
Mil
Distance en
Miles
7
CRUISE
DST
Distance d’un
voyage
8
PAS
ODO
Distance
totale
d’utilisation
9
TM
Durée d'un seul voyage
VOL
Voltage de la
batterie
TTM
Durée totale d’utilisation
14
Indicateur de
freins
10
THROTTLE
15
11
6KM/H de puissance Mode marche
On/Off

Press for a few seconds to turn on the LCD screen, press for a few seconds to turn off the screen. When the engine is
not running and the bike is not in use, the screen will automatically turn off after 5 minutes.
Home screen
Press the button to start, the screen will light up.
Light
Press until the light indicator appears on your display.
Do the same to turn off your light, it will turn off automatically if you turn off your LCD
screen.
Assistance
Press or to raise or lower your support level. Levels range from 1 (min power)
to 5 (max power).
Walking mode
Hold the button the symbol of the walking mode will be displayed, your bike
will travel at a maximum speed of 6 Km/hour.
If you release the button, the function will be switched off automatically.
Reset travel time and distance to zero
After switching on your LCD screen wait 5 seconds and then press
simultaneously on
After switching on your LCD screen wait 5 seconds and then press
simultaneously on and . TM time and DST distance flashes.
Briefly press the data will be reset.
If no button is pressed for 5 seconds, the LCD will automatically return to the Home screen.
Page7
Screen 2
Briefly press to access the second screen, on which you will find the average
speed as well as the total distance.
Screen 3
From the display two press once more on you will access the third screen,
where the maximum speed and battery voltage will be indicated.
Press ink once on to return to the home screen.
Error codes
03_ info motor anomaly.
04_info anomaly in the pedalling sensor
06_info short circuit of the motor or controller.
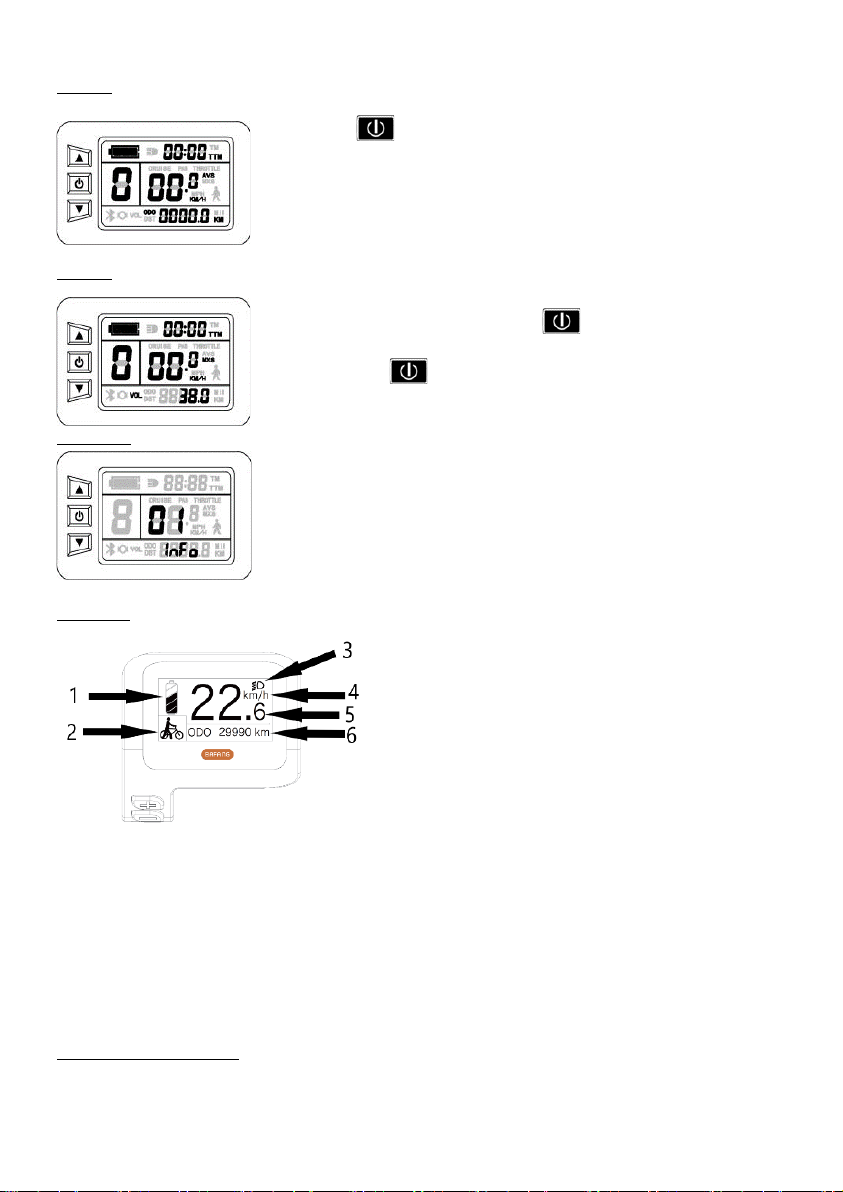
LCD Bafang
LCD display version for models City X et Confort X
1 Real-time battery charging
2 Level of assistance
3 Indicator light display when lights are on
4 Speed unit
5 Digital display
6 Trip: Daily kilometres (TRIP) - Total kilometres (ODO) - Maximum speed (MAX) - Average speed (average distance
remaining RANGE) - Energy consumption (CAL) - Travel time (TIME)
Switching the system on/off
Press and hold the power button for 2 seconds to turn on the system. Press the power button again for 2 seconds to
turn off the system.
Page8
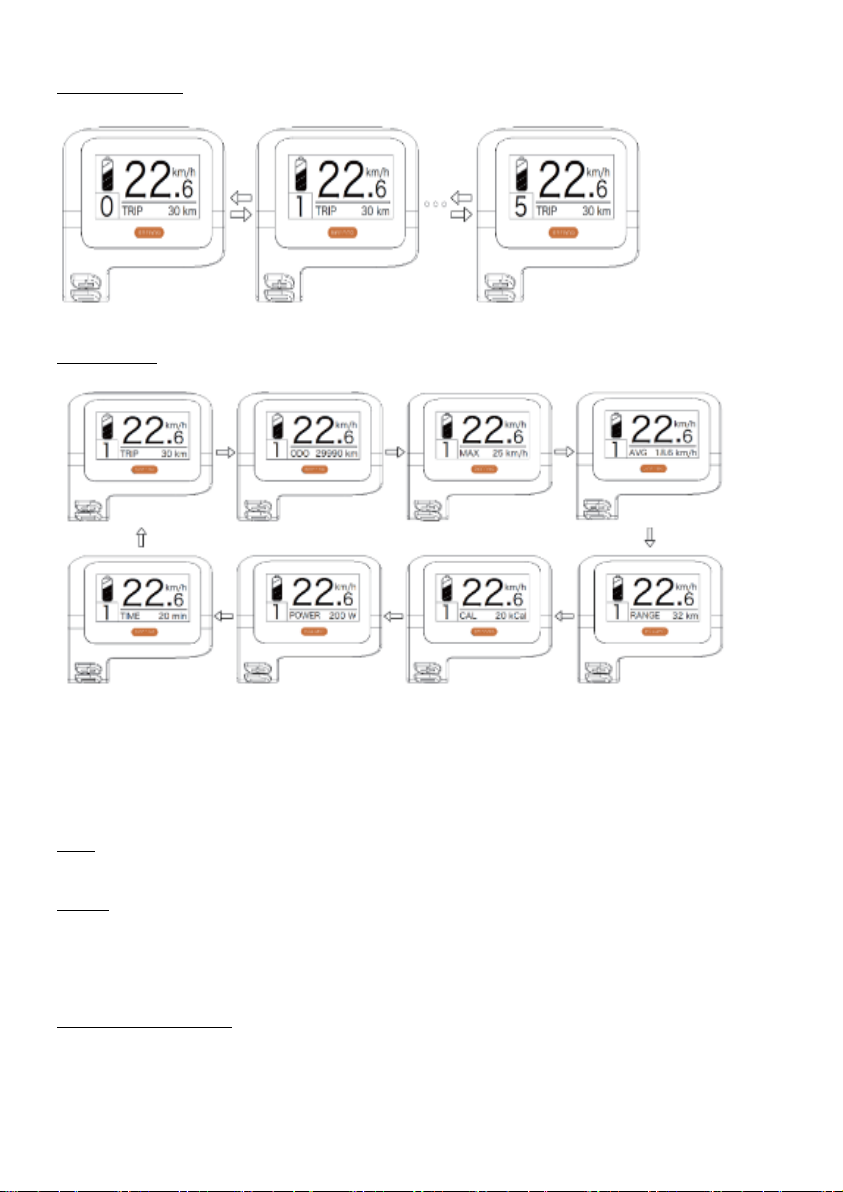
Levels of assistance
When the screen is on, press the + or - button to move to the desired level of assistance.
Selection mode
Briefly press the power button to view the different selectable modes.
Trip: Daily kilometres (TRIP) - Total kilometres (ODO) - Maximum speed (MAX) - Average speed (average distance
remaining RANGE) - Power consumption (CAL) - Trip time (TIME)
Lights
Press and hold the + button to activate the front light. Repeat this action to extinguish it.
Settings
Once the screen is switched on, press and hold the + and - buttons to enter the setting menu. Use the + or - button to
select the different parameters. Press the power button to confirm the selected option.
For your safety many parameters cannot be changed.
Assembly of the mudguard
To be able to mount your mudguards you need the tools available in the bag as well as the bag of screws.
The rods are packed to fit in the packing box, before putting them in place they must be spread slightly apart.
Be careful, in the bag containing the screws are the screws for the installation of a luggage rack.
Keep this one carefully.
Page9

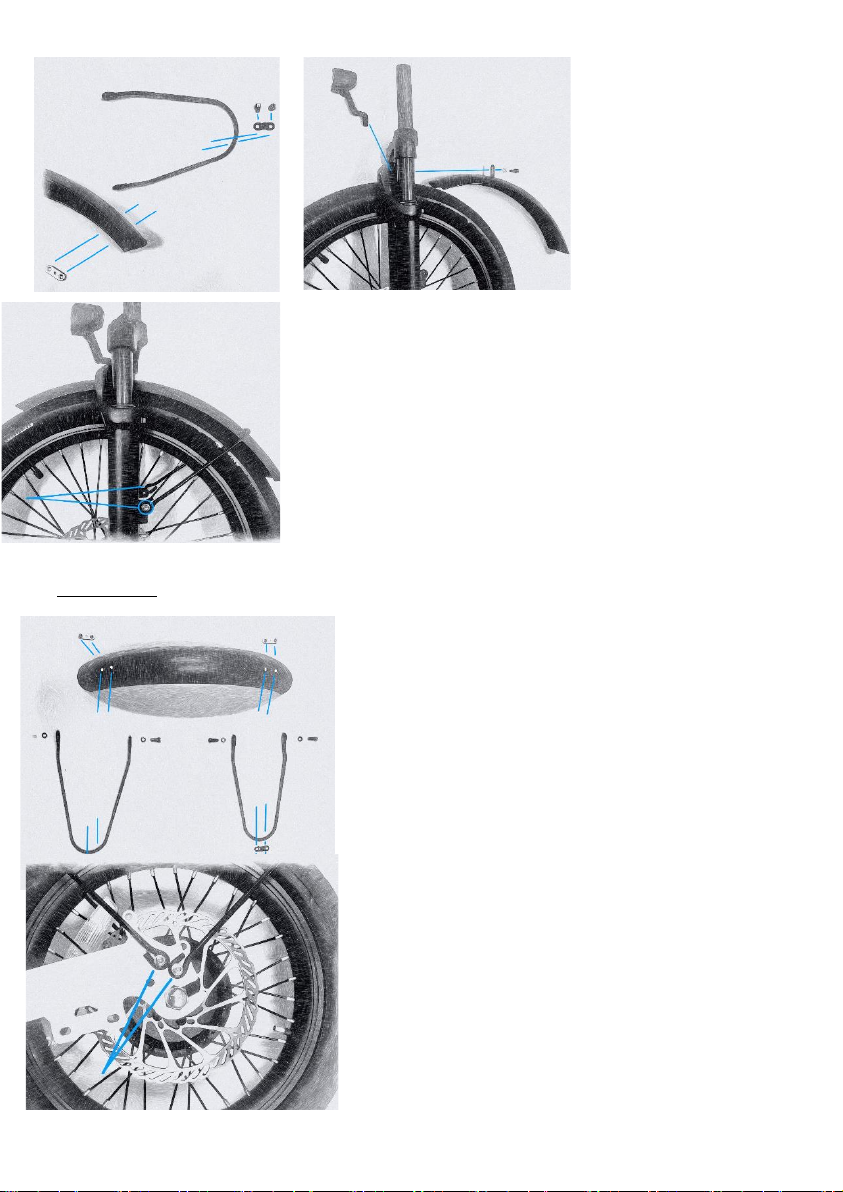
Front mudguard
Here is the assembly of the front mudguard for the following models:
City One, 4 Speed, City X
Position the lamp on the front of the fork and the mudguard on the
back of the fork.
Once everything is in place, tighten with the 5" Allen key and the 10"
open-end spanner.
Here is the assembly of the front
mudguard for the Comfort model
Slightly twist the front dough of the
mudguard to position it correctly.
Once in place, straighten the front foot.
Once everything is in place, tighten it with
the Allen key of 5 and the flat key of 10.
Page 10
Here is the assembly of the front
mudguard for the Comfort X
model.
Fix the rods on the back of the
mudguard.
Do not fully tighten the rod so that
you can adjust the position.
Position the front lamp and then the mudguard and screw it onto the fork arch.
Once the main screw is in place, you can now attach the rods to the bottom of
the fork.
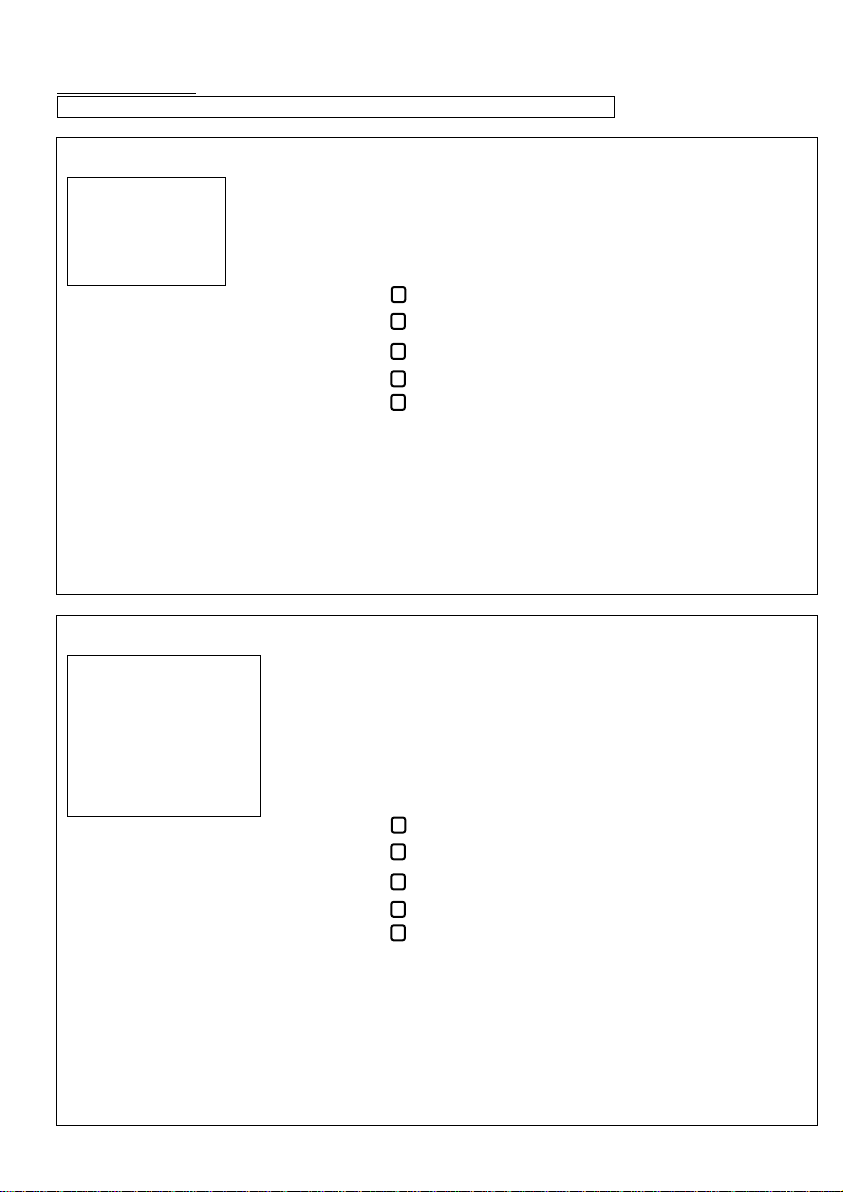
Rear mudguard Mounting of the rear mudguard is identical for all Eovolt models.
Please note that the longest rod is designed to go to the rear of the
bike.
The shortest part of the mudguard must be positioned on the rear of
the bike.
Fix the rods to the mudguard with the pads, do not tighten them to the
maximum to keep movement, this will make the positioning of the
mudguard easier.
Once the mudguard has been positioned, you can attach it to the
frame using the two eyelets provided.
Page11

Maintenance
To ensure safety and to keep the components in good working order, you should have your EAB checked periodically
by your dealer.
Please note that this does not exempt you from the daily checks that you must carry out before each use of your
Eovolt.
Always remove the battery before servicing the EAB.
Daily control
Before each use you should check certain points on your bike to ensure that you can ride safely.
Check :
•The condition of your tyres (pressure, wear, damage and tears).
•The proper functioning and cleanliness of your brake system as well as its wear and tear.
•The tightening of your stem
•Tightening your saddle clamp
•Proper operation is the cleanliness of the lighting devices.
•The correct locking of the frame
•Tightening your wheels
Spare parts and accessories
If you need to replace certain electrical parts we advise you to use original parts that have been selected for their
quality and compatibility. They must be replaced by an authorised technician with newer parts.
Check with an authorised technician to ensure that the accessories to be assembled are compatible.
Cleaning and lubrication
Lubricate once a month and after each washing and drying. Never use a high-pressure cleaner, water jet or
detergent on electrical parts. Remove your battery before cleaning with water. Dry your bike well before putting
your battery back on.
Clean the whole bike with soapy water and a sponge. Or with water under low pressure
Lubrication, transmission assembly, chain, rear derailleur, crankset and wheel axle.
Regularly check the condition of the electrical cables and connectors. The state of charge of your battery (every 2
months) when not in use. If necessary, clean the connectors with contact cleaner.
Revision
A first overhaul is necessary after one month of use or 150 km. Indeed, different screws and bolts of your bike will be
put in place, this revision allows you to refine the adjustments and the tightening of your bike.
Second revision, 6 months or 1000 Km, it allows you to make a first state of your bike and the wear and tear of the
consumables.
We then recommend that you have an overhaul at most every year or every 2000 km.
Page 12

Warranty
Important
Do not confuse maintenance and guarantee. Maintenance and adjustment revisions are not included in the
warranty.
Keep your invoice or sales receipt with date of purchase (the only document that validates the warranty).
Duration of the guarantee:
Bicycle guaranteed 5 years (only frame, rigid fork, handlebar/stem).
Motor, battery, controller, display, guaranteed for 2 years.
•The guarantee takes effect from the date of purchase by the customer. It is only granted for normal use
of the bicycle.
•For any warranty claim, the user must present the invoice with the date of purchase.
•The purchaser cannot claim cancellation of the sale, replacement by a new bicycle or a reduction in price
if the seller is able to repair the defect.
•The repair of a part does not extend the warranty period.
•Your bike is not designed to be used:
- in the sand
- in water (engine, battery, controller and display)
- in a saline environment (e.g. on the beach or seaside)
•Your bike is not designed for prolonged outdoor storage (maximum 12 hours). It must be stored in a dry
and temperate room (frost-free) away from corrosive products: marine environment (e.g. boat deck),
weed-killer, acids, solvents.
General limitation of the guarantee
•The guarantee only applies to the first owner and is not transferable on resale.
•The warranty does not apply if the instructions for use, maintenance and all other instructions in the user
manual have not been followed. Thus, the guarantee only applies for use under normal conditions of use
(excluding rental or any other professional use) and does not cover damage resulting from misuse (use by
two people at the same time, overloading, jumps...), failure to observe the precautions for use or an
accident.
•The warranty does not cover damage to parts with visible signs of impact due to a cause unrelated to the
quality of the bicycle (accident, shock, fall, etc.).
•The warranty does not cover damage caused by repairs carried out by an unauthorised technician or
resulting from poor maintenance.
•The warranty does not apply if modifications have been made to the bicycle by the user or by
unauthorised technicians. Modification of any component of the bicycle (frame and/or part, including
paint) may result in serious injury.
•The warranty does not apply to parts subject to wear and tear:
* Pneumatics * Hydraulic oils and lubricants
* Brake linings * Rear light
* Chains and toothed belts * Handle coverings
* crankset axles and derailleur rollers * Paintings
* Speed and brake cables * Battery
* Bearings and plain bearings
•Variations in battery consumption and performance, as well as a loss of capacity. They are related to the
use of the product, are technically unavoidable and as such do not constitute a material defect.
Page 13

Maintenance booklet
Frame no.
FIRST VISIT
DATE :
Stamp, signature
from the dealer
•Brake control......................................
•Transmission control...........................
•Electrical system check.........................
•Tightening torque check......................
•Changed parts:.......................................
......................................................................................................................................................................................
..........................................................................................................................................................
…………………………………………………………………………………………………………………………………………………………………..
…………………………………………………………………………………………………………………………………………………………………..
………………………………………………………………………………………………………………………………………………………………….
………………………………………………………………………………………………………………………………………………………………….
………………………………………………………………………………………………………………………………………………………………………………
……………………………………………………………………………………………………………………………………………………
SECOND VISIT
DATE :
Stamp, signature
from the dealer
•Brake control......................................
•Transmission control...........................
•Electrical system check.........................
•Tightening torque check......................
•Changed parts:.......................................
......................................................................................................................................................................................
..........................................................................................................................................................
…………………………………………………………………………………………………………………………………………………………………..
…………………………………………………………………………………………………………………………………………………………………..
………………………………………………………………………………………………………………………………………………………………….
………………………………………………………………………………………………………………………………………………………………….
………………………………………………………………………………………………………………………………………………………………………………
……………………………………………………………………………………………………………………………………………………
Page 15
Table of contents


