Epik Learning HIGHQ ELT10101H User manual

User Guide
Guide de l'utilisateur
Guía del Usuario
User Guide
Models: ELT10101H
ELT0802H
ELT0704H

Package contents:
• HIGHQTM Learning Tab.
• Quick Start Guide
• AC Charger
• USB Cable
• Matching Gel Case
Safety Warnings
Do not disassemble the product or accessories.
Do not use alcohol, thinner, or benzene to clean the surface of the device.
The device should be charged for about 6 hours during the first three charge cycles.
Do not store the device in places with high temperature, humidity, or dust. Avoid
dropping or strong impact.
Use an appropriate volume setting. High volume may cause hearing damage when
using headphones.
To charge the device, use the included USB cable and AC adapter.
When transferring data to/from a computer, do not suddenly disconnect the cable;
this may cause the device to malfunction. Use a “Safely Remove Hardware” or
“Eject” function on the computer.
Obey all local laws and regulations when using the device, such as when driving or
aboard an aircraft.
The 8-inch & 10-inch tablets are water resistant. All other devices and accessories
are neither water resistant nor waterproof.

Index
Technical Specifications 4
Micro SD Card Slot 5
Charging 5
Initial Setup 5
Power On/O 5
Before Starting 5
Getting Started 6
Software Overview 10
Unlock and Lock 10
Navigation Bar 10
Turn Wi-Fi On/O and Choosing a Network 11
Camera 11
Browsing the Internet 12
Downloading Content From the Google Play Store 12
Backup with Google 12
Remove Google User/Email/Account 12
Return Tablet to Factory Settings 13
Disclaimer 13
Welcome!
Thank you for purchasing your new
HIGHQTM Learning Tab. This User Guide
will provide step-by-step instructions to
help you learn to use your new device.
After opening the box, make sure the
package contents are available for you.

Quad-core ARM® Cortex-A53 MPCore™ at 1.3 GHz
Android 8.1 Go Edition (Oreo)
Google Browser
32GB
1GB DDR3
Micro SD Card Slot, Support up to 64GB flash
10.1" TFT Touch Panel
Front 2.0 megapixel, Rear 2.0 megapixel
800*1280
Touch Screen
8R/1.0w*2 built in speaker
3.5 mm
Micro USB
3.7V/6000mAH (500 Times in life) with
Lithium-ion Polymer Battery
10.06” x 6.70” x 0.43” (WxHxD) without case
1.25 lbs without case
AC 110-240V 50/60Hz DC 5V/2A
-10 C/14 F - 40 C/104 F
Wi-Fi (802.11 b/g/n)
CPU (Processor) Operating
System
Browser
Internal Storage
Memory (RAM)
Expansion Slot
Screen
Camera
Screen Resolution
Input Method
Built-in speaker Earphone
Jack
USB Cable
Battery
Size
Weight
Voltage
Operating Temperature
Network-Access
Technical Specifications
10.1” Tablet
Quad Core MTK8163 1.3GHZ
Android 8.1 Go Edition (Oreo)
Google Browser
16GB
1GB DDR3
Micro SD Card Slot, Support up to 64GB flash
8" TFT Touch Panel
Front 0.3 megapixel, Rear 2.0 megapixel
800*1280
Touch Screen
8R/1.0w*2 built in speaker
3.5 mm
Micro USB
3.7V/4000mAH(500 Times in life) with
Lithium-ion Polymer Battery
8.76” x 6.55” x 0.625” (WxHxD) with case
1.6 lbs with case
AC 110-240V 50/60Hz DC 5V/2A
-10 C/14 F - 40 C/104 F
Wi-Fi (802.11 b/g/n)
CPU (Processor) Operating
System
Browser
Internal Storage
Memory (RAM)
Expansion Slot
Screen
Camera
Screen Resolution
Input Method
Built-in speaker Earphone
Jack
USB Cable
Battery
Size
Weight
Voltage
Operating Temperature
Network-Access
8” Tablet
Quad Core MTK8163 1.3GHZ
Android 8.1 Go Edition (Oreo)
Google Browser
16GB NAND Flash
1GB DDR3
Micro SD Card Slot, Support up to 32GB flash
7” TFT Touch Panel
Front 0.3 megapixel, Rear 2.0 megapixel
1024 x 600 pixels
Touch screen
8R/1.0w*2 built-in speaker
3.5 mm
Micro USB
3.7V/3600mAH with Lithium-ion Polymer Battery
7.98” x 5.25” x 0.625” (WxHxD) with case
0.85 lbs with case
AC 110~240V 50/60Hz; DC 5V/2A
-10oC/14oF– 40oC/104oF
Wi-Fi (802.11 b/g/n)
CPU (Processor) Operating
System
Browser
Internal Storage
Memory (RAM)
Expansion Slot
Screen
Camera
Screen Resolution
Input Method
Built-in speaker Earphone
Jack
USB Cable
Battery
Size
Weight
Voltage
Operating Temperature
Network-Access
7” Tablet
4

Micro SD Card Slot
Your tablet is equipped with a micro SD memory card slot. You can use a micro
SD memory card (sold separately) for additional storage of music, photos, files,
etc. When inserting a micro SD memory card, insert as illustrated. Be careful not
to insert it at an angle as doing so may cause damage to the tablet or memory
card. To remove the card, press firmly and the card will pop out. It is
recommended to eject the micro SD card only when the tablet is powered o.
Charging
Use the included USB cable and AC adapter to charge the tablet. Other
chargers may cause damage. Do not use the charger in a humid environment.
Do not allow the charger to come in contact with liquid or moisture. Plug the AC
Adapter into the outlet, then connect the micro USB connector to the tablet.
Initial Setup
To get started with your new HIGHQTM Learning Tab, ensure that your tablet has
been fully charged before the first use. Press and hold the power button for 5
seconds until you see the HIGHQTM Learning Tab logo on screen. Allow 1 minute
for the tablet to power on. You will be prompted to start the initial setup process.
Power On/Off
To power on your tablet, press and hold the power button for 5 seconds.
To put your tablet in sleep mode, press and release the power button. This
mode is best if you will use the device again soon.
To power o your tablet, press and hold the power button for 2 seconds, then
tap Power o. This is best when the tablet will not be used for a longer period
(more than a few days).
Before starting
Make sure a Wi-Fi connection is available.
We recommend using a Google Account
(or Gmail) with your tablet. If you do not
have one, this guide will help you sign up
for a free Google Account.
5

Geing Started
Make sure a Wi-Fi connection is available. We recommend using a Google
Account (or Gmail) with your tablet. If you do not have one, this guide will help
you sign up for a free Google Account.
Charging
1. Before first use, we recommend
charging the tablet for 6 hours.
2. Plug in the included AC adapter.
3. Connect the USB cable from the AC
adapter to the tablet.
Language Selection
1. Scroll through the languages and
highlight your preference.
2. Tap Next.
Turn Power On
1. Press and hold the POWER button
for 3 seconds until the lighted
screen appears.
1
2
6

Connect to Wi-Fi
1. Tap your Wi-Fi Network name.
2. If your Network has a
password you will be
prompted to enter it.
3. Tap Connect.
Got Google?
1. If you already have a Google
Account, enter your email and
tap NEXT, and enter your
password.
2. If not, tap SKIP and you can
set one up.
Create a Google
Account
1. Enter your first and last name
in the appropriate boxes. Tap
the right arrow to continue.
7
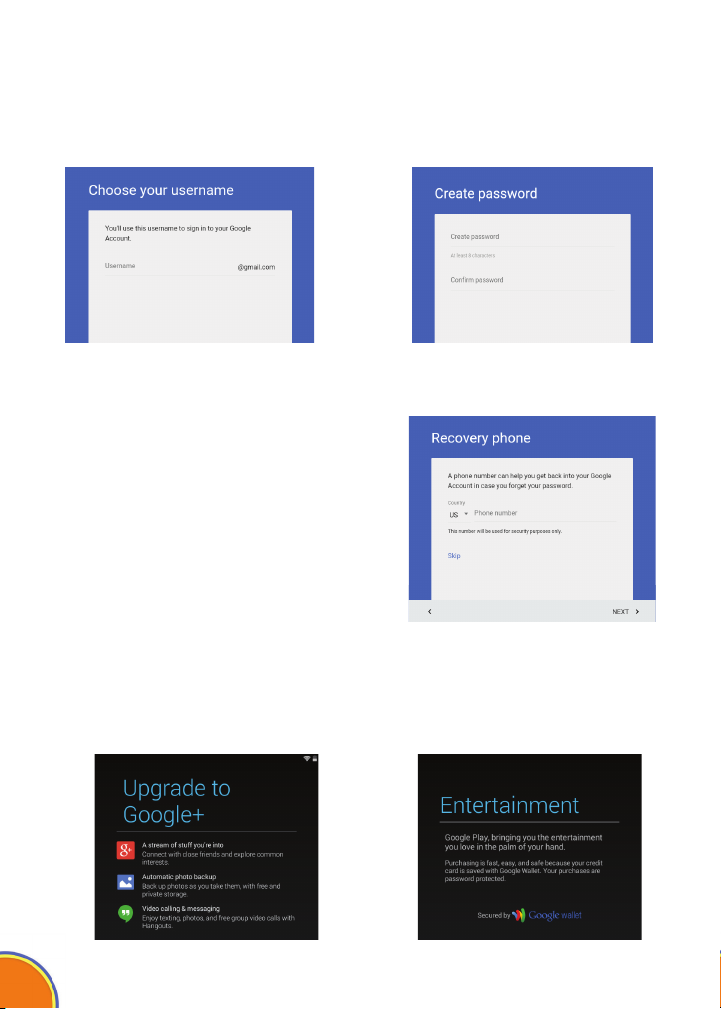
Recovery Phone
1. Follow the instructions on screen if you
would like to set up recovery phone.
2. If not, you can do this later by logging
in to google.com.
Setup Payment Info
You may choose to add a credit card to your account for digital purchases.
This can be done later at wallet.google.com.
Username and Password
1. Enter your desired username and tap the right arrow to continue.
2. Enter a password in the first box and repeat it in the second box. Tap the
right arrow to continue.
8

Google Services
Uncheck any services that you do not wish to have active on your tablet, then
tap the right arrow to continue.
Foow the prompts on screen to set up a Kidomi
account and get access to hundreds of games, videos,
and reading activities.
and reading activities.
9
Soware Overview
Your HIGHQTM Learning Tab features the AndroidTM operating system, version 8.1
Go Edition (Oreo). The included Google PlayTM store app gives you access to a
catalog of over one million apps. †† In addition, your tablet comes packed with
hundreds of learning games and reading activities as part of Kidomi, including
multi-award winning apps like Looney TunesTM Phonics, The Very Hungry
Caterpillar, Crayola Color, Draw and Sing, Toca Boca Hair Salon, and
iHeartRadio. Also, you'll find a suite of utilities designed especially for kids,
including a browser, photo viewer, and video player.
Unlock and Lock
To unlock the tablet, drag the padlock upwards.
To lock, simply press the power button to lock the tablet (sleep mode).
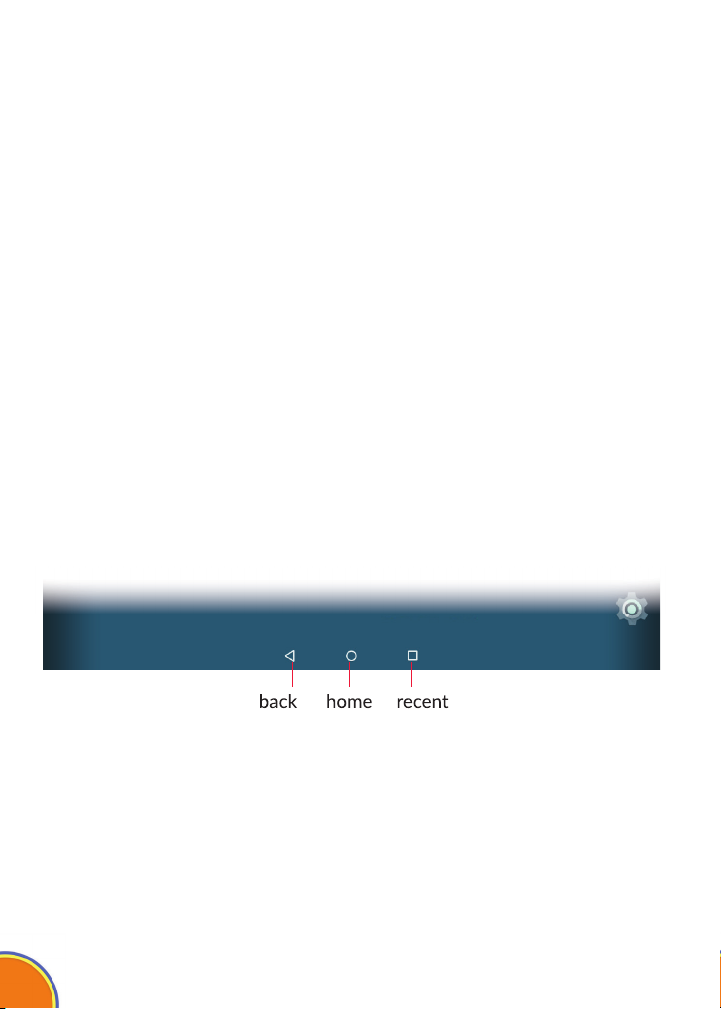
Navigation Bar
The navigation bar along the bottom of the screen allows you to switch between
apps. In some apps, the navigation bar becomes hidden. To reveal it, swipe up
from the bottom edge of the screen. The left button, back, takes you back one
screen. The center button, home, takes you to the home screen. The right
button, recent apps, brings up thumbnails of recently used apps; tap one to
switch to it.
10

Turn Wi-Fi On/Off and Choosing a Network
1. If you are in Kidomi, tap the hamburger icon on the upper right corner of the
screen.
2. Tap the Parent icon and enter your parent PIN.
3. Tap Exit Kidomi to go into Grown-Up mode.
4. Tap Settings.
5. Tap on Network/Internet
6. Tap Wi-Fi.
7. Tap the switch at the top of the screen to turn Wi-Fi on or o. To choose a
Wi-Fi network, make sure Wi-Fi is switched ON.
8. Tap the name of the network that you would like to connect to.
9. If a password is required, enter it in the box.
10. Tap Done on the keyboard, then tap Connect. Once a connection is
established, “connected” will appear under the network name.
Camera
The camera app can be accessed from the Android home screen.
Mode
Take Photo
Options
To switch between the front and rear camera, tap the
camera icon the top right of the screen.
Tap on the video camera icon to take a video.
To view pictures tap on the picture thumbnail on the top
right of the screen.
11

Browsing the Internet
Your tablet comes preloaded with the Chrome web browser. Locate and
tap the icon in your apps. Chrome works just like a web browser on
other devices and computers.
Downloading Content from the Google Play Store
Google Play oers an expansive catalog of apps, music, movies, etc.
Backup with Google
When you create a Google account on your HIGHQTM Learning Tab, you are
given the option to automatically back up app data, Wi-Fi passwords, and other
settings to Google's servers. If you wish to change this setting after creating or
using your existing Google Account:
1. From Grown-Up mode, tap Settings.
2. Scroll down and tap Backup & Reset.
3. Check, or uncheck Back up my data to enable or disable automatic backup of
your data to Google’s servers.
Remove Google User/Email Account
(please perform before the factory reset)
1. Tap on Settings
2. Tap on Users & Accounts
3. Tap on your Email
4. Tap on Remove Account
Back
Forward
Search and
Address Bar
4. Tap on Remove Account
12

Return Tablet to Factory Seings
To perform a factory data reset, you must use the Grown-up login and PIN.
WARNING: A factory data reset will delete all user setting and data such as apps
that you have downloaded, music, videos, photos, etc. All preloaded
applications will automatically be reinstalled. After the factory data reset, you
need to complete the initial setup process.
1. Tap Home at the bottom of the screen.
2. Tap Settings.
3. Scroll down and tap Backup & Reset.
4. Tap Factory data reset.
5. Tap Reset tablet.
Disclaimer
• Requires an internet connection.
• Google Play requires an internet connection. A
Google account may be required to download
apps.
• Many apps are available to download for free.
• Many apps are available for purchase.
Android is a trademark of Google Inc. The
Android robot is reproduced or modified from
work created and shared by Google and used
according to terms described in the Creative
Commons 3.0 Attribution License. Google Play
is a trademark of Google Inc.
13

Avertissements de sécurité
Ne pas démonter le produit ou les accessoires.
N'utilisez pas d'alcool, de diluant ou de benzène pour nettoyer la
surface de l'appareil.
L'appareil doit être chargé pendant environ 6 heures au cours des trois
premiers cycles de charge.
Ne rangez pas l'appareil dans des endroits soumis à une température
élevée, humidité ou poussière. Évitez de laisser tomber l'appareil ou les
impacts forts.
Utilisez un réglage de volume approprié. Un volume élevé peut
entraîner des dommages auditifs lors de l'utilisation d'un casque
d'écoute.
Pour charger l'appareil, utilisez le câble USB et l'adaptateur secteur
fournis.
Lorsque vous transférez des données vers/depuis un ordinateur, ne
débranchez pas le câble soudainement, cela pourrait provoquer un
dysfonctionnement de l'appareil. Utilisez la fonction « Retirer le
périphérique en toute sécurité »ou
« Éjecter » sur l'ordinateur.
Respectez toutes les lois et réglementations locales lorsque vous
utilisez l'appareil, par exemple lorsque vous conduisez un véhicule ou
vous trouvez à bord d'un avion.
La tablette de 8pouces est résistante à l'eau. Tous les autres appareils
et accessoires ne sont ni résistants à l'eau ni étanches.
Contenu de l'embaage :
•HIGHQTM Learning Tab.
• Guide de démarrage rapide
• Chargeur CA
• Câble USB
• Étui en gel assorti
et accessoires ne sont ni résistants à l'eau ni étanches.
14

Bienvenue!
Merci d'avoir acheté votre nouveau
HIGHQTM Learning Tab. Ce guide de
l'utilisateur vous fournira des instructions
étape par étape pour vous aider à
apprendre à utiliser votre nouvel appareil.
Après avoir ouvert la boîte, veuillez vérifier
le contenu de l'emballage.
Index
Spécifications techniques 16
Carte Micro SD 17
Chargement 17
Configuration initiale 17
Mise sous tension/hors tension 17
Avant de commencer 17
Commencer 18
Aperçu du logiciel 22
Déverrouiller et verrouiller 22
Barre de navigation 22
Activer ou désactiver le Wi-Fi et choisir un réseau
23
Caméra 23
Surfer sur Internet 24
Télécharger du contenu depuis le Google Play Store 24
Sauvegarde avec Google 24
Supprimer le compte d'utilisateur/de curriel Google 24
Revenir aux paramètres d'usine sur la tablette 25
Avis de non-responsabilité 25

Quad Core MTK8163 1.3GHZ
Android 8.1 Go Edition (Oreo)
Browser Google
16Go NAND Flash
1Go DDR3
Fente de carte Micro SD, allant jusqu'à 32 Go
Écran tactile TFT de 7 po
Caméra avant de 0,3 mégapixel, arrière de 2,0 mégapixels
1024*600 pixels
Écran tactile
Haut-parleur intégré de 8R/1.0w*2
de 3,5 mm
Micro USB
3,7V/3600mAH avec batterie polymère lithium-ion
200 mm x 135 mm x 16 mm
0,36 kg
CA 110~240V 50/60Hz CC 5V/2A
-10 oC/14 oF - 40 oC/104 oF
Wi-Fi (802.11 b/g/n)
Fonctionnement du processeur (CPU)
Système
Navigateur
Stockage interne
Mémoire (RAM)
Fente d'extension de
Écran
Caméra
Résolution de l'écran
Mode d'entrée
Haut-parleurs intégrés
Prise d'écouteurs
Câble USB
Batterie
Taille
Poids
Tension
Température de fonctionnement
Accès réseau
Quad Core MTK8163 1.3GHZ
Android 8.1 Go Edition (Oreo)
Browser Google
16Go
1Go DDR3
Fente de carte Micro SD, allant jusqu'à 64 Go
Écran tactile TFT de 8 po
Caméra avant de 0,3 mégapixel, arrière de 2,0 mégapixels
800*1280
Écran tactile
Haut-parleur intégré de 8R/1.0w*2
de 3,5 mm
Micro USB
3,7V/4000mAH (500 fois pendant la durée de vie) avec une batterie
polymère lithium-ion
225 mm x 164 mm x 16 mm
0,48 kg
CA 110~240V 50/60Hz CC 5V/2A
-10 C/14 F - 40 C/104 F
Wi-Fi (802.11 b/g/n)
Fonctionnement du processeur (CPU)
Système
Navigateur
Stockage interne
Mémoire (RAM)
Fente d'extension de
Écran
Caméra
Résolution de l'écran
Mode d'entrée
Haut-parleurs intégrés
Prise d'écouteurs
Câble USB
Batterie
Taille
Poids
Tension
Température de fonctionnement
Accès réseau
Tablee de 8 po
Quad-core ARM® Cortex-A53 MPCore™ at 1.3 GHz
Android 8.1 Go Edition (Oreo)
Browser Google
32Go
1Go DDR3
Fente de carte Micro SD, allant jusqu'à 64 Go
Écran tactile TFT de 10.1 po
Caméra avant de 2,0 mégapixel, arrière de 2,0 mégapixels
800*1280
Écran tactile
Haut-parleur intégré de 8R/1.0w*2
de 3,5 mm
Micro USB
3,7V/6000mAH (500 fois pendant la durée de vie) avec une batterie
polymère lithium-ion
255,5 mm x 170.4 mm x 11 mm (sans étui)
0,56 kg (sans étui)
CA 110~240V 50/60Hz CC 5V/2A
-10 C/14 F - 40 C/104 F
Wi-Fi (802.11 b/g/n)
Fonctionnement du processeur (CPU)
Système
Navigateur
Stockage interne
Mémoire (RAM)
Fente d'extension de
Écran
Caméra
Résolution de l'écran
Mode d'entrée
Haut-parleurs intégrés
Prise d'écouteurs
Câble USB
Batterie
Taille
Poids
Tension
Température de fonctionnement
Accès réseau
Tablee de 10.1 po
Tablee de 7 po
16
Spécifications techniques

Carte Micro SD
Votre tablette est équipée d'une fente pour carte mémoire micro SD. Vous pouvez utiliser
une carte mémoire micro SD (vendue séparément) pour stocker plus de musique, photos,
fichiers, etc. Lorsque vous insérez une carte mémoire micro SD, insérez-la comme illustré.
Veillez à ne pas l'insérer en angle, car cela pourrait endommager la tablette ou la carte
mémoire. Pour retirer la carte, appuyez fermement sur la carte et elle sortira. Il est
recommandé d'éjecter la carte micro SD uniquement lorsque la tablette est éteinte.
Chargement
Pour charger la tablette, utilisez le câble USB et l'adaptateur secteur fournis. D'autres
chargeurs peuvent causer des dommages. N'utilisez pas le chargeur dans un
environnement humide. Ne laissez pas le chargeur entrer en contact avec du liquide ou
de l'humidité. Branchez l'adaptateur secteur dans la prise, puis connectez le connecteur
micro USB à la tablette.
Configuration initiale
Pour commencer avec votre nouveau HIGHQTM Learning Tab, assurez-vous que votre
tablette a été complètement chargée avant la première utilisation. Appuyez sur le bouton
d'alimentation et maintenez-le enfoncé pendant 5 secondes jusqu'à ce que le logo
HIGHQTM Learning Tab s'ache à l'écran. Attendez 1 minute pour que la tablette s'allume.
Vous serez invité à commencer le processus d'installation initial.
Mise sous tension/hors tension
Pour mettre votre tablette sous tension, appuyez et maintenez la touche de mise sous
tension pendant 5 secondes.
Pour mettre votre tablette en mode de veille, appuyez et relâchez la touche de mise sous
tension. Ce mode est préférable si vous utilisez l'appareil à nouveau bientôt.
Pour la mise sous tension/hors tension appuyez sur la touche de mise de tension et
maintenez-la enfoncée pendant 2 secondes, puis appuyez sur Mise hors tension (Power
o). Cela est préférable lorsque la tablette ne sera pas utilisée pour une longue période
de temps (plus de quelques jours).
17
Avant de commencer
Assurez-vous qu'une connexion Wi-Fi est
disponible. Nous vous recommandons d'utiliser
un compte Google (ou Gmail) avec votre tablette.
Si vous n'en avez pas, ce guide vous aidera à
vous inscrire gratuitement à un compte Google.

1
2
Commencer
Assurez-vous qu'une connexion Wi-Fi est disponible. Nous vous recommandons
d'utiliser un compte Google (ou Gmail) avec votre tablette. Si vous n'en avez pas,
ce guide vous aidera à vous inscrire gratuitement à un compte Google.
Chargement
1. Avant la première utilisation, nous
vous recommandons de charger la
tablette pendant 6 heures.
2. Branchez l'adaptateur secteur
inclus dans la prise.
3. Connectez le câble USB et
l'adaptateur secteur à la tablette.
Sélection de la langue
1. Faites défiler les langues et mettez
en surbrillance la langue souhaitée.
2. Appuyez sur Suivant.
Mere sous tension
1. Appuyez sur la touche POWER
et maintenez-la enfoncée pendant
3 secondes jusqu'à ce que l'écran
s'allume.
18

Se connecter au Wi-Fi
1. Appuyez sur le nom de votre
réseau Wi-Fi.
2. Si votre réseau a un mot de
passe, vous serez invité(e) à
le saisir.
3. Appuyez sur Connecter.
Vous avez Google?
1. Si vous possédez déjà un
compte Google, entrez votre
adresse courriel et appuyez sur
SUIVANT, puis entrez votre mot
de passe.
2. Sinon, appuyez sur SAUTER
(SKIP) et vous pouvez en créer
un.
Créer un compte
Google
1. Entrez votre prénom et nom
de famille dans les cases
appropriées. Touchez la flèche
droite pour continuer.
19

Téléphone de récupération
1. Suivez les instructions à l'écran si vous
souhaitez configurer un téléphone de
récupération.
2. Sinon, vous pourrez le faire plus tard
en vous connectant à google.com.
Configuration des informations de paiement
Vous pouvez choisir d'ajouter une carte de crédit à votre compte pour
eectuer des achats numériques. Cela peut être fait plus tard sur
wallet.google.com.
Nom d'utilisateur et mot de passe
1. Entrez votre nom d'utilisateur souhaité et appuyez sur la flèche droite pour
continuer.
2. Entrez un mot de passe dans la première case et répétez-le dans la
deuxième case. Touchez la flèche droite pour continuer.
20
This manual suits for next models
2
Table of contents
Languages:
Other Epik Learning Tablet manuals


