EPLO EP-W20 User manual
Thank you for choosing our products. Please read the instructions carefully before installation
and keep it available for future maintenance or reference.
Installation Manual
Model: EP-W20

Before installation
Installation procedures
01
03
06
07
Safety instructions
List of materials
Installation
Technical drawings
Pre-installation confirmation
Content
05
Installation tools
Installation dimensions 06
08
Required accessories for in-wall carrier
10
06

01
SAFETY INSTRUCTIONS
READ ALL INSTRUCTIONS BEFORE USING
When using electrical products, especially when children are present, basic safety precautions
should always be followed, including the following:
1. The appliance is not to be used by persons (including children) with reduced physical,
sensory or mental capabilities, or lack of experience and knowledge, unless they have been
given supervision or instruction.
2. This appliance can be used by children aged from 8 years and above and persons with
reduced physical, sensory or mental capabilities or lack of experience and knowledge if
they have been given supervision or instruction concerning use of the appliance in a safe
way and understand the hazards involved.
3. Children shall not play with the appliance.
4. Cleaning and user maintenance shall not be made by children without supervision.
DANGER–To reduce the risk of electrocution:
WARNING– To reduce the risk of burns, electrocution, fire, or injury to persons.
1. Do not place or store product where it can fall or be pulled into a tub or sink.
3. Do not reach for a product that has fallen into water. Unplug immediately.
4. Do not wash the main unit or electrical plug with water or detergent.
5. Do not handle the electrical plug with wet hands.
6. Never block the outlet of the air dryer.
7. Never disassemble, repair or modify this product.
8. During installation, disassembly, repair and maintenance of the product, the power plug
must be switched off and water supply be shut off.
2. Do not place in or drop into water or other liquid.
1. Close supervision is necessary when this product is used by, on, or near children or
individuals with disabilities.
2. Use this product only for its intended use as described in this manual. Do not use
attachments not recommended by the manufacturer.
3. Never operate this product if it has a damaged cord or plug, if it is not working properly, if it
has been dropped or damaged, or dropped into water. Return the product to a service
center for examination and repair.
4. Keep the cord away from heated surfaces.
5. Never use while sleeping or drowsy.
6. Never drop or insert any object into any opening or hose.
7. Do not use outdoors or operate where aerosol (spray) products are being used or where
oxygen is being administered.
8. Connect this product to a properly grounded outlet only. See Grounding Instructions.
9. Do not throw cigarettes and other burning materials into toilet, otherwise it might cause fire.
10. This product is an electric appliance, so it must be placed far away from water and other
liquid.
11. Do not lay the product on its side or upside down during the electrical circuit.
12. It is prohibited to use other electric appliances in the same socket.
13. It is forbidden to use the power extension or unstable loose outlet.
14. Do not reuse any existing water supply hoses, otherwise it might cause leakage, fire or
electrical shock. Installation should include specified components and a new water supply
hose.

02
IMPORTANT SAFETY INSTRUCTIONS
CAUTION – Failure to follow the instructions may cause bodily injury or property
damage.
GROUNDING INSTRUCTIONS
This product should be grounded. In the event of an electrical short circuit, grounding reduces
the risk of electric shock by providing an escape wire for the electrical current.
The plug must be plugged into an outlet that is properly installed and grounded.
DANGER –Improper use of the grounding plug can result in a risk of electric shock.
If repair or replacement of the cord or plug is necessary, do not connect the grounding wire to
either flat-head terminal.
Check with a qualified electrician or serviceman if the grounding wire instructions are not
completely understood, or if in doubt as to whether the product is properly grounded.
This product is factory equipped with a specific electric cord and plug to permit connection to
a proper electric circuit. Make sure that the product is connected to an outlet having the same
configuration as the plug. No adapter should be used with this product. Do not modify the plug
provided — if it will not fit the outlet, please have the proper outlet installed by a qualified
electrician. If the product must be reconnected for use on a different type of electric circuit, the
reconnection should be made by qualified service personnel.
SAVE THESE INSTRUCTIONS
1. Do not install or use the product in wet places such as a steam room etc.
2. It is recommended to use water-proof electrical outlet which should be installed in a place
where is not easily to get wet.
3. This product should be used with 110V-120V, 50/60Hz electrical current only, load current
is at least 15A. Power plug must be equipped with ground fault circuit interrupter or ground
fault electrical leakage protector or similar high sensitive, rapid type leakage switch. (Rated
sensitive current under 6mA).
4. When it thunders, it is strongly recommended to pull out the power plug.
5. Do not stand on product unit, seat and lid.
6. Do not lean against the lid when using the product, to avoid damage.
7. This product is equipped with a soft-closing seat and lid. Do not push the toilet seat closed,
or damage may occur.
8. Do not use any caustic chemicals or scrubbing brush to clean this product.
9. Exposure to direct sunlight is prohibited.
10. Only use tap water or potable water; otherwise it may cause chafing.
11. Do not connect water supply to a hot water supply. Make sure inlet water temperature is
between 3~35℃/37.4~95℉.
12. Raise room temperature to prevent the toilet from damage due to freezing.
13. When not using the product over three(3) days, drain the water out of the toilet and pull
the electrical plug from the wall outlet.
14. Stop using the product and shut off the power when product malfunctions. Call for
professional service.
15. Means for full disconnection must be incorporated in series in the power input loop of
the same room where the product is installed, that is at the front end of the fixed wiring
to ensure safe use.
03
Installation Manual
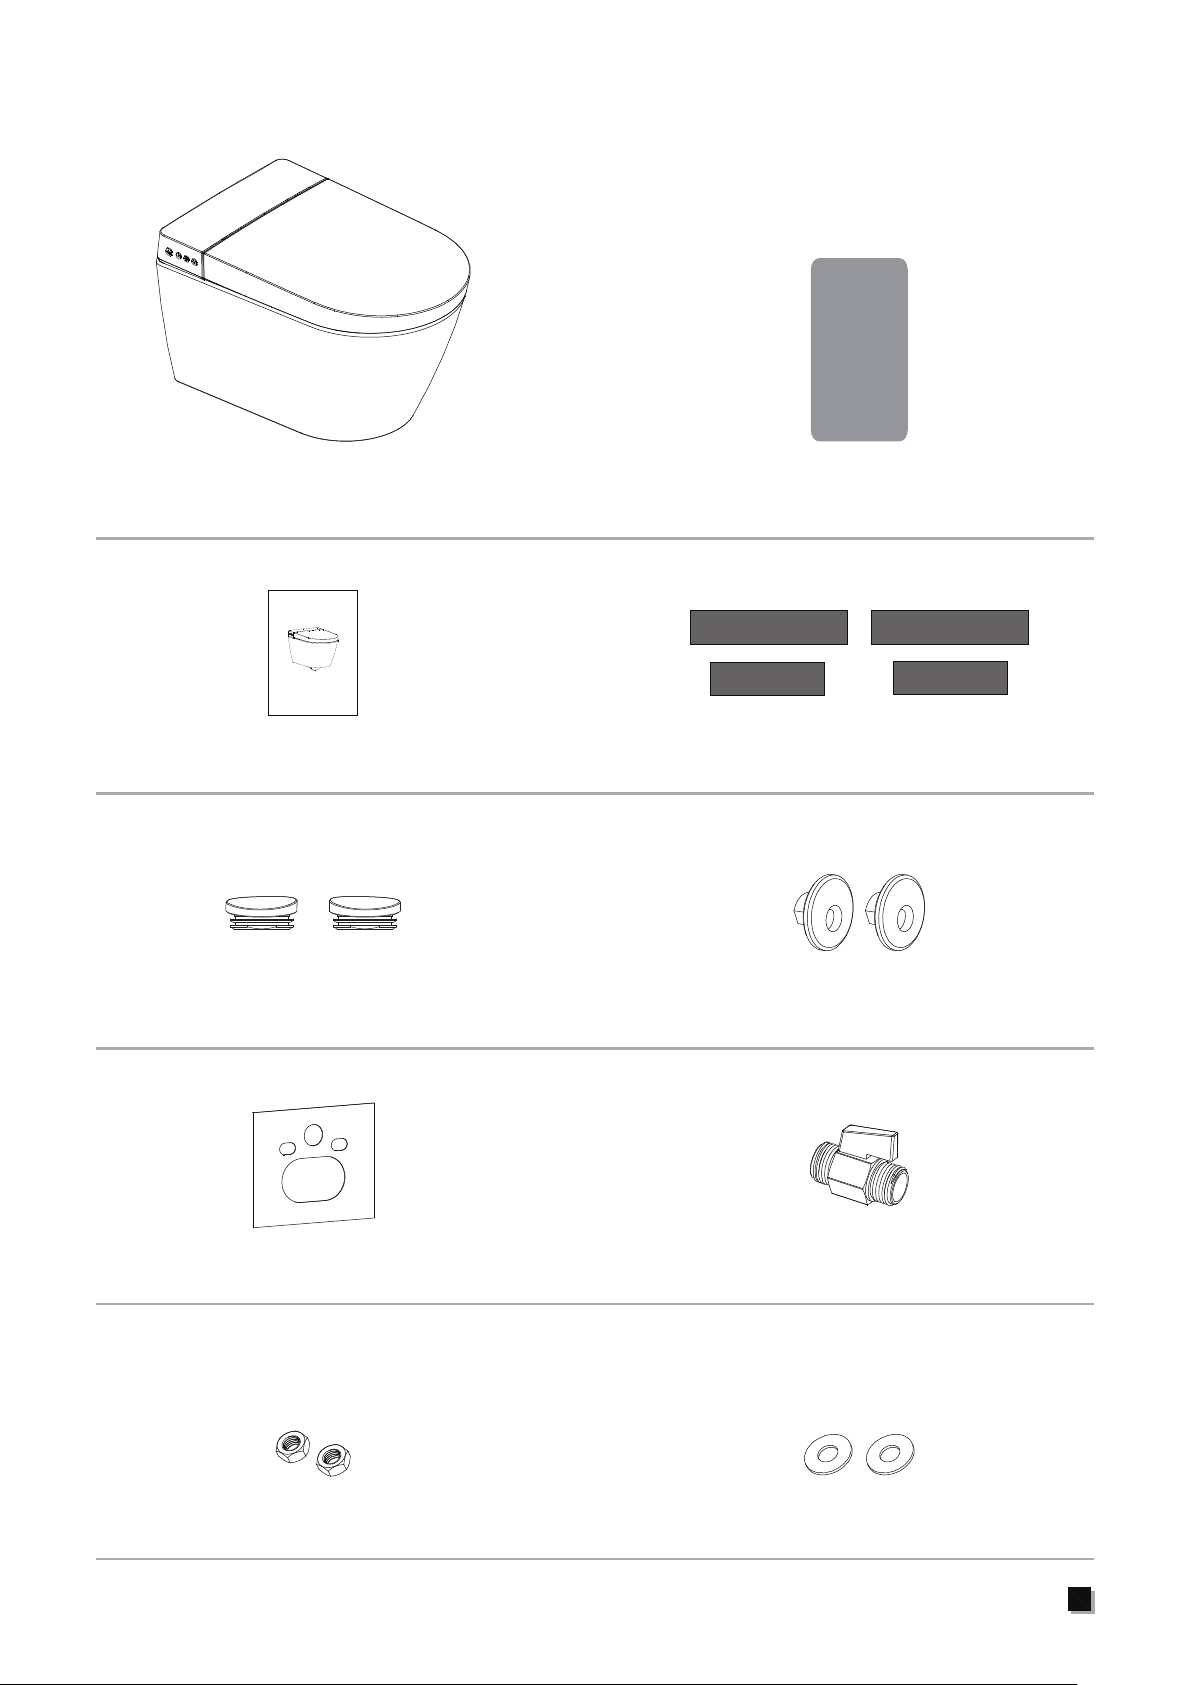
Transition Piece
Main Unit Remote Control Components
Installation Manual
Locking Nut (M12) Flat Washer
List of materials
Decorative Cap
Pad
Velcro
Ball Valve

04
List of materials
Hose
Power Cord
(Refer to the actual product)

05
Technical drawings
(Unit: mm)
Ground floor Ground floor
Ground floor
479
410
300
35
135212
963
433
312
180
606
398
06
Installation dimensions (Unit: mm)
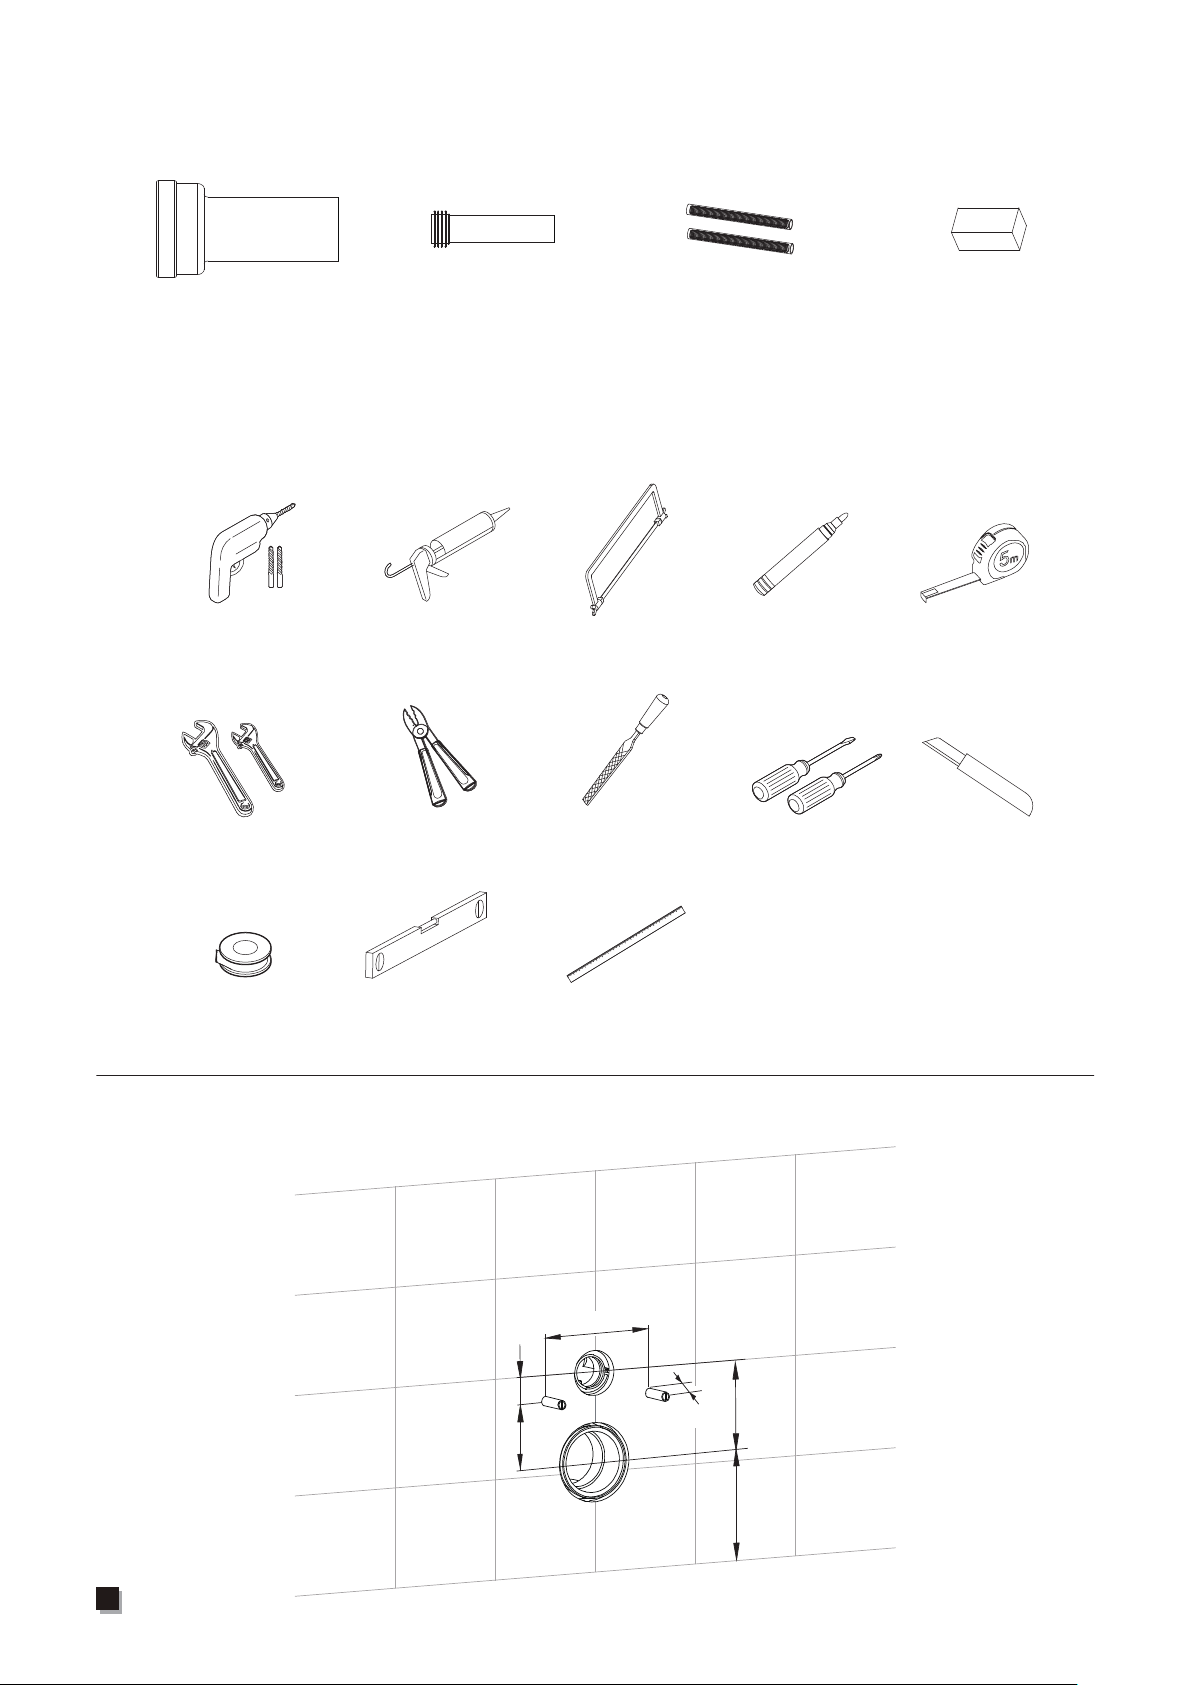
Installation tools
Drill
(with 1/4” drill bit) Caulk gun Saw
Assorted spanners FileWire stripper
Teflon tape
Tape measure
Assorted screwdrivers Cutter
Spirit level
Marker
Ruler
Required accessories for in-wall carrier
180
135
35
212
100
58.5
Extended drain pipe
+
Gasket
Flush pipe
+
Gasket
Bolts
(with protective sleeve)
Silicone sponge

07
After installation
Water & Electricity pre-installation dimensions
Pre-installation confirmation (Unit: mm)
Circuit pre-installation: Install a fixed electrical supply circuit (Neutral wire,
live wire and ground wire included.)
· Confirm the electrical connection location.
· Reserve pipeline for electrical circuit
Circuit breaker pre-installation
· Connect a separate upstream circuit breaker.
· Pre-connect an earth leakage circuit breaker or grounding protector for other independent
circuits.
Waterway pre-installation
· Reserve pipeline for water supply hose.
Note:
This circuit must have a leakage
protection function and can be
shut down separately.
212
180
500
500
58.5

08
Before installation
1. Minimum static water pressure: 0.08+MPa (8.5L+L/min), failure to meet this
pressure will not achieve the best flushing effect.
Note: Apply the methods below if you don't have water pressure testing device.
Open the angle valve to check the water volume. If the water volume after 10
seconds is greater than 1.42L, then it is OK to proceed installation.
10 Sec
2. Installation of power switch.
250
Note:
1. Please install the power switch in
accordance with the circuit breaker
instruction after the power is turned off
(Circuit breaker not supplied).
2. The ground wire should be 5mm longer
than neutral wire and live wire.
3. white: neutral wire
black: live wire
green: ground wire.
09
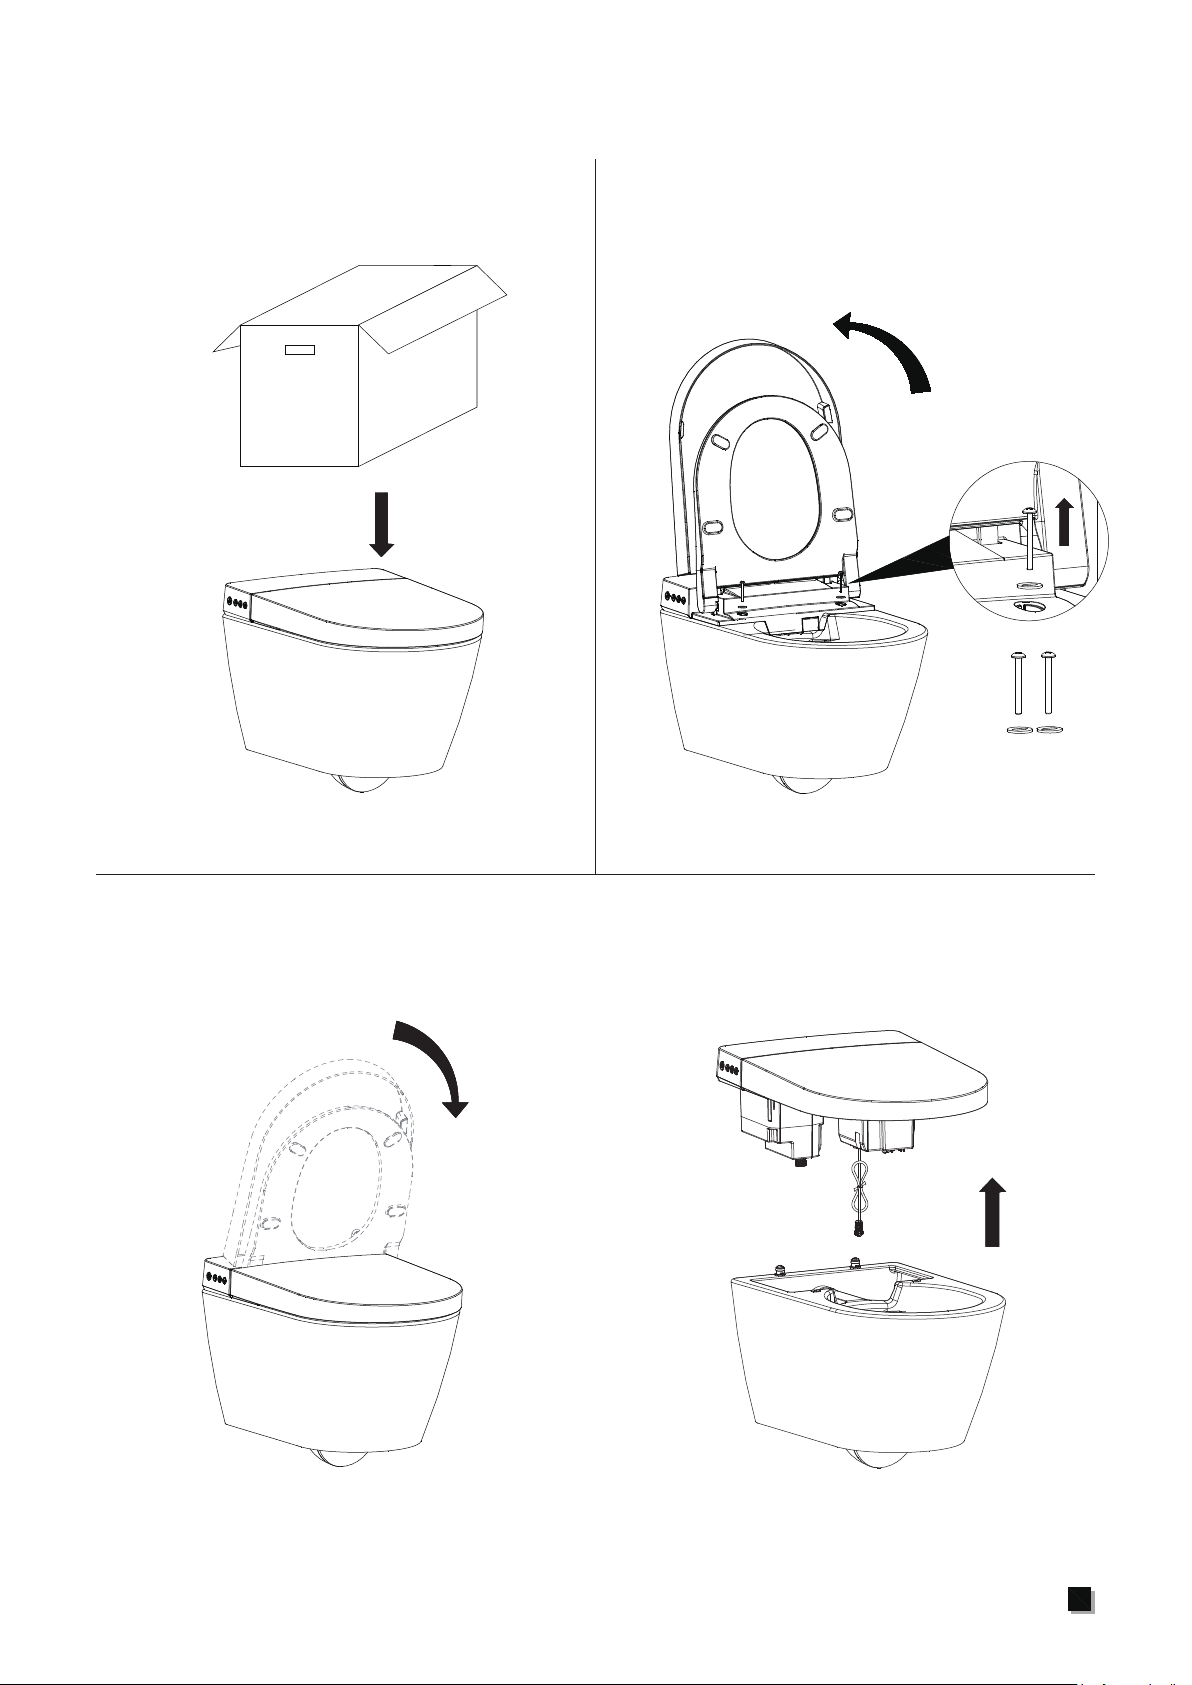
Installation Procedures
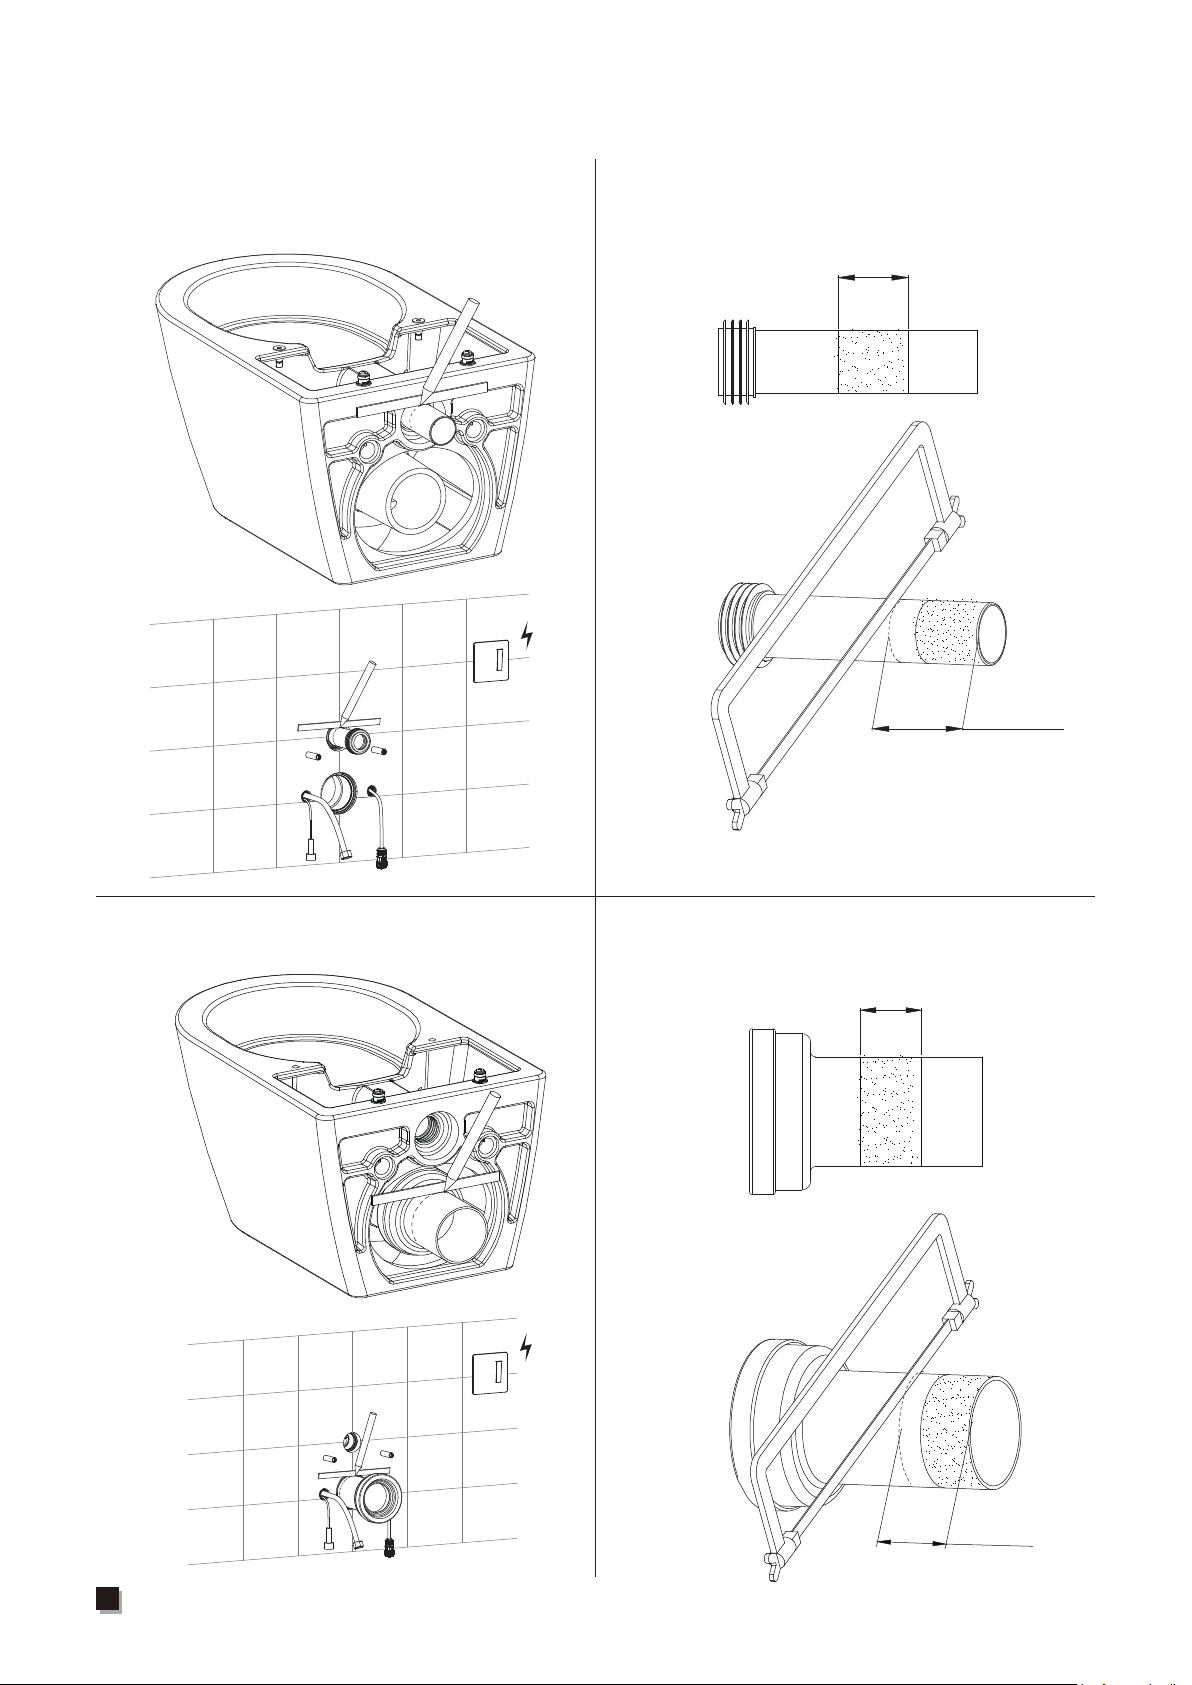
3. Close lid and seat, and then remove the bidet. Be careful not to damage the
product.
1. Unpack and confirm the list of
materials.
2. Open lid and seat, then remove
screws and washers.
10
L1
L2
Installation Procedures
L1+5mm
5. Cut off the excess pipe.4. Measure the flush pipe.
7. Cut off the excess pipe.
6. Measure the drain pipe.
L2+3mm

11
Installation Procedures
8. Bevel and deburr the sharp edges. 9. Apply silicone oil on the cutting
surface.
10. Install the pad. 11. Remove the protective sleeve on
bolts. Apply silicone oil on the
in-wall flush pipe and drain pipe
orifice.

12
Installation Procedures
12. Mount the flush pipe and drain
pipe.
13. Apply silicone oil on the flush pipe
and drain pipe.
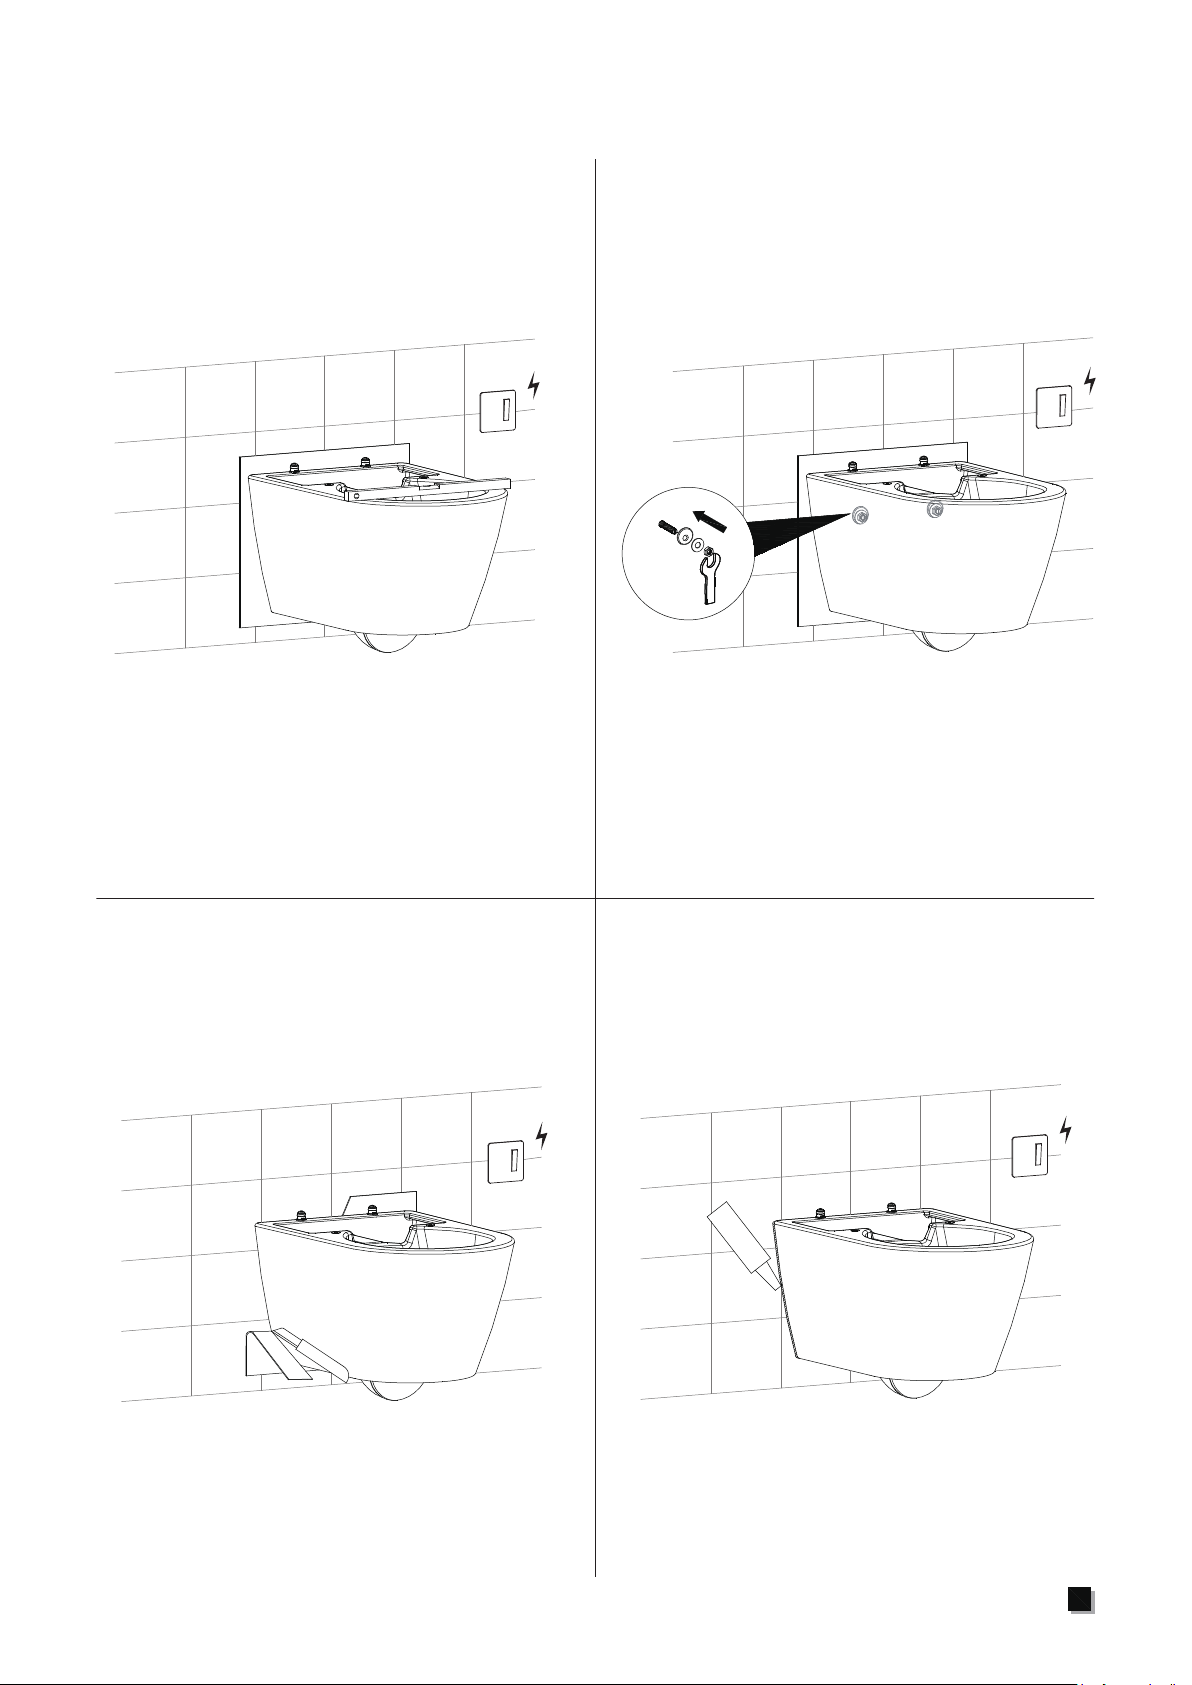
14. Place the toilet against the wall. 15. Pass the water supply hose,
off-seat auto flushing cable and
power cord through the toilet.
13
Installation Procedures
16. Level the toilet. 17. Install the washer and tighten the
nut.
18. Cut off the excess pad. 19. Seal gap around toilet with sealant.
14
Installation Procedures
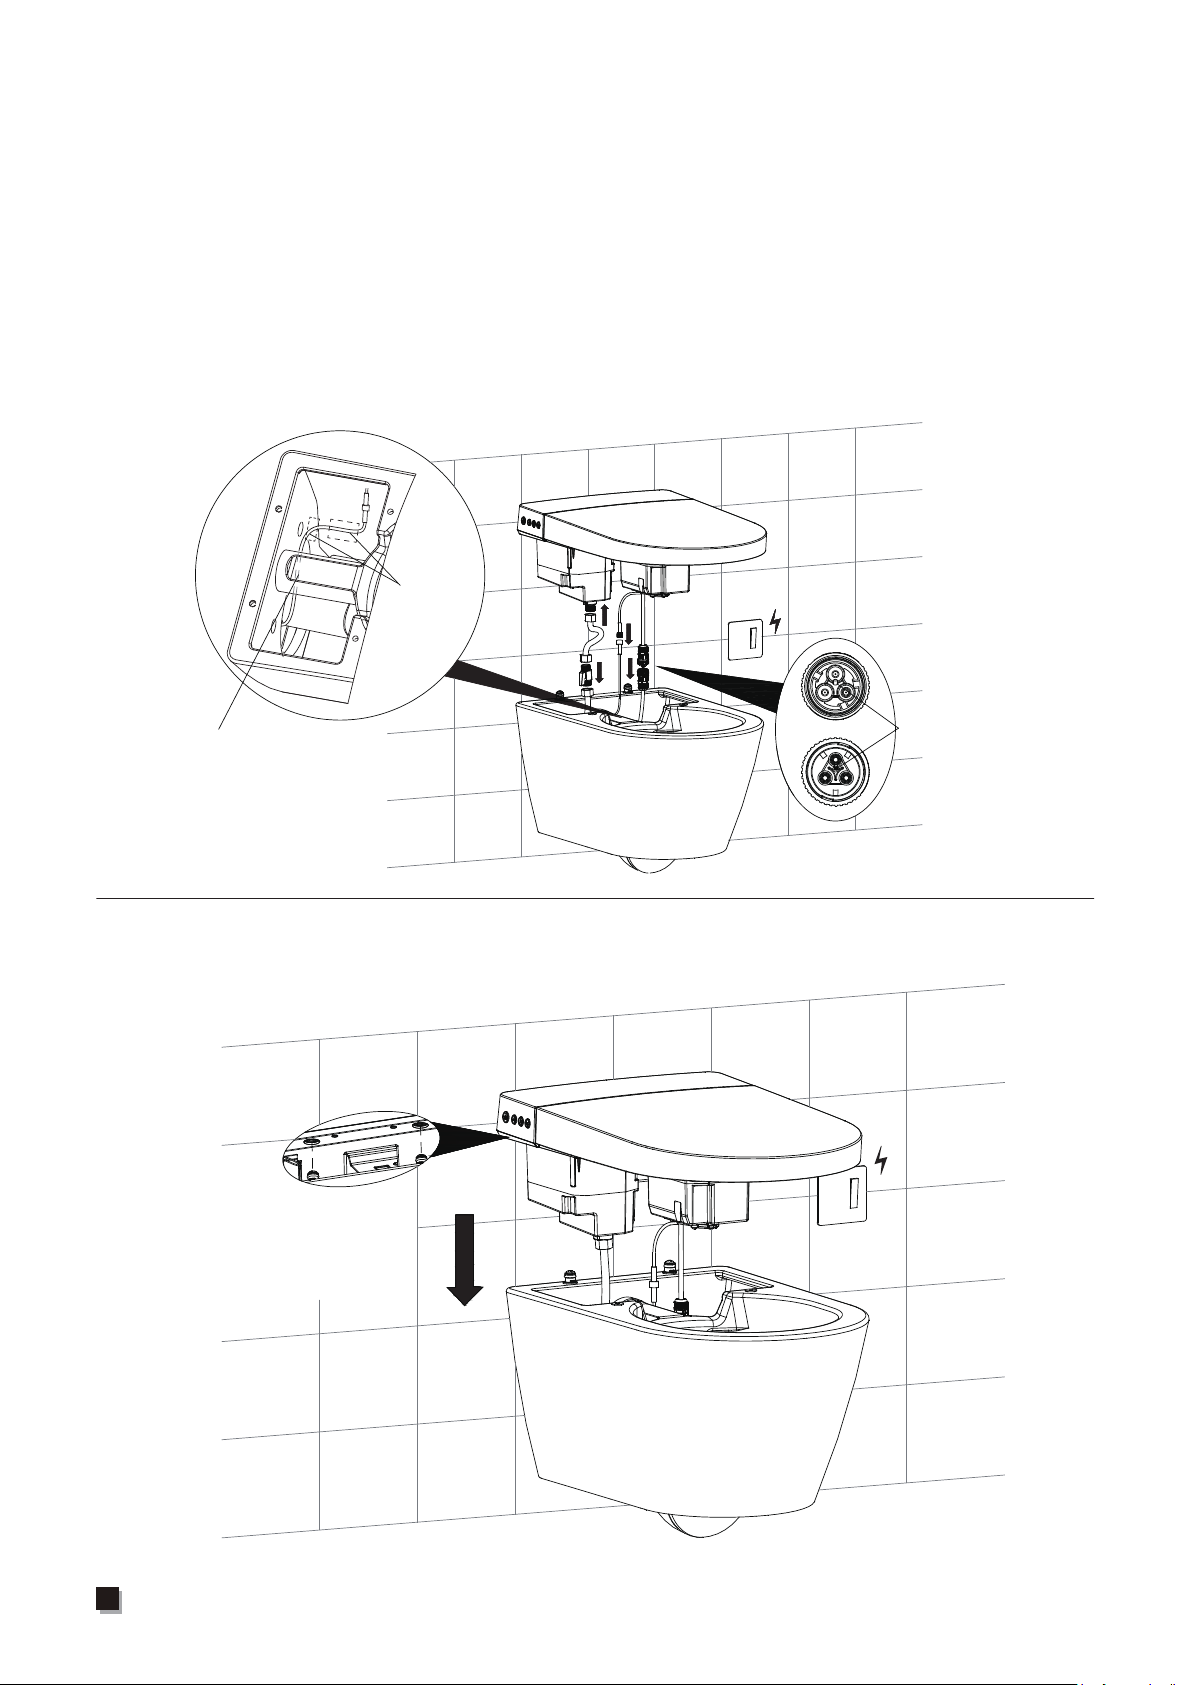
Align and tighten
Cabling diagram
Velcro
20. Tighten the bidet and toilet connectors.
Connect bidet and toilet water supply hose with a ball valve.
Pass the off-seat auto flushing cable through the middle of two pipes, and
connect it to bidet cable.
Fix two velcro at the following positions. Avoid crossing and overlapping
cables.
21. Position the bidet and check the alignment.
Align the hole on the
back of bidet with the
ceramic fixing rod.
15
Installation Procedures
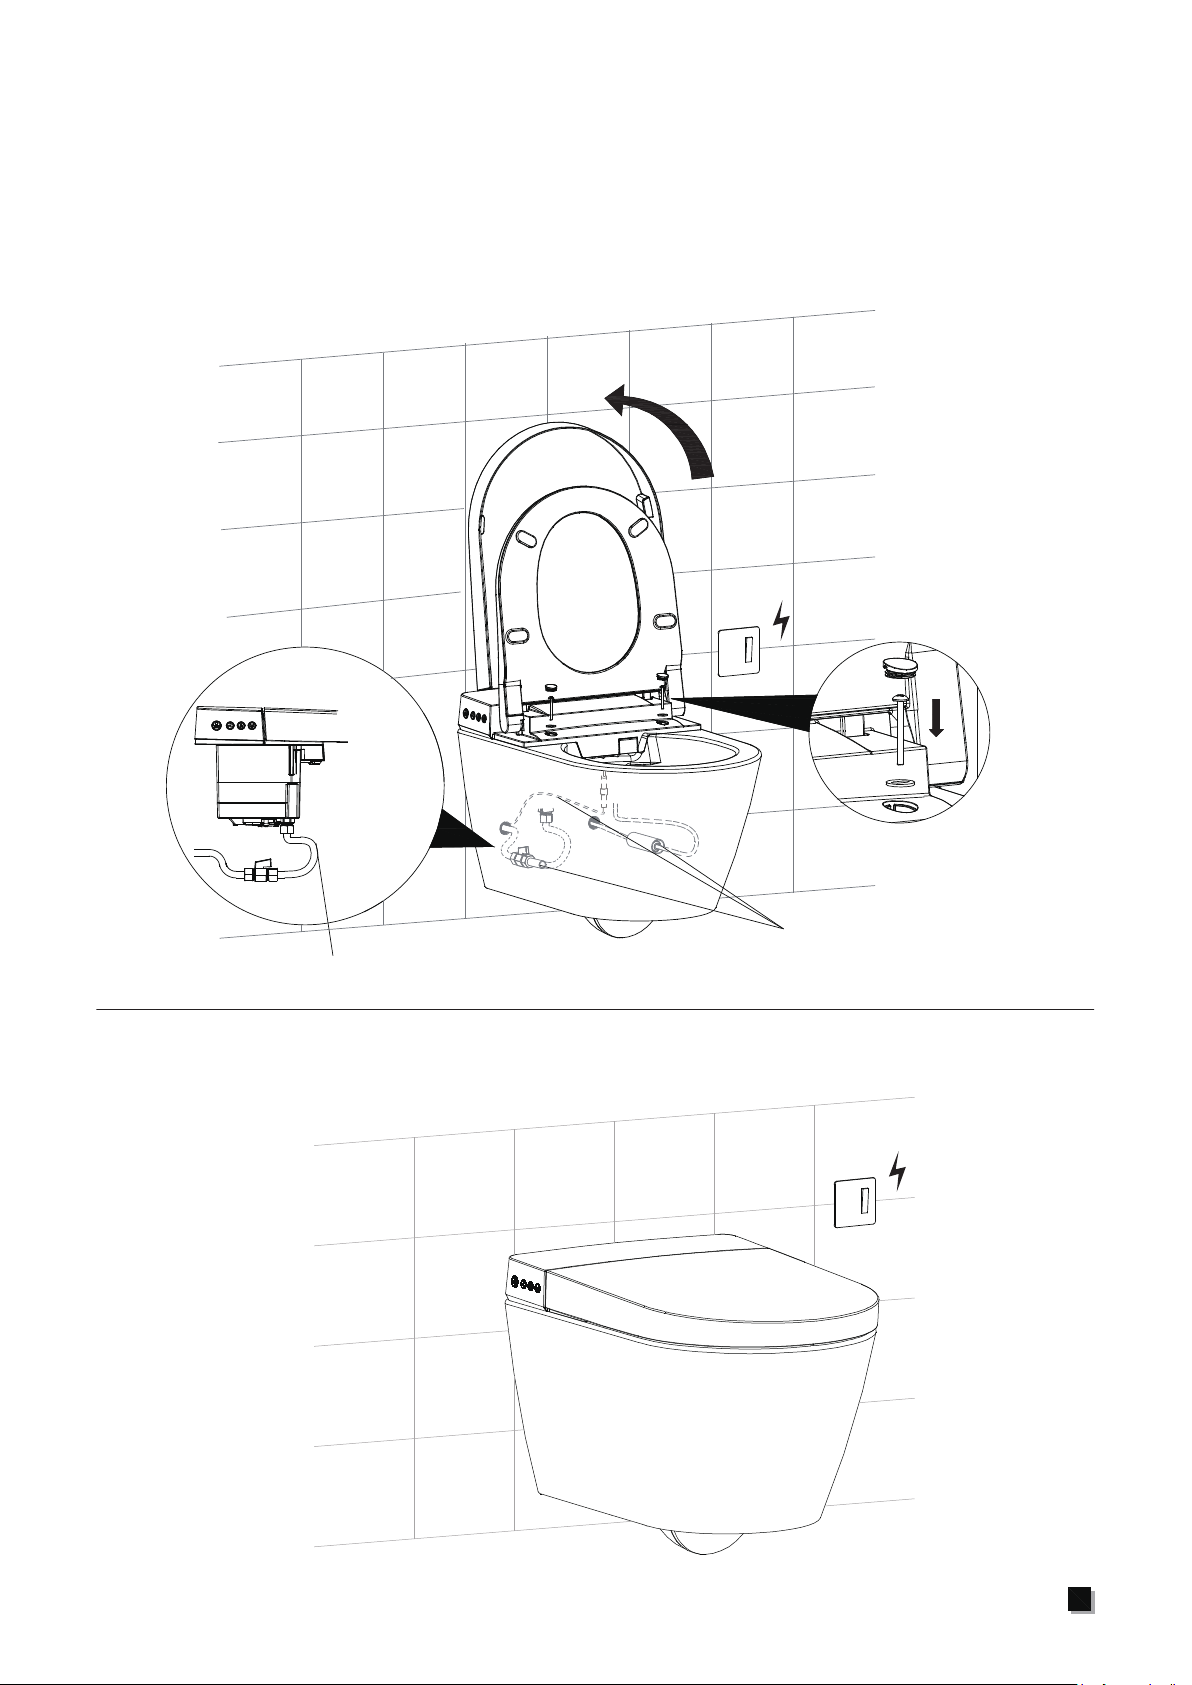
Velcro hook facing outward
Be careful not to fold or bend the hose.
22. Wrap velcro on water supply hose and power cord coupler respectively, and
then stick them to pre-installed velcro on both sides of the toilet, as shown
below.
Open cover and seat, install screws and decorative caps and then lock tight.
23. Close cover and seat. Finish installation.

Table of contents
Other EPLO Toilet manuals


