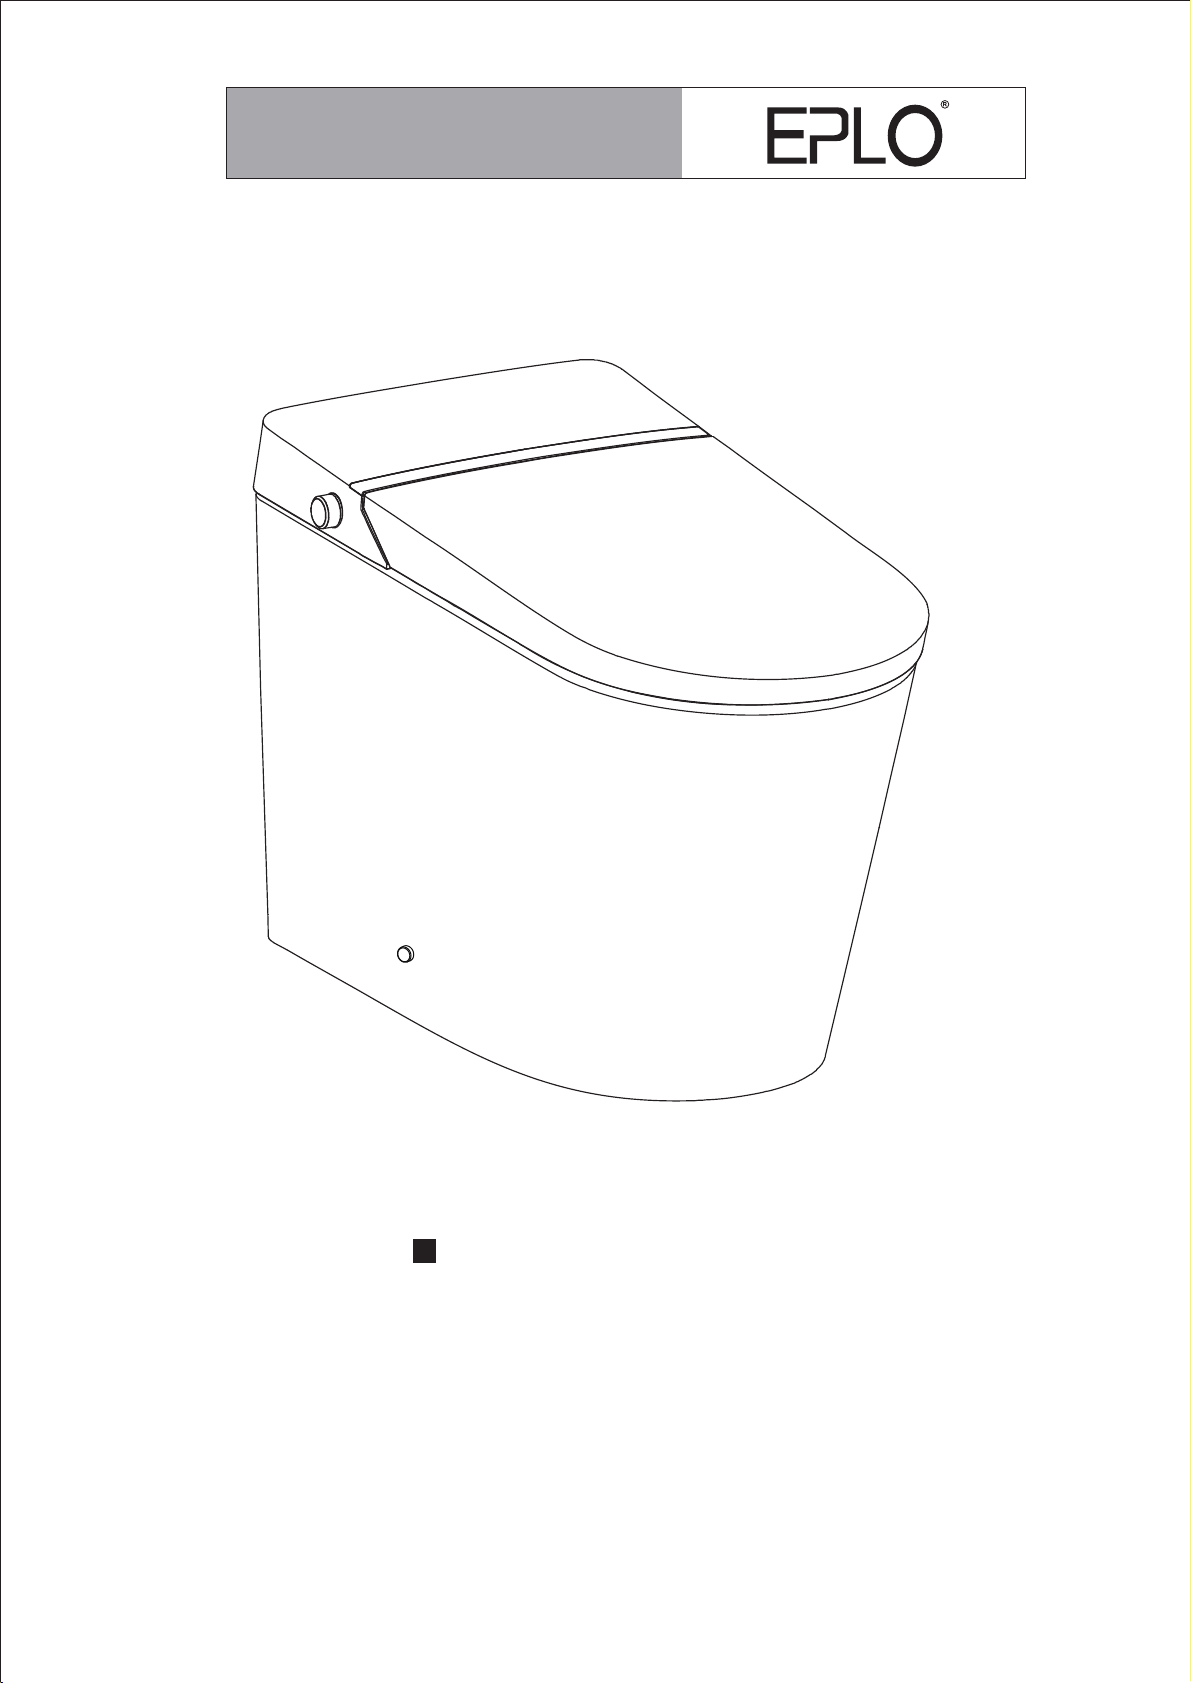
EPLO G20PRO User manual
Thank you for choosing our products. Please read the instructions carefully before
installation and keep it available for future maintenance or reference.
E-mail:[email protected]
Installation Manual
Model:G20PRO/G27PRO
ENJOY SMART LIFE

Content
Safety instructions
Technical specification
List of materials
Technical drawing
Parts identification
Toilet installation
Preparation
Lid auto open/close
01
03
05
06
07
08
10
11
Installation Others
Troubleshooting guide
15
16
Description of the knob function
Maintenance
Maintenance
1. Main unit care and maintenance
2. Spray nozzle maintenance and care
Emergency troubleshooting
1.
Power and water failure
2. Failure of remote control
3. Product unused for a period of time
12
13
3. Filter maintenance
01
IMPORTANT SAFEGUARDS
READ ALL INSTRUCTIONS BEFORE USING
When using electrical products, especially when children are present, basic safety
precautions should always be followed, including the following:
1. The appliance is not to be used by persons (including children) with reduced physical,
sensory or mental capabilities, or lack of experience and knowledge, unless they have
been given supervision or instruction.
2. Children being supervised not to play with the appliance.
3. This appliance can be used by children aged from 8 years and above and persons with
reduced physical, sensory or mental capabilities or lack of experience and knowledge if
they have been given supervision or instruction concerning use of the appliance in a safe
way and understand the hazards involved.
4. Children shall not play with the appliance.
5. Cleaning and user maintenance shall not be made by children without supervision.
DANGER–To reduce the risk of electrocution:
1. Do not use while bathing.
3. Do not place in or drop into water or other liquid.
4. Do not reach for a product that has fallen into water. Unplug immediately.
5. Do not wash the main unit or electrical plug with water or detergent.
6. Do not handle the electrical plug with wet hands.
7. Do not put a hand or other staff over the outlet of air dryer or block the outlet of air dryer.
8. Never disassemble, repair or modify this product.
9. During installation, disassembly, repaire and maintenance of the product, the power plug
must be switched off and water supply be shut off.
WARNING–To reduce the risk of burns, electrocution, fire, or injury to persons.
1. Close supervision is necessary when this product is used by, on, or near children or
invalids.
2. Use this product only for its intended use as described in this manual. Do not use
attachments not recommended by the manufacturer.
3. Never operate this product if it has a damaged cord or plug, if it is not working properly,
if it has been dropped or damaged, or dropped into water. Return the product to a service
center for examination and repair.
4. Keep the cord away from heated surfaces.
5. Never use while sleeping or drowsy.
6. Never drop or insert any object into any opening or hose.
7. Do not use outdoors or operate where aerosol (spray) products are being used or where
oxygen is being administered.
8. Connect this product to a properly grounded outlet only. See Grounding Instructions.
9. Do not throw cigarettes and other burning stuff into toilet, otherwise it might cause fire.
10. This product is electric appliance, so it must be placed far away from water. Please don’t
drench urine and other liquid to it.
11. Do not lay on side or upside the product during the electrical circuit.
12. It is prohibited to use other electric appliances in the same socket.
13. It is forbidden to use the power extension or unstable loose outlet.
14. The old aging water supply hose can not be used, otherwise it might cause leakage, fire
or electrical shock. Installation of the bidet seat should include specified components
and new water supply hose.
2. Do not place or store product where it can fall or be pulled into a tub or sink.

02
IMPORTANT SAFETY INSTRUCTIONS
1. Do not install or use the product in wet places as steam room etc.
2. It is recommended to use water-proof electrical outlet which should be lnstalled in the place
where is not easily got wet.
3. This product should be used with 120V, 60Hz electrical current only, load current is at least
15A. Power plug must be equipped with ground fault circuit interrupter or ground fault
electrical leakage protector or similar high sensitive, rapid type leakage switch
(Rated sensitive current under 6mA).
4. When it thunders, it is strongly recommended to pull out the power plug.
5. Do not stand on ceramic toilet.
6. Ceramic toilet must install floor fixing bolt.
7. Do not stand on product unit, seat and lid.
8. Do not lean against the seat lid when using the product, to avoid damage.
9. This product is equipped with soft-closing seal lid. Heavy pressing or pushing may damage
the soft-closing damper.
10. Do not use lacquer thinner, petrol, liquid medicine, detergent, insecticide, toilet cleanser and
scrubbing brush to clean the product.
11. Exposure to direct sunlight is prohibited.
12. Only use tap water or potable water; otherwise it may cause chafing.
13. Do not connect water supply to heater outlet. Make sure inlet water temperature at
3~35℃
14. When the room temperature is under zero degree, please dry up the water tank, to avoid
freezing.
15. Raise rest room temperature to prevent the toilet from damage due to freezing.
16. When move the product from cold or wet environment into normal room temperature, wait
for 2 hours until the condensation water is fully volatilized. Doing so can prevent the product
from electrical short-circuit.
17.When not using the product over three(3) days, drain the water out of the container and pull
the electrical plug from the wall outlet.
18.Stop using the product and shut off the power when product malfunctions, please contact the
service people for professional service.
CAUTION–Indicates that failure to follow the instruction may cause body injury or
property damage.
GROUNDING INSTRUCTIONS
This product should be grounded. In the event of an electrical short circuit, grounding reduces
the risk of electric shock by providing an escape wire for the electric current. This product is
equipped with a cord having a grounding wire with a grounding plug. The plug must be plugged
into an outlet that is properly installed and grounded.
DANGER –Improper use of the grounding plug can result in a risk of electric shock.
If repair or replacement of the cord or plug is necessary, do not connect the grounding wire to
either flat blade terminal. The wire with insulation having an outer surface that is green with or
without yellow stripes is the grounding wire.
This product is factory equipped with a specific electric cord and plug to permit connection to a
proper electric circuit. Make sure that the product is connected to an outlet having the same
configuration as the plug. No adapter should be used with this product. Do not modify the plug
provided — if it will not fit the outlet, have the proper outlet installed by a qualified electrician. If
the product must be reconnected for use on a different type of electric circuit, the reconnection
should be made by qualified service personnel.
SAVE THESE INSTRUCTIONS
.
/37.4~95℉
。

Technical specification
Rated power
Main Unit
Toilet
Rated voltage
Water pressure
range
Power cord length About 2.2m
0.08MPa - 0.8MPa
5-level adjustment
Pressure maintaining device, Automatic pressure relief
device
Automatic nozzle cleaning, Anti-syphon device,
Anti-backflow device, Filter device
Over 0.2m3/min
6-level adjustment
Thermal fuse, Temperature sensor, Thermostat
Diatom Deodorization
250W
1120W
120V, 60Hz
Nozzle position
Water pressure
protector
Anti-fouling device
Safety device
Warm air volume
Warm air
temperature
Heating power
Safety device
Deodorization
Method
Cleaning
device
Drying
device
Thermal fuse, Water temperature sensor, Ground
protection, Thermostat, Over temperature protection,
Leakage protection plug
Water proof IPX4
Flushing mode Siphonic jet
Flush volume 1.6/1.1Gpf, 6.0L(full flush)/4.1L(half flush)
Rough-in
Outlet outside
diameter
Drainage method S-trap
Heating power
Water temperature 6-level adjustment
Water volume
Cleaning mode Rear washing/Oscillating washing,
Front washing/Oscillating washing
1400W
≤100mm
305mm
3-level adjustment
Deodorization
03

04
Seat sensor, Temperature sensor, Bimetallic thermostat,
Thermal fuse, Leakage protection plug
Heated seat
Caring
device
Surface
temperature
Heating power
Burn protection
Safety device
Night light
assembly
User ID setting
Automatic flushing
Flushing during
power failure
6-level adjustment
50W
After 10 minutes of use, the seat temperature will
automatically drop slowly to a low level
Intelligent, Always on, Always off
To avoid interference when used by multiple users
Automatic flushing after use
Manual flushing after use
Foot sensor
flushing Foot sensor flushing
Seat,
Lid auto open/close
Nozzle
Antibacterial site
Lid opening
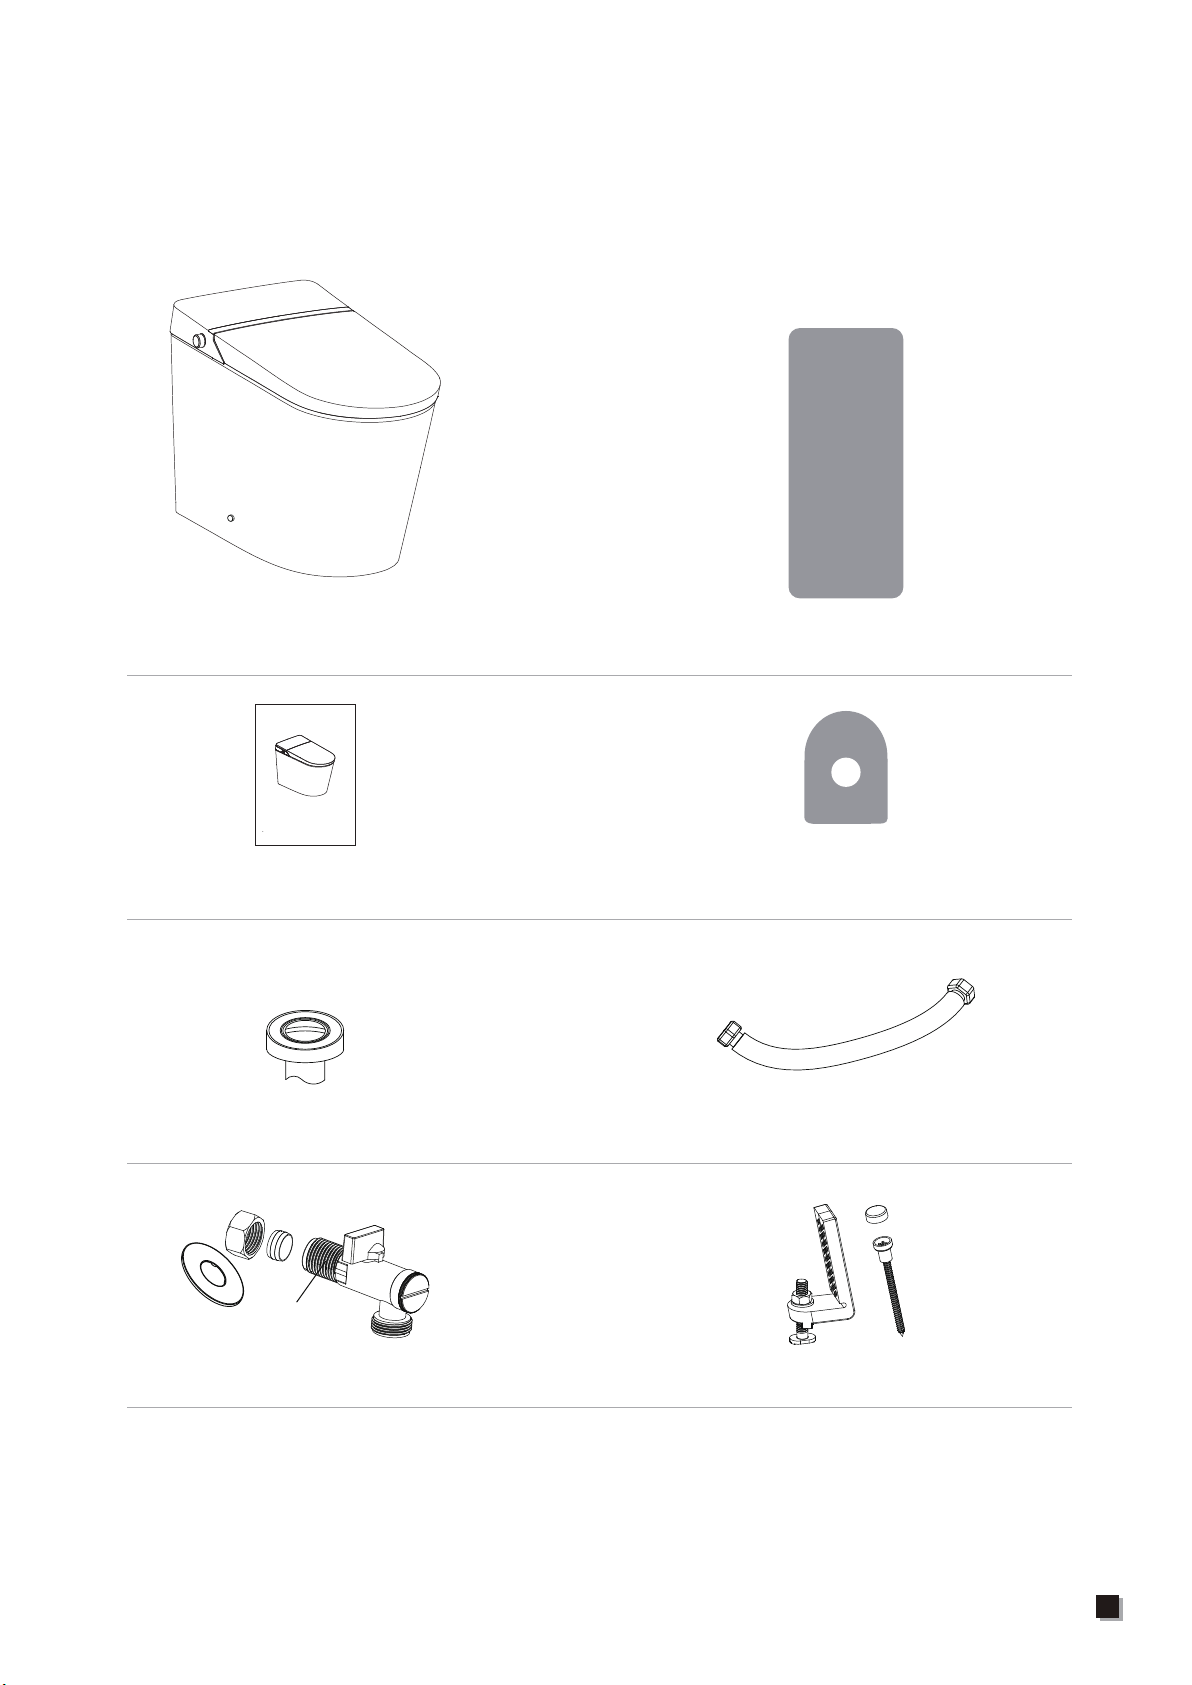
List of materials
Main Unit Remote Control Components
Sealing Flange
Installation CardboardInstallation Manual
Angle Valve
Hose(Installed)
Installation Manual
Thank you for choosing our products.Please read the instructions carefully before installation and
keep it available for future maintenance or reference.
05
Mounting accessory kit
NPT 1/2

Technical drawing
1. The drawing is for reference only, and we reserve the right to modify the
product appearance.
2. Product appearance is subject to change in kind.
06
700mm
396mm
485mm
415mm
405mm
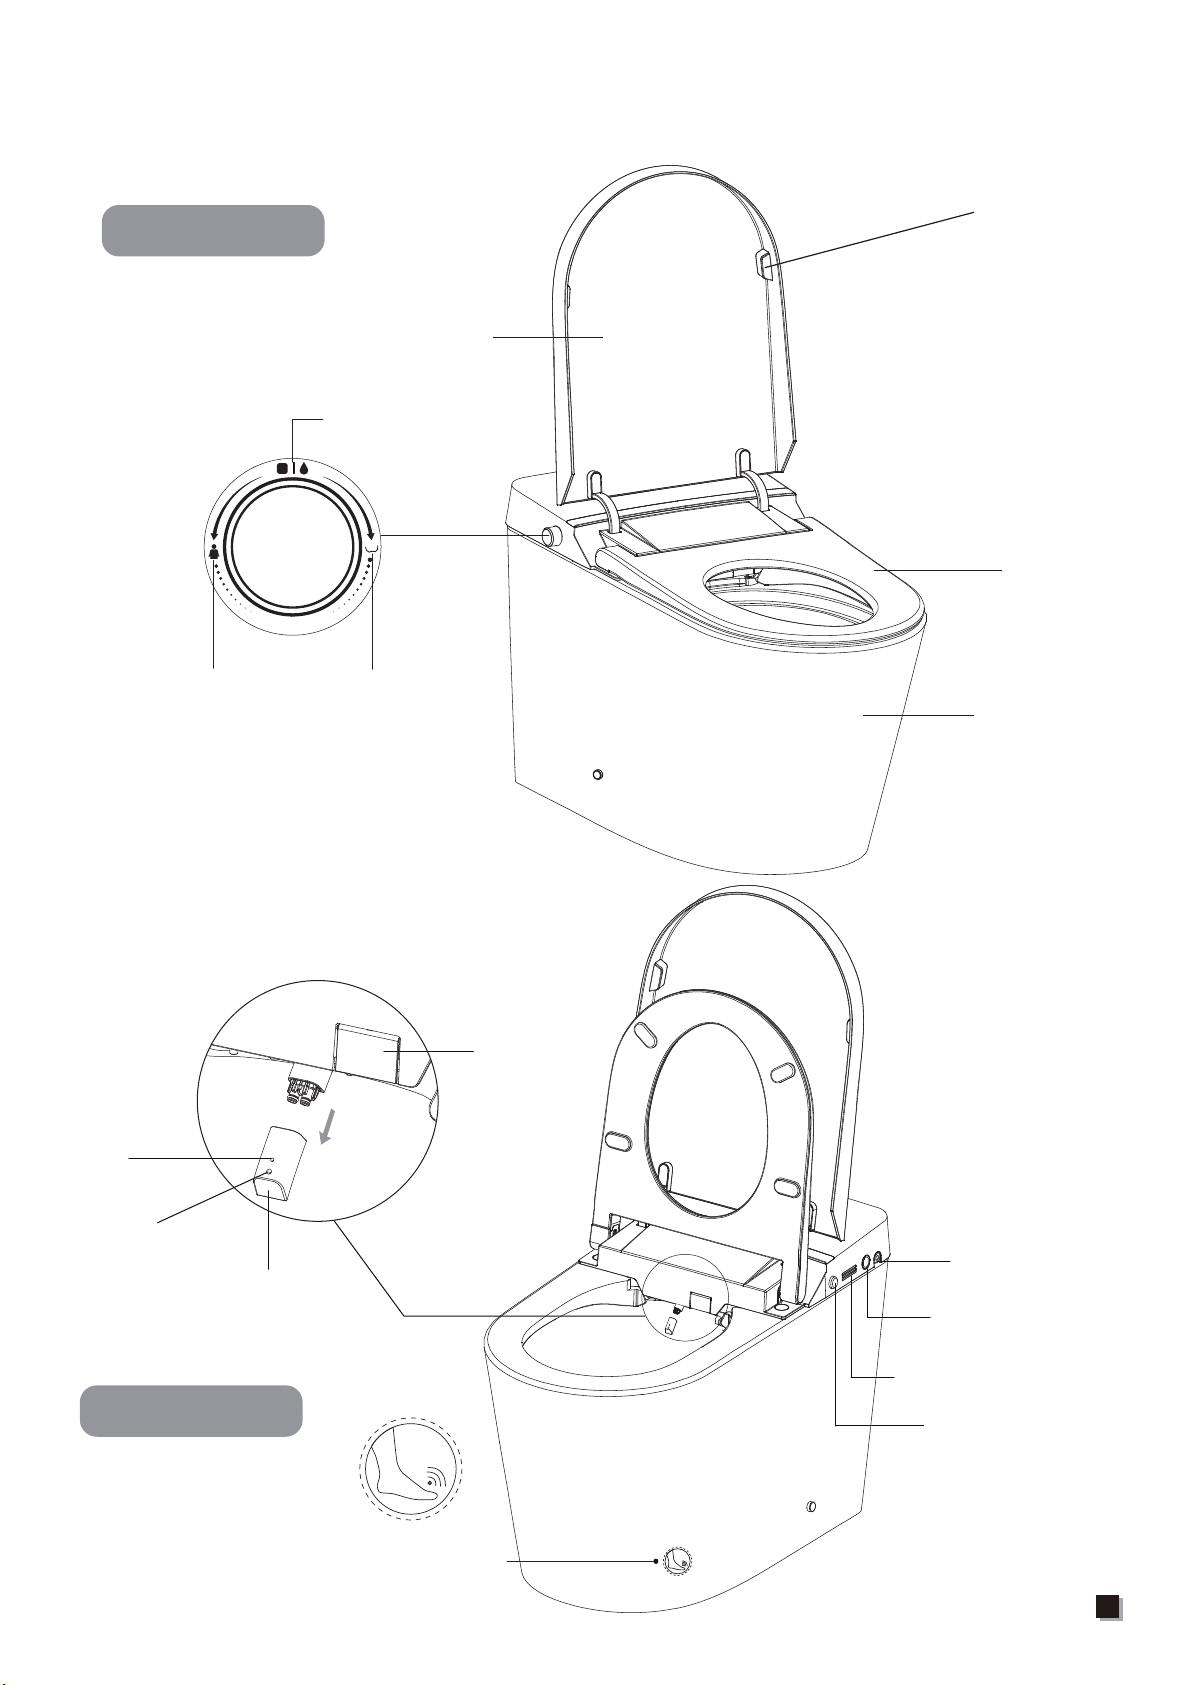
Parts identification
Left side Bumper
Seat
Ceramic toilet
Power cord
Manual flushing
button
Deodorizer
Remote control
sensor
Dryer shield
Spray
nozzle
Front
washing
Rear
washing
Right side
Lid
Knob
Touch the sensing
area with foot
Rear washing
button
Front washing
button
07

Draw drain outlet centerline on the floor.
Install angle valve at proper position on
the the wall according to dimension of
toilet.
1. Installation of angle valve
Line
Drain outlet
Angle valve
08
Toilet installation
Installation Method 1:
NPT 1/2
Choose the correct size of mating angle
valve that compatible with your water
oulet from the package.
5/8′′
Installation Method 2:
3. Connect hose to toilet water inlet
Connect one end of hose to the water inlet
of the toilet and tighten the connection.
Inlet
connector
Flexible hose
Nut
Bolt
4.Mounting bracket installation
Assemble the mounting bracket with bolts
and then install them to the pre-installed
flange plate on the ground and lock tight
with nuts.
Mounting bracket
Washer
305mm
Drain outlet
2. Cardboard installation
Align cardboard with the centerline of
drain outlet.
Draw contour line according to cardboard.
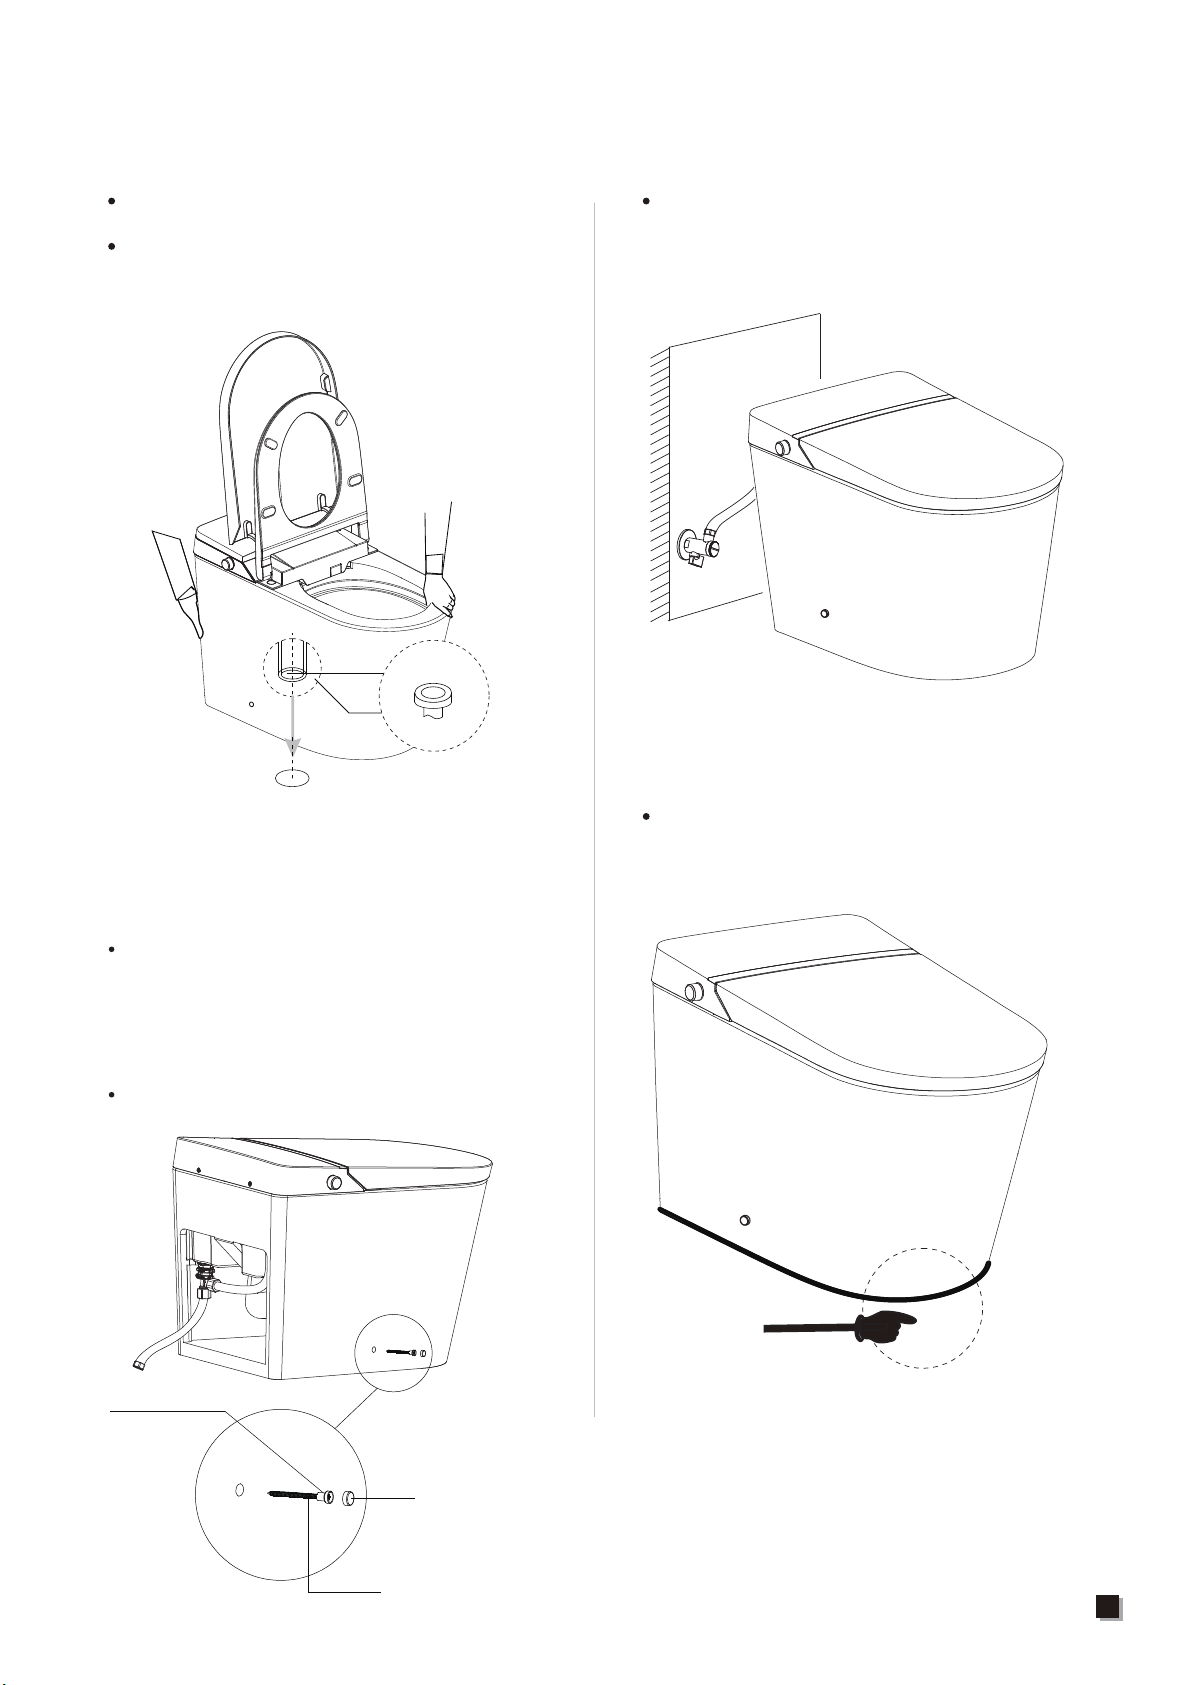
09
5. Ceramic toilet installtion
Install a sealing flange into drain outlet.
Install ceramic toilet on the corresponding
position.
Note: Two people are required to carry the
toilet.
Sealing flange
Toilet drain outlet
Connect the other end of hose to angle
valve and tighten the connection.
7. Connect hose to angle valve
8. Glass glue application
Note:
Please clean up the drain outlet;
Please make sure ceramic toilet outlet sits
perfectly on drain outlet.
Glass glue
Apply high quality mildew-proof glass glue
around the lower edge of the toilet.
6. Screw installation
Put the screw through the fixing sleeve and
then install it through the holes(on both
sides of the toilet ceramic) to the mounting
bracket on the ground, and lock tight with a
tool.
Put the decorative cap on the fixing sleeve.
Fixing sleeve
Screw
Decorative cap
10
Preparation
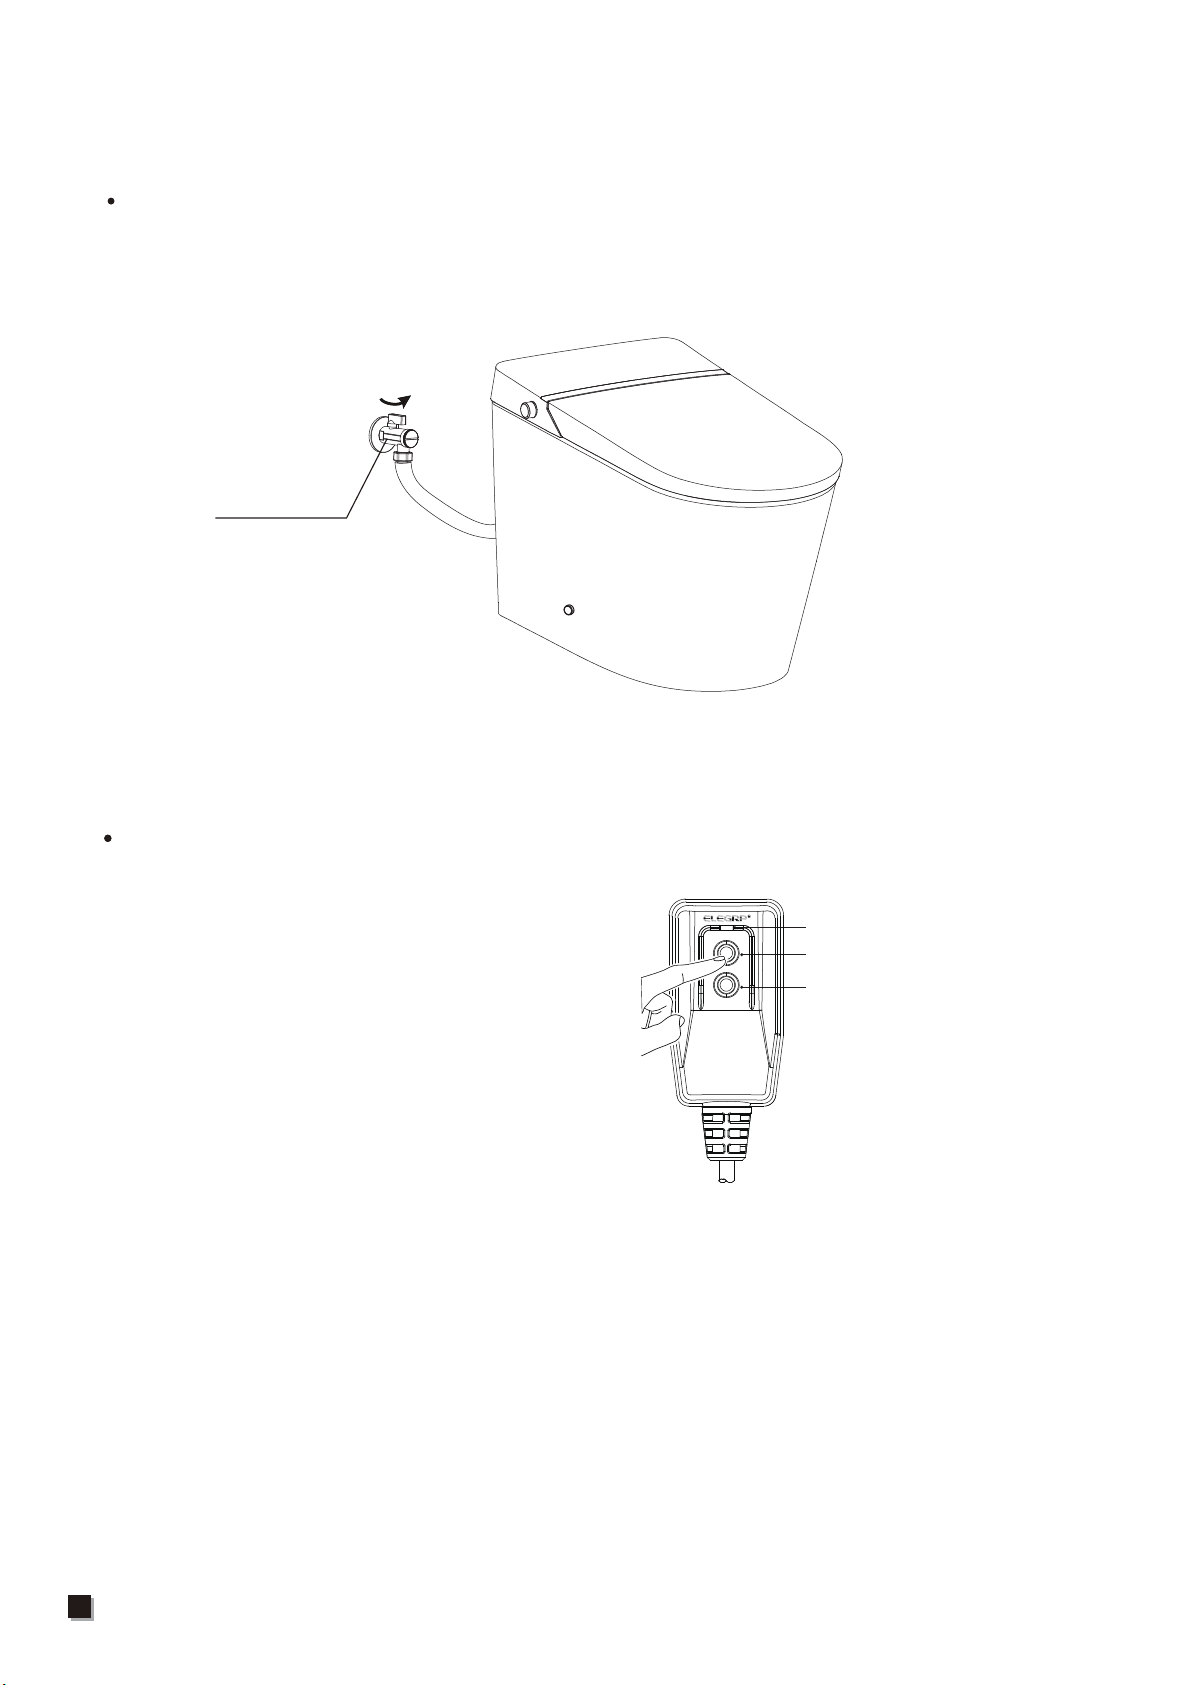
1. Turn on the angle valve
Check the threaded connection for leaks to ensure complete sealing. Turn the angle valve
counterclockwise to the full open position.
(Note: The angle valve opens with a large torque for the first time.)
Angle valve
3. Self-inspection
1. Once power is connected, the buzzer beeps. The knob lights up in blue, and the
self-inspection starts.
2. The buzzer beeps again, then the self-inspection completes, and the knob lights up in red.
3. The product is ready to use.
2. Power Connection
Insert the leakage protection plug into a power socket, press the reset switch, plug indicator
lights up, indicating that the power is on.
Note:
Press the test button prior to usage, the
reset switch pops up indicating that the
leakage protection function is normal.
* Only for models with leakage protection plug.
* Please refer to the actual product.
Current detection
test button
Reset switch
Indicator light
RESET
REMETTRE
TEST
TEST BEFORE EACH USE
1. PLUG INTO RECEPTACLE
2. PRESS RESET BUTTON:
VISUAL INDICATOR APPEARS.
3. PRESS TEST BUTTON:
VISUAL INDICATOR DISAPPEARS.
4. PRESS RESET FOR USE.
DO NOT USE IF ABOVE TEST FAILS.
WARNING:

1. Only for the product with auto lid opening/closing function.
Lid auto open/close
Approaching the toilet
1. When user enters the sensing range, the power
and energy-saving indicators light up and then
the seat lid opens automatically.
The seat lid closes automatically 180 seconds
after user leaves.
Leaving the toilet
Standing up to urinate
1. Open the seat by remote control or hand.
2. The seat and lid close automatically 180 seconds
after user leaves.
2. If the model you purchased is with foot sensor.
1. When the seat and lid are both closed, touch the sensing area with your foot to open the lid.
2. When the lid is open and seat is closed, touch the sensing area with your foot to open the
seat.
3. When the seat and lid are both open, touch the sensing area with your foot to activate half
flush.
11
12
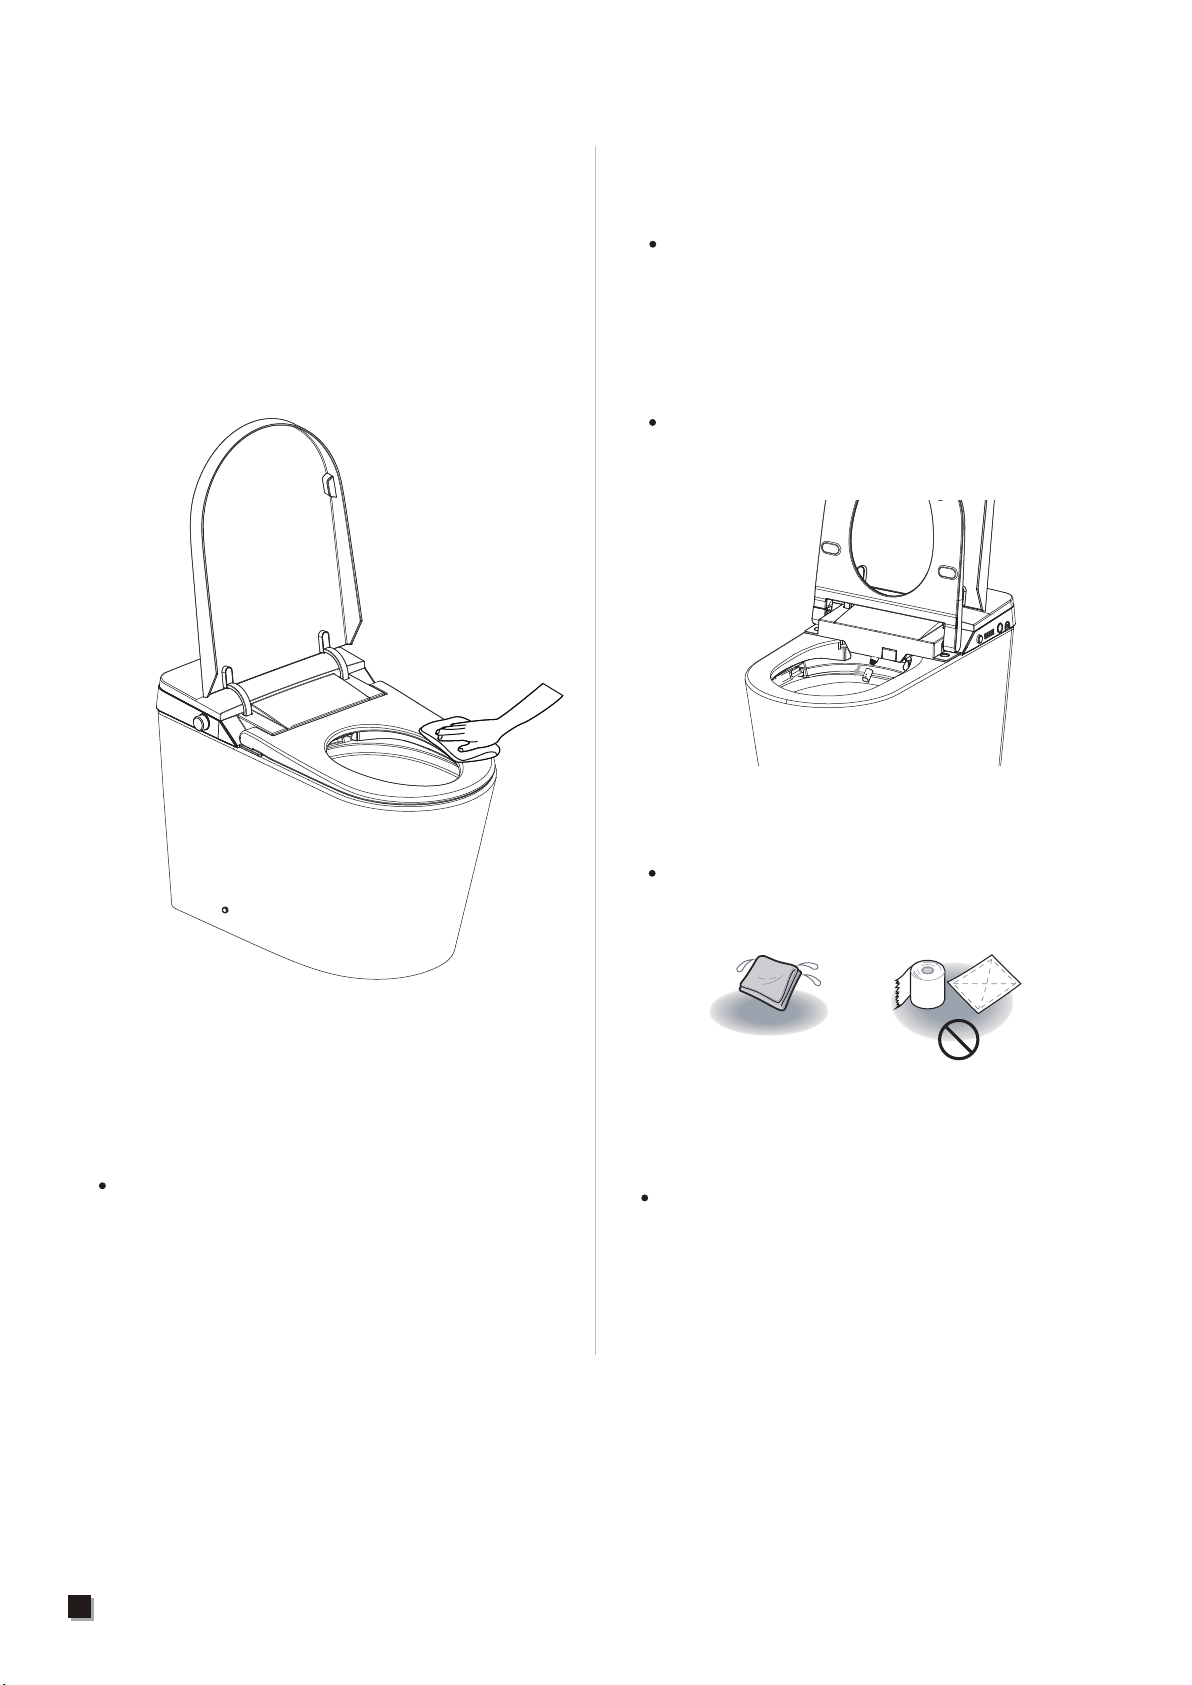
Maintenance
Main unit care and maintenance
2. Use only a soft, damp cloth to clean.
Avoid using harsh chemicals.
3. Safety self-inspection
Once cleaning is completed and all surfaces
are dry, re-connect the power plug.
Spray nozzle maintenance and care
1. Nozzle self-cleaning
2. Spray nozzle disassembly
When the nozzle moves forward, the nozzle
can be removed and cleaned separately.
4. Nozzle retraction
Put the nozzle back on and press the “Stop”
button to return the spray wand to its normal
position.
3. Use only a soft cloth or soft brush to clean
Do not pull or push the wand, to avoid
damage.
When no one is seated, turn the knob
clockwise. The nozzle will automatically
stretch out to allow access for cleaning.
1. Shut off power supply before doing
maintenance.

13
Press and hold the manual flushing button
for 4 seconds to flush
1. No power
Filter maintenance
If poor spray perfomance occurs under
normal conditions:
1. Unscrew angle valve nut
2. Remove filter net
3. Clean out the filter net under running water
using a toothbrush
4. Reinstall filter net and angle valve nut
Manual flushing
button
Put around 8L water into a barrel and flush
the ceramic bowl.
Note: Avoid water spilling from bowl.
2. No water supply
Power and water failure
Emergency troubleshooting

14
1. Operate via buttons on the main unit
Failure of remote control
2. Battery replacement
Remove the remote control from holder.
Open the battery cover and replace the
batteries.
Note: After battery replacement, the remote
control settings will be restored to the
defaults. Please reset.
Put the remote control back.
Product unused for a period of time
When the product is left unused for a long
time, especially in cold weather, it is highly
recommended to drain the water to prevent
freezing.
To discharge water
2. Activate flushing, and then turn off angle
valve to stop water supply.
3. Disconnect the hose from angle valve,
drain the water and reconnect.
1. Unplug and cut off the electricity
4. For your safety, it is recommended to put
antifreeze into the remaining water in the
bowl.
Note:Before water discharging,
the power must be cut off.
Note: Please turn on power and water supply
when using again.

Description of the knob function
1. When seated, turn the knob clockwise to start rear washing function, and turn
counterclockwise to start front washing function. Rear and front washing function
will automatically enter into the drying function after completion. (Note: default water
pressure, water temperature, air temperature, seat temperature, wand position are
intermediate.)
2. When no one is seated, turn the knob clockwise to start manual cleaning function of
the nozzle.
4. During drying, clockwise rotation increases air temperature and counterclockwise
rotation decreases air temperature.
5. In functional mode, press the knob to stop function in progress: rear washing, front
washing, drying or nozzle cleaning. In addition, press the knob to flush the toilet.
6. To enter into standby mode, press and hold the knob.
7. To enter into functional mode, press and hold the knob.
Below shows the indicator light status:
Functional mode: Red light; Energy saving mode: Blue light;
Flushing mode: Purple light; Standby mode: Light off.
* Default settings for all functions are intermediate when powering on. Use remote control
to switch to the function level set before.
15
3. During rear and front washing, turn the knob clockwise to move the spray wand
forward, and counterclockwise to move the spray wand backward; Long press the
knob to switch to the water pressure adjustment function. Clockwise rotation
increases the water pressure, and counterclockwise rotation decreases the water
pressure.
(
Note: During washing, long press the knob to switch between the functions
of water pressure adjustment and spray wand position adjustment.
)

Troubleshooting guide
Problem Cause
No water from
nozzle
Water supply hose is kinked
Angle valve is off
A water failure occurred
Poor water
spraying
Water supply hose is kinked
Angle valve is not fully
turned on
Filter clogged
Low water
temperature The water temperature is not
set properly
Low seat
temperature
The seat temperature is not set
properly
In standby mode
Solution
Straighten the hose to remove
the kink
Turn on the angle valve
Restore the water supply
Straighten the hose to remove
the kink
Turn on the angle valve fully
Clean the filter
Adjust the water temperature
Adjust the seat temperature
Switch to functional mode and
wait for 3+ minutes
Low dryer
temperature
Dryer not blowing
Spray wand
cannot retract
Spray wand
cannot stretch out
Remote control
cannot display
Malfunction of
deodorization
The dryer temperature is not
set properly
In standby mode or energy
saving mode
Power off
Get stuck by impurities
Power off
User is not within the sensing
area of the seat
The positive and negative
direction of the batteries is
incorrect
User is not within the sensing
area of the seat
Deodorization function
continues after user leaves
Caution
If the problem cannot be resolved as per above solutions, please
disconnect the power and contact service providers.
If the power leakage protection switch always trips, it means that
the product is leaking. Please disconnect the power and contact
service providers.
It is normal for the deodorizing
function to continue operating
after user leaves, for complete
odor removal.
Adjust position on seat to
activate the sensor
Reload the batteries
Adjust position on seat to activate
the sensor
Turn on the power
Remove the impurities
Push back the spray wand gently
and put power on
Switch to functional mode to use
dry function
Adjust the dryer temperature
16

The picture of product may not be entirely consistent with actual appearance
and color because of product improvements, please in kind prevail.
ASVFAF0401011A-1.0
This manual suits for next models
1
Table of contents
Other EPLO Toilet manuals


