Tavistock VITORIA PL850S User manual

Tavistock, Brassmill Lane Trading Estate, Bath, BA1 3JF
T. 01225 787870 | F. 01225 448877 | E. tavistock@roperrhodes.co.uk | W. www.tavistock-bathrooms.co.uk REF: JS.TAV | 08.13 V1.00
© Roper Rhodes Ltd.
No. Description Product Code Fixings included Gross Weight Net Weight
1
2
3
Vitoria High Level Cistern inc. Flush Fittings
Vitoria Oak Toilet Seat
CH850S
HLK850S
TS850NOSC
Yes
Yes
Yes
---
---
---
---
---
---
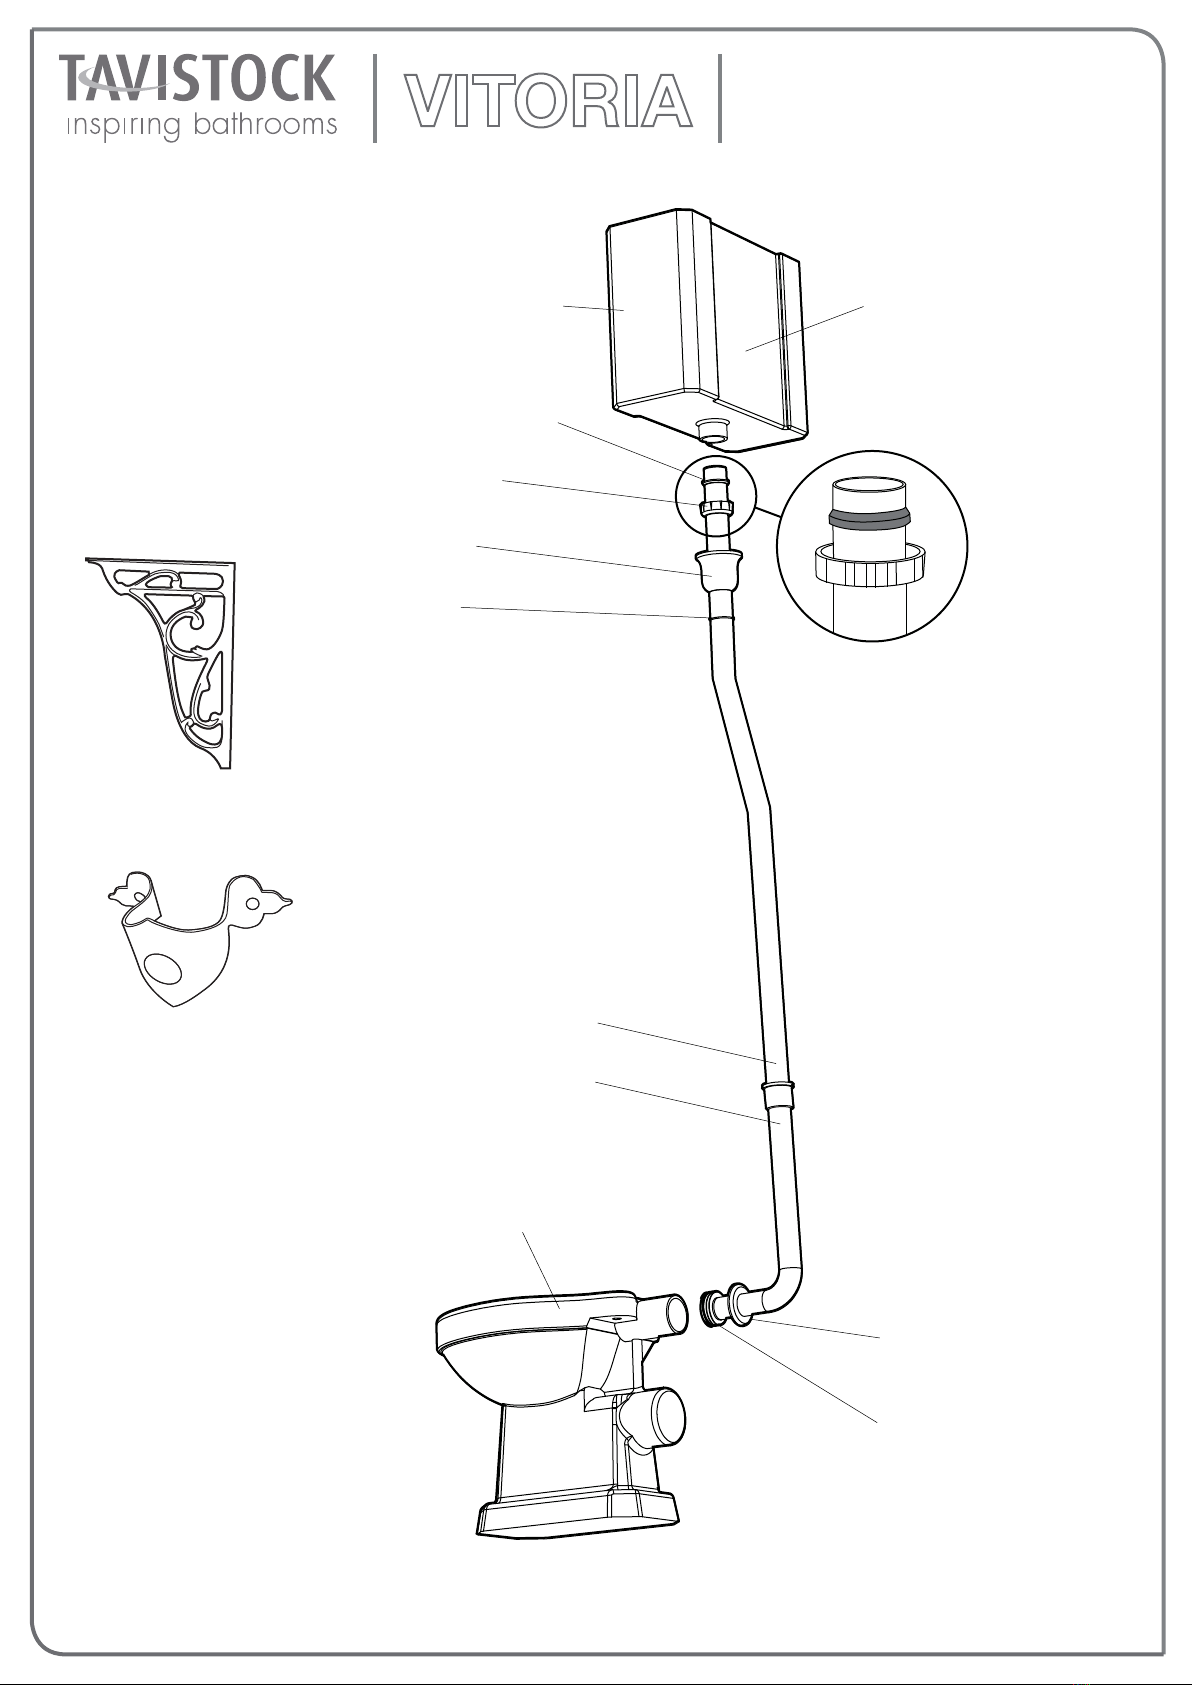
HIGH LEVEL WC
1
2
3
DIAGRAMS NOT TO SCALE
ALL DIMENSIONS IN MM
TOLERANCE OF ± 5MM
FAQ’s
What side is the inlet located? Left or right - reversible
Are there any other compatible seats? Vitoria White Toilet Seat - TS850WSC
Can this pan be used with a side connection outlet pipe? Yes
The cistern lid won’t shut/the cistern isn’t working correctly.
heights. Refer to instruction manual supplied with WC.
Cistern Settings:
Full Flush Volume: 6L
158mm
425mm
375mm
397mm
400mm
2380mm
350mm
200mm 481mm
195mm
180mm
Ø102mm
4
4
Vitoria High / Low Level Pan PL850S
Yes --- ---
Vitoria High Level Pipe Kit
x2
x2
x2
x2
Floor Fixing Kit:
2050mm MAX
Can the pull chain be installed on the left? No
Tavistock, Brassmill Lane Trading Estate, Bath, BA1 3JF
T. 01225 787870 | F. 01225 448877 | E. tavistock@roperrhodes.co.uk | W. www.tavistock-bathrooms.co.uk REF: JS.TAV | 08.13 V1.00
© Roper Rhodes Ltd.
HIGH LEVEL WC
ASSEMBLY
Vitoria High Level Cistern
CH850S
Rubber Conical Washer
CH850S
Compression Nut
CH850S
Chrome Cover
HLK850S
Cover O-ring
HLK850S
Upper High Level Flush Pipe
HLK850S
Metal Cover
HLK850S
Flush Cone
CH850S
Vitoria High Level Pan
PL850S
Cistern Bracket x2
HLK850S
Pipe Bracket
HLK850S
Lower High Level Flush Pipe
HLK850S
Cistern Fittings
CL850S
TRADITIONAL HIGH LEVEL WC
Installation & care instructions
Please retain for future reference
2050mm MAX
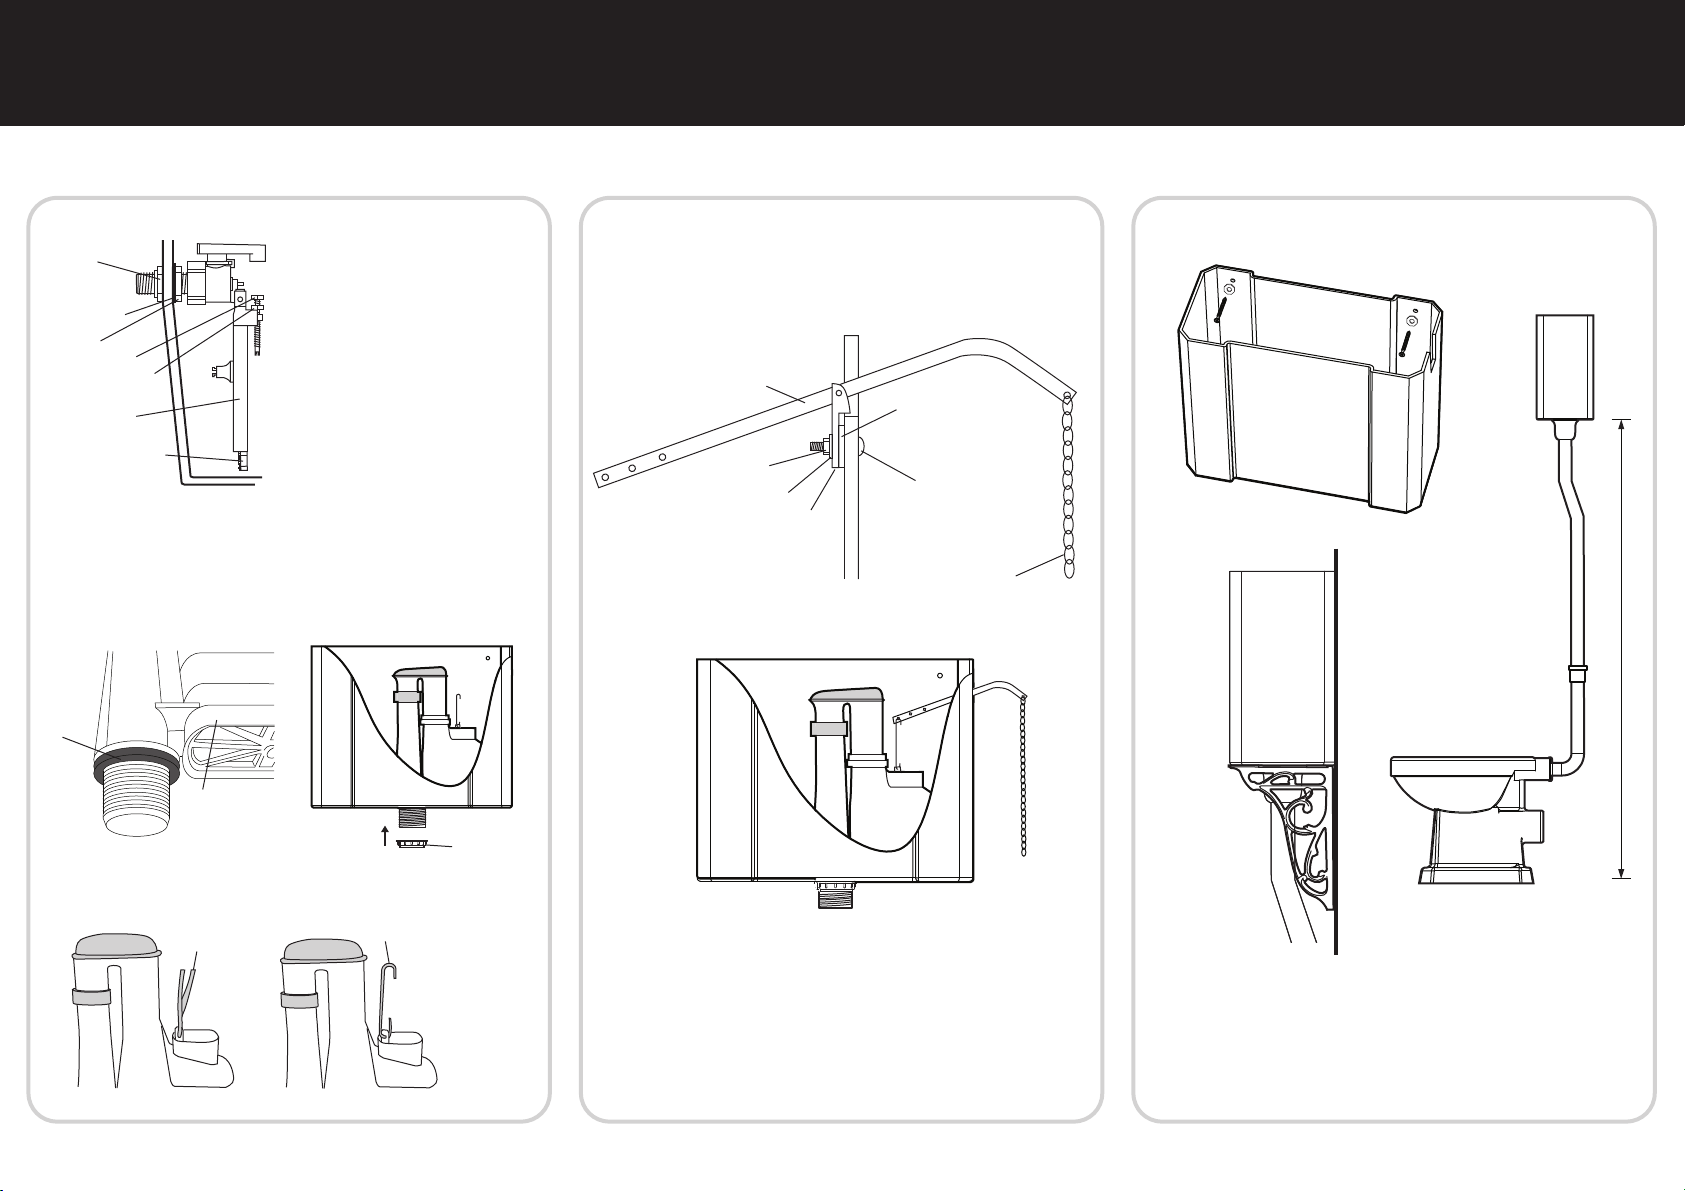
Assemble the side entry
inlet valve as shown.
Screw the float into the swivel arm screw
and assemble inside the cistern tank as
shown. Check for free movement of the
float (ensure the float does not get caught
on the side/back wall of the cistern). To
adjust the water level rotate the water level
adjustment screw. Turn clockwise to
reduce shut-off level, turn anti-clockwise to
raise shut-off level, secure by hand
tightening the locking nut.
The inlet valve is fitted with a high pressure
seat (white), if water pressure is low, the
inlet valve is supplied with a low pressure
seat (red, attached to the inlet valve arm)
that can be swapped.
1. The underside of the cistern can be a maximum of 2080mm off the floor.
Fix the cistern brackets to the wall first. Put the cistern on top of the brackets and
mark the positions of the holes on the wall. Screw the cistern to the wall using the
fixing screws and washers supplied through the fixing holes in the back of the
cistern. Ensure the tank is firmly secured to the wall.
The high level pipe kit can be cut down if required.
Note: Any screws and plugs supplied are suitable for stone/brick walls only. If in
doubt consult and expert.
FILL VALVE - ASSEMBLY IN CISTERN ASSEMBLY INSTRUCTIONS
IMPORTANT
Flush out all impurities in the cistern prior to installation.
FLUSH VALVE SPECIFICATIONS
Full Flush: 6L
Ensure the flush valve is assembled and fully tightened as shown, making sure the
rubber seal is over the thread of the valve and between the valve and the cistern.
Make sure that the fill valve and flush valve are not touching when assembled
inside the tank.
Use PTFE tape around the thread to ensure a water tight seal as shown below.
FLUSH VALVE - ASSEMBLY IN CISTERN
Once the outlet valve is assembled in the cistern, keeping hold of the
piston, remove the tie wrap. Once this has been removed, install the C-link
to the piston. To make the installation easier, the piston may need to be
pushed upwards from the underside.
Tie Wrap
C-Link
1.
2.
Back Nut
Rubber Washer
Back Nut
Locking Nut
Adjustment Screw
Arm
Float Connection
Assemble the flush arm to the tank. Attach the flush arm to the C-link on the flush
valve as shown. The handle and chain can then be attached to the flush arm.
Base
Seal
Siphon
FLUSH LEVER INSTALLATION
Back Nut
Round Head
Bolt
Plastic Washer
Flush Arm
Bracket
Brass Washer
Metal Nut
Flush Arm
Chain
1.
2.
REF: PL: 06 14 v1.0
TRADITIONAL HIGH LEVEL WC
Installation & care instructions
Please retain for future reference
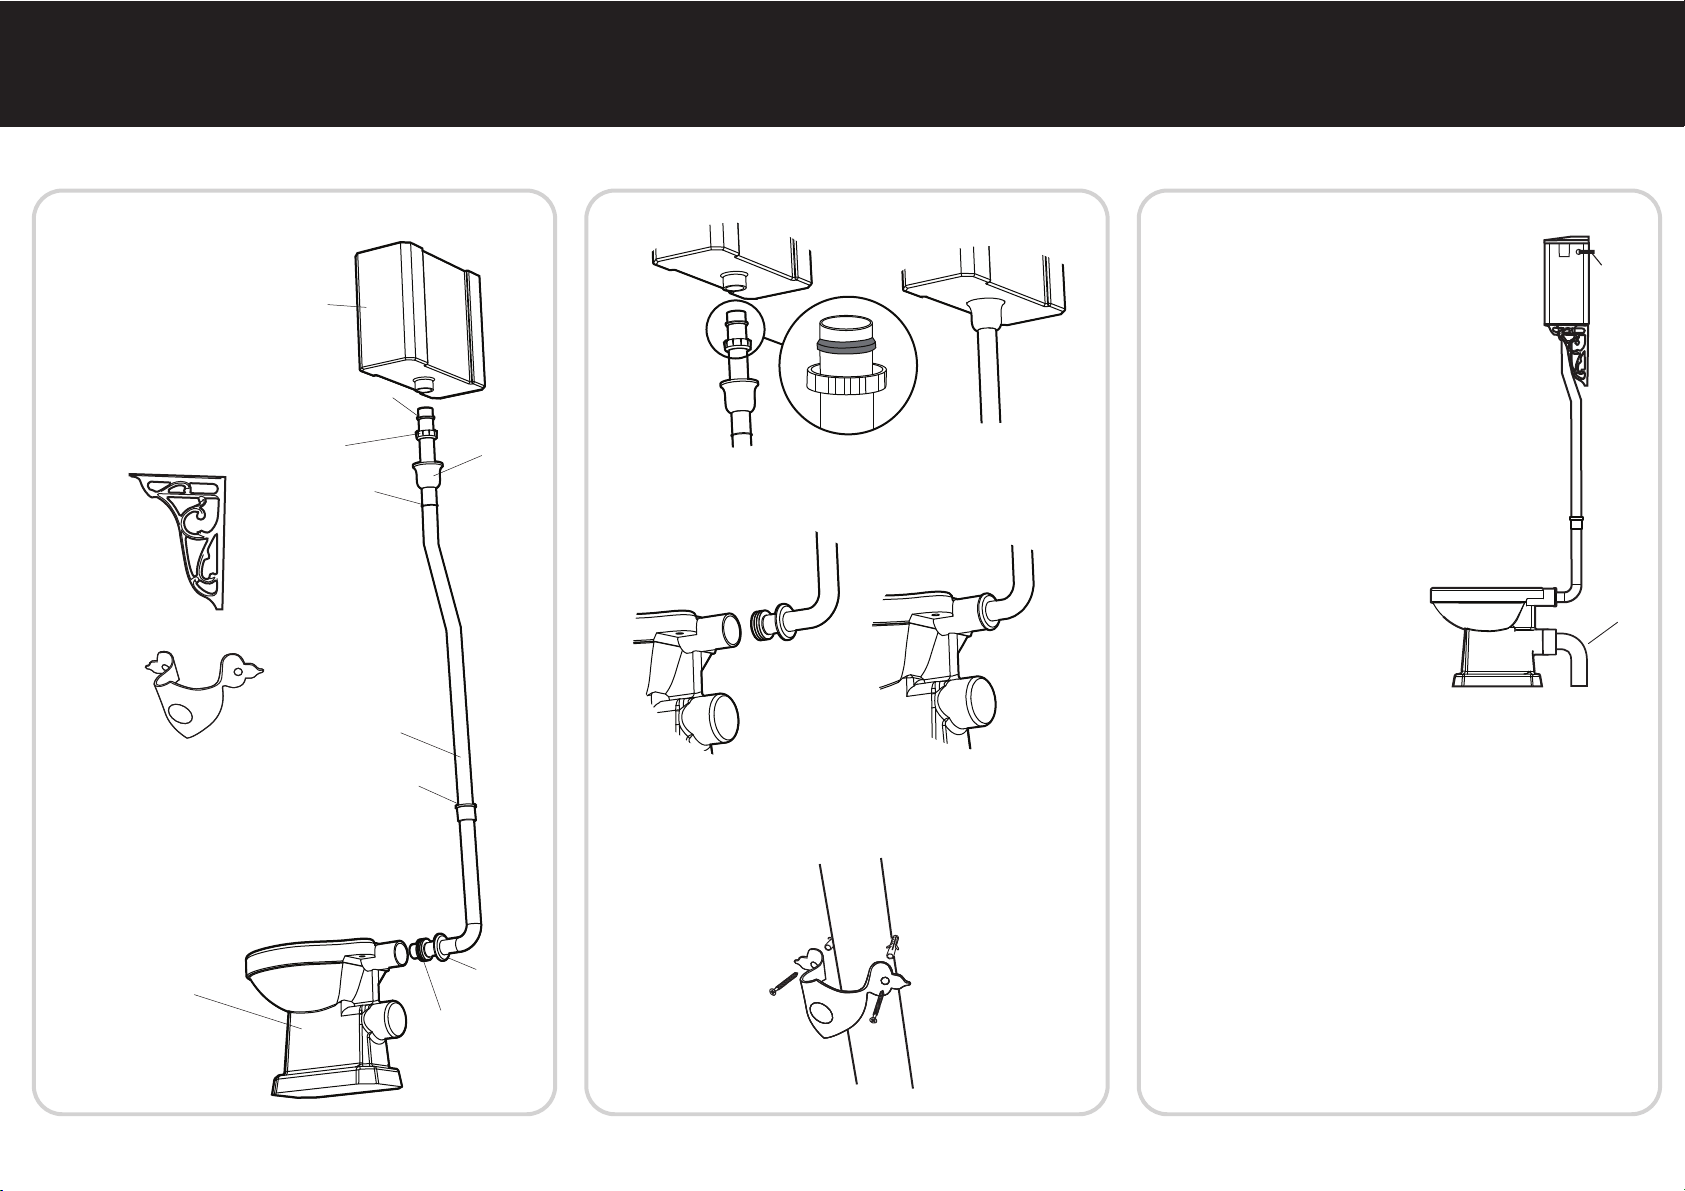
3. Insert the flush pipe into the bottom of the cistern and tighten the compression
fitting. To ensure a good seal use PTFE tape, around the thread.
Move the cover over the base of the flush valve and move the O-ring so it stays in
position.
4. Insert the flush pipe and flush cone into the inlet hole on the pan. Ensure the
pipe is fitted securely into the pan.
Use a small dab of silicone to hold the metal cover in place.
5. Use the pipe bracket to fix the pipe to the wall. Mount this bracket about
halfway up the flush pipe.
2. Join the two flush pipes together. Push the
top pipe into the bottom pipe ensuring that the
O-ring is inside the collar. Tighten the knurled
collar to secure the pipes together. Using the
diagram, place all of the components labelled
in the correct order onto the flush pipe.
Vitoria High Level Cistern
CH850S
Rubber Compression Washer
CH850S
Compression Nut
CH850S Cover
HLK850S
Cover O-ring
HLK850S
High Level Flush Pipe
HLK850S
Metal Cover
HLK850S
Flush Cone
CH850S
Vitoria High/Low Level Pan
LL850S
Cistern Bracket x2
HLK850S
Pipe Bracket
HLK850S
ASSEMBLY DIAGRAM
Soil pipe
MAKING PLUMBING
CONNECTIONS
Connect the soil pipe and ensure it is
adequately sealed around the toilet pan
outlet to prevent leakage.
The inlet valve has a threaded connector. It
is recommended that this thread is wrapped
in PTFE tape before connecting the water
supply.
Do not overtighten the supply to the inlet
valve as this could damage the inlet valve
causing leakage.
After connecting the water supply to the
inlet valve check that the inlet valve
components do not touch the internal walls
of the cistern and the ball float can move
freely up and down.
Check all connections are secure and a soil
pipe is fitted before testing the flush.
OPERATION
Pull the handle on the chain for a full flush of 6L.
Leave pulled for a full flush.
CARE
DO NOT introduce caustic chemical substances (e.g. containing chlorine compounds
or similar). These can damage the valve components and cause failure.
Water supply
connection
FINAL COMMISSIONING
- Fill the cistern with water and carefully check for leaks.
- Test the overflow by holding the float down, ensure that incoming water is completely
discharged. If not partially close the isolation valve (not supplied) and try again. Repeat
until all incoming water is discharged.
- Check that the inlet valve shuts off on the water line indicated inside the cistern.
Knurled Collar
REF: PL: 06 14 v1.0
This manual suits for next models
2
Other Tavistock Toilet manuals

Popular Toilet manuals by other brands

Kohler
Kohler PANACHE K-18182T-2 installation instructions

Toto
Toto Villeroy & Boch VICLEAN-U installation guide

Clou
Clou InBe IB/04.01140 installation instructions

Aqua-Sigma
Aqua-Sigma UB-6500U installation guide

Toto
Toto CST754EFN installation manual

BEMIS
BEMIS carrara&matta Canyon STA-TITE Installation instruction


