Bassini Harmony Series User manual

INSTALLATION INSTRUCTIONS
FOR BASSINI TOILET SUITES
Before installation, a visual check of the suite should
be undertaken. The pan, seat, pan fixings and trap
connector come in one box and the cistern and valves
are in a separate box. Ensure that nothing is damaged
or missing.
The drawings on the back of this installation document
show the “set-out’ for the Bassini pan. If it is to be
installed as an S-trap, the standard set-out can be
anywhere from 90-190mm (Back To Wall models) &
90-110mm (Wall Faced with Concealed Cistern Models)
from the finished wall to the centre of the waste outlet.
The two-piece plastic trap connector allows additional
flexibility in the set-out if needed.
Bassini toilet suites can be installed
with back-entry or bottom-entry
water connections. The Bassini
pans, both standard height and easy
height, can be installed as P-trap, or
S-trap using the universal plastic trap
connector supplied with the pan.
1. Establish the rough in positions for the water inlet
to the cistern, the waste outlet and the holes for
the pan fixing brackets (see drawing overleaf).
For back-inlet connections, ensure the water
inlet connection is extending 40mm from the
finished wall.
2. Prepare the waste outlet according to the required
set-out.
For S-Trap installations, cut the plastic trap
connector to suit the set-out. (The grooves on the
trap connector are 10mm apart.)
For P-Trap installations, set the centre of the
waste outlet 185mm from the finished floor level.
NB. A pan collar to connect the P-trap to the
waste outlet is not supplied with the pan.
3. Drill the holes in the floor for the fixing brackets,
ensuring that they are 40mm inside the traced
outline of the pan (see separate instructions
accompanying the bracket).
The installation of this toilet suite should be undertaken by a qualified and licensed plumber and in accordance with the
National Plumbing Code AS/NZS 3500.2 Harmony sanitaryware products are designed to meet the appropriate Australian standards.
BASSINI
Setup:
For further information, visit www.harmonybathroomware.com.au
Harmony Installation Instructions - Bassini_V4.indd 3 22/02/2017 12:31 PM

S-Trap Installation for:
Back To Wall
Back-Entry versions:
S-Trap Installation for:
Back To Wall
Bottom-Entry versions:
Suits Models:
HARMONY10200, HARMONY10250 (Fig.1)
HARMONY10400, HARMONY10450 (Fig.3)
Suits Models:
HARMONY10300, HARMONY10350 (Fig.2)
1. Lubricate the rubber at the end of the plastic trap
connector (using a water-based lubricant) and
position it firmly in the waste outlet.
2. Fix the trap connector to the wall using the rod
and bracket.
3. Align the pan with the trap connector, then push
it back firmly towards the wall so there is a firm
connection.
4. Bolt the cistern to the pan, flush it with a bucket of
water to ensure there are no leaks.
5. Flush the water line.
6. Connect the water inlet valve using a 15mm
mini cistern stop. Fill the cistern and ensure
that water is at the correct level. Any minor
adjustments should be in line with the instructions
accompanying the inlet valve.
1. Lubricate the rubber at the end of the plastic trap
connector (using a water-based lubricant) and
position it firmly in the waste outlet.
2. Fix the trap connector to the wall using the rod
and bracket
3. Bolt the cistern to the pan, flush it with a bucket of
water to ensure there are no leaks.
4. Insert a flexible connector through the hole in the
side of the pan and connect it to the water inlet at
the base of the cistern.
5. Align the pan with the trap connector, then push
it back firmly towards the wall so there is a firm
connection
6. Connect the other end of the flexible connector
to the water point (usually a mini cistern stop) on
the wall adjacent to the pan. Fill the cistern and
ensure that water is at the correct level. Any minor
adjustments should be in line with the instructions
accompanying the inlet valve.
For further information, visit www.harmonybathroomware.com.au
1. Ensure the toilet suite is level and that the cistern is
square to the wall.
2. Attach the cistern to the wall.
3. Attach the seat according to the
separate instructions.
4. Fix the pan to the floor using the screws and
caps provided.
5. Silicone the suite to the floor and remove any excess.
6. Flush the toilet (both half flush and full flush)
to ensure it is functioning correctly.
1. Ensure the toilet suite is level and that the cistern
is square to the wall.
2. Attach the cistern to the wall.
3. Attach the seat according to the
separate instructions.
4. Fix the pan to the floor using the screws and
caps provided.
5. Silicone the suite to the floor and remove
any excess.
6. Flush the toilet (both half flush and full flush)
to ensure it is functioning correctly.
Final StepS:
Final StepS:
Harmony Installation Instructions - Bassini_V4.indd 4 22/02/2017 12:31 PM

S-Trap Installation for:
Wall-Faced Pans
with Concealed Cistern:
Suits Models:
HARMONY10500, HARMONY10550 (Fig.4)
HARMONY10600, HARMONY10650 (Fig.5)
1. Install the cistern in the wall as per the instructions
accompanying the concealed cistern. It is
important to adhere to the height
and pressure recommendations for the cistern.
2. Set the flush pipe from the cistern at the
appropriate height to engage with the pan.
3. Lubricate the rubber at the end of the plastic trap
connector (using a water-based lubricant) and
position it firmly in the waste outlet.
4. Fix the trap connector to the wall using the rod
and bracket
5. Align the pan with the trap connector and flush
pipe, then carefully push the pan back towards the
wall so there is a firm connection of both the trap
connector and the flush pipe.
6. Follow the instructions for filling and testing the
concealed cistern
1. Attach the seat according to the
separate instructions.
2. Fix the pan to the floor using the screws and
caps provided.
3. Silicone the suite to the floor and remove
any excess.
4. Flush the toilet (both half flush and full flush)
to ensure it is functioning correctly.
1. Clean the toilet suite with liquid detergent and a
damp cloth.
2. Do not use water additives, or place them in
the cistern.
Final StepS:
Care and MaintenanCe:
Disclaimer: Dimensions and set-outs contained in these instructions are correct at the time of publication. However, neither the
manufacturer nor the distributor takes responsibility for printing errors. The manufacturer and the distributor reserve the right to vary
specifications or delete toilet suite models without prior notification. A failure to follow these instructions, or a failure to have the product
installed by a licensed tradesperson, may void the product’s warranty.
www.harmonybathroomware.com.au
Harmony Installation Instructions - Bassini_V4.indd 5 22/02/2017 12:31 PM
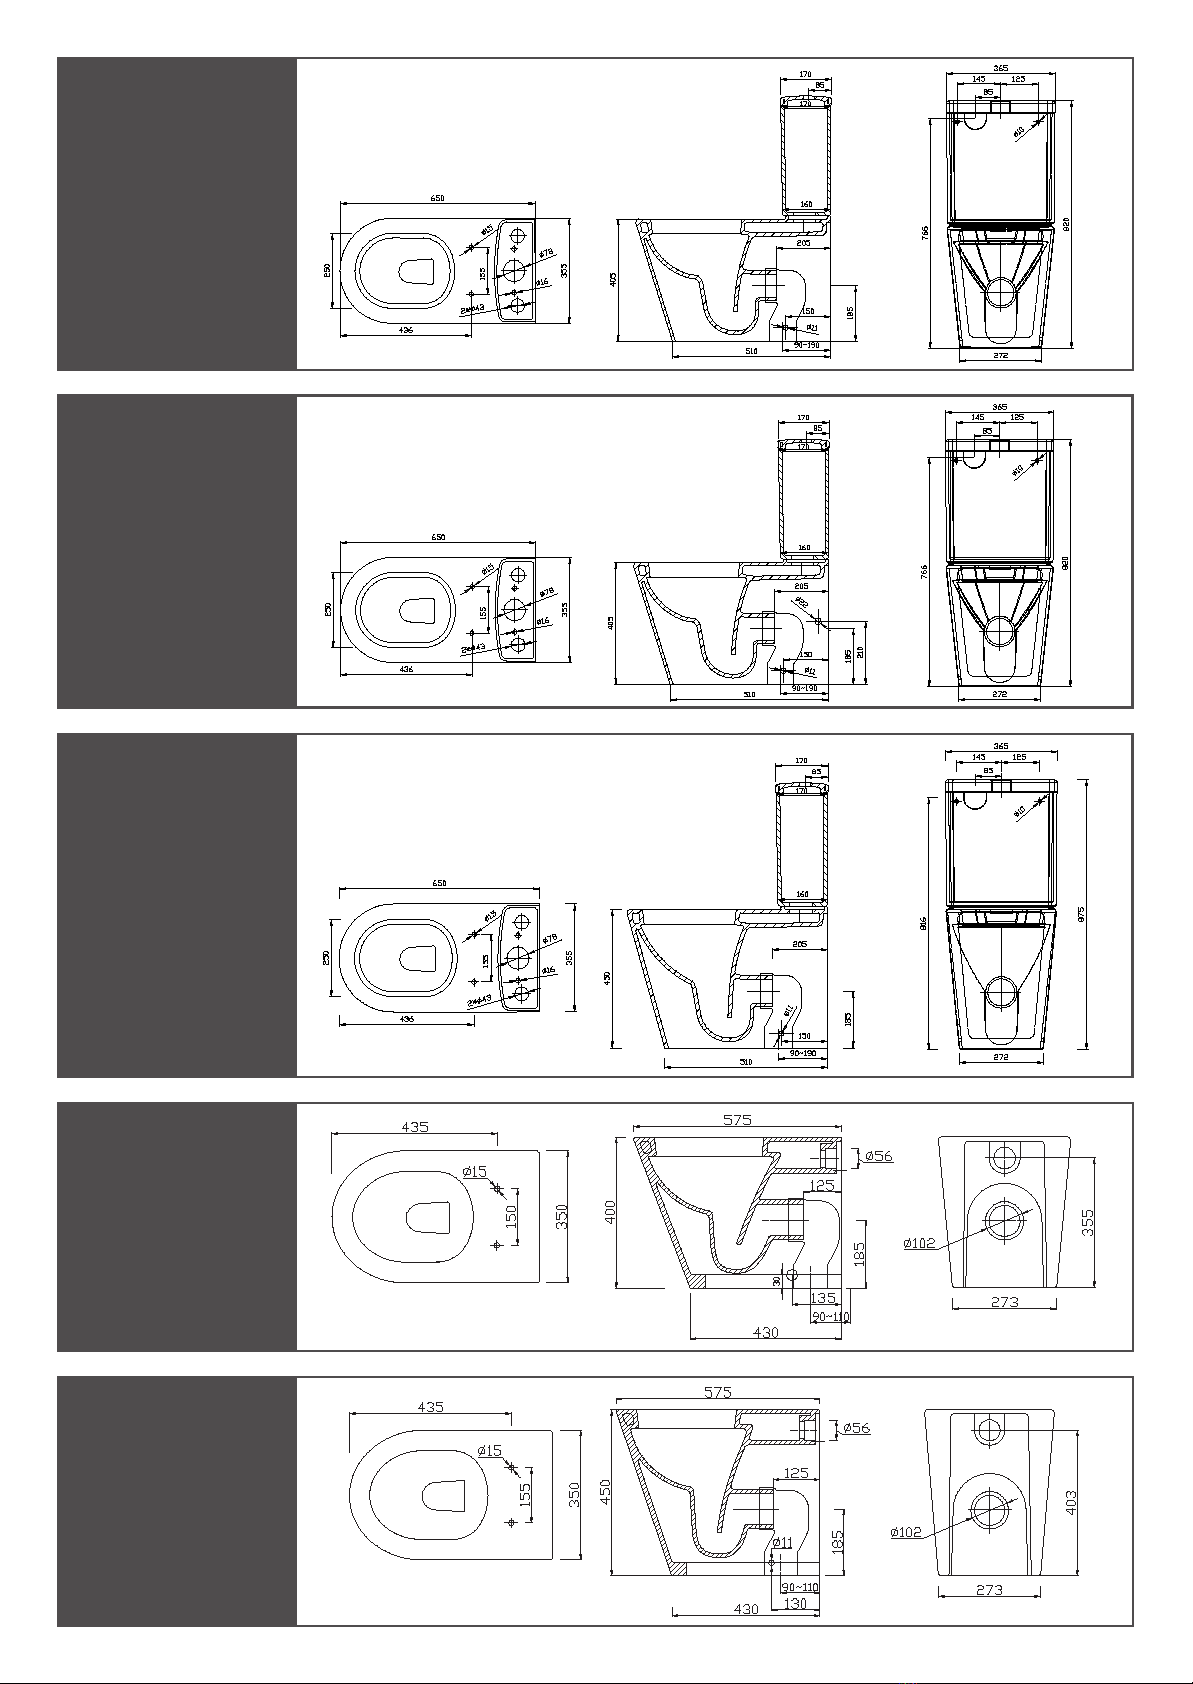
BASSINI
Back to Wall
Toilet Suite
Back Entry
(Fig.1)
HARMONY10200
HARMONY10250
BASSINI
Back to Wall
Toilet Suite
Bottom Entry
(Fig.2)
HARMONY10300
HARMONY10350
BASSINI
Easy Height
Back to Wall
Toilet Suite
Back Entry
(Fig.3)
HARMONY10400
HARMONY10450
BASSINI
Easy Height
Wall Faced
Toilet Pan with
Concealed Cistern
(Fig.5)
HARMONY10600
HARMONY10650
BASSINI
Wall Faced
Toilet Pan with
Concealed Cistern
(Fig.4)
HARMONY10500
HARMONY10550
Harmony Installation Instructions - Bassini_V4.indd 2 22/02/2017 12:31 PM


This manual suits for next models
10
Table of contents
Popular Toilet manuals by other brands


IFO
IFO Cera 3875 Maintenance Instruction

Toto
Toto WASHLET+ NEXUS 1G S550E MW4423056CUFGA 01... installation instructions

American Standard
American Standard NEO MODERN CCAS2073 installation manual

DURAVIT
DURAVIT SensoWash Slim manual

Mirabelle
Mirabelle VILAMONTE MIRVL220WH installation instructions

Kohler
Kohler K-3749 installation guide

Kohler
Kohler K-5401IN-0 installation guide

IFO
IFO Spira Art 6240 Assembly, Operating and Maintenance Instruction

Sanela
Sanela SLWN 14 Mounting instructions

Cersanit
Cersanit AQUA 40 MECH Installation and operating instructions

Clesana
Clesana C1 Series installation instructions

Toto
Toto NEOREST instruction manual