EPOS EXPAND VISION 3T User manual
User Guide
EXPAND VISION 3T
Video collaboration bar for Microsoft®Teams
1
Contents
Welcome �������������������������������������������������������������������������������������������������������������������������������������������������3
Package contents ���������������������������������������������������������������������������������������������������������������������������4
VISION 3T at a glance������������������������������������������������������������������������������������������������������������������6
Video collaboration bar at a glance������������������������������������������������������������������������������������������������������������ 6
Remote control at a glance ��������������������������������������������������������������������������������������������������������������������������������8
Speakerphone at a glance�������������������������������������������������������������������������������������������������������������������������������10
Placing / mounting VISION 3T��������������������������������������������������������������������������������������������12
Installation options ���������������������������������������������������������������������������������������������������������������������������������������������������12
A Placing the product on a desk�����������������������������������������������������������������������������������������������������������������13
B Placing the product on a screen / monitor�����������������������������������������������������������������������������������13
C Mounting the product on a wall��������������������������������������������������������������������������������������������������������������14
Connecting / preparing devices ��������������������������������������������������������������������������������������15
Connection possibilities������������������������������������������������������������������������������������������������������������������������������������� 15
1 Connecting a screen������������������������������������������������������������������������������������������������������������������������������������������17
2 Connecting to a network�������������������������������������������������������������������������������������������������������������������������������18
3 Connecting the speakerphone ��������������������������������������������������������������������������������������������������������������� 19
4 Connecting to the power supply����������������������������������������������������������������������������������������������������������20
5 Inserting the remote batteries�������������������������������������������������������������������������������������������������������������������21
Pairing Bluetooth devices��������������������������������������������������������������������������������������������������������������������������������22
Connecting other accessories �������������������������������������������������������������������������������������������������������������������� 23
Positioning the devices���������������������������������������������������������������������������������������������������������������������������������������24
How to use – the basics����������������������������������������������������������������������������������������������������������25
Adjusting the camera������������������������������������������������������������������������������������������������������������������������������������������� 25
Changing the volume ����������������������������������������������������������������������������������������������������������������������������������������� 26
Muting / unmuting the microphone���������������������������������������������������������������������������������������������������������27
Joining meetings / calls��������������������������������������������������������������������������������������������������������������������������������������27

2
Good to know����������������������������������������������������������������������������������������������������������������������������������28
Mirroring the screen��������������������������������������������������������������������������������������������������������������������������������������������� 28
Using an optional Kensington®lock �������������������������������������������������������������������������������������������������������� 28
Standby mode & waking up���������������������������������������������������������������������������������������������������������������������������� 29
Using the privacy buttons������������������������������������������������������������������������������������������������������������������������������� 30
Changing VISION 3T settings��������������������������������������������������������������������������������������������������������������������������31
Maintaining & updating products������������������������������������������������������������������������������������32
Cleaning the products����������������������������������������������������������������������������������������������������������������������������������������32
Storing and carrying the speakerphone����������������������������������������������������������������������������������������������32
Updating the rmware����������������������������������������������������������������������������������������������������������������������������������������� 33
Replacing / removing the batteries ��������������������������������������������������������������������������������������������������������� 33
If a problem occurs���������������������������������������������������������������������������������������������������������������������34
Collaboration bar solutions����������������������������������������������������������������������������������������������������������������������������� 34
Speakerphone solutions�����������������������������������������������������������������������������������������������������������������������������������35
Pairing a new remote �������������������������������������������������������������������������������������������������������������������������������������������36
3Welcome
Welcome
Video collaboration� Reinvented�
All-in-one video collaboration solution
for today’s smart oce� Join meetings
with just one touch and enjoy a full
Microsoft Teams experience�
Empower your meeting room
Comes with wide angle 4K camera
with Sony®sensor, enhanced PTZ and
superior audio from included EPOS
EXPAND SP 30T
Microsoft Teams certied
Immerse yourself in Microsoft Teams
with all the familiar features�
Fully integrated
Key benets & features
Easy setup. Easy maintenance
Intelligent solution with automatic
software updates, remote device
management and provisioning�
Simply plug and play
One-touch join
All-in-one solution that’s ready
when you are� No PC needed�
One touch, and you’re in
Like being there
Enjoy a natural meeting
experience with intelligent picture
framing, voice tracking and
noise cancellation� Powered by
EPOS AI™
§
§
For safety instructions, consult the Safety Guide�
For specifications, consult the Fact sheet available at
www�eposaudio�com�
Trademarks
The Bluetooth®word mark and logos are registered trademarks owned by Bluetooth SIG, Inc� and any use of such marks by
DSEA A/S is under license�
The N-Mark is a trademark or registered trademark of NFC Forum, Inc� in the United States and in other countries�
USB Type-C®and USB-C®are trademarks of USB Implementers Forum�
Kensington is a registered trademark of ACCO Brands� Kensington The Professionals’ Choice is a trademark of ACCO Brands�
All other trademarks are the property of their respective owners�
4Package contents
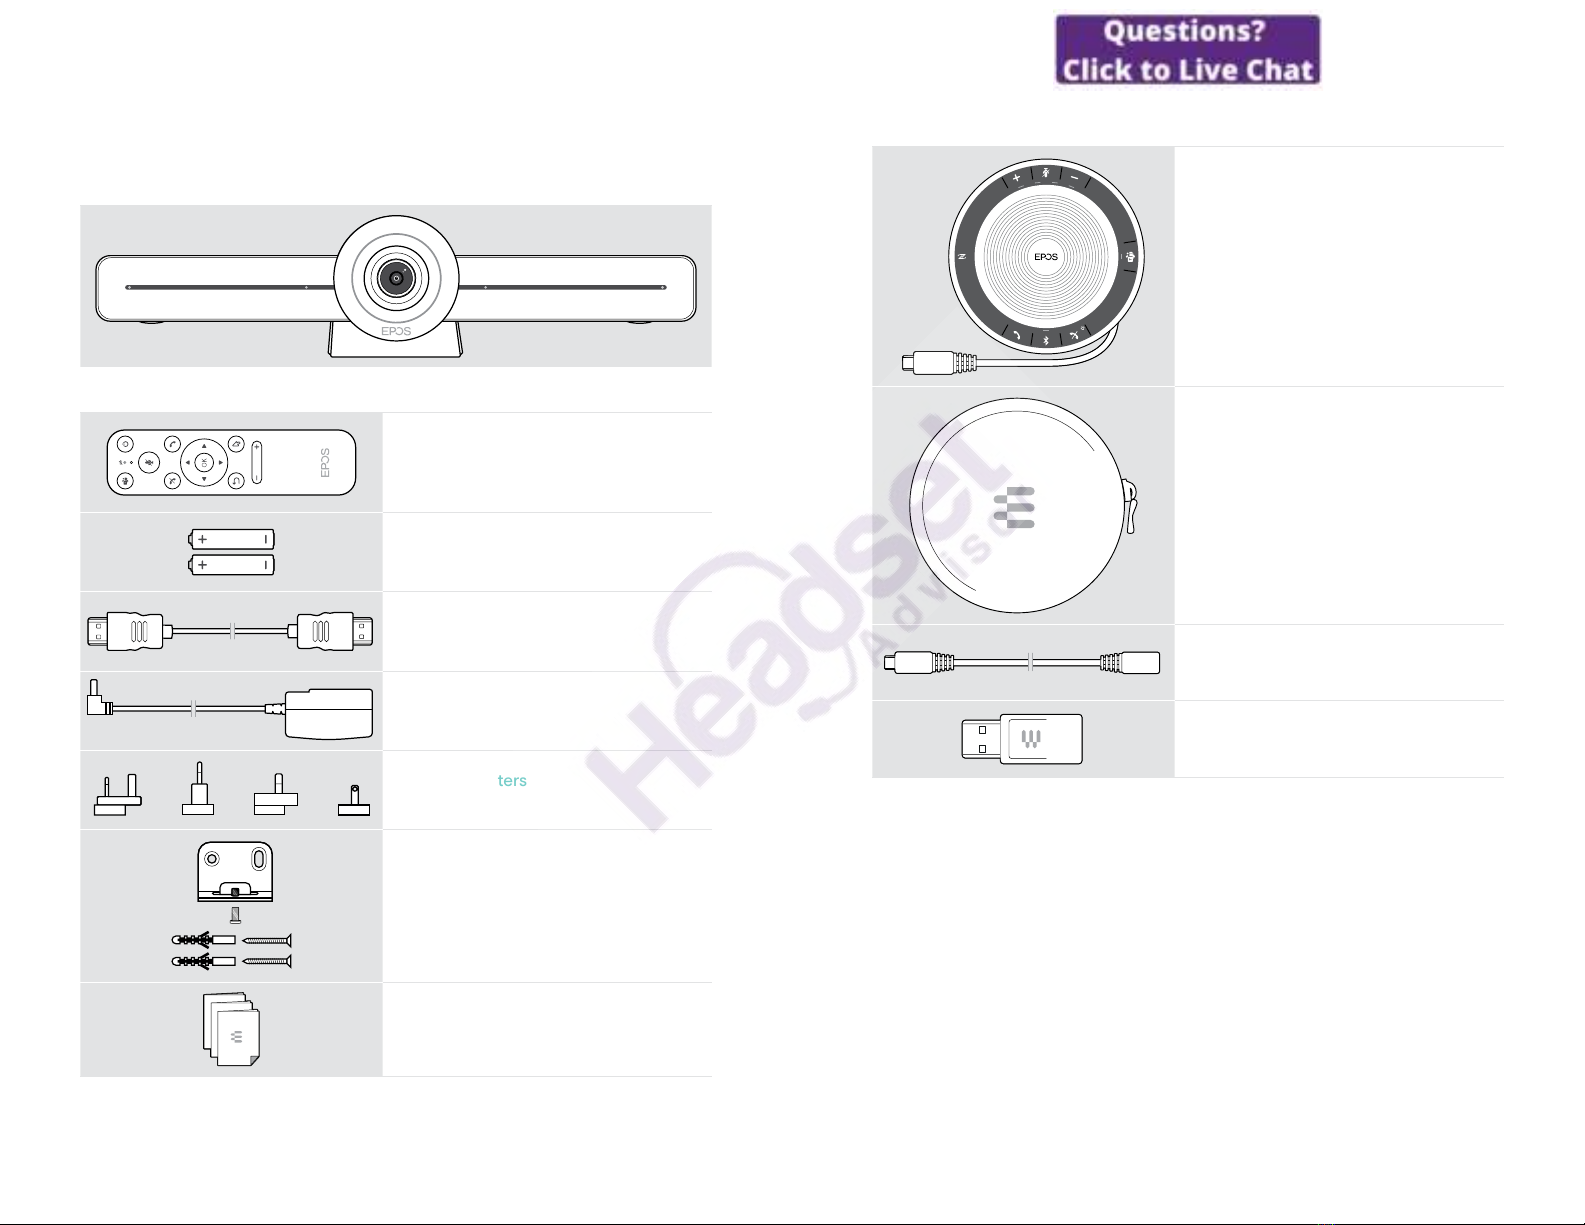
Package contents
EXPAND VISION 3T Video collaboration bar
VISION-RC01T
Remote control
Batteries for remote control
AAA Alkaline batteries
HDMI cable
Power supply unit
Country adapters
UK, EU, AU, US
Wall mount accessories
Mounting plate
Axing screw
Dowels*
Dowel screws
*diering wall types may require specic dowels
Quick Guide
Safety Guide
Compliance sheet
5Package contents
EXPAND SP 30T
Bluetooth®speakerphone
with built-in rechargeable battery
Carry pouch
for speakerphone
USB extension cable, 5 m
USB-C®to USB-A adapter
In this User Guide only the main functions of the EXPAND SP 30T are explained and
focused on the collaboration bar connection�
For further connections and functionalities, check the full EXPAND SP 30T User
Guide on the product page at www�eposaudio�com�
6VISION 3T at a glance
VISION 3T at a glance
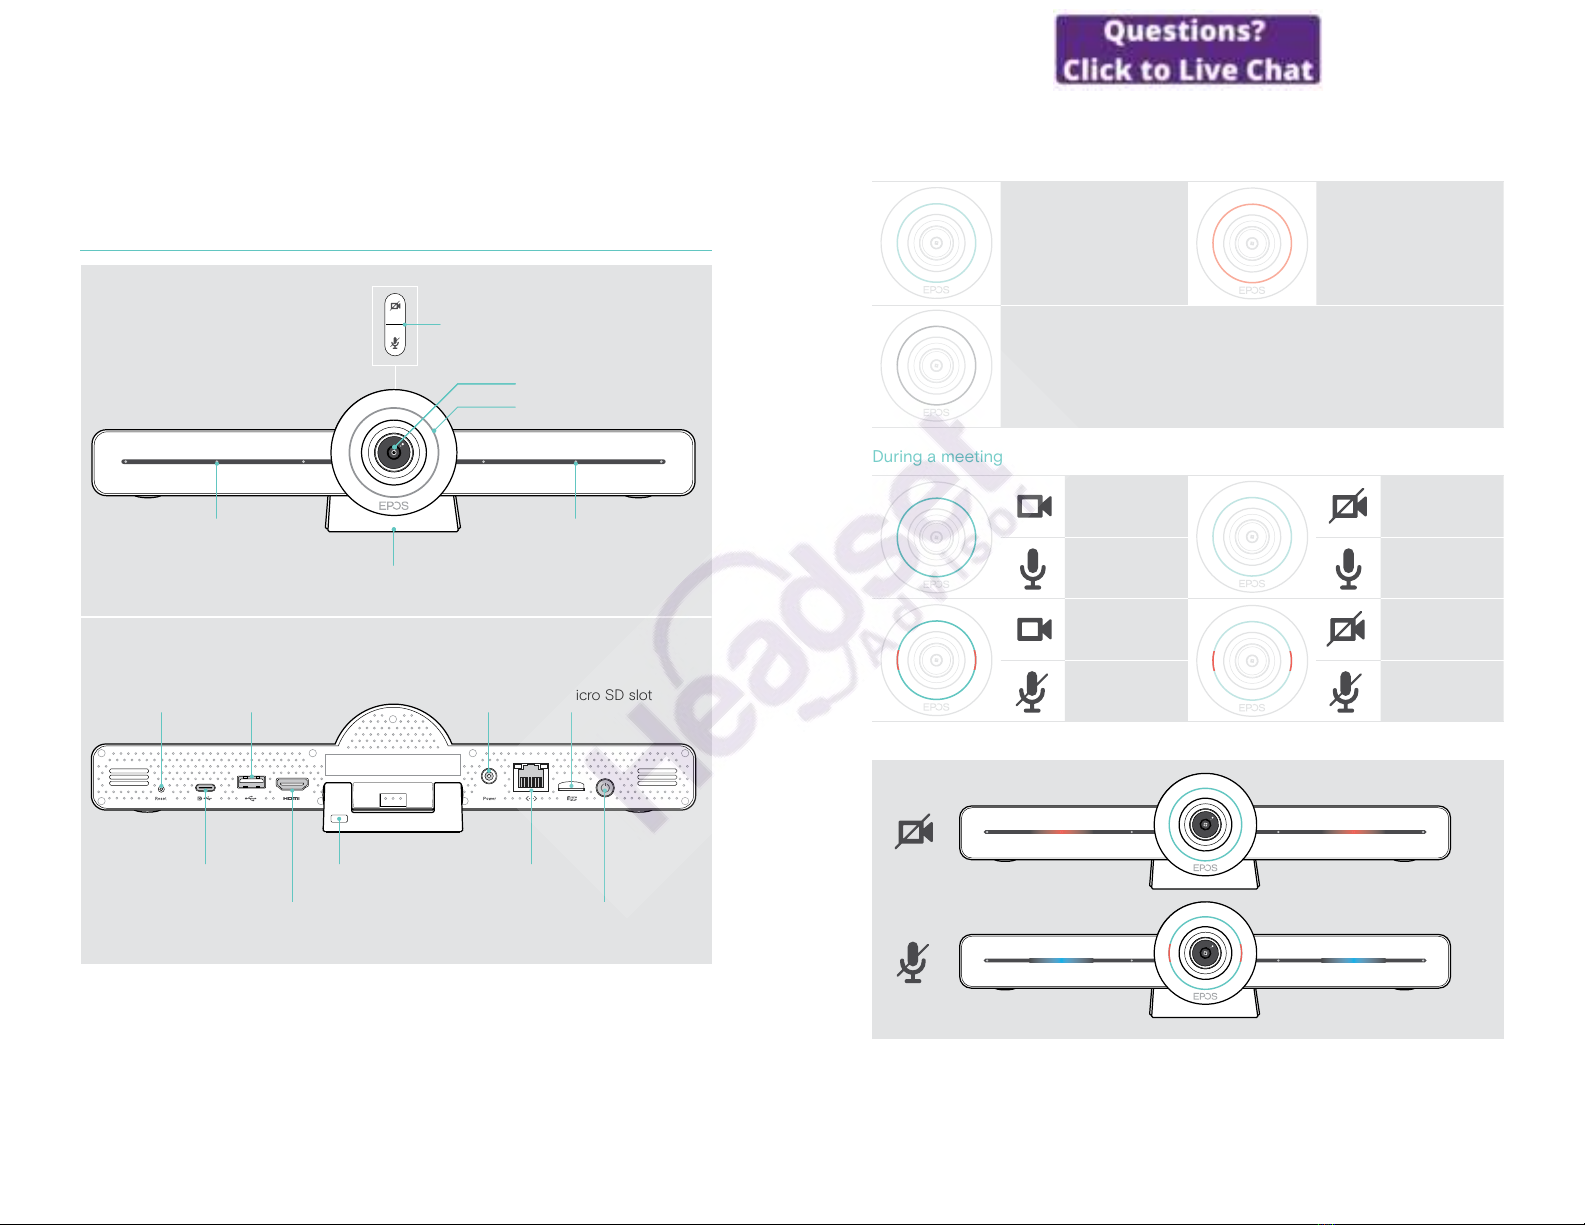
Video collaboration bar at a glance
Camera
HDMI
Power
LED ring
Stand
USB-C /
Display port
Reset
button
FRONT
REAR
Privacy buttons:
camera & microphone
Power button
RJ45 Ethernet
Micro SD slot
USB-A
Kensington lock slot
Privacy LED Privacy LED
7VISION 3T at a glance
Collaboration bar: LED at a glance
Switched on Standby mode
Switched o / not connected to the mains
During a meeting
Camera active Camera
inactive
Microphone
unmuted
Microphone
unmuted
Camera active Camera
inactive
Microphone
muted
Microphone
muted
Privacy mode Camera / Microphone (see page 30)

8VISION 3T at a glance
Remote control at a glance
Power button
Hook on button
Mute button
Battery low &
Pairing LED
Microsoft Teams button
Hook off button
Volume down button
Mouse pointer button
Navigation buttons
Volume up button
Return button
9VISION 3T at a glance
Remote control: Buttons at a glance
Button Function Page
Microsoft
Teams Starts next Microsoft Teams meeting –
Power Standby / Wake up 29
Mute Mutes / Unmutes the speakerphone’s
microphone 27
Hook on Ends / rejects a call –
Hook o Accepts a call –
Navigation
•Arrows: Moves between dierent
functions
•OK: Selects the element where the
mouse pointer is located
–
Back Returns to previous menu –
Mouse pointer Activates the mouse pointer –
Volume
down / up
–Decreases the volume
+Increases the volume 26

10VISION 3T at a glance
Speakerphone at a glance
Volume up button Volume down button
Bluetooth button
Hook o button
Speaker
Mute button
Status LEDs
NFC area
Microsoft Teams
button & LED
Bluetooth & Activity LED
Hook on, Power,
Battery status button
TOP
BOTTOM
USB-C connector
11VISION 3T at a glance
Speakerphone: LEDs at a glance
Activity LED Meaning
Device switched on
3x Device switching o
Device switched o
Incoming call
Active call
Call on hold
Second call on hold
Status LEDs Meaning
Microphone muted
Volume level; 8 steps
Battery status; 8 steps
For further connections and functionalities, check the EXPAND SP 30T User Guide
on the product page at www�eposaudio�com�

12Placing / mounting VISION 3T
Placing / mounting VISION 3T
Installation options
The collaboration bar can be:
• A placed on a desk
• B placed on top of a screen/monitor
• C mounted on a wall
A
B
C
13Placing / mounting VISION 3T
A Placing the product on a desk
>Place the collaboration bar on your desk�
>Hold down the stand and rotate the collaboration bar so that it points in the
direction of the meeting participants�
A
B Placing the product on a screen / monitor
>Rotate the stand�
>Put the product on the top of your screen/monitor�
>Hold down the product and rotate the stand so that it is xed securely on your
device�
B
14Placing / mounting VISION 3T
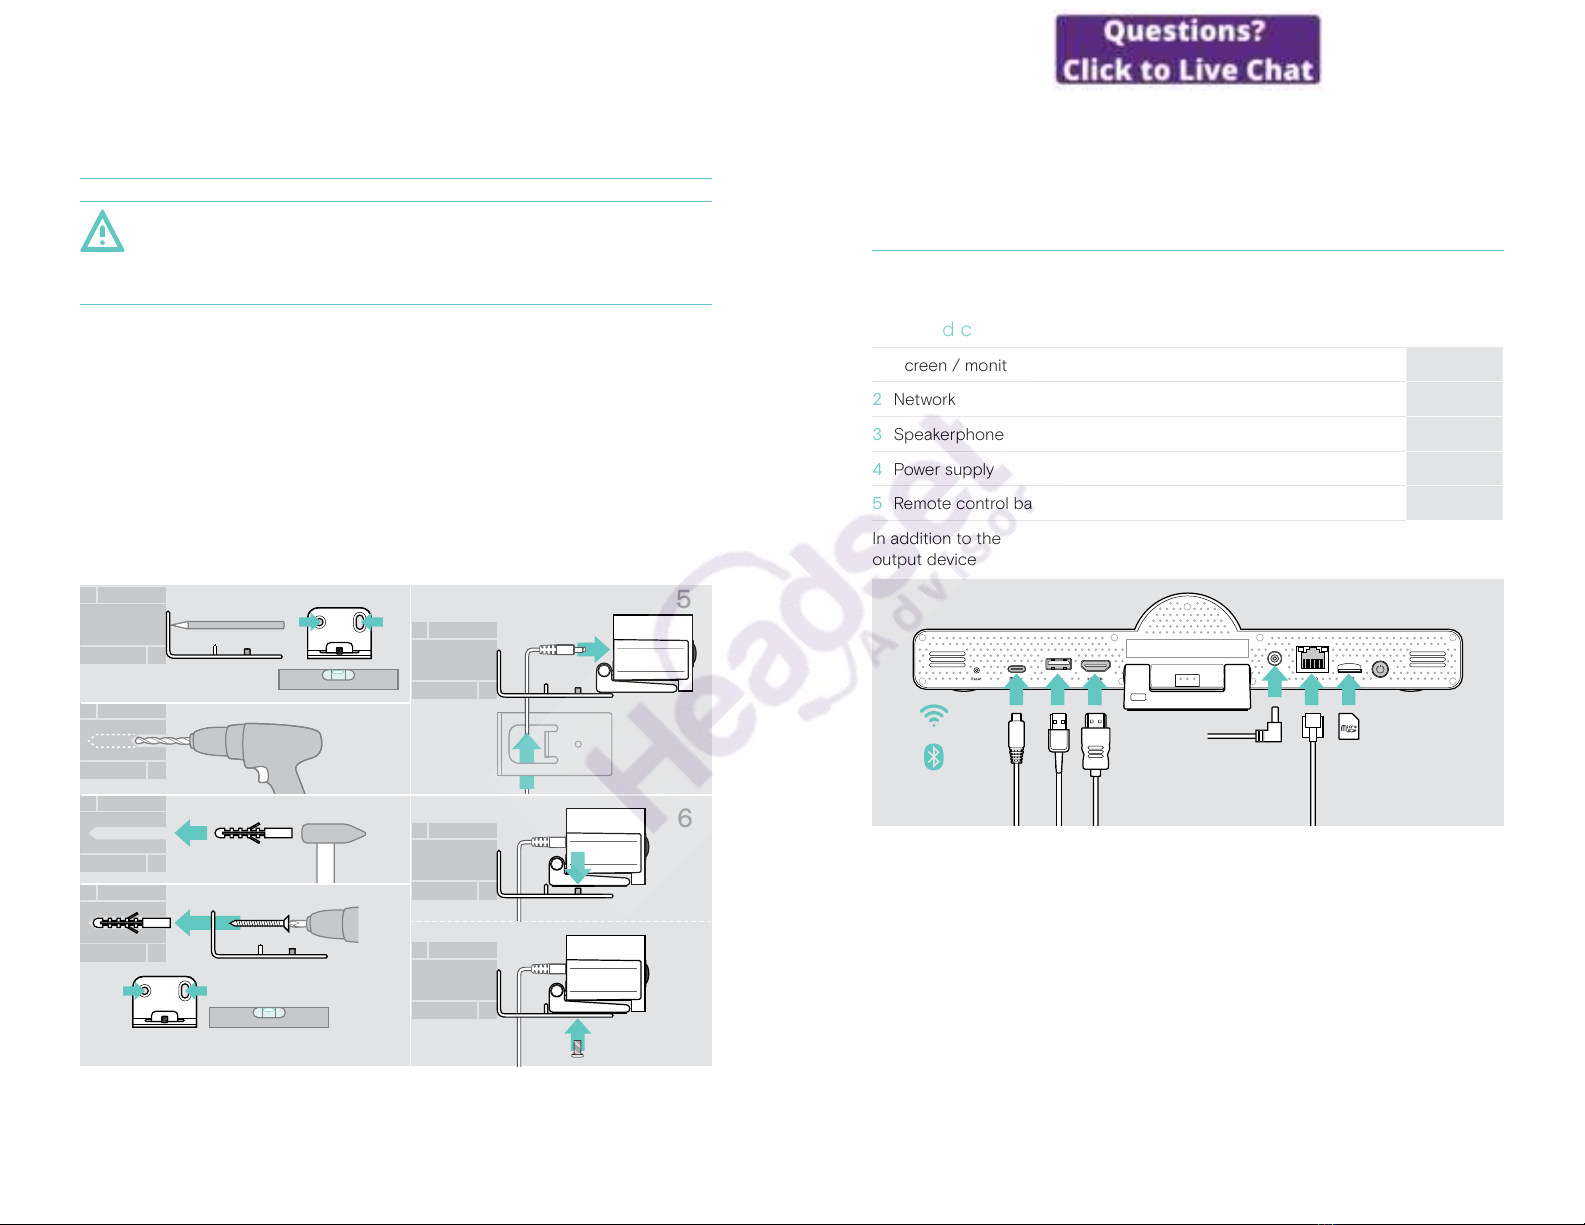
C Mounting the product on a wall
CAUTION
Danger of accidents or damages!
Drilling into e�g� cables and can lead to accidents�
>Check whether there are any cables or pipes in the wall�
The wall type is an example - other wall types may require dierent mounting.
1 Choose a position so that the camera meets the eye-height of meeting
participants� Hold the mounting plate against the wall, balance it and add two
marks�
2 Drill two holes�
3 Insert the two dowels�
4 Hold the mounting plate against the wall and x it with the screws� Start on the
left and bring it in balance with the other screw�
5 Hold the collaboration bar and connect the required cables as the space is small
when nally mounted > see page 15�
6 Position the collaboration bar and tighten the screws�
1 2
5
6
1
4
2
3
C
15Connecting / preparing devices
Connecting / preparing devices
Connection possibilities
The collaboration bar with its speakerphone works as an All-in-one solution� You
only need a screen/monitor, internet access and a Microsoft Teams account�
Required connections & actions Page
1 Screen / monitor 17
2 Network 18
3 Speakerphone 19
4 Power supply 20
5 Remote control batteries 21
In addition to the listed devices you can connect a variety of dierent in- and
output devices to the collaboration bar via the ports shown below�
For even more connection possibilities see EXPAND SP 30T User Guide�

16Connecting / preparing devices
Network options Page
Wi-Fi
18
Ethernet
Wired devices & memory card options Page
USB-A:
•Speakerphone 19
•Audio Device 23
•Keyboard / Mouse 23
•Touch Screen interface 23
USB-C / Display port:
•Speakerphone 19
•Audio Device 23
•Keyboard / Mouse 23
•Screen / Monitor 17
HDMI Out:
•Screen / Monitor 17
Micro SD:
• Micro SD memory card:
expansion of internal storage for upcoming features
23
Bluetooth devices options Page
•Keyboard / Mouse
22
•Audio Device
17Connecting / preparing devices
1 Connecting a screen
You can connect one or two screens via:
HDMI: primary screen/monitor
>
Connect the delivered HDMI cable to the HDMI OUT and your
screen/monitor�
USB-C / Display port: secondary screen/monitor
>
Connect a USB-C cable to the USB-C / Display port and your
screen/monitor�
18Connecting / preparing devices
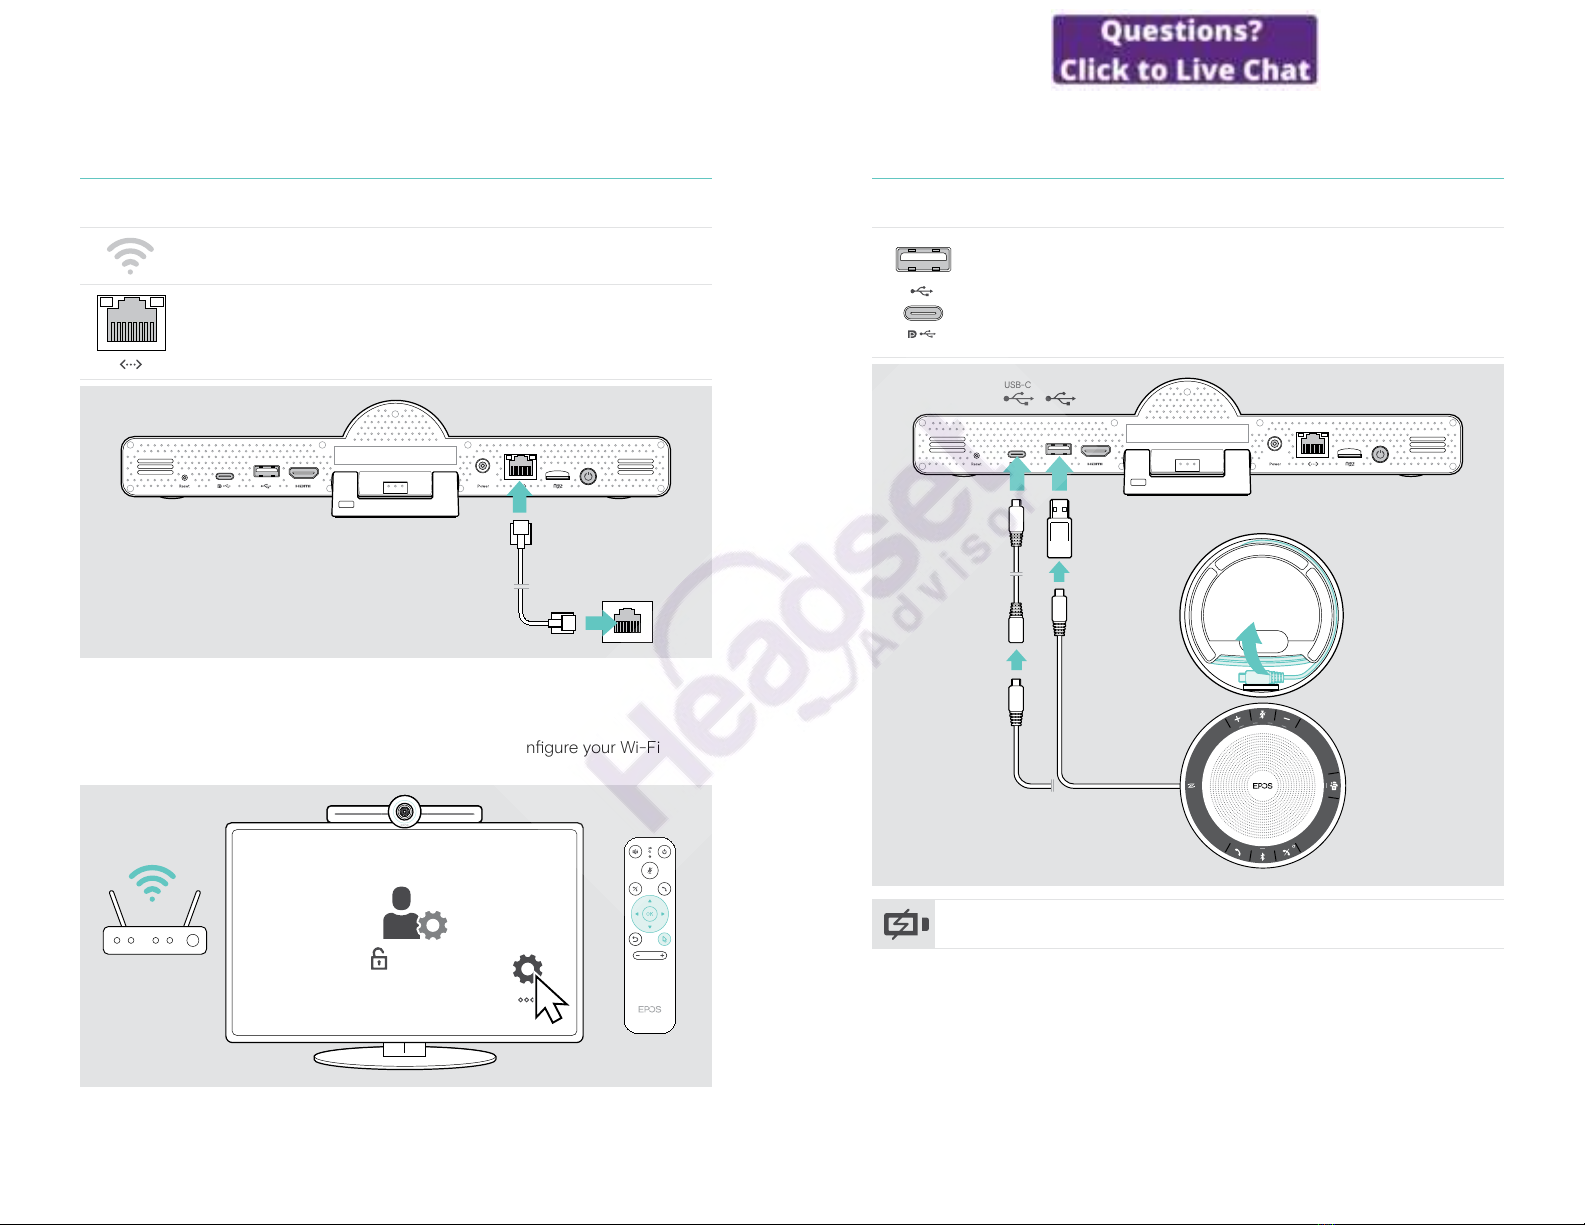
2 Connecting to a network
The collaboration bar requires internet access� You can connect it to a network via:
Wi-Fi:
>
Connect to your Wi-Fi�
Ethernet:
>
Connect a LAN cable to the Ethernet port�
Connecting to Wi-Fi
After the collaboration bar and your screen are turned on:
>
Enter the Settings menu > Device Settings > Wi-Fi to congure your Wi-Fi
connection (Password by default: 0000)�
0000
19Connecting / preparing devices
3 Connecting the speakerphone
You can connect the speakerphone either via USB-A or USB-C�
USB-A / USB-C:
>Release the USB-C plug, unwind the cable and place the
speakerphone on your desk�
>Connect it to USB-C or USB-A via the included adapter� Use the
USB extension cable – if required�
USB-AUSB-C
The speakerphone will automatically be charged�
20Connecting / preparing devices
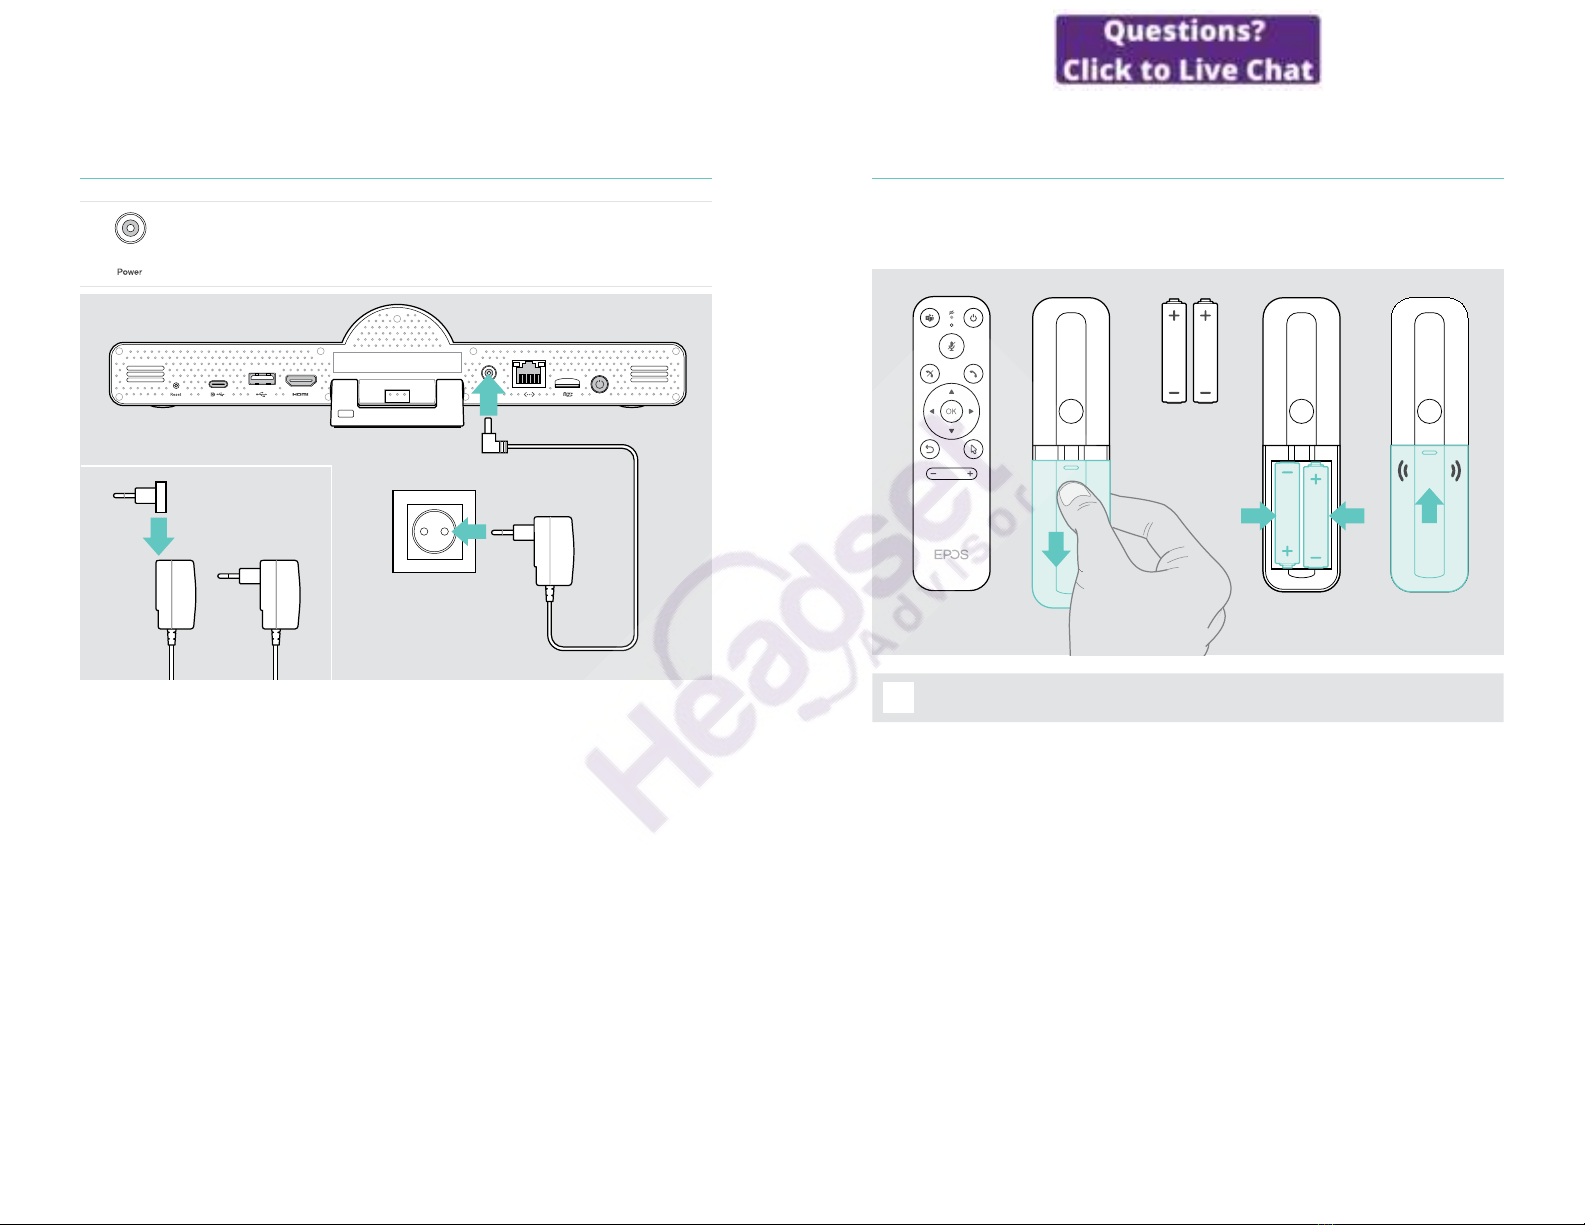
4 Connecting to the power supply
>
Select a suitable country adapter (EU, US, AU, UK) and slide it in�
>
Connect the Power supply unit with the Power and wall socket�
The collaboration bar turns on� The LED ring lights up mint�
EU/UK/US/AU
21Connecting / preparing devices
5 Inserting the remote batteries
>Open the battery compartment�
>Insert the AAA Alkaline batteries� Take care of the + and – direction�
>Close the battery compartment�
click
iInstead of the remote control you can also use a mouse or your
touchscreen�
22Connecting / preparing devices
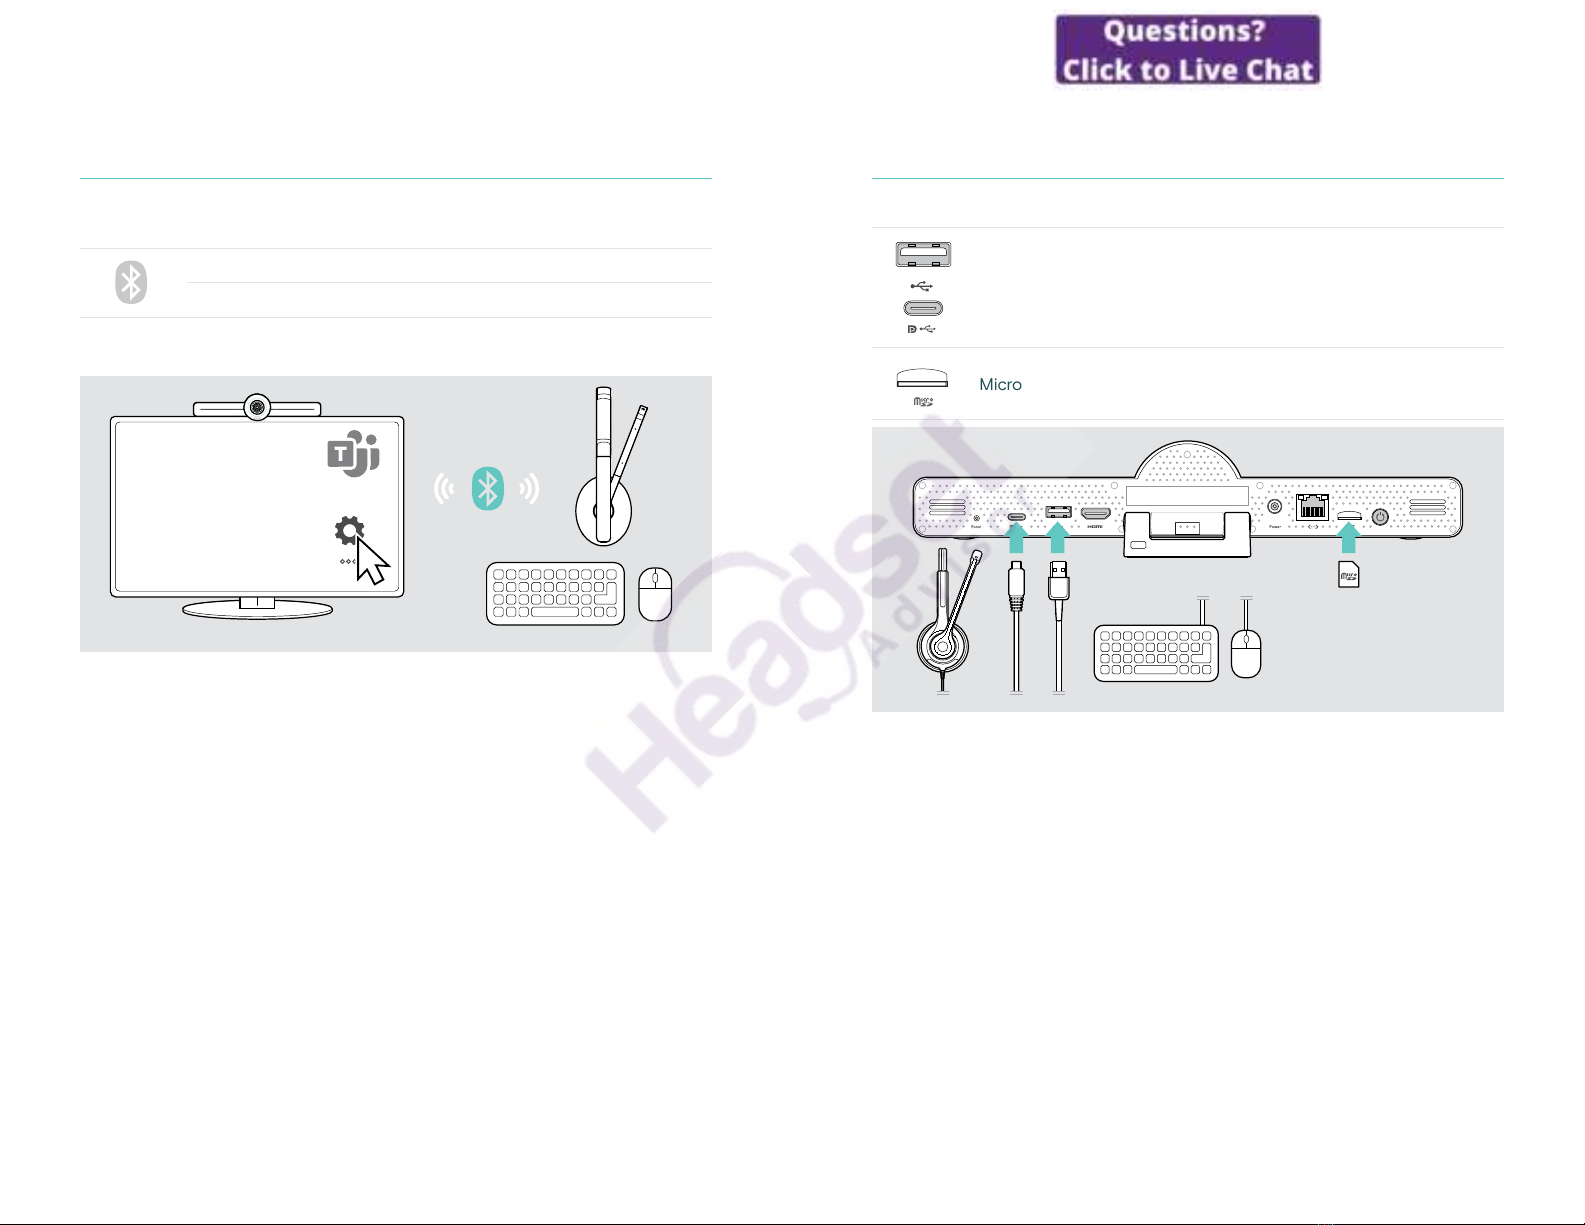
Pairing Bluetooth devices
The collaboration bar complies with the Bluetooth 5�0 standard� The following
Bluetooth proles are supported: A2DP, HSP and AVRCP�
•Keyboard / Mouse
•Audio Device
>Enter the Settings menu > Device Settings > User Settings > Bluetooth to
connect your Bluetooth device�
23Connecting / preparing devices
Connecting other accessories
You can connect several other accessories, e�g� for navigation�
USB-A / USB-C:
>
Connect your wired USB device (audio device, keyboard, mouse,
touch screen interface)�
Micro SD: for future use cases

24Connecting / preparing devices
Positioning the devices
You can use the speakerphone in meeting rooms with up to 8 participants�
>Place the speakerphone as centered as possible�
>Place the collaboration bar so that it captures meeting participants�
1 - 8
25How to use – the basics
How to use – the basics
The collaboration bar turns on automatically as soon as it is
connected to power� The LED lights up mint� If it lights up light
red, the device is in standby mode (see page 25)�
The connected speakerphone also turns on and the LED lights
up white�
Adjusting the camera
Using the Intelligent Framing feature
The collaboration bar is equipped with an intelligent framing feature - powered
by EPOS AITM� This feature automatically frames the picture and adjusts the digital
zoom to eectively capture the meeting participants�
>
Enter the Settings menu > Device Settings > Other Settings > Camera controls
to activate it�
Using the Camera Pan-Tilt-Zoom (PTZ) feature
You can adjust the camera position and digital zoom level to optimally capture the
meeting space�
>
Enter the Settings menu > Device Settings > Other Settings > Camera controls
to adjust it�
26How to use – the basics
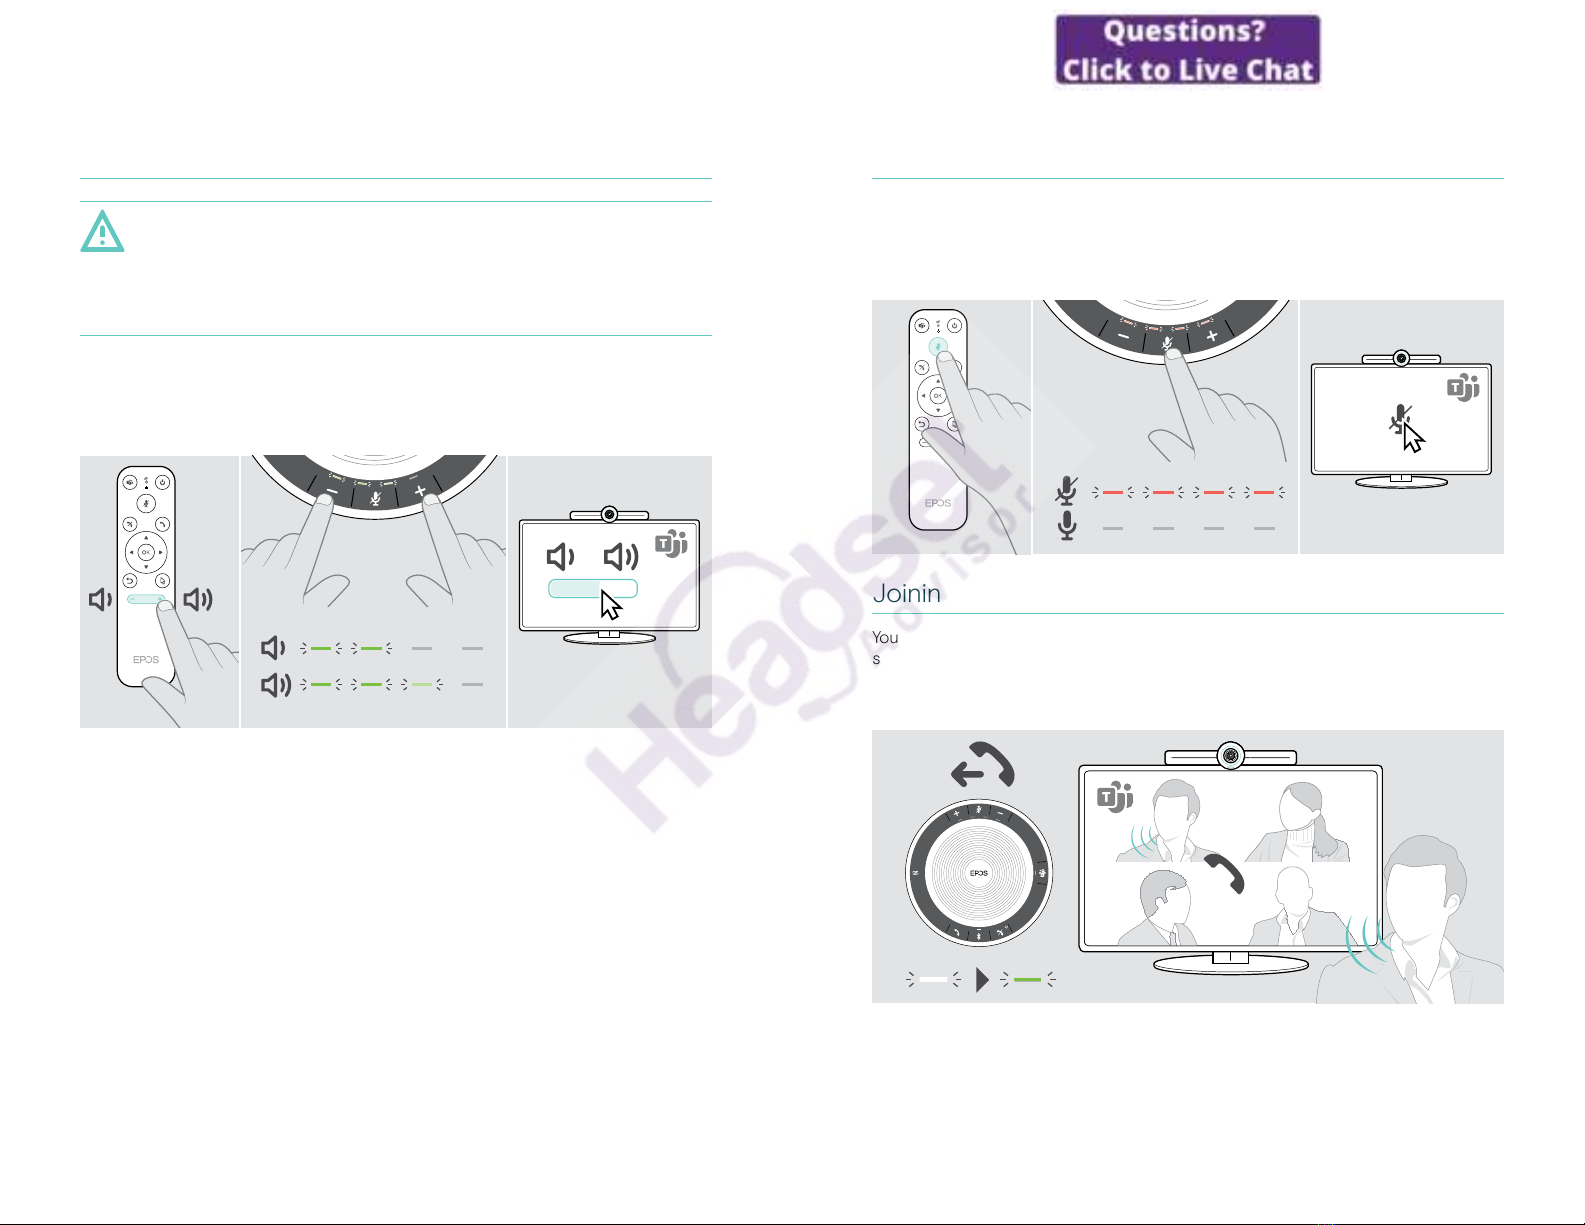
Changing the volume
CAUTION
Risk of hearing damage!
Listening at high volume levels for long periods can lead to permanent
hearing defects�
>Do not continuously expose yourself to high volumes�
You can adjust the volume in a meeting via:
1 remote control,
2 speakerphone or
3 Microsoft Teams on-screen menus
27How to use – the basics
Muting / unmuting the microphone
You can mute or unmute the microphone in a meeting via:
1 remote control,
2 speakerphone or
3 Microsoft Teams on-screen menus
Joining meetings / calls
You can join and control meetings and calls via Microsoft Teams, the remote and the
speakerphone (see EXPAND SP 30T User Guide)�
>
Join your meeting or initiate a call via the Microsoft Teams on-screen menus�
The speakerphone LED lights up green�

28Good to know
Good to know
Mirroring the screen
You can use Miracast to display content on the connected screen, e�g� by using the
“project” function in Windows�
iThis function is for local content sharing, not for sharing content in
Microsoft Teams meetings�
It is possible to change the screencasting name of the device in the settings menu�
Using an optional Kensington®lock
You can secure your collaboration bar e� g� on a table of a meeting room with an
optional Kensington lock�
>Follow the instructions for your Kensington lock�
29Good to know
Standby mode & waking up
The collaboration bar turns to standby mode, if:
• you have activated backlight timer in the settings (see
page 31) or
• you press the power button on the remote or on the back of
the collaboration bar�
The LED ring lights up dimmed red� The speakerphone turns
to standby too (activity LED dimmed, all other LEDs o)�
To wake up the collaboration bar and the speakerphone:
>
Press any button on the remote control or the power button
on the collaboration bar�
The LED ring lights up mint�

30Good to know
Using the privacy buttons
For additional privacy, the collaboration bar is equipped with hardwired switches for
disabling the camera and/or microphones�
>Press the button on the collaboration bar to activate / deactivate the camera or
microphones�
Camera deactivated: Privacy mode
Microphones deactivated: Privacy mode
i
If the privacy mode is activated, the only way to enable it is via the privacy
switches�
The switches are intended for additional privacy and not to be used during
Microsoft Teams meetings�
31Good to know
Changing VISION 3T settings
The on screen settings menu is used for e�g� setting up, conguring and
personalizing the device – for example:
•Network and wireless devices connections
•Camera controls
•Display settings
•Language
iThe Admin settings are password protected - default password: 0000�
32Maintaining & updating products
Maintaining & updating products
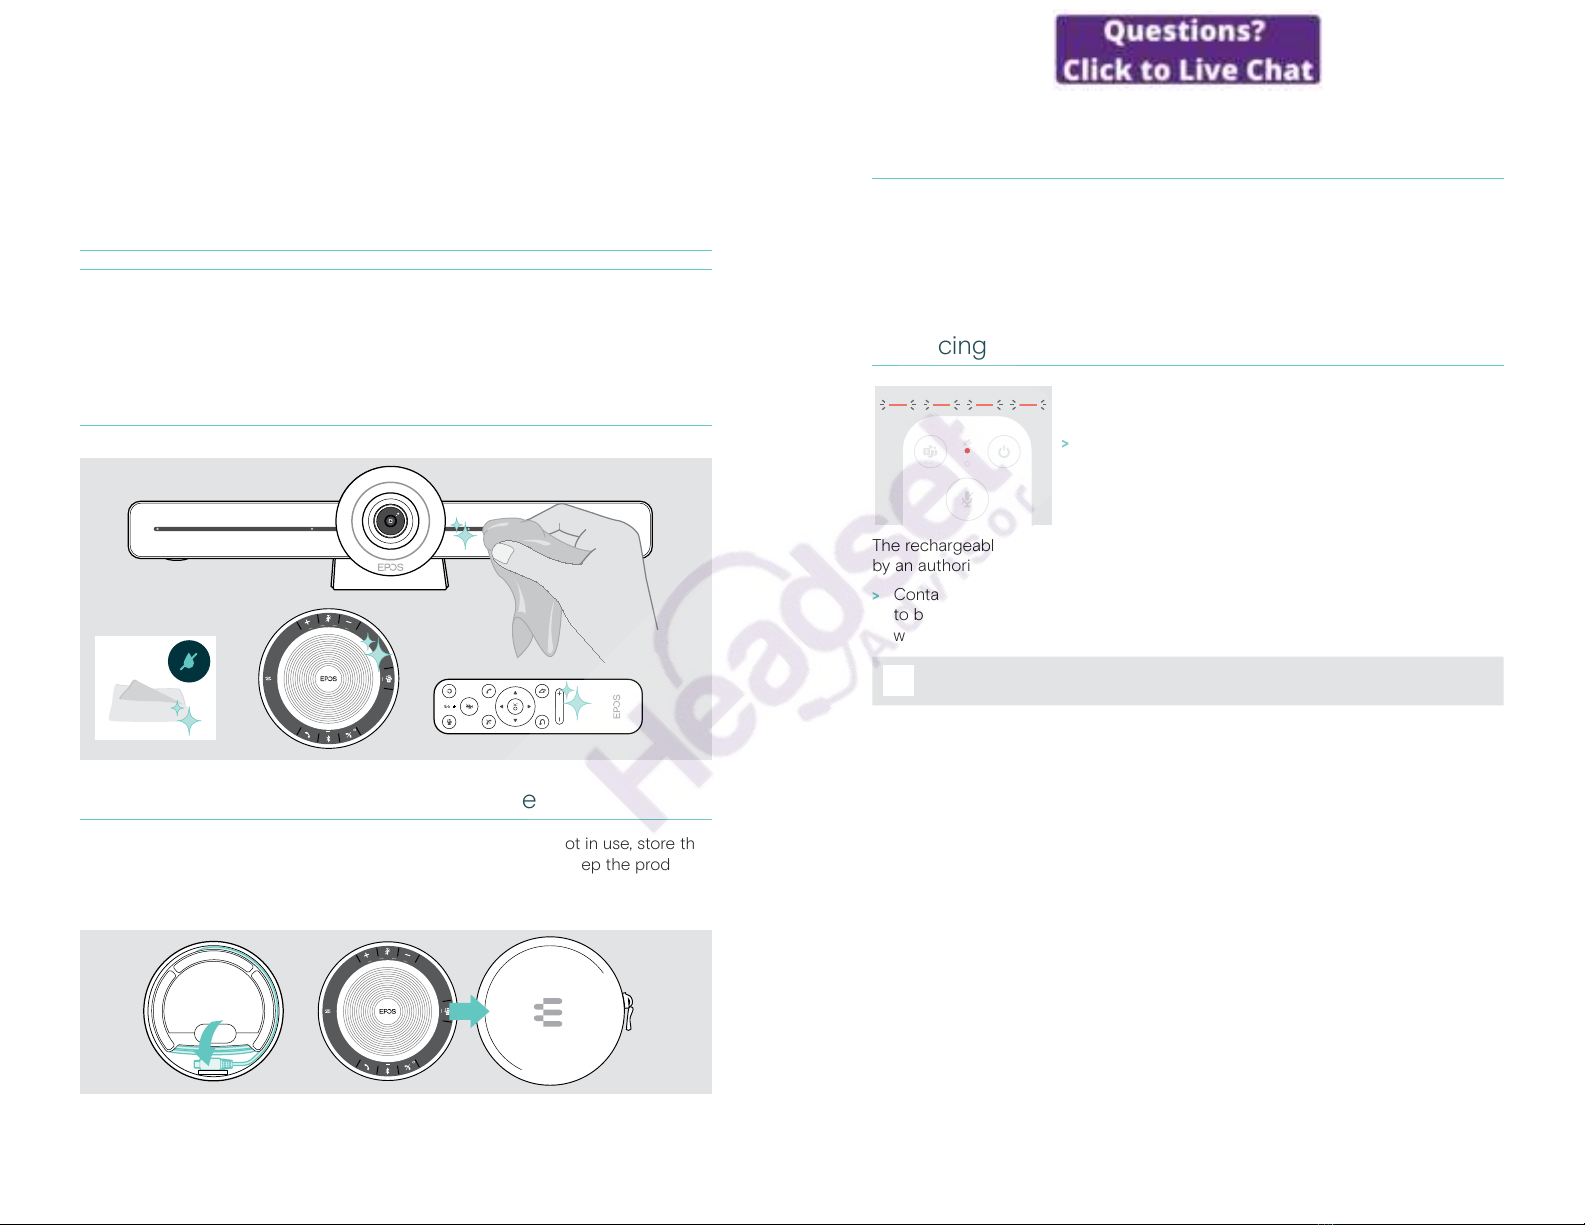
Cleaning the products
CAUTION
Liquids can damage the electronics of the product!
Liquids entering the housing of the device can cause a short circuit and damage
the electronics�
>Keep all liquids far away from the product�
>Do not use any cleansing agents or solvents�
>Use a dry cloth to clean the product only�
Storing and carrying the speakerphone
Store the speakerphone in a clean and dry environment� When not in use, store the
product in the carry pouch� This will help to avoid scratches and keep the product
in good condition�
>Wind up the USB cable and put the speakerphone in the Carry pouch�
33Maintaining & updating products
Updating the rmware
Updates for EXPAND VISION 3T will be made available through the Microsoft Teams
admin center, and will be downloaded and installed automatically – once enabled by
the IT-administrator�
You can update the rmware of your speakerphone by using the free EPOS
Connect software (see EXPAND SP 30T User Guide)�
Replacing / removing the batteries
If the remote batteries are almost empty, the remote LED
ashes red�
>
Replace or remove the remote control’s AAA Alkaline
batteries as shown on page 21�
The rechargeable battery of the speakerphone must only be replaced or removed
by an authorized EPOS service center�
>
Contact your EPOS service center if the rechargeable battery needs
to be replaced� To nd an EPOS service partner in your country, visit
www�eposaudio�com�
iIf you do not use the speakerphone for extended periods of time it is
recommended to charge it every 3 months�

34If a problem occurs���
If a problem occurs���
If a problem occurs that is not listed here or if the problem cannot be solved with
the proposed solutions, please contact your local EPOS partner for assistance� To
nd an EPOS partner in your country, search at www�eposaudio�com�
Collaboration bar solutions
Problem Possible cause Solution Page
Microsoft Teams
call can not be
established
Firewall is blocking the call >Check and change the network
rewall settings based on
Microsoft Teams guidelines�
–
Camera image
not displayed
correctly
Camera position not optimal >Change the camera positioning
and zoom level�
25
Mouse pointer not
visible on screen
Mouse pointer disappears
after a while
>Press the remote control’s arrow
button�
–
No audio Connector not inserted
correctly
>Check the cable connection� 15
Privacy mode for microphone
active: collaboration bar front
LEDs blue
>Press the mute button on top of
the collaboration bar�
30
Speakerphone is turned o >Press and hold the Power on/o
button for 2 seconds�
–
Low video quality Poor internet connection >Check your internet connection
performance�
–
Plastic protection on camera
lense not removed
>Remove the plastic protection� –
No picture on
connected
screen/monitor or
no video captured
Wrong input source selected
on connected screen/monitor
>Change input on the screen/
monitor�
15
Cable not connected
properly
>Check the cable connection� 15
Privacy mode for camera
active: collaboration bar front
LEDs red
>Press the camera button on top
of the collaboration bar�
30
Remote does
not react to any
button press
Batteries empty >Replace the batteries� 21
Collaboration bar
does not respond
Collaboration bar has
experienced an unexpected
error
>Unplug and plug-in the power
supply unit to reboot�
–
35If a problem occurs���
Speakerphone solutions
Problem Possible cause Solution Page
No audio signal USB connector not inserted
correctly
>Check the connectors and the
adapter�
19
Volume is adjusted too low >Increase the volume� 26
Speakerphone is turned o >Press and hold the Power
button for 2 seconds�
–
Activity LED is
dimmed and all
other LEDs o
Speakerphone in standby
mode
>Wake up the collaboration bar� 29
Speakerphone
does not react to
any button press
Speakerphone has
experienced an unexpected
error
>Press and hold the Power on/o
button for 10 seconds to reboot�
–
For further solutions, check the EXPAND SP 30T User Guide on the product page
at www�eposaudio�com�
36If a problem occurs���
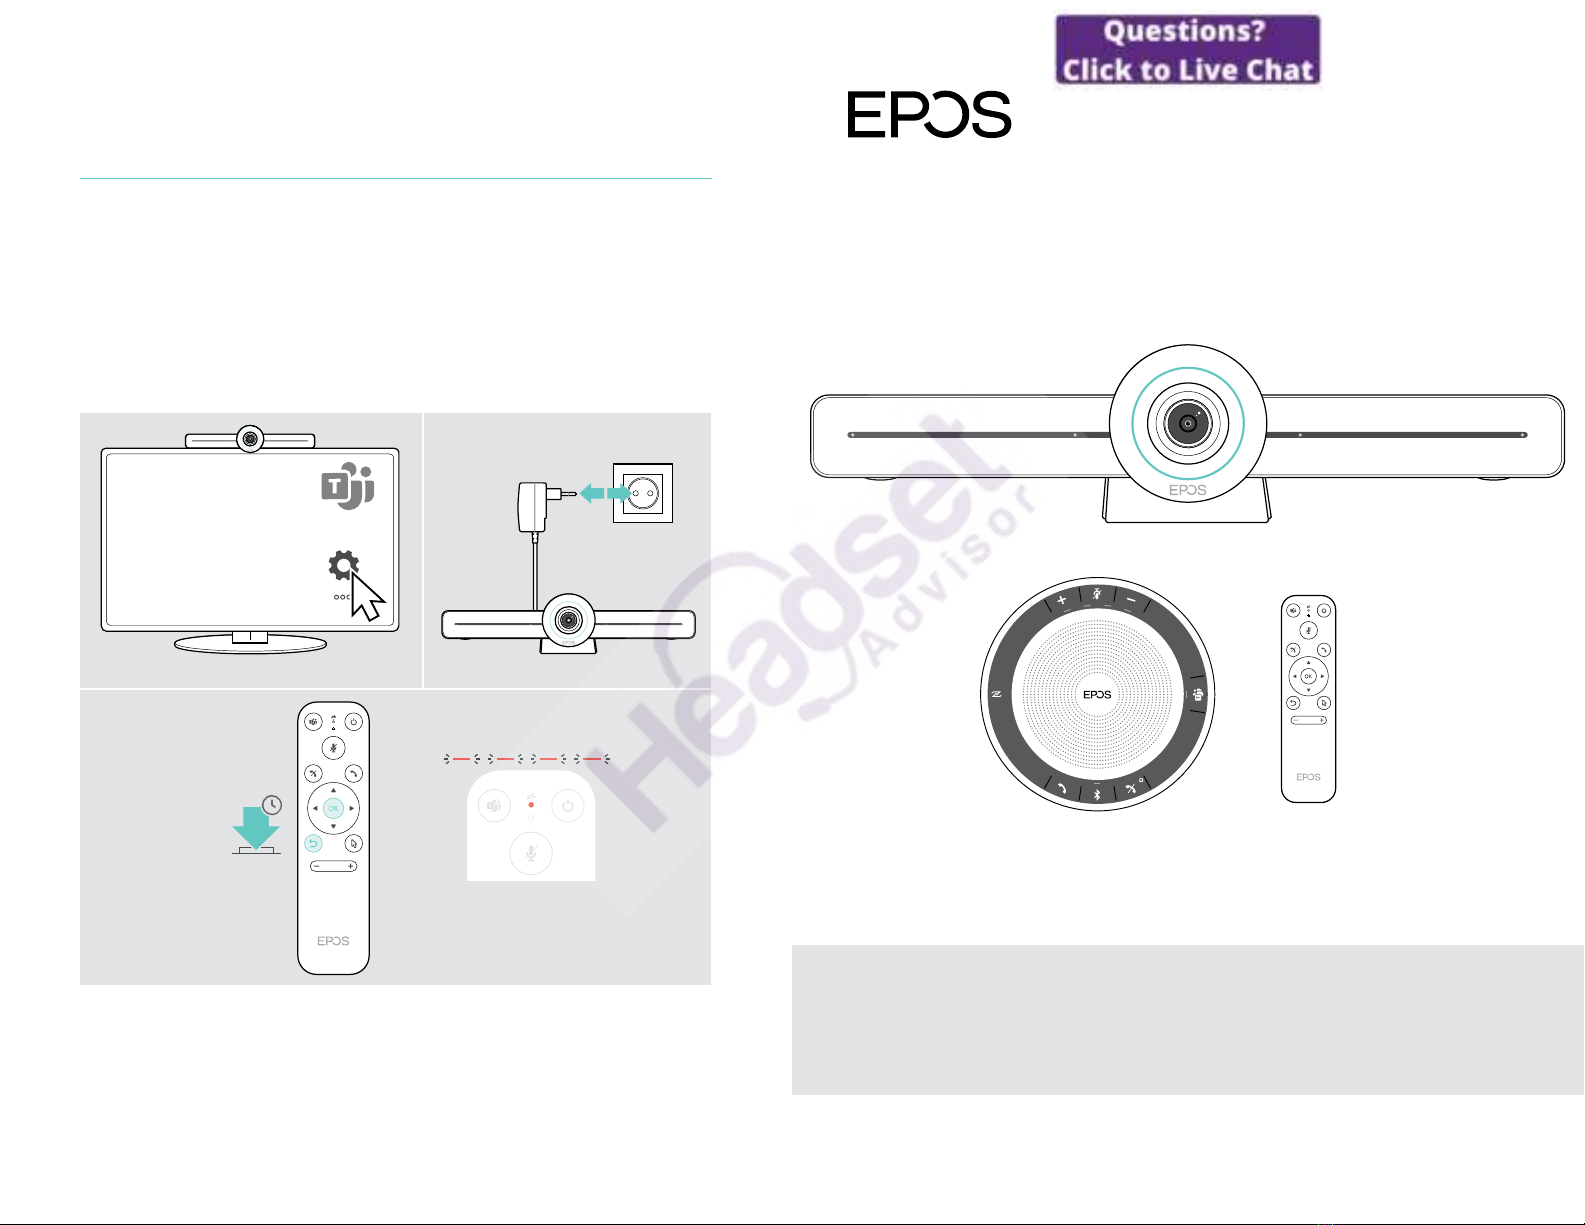
Pairing a new remote
The included remote control is already paired to the collaboration bar� If you have
replaced the remote control, you need to pair it�
>
Connect a mouse (see page 23) or use the touchscreen for navigation�
>
Enter the Settings menu > Device Settings > Other Settings > Unpair remote�
>
Unplug and plug in the mains power supply, to reboot the collaboration bar�
>
Hold the BACK and OK button on the new remote simultaneously until the Pairing
LED on the remote control ashes red continuously�
As soon as the collaboration bar is re-booted the remote will be automatically
paired and the LED on the remote control turns o�
10s
37If a problem occurs���
DSEA A/S
Kongebakken 9, DK-2765 Smørum, Denmark
www.eposaudio.com
Publ. 05/21, A02
Other manuals for EXPAND VISION 3T
1
Table of contents


