EPSOM E7105L User manual

Job No
EPSOM
collection
E7105L –5 DRAWER LINGERIE CHEST
Congratulations on the purchase of your EPSOM 5 DRAWER LINGERIE CHEST. The EPSOM Collection is
manufactured right here in New Zealand - by New Zealanders, for New Zealanders. A stylish option which
combines quality with value, The Epsom Collection is an excellent investment for your home.
The Epsom Collection is constructed from NZ made MDF, a renewable resource from sustainably managed
pine forests. This means you can have complete confidence that with The Epsom Collection, you are making
an environmentally responsible choice.
If you have any questions please visit www.warehousefurniture.co.nz or call the manufacturers direct on
0800 100 858.
WHERE TO ASSEMBLE YOUR LINGERIE CHEST
Assemble your Lingerie Chest on a clean and smooth surface, free of anything which may damage the
finished surfaces. A clean, carpeted floor is ideal. If assembling on a workbench or table we suggest you
cover it with the carton the Lingerie Chest was packaged in.
Warning! Never leave hardware parts where children can reach them. Small parts may be a choking
hazard!
5 YEAR GUARANTEE
The Epsom Collection carries a 5 year guarantee against defective material or workmanship, excluding
misuse and normal wear and tear. Obviously, as this unit is customer-assembled we cannot guarantee
cabinet failure or damage from incorrect assembly. All claims need proof of purchase –to ensure this
register your Lingerie Chest at www.warehousefurniture.co.nz.
Follow the assembly instructions carefully and take note of the precautions below.
Avoid direct sunlight wherever possible.
Keep cabinet in a dry place.
Wipe off spilt liquids immediately.
Avoid placing hot items directly on the surface.
Clean with a damp cloth and buff dry with a soft dry cloth - microfibre is ideal.
Do not allow nail polish, removers, deodorant or other damaging chemicals to come into
contact with the surface.
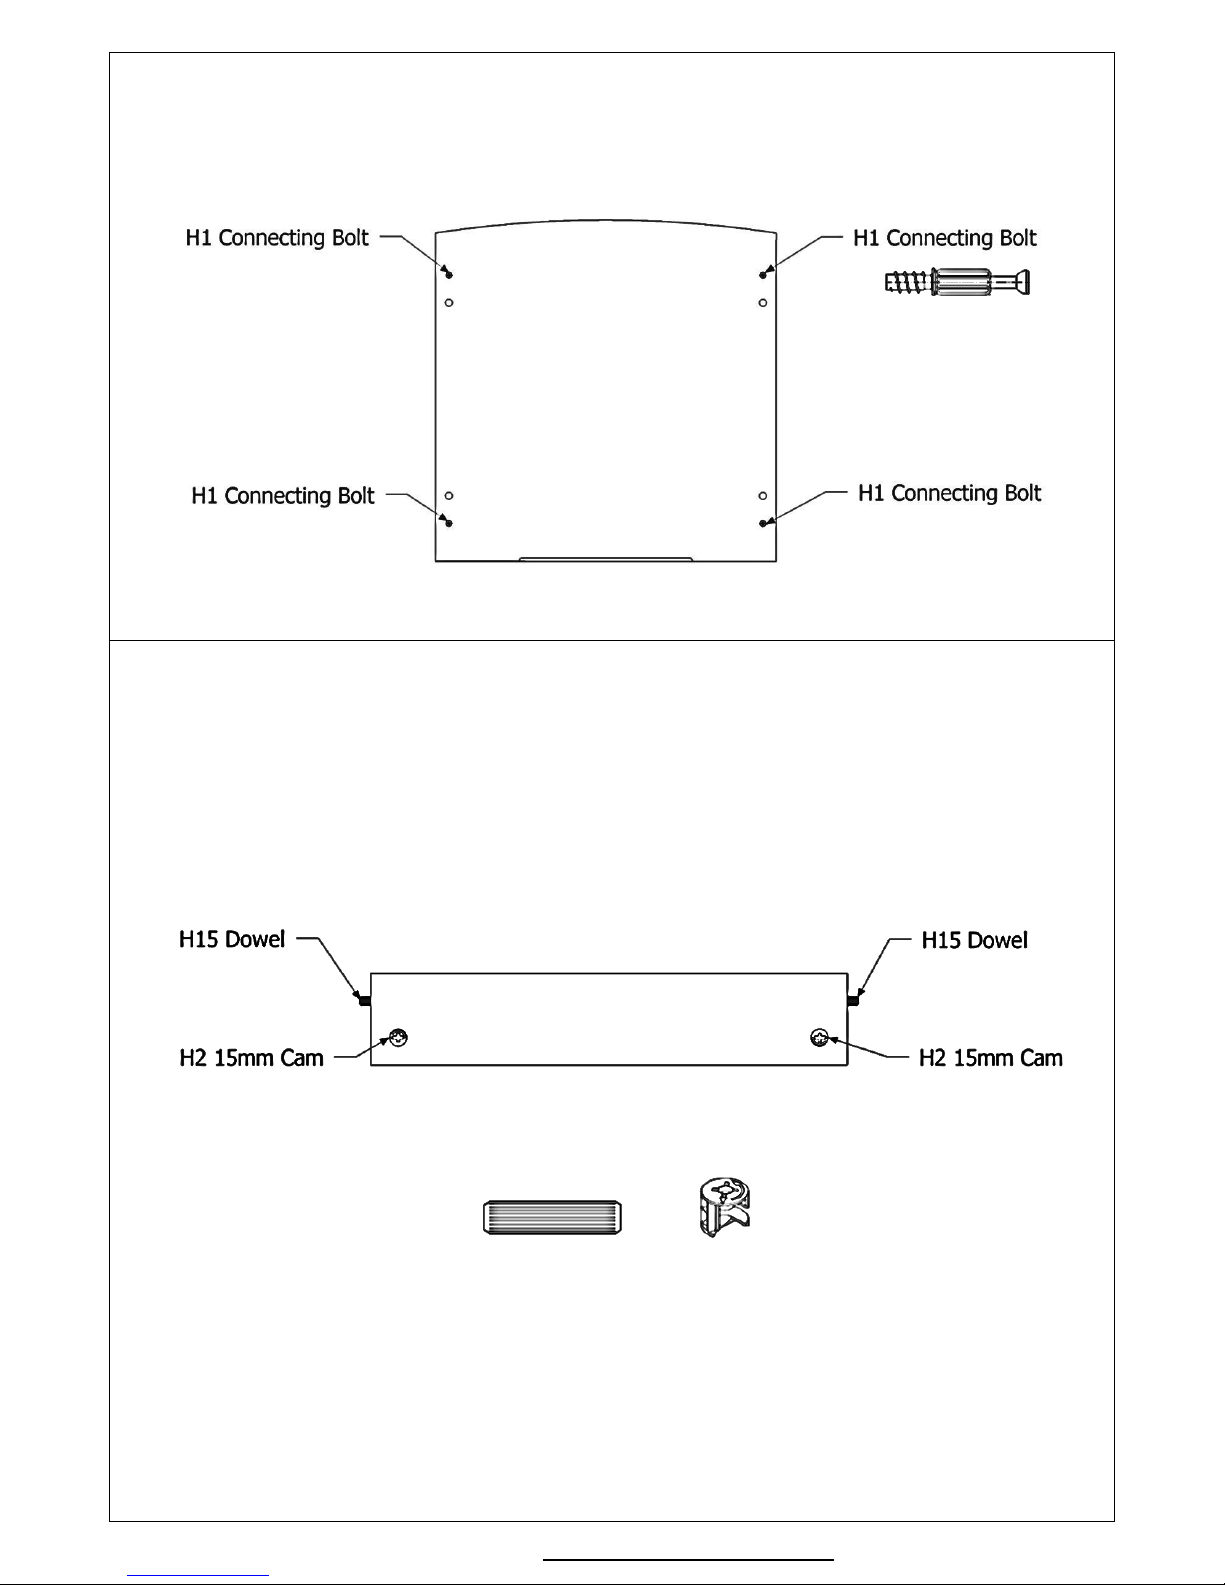
COLOUR CODING
To help identify the parts, the main components are colour coded with a pen mark on the back edge of the
panel. (The unfinished edge.)
RED Right Hand Parts. (E.g. RH End, RH Division, RH Drawer Side.)
GREEN Left Hand Parts. (E.g. LH End, LH Division, LH Drawer Side.)
BLUE Tops
PURPLE Bases

EPSOM –E7105L 2
For assembly advice or parts go to www.warehousefurniture.co.nz call 0800 100 858
PARTS LIST
Please check you have all the necessary parts before beginning to assemble your Lingerie Chest. The
measurements provided will help you to identify each part. If any parts are missing or damaged please
contact the manufacturers directly, either via our website or our 0800 number. Do not call the store you
bought the cabinet from as they will be unable to help you. Note: You may find two pieces of board fitted
across the ends of the package. These are for packing purposes only and are not part of the cabinet.
QTY
PART
MEASUREMENTS
NOTES
1
Top
465 x 396 x 25mm
Black finish on one side.
1
LH End
1017 x 372 x 15mm
Black finish on both sides.
1
RH End
1017 x 372 x 15mm
Black finish on both sides.
1
Top Drawer Front
413 x 195 x 15mm
Black finish on one side.
4
Bottom Drawer Front
413 x 235 x 15mm
Black finish on one side.
1
Front Toeboard
419 x 80 x 15mm
Black finish on front side only.
1
Rear Toeboard
419 x 80 x 15mm
Plain
1
Bottom Rail
419 x 80 x 15mm
Plain
5
LH Drawer Sides
340 x 160 x 12mm
Plain
5
RH Drawer Sides
340 x 160 x 12mm
Plain
5
Drawer Backs
369 x 155 x 12mm
Plain
5
Drawer Bottoms
379 x 339 x 4mm
Plain
1
Back Panel
962 x 439 x 4mm
Plain
HARDWARE LIST
QTY
PART
CODE
20
Connecting Bolts
H1
10
Large Cams
H2
10
Small Cams
H3
20
Drawer Slide Screws
H4
20
Small Woodscrews
H6
20
31mm Woodscrews
H9
20
Dowels
H15
5
Metal drawer slides set
H21
4
Nail on Glides
H37
1
Bag of small Nails
H27
5
Handles
H43

EPSOM –E7105L 3
For assembly advice or parts go to www.warehousefurniture.co.nz call 0800 100 858
CAM INSTALLATION & OPERATION GUIDE
The Cam and Connecting Bolt system is used to put your unit together. Below is an explanation of how this
system works.
To see a demonstration click on the assembly assistance tab at www.warehousefurniture .co.nz.
DRAWER SLIDES GUIDE
Your pack will contain five sets of Metal Drawer Slides. These are bundled together with adhesive tape.
Each set comprises of 4 components. Undo the tape on one set at a time and separate the parts.
LEFT HAND PART (DL) RIGHT HAND PART (DR)
The Drawer Slide components shown above are attached to the drawer. They have the letters DL or DR
stamped on them to indicate left hand or right hand components. Put these parts aside for attaching to the
drawer later on.
LEFT HAND PART (CL) RIGHT HAND PART (CR)
The Drawer Slide components shown above are to be attached to the cabinet. They have letters CL or CR
stamped on them to indicate left hand or right hand components. You will need these for steps 1 and 2.
Use these holes

EPSOM –E7105L 4
For assembly advice or parts go to www.warehousefurniture.co.nz call 0800 100 858
INSTALL THE HARDWARE
STEP 1 - LH END
Take the LH End and lay it on a clean, clear surface with the holes facing upwards.
Take the five LH Cabinet Drawer Slide (CL) and screw them to the LH End using 10 H4 Drawer Slide
Screws. Use the holes as indicated in the drawing below. Ensure that the end of the slide with the
wheel faces towards the finished edge of the side.
Insert two H2 Large Cams as indicated. Make sure the arrow on top of the Cam points towards the
top edge of the End.
Push two H15 Dowels into the top edge of the End.
Screw three H1 Connecting Bolts into the holes as indicated below.
H1 H2 H15 H4
Finished Edge

EPSOM –E7105L 5
For assembly advice or parts go to www.warehousefurniture.co.nz call 0800 100 858
STEP 2 - RH END
Take the RH End and lay it on a clean, clear surface with the holes facing upwards.
Take the five LH Cabinet Drawer Slide (CR) and screw them to the LH End using 10 H4 Drawer Slide
Screws. Use the holes as indicated in the drawing below. Ensure that the end of the slide with the
wheel faces towards the finished edge of the side.
Insert two H2 Large Cams as indicated. Make sure the arrow on top of the Cam points towards the
top edge of the End.
Push two H15 Dowels into the top edge of the End.
Screw three H1 Connecting Bolts into the holes as indicated below.
H1 H2 H15 H4
Finished Edge

EPSOM –E7105L 6
For assembly advice or parts go to www.warehousefurniture.co.nz call 0800 100 858
STEP 3 - TOP
Lay the Top Black side down on a clean and clear surface.
Screw four H1 Connecting Bolts into the underside of the Top as indicated below.
STEP 4 - RAIL AND TOEBOARDS
Take the front and rear Toeboards and the Bottom Rail. Install two H2 Large Cams into each.
Ensure the arrow on the top of the Cam points towards the edge of the Toeboard with the hole in
it. Note: The front Toeboard has one finished side.
Push two H15 Dowels into each end of both Toeboard and the Bottom Rail as shown below.
H15 H2

EPSOM –E7105L 7
For assembly advice or parts go to www.warehousefurniture.co.nz call 0800 100 858
ASSEMBLE THE LINGERIE CHEST
STEP 5 - ATTACH RAIL AND TOEBOARDS TO LH END
Take the LH End and lay it
flat on the ground.
Fit the Front Toeboard
over the Connecting Bolt
closest to the finished
edge of the end. Ensure
the finished side of the
toeboard is facing
forwards so that the cams
can’t be seen once the
cabinet is completed.
Fit the Rear Toeboard and
the Back Rail over the
other two Connecting
Bolts.
Tighten the three Cams in
a clockwise direction to
lock the Toeboards and
Rail to the LH End. Ensure the cams turn at least ¼ to ½ a turn.
To see a demonstration of how the cam and connecting bolt works click on the assembly assistance tab
at www.warehousefurniture.co.nz.
STEP 6 - ATTACH RH END
Fit the Connecting Bolts installed in the RH End into the Cams in the Toeboards and Rail as shown
below.
Tighten the three Cams by turning in a clockwise direction (they should turn at least ¼ of a turn).

EPSOM –E7105L 8
For assembly advice or parts go to www.warehousefurniture.co.nz call 0800 100 858
STEP 7 - ATTACH TOP AND GLIDE FEET
Attach the Top to the Ends by fitting the four Connecting Bolts installed in the Top into the Cams in
the Ends. Tighten all four Cams to lock the Top to the Ends.
Tap the four H37 Nail on Glides into the bottom of the Ends as indicated below. Space them about
20mm in from the front and back edges.
STEP 9 - BACK PANEL
Carefully lay the Lingerie Chest on its front edge.
Fit the Back panel into place.
Using the H27 Small Nails attach the Back Panel into place. Ensure that the Nails are going into the
back edge of the Top and LH and RH Sides. Space the nails about 100mm apart. Stand the Lingerie
Chest upright.
H37 Nail on Glides

EPSOM –E7105L 9
For assembly advice or parts go to www.warehousefurniture.co.nz call 0800 100 858
ASSEMBLE THE DRAWERS
To see a demonstration of how a drawer goes together click on the assembly assistance tab at
www.warehousefurniture.co.nz.
STEP 10 - INSTALL HARDWARE
Install the hardware in the Drawer parts as shown below.
Note: Be sure that the arrow on the Small Cam points to the end of the drawer side nearest it.
H15 Dowel H3 Small Cam H1 Connecting Bolt

EPSOM –E7105L 10
For assembly advice or parts go to www.warehousefurniture.co.nz call 0800 100 858
STEP 11 - ASSEMBLE THE DRAWER
Lay the Drawer Front face down on a smooth, clean surface.
Attach the LH and RH Drawer Sides by fitting them into place over the Connecting Bolts installed in
the Drawer Front.
Turn the Small Cams clockwise to lock the Drawer Sides in place.
Slide the Drawer Bottom into place in the grooves in the Drawer Sides and Drawer Front.
Fit the Drawer Back into place between the Drawer Sides. The groove in the Drawer Back will fit
over the end of the Drawer Bottom.
Secure the Drawer Sides to the Drawer Back with four H9 Screws as shown below.
H9 Woodscrew

EPSOM –E7105L 11
For assembly advice or parts go to www.warehousefurniture.co.nz call 0800 100 858
STEP 12 - ATTACH THE DRAWER SLIDES
Turn the drawer upside-down as shown and attach the Drawer Slides (DR and DL) with the four H6
Small Woodscrews as shown below. Ensure that the ends of the slides without the wheels are hard
up against the back of the drawer front. Each slide requires two screws.
STEP 13 - ATTACH THE HANDLE AND INSERT THE DRAWER
Attach the Bar Handle to the Drawer Front using the screws provided.
Fit the drawers into the Lingerie Chest. Make sure that the rollers at the back of the drawer go
behind the front rollers in the cabinet and into the channel of the drawer slide. It helps to lift the
front of the drawer up a little when doing this.
CONGRATULATIONS, YOUR EPSOM 5 DRAWER LINGERIE CHEST IS NOW COMPLETE.
THANK-YOU FOR SUPPORTING NEW ZEALAND MADE FURNITURE
H6 Small Woodscrew
Table of contents
Other EPSOM Indoor Furnishing manuals
Popular Indoor Furnishing manuals by other brands

Furniture of America
Furniture of America CM-AC365 Assembly instructions

Baxton Studio
Baxton Studio 0017 Assembly instructions

Premium Living
Premium Living CLFS831S Assembling Instruction

Moss
Moss NEKHO installation instructions

Ballard Designs
Ballard Designs MS136 manual

Great Little Trading
Great Little Trading L4597 manual

Ovela
Ovela OVMIASDBDWA user guide

LIVARNO
LIVARNO home 353697 2010 Operation and safety notes

Core Products
Core Products AY210 Assembly instructions

Argos Home
Argos Home Apartment Mirror 299/8426 installation instructions

Pier 1 Imports
Pier 1 Imports Darcey Cast Iron Daybed Assembly

ROOMS TO GO
ROOMS TO GO KIDS CREEKSIDE 2.0 3744440P manual