ErgoCentric upCentric UP-2LV User manual

ergoCentric®
Owner’s manual
Guide de l’utilisateur
UP-2LV

English
Introduction....................................................................................2
.................................................................................2
Standard features .........................................................................3
Important information.................................................................5
Safety instructions.........................................................................6
Parts .................................................................................................7
Assembly instructions..................................................................8
Getting started ............................................................................12
Troubleshooting ..........................................................................14
Disposal guidance ...................................................................... 18
Warranty .......................................................................................18
If you need assistance ...............................................................19
Français
Introduction................................................................................. 20
.............................................................................. 20
Caractéristiques standard.........................................................21
Informations importantes........................................................ 23
Instructions de sécurité ............................................................ 24
Pièces............................................................................................ 25
Instructions de montage.......................................................... 26
Pour commencer ....................................................................... 30
Dépannage.................................................................................. 32
Conseils pour disposer de la table........................................ 36
Garantie........................................................................................ 36
Pour une aide technique.......................................................... 38

2upCentric®– UP-2LV Owner's Manual | Guide de l’utilisateur
Introduction
The upCentric®electric height adjustable table allows users to easily adjust
their work surface to the optimal working height and to alternate between
seated and standing positions throughout the work day, reducing backaches,
pains, stress and tension, and improving circulation throughout the body.
Moving the upCentric table is intuitive with the easy-to-use up/down control.
The quiet motors housed in each of the table’s legs ensure a quick, smooth
transition in positions.
adjustable table. The durable open frame design provides optimal knee
clearance and space for storage.
Specications
UP-2LV UP-2LV-22 (22") UP-2LV-29 (29")
Height range
(Frame only, does not include tabletop) 21.6"-47.9" 21.6"-47.9"
Depth of foot 21.65" 29.5"
Depth of bracket 19.7" 19.7"
Travel speed 1.6"persecond 1.6"persecond
Volume 39 Db 39 Db
Weight capacity 220 lbs 220 lbs
Motors 2 (1 per leg) 2 (1 per leg)
Max. operational power draw 180 W 180 W
Stand-by power draw <0.1 W <0.1 W
Tabletop size range 22"x44"-28"x84" 29"x44"-36"x84"
Power cord length 1.8 m (70.85") 1.8 m (70.85")
BIFMA X5.5 | CSA | GREENGUARD Gold | UL
upCentric®UP-2LV

3upCentric®– UP-2LV Owner's Manual | Guide de l’utilisateur
Standard features
Presettable memory positions
upCentric®electric height adjustable tables come standard with 4 presettable
memory positions, allowing you to set customized seated and standing table
heights, and to quickly adjust to these positions when changing between seated
to standing positions. See page 12 for instructions on setting memory positions.
One-touch adjustment
Once you have set a memory position, you no longer have to hold the up
or down button to adjust the table. Simply press the ❶, ❷, ❸or ❹
button for your desired memory position and the table will automatically
adjust to your preset position.
Minimum/maximum heights
You can set a minimum or maximum allowable adjustment height at any
position within the adjustable range of the table. If you have something
above or below your work surface (such as a storage pedestal under your
desk or a shelf mounted to above your work surface), these limits can be
set to avoid accidental contact, eliminating instances of damage or injury.
at any time. See pages 12 and 13 for instructions on setting min/max height limits.
Customizable digital display settings
There are two changeable options for the digital height readout on the
digital display handset:
1. Changing desk starting height
The default starting height on the digital height readout is 22.9",
which is the accurate minimum table height for this table when using
a 1" thick work surface and standard glides; however, if you add casters
1" the starting height may be higher or lower than 22.9". In these cases,
the digital height readout can be adjusted so that the starting height is
accurate to the actual lowest height of the work surface. See page 13
for instructions.
2. Converting between metric and imperial measurements
The default unit of measure (UOM) displayed on the digital height
readout is inches; however, you can change between inches and
centimetres for your desired UOM. See page 14 for instructions.

4upCentric®– UP-2LV Owner's Manual | Guide de l’utilisateur
Gyro-sensor anti-collision system
Every upCentric®electric height adjustable table has a built in gyro-sensor
based anti-collision system. This patented anti-collision system uses precision
gyroscope technology, allowing for three axis collision detection.
This sensor provides enhanced safety to help prevent user injury and
equipment damage. When the table is in motion, if it encounters any
external resistance or unbalance in the tabletop, the gyro-sensor picks up
the disturbance immediately and enacts a safety stop. The table will stop
moving immediately and reverse adjustment by 1" to move away from the
obstruction is has come in contact with.
Power-saving and quick start wake-up
upCentric electric height adjustable tables have the lowest power draw of
any electric height adjustable table on the market. When no buttons have
been pressed for 30 seconds, the control box goes into stand-by mode,
where the control box uses less than 0.1 W of electricity.
When in sleep mode, press any button to wake the system up. The quick
start feature allows the table to start moving immediately once a button
has been pressed, with no wake-up delay.

5upCentric®– UP-2LV Owner's Manual | Guide de l’utilisateur
Important information
• Always make sure all screws are tightened before
use of the table and after moving or transporting.
• Duty cycle of the frame for desk is 10%,
max. 2 minutes operating/min. 18 minutes stop.
• Ensure the loading on each leg is less than the maximum
outlined below, otherwise it might cause permanent damage
to the leg(s) during operation.
Load capacity
Table maximum 220 lbs (99.8 kg)
Each leg maximum 140 lbs (63.5 kg)
• When the motor cable is connected to the control box, the legs
can maintain an adequate locking force up to the maximum load on
the tabletop. However, when the cable is damaged or is disconnected
from the control box, it will cause the desk to sink to the bottom within
hours if the load on either leg is larger than the maximum capacity.
• Make sure that no persons or items will collide with the table,
when adjusting upwards and downwards.
• Damaged cords must be replaced before connecting
the main power cable.
• The upCentric®is not intended to be used as a person lift.
• Do not pull or push the table if adjusting.

6upCentric®– UP-2LV Owner's Manual | Guide de l’utilisateur
Safety instructions
Before installation/re-installation
Make sure that the table is being installed as described in the
“Assembly instructions” section of this owner’s manual. When installing
and using electrical equipment, basic safety precautions should always
1. If the power cord is damaged it must be replaced.
2. Do not open any electrical components
(control box, motor housing, handset).
3. Never drop or insert any object into any opening.
4. Make sure the correct tools and assembly parts
are used when assembling the system.
5. Before transporting the table, always remove
the power cord from main power supply.
During operation
1. Not intended for use by children.
2. For indoor use only.
3. Do not use table when the load exceeds the maximum capacity.
See page 5 for weight limits.
4. Always unplug the table from the electrical outlet before cleaning.
5. Unplug from outlet before installing or removing parts.
6. Keep the cord away from heated surfaces.
7. Do not operate where aerosol (spray) products are being used
or where oxygen is being administered.
8. To disconnect, lower table to minimum height, then remove
plug from outlet.
9. If table is heavily loaded, keep load away from edges to prevent
the possibility of the table tipping over.
10. Any servicing is to be performed by an authorized service
representative. Contact service@ergocentric.com or 1 866 438-3746
for more information.
11. Make sure that no persons or items will collide with the table when
adjusting upwards and downwards.
12. If the control box or the legs make any unusual noises or smells,
immediately unplug table from power supply.
7upCentric®– UP-2LV Owner's Manual | Guide de l’utilisateur
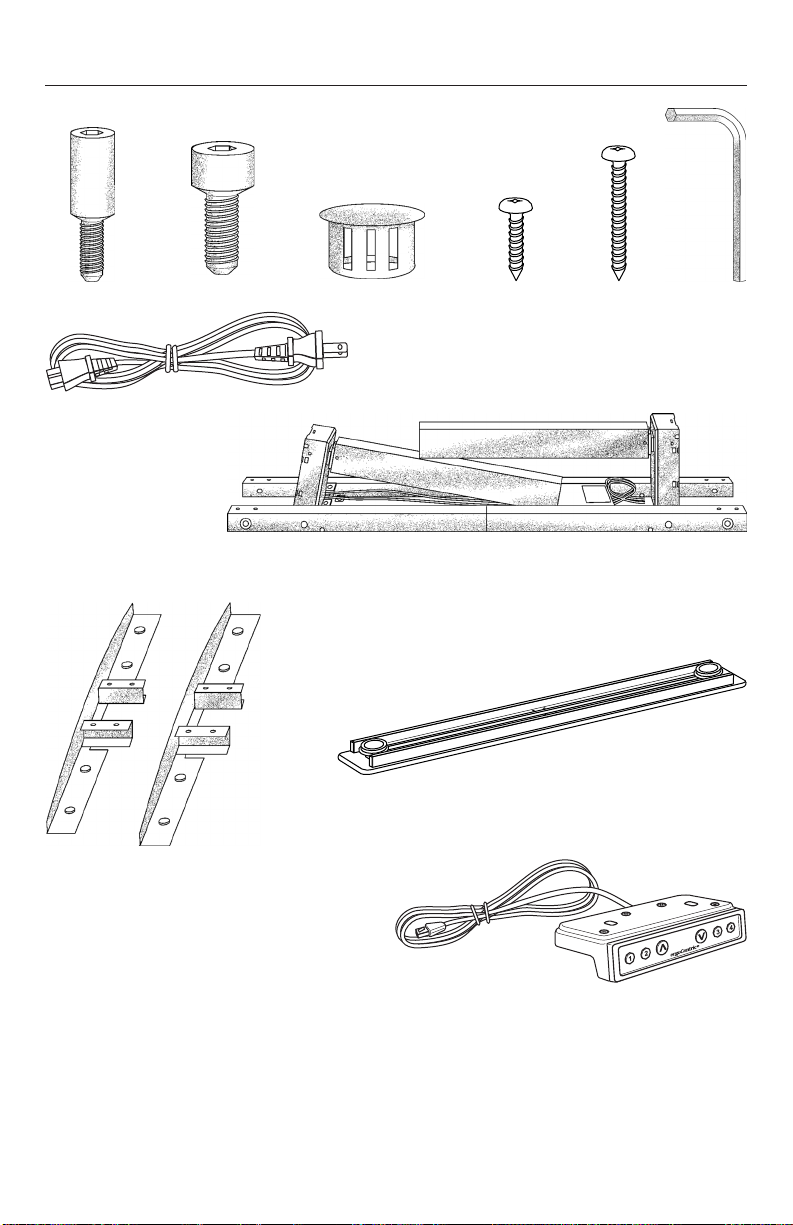
Parts
G x1
K x1
J x2
Tools Required:
a) Power drill
Phillips head #2 bit
OR
b)Phillips head #2 screwdriver
B x8
C x4
F x1
A x4
*
H x1
I x2
* These 4 bolts are already inserted
in the upCentric frame.
E x2
D x14
8upCentric®– UP-2LV Owner's Manual | Guide de l’utilisateur
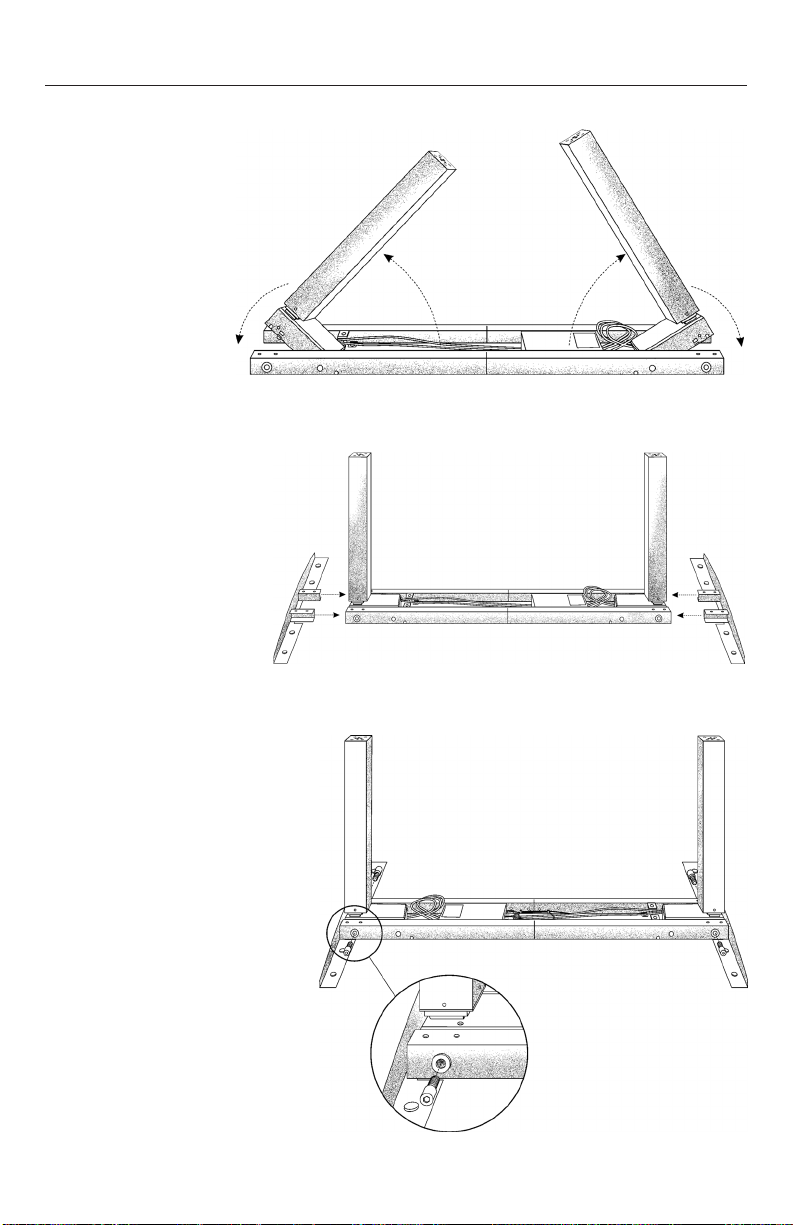
Assembly instructions
Step 1:
Place frame (H
and fold legs out into a
vertically upright position.
Step 2:
Insert brackets (I) into
ends of table frame.
Step 3:
Fasten brackets and legs
into place with bolts (A).*
* These 4 bolts should already be
inserted in the upCentric frame.
If they are not, check box as
they may have come loose
during shipping.

9upCentric®– UP-2LV Owner's Manual | Guide de l’utilisateur
Step 4 – Adjust frame width:
4.1: Unclip wires from wire clips (shown with circles)
and loosen 8 bolts on inside of frame (shown with arrows).
4.2: Adjust frame by sliding each side in opposite directions until
holes in tabletop brackets (I) are aligned with pilot holes on tabletop.
4.3: Retighten 8 bolts on inside of frame, then reclip wires back
into wire clips.
Note: Pilot holes make installation quick and easy, but they are
not always necessary. If your tabletop does not have pilot holes,
the ideal frame width is 2"-4" shorter than the tabletop width
(leaving 1"-2" of overhang on each side).
i.e. on a 60" wide tabletop, ideal frame width is 56"-58".
4.1 4.3
4.2
H M1 M2

10 upCentric®– UP-2LV Owner's Manual | Guide de l’utilisateur
Step 5:
Add plugs (C) into holes
on each side of the frame.
Step 6:
Plug AC cable (G) and handset (K) into control box:
6.1: Plug AC cable (G) into back of control box.
6.2: Plug handset wire (K) into front of control box,
in the input marked “H”.
6.3: Run handset wire through
the inlet hole on underside of frame
(plastic wire cover clips into inlet hole).
There are 4 inlet holes, on both sides
of the frame, and at each end.
6.3
6.2
H M1 M2
6.1

11upCentric®– UP-2LV Owner's Manual | Guide de l’utilisateur
7.1 7.2
Step 7:
Attach frame and handset to tabletop.
7.1: Place the frame in the center of the tabletop (aligned with pilot holes,
or in desired location) and attach frame to tabletop with 14 screws (D).
7.2: Place handset (K) in the desired location and attach with screws (E),
then secure excess wire into wire clips on underside of frame.
Step 8:
Attach feet (J) to the
ends of the table legs
with bolts (B).

12 upCentric®– UP-2LV Owner's Manual | Guide de l’utilisateur
How to synchronize
Press and hold the up/down buttons on the handset at the same time
for 3-5 seconds, both legs will begin to lower. Continue holding the buttons
until both legs reach the lowest position.
make a beep sound and the buttons can be released. The display will show
the starting height.
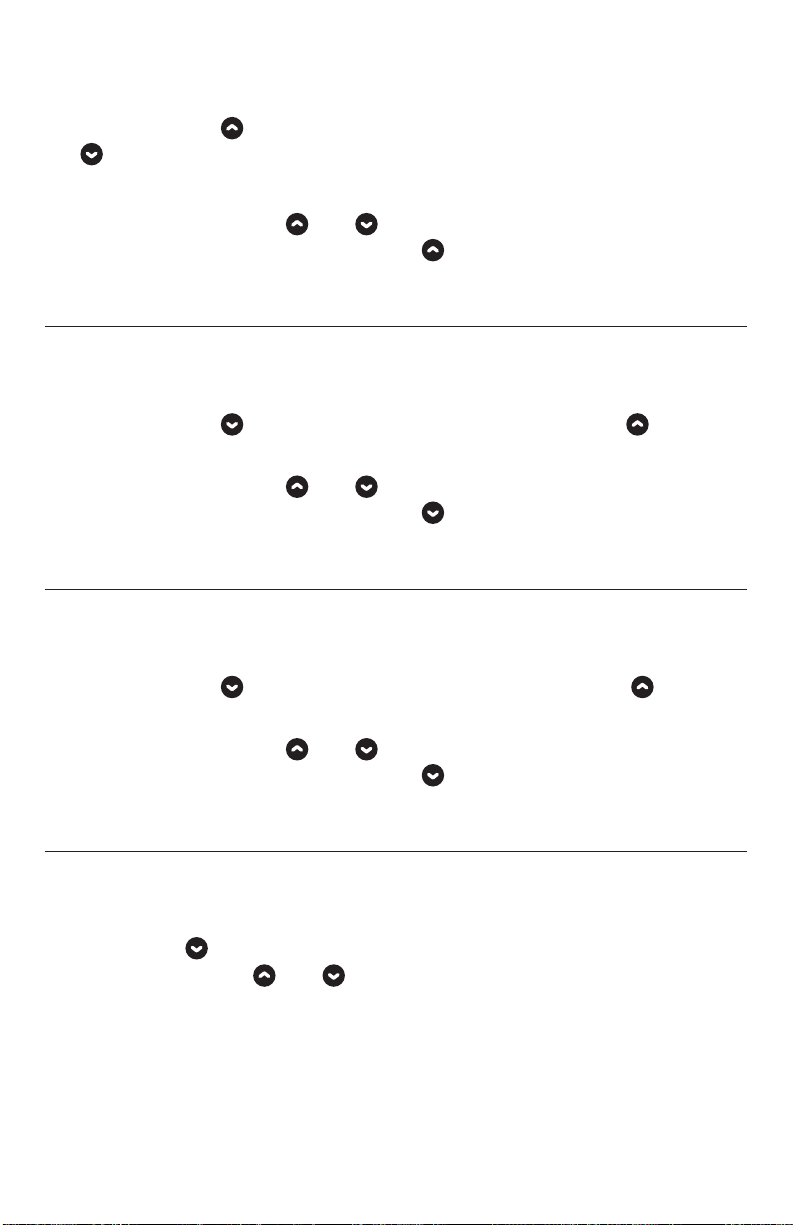
How to set a memory position
Use the and buttons to adjust table to the desired height.
Hold the button and the desired memory button (❶, ❷, ❸or ❹)
together until it beeps and P1, P2, P3 or P4 is shown on the display screen.
Now you can press the memory button and the table will automatically
move to the preset memory position.
How to set a maximum height limit
Move the table to the desired maximum height.
Press and hold the button while simultaneously pressing
the button 4 times.
A beeping sound will notify you that the process has completed.
Note: You must press the and
press and you must continue to hold the button the entire time, or this
setting will not work.
Getting started
1 2 3 4
P2
1 2 3 4
OOO
13upCentric®– UP-2LV Owner's Manual | Guide de l’utilisateur
How to disable a maximum height limit
Move the table to the maximum height limit.
Press and hold the button while simultaneously pressing
the button 4 times.
A beeping sound will notify you that the process has completed.
Note: You must press the and
press and you must continue to hold the button the entire time, or this
setting will not work.
How to set a minimum height limit
Move the table to the desired minimum height limit.
Press and hold the button while simultaneously pressing the button
4 times. A beeping sound will notify you that the process has completed.
Note: You must press the and
press and you must continue to hold the button the entire time, or this
setting will not work.
How to disable a minimum height limit
Move the table to the minimum height limit.
Press and hold the button, while simultaneously pressing the button
4 times. A beeping sound will notify you that the process has completed.
Note: You must press the and
press and you must continue to hold the button the entire time, or this
setting will not work.
Adjusting your starting display height
First, make sure your table is adjusted to the lowest position.
Press and hold
and buttons to adjust the height on the
handset display.
Once the handset display is showing the correct height, wait 10 seconds.
the starting height.

14 upCentric®– UP-2LV Owner's Manual | Guide de l’utilisateur
Switching between metric and imperial units
Press memory buttons ❶❷and ❹for 5 seconds.
The handset display will show “C-I”.
For metric: Press ❷, the handset display will show “C” for centimeters.
For imperial: Press ❸, the handset display will show “I” for inches.
Note: Imperial units (inches) are the default UOM.
Troubleshooting
This guide is to provide general instructions to troubleshoot your
upCentric®height adjustable table.
WARNING
Ensure the desk is free to move and not obstructed.
Personnel should use caution to prevent injury from a desk in motion.
Please note this is a general guide and not absolute.
1 2 3 4
c-i

15upCentric®– UP-2LV Owner's Manual | Guide de l’utilisateur
Synchronize table legs
Prior to performing any troubleshooting, perform a re-synchronization.
On occasion, the table may require a re-sync for a variety of reasons.
This is normal.
• Ensure there are no obstructions for the desk to move vertically.
• Press and hold and at the same time.
• Continue to hold and while the desk lowers
until it reaches the bottom (lowest point).
• Release the buttons once the system beeps.
• If it does not beep, or if the desk is not level,
repeat the re-sync operation.
• This operation may be required a few times
until the desk is at the lowest level position.
The system has now been re-synchronized.
Error codes
E00 Synchronization in progress
E01 Overuse protection
E02 Unbalance protection
E03 Anti-collision
E04 T-touch protection
E11 M1 motor over-current protection
E12 M2 motor over-current protection
E13 M3 motor over-current protection
E21 No Hall sensor from M1
E22 No Hall sensor from M2
E23 No Hall sensor from M3
E31 No current from M1
E32 No current from M2
E33 No current from M3

16 upCentric®– UP-2LV Owner's Manual | Guide de l’utilisateur
Issue: No movement at all
• Perform re-sync (see page 15 ).
• Is green light on Control Box on?
If it is, this mean there is power going to the table.
• Does the handset light up and display correctly?
• If the Control Box has power and the handset appears to be working,
unplug both items and reconnect ensuring all wires are secure.
• Perform re-sync (see page 15 ).
• If the frame still does not adjust, a service technician needs to be called.
Issue: Only one leg moves
• Perform re-sync (see page 15 ).
• One leg may lower only 1", then stop.
• Continue to perform resets until both legs are at lowest position.
• If the frame still does not adjust, a service technician needs to be called.
Issue: Received frame without a control box
• A 3-Leg main frame (Box 1) was sent in error instead of a 2-Leg frame.
• Contact ergoCentric to have the correct frame box sent out.
Issue: Cords to handset are too short
• Request extension cords from ergoCentric.
Issue: Motor housing (where leg meets frame) is open
• Lightly inspect to ensure no internal damage exists.
• If there is no internal damage, clip the plastic cover down and use as is.
• If there are any internal damage issues, the leg will need to be replaced.
• If the product was opened and the motor housing is opened,
ignore the sticker message indicating warranty is void.
Issue: Control box is cracked/damaged
• Document the damage and request a new control box
from ergoCentric.

17upCentric®– UP-2LV Owner's Manual | Guide de l’utilisateur
Issue: Wires are damaged
• Document the damage and request new AC cable, handset,
or leg as required.
Issue: Handset and control box are not working
• Unplug everything from control box for 10 seconds, then plug back in.
• Perform re-sync (see page 15 ).
• If it lights up green, this means there is power going to the table.
If not, request a new control box.
• Does the handset light up and display correctly?
If not, request a new handset.
• Perform re-sync (see page 15 ).
• If the frame still does not adjust, a service technician needs to be called.
Issue: Legs are not moving together
• Have a service technician bring in a new control box
to test on the frame.
should have spare legs to test and replace the problem leg(s).
Issue: Frame is leaking lubricant from
the bottom of a leg
• The frame may have been over-lubricated and the extra lubrication
is now leaking out.
• This will not cause any mechanical problems with the frame
and it will continue to work properly.
Issue: Mid-section of leg does not adjust
with whole leg
• The leg will continue to work properly. May make a loud noise
while adjusting.
• If this is a persistent issue, a service technician can replace the leg.

18 upCentric®– UP-2LV Owner's Manual | Guide de l’utilisateur
Disposal guidance
upCentric®height adjustable tables may be disposed by dividing them
We recommend that the upCentric is disassembled as much as possible
before disposal. Main groups within sorting of waste: metal, plastic,
cable scrap, combustible material and collection for recoverable resources.
Do not dispose of electrical appliances as unsorted municipal waste;
use separate collection facilities.
Contact your local government for information regarding the collection
hazardous substances can leak into the groundwater and get into the
food chain, damaging your health and wellbeing.
Warranty
• 12 year warranty covers the frame structure and steel parts.
• 12 year warranty on high pressure laminate tabletops.
• 7 year warranty on motors, wires and all electronic components.
ergoCentric Seating Systems hereby warrants all of its tables and accessory
products against defects and functional failure of materials.
These warranties shall not apply to any products which must be replaced
because of normal wear and tear, negligence, abuse or accident, shipping
damage, or product use other than in accordance with written instructions
and warnings.
ergoCentric makes no warranty that any of its products are suitable for any
particular purpose and makes no other warranties, expressed or implied,
other than those set forth herein.
In no event shall ergoCentric be liable in either tort or contract for any loss
or direct, special, incidental, consequential or exemplary damages.
This warranty is based on the use during an eight hour work day.

19upCentric®– UP-2LV Owner's Manual | Guide de l’utilisateur
Warranty claims
ergoCentric will repair or replace any product or materials, covered by
this warranty, found to be defective or inferior within the warranted period.
This warranty includes the cost of labour and shipping. Claims are to be
made directly to ergoCentric or to the authorized representative from
whom the product was purchased. Product or materials, for which a claim
has been made, must be made available for inspection by an authorized
ergoCentric representative.
Limit of warranty
These warranties shall be valid only during the term of these warranties;
and while the products herein warranted are in the possession of the
original purchaser. The original purchaser shall mean the party which
or an authorized ergoCentric representative.
If you need assistance
Please contact ergoCentric:
• Phone: 1 866 GET ERGO (438-3746)
• Email: service@ergocentric.com
This manual suits for next models
2
Table of contents
Languages:
Other ErgoCentric Desktop manuals

Popular Desktop manuals by other brands

Lenovo
Lenovo 6072CC3 - Thinkcentre M57 2.33G2gb 80Gb Dvdrom... Hardware installation and replacement guide

Sony
Sony PCV-RS210 - Vaio Desktop Computer Specifications

HP
HP ProDesk 405 G2 Brochure & specs

Lenovo
Lenovo ThinkCentre M81 Ghidul utilizatorului

Asus
Asus Essentio CG8350 user manual

Lenovo
Lenovo ThinkCentre M58e Guías del usuario


