Ergofino DT301 User manual
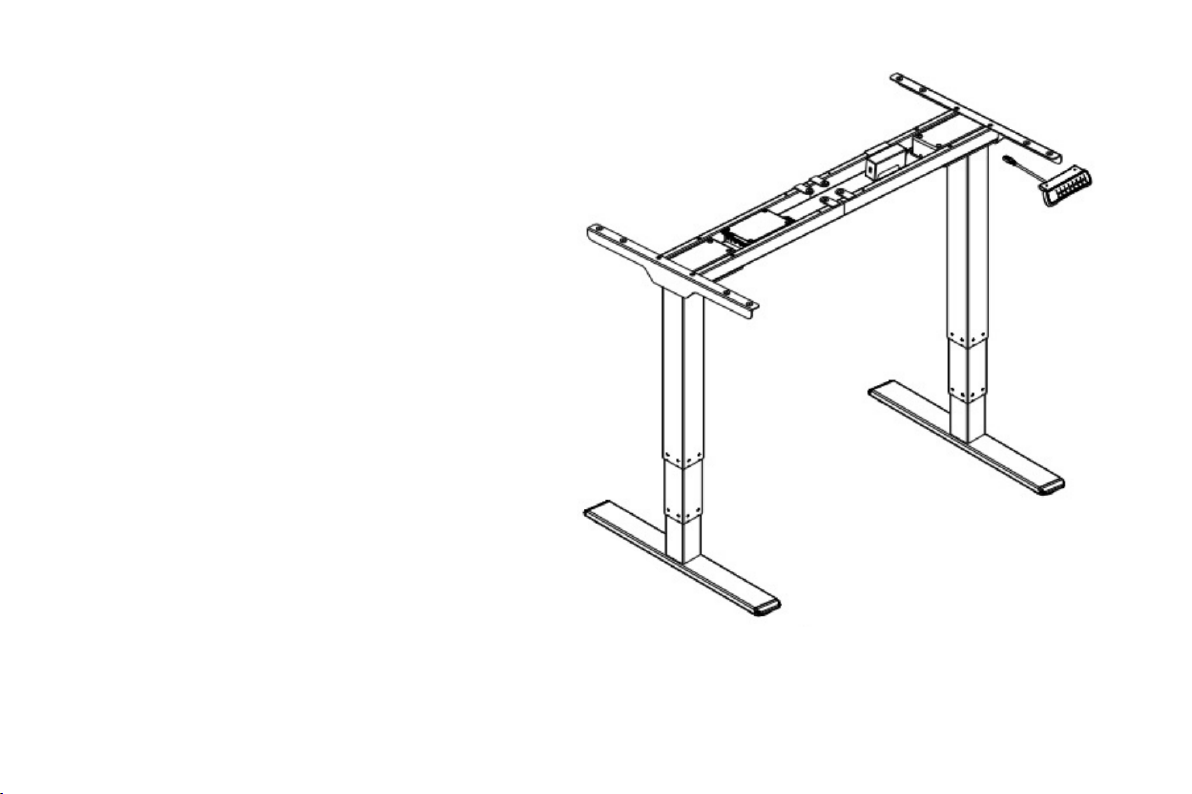
ELECTRIC
HEIGHT-ADJUSTABLE DESK
Assembly &
Installation Guide
Model: DT301-303

Preface
This electric height-adjustable standing desk consists of a heavy-duty steel
desk frame and a motorized height adjustment system. Please read and
completely understand this manual before assembly and use.
FAILURE TO COMPLY WITH OR OBSERVE ALL INSTRUCTIONS AND
WARNINGS REGARDING THE USE OF THIS PRODUCT MAY RESULT IN
SERIOUS PROPERTY DAMAGE OR PHYSICAL INJURY.
DANGER - To avoid the risk of electric shock, always unplug this
furnishing before cleaning, putting on or taking off parts.
Instruction safety and warnings:
1

Keep children away from electric height-adjustable desks, control units, and
keypads. There is a risk of injury and electric shock.
Close supervision is necessary when this furnishing is used by, or near
children, invalids, or the disabled.
Use this furnishing only for its intended use as described in these instructions.
Use attachments recommended by the manufacturer only.
Make sure the power socket/outlet is close to the furnishing in use and easily
accessible.
Never operate on this furnishing when the cord or plug is damaged, it is not
working properly, or it has been dropped into water.
Keep the cords away from heated surfaces.
Do not open any of the following components: legs, control box, or keypad.
There is a danger of getting electric shock.
WARNING - To avoid the risk of burns, fire, electric shock, or physical injury:
2

Do not insert anything into any seam or opening.
Keep all electrical components dry.
Do not operate this furnishing in an environment where aerosol (spray) products
are being used or oxygen is being administered.
Do not use outdoors. Inappropriate use of this product may cause property
damage or physical injury.
Check surroundings on all sides before use. Body parts and property can be
crushed if trapped in immobile obstacles and the desk's range of motion.
Ensure the length of power cords are accounted for when operating the desk.
Monitors, computers, speakers, anything with a cord that is not long enough for
the desk's range of motion could be pulled down or have its wires broken. Items
pulled off the desk may cause other items to fall.
Pinch Point: Keep hands and fingers clear.
Please provide this manual to users, installers, or support personnel operating
the product.
3

MAKE SURE NO OBSTACLES ARE IN THE DESK'S PATH AND ALL CORDS
ARE OF APPROPRIATE LENGTH FOR DESK TRAVEL. FAILURE TO
COMPLY WITH OR OBSERVE ALL ASSEMBLY, SAFETY, AND OPERATION
INSTRUCTIONS AND WARNINGS REGARDING THE USE OF THIS
PRODUCT MAY RESULT IN SERIOUS PROPERTY DAMAGE OR PHYSICAL
INJURY.
Use and Liability:
This height-adjustable desk has two electric motors and is designed for use in dry work areas
only. The desk height is adjustable so that it can be positioned at the most ergonomically
suitable height. These desks are designed only for the purposes included in this manual. They
should not be used in environments with high humidity or dampness. Any other use is at user's
risk. Do not move around, crawl, or lie under the desk frame. Do not sit or stand on the desk
frame. Children should never use the desk unless they are supervised by adults.
Liability: For damages caused from improper use or handling of the desk other than those
described in this manual, there is no warranty.
4
5
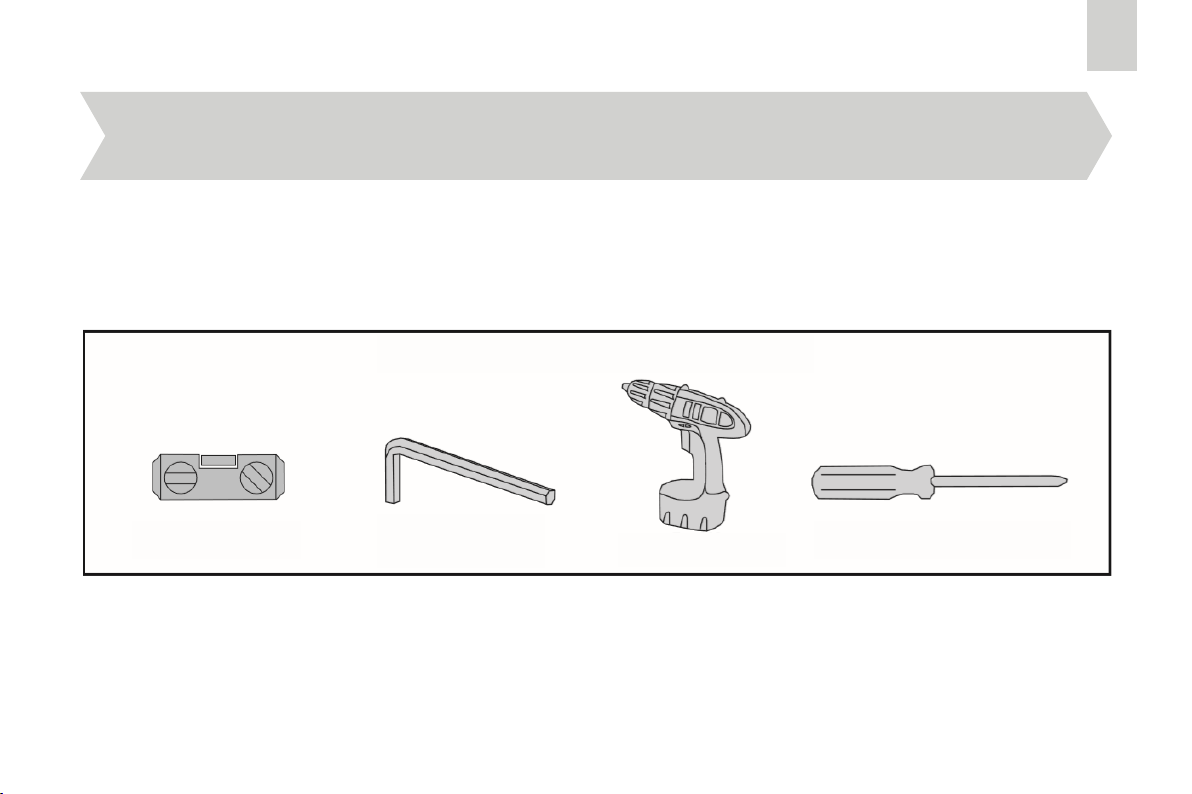
Preparation
Bubble Level Allen Wrench
(included) Drill Phillips Screwdriver
Tools Required
6
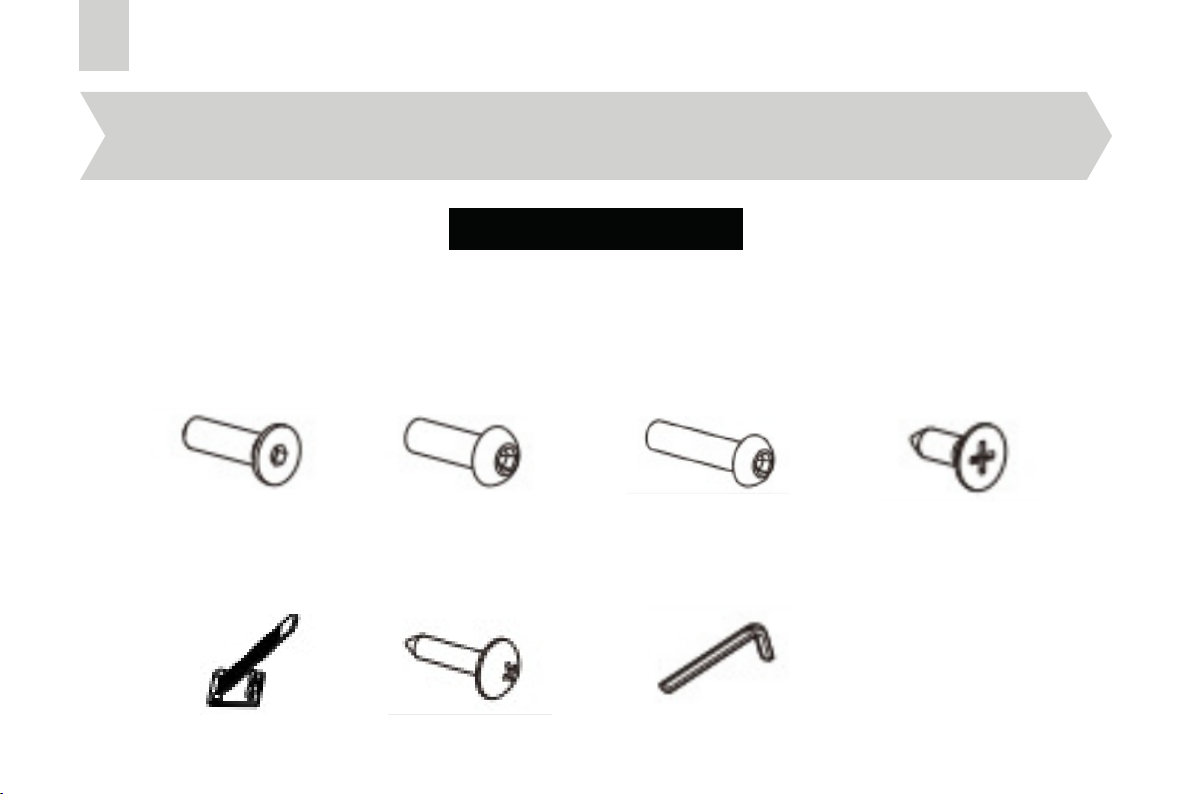
Checklist
M6*4
Accessory List
A B
M6*8
C
M6*8
D
St4.2*6
E F G
Cable tie*6 St4.2*16 Allen key *1
Attention:
The drawings below are for guidance only and they may differ slightly from the product and fittings received.
Please contact our customer service department if you have any questions.
7
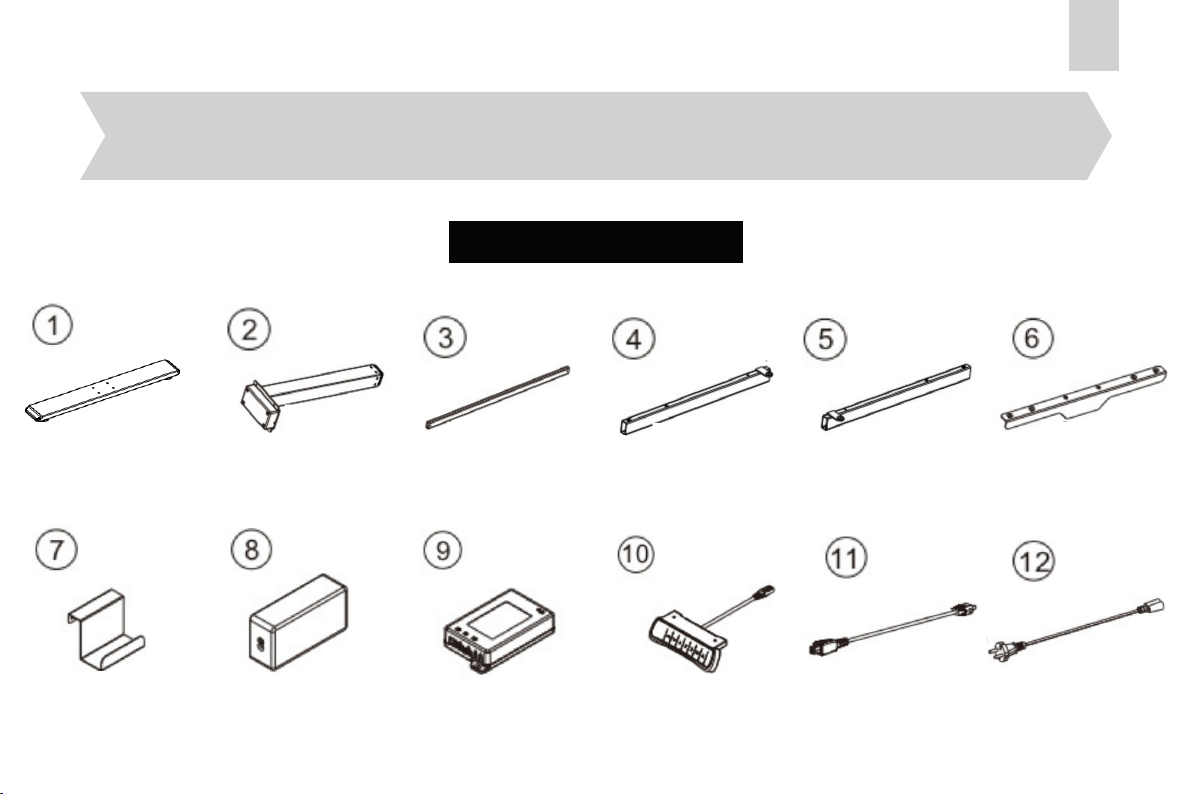
Checklist
Side Bracket*2
Adapter Arm*1
Feet*2 Connection
Rod*2
Left
Supporting
Beam*2
Part List
Lifting Column*2
Adapter*1 Control Box*1 Handset
(Option)*1 Adapter Cabel*1 Power Plug*1
Right
Supporting
Beam*2
8
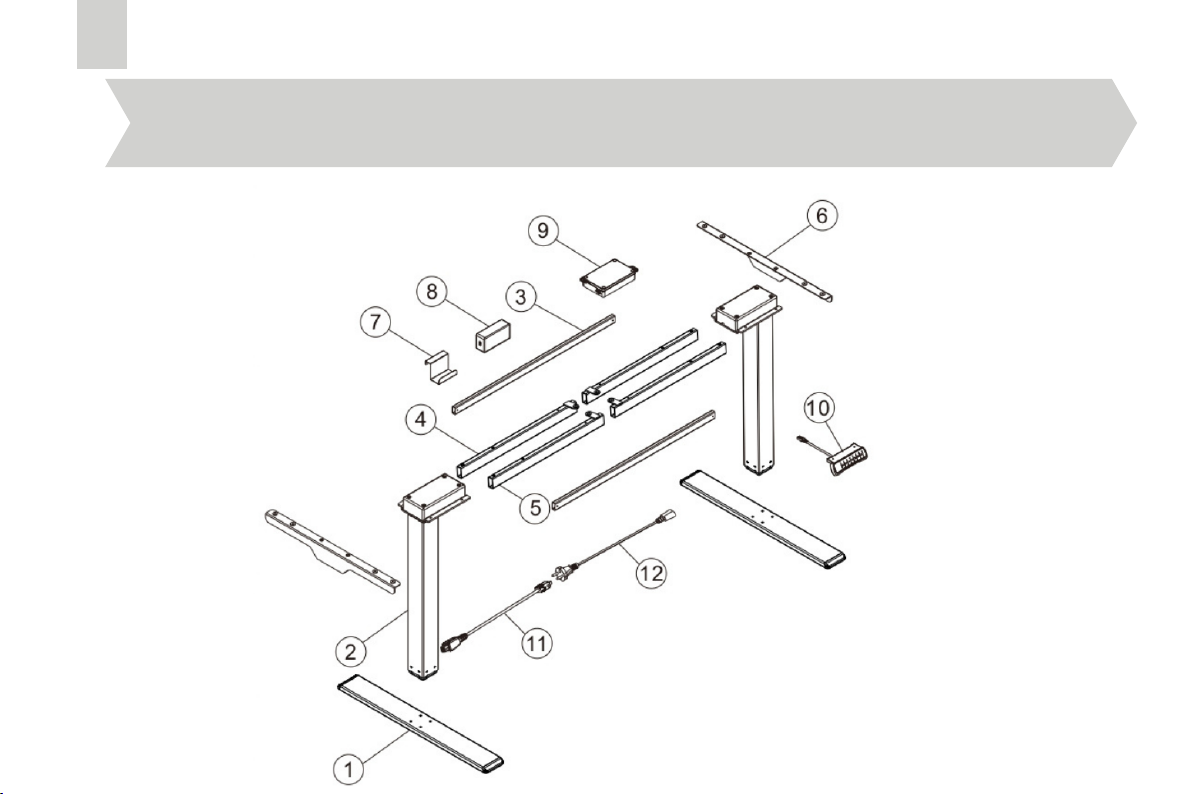
Installation instruction
9
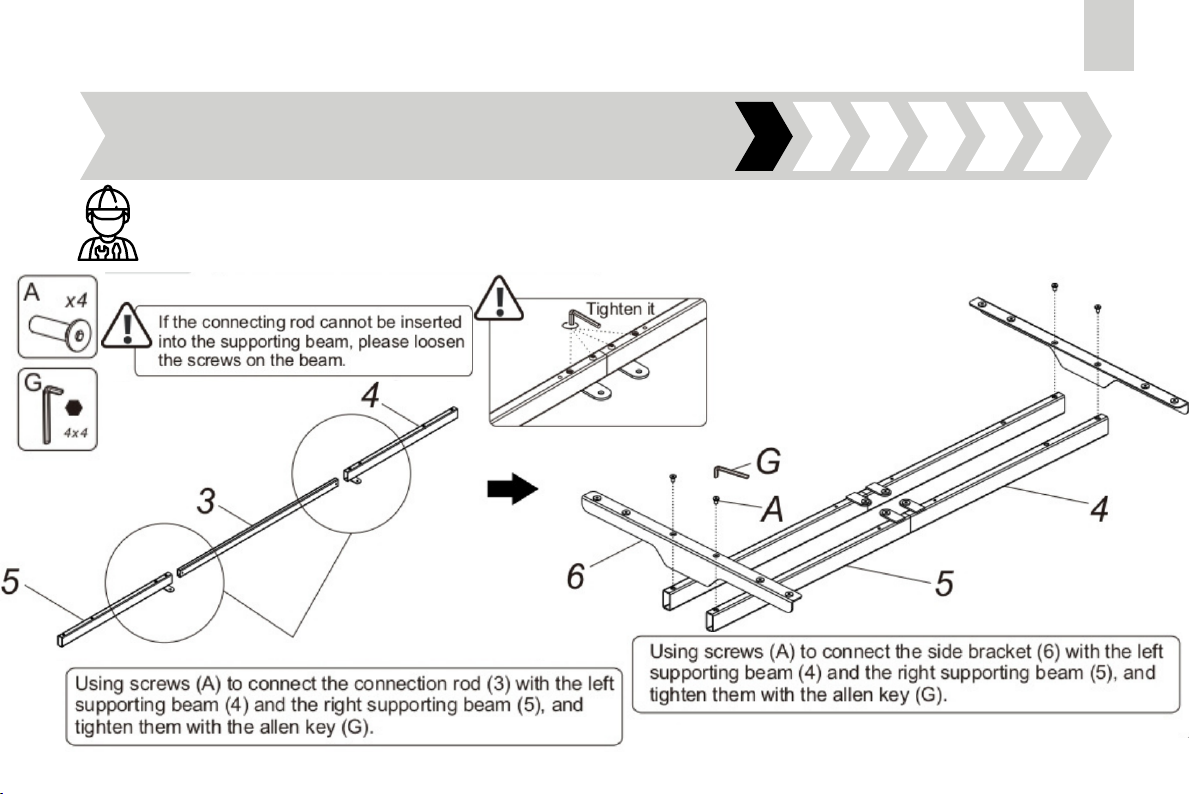
Assembly
Step 1: Install the supporting beam and the side bracket
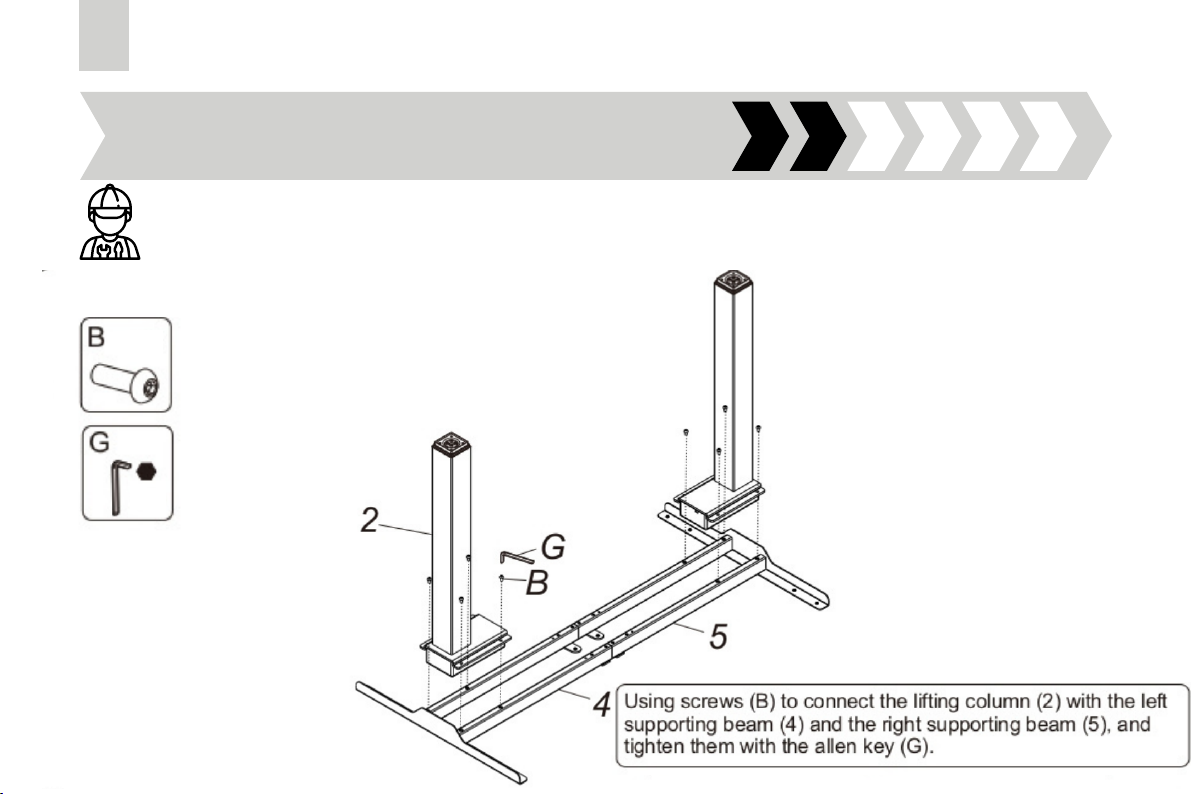
Assembly
Step 2: Install the lifting column
10
4 x 4
x 8
11
Assembly
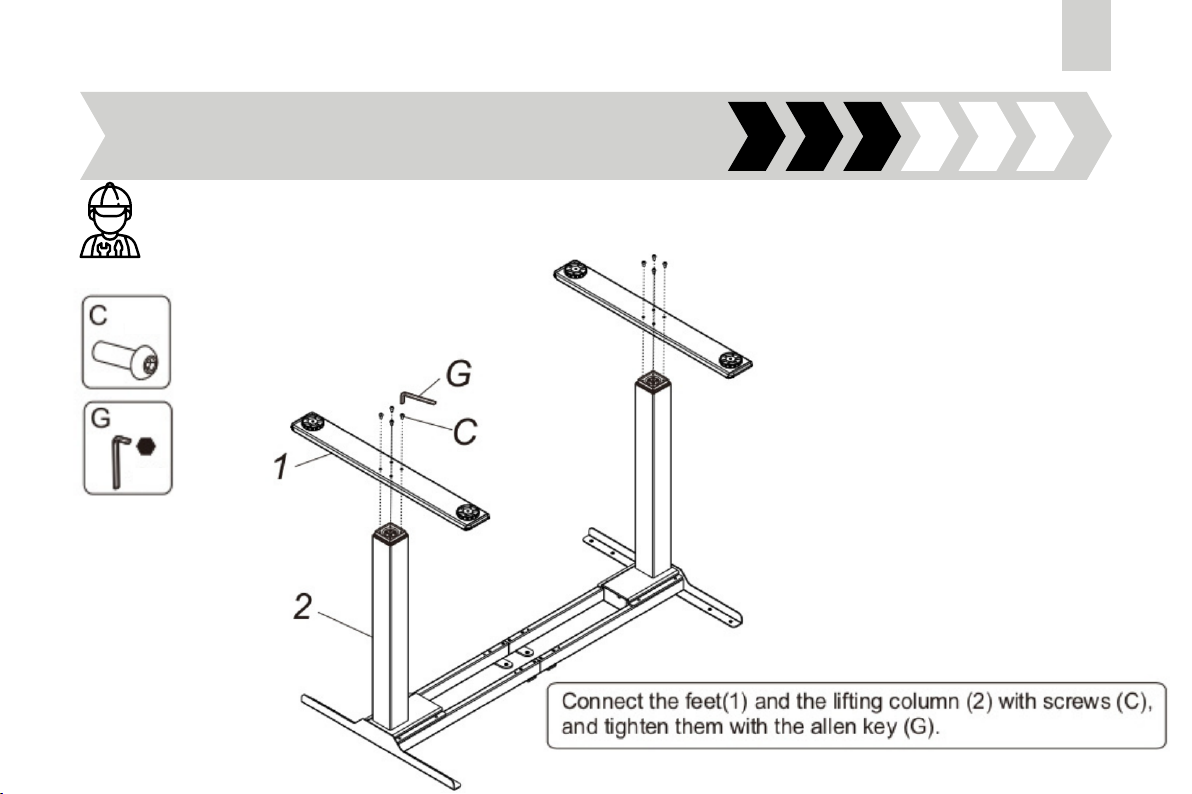
Step 3: Install the feet
4 x 4
x 8

Assembly
Step 4: Install the adapter arm
12
4 x 4
Adjust
Tighten
13
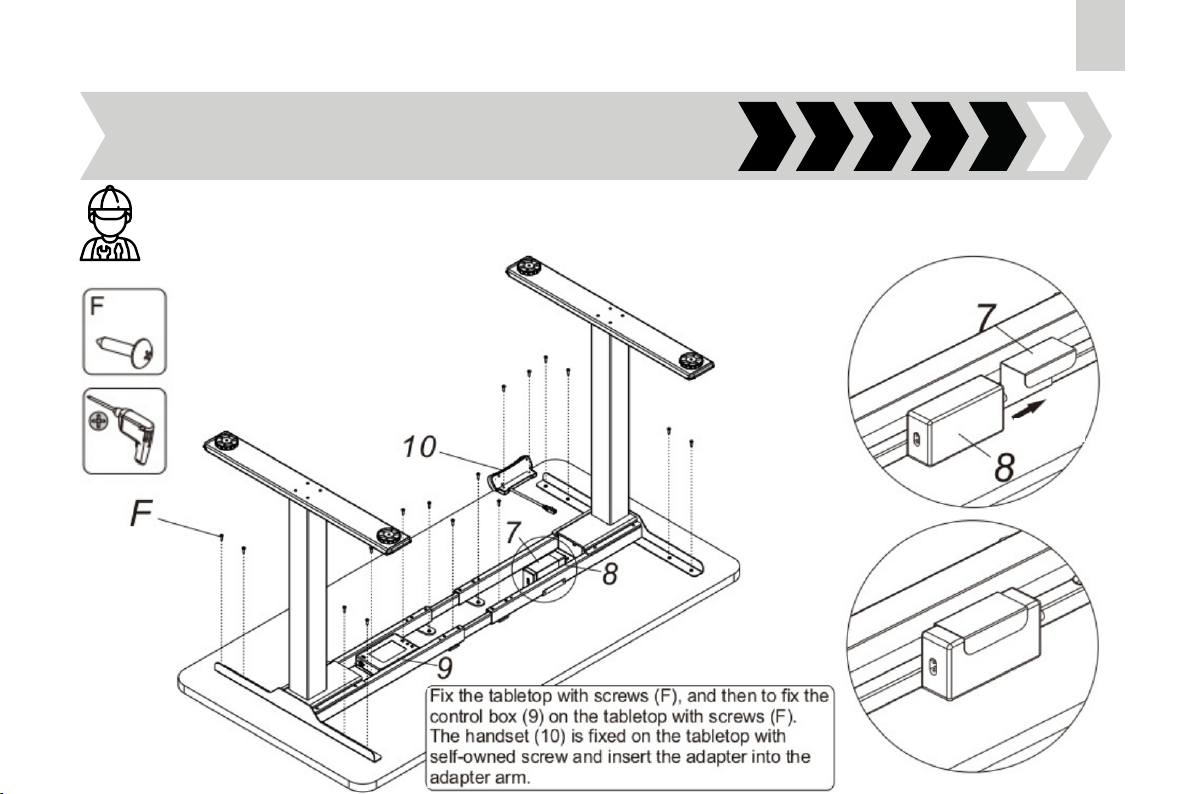
Assembly
Step 5: Install the tabletop, handset, control box and adapter
x 14
Insert
14
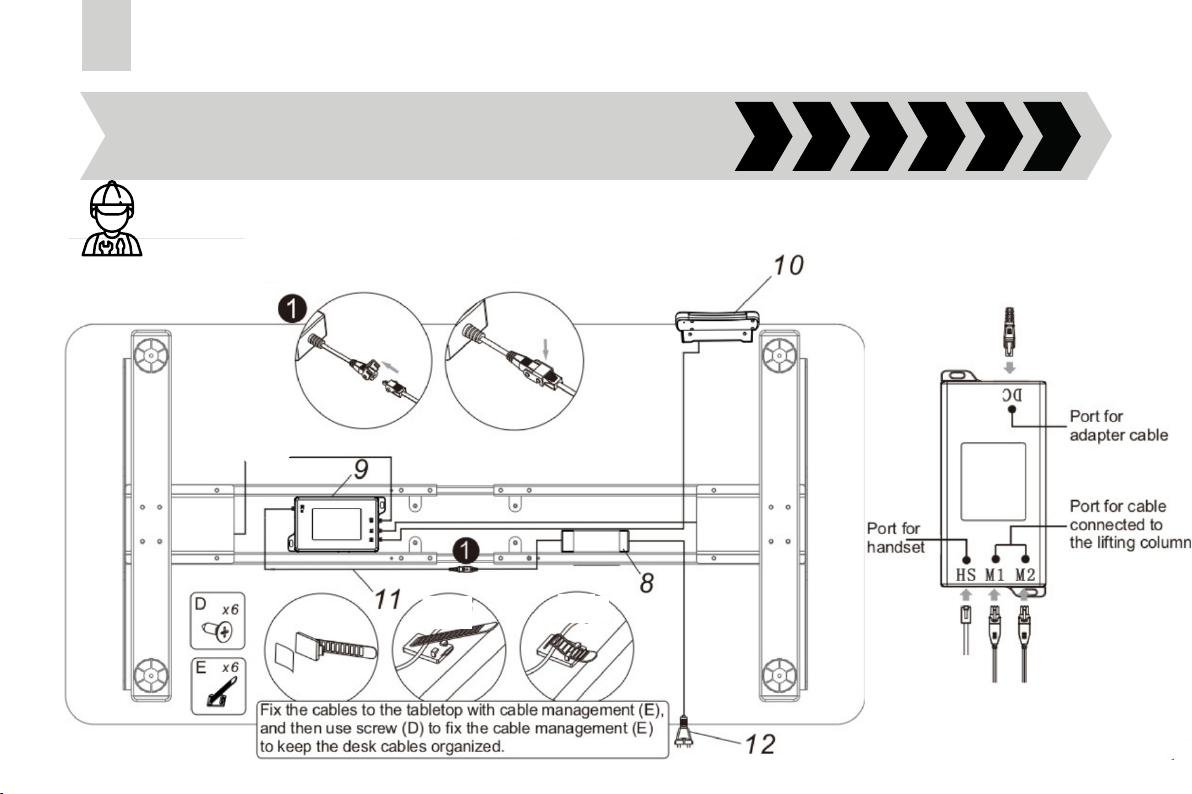
Assembly
Step 6: Connect cables to the control box
Tear off
Manage
cables
Fix
cables

15
Technical Data
Column Stage 3
Max. Weight Capacity 100kg
Height Range 620-1270mm (without tabletop)
Width Range 1100-1700mm

16
Common fault treatment
The following tips will help you detect and eliminate the common fault and error. If the fault you met is not listed below,
please contact with your supplier. Only the manufacturer and professionals are capable for investigating and correcting
those fault and error.
Fault phenomenon Method
No response while long pressing down arrow after
connected with a power supply
Check if all the cables be connected well
Contact your supplier or dealer
1.
2.
No response while pressing up arrow/down arrow after
connected with a power supply
Check if all the cables be connected well
Contact your supplier or dealer
1.
2.
Rising in a low speed Check if overloaded, max loading: 100kg
Contact your supplier or dealer
1.
2.
The motor not move as instructed Contact your supplier or dealer
Go down but not go up Reposition
Contact your supplier or dealer
1.
2.
Downward sliding Check if overloaded, max loading: 100kg
Contact your supplier or dealer
1.
2.
Frequently Reposition Check if overloaded, max loading: 100kg
Contact your supplier or dealer
1.
2.
Overwork
(Duty cycle: Max 2min on/ 18min OFF)
Restarter after suspend for 18mins while connecting with power
Contact your supplier or dealer
1.
2.
Not enough up&down height
Press ''M'' and ''3'' together for 3 seconds or more, after hearing
continuous beeping for twice, it will restore factory settings
Contact your supplier or dealer
1.
2.
17
Power supply: AC100V-240V, 50/60 Hz.
Service Environment: 0-40 ℃.
Unplug the power plug before cleaning, wipe the dust on surface with slight wet
dishcloth when cleaning, be careful not to let the drops into the internal parts, not
loose the connector.
The electric box contains electronic components, metals, plastics, wires etc., so
dispose of it in accordance with each country's environmental legislation, not the
general household waste.
Check carefully to ensure correct and complete assembly before using.
Be familiar with all functions and program settings of the product before first use.
Children are forbidden to play on the product because of unforeseen action when
playing, so any dangerous consequences caused by this improper action will not be
on manufacturers.
Slight noise caused by the V-ribbed belt or brake system due to structure will not
have any effect on the use of the equipment.
Corrosive or abrasive materials are forbidden to clean the equipment. Must ensure
that the cleaner used will not pollute the environment.
Attention
18
This appliance can be used by children aged from 8 years and above and persons with
reduced physical, sensory or mental capabilities or lack of experience and knowledge if
they have been giveb supervision or instruction concerning use of the appliance in a safe
way and understand the hazards involved. Children shall not play with the apploance.
Cleaning and user maintenance shall not be made by children without supervision.
If the supply cord is damaged, it must be replaced by the manufacturer, its service agent or
a similarly qualified person in order to avoid a hazard.
Please make sure there is no hazard sources in your operating environment, e.g., do not
litter the tools around. Always be careful to treat the packaging materials in order to avoid
any possible danger, e.g. plastic bag may lead to choking hazard to children.
Keep the original package of the equipment if necessary in case of the future use in
transportation.
This manual suits for next models
2
Table of contents
Other Ergofino Indoor Furnishing manuals

Popular Indoor Furnishing manuals by other brands

Regency
Regency LWMS3015 Assembly instructions

Furniture of America
Furniture of America CM7751C Assembly instructions

Safavieh Furniture
Safavieh Furniture Estella CNS5731 manual

PLACES OF STYLE
PLACES OF STYLE Ovalfuss Assembly instruction

Trasman
Trasman 1138 Bo1 Assembly manual

Costway
Costway JV10856 manual


